


If your electrical box is recessed more than 1/4 inch behind a noncombustible wall (like ceramic), or if it is recessed at all behind a combustible wall (like vinyl peel-and-stick or wood), the National Electrical Code requires a box extender. Spacers only push the device forward; extenders create a fire-safe tunnel that protects the wall cavity from electrical arcing.
You just finished applying a beautiful new backsplash. You go to screw the outlet cover plate back on, but the receptacle sinks backward into the wall. The plate wobbles, exposing a dark gap around the edges. It is tempting to grab longer screws, force the plate flush, and call it a day.
Do not reach for those longer screws just yet. This is a critical safety junction, not merely a cosmetic issue. The decision requires shifting your focus away from appearance and assessing a specific standard: the Outlet Setback Safety Threshold.
If the electrical box opening sits entirely behind your new finished wall, a simple screw replacement leaves combustible wall layers exposed to electrical arcing.
Use an outlet box extender when the front edge of the electrical box is set back too far behind the finished backsplash surface. This is critical where tile or other wall material leaves the receptacle unsupported or creates a gap around the box.
Spacers may help bring the outlet device forward, but they do not replace a code-appropriate box extension when the box opening itself is recessed. If wires are damaged, the box is loose, the GFCI will not seat correctly, or you are unsure about power safety, stop and call a licensed electrician.

Understanding how to manage this depth difference requires recognizing a few structural realities:
- Measure the Setback First: Always measure the box face relative to the new finished backsplash surface, not the old drywall. Taking this baseline correctly is the foundation of electrical code adherence.
- Avoid Screw Shortcuts: Do not rely on longer screws as your only fix, as this leaves the device mechanically unsupported. Unsupported devices flex every time a plug is inserted, causing micro-fractures in the copper wiring over time.
- Consult the Decision Framework: Choose between an extender, a spacer, or a professional electrician using a safety-first approach. Precision here prevents catastrophic fire hazards hidden entirely behind your walls.
When does a backsplash outlet need a box extender?
In our experience, homeowners frequently misjudge the purpose of an electrical box. It is not just a convenient hollow space to stuff wires into. An electrical box serves as a fire-containment chamber. This fundamental principle is critical; the box is engineered to choke off oxygen and contain sparks before they can ignite the surrounding structure.
If a loose wire sparks or a receptacle overheats, the metal or plastic box keeps that heat away from the wood studs and drywall paper. We assess this using the Outlet Setback Safety Threshold. This standard evaluates the distance between the electrical box's front edge and the finished backsplash plane.
This threshold aligns with NEC 314.20—the National Electrical Code mandate dictating that installations in walls constructed of combustible material must have boxes mounted flush with the finished surface.
For noncombustible surfaces like pure ceramic, the code allows a setback of up to 1/4 inch. However, if your backsplash introduces any combustible elements, the box must extend perfectly flush. When interpreting this code, understand that "combustible" applies to the wood paneling, drywall paper, and even many types of modern synthetic adhesives.
The Dangers of Inadequate Setback Adjustments
Many weekend remodelers assume a cover plate gap or a slightly wobbly receptacle is just a visual nuisance. Industry consensus dictates otherwise. A wobbly outlet is a primary safety signal.
When you push a plug into a loose receptacle, the internal wires flex. Over time, this constant bending weakens the copper, increasing resistance. High resistance generates intense heat, a leading catalyst for hidden wall fires. Data from the National Fire Protection Association (NFPA) consistently highlights electrical distribution equipment as a leading cause of home structure fires. Ignoring a wobbly outlet is essentially inviting an eventual failure point within your home's most sensitive infrastructure.
Handling Different Backsplash Materials
We frequently hear the misconception that thin, adhesive-backed upgrades do not warrant electrical adjustments. Even the thinnest materials alter the geometry of your wall cover. The wall profile is a delicate ecosystem where even a 1/16-inch variance can tilt a receptacle enough to cause binding against the cover plate.
- Traditional Ceramic or Porcelain: These materials are generally noncombustible, but their thickness (often 1/4 to 3/8 inch) easily pushes the wall surface past the allowable depth, requiring a rigid extender. You cannot stretch the outlet yoke to cover this gap safely.
- Peel-and-Stick Applications: These panels can still create a measurable offset. Even if they are thinner than ceramic tile, they often consist of combustible vinyl or plastics. This immediate classification as "combustible" immediately invokes the strict "flush to the wall" electrical code rule.
- Glass and Stone Veneers: These heavy materials not only add depth but require perfectly flat receptacle support to prevent the glass or stone edges from cracking when you tighten the cover plate. Uneven tension on the plate screw will almost certainly shatter glass mosaics.
Before inspecting your setback, safety protocols demand that you turn off the power at the breaker. Verify the power is off using a reliable non-contact voltage tester. Only then should you remove the wall plate and inspect the box depth without disturbing the wiring. Never assume a wall switch controls all the current running through a specific receptacle box. Shared neutrals and complex kitchen circuits mean live current can remain even if a plugged-in lamp turns off.
What should you do for peel-and-stick backsplash outlets?
Applying adhesive panels seems straightforward, but DIYers often stumble when reaching the outlet zones. We evaluate this scenario using the Thin-Material Risk Index. This index proves crucial because visual thinness often belies actual spatial impact when dealing with rigid hardware plates.
This index provides a quantitative baseline, combining an assessment of added thickness, combustibility, heat exposure, and device support quality. Thin peel-and-stick panels may not always trigger the need for a full box extender, but they frequently require spacers. The decision hinges on exactly how the new material meets the edge of the drywall cutout.
If the outlet feels loose after applying the thin material around the box, the installation fails the support quality metric. Furthermore, combustible plastic-faced products near electrical openings require precise trimming. You must never tuck adhesive vinyl into the electrical box interior. Doing so introduces highly flammable synthetic fuel directly into a designated fire-containment zone.
Assessing Backsplash Material Requirements
Different wall treatments interact with your electrical hardware in varied ways. We have benchmarked the common materials to clarify your next steps.
| Material Type | Added Thickness | Combustibility Risk | Required Action |
|---|---|---|---|
| Vinyl Peel-and-Stick | Very Thin (~1/16") | High | Often needs spacers; keep edges out of box. |
| Gel Resin Tile | Thin (~1/8") | High | Spacers required; check support stability. |
| PVC Panel | Moderate (~3/16") | Moderate | Spacers or thin extenders; trim neatly. |
| Metal Mosaic (Adhesive) | Moderate (~3/16") | Low | Spacers usually sufficient; careful of sharp edges. |
| Ceramic Peel-and-Stick | Thick (~1/4"+) | Low | Box extender heavily recommended. |
| Stone Veneer | Very Thick (~1/2") | Low | Full box extender strictly required. |
When assessing the long-term performance degradation of your wall covering, particularly concerning heat and moisture resistance near electrical fixtures, specific products function as the architectural standard. The materials you choose directly impact the safety threshold of the surrounding electrical components.
Material Spotlight: Enhancing Wall Resilience
Materials like Lemon Zest inherently neutralize these environmental threats. By offering excellent waterproof and heat-resistant properties, they yield an optimal configuration that simplifies the trimming process around complex outlet boxes. Lemon Zest Peel and Stick Tiles are the fastest, easiest way to bring your home decor vision to life. Built to last with exceptional durability, they remove the anxiety of material degradation near heat-producing kitchen appliances.
Explore Lemon Zest TilesSimilarly, utilizing premium materials recalibrates the baseline expectations for grout-free adhesion. Their self-adhesive nature prevents the uneven wall surfaces commonly caused by traditional mortar, which frequently lead to frustrating wall plate gaps.
Achieving Flush Wall Installations
Choosing Sakura Bloom tiles helps avoid mortar buildup that pushes cover plates out of alignment. Upgrade your home with the Sakura Bloom Peel and Stick Wall Tiles. These self-adhesive, grout-free tiles bring a fresh, modern look to any space while maintaining a tight, predictable profile that makes determining your electrical box setback incredibly straightforward.
View Sakura Bloom CollectionWorking with GFCI Receptacles
Ground Fault Circuit Interrupter (GFCI) outlets present a unique challenge. They are physically deeper than standard outlets. When you add a backsplash layer, a GFCI becomes incredibly unforgiving. The internal cavity of the electrical box is already severely restricted by the bulk of the GFCI unit.
If the box depth is already marginal, pushing a bulky GFCI back into a box packed with wire extensions can exceed safe box fill limits. When evaluating these crowded spaces, the foundational methodology requires a strict adherence to proper planning.
Pro Strategy: Master Your Grid First
The comprehensive framework detailed in our guide provides the standardized evaluation necessary to plan your sink zones and outlet cuts without critical failure. Don't risk ruining expensive tiles because of a poorly planned electrical cutout. Plan a peel-and-stick kitchen backsplash layout around counters, outlets, sink zones, edge finishes, and tile quantity before making the first cut.
Read the Full Layout Guide
Spacers vs. Box Extenders: Which solves the problem safely?
Understanding what part to buy at the hardware store saves you time and prevents hazardous mistakes. We separate these components using the Containment Versus Support Score. This metric measures whether a product simply pushes a device forward or actually extends the fire-rated walls of the electrical enclosure.
Think of an electrical box as a fireproof safe. If you build a new wall that is two inches thicker than the safe's door, you cannot just use long bolts to float the lock in the air. You need a steel tunnel to connect the safe to the new wall surface. Leaving an air gap between the old box and the new wall is an open invitation for a spark to find dry wallboard paper.
The Function of Box Extenders
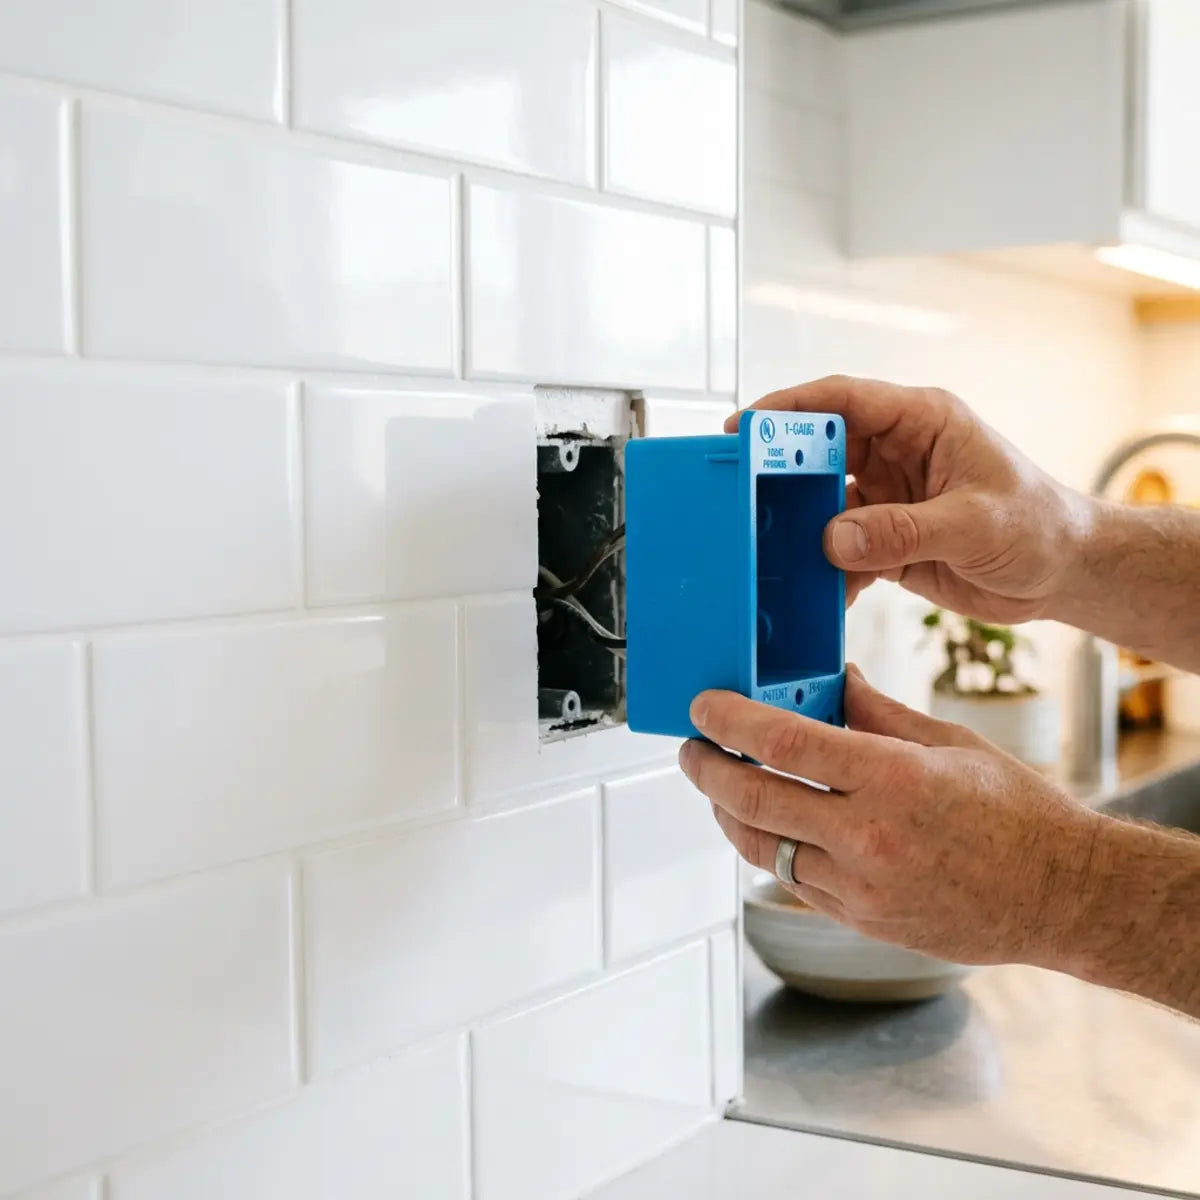
An outlet box extender acts as that protective tunnel. It is a rigid, typically rectangular sleeve made of non-conductive plastic or metal.
- Fire Containment: Extenders slide directly into the existing recessed box, bridging the gap between the old box edge and the new backsplash, creating a continuous protective barrier.
- Code Compliance: By creating an unbroken, fire-rated chamber, extenders fundamentally mitigate the risk of sparks contacting the exposed wall cavity. This aligns strictly with NEC 314.20.
- Structural Integrity: They provide a solid, flush surface for the device yoke to rest against, entirely eliminating receptacle wobble. The device sits firmly on the extender lip.
The Function of Outlet Spacers
Outlet spacers—often called caterpillars or shims—serve a completely different purpose. They are small, accordion-like plastic pieces or folding rubber tubes.
- Device Shimming: Spacers slide over the mounting screws to push the receptacle device forward. They only address the depth of the screw, not the walls of the box.
- No Fire Protection: They do not enclose the gap around the box. They offer zero arc-containment value. If a spark occurs, the wall cavity is fully exposed.
- Usage Limits: They are only acceptable if the existing box is already flush with the wall, but the device itself needs minor forward adjustment to sit perfectly flat against the cover plate.
Interactive Tool: Spacer or Extender?
Select your current situation to determine the correct hardware.
When correcting depth issues, industry consensus dictates addressing the root cause rather than patching the symptom. Shimming a dangerously recessed outlet is a massive liability. Learning to properly align your materials early prevents this panic altogether.
Preventing Installation Disasters
The practical troubleshooting detailed in our installation guide provides a quantitative baseline for recognizing when improper alignment requires a full box extension rather than a temporary shim. This article offers actionable, easy-to-follow repair methods for the five most common installation mistakes — supported by visual guidance, practical troubleshooting, and expert-backed prevention tips for long-lasting results.
Read the Troubleshooting GuideHow do you measure and correct electrical box setback?
Guessing the depth of your setback leads to frustrating trips back to the hardware store. Before purchasing materials, establish an accurate operational threshold. You must quantify the distance from the face of the old box to the plane of the new tile.
Take a clear, well-lit photo of your open electrical box (with power off) before heading to the store. Capture the wiring configuration and the shape of the existing box edges. Show this photo along with your precise measurements to the electrical associate to ensure you purchase an extender that matches your specific box geometry (single-gang, two-gang, or round).
A simple ruler or a tape measure works perfectly for this.
Safety Verification Checklist: Measuring Your Box
Check off these critical steps as you perform the measurement process to ensure zero risk of electric shock.
If that measurement exceeds 1/4 inch on a noncombustible wall, or if it is anything greater than zero on a combustible wall, an extender is strictly mandated. Do not attempt to calculate "close enough." The integrity of your home's wiring depends on rigid, mathematical thresholds.

Selecting the Right Components
Hardware stores carry several variations. You will see brand names like Arlington or Carlon. These are universally recognized standard parts. Ensure you check for compatibility regarding single-gang, two-gang, GFCI profiles, and Decora style openings.
Always look for a UL-Listed indicator on the packaging. UL—Underwriters Laboratories—tests these devices to ensure they empirically demonstrate safe fire containment under fault conditions. Do not use unrated, 3D-printed, or modified plastic bits. Altering an extender or using uncertified materials entirely negates its fire-rating value.
Integrating Under-Cabinet Lighting
Often, a backsplash upgrade coincides with adding under-cabinet lighting. This introduces additional wiring complexities near your freshly extended outlets. Navigating multiple cord paths over a new tile surface can ruin the aesthetic you just worked so hard to create.
Advanced Finish: Cable Management Integration
When factoring in visual aesthetics and wiring safety, proper concealment functions as the architectural standard. By empirically neutralizing the clutter of exposed cords, the methods in our specialized guide recalibrate the baseline expectations for a clean, integrated finish. Want a built-in look fast? Learn how to hide wires behind peel and stick backsplash safely, neatly, and with renter-friendly options.
Learn How to Hide LED WiresWhen should you stop and call a licensed electrician?
We heavily advocate for DIY empowerment, but electrical work carries unforgiving consequences. It is vital to operate within a clearly defined DIY Boundary Risk Score. This metric evaluates the complexity of the wiring against your practical experience level.
If you encounter scenarios that exceed basic mechanical adjustments, you must stop immediately. Changing a cover plate or sliding a plastic extender over existing, healthy wires is standard maintenance. Modifying the wiring infrastructure itself crosses the boundary into professional territory.
Identifying Critical Red Flags
We have observed several distinct situations where a homeowner should bypass DIY attempts and contact a licensed professional immediately. Do not attempt to patch or tape over these issues:
If the plastic coating on the wires flakes off, cracks, or exposes bare copper when you gently pull the outlet forward, the wire is degraded. Re-insulating old, brittle wiring is not a safe DIY task.
If your home was built in the late 1960s or 1970s and features silver-colored aluminum wires instead of copper, special handling is legally required. Mixing aluminum and copper without specific CO/ALR rated devices causes fires.
If you cannot physically fit a GFCI or a box extender into the space without crushing the wires forcefully, you have a "box fill" violation. An electrician must swap the box for a deeper volume model.
If the wires are so short that the receptacle cannot pull past the new backsplash plane, an electrician must safely splice extensions (pigtails) inside the box using properly rated wire nuts.
If turning power back on causes the breaker to trip instantly, or if the GFCI button will not reset after installing your extender, you have created a dead short. Do not force the breaker on. Shut it off and call an electrician to find the pinched wire behind your new tile.
Safety margins change depending on the zone of your kitchen. For instance, areas immediately behind cooking appliances require rigorous heat-rating considerations. The extreme temperatures generated by heavy cooking directly affect both the tile adhesive and the electrical wiring running through the wall cavity behind it.
Safety Protocol: Open Flame Proximity
In evaluating these high-temperature zones, the foundational methodology requires strict adherence to appliance clearance codes. The comprehensive framework detailed in our specific hazard guide provides the quantitative baseline necessary to implement your wall design safely near open flames. Confused about safe backsplash distance behind gas stoves? Learn the exact code-compliant spacing for U.S. and Canada homeowners. Stay safe and stylish while protecting your electrical layout.
Read the Stove Distance GuidelinesFinalizing the Edge Transitions
Once the electrical boxes are safely extended and the receptacles are firmly supported, attention turns to the visual transitions. The way your backsplash meets the wall, the window frames, and the electrical plates dictates the overall quality of the space.
A common pain point involves finishing the exposed sides of peel-and-stick tiles where they terminate. If your electrical box sits near a window return, achieving a clean edge is paramount for both safety and aesthetics. Water intrusion from a sink window into a poorly sealed tile edge can eventually reach the electrical box area.
Perfecting Complex Tile Cuts
When evaluating these edge transitions, maintaining continuous adhesion functions as the standard. The tested methods in our specialized repair guide provide the standardized evaluation necessary to secure clean, renter-safe results. Tested verdict: learn the best peel and stick tile window return method for clean edges, strong adhesion, and durable installations that won't peel away near tricky outlet corners.
View Window Return FixesSimilarly, choosing the right method to seal the perimeter ensures longevity.
Sealing and Trimming for Longevity
For an in-depth comparison of edge treatments, our dedicated guide yields an optimal configuration for hiding exposed seams and creating intentional corner lines. The border around your newly secured electrical plates should look flawless. Compare peel-and-stick tile edge finishes so exposed sides, counter lines, corners, and seams look intentional and remain waterproof for years.
Compare Edge Finish OptionsFinal Thoughts
Measure the finished-surface setback first, then definitively choose an extender, a spacer, or a licensed electrician based on structural safety rather than mere appearance.
We cannot stress enough that forcing longer screws through a wobbly receptacle is never the appropriate fix. A safe kitchen requires rigidly supported devices and properly contained electrical boxes. Taking shortcuts behind the walls invites catastrophic failures that could be prevented with a simple, three-dollar piece of certified plastic.
We encourage you to compare UL-listed extender options at your local hardware store to ensure your beautiful new backsplash remains entirely code-compliant. Do the job once, do it safely, and enjoy your stunning, fully functional upgraded space.
Frequently Asked Questions
Can I stack multiple outlet spacers instead of using an extender?
No. Stacking multiple spacers pushes the device forward but leaves the sides of the electrical box completely open. This violates the NEC requirement for fire containment within the wall cavity. If the gap is larger than a minor shim adjustment, a rigid, UL-listed box extender is strictly required.
Do I need to turn off the main breaker just to measure the box depth?
Yes. Safety protocols mandate cutting the power before inserting any tools, rulers, or measuring tapes near an open electrical box. Even if you are just measuring the edge, accidental contact with a live terminal can cause severe injury. Always use a non-contact voltage tester first.
Why does my GFCI outlet stick out further than a regular outlet?
GFCI (Ground Fault Circuit Interrupter) receptacles house complex internal circuitry designed to cut power rapidly during a fault. This physical bulk makes them significantly deeper than standard outlets. They require more careful wire management and precise box extender sizing to fit correctly without crushing the internal wiring.
Will a box extender fix a loose electrical box?
No. An extender only bridges the gap between the box and the new wall surface. If the original electrical box is physically loose or detached from the wooden wall stud, an extender will not secure it. You must secure the main box to the framing first, often requiring an electrician's intervention.
Kommentar hinterlassen
Diese Website ist durch hCaptcha geschützt und es gelten die allgemeinen Geschäftsbedingungen und Datenschutzbestimmungen von hCaptcha.