





















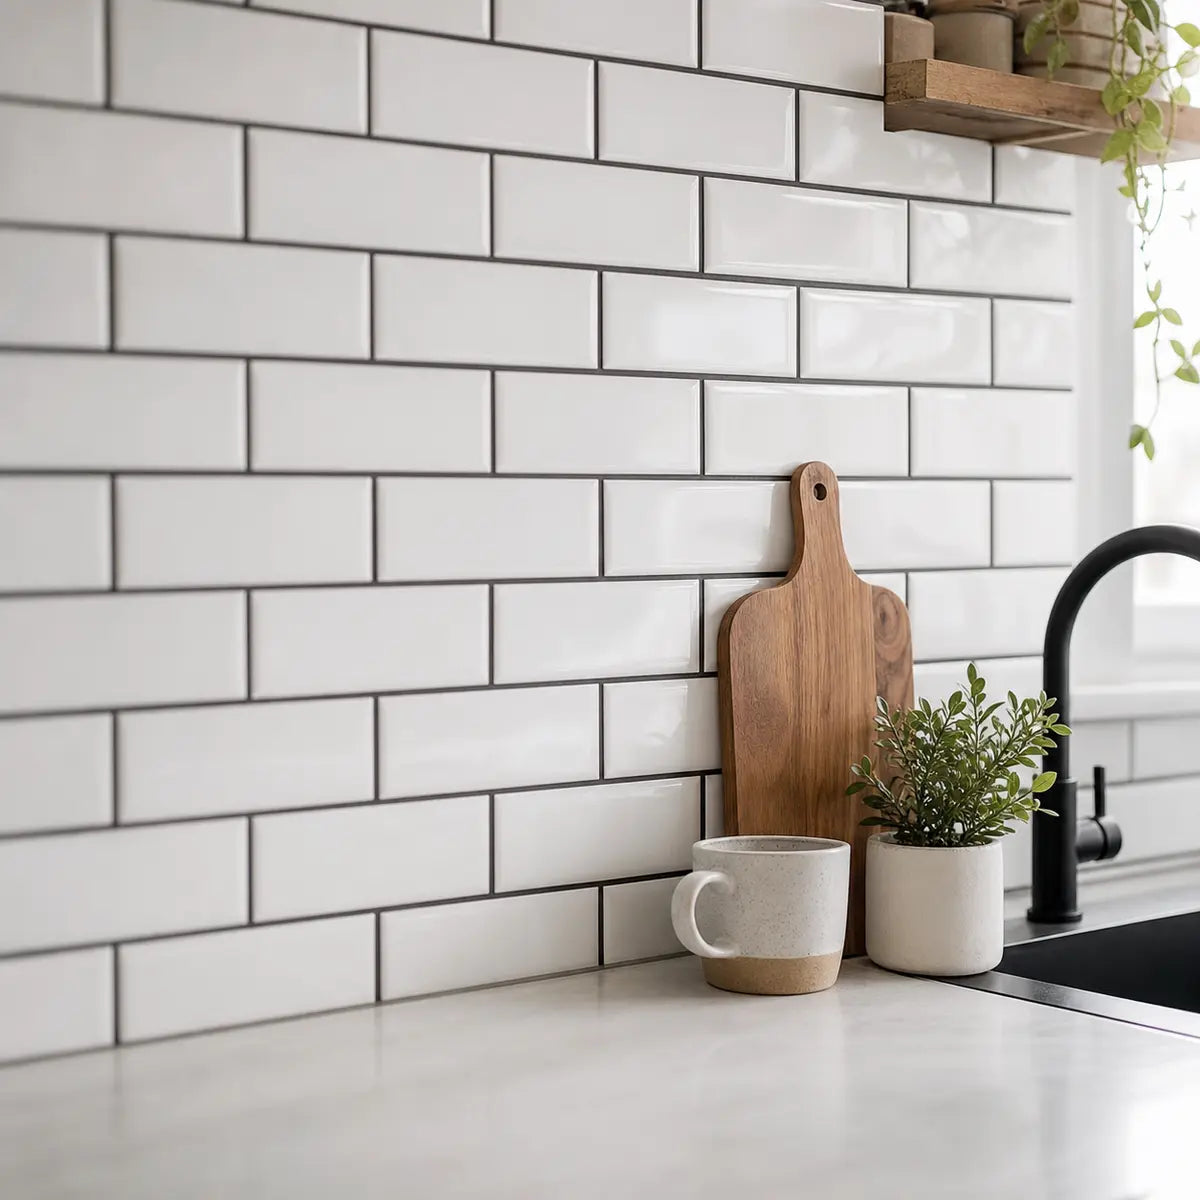
Design guide · Small walls · Renter-friendly upgrades
Peel-and-stick subway tile can look polished in a small kitchen, coffee bar, laundry nook, or rental apartment when you judge it by more than price. The strongest choice balances visual realism, room scale, surface compatibility, removability, heat and moisture limits, and the amount of cutting you can handle.
That is the standard we use here: Realistic Refresh Value, or RRV. It is an editorial decision framework, not a scientific score. It asks a practical question: Will this idea look intentional on your wall, and will it suit the conditions of your room?
For most small spaces, the safest starting point is a light subway-style tile with a restrained grout look, a layout that responds to the wall’s proportions, and a product whose installation limits match the location. Horizontal running bond usually feels familiar and forgiving. Vertical placement can create a taller visual rhythm, while herringbone works best as a focused accent rather than a full-wall default.
Before buying, verify three things:
- The wall is smooth, clean, dry, and compatible with the specific product.
- The tile is approved for the heat and moisture exposure in that location.
- The removal language is conditional, especially if you rent.
The goal is not to make an adhesive tile pretend to be a high-end ceramic installation. The goal is to choose a finish, pattern, and stopping point that make the upgrade feel deliberate.
What makes peel-and-stick subway tile look realistic?
The most realistic peel-and-stick subway tile ideas get five details right: scale, surface texture, grout definition, alignment, and stopping points. A low price matters less than whether those details work together.
Real tile has visual weight. It catches light at the edges, creates small shadows, and follows a consistent pattern. Peel-and-stick products vary widely in how convincingly they reproduce those qualities. Some are thin, flat films with printed grout lines. Others use a raised or textured surface. That does not automatically make a product realistic, but it can give the wall more depth when the lighting is favorable.
The best visual results usually come from:
- A tile proportion that suits the wall instead of creating tiny leftover strips.
- A grout look with enough definition to show the pattern but not so much contrast that every seam becomes the first thing you see.
- Straight reference lines and carefully aligned courses.
- A clean transition at cabinets, counters, corners, and open edges.
- A planned end point rather than stopping randomly halfway across a wall.

A useful rule from our experience is to spend more planning time on the first row than on the last row. If the first row follows a crooked counter or shelf, every later row inherits the error. Start from the most visible and level reference point, then hide partial cuts under cabinets, in corners, or at less noticeable edges.
The installation guide from Art3d’s peel-and-stick tile instructions recommends laying out the project first, establishing vertical and horizontal reference lines, test-fitting cut pieces, and applying even pressure after placement. Those steps sound basic, but they solve the most common visual problem: a pattern that gradually drifts out of level.
Existing tile can work as a substrate in some cases, but it is not automatically safe to cover. Smart Tiles says its checked product family can go over smooth glass or ceramic backsplash tile, while warning that deep or wide grout lines may affect the finished appearance. The manufacturer recommends testing one or two tiles before committing to the whole wall. That is good practice for any brand because old grout lines can telegraph through a thin overlay.
For a deeper planning pass, use this kitchen backsplash layout guide before ordering. It focuses on focal zones, outlets, open edges, heat areas, quantity, and pattern direction.
Which peel-and-stick subway tile ideas brighten a small kitchen?
The best peel-and-stick subway tile for a dark or compact kitchen is usually a light finish with moderate visual contrast and enough texture to prevent the wall from looking flat. White, warm white, and pale marble-look options can reflect available light, but the result depends on the room’s lighting, cabinet color, counter material, and tile finish.
Glossy white is often the first choice for a small kitchen because it catches more highlights than a fully matte surface. It can make a narrow backsplash feel cleaner and more reflective, particularly under under-cabinet lighting. The tradeoff is that glossy surfaces can reveal smudges, uneven walls, and installation inconsistencies more readily.
Matte white is quieter. It works well when the cabinets, counters, or hardware already provide visual interest. It tends to soften glare and can make a rental kitchen feel less like a temporary renovation project. If the wall is highly visible from the living room, matte or lightly textured white may be easier to live with than an intensely shiny finish.
Marble-look subway tile adds movement without requiring a strong grout contrast. Choose a restrained pattern for a small wall. Heavy veining can compete with open shelving, framed art, appliances, or a busy countertop.
The evidence here needs careful framing. A 2019 peer-reviewed study of four perceptual experiments found that denser stripe patterns made stereoscopically presented interior spaces appear wider and higher than lower-density patterns or plain walls. The study found only a weak effect from orientation, and it tested stripe patterns rather than tile, grout, gloss, or real kitchens. You can read the bounded finding in the PubMed record for “Wall patterns influence the perception of interior space”. That supports using pattern density thoughtfully, but it does not prove that every vertical tile layout makes a room taller or that glossy white tile will make a kitchen larger.
For a small kitchen, our practical ranking is:
- Light tile with low-to-medium grout contrast.
- Glossy white when the wall is smooth and the lighting is limited.
- Matte white when cabinets, counters, or hardware already carry the design.
- Subtle marble-look tile when you want interest without dark seams.
- High-contrast black grout only when the room has enough visual breathing space.
Browse small kitchen decor ideas with renter-friendly upgrades for ways to pair a backsplash with lighting, storage, and wall color. Tile rarely solves a cramped kitchen by itself. The strongest refreshes coordinate the backsplash with the rest of the wall.

Is horizontal or vertical subway tile better for a small kitchen?
Choose horizontal subway tile when the wall feels narrow or you want the most familiar, forgiving installation. Choose vertical subway tile when you want a taller visual rhythm, have a short backsplash run, or need a more contemporary accent.
A horizontal running-bond pattern places the long dimension of the tile across the wall. It works especially well in galley kitchens because it follows the direction of the counters and cabinets. The repeated horizontal lines can make a narrow run feel visually connected from one end to the other.
Vertical subway tile rotates that rhythm. It can draw attention upward, which is useful beneath open shelves, beside a tall pantry cabinet, or on a narrow wall between a counter and a ceiling. It also creates a less expected look without requiring a complicated geometric pattern.
Still, do not treat direction as a guaranteed optical fix. The perceptual research cited above found that orientation had a weak effect in its test conditions, while pattern density mattered more. In a real kitchen, cabinet lines, lighting, wall height, grout contrast, and tile proportions all influence what you notice first.
Use this quick decision guide:
| Wall problem | Better starting point | Why |
|---|---|---|
| Narrow galley kitchen | Horizontal running bond | Follows the counter line and keeps the pattern calm |
| Short wall beneath open shelves | Vertical layout | Gives the wall a taller, more directional rhythm |
| Small coffee bar | Vertical or stacked layout | Creates a defined feature behind a compact station |
| Wide blank accent wall | Horizontal running bond | Prevents the wall from feeling overly busy |
| Small focal area | Herringbone | Adds movement without covering every surface |
| Uneven beginner installation confidence | Horizontal running bond | Easier to align and cut than angled patterns |
If you choose vertical tile, dry-lay several rows first. Check how the pattern meets the counter, shelves, outlets, and top edge. A vertical layout can look excellent in a small area, but uneven spacing becomes visible quickly because the eye follows the upright seams.
Our ranking: eight peel-and-stick subway tile ideas by Realistic Refresh Value
The rankings below are design judgments based on visual control, scale fit, installation difficulty, maintenance, renter risk, and how easily the idea can be adapted to a small wall. They are not independent product-performance tests.

Soft white horizontal running bond for a small kitchen backsplash
Best for: First-time DIYers, apartment kitchens, galley kitchens, and broad backsplash runs.
This is the strongest all-around option because it solves several problems at once. A light color keeps the wall visually open, the horizontal direction supports the room’s existing counter lines, and the running-bond pattern feels recognizable without looking overworked.
Choose this idea if you want a low-risk refresh that blends with stainless steel, wood, white cabinets, black hardware, or painted lower cabinets. A warm white can connect better with cream cabinets and natural wood. A cooler white can suit gray counters and stainless appliances.
Keep the grout look restrained. If the seams are too faint, the product may read as a printed wall covering. If they are too dark, the pattern may dominate a small kitchen. Before buying a full quantity, compare the sample beside your counter, cabinet door, and wall color.
Glossy white subway tile behind the sink and prep area
Best for: Kitchens that need a brighter-looking focal zone without a full backsplash installation.
A partial backsplash can deliver a finished look while reducing material, cutting, and visual weight. Concentrate the tile behind the sink, between upper cabinets, or along the most visible prep area. Use a clean vertical edge, cabinet edge, or shelf as the stopping point.
Glossy white is a good fit when the wall receives under-cabinet lighting or daylight. It gives the surface small highlights that can make the backsplash feel more active than painted drywall.
This idea works particularly well for renters who do not want to cover an entire kitchen. It also limits the number of difficult cuts. The tradeoff is that a partial installation must look intentional. Do not end the tile in the middle of an uninterrupted wall unless a shelf, cabinet, or change in depth gives the edge a reason to stop.
Vertical white subway tile for a narrow wall or coffee bar
Best for: Coffee bars, beverage stations, narrow kitchen returns, and short accent walls.
A coffee bar often has a small footprint but deserves a distinct visual identity. Vertical peel-and-stick subway tile can make the area feel like a planned station rather than a collection of appliances on a leftover counter.
Use this layout behind a coffee maker, floating shelf, framed menu, or wall-mounted mug rail. Keep the surrounding accessories simple so the tile remains the background.
Vertical tile also helps when the wall is taller than it is wide. It directs the eye upward without requiring dark color or a busy pattern. The effect is subtle, so pair it with a clear stopping point and lighting that reaches the wall.
Our caution: do not force vertical tile across a long galley kitchen simply because it is trending. It can make the installation more demanding and may fight the horizontal lines of the room.
Warm marble-look subway tile for a pantry or laundry nook
Best for: Small utility walls that need warmth, texture, or separation from adjacent painted surfaces.
A pantry wall or laundry nook often benefits from a little more pattern than a main kitchen backsplash. These are areas where a marble-look subway tile can add visual interest without competing with a large room full of cabinetry.
Choose a warm, low-contrast marble pattern for a pantry with wood shelving, brass hardware, or cream paint. In a laundry nook, a soft gray or pale stone look can connect with white appliances while making the wall feel finished.
Use marble-look tile instead of paint when the wall is likely to collect splashes, scuffs, or visible wear and the product is rated for that environment. Use paint when the wall is textured, damp, or difficult to prepare. Peel-and-stick tile is not a universal substitute for a moisture barrier or waterproof wall finish.
White tile with a dark grout look for a powder room or small focal wall
Best for: Powder rooms, vanity backsplashes, and accent areas where you want graphic definition.
White peel-and-stick tile with black or dark grout creates a strong pattern. It can look crisp and architectural, especially with black fixtures, a dark mirror frame, or natural wood.
The key is proportion. On a tiny wall, high contrast can make every seam prominent. That may be exactly what you want behind a pedestal sink or vanity, but it can overwhelm a small kitchen with several appliances, shelves, and cabinet lines.
There is no independent evidence in the supplied research showing that dark grout looks more realistic than low-contrast grout. Treat it as a style decision, not a realism guarantee. Order a sample and view it from the doorway, where the whole wall will be seen, rather than judging it only from a close-up.
Herringbone subway tile as a controlled accent
Best for: A small coffee bar, range hood focal area, vanity wall, or narrow section between cabinets.
Herringbone adds movement and makes a small area feel more custom. It also requires more layout discipline. The Art3d guide documents herringbone as an installation option and shows a 45-degree setup, but it does not compare error rates, labor, or waste against straight patterns.
Use herringbone where the wall is small enough to manage and visible enough to justify the extra work. A full backsplash in a large kitchen can require many angled cuts around outlets, corners, cabinets, and open edges.
For a beginner, start with a contained rectangle. Establish the centerline, dry-fit the first few pieces, and confirm that the pattern terminates cleanly on both sides. A herringbone pattern that begins off-center or ends with awkward slivers will look less realistic than a simple running bond installed accurately.
Matte white subway tile for a renter-friendly apartment kitchen
Best for: Renters who want a calm, low-commitment visual update.
Matte white is a strong choice when you want the tile to support the room rather than become its main feature. It can soften dated counters, brighten dark cabinets, and create a cleaner background for removable shelves or artwork.
Renter suitability depends on more than the word “removable.” Smart Tiles says removal may cause little or no damage depending on the original surface, while Tic Tac Tiles warns that paint or wallpaper may come off with the adhesive backing. There is no independent damage-rate dataset establishing that any peel-and-stick tile is deposit-safe.
Test a hidden area first. Photograph the wall before installation. Keep the product instructions and your lease requirements together. When removal is required, work slowly and follow the manufacturer’s method rather than pulling quickly at a sharp angle.
See the store’s usage guidance for kitchen, bathroom, renter, and accent-wall applications before choosing a location.
Textured or beveled subway tile on a small statement wall
Best for: A short wall where shadow, depth, and tactile detail matter more than a seamless full-backsplash effect.
A beveled or raised subway tile can produce stronger highlights and shadows than a flat printed pattern. It may feel more tile-like under side lighting, especially on a coffee bar or powder-room wall.
The risk is scale. Strong bevels create more visual activity, and pronounced texture can expose poor surface preparation. They also need careful cleaning because raised edges can hold dust or residue.
Use this idea when you have a smooth wall, a defined stopping point, and enough space for the pattern to be appreciated. For a long, cramped backsplash, a flatter and quieter surface usually has a higher RRV.
Is peel-and-stick subway tile good for kitchens?
Yes, peel-and-stick subway tile can work well for a kitchen backsplash when the product is rated for the specific surface, moisture exposure, and heat conditions. It is best for decorative wall areas, not as a blanket replacement for every ceramic backsplash or heat shield.
The wall must be smooth, dry, clean, and free from grease. Smart Tiles lists smooth painted drywall, smooth ceramic tile, acrylic wall panels, wall linoleum, mirror, and wallpaper among the surfaces supported for its checked product family. It lists textured, porous, uneven, unpainted drywall, brick, stone, floors, countertops, ceilings, and shower interiors as unsuitable or restricted. Fresh paint may need to cure for 21 days under that manufacturer’s guidance.
Product language also matters. “Water resistant” does not mean waterproof. “Heat resistant” does not mean fireproof. A product can tolerate humidity and occasional splashes while still being unsuitable for direct water exposure or open flame.
For a broader installation roadmap, read the beginner guide to installing peel-and-stick subway tiles. It covers preparation, cutting, alignment, cleaning, troubleshooting, and removal.
Can peel-and-stick subway tile go behind a stove or sink?
It may be possible behind a sink or stove, but the answer depends on the product, appliance, surface temperature, ventilation, and installation instructions. Never assume that a peel-and-stick tile is automatically suitable behind every cooking appliance.
For one Smart Tiles product page, the stated maximum surface temperature is 120°F, or 49°C. The page describes the product family as heat and humidity resistant but not intended for direct contact with water. Tic Tac Tiles gives a product-specific 120°F limit as well and states that an 8-inch tile-free zone should remain above a gas stove without a rear control panel or metal plate. These values apply to the manufacturers and product conditions checked; they should not be generalized to every brand.
Check, in order:
- The tile manufacturer’s current installation and temperature instructions.
- The range or cooktop manufacturer’s required clearances.
- Your local building or fire requirements.
- The actual wall-surface temperature during use.
- Whether steam, grease, direct flame, or hot exhaust reaches the wall.
- Whether the tile is near a countertop appliance such as a toaster oven.
The CPSC advises staying in the kitchen while cooking, keeping cooking surfaces clean, keeping towels and potholders away from hot surfaces, and keeping flammable materials away from heat. Its home cooking safety guidance does not approve any particular peel-and-stick tile.
Do not use NFPA 96 as a simple residential backsplash rule. The NFPA 96 standard description covers commercial cooking operations, ventilation, fire protection, inspection, maintenance, and clearances. It does not establish a universal residential clearance for adhesive tile.
If the product instructions do not clearly cover your appliance and location, stop at the edge of the heat zone or choose a different material.
How do you install peel-and-stick subway tile around outlets, corners, and existing tile?
Successful installation comes from measuring and test-fitting before exposing the adhesive. Outlets, corners, and existing grout lines are manageable, but they are the places where rushed work becomes visible.
Start by cleaning and degreasing the wall. Repair loose paint, fill holes, and allow any primer or paint to cure according to the product instructions. Do not install over a textured wall simply because the tile feels thick enough to hide it.
For outlets:
- Turn off power at the breaker before working near an electrical device.
- Remove only the cover plate if the product instructions allow it; do not work on energized wiring.
- Measure the outlet position from two fixed edges.
- Transfer those measurements to the back of the tile.
- Test-fit the piece before removing the liner.
- Use the cutting method recommended for the product.
- Reinstall the cover plate so it sits neatly over the finished edge.
The Art3d guide lists a hole saw or coping saw for circular and outlet cuts and recommends protective eyewear when using saws. The right tool depends on the tile material, thickness, and manufacturer instructions.
At corners, avoid forcing a full tile to bend around an outside corner unless the product explicitly permits it. A clean cut with a planned edge is usually more convincing. Inside corners can hide a narrow cut, but measure both walls because apartments and older homes rarely have perfectly square corners.
Over existing tile, inspect the grout. Smooth, shallow grout may be acceptable for some products. Deep or uneven grout can show through, create hollow areas, or reduce contact between the adhesive and wall. Test one or two tiles in an inconspicuous area before covering the full surface.

For more detailed preparation and removal advice, use the peel-and-stick subway tile installation guide.
What should you compare before buying peel-and-stick subway tile?
Compare the product specification, not just the room photo. A styled image can show color and layout, but it cannot tell you whether the tile suits your wall or appliance.
| Specification | Why it matters |
|---|---|
| Finish | Glossy surfaces reflect light; matte surfaces soften glare |
| Surface texture | Raised details can add depth but may show uneven walls |
| Tile and panel dimensions | Determines scale, seams, cuts, and leftover strips |
| Grout appearance | Controls how strongly the pattern reads |
| Adhesive type | Affects positioning, final bond, and removal risk |
| Surface compatibility | Prevents installation over unsuitable walls |
| Heat limit | Critical near stoves, cooktops, and countertop appliances |
| Moisture language | Distinguishes water resistance from waterproofing |
| Removal instructions | Sets realistic expectations for renters |
| Samples and return policy | Lets you test color, scale, and adhesion before a full order |
A sample is not optional when the project is highly visible. Place it beside the cabinet, counter, hardware, and wall paint. View it in daylight and at night. Stand several feet away. A tile that looks convincing in a close-up product photo may look too busy across a full backsplash.

For store-local options, compare the documented use cases for Subway Marble peel-and-stick tile, Subway Magic, Rock Subway, and Jet Subway. The available store descriptions identify these as self-adhesive, grout-free subway-style wall tiles with an almond-white appearance and 3D texture, and list kitchen, bathroom, accent-wall, renter-friendly, removable, water-resistant, and heat- and moisture-resistant use cases. Confirm the current product instructions before installing in a high-heat or wet location.
When should you choose tile instead of paint?
Choose peel-and-stick subway tile when you want a defined backsplash zone, added surface texture, or a visual transition between cabinets and counters. Choose paint when the wall is textured, difficult to clean, damp, or likely to need frequent changes.
Tile makes the most sense in:
- A coffee bar where the backsplash defines a small station.
- A laundry nook where a finished wall helps separate the utility area.
- A pantry wall with open shelving.
- A powder room vanity wall.
- A smooth kitchen backsplash that needs a more finished surface than paint.
Paint may be the better choice for a large blank wall, a wall with heavy texture, a shower interior, or a location exposed to direct water. It also offers simpler color changes and fewer seams.
A useful design test is to ask whether the wall has a clear job. If the tile is only filling empty space with no relationship to the counter, shelf, vanity, or appliance, paint may look more intentional. If the tile creates a clear backdrop for a functional zone, the upgrade usually feels more considered.
What is the safest renter-friendly approach?
The safest renter approach is to get permission, test a small hidden area, choose a smooth compatible wall, document the original condition, and treat removal as conditional rather than guaranteed.
Do not rely on the word “removable” alone. Adhesive can bond differently to old paint, new paint, wallpaper, patched drywall, and glossy finishes. Smart Tiles describes removal as dependent on the original surface. Tic Tac Tiles warns that paint or wallpaper may come off with the adhesive backing.
Before installation:
- Read the lease and ask the landlord or property manager when required.
- Photograph the wall, outlets, counters, and existing backsplash.
- Test the product behind an appliance or inside a cabinet area.
- Wait through the manufacturer’s recommended test period.
- Keep a few spare pieces for future repairs.
- Plan a removal method before installing the first tile.
A rental-friendly project is usually better when it is smaller. A coffee bar, vanity wall, or short backsplash run limits the amount of adhesive on the wall and reduces cutting mistakes. It also creates a clear stopping point that can look more intentional than a partial installation across a long wall.
Frequently Asked Questions
Does peel-and-stick subway tile look cheap?
It can, but the problem is usually poor alignment, an unsuitable wall, excessive grout contrast, awkward edges, or a pattern that does not suit the room. A restrained design installed on a smooth surface can look far more convincing than an expensive product installed over texture or crooked lines.
Can you put peel-and-stick tile over backsplash tile?
Some manufacturers allow installation over smooth existing ceramic or glass tile. Deep grout lines, raised texture, grease, loose tile, and uneven surfaces can affect the result. Test one or two tiles before covering the wall.
Is white peel-and-stick tile with black grout too much for a small kitchen?
Not always. It works best on a focused backsplash with simple cabinets, limited countertop pattern, and enough visual space. If the kitchen already has dark hardware, open shelving, strong veining, or several appliances, lower-contrast grout may feel calmer.
Is vertical subway tile a good choice for a small wall?
Yes, especially for a coffee bar, narrow return wall, vanity area, or short backsplash beneath shelves. It creates a taller visual rhythm, but the effect is not guaranteed. Check the complete composition, including wall height, cabinet lines, lighting, and grout contrast.
How long does peel-and-stick subway tile last?
The supplied evidence does not establish a universal lifespan across brands. Longevity depends on the product, surface preparation, heat, moisture, cleaning, adhesive, and installation conditions. Follow the specific manufacturer’s instructions rather than relying on a general number.
Final Thoughts
The best peel-and-stick subway tile idea is not automatically the cheapest, brightest, trendiest, or most heavily textured option. It is the idea with the highest Realistic Refresh Value for your wall, room proportions, rental status, heat and moisture exposure, and installation comfort.
For most readers, that means starting with a light horizontal running bond for a kitchen backsplash, a vertical layout for a coffee bar or narrow accent wall, a subtle marble look for a pantry or laundry nook, and high-contrast grout only where the wall can carry it.
Measure before cutting. Test the surface before committing. Read the heat and moisture limits. Treat removable as conditional. When those decisions are handled first, peel-and-stick subway tile can feel like a planned room update rather than a temporary cover-up.
Browse the tile design ideas comparison hub to compare subway, herringbone, marble-look, color, finish, and layout directions before choosing your collection.



Kommentar hinterlassen
Diese Website ist durch hCaptcha geschützt und es gelten die allgemeinen Geschäftsbedingungen und Datenschutzbestimmungen von hCaptcha.