


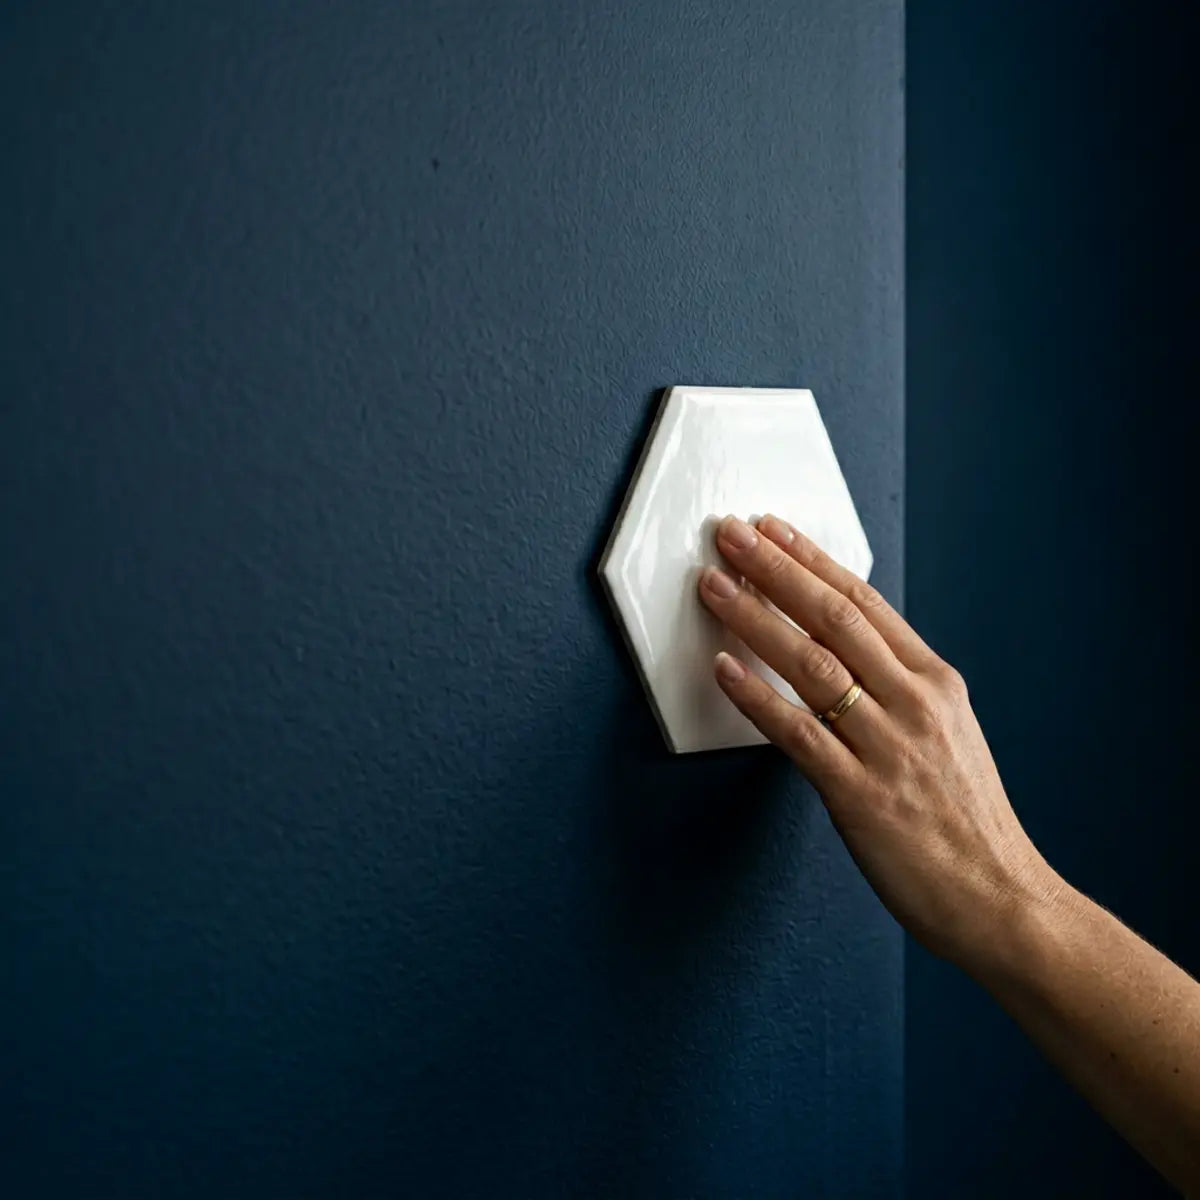
Das moderne Interior Design lebt von mutigen Gegensätzen und gewagten ästhetischen Entscheidungen. Im letzten Jahrzehnt hat die Branche einen massiven Anstieg der Beliebtheit dunkler, satter Wandfarben erlebt. Mitternachtsblau, Smaragdgrün, Anthrazitgrau und sogar tiefschwarze Statement-Wände sind zum Markenzeichen raffinierter, zeitgemäßer Räume geworden. Diese stimmungsvollen Farbtöne schaffen ein Gefühl von Intimität und Dramatik, das helle, luftige Farben einfach nicht nachbilden können. Wenn es jedoch an der Zeit ist, diese Räume zu aktualisieren oder umzubauen, stehen Hausbesitzer oft vor einer einzigartigen Reihe struktureller und optischer Herausforderungen. Einer der häufigsten Konfliktpunkte entsteht, wenn man ein helles, kontrastierendes Element – etwa einen klaren, weißen Küchen-Backsplash oder eine leuchtende Akzentwand im Bad – direkt auf diesen dunklen Untergründen anbringen möchte.
Die Attraktivität von DIY-Umrüstprodukten ist unbestreitbar. Sie bieten einfache Zugänglichkeit, Tempo und budgetfreundliche Verwandlungen, ohne dass man teure Handwerker beauftragen oder sich mit dem Schmutz von klassischem Mörtel und Fugenmasse herumschlagen muss. Doch dieser Komfort kann manchmal die zugrunde liegenden physikalischen Eigenschaften der Materialien verdecken. Bei High-Contrast-Makeovers rückt die Physik von Lichtdurchlässigkeit und Materialdichte plötzlich in den Fokus. Wer nicht versteht, wie Licht mit dünnen Verbundmaterialien interagiert, kann aus einem spannenden Wochenendprojekt schnell eine frustrierende, kostspielige Enttäuschung machen. Sie verbringen Stunden damit, einen strahlend weißen peel-and-stick tile über einer stimmungsvollen navyfarbenen Wand auszurichten und waagerecht zu justieren. Dann treten Sie einen Schritt zurück, um Ihr Werk zu bewundern, und sehen statt eines sauberen Ergebnisses nur ein matschiges, graues Raster. Die dunkle Wandfarbe schimmerte direkt durch die helle Fliese und ruinierte die klare Optik.
Ja, Sie können peel-and-stick tile auf dark paint anbringen, aber helle Verbundfliesen benötigen häufig eine Barrierschicht, um show through zu verhindern. Die zuverlässigste Lösung ist, die Dunkelheit der Wand und die Opazität der Fliese zuerst zu prüfen. Bei hohem Kontrast müssen Sie vor der Installation eine stark deckende, weiße stain-blocking primer oder eine feste Unterlage verwenden.
Die Installation eines modernen backsplash auf dunkler Trockenbauwand erfordert ein strategisches Vorgehen. Wände mit hohem Kontrast entlarven dünne oder leicht transparente Verbundfliesen sofort. Die Wahl der primer beeinflusst sowohl die optische Deckkraft als auch die langfristige Haftung. Glücklicherweise gibt es mietersichere Barriere-Optionen, doch sie müssen sorgfältig auf das Gewicht Ihrer Fliese und die Anforderungen an die Entfernbarkeit abgestimmt werden.
Tiefer Einblick: Die Physik des Lichts in Verbundmaterialien
Um eine DIY-Installation wirklich zu meistern, muss man wie ein Architekt denken und die Materialien auf molekularer Ebene verstehen. Peel-and-stick tiles bestehen in der Regel aus geschichteten Polymeren – oft einer Mischung aus Vinyl, Polyurethan und proprietären Klarlack-Oberflächen. Diese Schichten bieten zwar ausgezeichnete Flexibilität und Feuchtigkeitsbeständigkeit, sind in Bezug auf die Lichtausbreitung jedoch von Natur aus isotrop. Das bedeutet, dass Licht relativ leicht durch sie hindurchwandern kann, sofern es nicht auf eine undurchsichtige Barriere trifft. Trifft Umgebungslicht auf eine strahlend weiße Verbundfliese, die über einer dunklen navyfarbenen Wand installiert ist, dringt ein Teil dieses Lichts durch die obere Nutzschicht, passiert die weiße Pigmentschicht (die selten 100% dicht ist) und trifft auf die dunkle Farbe darunter. Die dark paint wirkt wie eine Lichtsenke und absorbiert die Photonen, statt sie zu reflektieren. Das verbleibende Licht, das zu Ihrem Auge zurückreflektiert wird, ist deutlich vermindert, was zu einem Phänomen führt, das als „optische Verdunkelung“ bezeichnet wird. Für das menschliche Auge wirkt die makellose weiße Fliese dann matt, gräulich oder schmutzig. Diese optische Übertragung zu blockieren, ist das grundlegende Geheimnis für eine makellose, professionell wirkende Installation.
Kann man peel and stick tile auf dark paint anbringen, ohne show-through?
Haben Sie sich schon gefragt, warum Ihre strahlend weiße Fliese an der Wand mattgrau wirkt? Dieser Abschnitt bietet ein direktes Machbarkeitsmodell auf Basis von Wanddunkelheit und Fliesenopazität, damit Sie mit vollem Vertrauen installieren können.
Ja, eine Installation über dark paint ist grundsätzlich machbar, aber der ästhetische Erfolg hängt von der physikalischen Lichtdurchlässigkeit ab. Wenn Ihre Fliese keine ausreichende innere Dichte hat, absorbiert der dunkle Untergrund das durch sie hindurchtretende Licht. Dadurch entsteht ein schattiger, durchscheinender Effekt. Um erfolgreich zu sein, müssen Sie diese visuelle Übertragung vollständig blockieren.
Eine direkte Installation ist nur dann sinnvoll, wenn Sie eine dicke, sehr opake Fliese verwenden oder über einer hellen Wand arbeiten. Bei schwarzen, anthrazitfarbenen, navyfarbenen und tiefgrünen Wänden ist ein weißer primer oder eine Unterlage fast immer zwingend erforderlich. Sie müssen vor dem Aufbringen heller Verbundmaterialien eine neutrale, blanke Grundlage schaffen.

Interaktives Modul: Risikoanalyse für Wandkontrast
Nicht sicher, ob Ihr Projekt ein Risiko für optische Verdunkelung hat? Beantworten Sie die drei Fragen unten, um sofort ein personalisiertes Risikoprofil für Ihre bevorstehende Installation zu erhalten.
1. Welche Farbe hat die Wand, die Sie mit Fliesen versehen?
2. Was ist die Hauptfarbe der Fliese, die Sie verlegen?
3. Haben Sie die Fliese mit einer hellen Taschenlampe getestet?
Das Erkennen Ihres Risikoprofils ist der erste entscheidende Schritt zu einer erfolgreichen Installation. Sobald Sie verstehen, dass möglicherweise ein chemischer oder physischer Eingriff erforderlich ist, müssen Sie tiefer in branchenübliche Kennzahlen eintauchen, um die richtigen Materialien auszuwählen. Sich auf Vermutungen zu verlassen, führt oft dazu, dass die falsche Art von Farbe oder Primer gekauft wird, was Geldverschwendung und eine ruinierte Optik zur Folge hat.
Grundlagen der Opacity Coverage Reliability (OCR)
In der Renovierungsbranche bewerten Profis die Materialdichte. Bei der Beurteilung dünner Verbundfliesen vor kontrastreichen Hintergründen ist eine standardisierte Bewertung erforderlich. Die grundlegende Methodik basiert auf der Opacity Coverage Reliability (OCR). Diese misst, wie effektiv eine Barriere verhindert, dass Hintergrundfarben den Oberflächenabschluss beeinflussen.
Um eine statistisch signifikante Verbesserung bei OCR zu erzielen, reicht normale Wandfarbe nicht aus. Wandfarbe enthält nicht die konzentrierte Titandioxid-Menge, die für eine vollständige Sperrwirkung nötig ist. Deshalb sind spezielle sperrende Fleckenblocker-Primer der architektonische Standard, um dunkle, satte Farben vor dem Fliesenlegen abzudecken.
Bei der Bewertung von OCR ist es ebenso wichtig, die allgemeine Haltbarkeit und physische Widerstandsfähigkeit des Fliesenverbunds selbst zu betrachten. Fliesen mit höherer Dichte blockieren dunkle Hintergründe nicht nur effizienter, sondern ihre dickeren Nutzschichten bieten auch deutlich besseren Schutz vor alltäglichen Küchenbelastungen wie fliegenden Utensilien, scheuernden Schwämmen und versehentlichen Stößen. Eine Fliese kann am ersten Tag schön und blickdicht aussehen, aber wenn die Klarlackschicht leicht verkratzt, setzt sie Schmutz und Fett fest, wodurch die Optik schnell beeinträchtigt wird. Wenn Sie den kühnen Werbeversprechen der Hersteller zur Haltbarkeit ihrer DIY-freundlichen Produkte skeptisch gegenüberstehen, sind Sie nicht allein. Eine fachliche Prüfung ist unerlässlich. Wir empfehlen dringend, objektive, datenbasierte Tests zu prüfen, bevor Sie eine endgültige Kaufentscheidung treffen. Um tiefer in die Wissenschaft der Verbundhaltbarkeit einzutauchen, sehen Sie sich unsere umfassende Analyse und Einsatzempfehlungen im ausführlichen Bericht an: Wir haben die Kratzfestigkeit in Verbund-Wandfliesen getestet.
Wie Fliesenoberfläche und Farbscheinniveau den Erfolg beeinflussen
Die physische Beschaffenheit der von Ihnen gewählten Fliese beeinflusst direkt die erforderlichen Vorbereitungsarbeiten. Sie müssen Materialstärke, Rückseitenart und die Textur der vorhandenen Wand berücksichtigen.
- Verbundstärke: Ultradünne Vinylfliesen haben eine hohe Lichtdurchlässigkeit. Sie lassen jeden Grauton der dunklen Wand dahinter durchscheinen.
- Metallische oder Folienrückseiten: Einige Premium-Verbundfliesen verwenden eine Folienschicht. Dieses empirisch belegte Merkmal blockiert Licht und verdeckt dunkle Farbe vollständig.
- Risiken durch den Glanzgrad der Farbe: Dunkle Farben werden oft in seidenmatter oder halbglänzender Ausführung formuliert, um Abriebspuren zu widerstehen. Diese glatten Oberflächen beeinträchtigen die Haftung von Peel-and-Stick-Kleber mit der Zeit erheblich.
Wenn man eine quantitative Basis für Verbundmaterialien festlegt, zeigt strenges Testen eine Leistungslücke. Das umfassende Framework, das in unserem Leitfaden beschrieben wird, zeigt, wie dichte, hochwertige Verbundschichten die Lichtdurchlässigkeit im Vergleich zu einfachen Vinyl-Einstiegsprodukten drastisch reduzieren.
Bewertung von Barrieremethoden per OCR
Die folgende Tabelle zeigt, wie verschiedene Vorbereitungsmethoden in Bezug auf ihre Opacity Coverage Reliability beim Verlegen von weißer Fliese über schwarzer Farbe abschneiden. Das Verständnis dieser Matrix ist entscheidend, bevor Sie Geld für Renovierungsmaterial ausgeben.
| Vorbereitungsmethode | Deckkraft, Abdeckwirkung, Zuverlässigkeit (OCR) | Haftfestigkeit | Beste Anwendungsfälle |
|---|---|---|---|
| Direkte Installation (ohne Vorbereitung) | Sehr niedrig | Variabel (hängt vom Glanzgrad ab) | Nur undurchsichtige, dunkle Fliesen |
| Standardweißlack | Niedrig | Schlecht (Farbe härtet weich aus) | Wenig kontrastreiche Wände (hellgrau) |
| Fleckenblockierende Grundierung | Sehr hoch | Ausgezeichnet | Kontrastreiche, dauerhafte Installationen |
| Tapetenausgleichsvlies | Hellgrau | Gut (hängt vom Kleber ab) | Mietfreundlich, glatte Oberflächen |
Profi-Tipp: Der Test mit dem Reststückbrett
Ein weit verbreiteter Irrtum ist, dass alle peel-and-stick tile eine solide weiße Kleberückseite haben, die als primer wirkt. In Wirklichkeit sind die meisten Standardkleber klar oder leicht milchig. Um das vor dem Kauf zu testen, richten Sie eine helle LED-Taschenlampe direkt auf die Rückseite Ihres Fliesenmusters. Wenn Sie das Licht vorne klar erkennen, wird dunkle Farbe durchscheinen.
Um das noch einen Schritt weiterzugehen, bringen Sie Ihre erste Testfliese niemals direkt in der Mitte Ihrer frisch grundierten Wand an. Suchen Sie stattdessen ein Stück Restholz, Karton oder übrig gebliebenes Trockenbauwandmaterial. Streichen Sie es in exakt derselben dunklen Farbe wie Ihre aktuelle Wand. Sobald es trocken ist, tragen Sie auf eine Hälfte des Bretts einen Streifen Ihres gewählten primers auf, lassen Sie ihn aushärten und kleben Sie dann Ihr Muster über die Trennlinie. So erhalten Sie eine brillante, risikofreie, realitätsnahe visuelle Darstellung der tatsächlichen Opacity Coverage Reliability (OCR) des primers unter Ihren spezifischen Küchenlichtbedingungen.
Was ist die beste Barrieremethode, um zu verhindern, dass dunkle Farbe durchscheint?
Sie schwanken zwischen weißer Farbe, fleckenblockierendem primer oder dicken Tapetenunterlagen? Wir vergleichen Barrieremethoden nach Deckkraft, Haftung und Kosten, damit Sie beim ersten Mal die richtige Lösung wählen.
Die beste Barrieremethode, um zu verhindern, dass dunkle Farbe durchscheint, ist ein spezieller, stark deckender, fleckenblockierender primer. Diese speziellen Beschichtungen sind mit hohen Anteilen an opaken Pigmenten und Bindeharzen formuliert. Sie decken nicht nur die dunkle Farbe ab, sondern schaffen auch eine ideale, leicht poröse mikroskopische Oberfläche, auf der der Fliesenkleber dauerhaft haften kann.
Normale weiße Acryl-Wandfarbe ist die falsche Wahl. Wandfarbe bleibt weich und flexibel, was dazu führen kann, dass schwere Fliesen mit der Zeit absacken. Außerdem benötigt typische Decken- oder Wandfarbe mehrere Anstriche, um schwarze Farbe zu überdecken, was Zeit und Budget verschwendet. Sie müssen einen echten primer verwenden, um den Untergrund zu sichern.
Die Chemie der Haftung: Warum versagt Wandfarbe? Herkömmliche latexfarbene Innenfarben sind mit einem niedrigen Bindemittel-Pigment-Verhältnis formuliert und setzen auf eine glatte, leicht zu reinigende Oberfläche statt auf strukturelle Festigkeit. Sie enthalten Weichmacher, die den Farbfilm flexibel halten, während ein Haus sich ausdehnt und zusammenzieht. Für allgemeine Wände ist das ideal, doch diese Flexibilität ist fatal, wenn sie das Gewicht einer schweren Verbund-Backsplash tragen soll. Wenn sich der Raum aufheizt (etwa hinter einem Herd), wird Standardfarbe weich. Der Klebstoff auf der Fliese haftet zwar perfekt an der Farbe, aber die Farbschicht löst sich von der Trockenbauwand, wodurch die gesamte Installation versagt. Primer hingegen sind reich an Harzen, die zu einer festen, tragfähigen Oberfläche aushärten und speziell dafür entwickelt wurden, unterschiedliche Materialien miteinander zu verbinden.

Analyse von Primer-Formulierungen für dunkle Wände
Die Wahl der richtigen chemischen Formulierung stellt sicher, dass Sie ein helles, farbgenaues Fliesen-Finish erzielen. Der Branchenkonsens besagt, Primer anhand ihrer Bindemittel und ihrer Deckkraftgrenzen zu bewerten.
- Schellackbasierte Primer: Produkte wie Zinsser B-I-N sind die unangefochtenen Meister der Deckkraft. Sie blockieren kontrastreiche Farben mit einem einzigen Anstrich und trocknen schnell. Allerdings verströmen sie starke Gerüche und erfordern eine kräftige Belüftung.
- Ölbasierte Primer: Beschichtungen wie KILZ Original bieten eine außergewöhnliche Deckkraft für dunkelblaue und schwarze Wände. Sie schaffen eine äußerst langlebige Haftverbindung, erfordern zur Reinigung jedoch Terpentinersatz und brauchen länger zum Aushärten.
- Wasserbasierte Fleckenblocker: Hochwertige Optionen wie Zinsser Bulls Eye 1-2-3 bieten geringe Geruchsentwicklung und eine einfache Reinigung mit Wasser und Seife. Sie eignen sich hervorragend für mittel- bis dunkelgraue Wände, benötigen bei tiefschwarz jedoch möglicherweise zwei Anstriche.
- Haftvermittler: Klare Primer verbessern nur den Halt. Sie bieten keinerlei blockierende Wirkung gegen Farbe und dürfen niemals allein verwendet werden, wenn Sie dunkle Farbe abdecken möchten.
Bei der Berechnung der Total Cost of Ownership (TCO) für ein Backsplash-Projekt sind Nacharbeiten der größte Kostenfaktor. Wenn Sie keinen geeigneten Primer verwenden, führt das zu verschwendeten Materialien. Die Umsetzung einer standardisierten Barriere-Methode mindert das Risiko von Haftungsversagen und durchscheinendem Farbdurchschlag grundlegend.
Temporäre Barrieren für Mieter
Warnhinweis für Mieter: Risiko für die Kaution & Teststellen
Das Auftragen schwerer chemischer Primer (wie schellack- oder ölbasierter Varianten) verändert die Wand des Vermieters dauerhaft. Das verstößt gegen die meisten üblichen Mietverträge und führt mit ziemlicher Sicherheit zum Verlust Ihrer Kaution. Außerdem kann das direkte Auftragen aggressiver Klebstoffe auf einfache Vermieter-Dispersionsfarbe beim Entfernen das Trockenbaupapier regelrecht zerreißen. Gehen Sie niemals vor, ohne einen unauffälligen 3x3 inch Testfleck in einer verborgenen Ecke (e.g., hinter dem Kühlschrank) anzulegen und ihn 7 Tage lang stehen zu lassen, bevor Sie ihn entfernen, um mögliche Schäden am Untergrund zu beurteilen.
Mieter stehen vor einem besonderen Dilemma. Sie möchten die dunkle Farbe des Vermieters abdecken und eine frische weiße Backsplash anbringen, dürfen die Wand jedoch nicht dauerhaft mit Schellackprimer verändern.
Das Aufbringen eines robusten, glatten Tapetenliners wirkt wie eine schwebende Barriere. Sie bringen den Liner mit einer temporären, wasserlöslichen Kleistergrundierung an. Im trockenen Zustand entsteht so eine strahlend weiße Oberfläche für Ihre Fliesen. Wenn Ihr Mietvertrag endet, lassen sich Liner und Fliese gemeinsam wieder abziehen und schützen dabei die dunkle Farbe darunter.
Für Mieter, die ein vorhersehbares Ergebnis bei der schonenden Entfernung wünschen, ist ein standardisierter Ablauf erforderlich. Das Verständnis der feinen Unterschiede zwischen Wärme-Lösungs-Methoden, chemischen Lösungsmitteln und reiner mechanischer Hebelwirkung ist entscheidend. Der Versuch, eine gealterte Verbundfliese ohne systematischen Plan von einer empfindlichen Mietwand zu lösen, reißt oft große Stücke Gipskartonpapier mit heraus und führt zu teuren Reparaturen sowie verärgerten Vermietern. Die in So entfernen Sie Peel-and-Stick-Fliesen, ohne die Farbe zu beschädigen: Der ultimative Leitfaden für Mieter beschriebenen Methoden legen die grundlegenden Erwartungen fest. Das Verständnis dieser Entnahmetechniken ist entscheidend, bevor auf einer Mietwand irgendein Klebstoff aufgetragen wird. Perfekt für Mieter – entdecken Sie sichere Schritt-für-Schritt-Methoden, Werkzeuge und Reinigungstipps, um Ihre Wände zu schützen.
Benchmark zur Effizienz der Barriereleistung
Die folgende Tabelle vergleicht verschiedene Untergrundmethoden anhand ihrer Barriereleistungseffizienz (BPE), damit Sie die Lösung an Ihre konkrete Wohnsituation anpassen können.
| Sperrprodukt-Typ | Leistungsfähigkeit der Barriere (BPE) | Geruch / VOC-Wert | Mietfreundlich? | Aushärtezeit vor dem Verlegen von Fliesen |
|---|---|---|---|---|
| Schellackgrundierung (Zinsser B-I-N) | Außergewöhnlich | Hoch | Nein | 45 Minuten |
| Ölgrundierung (KILZ Original) | Ausgezeichnet | Helllich | Nein | 2 Stunden |
| Wassergrundierung (Bulls Eye 1-2-3) | Sehr gut | Niedrig | Nein | 1 Stunde |
| Schwere Tapetenunterlage | Gut | Keine | Ja | 24 Stunden |
Ein hilfreicher Profi-Tipp bei der Verwendung von Primern mit hohem VOC-Gehalt: Behandeln Sie den Auftrag wie eine professionelle Spritzkabine. Öffnen Sie die Fenster, richten Sie einen Abluftventilator nach außen aus und tragen Sie einen geeigneten Atemschutz. Der Geruch verfliegt schnell, sobald der Schellack ausgehärtet ist, und hinterlässt eine perfekte, deckende Oberfläche.
Wie repariert man Peel-and-Stick-Fliesen, wenn die Wandfarbe bereits durchscheint?
Haben Sie die Fliesen bereits angebracht und erst danach bemerkt, dass die Wandfarbe die Optik ruiniert? Hier erfahren Sie genau, wie Sie das Projekt retten können, ohne Ihre Trockenbauwand zu beschädigen.
Fehlerbehebungs-Flussdiagramm: Rettung einer transluzenten Installation
Symptom: Die gesamte Wand wirkt unmittelbar nach dem Anbringen der Fliesen grau/schmuddelig.
Ursache: Keine OCR-Barriere über dunkler Farbe installiert. Das Licht sinkt in den Untergrund ein.
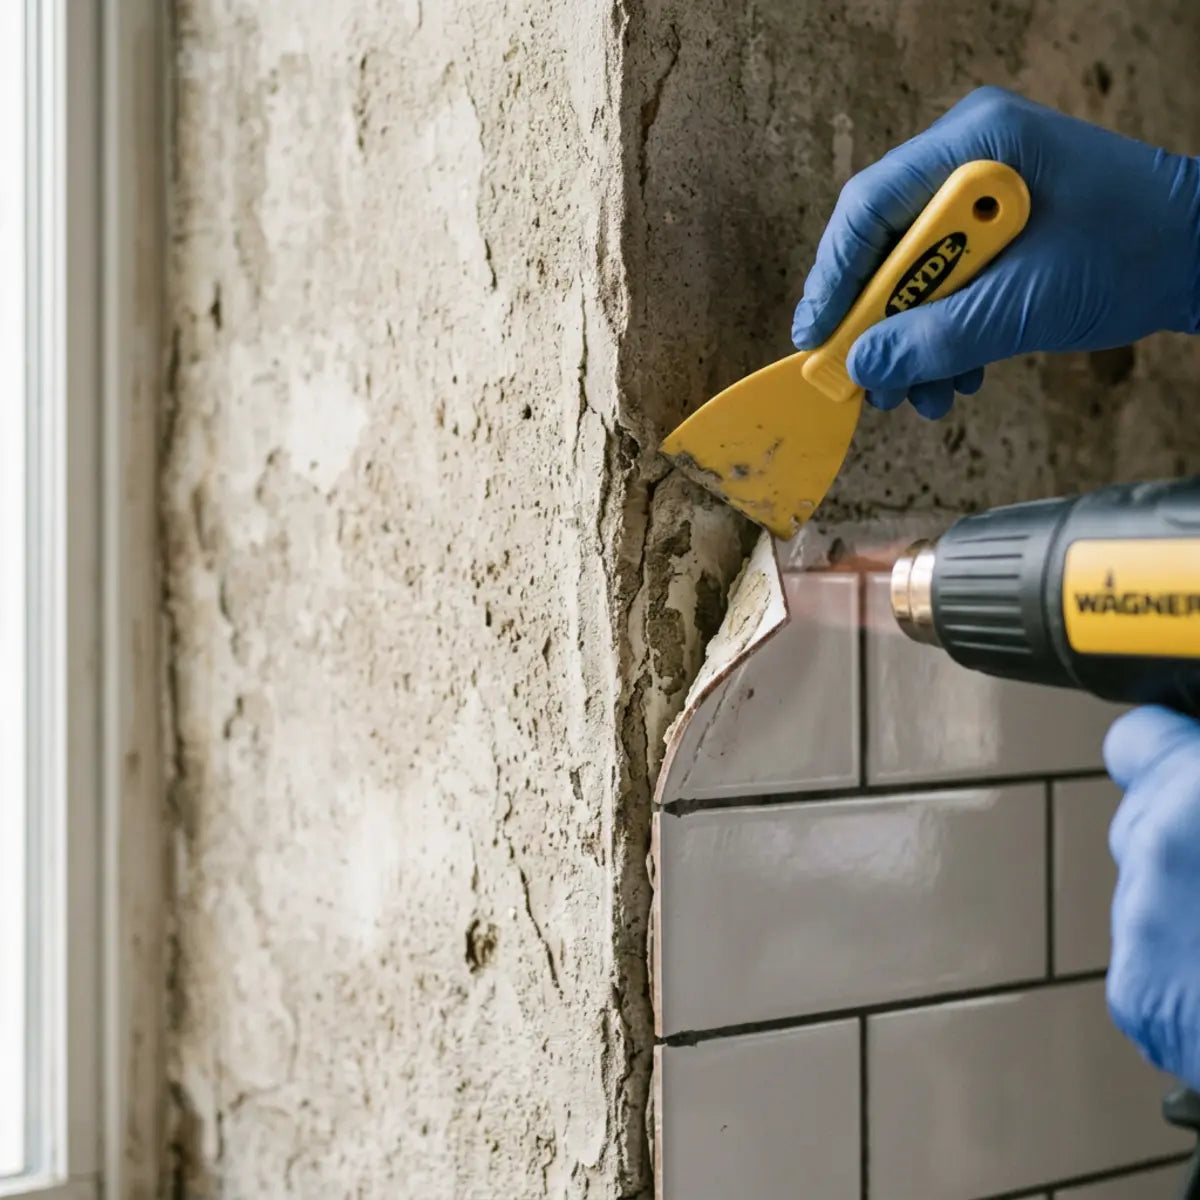
Maßnahme: HÖREN Sie sofort auf, weitere Fliesen anzubringen. Drücken Sie die vorhandenen Fliesen nicht fest an.
Grund: Je länger der Klebstoff an der Wand aushärtet, desto schwieriger wird das Ablösen.
Aktion: Heißluftpistole auf niedriger Stufe ansetzen und die betroffenen Fliesen langsam entfernen. Die entfernten Fliesen entsorgen.
Grund: Hitze macht den Acrylkleber plastisch und verhindert, dass das Drywall-Papier einreißt. Einmal gedehnt, können die Fliesen nicht wiederverwendet werden.
Wenn dunkle Farbe bereits durch Ihre installierte Fliese durchscheint, können Sie die Farbe von der Oberfläche aus nicht korrigieren. Die einzige dauerhafte Lösung besteht darin, die betroffenen Fliesen vorsichtig zu entfernen, auf die dunkle Wand eine geeignete weiße, fleckenblockierende Grundierung aufzutragen und eine neue Charge Fliesen zu verlegen.
Davon abzuraten ist, die lichtdurchlässige Peel-and-Stick-Fliese einfach zu übermalen. Wandfarbe haftet nicht richtig auf der glatten Vinyl- oder Verbundoberfläche der Fliese, was sofortiges Abblättern und Abplatzen zur Folge hat. Sie müssen den Untergrund direkt behandeln, um das Problem der Lichtdurchlässigkeit zu lösen.
Sichere Entfernen-Strategien für gestrichene Trockenbauwände
Das Entfernen frisch angebrachter Peel-and-Stick-Tile erfordert Geduld. Wenn Sie die Fliesen aggressiv abreißen, reißen Sie das Trockenbaupapier ein und verursachen einen erheblichen Ausbesserungsaufwand. Sie müssen zuerst den Klebstoff erweichen.
- Kontrollierte Wärme anwenden: Verwenden Sie einen Haartrockner auf mittlerer Stufe. Halten Sie ihn 15 Zentimeter von der Fliesenoberfläche entfernt und erwärmen Sie den Acryl-Kleberrücken 30 Sekunden lang, um ihn weicher zu machen.
- Spachtel verwenden: Schieben Sie vorsichtig ein breites, Kunststoff-Spachtel hinter die erwärmte Fliese. Arbeiten Sie langsam, um die Klebeverbindung zu lösen, ohne die dunkle Farbe darunter zu beschädigen.
- Parallel abziehen: Ziehen Sie die Fliese niemals gerade nach außen in Richtung Brust. Ziehen Sie die Fliese flach auf sich selbst zurück und halten Sie sie parallel zur Wand, um die Belastung des Trockenbaupapiers zu minimieren.
- Rückstände entfernen: Sobald die Fliesen ab sind, verwenden Sie einen Reiniger auf Zitrusbasis, um klebrige Stellen von der dunklen Farbe zu entfernen. Waschen Sie die Wand vor dem Grundieren gründlich ab.
Wenn es um empfindliche Untergründe geht, verhindert das Benchmarking anhand einer Leistungsminderungskurve katastrophale Wandschäden. Entscheidend ist die Unterscheidung zwischen modernem Gipskarton und historischen Putzwänden. Putz ist bekanntermaßen spröde, und zu starkes Ziehen kann das gesamte Lattensystem destabilisieren und hinter der Wand zerbröseln lassen. Die in unserer Studie beschriebenen strengen Protokolle, Wir testeten die sicherste Art, Fliesen von altem Putz zu entfernen, liefern wichtige Toleranzen. Getestet an empfindlichen Putzwänden: Erfahren Sie, wie Sie Peel-and-Stick-Fliesen sicher entfernen, Risse vermeiden und wissen, wann Sie mit dem DIY-Projekt aufhören sollten. Das Befolgen dieser empirischen Schritte reduziert das Versagen des Untergrunds drastisch.
Abhebende Kanten bei der Neuinstallation kontrollieren
Sobald Sie die lichtdurchlässigen Fliesen entfernt, die Wand grundiert und mit der Neuinstallation begonnen haben, können Probleme auftreten, wenn die Kanten Ihrer neuen Fliesen nicht perfekt haften. Das passiert oft, wenn der Reiniger auf Zitrusbasis nicht vollständig von der dunklen Farbe abgewaschen wurde.
Jegliche chemischen Rückstände verändern grundsätzlich die Haftschwelle des neuen Fliesenklebers. Sie müssen sicherstellen, dass die frisch grundierte Wand völlig trocken und makellos sauber ist. Wenn Sie an den Ecken Ihrer neuen, deckenden Fliesen einen leichten Haftverlust feststellen, sind spezielle Verbindungstechniken erforderlich.
Um die Ergebnisse neu abzustimmen und in Problemzonen eine dauerhafte Haftung zu sichern, lesen Sie den Anhebbende Kanten bei Peel-and-Stick-Fliesen beheben: DIY-Anleitung. Heben sich Ihre Peel-and-Stick-Fliesen? Erfahren Sie mit dieser Schritt-für-Schritt-DIY-Anleitung, wie Sie sich ablösende Kanten dauerhaft reparieren. Holen Sie sich Expertentipps und verhindern Sie zukünftige Schäden. Diese Ressource liefert die quantitative Grundlage für Techniken zum Abdichten der Kanten, mit Spezialsprays und Druckmechanik, damit Ihr zweiter Versuch makellos und strukturell stabil bleibt.
Checkliste für die Vorbereitung dunkler Wände für Peel-and-Stick-Backsplash
Machen Sie sich Sorgen, dass Ihre neuen Fliesen wegen der Grundierung oder der Vorbereitungsart abfallen könnten? Dieser Abschnitt beschreibt die exakte Vorbereitungsreihenfolge, um sowohl Deckkraft als auch eine dauerhafte Haftung zu gewährleisten.
Eine gründliche Vorbereitung erfordert, die dunkle Farbe zu entfetten, die Oberfläche leicht anzuschleifen, um den Glanz zu brechen, eine hochdeckende weiße Grundierung aufzutragen und sie vollständig chemisch aushärten zu lassen. Wenn die Aushärtezeit übersprungen wird, können flüchtige Gase hinter den Fliesen eingeschlossen werden, was zu einem katastrophalen Versagen des Klebstoffs führt.
Sie können die Vorbereitungsphase nicht überstürzen. Viele Hausbesitzer glauben fälschlicherweise, dass eine Grundierung, wenn sie sich trocken anfühlt, bereits bereit für Fliesen ist. Trocknungszeit und Aushärtezeit sind chemisch völlig unterschiedliche Prozesse. Sie müssen warten, bis die Grundierung vollständig ausgehärtet ist, um ein stabiles Fundament zu gewährleisten.

Die druckbare Vorbereitungs-Checkliste herunterladen
Überlassen Sie Ihren Renovierungserfolg nicht dem Gedächtnis. Laden Sie unsere umfassende Schritt-für-Schritt-Vorbereitungs-Checkliste direkt auf Ihr Gerät herunter. Halten Sie sie beim Einkauf der Materialien griffbereit und befolgen Sie sie während Ihres Installationswochenendes konsequent, um eine dauerhafte, deckende Verbindung zu gewährleisten.
Schritt-für-Schritt-Installationsprotokoll
Die strikte Einhaltung eines sequenziellen Arbeitsablaufs führt zu einer optimalen Lösung für kontrastreiche Wände. Befolgen Sie diese Schritte sorgfältig.
- Gründlich entfetten: Waschen Sie die dunkle Wand mit einem TSP-Ersatz (Trinatriumphosphat). Küchenwände beherbergen unsichtbares Fett, das verhindert, dass Grundierung und Fliesen haften.
- Die Oberfläche anschleifen: Schleifen Sie die dunkle Farbe mit 120er-Schleifpapier leicht an. Sie wollen die Farbe nicht entfernen; Sie nehmen lediglich dem glänzenden Finish den Glanz, um einen mechanischen Halt zu schaffen.
- Den Staub abwischen: Verwenden Sie ein leicht feuchtes Mikrofasertuch, um den gesamten Schleifstaub zu entfernen. Lassen Sie die Wand vollständig trocknen.
- Fleckenblockierende Grundierung auftragen: Rollen Sie einen gleichmäßigen Anstrich Ihrer gewählten weißen Grundierung auf. Wenn die dunkle Farbe noch stark durchscheint, tragen Sie nach dem Trocknen der ersten Schicht eine zweite Schicht auf.
- Aushärtezeiten beachten: Warten Sie mindestens 72 Stunden. Einige Grundierungen benötigen bis zu 7 Tage, um vollständig auszuhärten, bevor nicht atmungsaktive Peel-and-Stick-Fliesen angebracht werden.
Beim Verlegen von Verbundmaterialien auf frisch beschichteten Untergründen garantiert der Einsatz standardisierter Anwendungstechniken den Erfolg. Der Scraperoo - Y dient als architektonischer Standard für gleichmäßigen Druck. Sorgen Sie mit unserem DIY-Fliesenschaber für eine perfekte Peel-and-Stick-Flieseninstallation! Dieses vielseitige Werkzeug hilft dabei, Luftblasen zu glätten, eine starke Haftung zu sichern und Fliesen exakt auszurichten. Indem das Werkzeug eingeschlossene Lufttaschen während der Verarbeitung empirisch neutralisiert, sorgt es für eine dauerhafte Kante-an-Kante-Verbindung.
Wandverträglichkeit prüfen
Bevor Sie Ihre gesamte Rückwand anbringen, müssen Sie einen kleinen Verträglichkeitstest durchführen. Grundieren Sie einen verborgenen Bereich Ihrer dunklen Wand, lassen Sie ihn aushärten und bringen Sie eine einzelne Fliese an.
Warten Sie 48 Stunden und versuchen Sie dann, die Testfliese wieder abzuziehen. Sie sollte erheblichen Widerstand bieten. Wenn sie sich leicht ablösen lässt, ist Ihre Grundierung nicht ausgehärtet oder die dunkle Farbe darunter war zu glänzend und hätte stärker angeschliffen werden müssen. Erst testen erspart enormen Frust.
Für eine umfassende Aufschlüsselung der Verträglichkeitskennwerte für Untergründe stützt sich der Branchenkonsens auf dokumentierte Praxistests. Die ausführliche Analyse in Stickfliesen auf gestrichenen Wänden anbringen: Anleitung & Tipps dient als maßgebliche Referenz. Sorgen Sie sich, dass Ihre Peel-and-Stick-Fliesen nicht auf gestrichenen Wänden haften? Unser vollständiger Leitfaden zeigt Ihnen, wie Sie eine starke Haftung für ein perfektes Ergebnis sicherstellen. Wenn Sie diese standardisierten Bewertungen prüfen, stellen Sie sicher, dass Ihre Vorbereitungsarbeit vor dem Einsatz Ihres gesamten Bestands den Materialtoleranzen entspricht.
Entscheidungslogik: Brauche ich eine Barriere?
Entfetten, abschleifen und direkt anbringen. Kein Farbdurchschlagen zu erwarten.
Machen Sie den Taschenlampentest auf der Rückseite des Fliesenmusters.
Die Fliese hat eine natürliche hohe Lichtundurchlässigkeit.
Vor der Montage einen fleckenblockierenden Primer oder eine Wandverkleidung auftragen.
Beste deckende Alternativen zu dünnem Peel-and-stick
Haben Sie genug davon, sich mit Primern zu beschäftigen, und möchten einfach eine Fliese, die dick genug ist, um die Wand zu verdecken? Wir zeigen Ihnen die Materialprofile, die dunkle Hintergründe ganz ohne zusätzliche Vorbereitung natürlich blockieren.
Der Umstieg auf einen dickeren, mehrschichtigen Steinverbund oder ein dunkelfarbiges Fliesenprofil macht aufwendiges Weiß-Grundieren überflüssig. Undurchsichtige Materialien blockieren die Lichtdurchlässigkeit bereits an der Oberfläche und machen die dunkle Wandfarbe darunter für die spätere Optik völlig irrelevant.
Die Wahl des richtigen Materialprofils ist der einfachste Weg, Probleme mit Farbdurchschlagen zu umgehen. Wenn Sie dunklere Optiken oder strukturierte Oberflächen mögen, können Sie auf übel riechende Primer und mühsames Abschleifen komplett verzichten und direkt mit einer schnellen Montage beginnen.
Hochdichte- und dunkle Fliesenprofile nutzen
Wenn es Ihr Design zulässt, löst der Wechsel von dünnen weißen Subway-Fliesen das Transparenzproblem sofort.
- Steinkern-Verbundmaterialien: Hochwertige Fliesen mit einem Kern aus zerstoßenem Stein oder starrem PVC lassen kein Licht durch. Sie bieten 100% Opazität und decken selbst das dunkelste Schwarz vollständig ab.
- Metallische Oberflächen: Gebürstete Aluminium- oder Kupfer-Peel-and-stick-Fliesen haben massive Metalloberflächen. Durch Metall dringt kein Licht, was eine absolut sichere Barriere bietet.
- Dunkle Farbpaletten: Eine dunkle Fliese über einer dunklen Wand zu verlegen, ist äußerst effizient. Eine marineblaue oder anthrazitfarbene Fliese leidet nicht unter Farbverzerrungen, wenn sie vor einem ähnlichen Hintergrund angebracht wird.
- Dicke 3D-Strukturen: Fliesen mit erhabenen, dimensionalen Texturen werfen von Natur aus Mikro-Schatten und verfügen über dickere Materialschichten, wodurch die Sichtbarkeit des Untergrunds drastisch reduziert wird.
Bei der Bewertung des Kosten-Nutzen-Verhältnisses bestimmter Ästhetiken ist eine von Natur aus opake Oberfläche besonders effizient. Ausführungen wie die Black Marble Peel-and-Stick-Fliese schaffen eine quantitative Basis für die vollständige Abschirmung des Untergrunds. Verwandeln Sie Ihr Zuhause mühelos mit Black Marble Peel and Stick Wall Tiles. Diese selbstklebenden, fugenlosen Fliesen kombinieren einen frischen Almond-White-Ton mit realistischen 3D-Strukturen, um alten Wänden neues Leben einzuhauchen. Dieses Profil, das so konstruiert ist, dass Lichtdurchlässigkeit vollständig vermieden wird, bietet eine optimale Konfiguration für schnelle Upgrades.
Über stark strukturierten dunklen Wänden verlegen
Manchmal ist das Problem nicht nur die dunkle Farbe, sondern auch die starke Struktur darunter. Alte Holzvertäfelungen, stark strukturierte Trockenbauflächen oder tief gerillte Farbschichten zeichnen sich durch dünnes Vinyl ab, verzerren das Licht und zerstören die Illusion echter Fliesen.
Wenn Sie es mit dunklen, strukturierten Oberflächen zu tun haben, müssen Sie eine starre Fliese verwenden. Flexibles Vinyl passt sich den Rillen an und hebt jeden Makel hervor. Starre Kernfliesen überbrücken die Spalten und schaffen eine glatte, ebene Fläche, unabhängig vom Chaos dahinter.
Für Umgebungen, die ein striktes Überbrücken der Struktur erfordern, zeigt die standardisierte Prüfung, dass die Materialstärke entscheidend ist. Die in unserem Wir haben 1970er-Jahre-Vertäfelung getestet: Peel-and-Stick-Tile-Leitfaden ausgewerteten empirischen Daten zeigen, wie starre Profile das Durchscheinen von Strukturen grundsätzlich mindern. An echter Holzvertäfelung aus den 1970er-Jahren getestet, zeigt dieser Leitfaden, welche Vorbereitung Peel-and-Stick-Fliesen wirklich haften lässt. Sehen Sie sich die Ergebnisse an und verlegen Sie mit Vertrauen. Dieser Ansatz schafft einen klaren Weg, um komplexe, dunkel gebeizte Untergründe abzudecken.
Abschließende Gedanken
Fallstudie: Die katastrophale und wieder gut gemachte Mitternachtsmarine-Küche
Betrachten Sie ein kürzlich von uns analysiertes Renovierungsprojekt eines Hausbesitzers. Ziel war es, eine stark gesättigte, seidenmatte Küchenwand in Mitternachtsmarine mit dünnen, leuchtend weißen Vinylfliesen im Fischgrätmuster zu verkleiden. In dem Bestreben, schnell fertig zu werden, übersprang der Hausbesitzer den Primer-Schritt und ging davon aus, dass die Kleberückseite dicht genug sei, um die Farbe zu blockieren. Nach dem Abschluss drang das helle Küchenlicht durch das dünne Vinyl, wurde an der marineblauen Farbe reflektiert und verwandelte das klare weiße Fischgrätmuster in ein mattes, schattenhaftes Grau. Da die dunkle Farbe seidenmatt war, begannen sich außerdem innerhalb von 48 Stunden die Kanten der Fliesen zu lösen.
Die Wiederherstellung war arbeitsintensiv. Alle Fliesen mussten vorsichtig erwärmt und entfernt werden, wodurch der gesamte Bestand ruiniert wurde. Die Wand wurde gründlich mit einem TSP-Ersatz entfettet, mit 120er-Schleifpapier angeschliffen, um den Glanz zu brechen, und mit einer hochdeckenden schellackbasierten Grundierung beschichtet. Nach einer 72-stündigen Aushärtung wurden neue Fliesen angebracht. Das Ergebnis war eine beeindruckende, extrem opake, brillant weiße Rückwand, die die dunkle Geschichte der Wand vollständig verbarg. Dieses reale Szenario zeigt perfekt, warum eine analytische Vorbereitung der entscheidende Faktor zwischen einem Wochenenddesaster und einem architektonischen Triumph ist.
Eine helle Peel-and-Stick-Rückwand erfolgreich über einer dunklen Wand zu verlegen, erfordert ein einfaches, logisches Entscheidungsmodell. Bewerten Sie zunächst die Dunkelheit Ihrer Wand und die inhärente Opazität der gewählten Fliese mit einem einfachen Taschenlampentest. Wenn Sie ein hohes Risiko für Farb-Show-through feststellen, müssen Sie vor dem Aufbringen des Klebers eingreifen.
Wählen Sie die Barriere-Methode, die zu Ihrer Wohnsituation passt. Eigentümer sollten eine stark deckende, fleckblockierende weiße Grundierung verwenden, um eine permanente, opake Basis zu schaffen. Mieter sollten schwere Tapetenunterlagen in Betracht ziehen, um die ursprüngliche dunkle Farbe zu schützen und dennoch eine helle, weiße Oberfläche zu erzielen. Überspringen Sie niemals die erforderlichen Aushärtezeiten.
Bevor Sie Ihr nächstes Projekt beginnen, nehmen Sie sich einen Moment Zeit, um Ihre Materialien zu prüfen. Laden Sie unsere Vorbereitungs-Checkliste herunter, um sicherzustellen, dass Ihr Untergrund bereit ist, vergleichen Sie unsere empfohlenen opaken Fliesenprofile, und sichern Sie sich die richtige Grundierung für die spezifische Chemie Ihrer Wand. Ein wenig Testen heute garantiert morgen ein makelloses, professionelles Finish.


Kommentar hinterlassen
Diese Website ist durch hCaptcha geschützt und es gelten die allgemeinen Geschäftsbedingungen und Datenschutzbestimmungen von hCaptcha.