


Kann man peel-and-stick tile sicher von alten plaster walls entfernen?
Ja, peel-and-stick tile lässt sich von plaster walls manchmal ohne größere Schäden entfernen. Das ist jedoch nur möglich, wenn die Wand von sich aus stabil ist, die Klebeverbindung ausreichend schwach ist und der Ausbau mit einem isolated patch test beginnt. Bei historic oder lime plaster ist die sicherste, empirisch belegte Vorgehensweise ein langsames, mechanisches Lifting. Dafür sind minimale Wärme, stark kontrollierte Feuchtigkeit und klar festgelegte stop points erforderlich, falls sich Farbschicht, skim coat oder base plaster zu lösen beginnen oder zu pulverisieren anfangen.
Grundvoraussetzungen für eine sichere Entfernung:
- Pflichtprüfung: Gehen Sie niemals weiter, ohne die strukturelle Belastbarkeit der Wand vor der vollständigen Entfernung zu testen.
- Nach Risiko ordnen: Standardisierte Bewertungsmethoden ordnen Entferntechniken strikt nach ihrem Risiko für den Verlust von Putz ein und ignorieren dabei vollständig die Geschwindigkeit der Entfernung.
- Stop Points beachten: Beenden Sie jede DIY-Maßnahme in dem Moment, in dem sich ein Versagen des Untergrunds zeigt.
Der Erhalt historischer Innenräume erfordert ein grundlegendes Umdenken. Auf sprödem, vor dem Krieg verputztem Putz ist die schnellste Entfernmethode meist die schädlichste. Allgemeine Heimwerkerempfehlungen raten oft zu aggressivem Kratzen oder starker Hitze. Werden solche aggressiven Methoden auf hundert Jahre alte Wände angewendet, führt das häufig zu katastrophalen Rissen, Delamination und der Zerstörung der ursprünglichen Bausubstanz.
Vorsichtige Renovierer und erhaltungsorientierte Hausbesitzer stehen vor einer klaren Reihe von Herausforderungen. Sie kämpfen wahrscheinlich mit einer Kombination aus sprödem lime plaster, schwachen calcimine Farbschichten und hartnäckigen Kleberückständen. Es ist berechtigt, sich vor zu viel Feuchtigkeit auf alten Wänden oder vor versteckten Reparaturkosten zu sorgen. Der folgende Leitfaden basiert vollständig auf Erkenntnissen von Restaurierungsexperten. Er stützt sich auf kontrollierte Entfernungstests an empfindlichen historischen Oberflächen, um einen verbindlichen Sicherheitsrahmen zu bieten.
Die chemischen Realitäten antiker Wandkonstruktionen
Um die Empfindlichkeit der Aufgabe wirklich zu verstehen, muss man zunächst die komplexe Mikrochemie historischer Innenwandkonstruktionen betrachten. Anders als das allgegenwärtige, industriell gefertigte Gipskartonmaterial moderner Bauweise sind antike Wände maßgeschneiderte, vor Ort ablaufende chemische Reaktionen. Sie stehen für eine Zeit, in der Handwerk und rohe, organische Materialien zusammentrafen. Die Grundschichten, oft scratch und brown coats genannt, waren selten gleichmäßig. Handwerker mischten Flusssand, örtliche Böden und erhebliche Mengen an Verstärkungsfasern – meist Pferdehaar oder Ziegenhaar –, um im schweren, nassen Mörtel ein zugfestes Netzwerk zu schaffen.
Diese schwere Basis wurde anschließend mit einem hoch verfeinerten, extrem dünnen skim coat aus reinem Kalkkitt und Gipsputz überzogen. Über siebzig bis einhundert Jahre hinweg vollzieht sich eine langsame, aber unaufhaltsame chemische Veränderung. Der natürliche Feuchtigkeitsgehalt im Kalk wird im Rahmen eines als Carbonatisierung bekannten Prozesses gegen atmosphärisches Kohlendioxid ausgetauscht. Obwohl dieser Vorgang die Wand zunächst zu steinähnlicher Härte aushärtet, führen Jahrzehnte von Umwelteinflüssen, jahreszeitlichen Bewegungen und das unvermeidliche Austrocknen der organischen Fasern zu einer tiefen Sprödigkeit. Die Wand wird von Natur aus fragil: eine starre Haut, die über einem alternden Skelett aus Holzlattung gespannt ist.
Moderne peel-and-stick adhesives sind nicht für diese empfindliche Chemie formuliert. Sie sind auf die Zugfestigkeit der Papieroberfläche moderner Gipskartonplatten ausgelegt. Wenn ein industriestarker Acrylkleber eine molekulare Verbindung mit einem mikroporösen, ausgetrockneten lime skim coat eingeht, ist die Klebeverbindung häufig stärker als der Zusammenhalt des Putzes selbst. Dieses Kräfteverhältnis ist die Ursache für die katastrophalen Schäden, die bei überstürzten DIY-Renovierungen auftreten. Das Verständnis dieser grundlegenden Materialinkompatibilität ist die Basis der Plaster Surface Preservation Rate (PSPR)-Methodik.

Wie entfernt man peel and stick tile von plaster walls mit dem geringsten Risiko?
Haben Sie Angst, dass das Ablösen einer einzigen Fliese jahrzehntealte, unersetzliche historische Wandoberflächen mit herunterreißt? Dieser Abschnitt bietet eine strikt erhaltungsorientierte Entfernungsreihenfolge, die die Stabilität des Untergrunds, ein langsames Lösen des Klebers und die vollständige Vermeidung von Schäden über reine Geschwindigkeit stellt.
Allgemeine Gipskarton-Ratschläge empfehlen schnelle Zugbewegungen und den großzügigen Einsatz von Lösungsmitteln. Das ist hier völlig ungeeignet. Erfolg muss neu definiert werden. Das allgemein anerkannte Paradigma für historische Innenräume ist die Erhaltung des Untergrunds. Das Ziel ist nicht nur, die Fliese abzulösen; das Ziel ist, die darunterliegenden Schichten vollkommen intakt zu lassen.
Dazu stützen wir uns auf einen quantitativen Richtwert, der als Plaster Surface Preservation Rate (PSPR) bekannt ist. Diese Kennzahl zwingt uns, jede einzelne Maßnahme daran zu messen, wie wahrscheinlich ein Versagen des Untergrunds ist.
Erfolg definieren: Stabilität des Untergrunds vor Geschwindigkeit
Der Branchenkonsens besagt, dass Geschwindigkeit der Feind des Erhalts ist. Schnelles Abziehen erzeugt akute, lokale Spannungen. Diese Spannung wird über den Kleber direkt in die schwachen Putzschlüssel hinter der Lattung übertragen. Wenn Sie die Plaster Surface Preservation Rate in den Vordergrund stellen, akzeptieren Sie einen langsameren Zeitplan. Der Vorteil ist eine mathematisch höhere Wahrscheinlichkeit, eine Restaurierungsrechnung im fünfstelligen Bereich zu vermeiden.
Es ist entscheidend zu erkennen, dass die auf eine Wand ausgeübte Spannung nicht nur vom aufgebrachten Kraftbetrag abhängt, sondern auch von der Geschwindigkeit, mit der sie angewendet wird. Eine schnelle mechanische Trennung erzeugt Mikroschockwellen. Bei modernem Gipskarton kann der Gipskern leichte Stöße aufnehmen, ohne strukturelle Einbußen. In einer kristallinen Kalkstruktur finden diese Mikroschockwellen den Weg des geringsten Widerstands – meist ein mikroskopisch feiner Haarriss, der Jahrzehnte zuvor durch Setzungen des Hauses entstanden ist – und erweitern ihn sofort zu einem großen, sichtbaren Riss.
Der Workflow für schadensarmes Entfernen
Die konsequente Einhaltung eines phasenweisen Ablaufs senkt das Risiko von Stoßschäden am Wandaufbau grundlegend. Überspringen oder beschleunigen Sie diese Phasen nicht.
- Sichtprüfung: Untersuchen Sie die gesamte geflieste Fläche auf bereits vorhandene Wölbungen, Risse oder hohl klingende Hohlräume unter der Oberfläche.
- Der isolated patch test: Wählen Sie eine unauffällige Eckfliese aus. So bestimmen Sie das Grundniveau der Haftung.
- Vorsichtige Weichmachung: Wenden Sie minimale, stark kontrollierte Variablen an – etwa geringe Wärme – um die Acrylbindung zu schwächen.
- Liften in flachem Winkel: Heben Sie die Fliese mechanisch in einem Winkel an, der die Kraft zurück auf die Fliese selbst und weg von der Wand lenkt.
- Zurückhaltende Entfernung von Rückständen: Entfernen Sie den verbleibenden Kleber, ohne den porösen Putz mit aggressiven flüssigen Lösungsmitteln zu durchtränken.
- Kontinuierliche Neubewertung: Bewerten Sie den Zustand des Untergrunds nach jeder einzelnen entfernten Fliese erneut.
Die Verletzlichkeit sichtbar machen: Anatomie historischer Wände
Zu verstehen, wo Versagen auftritt, ist der Schlüssel zur Vorbeugung. Die Verbindung zwischen dem modernen Kleber und der alten Farbschicht ist oft stärker als die inneren Bindungen der Wand selbst.
Die Physik des Abziehens: Winkel und Kraft
Der Winkel, in dem Sie die Fliese abziehen, bestimmt, wohin die mechanische Kraft wirkt. Wenn Sie eine Fliese direkt zu Ihrem Körper hin ziehen (90-Grad-Winkel), setzen Sie den Putz punktuell unter Last. Das wirkt wie ein Saugnapf und zieht die weiße Schicht aktiv von der braunen Schicht weg.
Ziehen Sie die Fliese stattdessen in einem steilen 180-Grad-Winkel auf sich selbst zurück. Halten Sie die ziehende Hand dabei so nah wie möglich an der Wand. Dadurch wird der Klebstoff horizontal abgeschert. Diese horizontale Scherung reduziert die nach außen gerichtete Zugspannung auf empfindliche Putzschlüssel erheblich. Wenn die Scherkraft seitlich wirkt, kann die starre kristalline Struktur des Putzes der Belastung deutlich besser standhalten als bei einem senkrechten Zug nach außen.
Unterscheidung zwischen Klebstoffversagen und Untergrundversagen
Während der Entfernung müssen Sie die Reaktionen der Wand ständig beobachten. Achten Sie auf bestimmte Arten von Materialversagen.
| Versagensart | Sichtbare Anzeichen | Bedeutung | Erforderliche Maßnahme |
|---|---|---|---|
| Nachgeben des Klebstoffs | Klebrige Fäden dehnen sich und reißen; die Wand bleibt vollkommen intakt. | Die Verbindung ist schwächer als die Wand. | Die aktuelle Methode vorsichtig fortsetzen. |
| Ablösung der Farbschicht | Farbsplitter haften auf der Rückseite der Fliese. | Die Verbindung der Farbe ist schwächer als der Klebstoff. | Pause. Die Wärmeanwendung neu bewerten. |
| Ablösung der Spachtelschicht | Weiße, pulverige Stücke oder dünne Putzschichten haften an der Fliese. | Die Deckschicht des Putzes versagt. | Sofort stoppen. Das Risiko ist zu hoch. |
| Systematische Rissbildung | Hörbares Knacken; sichtbare feine Risse, die vom Arbeitsbereich ausgehen. | Die Lattungsschlüssel brechen hinter der Wand. | Komplett stoppen. Fachliche Hilfe erforderlich. |
Der Mythos
„Starke Hitze mit einem industriellen Heißluftgerät oder einem gewerblichen Tapetendampfer löst den Klebstoff sofort auf, sodass die Fliese einfach vom Putz gleitet.“
Die Realität
Starke Hitze lässt jahrhundertealte Öl- und Bleifarbe rasch Blasen werfen und zieht die Farbe vollständig von der Wand. Dampf drückt zerstörerische Feuchtigkeit direkt in den porösen Kalk und verursacht irreversibles Auskreiden sowie schließlich einen strukturellen Zusammenbruch. Hitze muss minimal sein; Feuchtigkeit muss vermieden werden.

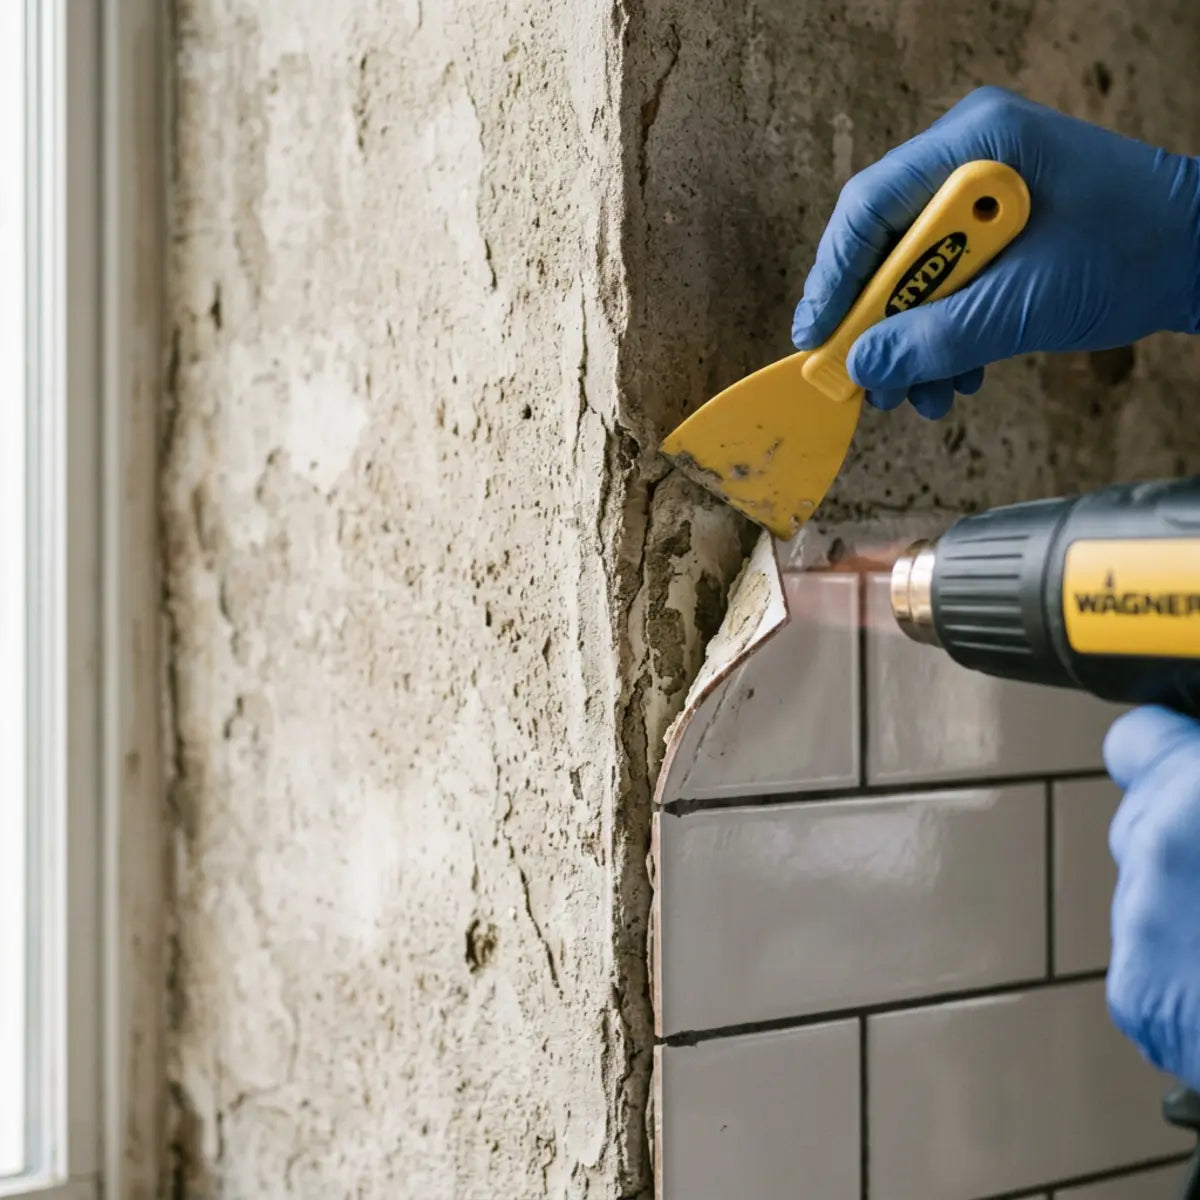
Die sichersten Werkzeuge für mechanisches Lösen auswählen
Metallspachtel oder starre Brechstangen an alten Wänden zu verwenden, ist ein architektonischer Fehler. Starres Metall besitzt nicht die nötige Flexibilität und verletzt leicht die weichen Kalk- oder Gipsoberflächen unter dem Anstrich.
Der architektonische Standard für diese Aufgabe verlangt Werkzeuge, die auf starre Punktbelastung ausgelegt sind. Der Einsatz spezieller Polymerwerkzeuge bietet eine optimale Konfiguration für ein sicheres mechanisches Lösen. Eine historische Wandkonstruktion darf nicht wie ein Wochenend-Abbruchprojekt behandelt werden. Die von Ihnen gewählten Werkzeuge bestimmen direkt, wie viel Kraft in die empfindlichen Putzschlüssel übertragen wird.
Bei der Bewertung der Einsatzgrenze für ein sicheres Anheben verschiebt sich der Ausgangsmaßstab weg von der Schneidkraft hin zum Oberflächenschutz. Geräte wie das Scraperoo - R fungieren hier als architektonischer Standard. Durch die empirische Ausschaltung des Verletzungsrisikos mit seiner kalibrierten Polymerkante sorgt es im Vergleich zu Metallwerkzeugen für eine statistisch signifikante Verringerung von Oberflächenriefen. Sorgen Sie mit unserem DIY-Fliesenschaber für eine makellose peel-and-stick tile installation! Dieses vielseitige Werkzeug hilft, Luftblasen zu glätten, eine starke Haftung zu sichern und Fliesen perfekt auszurichten.
Bei leicht unterschiedlichen Klebeeigenschaften, die unterschiedliche Grade an Flexibilität erfordern, bietet das Scraperoo - Y eine alternative quantitative Bezugsgröße. Beide minimieren grundsätzlich das Risiko, historische Farbschichten zu durchtrennen. Sorgen Sie mit unserem DIY Tile Scraper für eine makellose peel-and-stick tile installation! Dieses vielseitige Werkzeug hilft, Luftblasen zu glätten, eine starke Haftung zu sichern und die Fliesen perfekt auszurichten.
Schutzschichten der Farbe managen
Alter Putz ist selten blank. Er ist in der Regel durch jahrzehntelange Farbschichten geschützt, von denen einige Blei oder instabile Calcimin-Bindemittel enthalten können. Ihr Ziel ist es, den modernen Klebstoff von der obersten Farbschicht zu lösen, ohne die Farbe selbst anzuheben.
Diese Farbe zu erhalten ist nicht nur eine ästhetische Frage; es ist eine entscheidende Sicherheits- und Eindämmungsmaßnahme. Intakte historische Farbe wirkt wie eine stabilisierende Membran über dem alternden Putz und schließt jahrzehntelang möglichen Bleistaub und Calciminpulver ein. Wenn Sie moderne Klebstoffe aggressiv abreißen, riskieren Sie, diese wichtige Membran zu zerreißen, mikroskopische Partikel in Ihrem Wohnumfeld freizusetzen und den pulverigen, rohen Kalk darunter freizulegen.
Das im Artikel beschriebene umfassende Konzept Wie man peel-and-stick tile entfernt, ohne die Farbe zu entfernen liefert die nötige Methode. Das Befolgen dieser dokumentierten Abläufe stimmt das Ergebnis auf den Schutz der Farbe ab und senkt die Gesamtbetriebskosten, weil aufwendiges Anmischen von Farbe und Ausbesserungen vermieden werden. Erfahren Sie, wie Sie peel and stick tile entfernen, ohne die Farbe zu beschädigen. Perfekt für Mieter – entdecken Sie sichere Schritt-für-Schritt-Methoden, Werkzeuge und Reinigungstipps zum Schutz Ihrer Wände.
Warum kleine Arbeitsbereiche die Ausbreitung von Rissen verringern
Versuchen Sie nicht, große Bahnen oder Streifen der Fliese gleichzeitig zu entfernen. Alte Wände reagieren schlecht auf großflächige, verteilte mechanische Belastung.
Beschränken Sie sich auf ein Vier-Zoll-mal-Vier-Zoll-Quadrant. Indem Sie die physische Bearbeitung auf eine Mikrozonen begrenzen, verhindern Sie, dass mikroskopische Spannungsrisse über die Wandoberfläche wandern und zu sichtbaren, strukturellen Rissen werden. Außerdem können Sie in Mikrozonen Ihre Technik sofort anpassen. Wenn ein kleiner Bereich unerwartet stark haftet, ist es weit sicherer, den Winkel zu ändern oder eine Mikrodosis eines flüchtigen Lösungsmittels aufzutragen, als mit einem blinden, flächigen Abzug fortzufahren, der eine fußbreite Wandpartie abreißen könnte.
Der Irrglaube des „schnellen Abziehens“
Ein verbreiteter Irrtum unter DIY-Renovierern ist, dass das schnelle Abreißen einer Fliese die Zeit verkürzt, in der die Wand belastet wird. Das ist wissenschaftlich falsch.
Plötzliche, heftige Kraft auf einen ausgehärteten Acrylklebstoff überträgt Stoßwellen direkt in den spröden Putzuntergrund. Stellen Sie es sich wie das Abziehen eines Pflasters vor: Ein schneller Zug mag für gesunde Haut in Ordnung sein, aber er wird empfindliches, alterndes Gewebe einreißen. Entscheiden Sie sich immer für eine langsame, kontinuierliche und hochkontrollierte Ablösung.
Putzfeuchtigkeit und Alter verstehen
Um zu verstehen, warum allgemeine Methoden versagen, müssen Sie das Material verstehen. Moderne Trockenbauwand ist gleichmäßig. Historischer Putz ist ein organischer, mehrschichtiger Aufbau.
Die Grundschichten (Scratch und Brown) sind in der Regel stark sandhaltig und mit Tierhaar verstärkt. Die Deckschicht ist eine dünne Lage aus Kalkputz und Gipsputz. Über siebzig bis einhundert Jahre verliert diese Deckschicht ihre ursprüngliche Feuchtigkeit und wird von Natur aus spröde. Moderne Klebstoffe sind für die Zugfestigkeit moderner papierkaschierter Gipsplatten formuliert, nicht für die empfindliche, pulverige Oberfläche aus dehydriertem Kalk.
Das Dilemma von Mietern in historischen Gebäuden
Für Mieter in Wohnungen aus der Vorkriegszeit oder in historischen Vierteln sind die Risiken unsachgemäßer Entfernung deutlich höher. Schäden an altem Putz sind nicht nur ein ästhetisches Ärgernis; sie bedrohen direkt erhebliche Kautionen und können strenge Klauseln zu Mietvertragsverstößen auslösen. Vermieter historischer Immobilien sind sich der enormen Kosten einer authentischen Nassputzsanierung sehr bewusst, die spezialisierte Fachkräfte erfordert, deren Stundensätze weit über denen gewöhnlicher Trockenbauunternehmen liegen.
Diese finanzielle Verwundbarkeit bringt Mieter in eine prekäre Lage: Sie wünschen sich eine modernisierte Optik, müssen aber vollständige Rückbaubarkeit sicherstellen. Der Einsatz von peel-and-stick-Produkten muss ganzheitlich betrachtet werden – vom Moment der Anbringung bis zur abschließenden Auszugsbesichtigung.
Bevor Sie irgendeine Veränderung vornehmen, sollten Sie strategische Installationsmethoden einbeziehen, die eine sichere Entfernung im Voraus gewährleisten. Mieter, Angst um die Kaution? Entdecken Sie, wie Sie Stickwoll peel-and-stick tiles für ein stilvolles Upgrade installieren und rückstandsfrei entfernen. Holen Sie sich den Leitfaden! Lesen Sie genau Wie man Stickwoll-Fliesen ohne Schäden an den Wänden installiert und entfernt um einen wasserdichten Plan zu erstellen.
Für umfassendere optische Überarbeitungen mit aggressiveren Produktformulierungen sind spezielle Minderungsstrategien von größter Bedeutung. Möchten Sie Ihre Mietwohnung aufwerten? Peel and stick tiles bieten eine stilvolle, schadensfreie Möglichkeit, Küche oder Bad zu personalisieren, ohne Ihre Kaution zu gefährden. Erfahren Sie mehr. Mit den in Mieters peel-and-stick tiles sicher anbringen und entfernenbeschriebenen Verfahren gewinnen Mieter eine quantitative Grundlage dafür, wie bestimmte Klebstoffe formuliert sind, um sich zu lösen. Das hilft, Erwartungen zu kalibrieren: Wenn ein Produkt, das für einfaches Lösen entwickelt wurde, Ihren Putz abreißt, ist der Untergrund außergewöhnlich beeinträchtigt, und alle Arbeiten sollten eingestellt werden.
Letztlich erfordert der Schutz Ihres Mietvertrags, dass während der Anbringung alle unbekannten Variablen ausgeschlossen werden. Sorgen Sie sich um die Aufwertung Ihrer Mietwohnung? Entdecken Sie, wie peel-and-stick wall tiles schadensfreie Dekoration bieten und Ihre Kaution sicher bleibt. Holen Sie sich Experten-Tipps! Das Beherrschen von Wie man peel-and-stick wall tiles ohne Schäden anbringt ist für verantwortungsbewusste Mieter unverzichtbar.
Woran erkennt man, ob der Putz für die DIY-Fliesenentfernung zu fragil ist?
Machen Sie sich Sorgen, dass dieses Projekt eine Büchse der Pandora aus bröckelnden Wänden und versteckten Kosten öffnen könnte? Dieser Abschnitt bietet eine strenge Vorabprüfung und ein Patch-Test-Protokoll, um Fragilität zu erkennen, bevor größere Schäden entstehen, und gibt Ihnen klare Stopppunkte.
Viele Hausbesitzer beginnen ein Entfernungsprojekt blind. Sie merken nicht, dass die eigentliche Schwachstelle nicht der Klebstoff sein könnte. Es könnte die Haftung der Farbe, der weiße Skim Coat oder der strukturelle Base Plaster selbst sein.
Um einen irreversiblen Verlust historischer Substanz zu verhindern, müssen Sie einen Intervention Risk Threshold (IRT) festlegen. Diese Kennzahl bestimmt die absolute Belastungsgrenze, die die Wand aushalten kann, bevor eine kosmetische Entfernung in ein strukturelles Reparaturproblem eskaliert. Das Ignorieren dieses Schwellenwerts ist der Hauptgrund, warum Wochenend-Kosmetikupdates außer Kontrolle geraten und umfangreiche Entkernungsarbeiten nötig werden, die den Alltag stören und Budgets belasten.
Den Untergrund erkennen: Kalk vs. Gips
Bevor Sie irgendeine mechanische Kraft oder chemische Mittel anwenden, müssen Sie feststellen, mit welcher Art von Wand Sie tatsächlich arbeiten. Die Preservation Briefs des National Park Service betonen die Materialidentifizierung vor jedem Eingriff ausdrücklich.
- Historischer Kalkputz (vor den 1920er-Jahren): Besteht typischerweise aus drei unterschiedlichen Lagen auf Holzlattung. Er härtet langsam durch Aufnahme von Kohlendioxid aus. Er ist stark alkalisch, im gealterten Zustand äußerst spröde und sehr anfällig für Feuchtigkeitsschäden.
- Früher Gipsputz (1920er- bis 1940er-Jahre): Wurde oft auf rock lath (frühe Putzträgerplatte) oder Metalllattung aufgebracht. Er härtet chemisch aus und ist im Allgemeinen härter und spröder als Kalkputz. Er ist etwas widerstandsfähiger gegen Zugkräfte, neigt aber zum Brechen.
- Unbekannte Konstruktionen: Wenn Sie Alter oder Aufbau nicht verifizieren können, verlangt der Fachkonsens, dass Sie die Wand vorerst als die empfindlichste historische Variante (Kalkputz auf Holzlattung) behandeln, bis das Gegenteil bewiesen ist.
Interaktive Vorab-Prüfung des Putzes
Führen Sie diese physische Inspektions-Checkliste vollständig durch. Sobald alle Sicherheitsparameter bestätigt sind, können Sie Ihren Freigabebericht für die Entfernung erstellen.
Das Protokoll für den Patch-Test
Ein Patch-Test auf kleiner Fläche ist nicht verhandelbar. Dieser Test misst genau, wie der jeweilige Klebstoff unter kontrollierten Bedingungen mit Ihrem konkreten Wandaufbau reagiert. Überspringen Sie diesen Schritt niemals, da Umweltfaktoren, die in Ihrem spezifischen Raum einzigartig sind, das Klebstoffverhalten drastisch verändern können.
- Schritt 1: Bereich auswählen: Wählen Sie eine Fliese im am wenigsten sichtbaren Bereich, etwa hinter einem Gerät oder in der Nähe der Fußleisten.
- Schritt 2: Ausgangszustand dokumentieren: Notieren Sie jegliches vorhandenes Absacken, hohle Klangstellen oder sichtbare Feuchtigkeitsschäden rund um die Teststelle.
- Schritt 3: Die Trockenhebung: Versuchen Sie, eine Ecke der Fliese nur mit einem Kunststoffspachtel und sanfter manueller Kraft anzuheben. Verwenden Sie noch keine Wärme. Beobachten Sie den Widerstand.
- Schritt 4: Minimale Wärmeanwendung: Wenn die Trockenhebung scheitert, wenden Sie sehr geringe, indirekte Wärme an. Achten Sie darauf, wie der Klebstoff reagiert und ob die Farbe zu schnell weich wird.
- Schritt 5: Rückstandsbeurteilung: Nachdem die Testfliese entfernt wurde, tragen Sie eine winzige Menge des von Ihnen gewählten Reinigungsmittels auf den verbleibenden Klebstoff auf. Beobachten Sie die Wand auf Verfärbungen oder Erweichung.
Profi-Tipp: Das Wärme-Dilemma
Wärme anzuwenden ist ein gängiger Rat, um Acrylklebstoffe weicher zu machen. An historischen Wänden ist Wärme jedoch eine äußerst heikle Variable. Zwar senkt sie die Viskosität des Fliesenklebers wirksam, greift aber gleichzeitig die darunterliegende historische Farbschicht an. Viele alte öl- oder bleihaltige Farben werden bei Kontakt mit modernen Heißluftpistolen extrem klebrig oder blasen sich auf. Wenn die Farbschicht schneller weich wird als der Fliesenkleber, zieht die Fliese die Farbe einfach direkt vom Putz ab.
Verwenden Sie niemals eine industrielle Heißluftpistole. Nutzen Sie einen normalen Haartrockner auf niedriger Stufe. Bewegen Sie die Düse ständig, um eine punktuelle Wärmeeinwirkung auf eine Stelle zu vermeiden. Halten Sie ihn mindestens sechs Zoll von der Oberfläche entfernt.

Kleberückstände sicher entfernen
Sobald die Fliese entfernt ist, stehen Sie vor der zweiten Herausforderung: klebrige Rückstände. Der Versuch, diese mit Wasser oder starken flüssigen Lösungsmitteln abzuwaschen, ist ein gravierender Fehler.
Historischer Putz, besonders Kalkputz, ist hochporös. Wenn Sie die Wand zu stark befeuchten, wandert die Feuchtigkeit durch die Farbschicht und löst die Bindemittel des Putzes von innen heraus auf. Das führt zu Ausblühungen, Puderbildung und letztlich zum Zusammenbruch. Die empfindliche Gitterstruktur aus ausgehärtetem Kalk kann Druckkräften standhalten, besitzt jedoch nahezu keinen Widerstand gegen hydrochemischen Abbau durch aggressive moderne Reinigungsmittel.
- Mechanisches Abrollen: Ihre erste Verteidigungslinie ist manuelle Reibung. Verwenden Sie ein sauberes Mikrofasertuch oder sogar Ihren Daumen, um den Kleberückstand vorsichtig zu kleinen Kügelchen abzurollen. So entfernen Sie den Großteil des Materials, ohne Flüssigkeiten einzubringen.
- Gezielte chemische Anwendung: Wenn chemische Hilfe nötig ist, sprühen Sie nicht auf die Wand. Tragen Sie ein hochflüchtiges Lösungsmittel (z. B. Waschbenzin oder Isopropylalkohol) mit einem Wattestäbchen auf.
- Kurze Einwirkzeit: Tupfen Sie das Lösungsmittel präzise auf den Klebstoff. Lassen Sie es nicht einweichen. Das Ziel ist, die chemische Bindung sofort zu lösen, alles wegzuwischen und den Bereich unmittelbar trocken zu lassen.
Chemische Verträglichkeit und Lösungsmittel
Sie müssen die Verträglichkeit jedes Lösungsmittels mit alter Farbe prüfen. Citrus-basierte Klebstoffentferner gelten zwar als sicher, enthalten aber d-Limonen. Dieses wirkt wie ein langsam verdunstendes Öl.
Bei einer stark porösen, älteren Wand können diese öligen Rückstände den Putz dauerhaft verfärben und verhindern, dass spätere Farbe oder Grundierung haftet. Alkoholbasierte Lösungsmittel verdunsten deutlich schneller und senken damit das Intervention Risk Threshold erheblich, da die Flüssigkeit kürzer mit dem historischen Untergrund in Kontakt bleibt. Testen Sie Ihr Lösungsmittel immer zuerst an einem versteckten Farbchip.
Umgang mit isolierten Schäden und alternativen Untergründen
Es ist wichtig, zwischen einem lokal begrenzten, oberflächlichen Schaden und einem systemischen Untergrundversagen zu unterscheiden. Gelegentlich kann trotz Ihrer besten Einhaltung der Plaster Surface Preservation Rate eine einzelne Fliese ein kleines Stück der skim coat herausreißen. Das bedeutet nicht zwangsläufig eine komplette strukturelle Überarbeitung, und es heißt auch nicht, dass Ihr gesamtes Projekt verloren ist. In vielen Fällen lässt sich lokaler Schaden eingrenzen und beheben.
Wenn genau dieses Szenario eintritt, ist gezieltes Eingreifen erforderlich. Ist eine peel-and-stick tile beschädigt? Erfahren Sie, wie Sie sie ganz einfach ersetzen, ohne Ihren Boden neu zu verlegen. Schritt-für-Schritt-DIY-Reparaturanleitung für Einsteiger. Probieren Sie es noch heute aus! Lesen Sie die vollständige Methode im Schritt-für-Schritt-Leitfaden zum Ersetzen einer beschädigten peel-and-stick tile um zu verstehen, wie Sie einen Patch nahtlos einfügen, ohne den umliegenden fragilen Putz unnötiger, sekundärer Belastung auszusetzen.
Untergründe im Vergleich: Putz vs. Paneele
Um die erforderliche Vorsicht vollständig zu würdigen, betrachten Sie, wie diese Klebstoffe auf widerstandsfähigeren Oberflächen reagieren. Die physikalischen Bedingungen sind völlig andere.
Wenn man die Leistungsabfallkurve bewertet, zeigen die im Artikel dokumentierten Ergebnisse Wir haben 1970er-Jahre-Paneele getestet: Leitfaden für peel-and-stick tile dass starre, undurchlässige Oberflächen das Entfernen deutlich besser vertragen. An echtem Holzpaneel aus den 1970er-Jahren getestet, zeigt dieser Leitfaden, welche Vorbereitung dafür sorgt, dass peel and stick tile hält. Sehen Sie sich die Ergebnisse an und verlegen Sie mit Vertrauen. Im Vergleich zu Holzpaneelen weist historic plaster eine deutlich höhere Empfindlichkeit gegenüber Zugbelastung und Lösungsmittelaufnahme auf, was die Notwendigkeit äußerster Vorsicht bestätigt. Die undurchlässige Beschaffenheit von Vintage-Holzpaneel-Oberflächen blockiert die Klebstoffmoleküle physisch daran, sich mit dem tiefen Untergrund zu verzahnen – ein Luxus, den poröse lime assemblies nicht bieten.
Kosmetischer Schaden vs. Restaurierungsreparatur
Sie müssen zwischen akzeptabler Oberflächenabnutzung und kritischem Versagen unterscheiden können. Die folgenden Diagnosekriterien ziehen klare Grenzen.
| Schadensklassifizierung | Symptome | Reparaturstrategie |
|---|---|---|
| Oberflächlich kosmetisch | Kleine Farbabplatzungen; leichte Mattierung des Oberflächenglanzes. | Leichtes Schleifen, punktuelles Grundieren und Neuanstrich. |
| Leichter Untergrundverlust | Flache Kerben in der white coat, nicht tiefer als 1/16th of an inch. | Sorgfältiges Auftragen von setting-type joint compound. |
| Restaurierungsniveau (Arbeiten stoppen) | Freigelegte brown coat; tiefe Risse; Putz, der sich von den lath keys löst. | Erfordert einen Spezialisten für Putzrestaurierung, um die Wand wieder zu befestigen und zu egalisieren. |
Jetzt stoppen, wenn Sie dies sehen
Wann Sie einen Profi hinzuziehen sollten
Zu wissen, wann man aufhören muss, ist das wichtigste Werkzeug zum Erhalt. Sie müssen sich strikt an festgelegte stop points halten. Wenn Ihre Wand beim leichten Klopfen hohl klingt, bedeutet das, dass sich der Putz bereits von der Holzlattung dahinter gelöst hat. Das Einzige, was ihn an Ort und Stelle hält, sind die Schwerkraft und die strukturelle Integrität des umliegenden Putzes. Das Abziehen einer klebenden Fliese von einer hohlen Wand führt zwangsläufig dazu, dass der gesamte Abschnitt zusammenbricht.
Wenn Sie bei der ersten Inspektion oder beim patch test pulvernden Putz, starke Delamination oder einen hohlen Klang feststellen, brechen Sie das Projekt ab. Ziehen Sie sofort einen auf Denkmalpflege spezialisierten Putzexperten hinzu.
Die Rolle der Luftfeuchtigkeit in alten Häusern
Ein oft übersehener Faktor in historischen Häusern ist die Umgebungsluftfeuchtigkeit. Lime plaster ist stark hygroskopisch; er nimmt je nach Raumklima Feuchtigkeit auf und gibt sie wieder ab.
Ein Versuch dieses Projekts während hoher Luftfeuchtigkeit erhöht das Risiko. Der Feuchtigkeitsgehalt in der Wand macht die alten Bindemittel etwas weicher, wodurch die skim coat leichter einreißt. Die Kontrolle der Umgebung ist ein aktiver Teil des Untergrundschutzes. Planen Sie die Entfernung für trockene, klimatisierte Phasen, damit der Putz seine maximale natürliche Festigkeit hat. Der Einsatz von Luftentfeuchtern im Arbeitsbereich für 48 hours vor dem mechanischen Eingriff kann die strukturelle Widerstandsfähigkeit der white coat geringfügig verbessern.
Risiko durch langsames Vorgehen minimieren
Geduld ist Ihre wichtigste Strategie. Behandeln Sie das Entfernen eher wie eine archäologische Ausgrabung als wie eine Abrissarbeit.
Arbeiten Sie in kleinen Schritten. Machen Sie häufig Pausen. Wenn Sie merken, dass Sie frustriert werden und stärker oder schneller ziehen, treten Sie einen Schritt zurück. Die strukturelle Integrität einer hundert Jahre alten Wand ist weit mehr wert als die wenigen Stunden, die Sie durch Hast sparen würden.
Häufig gestellte Fragen
Welches Lösungsmittel ist für Kleberückstände auf altem Putz am sichersten?
Nach Denkmalpflegestandards gelten schnell verdunstende Lösungsmittel wie hochreiner Isopropylalkohol oder Waschbenzin im Allgemeinen als am sichersten. Sie verflüchtigen sich rasch und minimieren so das Risiko, in das poröse lime oder gypsum einzuziehen. Vermeiden Sie langsam trocknende, ölbasierte Citrus-Entferner auf historischen Wänden, da sie dauerhafte Flecken verursachen und die spätere Farbhaftung beeinträchtigen können. Führen Sie immer zuerst einen Spot-Test durch.
Wie lange sollte ich Wärme anwenden, bevor ich versuche, eine Fliese anzuheben?
Sie sollten geringe Hitze in kurzen, gleichmäßigen Intervallen von jeweils nicht mehr als 15 bis 30 Sekunden anwenden. Ziel ist es, den Klebstoff nur so weit sanft zu erwärmen, dass seine Viskosität sinkt, nicht die Fliese zu erhitzen oder die darunterliegende historische Farbe Blasen werfen zu lassen. Testen Sie die Ecke der Fliese kontinuierlich; gibt sie leicht nach, ist die Wärmebehandlung ausreichend.
Warum löst sich mein Putz mit der Fliese in weißen Stücken?
Wenn weiße Stücke auf der Rückseite der Fliese haften, ist die Verbindung des Klebstoffs stärker als die Haftung der Deckschicht des Putzes (der skim coat). Das weist auf einen schweren Versagensfall des Untergrunds hin, meist aufgrund von gealtertem, ausgetrocknetem Putz oder früheren Feuchtigkeitsschäden. Sie müssen die Entfernung sofort stoppen, um tiefere strukturelle Schäden zu verhindern.
Kann ich neue peel-and-stick tile auf beschädigtem Putz anbringen?
Neue Klebeprodukte auf nachgebendem, pudrigem oder rissigem Putz anzubringen, ist dringend abzuraten. Der neue Klebstoff haftet dann nur an losem Schutt und führt zu einem sofortigen Versagen. Die Wand muss strukturell stabilisiert, mit geeigneten, abbindenden Spachtelmassen ausgebessert und mit einem ölhaltigen oder pigmentierten Schellack-Primer versiegelt werden, um vor jeder neuen Anwendung einen stabilen, nicht porösen Untergrund zu schaffen.
Abschließende Gedanken
Der sicherste Weg, peel and stick tile von plaster walls zu entfernen, besteht darin, Ihr Ziel grundlegend zu ändern. Sie müssen Ihre Vorgehensweise vollständig auf den Erhalt ausrichten und einen langsameren, sorgfältigeren Prozess statt Tempo und Bequemlichkeit akzeptieren.
Historische Innenräume verlangen Respekt. Indem Sie strikt ein patch-test-Protokoll anwenden, mit minimalen, kraftarmen Entfernungstechniken arbeiten und feste stop points einhalten, schützen Sie die architektonische Integrität Ihres Hauses. Sie verringern das Risiko schwerer Schäden und vermeiden kostspielige Restaurierungsarbeiten.
Wir empfehlen Ihnen dringend, vor Beginn Ihres Projekts eine umfassende Checkliste zur sicheren Putzentfernung herunterzuladen und Leitfäden zur Identifizierung historischer Materialien zu prüfen. Wenn Ihre ersten Tests die hier besprochenen Sicherheitsgrenzen überschreiten, wenden Sie sich an einen auf Erhaltung spezialisierten Putzexperten, damit das Erbe Ihres Hauses erhalten bleibt.


Kommentar hinterlassen
Diese Website ist durch hCaptcha geschützt und es gelten die allgemeinen Geschäftsbedingungen und Datenschutzbestimmungen von hCaptcha.