


Eine professionelle virtuelle Präsenz erfordert mehr als nur eine ordentliche Webcam und ein gebügeltes Hemd. Wenn Ihre täglichen video calls von einem ablenkenden Blick auf ein chaotisches Gästezimmer geprägt sind, riskieren Sie, Ihre Glaubwürdigkeit zu untergraben. Ein schlecht ins Bild gesetzter, unordentlicher Arbeitsbereich signalisiert Kunden und Kollegen subtil, dass Ihnen die Liebe zum Detail fehlt.
Die rasante Zunahme von remote work hat die Art und Weise, wie wir berufliche Beziehungen aufbauen, grundlegend verändert und die Videokonferenz von einem seltenen Ereignis zur zentralen Bühne des modernen Geschäfts gemacht. In dieser digitalen Landschaft fungiert Ihre on-camera presence als Ihre physische Visitenkarte, Ihr Eckbüro und Ihr maßgeschneiderter Anzug – alles vereint in einem einzigen visuellen Bildausschnitt. Psychologische Studien zum „Halo-Effekt“ zeigen, dass Zuschauer unbewusst die Eigenschaften Ihrer Umgebung auf Ihre persönliche Kompetenz übertragen. Ist Ihr Hintergrund sorgfältig, strategisch und ruhig, geht das Gehirn des Betrachters automatisch davon aus, dass auch Ihre Arbeitsmoral und Ihre Organisationsfähigkeiten genau diese Eigenschaften besitzen. Umgekehrt sendet ein chaotischer Hintergrund Botschaften innerer Unordnung – unabhängig von Ihrem tatsächlichen Talent oder Ihrer Vorbereitung.
Eine professionelle Zoom background wall ist ein durchdacht gestalteter Bereich Ihres home office, der auf der Kamera sauber, gut beleuchtet und markenkonform wirkt. Sie kombiniert Design, Beleuchtung und personal branding, um in jedem virtual meeting einen vertrauenswürdigen und gepflegten Eindruck zu hinterlassen.
Die Einrichtung dieses speziellen Bereichs ist eine Investition in Ihre Karriere. Wenn Ihre on-camera presence Ordnung und Absicht ausstrahlt, verbinden Betrachter diese Eigenschaften ganz natürlich mit Ihrer Arbeit. Die Ästhetik Ihres Hintergrunds beeinflusst direkt die wahrgenommene Autorität Ihrer Botschaft. Jeder sichtbare Gegenstand in Ihrem Bildausschnitt – von der Farbe der Wand bis zur Platzierung einer Lampe – ist ein Teil nonverbaler Kommunikation. In Verhandlungen mit hohem Einsatz, Kundengesprächen oder Meetings des Führungsteams ist die Kontrolle dieser nonverbalen Signale oft der Unterschied zwischen Präsenz im Raum und dem Verschwinden im Hintergrund.
Aus unserer Erfahrung in der Beratung von remote teams wissen wir: Eine kontrollierte visuelle Umgebung verändert grundlegend, wie andere Ihre Präsentationen wahrnehmen. Dafür brauchen Sie kein großes Renovierungsbudget. Mit einfachen Prinzipien der Innenraumgestaltung können Sie einen bezahlbaren und äußerst wirkungsvollen Hintergrund schaffen. Es geht um Absicht. Indem Sie den digitalen Raum, den Sie einnehmen, bewusst gestalten, signalisieren Sie Respekt gegenüber den Menschen, mit denen Sie sprechen, und unterstreichen zugleich Ihre eigene professionelle Stellung.
Was macht einen Zoom-Hintergrund auf der Kamera wirklich professionell?
Haben Sie das Gefühl, dass Ihr unordentliches Gästezimmer Ihre berufliche Glaubwürdigkeit bei wichtigen video calls sabotiert? In diesem Abschnitt erfahren Sie die Schlüsselelemente eines kameratauglichen Hintergrunds, damit Ihre virtual meetings sofort Autorität ausstrahlen.
Die Grundlage eines hochwertigen Videosignals sind visuelle Klarheit, kontrollierte Beleuchtung und Markenkonsistenz. Professionalität vor der Kamera bedeutet, alles zu eliminieren, was mit Ihrem Gesicht und Ihrer Stimme konkurriert. Das menschliche Gehirn hat Mühe, dichte visuelle Daten zu verarbeiten, während es gleichzeitig versucht, sich auf ein Gespräch zu konzentrieren.
Wir müssen hier einen entscheidenden Begriff definieren: visueller Lärm. Visueller Lärm bezeichnet ablenkende Elemente innerhalb eines Bildausschnitts – etwa lebhafte Tapetenmuster, verstreute Papiere oder ungemachte Betten –, die das Gehirn des Betrachters zwingen, unnötige Informationen zu verarbeiten. Wenn die Kamera ein unordentliches Bücherregal mit Hunderten zufällig farbiger Buchrücken erfasst oder einen Wäschekorb in der Ecke stehen lässt, wird der Blick des Zuschauers instinktiv von diesem Chaos angezogen. Das ist nicht bloß eine Frage der Ordnung, sondern der visuellen Verarbeitungskapazität.
Die Reduzierung dieses Lärms ist nicht nur eine ästhetische Vorliebe, sondern eine kognitive Notwendigkeit. Eine von Forschern des Virtual Human Interaction Lab der Stanford University veröffentlichte Studie hat empirisch gezeigt, dass komplexe Hintergründe maßgeblich zur Ermüdung bei Videokonferenzen beitragen. Je mehr das Gehirn arbeiten muss, um den Hintergrund zu entschlüsseln, desto weniger Aufmerksamkeit kann es dem Sprecher widmen. Hinzu kommt: Webcams verwenden sehr aggressive Komprimierungsalgorithmen. Wenn Sie vor einem visuell unruhigen Hintergrund sitzen, hat die Software Mühe, die Vielzahl bewegter Pixel zu kodieren, was zu einem verpixelten, niedrig aufgelösten Erscheinungsbild Ihres Gesichts führt. Ein reduzierter Hintergrund verbessert buchstäblich die digitale Auflösung Ihres Streams.
Um einen wirklich professionellen Standard zu erreichen, rät die Branchenmeinung dazu, hochkontrastreiche geometrische Muster strikt zu vermeiden. Solche Elemente bringen Kamerasensoren oft an ihre Grenzen und erzeugen auf dem Bildschirm des Betrachters einen störenden Moiré-Effekt.
Stattdessen entsteht ein professionelles Setup durch die optimale Balance dieser Schlüsselelemente:
- Tiefe und Distanz: Wenn Sie mindestens einen Meter von der Rückwand entfernt sitzen, wirken Sie nicht wie ein flacher, schwebender Kopf. Dieser physische Abstand ermöglicht zudem eine leichte Unschärfe in der Tiefenschärfe, wodurch der Fokus klar auf Sie gelenkt wird.
- Zweckmäßige Schlichtheit: Die Verwendung von Vollfarben oder dezenten Texturen sorgt dafür, dass der Autofokus der Kamera auf Ihrem Gesicht bleibt. Wenn der Hintergrund zu komplex ist, gerät der Autofokus Ihrer Webcam ins „Pumpen“ und zoomt ständig hinein und heraus, während er versucht zu erkennen, was im Bild wichtig ist.
- Strategisches Branding: Wenn Sie einige ausgewählte Objekte auf einem einzelnen Regal platzieren, vermittelt das Ihre Branchenexpertise, ohne das Bild zu überladen. Auszeichnungen, branchenspezifische Bücher oder dezent markenkonforme Objekte erzählen eine Geschichte des Erfolgs.
Betrachten Sie das verbreitete Missverständnis, dass ein digitaler Greenscreen-Hintergrund die ultimative professionelle Lösung sei. In Wirklichkeit kommt es bei digitalen Hintergründen oft zu Störungen, wobei die Ränder von Haaren oder Händen abgeschnitten werden. Eine physische, bewusst gestaltete Wand beseitigt dieses Problem des Abschneidens von Natur aus und sorgt bei jedem Call für ein zuverlässiges, deterministisches Ergebnis. Ein physischer Raum hat eine psychologische Authentizität, die ein digitaler Unschärfeeffekt einfach nicht nachbilden kann. Er signalisiert dem Betrachter, dass Sie in einer realen, professionellen Umgebung verankert sind.
Die Ästhetik über das Büro hinaus erweitern
Die Nachfrage nach professionellen virtuellen Setups geht über klassische Häuser und Wohnungen hinaus. Digitale Nomaden und Remote-Profis, die Vollzeit reisen, stehen vor besonderen räumlichen und baulichen Herausforderungen. Möchten Sie Ihren mobilen Arbeitsplatz einfach auffrischen? Erfahren Sie in unserem Spezialguide, wie Sie mit Peel-and-Stick-Tapeten Wohnmobilwände gestalten und erhalten Sie Profi-Tipps für dauerhafte Ergebnisse.
Den vollständigen RV-Umbau-Guide entdeckenSehen wir uns ein typisches Vorher-Nachher-Szenario an. Vor dem Upgrade zeigte der Hintergrund eines Remote-Beraters einen gut sichtbaren offenen Kleiderschrank und gestapelte Kartons. Das Umgebungslicht verursachte starke Schatten.
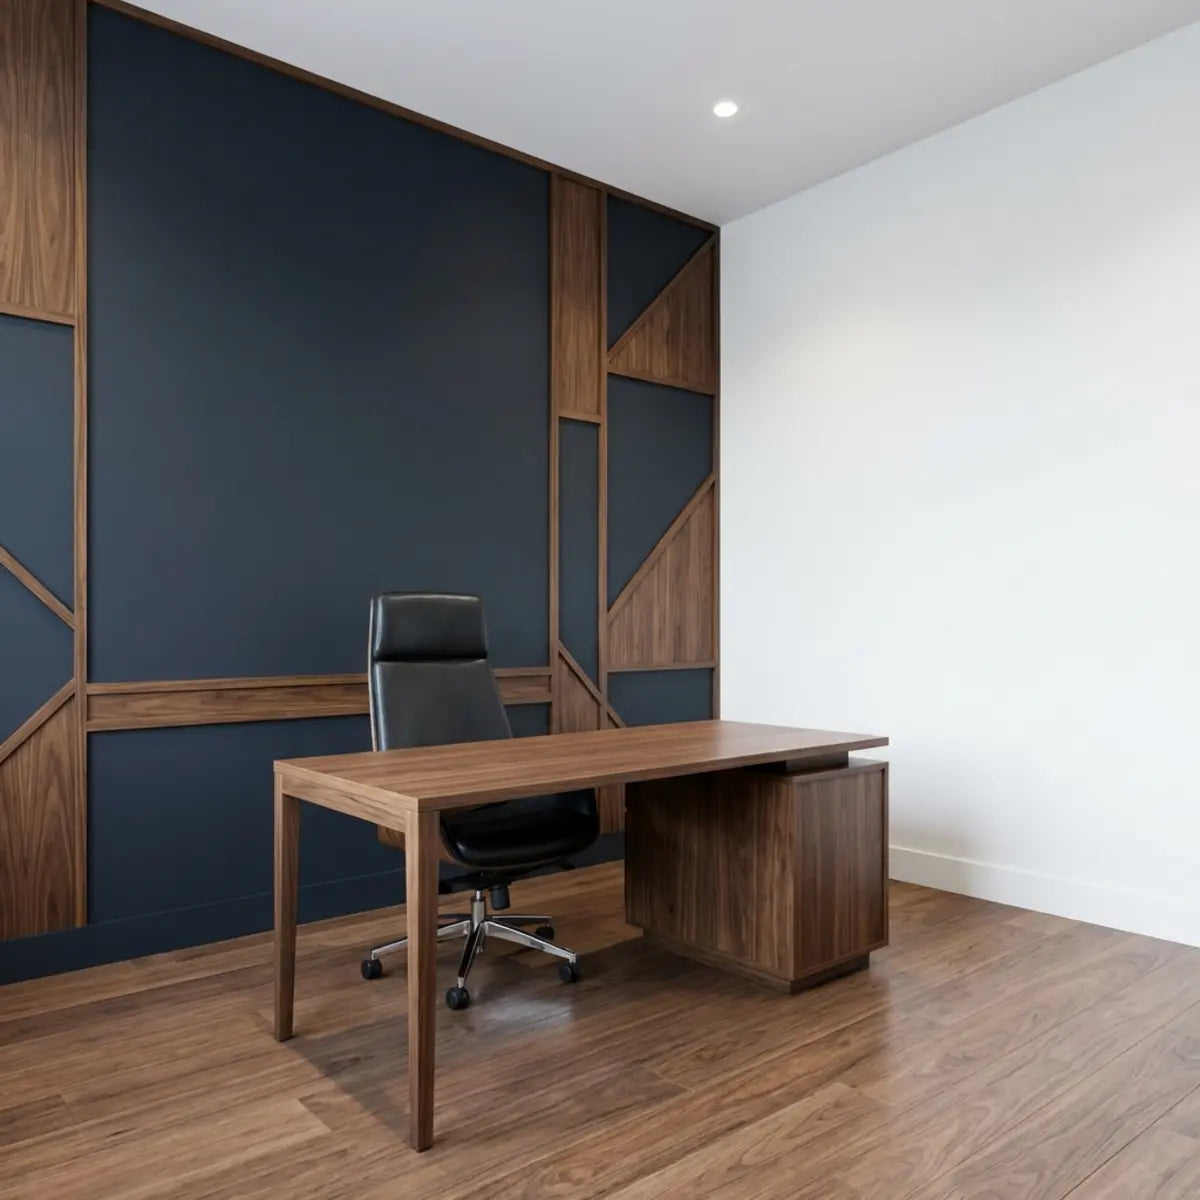
Nach der Umsetzung einer gezielten Strategie drehte der Berater seinen Schreibtisch um 90 Grad, sodass er zu einem Fenster zeigte. Er strich die massive Wand hinter sich in mattem Marineblau und brachte ein einzelnes schwebendes Regal an, auf dem zwei branchenrelevante Bücher standen. Diese standardisierte Bewertung seines Raums erhöhte sofort seine wahrgenommene Autorität.

Wie gestalten Sie eine Akzentwand im home office, die Ihre Zoom-Präsenz verbessert?
Haben Sie Schwierigkeiten herauszufinden, wie Sie eine leere, leblose Wand in eine dynamische Darstellung Ihrer persönlichen Marke verwandeln können? Dieser Abschnitt zeigt, wie Sie strategisch eine Fokuswand auswählen und gestalten, die als wirkungsvoller Anker für Ihre täglichen Meetings dient.
Profi-Tipp: Beherrschen Sie Ihre Kamerageometrie
Bevor Sie Materialien kaufen, zeichnen Sie das Sichtfeld Ihrer Webcam mit Malerkrepp direkt an die Wand. Setzen Sie sich in Ihre normale Arbeitshaltung und lassen Sie eine andere Person das Klebeband exakt an den Rändern des Kamerabildes anbringen. So verschwenden Sie weder Zeit noch Budget für Ecken des Raums, die nie auf dem Bildschirm erscheinen.
Der erste Schritt bei der Gestaltung Ihres virtuellen Sets besteht darin, den richtigen architektonischen Anker auszuwählen. Sie müssen eine Fokuswand identifizieren, die genau hinter Ihrem Schreibtisch liegt und zu Ihrer primären Lichtquelle ausgerichtet ist. Diese spezifische Geometrie stellt sicher, dass Ihre Kamera eine saubere, flache Fläche erfasst, statt einer ungünstigen Ecke. Vermeiden Sie es, Ihre Kamera auf sich kreuzende Raumecken auszurichten, da dies eine beengte, klaustrophobische Optik erzeugt, die Zuschauer unbewusst unwohl fühlen lässt.
Sobald Sie die Wand identifiziert haben, werden die Auswahl der richtigen Textur und Farbe zu Ihrem Hauptziel. Farben vermitteln unbewusste Botschaften. Eine matte Oberfläche gilt allgemein als die beste Wahl für Video, da glänzende Farben Bildschirmreflexionen direkt in das Kameraobjektiv zurückwerfen. Sie müssen den Lichtreflexionswert (LRV) der gewählten Oberfläche berücksichtigen. Ein zu hoher LRV (wie reines Weiß) führt dazu, dass die Kamera Ihr Gesicht unterbelichtet und Sie im Schatten erscheinen lässt. Ein zu niedriger LRV (wie tiefes Schwarz) absorbiert das gesamte Umgebungslicht und lässt den Raum höhlenartig wirken. Mittlere Farbtöne schaffen die perfekte Balance und bieten Kontrast, ohne die Belichtungseinstellungen des Kamerasensors zu beeinflussen.
Farbpsychologie spielt eine enorme Rolle dabei, wie Kunden Sie wahrnehmen. Tiefes Blau vermittelt Stabilität und Vertrauen. Warme, gedeckte Grüntöne schaffen eine beruhigende Umgebung, die die Anspannung bei Gesprächen mit hohem Einsatz reduziert. Sie möchten eine Farbe, die sich von Ihrer typischen Garderobe abhebt, damit Sie im Vordergrund klar hervorstechen. Wenn Sie häufig dunkle Blazer tragen, sollten Sie einen sanfteren, helleren, strukturierten Hintergrund wie Salbeigrün in Betracht ziehen, damit Sie nicht mit der Wand verschmelzen.
Hybrid-Arbeitsbereiche verwandeln
Die Grundsätze, einen auffälligen, mietfreundlichen Blickfang zu schaffen, beschränken sich nicht nur auf Ihr home office. Viele Remote Worker nutzen eine Ecke im Schlafzimmer als Arbeitsplatz. In diesen hybriden Umgebungen ist es entscheidend, klare visuelle Zonen zu schaffen. Wenn Sie die Ästhetik Ihres Schlafzimmers ohne Werkzeuge oder dauerhafte Veränderungen aufwerten möchten, entdecken Sie unsere Schritt-für-Schritt-Anleitung, wie Sie eine luxuriöse Verwandlung schaffen.
Lernen Sie, ein Faux-Headboard mit Peel-and-Stick-Kacheln zu bauenWir begleiten Freelancer oft durch komplette Workspace-Verwandlungen. Nehmen Sie Sarah, eine Grafikdesignerin, die wollte, dass ihr Hintergrund ihre kreative Expertise widerspiegelt, ohne chaotisch zu wirken. Sie markierte das exakte Sichtfeld ihrer Kamera mit Malerkrepp an der Wand.
Durch die Anwendung einer dezenten, strukturierten Behandlung innerhalb dieses genau abgeklemmten Gitters vermied sie es, Zeit und Geld für Bereiche zu verschwenden, die die Kamera nie sehen würde. Diese präzise Framing-Technik kalibriert die Ausgabe Ihrer Webcam und stellt sicher, dass jeder sichtbare Quadratzentimeter einem Zweck dient. Zusätzlich verleiht das Hinzufügen physischer Struktur an der Wand – etwa durch schaumstoffrückseitige Fliesen oder Akustikpaneele – deutliche schalldämpfende Vorteile. Es reduziert den Raumhall und sorgt für ein volleres, sendungsreifes Audioerlebnis für die Menschen, die Ihnen zuhören.

Bei der Bewertung der konkreten Materialien, die für diese Verwandlung benötigt werden, sollten wir über einfache Farbe hinausblicken.
| Materialart | Installationszeit | Risiko von Kamerablendeffekten | Professionelle Wirkung | Idealer Anwendungsfall |
|---|---|---|---|---|
| Matte Farbe | 1–2 Tage | Sehr niedrig | Mittelmäßig | Einfache, minimalistische Hintergründe in Uni-Farben. |
| Gemusterte Tapete | 2–3 Tage | Niedrig | Hoch (wenn dezent) | Subtile Tiefe und luxuriöse Textur hinzufügen. |
| Strukturierte Peel-and-Stick-Optik | 2–4 Stunden | Null | Sehr hoch | Realistisch wirkende Backstein-, Holz- oder Steinoptiken lassen sich schnell erstellen. |
Eine häufige Hürde bei der Umsetzung dieser Wandbehandlungen besteht darin, mit bereits vorhandenen, stark strukturierten Oberflächen umzugehen. Wenn Ihre gewählte Akzentwand nicht perfekt glatt ist, machen Sie sich vielleicht Sorgen über Haftungsprobleme. Glücklicherweise gibt es erprobte Techniken, um das zu überwinden. Probleme mit Tapeten auf unebenen Oberflächen? Entdecken Sie Experten-Schritte, die besten Klebstoffe und DIY-Vorbereitungstipps, damit Ihre Tapete haftet und makellos aussieht – in unserem umfassenden Tutorial.
Lesen: So installieren Sie Tapete erfolgreich auf Wänden mit Orangenhaut-StrukturBei der Bewertung der Gesamtbetriebskosten (TCO) für home office-Upgrades verschiebt sich die Basiskennzahl von reinem Einzelhandelspreis hin zu Installationsausfallzeiten und langfristiger Haltbarkeit. Materialien wie die Moss Gradient Fliese—die eine satte visuelle Tiefe bietet, die mit herkömmlichen Wandstickern nicht zu erreichen ist—weisen im Vergleich zu traditionellem Mauerwerk nachweislich geringere Betriebskosten auf.
Indem sie sich so einfach wie ein Aufkleber anbringen lässt und dabei eine erstklassige Haltbarkeit bietet, setzt dieses Produkt einen neuen Maßstab für Kosteneffizienz. Es wurde entwickelt, um den Aufwand von Fugen und Handwerkerkosten zu umgehen, sodass Sie in nur einem Nachmittag einen strukturierten, kameratauglichen Blickfang schaffen können. Die daraus entstehende Ästhetik ahmt hochwertige architektonische Steinmetzarbeiten nach und vermittelt ein Niveau von Erfolg und Stabilität, das bei Executive-Kunden tiefen Anklang findet.
Wer diesen Ansatz ausweiten möchte, sollte eine stimmige Ästhetik im ganzen Raum schaffen. Die grundlegende Methodik erfordert eine strikte Einhaltung der richtigen Materialauswahl. Der umfassende Rahmen, der in unserem Leitfaden detailliert beschrieben wird, lautet: Sie möchten einen luxuriösen Look mit kleinem Budget? Peel-and-Stick-Mosaikfliesen bieten eine beeindruckende, einfache DIY-Lösung für eine professionelle Akzentwand. Erfahren Sie die Schritte in So erstellen Sie ein Peel-Stick-Mosaik-Meisterwerk, das die quantitative Grundlage liefert, die notwendig ist, um diese Art von DIY-Akzentwand makellos umzusetzen.
Den Rest Ihres Zuhauses aufwerten
Während die Optimierung Ihres home office entscheidend ist, kann die Ausweitung dieser stimmigen Designphilosophie auf Ihre Wohnbereiche die Gesamtästhetik Ihres Zuhauses deutlich aufwerten. Wenn sich Ihr Schreibtisch beispielsweise einen Raum mit dem Wohnzimmer teilt, könnte Sie ein einheitlicher Look interessieren. Erfahren Sie, wie Peel-and-Stick-Fliesen einen modernen, erschwinglichen und mietfreundlichen Blickfang für Entertainment-Center schaffen.
Verwandeln Sie Ihr Wohnzimmer mit einer Peel-and-Stick-TV-AkzentwandWelche Licht- und Deko-Entscheidungen sorgen für die besten Ergebnisse vor der Kamera?
Lässt Ihr Kamerabild Sie ausgewaschen wirken oder wirft es seltsame, unvorteilhafte Schatten? Dieser Abschnitt bietet ein bewährtes Rahmenwerk, um mit gezielter Beleuchtung und minimalistischem Dekor ein makelloses Bild vor der Kamera zu erzielen.
Selbst die schönste strukturierte Akzentwand wird nicht beeindrucken, wenn sie in schlechtes Licht getaucht ist. Die Beleuchtung bestimmt, wie der Kamerasensor Farben, Tiefe und die Konturen Ihres Gesichts wahrnimmt. Sie sollten weiches, gerichtetes Licht priorisieren, um harte Schatten zu vermeiden, die Müdigkeit betonen. Ein schlecht beleuchtetes Gesicht weckt unbewusst Misstrauen; wenn Zuschauer Ihre Augen und Mimik nicht klar erkennen können, entsteht natürlich eine Distanz zu Ihrer Botschaft.
Ein zentrales Konzept, das Sie beherrschen sollten, ist Farbtemperatur. Die Farbtemperatur ist ein in Kelvin (K) gemessener Wert, der die sichtbare Wärme oder Kühle einer Lichtquelle angibt. Eine niedrige Kelvin-Zahl (2700K) erzeugt ein warmes, gelbliches Leuchten, das an ein gemütliches Kaminfeuer oder eine herkömmliche Glühbirne erinnert, während eine hohe Zahl (5600K) den klaren, bläulichen Ton von bedecktem Tageslicht nachbildet.
Für die genauesten Hauttöne und eine natürliche Darstellung des Hintergrunds auf einer Webcam empfiehlt die Branchenmeinung, Ihre Hauptlichter zwischen 4000K und 5000K einzustellen. Dieser Bereich ahmt helles, neutrales Tageslicht nach. Das Mischen verschiedener Farbtemperaturen im selben Raum – etwa eine warme Schreibtischlampe in Kombination mit kühlem Fensterlicht – verwirrt den Weißabgleich der Kamera. Die Software versucht, die widersprüchlichen Daten auszugleichen, was oft zu einem kränklichen, unnatürlichen Hautton oder einem Hintergrund führt, der zu orange oder zu stark blau wirkt. Sie müssen auch den Farbwiedergabeindex (CRI) Ihrer Lampen berücksichtigen. Achten Sie darauf, LED-Leuchten mit einem CRI-Wert von 90 oder höher zu kaufen, was garantiert, dass Farben auf der Kamera naturgetreu wiedergegeben werden.
Viele Menschen unterliegen dem Irrglauben, dass helleres Licht automatisch besseres Licht ist. Eine harte, nackte Glühbirne, die direkt auf Ihr Gesicht gerichtet ist, lässt Ihre Gesichtszüge verblassen und erzeugt blendende Reflexionen auf Ihrem Hintergrund. Weichheit ist das eigentliche Ziel. Das Licht soll sich sanft um Ihr Gesicht legen, Falten aufzufüllen und Augenringe zu minimieren.

Um optimale Ergebnisse zu erzielen, müssen Sie ein strukturiertes Testprotokoll umsetzen, um Ihre Umgebung feinzujustieren. Folgen Sie dieser empirisch belegten Schritt-für-Schritt-Anleitung, um Ihr Framing zu perfektionieren:
- Schritt 1: Das Führungslicht einrichten Platzieren Sie Ihre hellste und weichste Lichtquelle direkt hinter und leicht über Ihrer Webcam. So wird Ihr Gesicht gleichmäßig ausgeleuchtet und dient dem Sensor als primäre Lichtquelle.
- Schritt 2: Die Lichtquelle diffundieren Wenn Ihr Licht zu hart ist, lenken Sie es von einer weißen Wand vor Ihnen ab oder verwenden Sie ein halbtransparentes Diffusorpanel, um den Strahl zu mildern. Diffuses Licht minimiert Hautunreinheiten und harte Blendungen auf Brillen.
- Schritt 3: Streulicht kontrollieren Schalten Sie Ihre Deckenbeleuchtung aus. Deckenlicht wirft tiefe Schatten unter Ihre Augen und beleuchtet die Oberseite Ihres Kopfes nur unzureichend, was einen höhlenartigen, unprofessionellen Eindruck erzeugt, der an einen Verhörraum erinnert.
Wenn Sie die Objekte arrangieren, die vor Ihrer neu beleuchteten Wand stehen, ist größte Zurückhaltung gefragt. Der architektonische Standard zur Minimierung visueller Unordnung bei gleichzeitigem Erhalt von Charakter folgt strikt dem Prinzip der visuellen Balance.
Visuelle Balance meistern
Der umfassende Rahmen, der in unserem Leitfaden „Machen Sie sich Sorgen, dass ein Spritzschutz mit Ihrem Marmor konkurriert? Erfahren Sie, wie Sie markante Marmorarbeitsplatten mit dezenten Peel-and-Stick-Optionen kombinieren“ erläutert wird, liefert die quantitative Grundlage, um kontrastierende Texturen erfolgreich einzusetzen.
Lesen: Wir nutzen visuelle Balance, um Spritzschutz und markanten Marmor zu kombinierenDie Kombination eines dezenten, einfarbigen Hintergrunds mit nur ein oder zwei markanten, gut ausgeleuchteten Deko-Elementen reduziert die visuelle Ermüdung der Zuschauer grundlegend. Betrachten Sie Ihren Hintergrund wie ein Bühnenbild. Eine gesunde, echte Pflanze bringt natürliche Wärme ein – ein Konzept, das als biophiles Design bekannt ist und nachweislich den Stress sowohl für den Sprecher als auch für das Publikum subtil senkt. Ein gerahmtes, dezent abstraktes Kunstwerk bringt einen Hauch Persönlichkeit ein, ohne Aufmerksamkeit zu verlangen. Wenn Sie die Dekoration auf drei sorgfältig ausgewählte Objekte auf einem einzigen Regal beschränken, stellen Sie sicher, dass der Fokus des Zuschauers genau dort bleibt, wo er hingehört – auf Ihnen.

Abschließende Gedanken
Ein professioneller Zoom-Hintergrund zu gestalten ist ein strategischer Prozess, der Lichtkontrolle, sorgfältige Farbauswahl und hochwertige Wandverkleidungen miteinander verbindet. Indem Sie visuelle Störfaktoren beseitigen und auf weiches, ausgewogenes Licht setzen, steigern Sie Ihre Glaubwürdigkeit vor der Kamera sofort. Ein hochwertiger Look lässt sich ganz einfach mit gezielten Anstrichen oder innovativen Peel-and-Stick-Lösungen erzielen, die nur minimale Ausfallzeiten erfordern.
Ihr digitaler Arbeitsplatz verdient dieselbe Pflege und denselben Respekt wie ein physischer Konferenzraum. Einmal eingerichtet, zahlt sich diese ästhetische Investition täglich in Form von mehr Autorität, klarerer Kommunikation und einer überzeugenden virtuellen Präsenz aus, die bei jedem Kollegen und Kunden, dem Sie begegnen, einen bleibenden positiven Eindruck hinterlässt.
Wir empfehlen Ihnen, Ihren aktuellen virtuellen Bildausschnitt noch heute zu überprüfen. Machen Sie bei Ihrem nächsten Meeting einen Screenshot und identifizieren Sie einen Bereich mit visueller Unordnung, den Sie entfernen können. Eine vollständige Schritt-für-Schritt-Anleitung zur Optimierung Ihres Arbeitsbereichs finden Sie in unserer kompletten home office design checklist oder in unseren weiteren Ratgebern zur Innenraumgestaltung.
Interaktive Leserumfrage: Prüfen Sie Ihren Raum
Was fehlt Ihrem aktuellen Zoom-Setup am meisten?
Häufig gestellte Fragen
Kann ich einfach einen digitalen Unschärfeeffekt verwenden, statt eine Wand zu gestalten?
Digitale Unschärfeeffekte sind für vorübergehende Situationen zwar praktisch, aber keine dauerhafte Lösung. Die Software hat oft Schwierigkeiten, die Konturen von Kopf und Schultern präzise zu erkennen, was bei Bewegungen einen ablenkenden, glitchigen Halo-Effekt erzeugt. Eine physische, gut gestaltete Hintergrundwand vermittelt ein deutlich höheres Maß an authentischer Professionalität.
Welche ist die absolut beste Wandfarbe für einen Videoanruf-Hintergrund?
Matte Farben im mittleren Tonbereich schneiden vor der Kamera in der Regel am besten ab. Dunkles Marineblau, Salbeigrün und warmes Anthrazitgrau bieten einen hervorragenden Kontrast zu menschlichen Hauttönen, ohne den Sensor zu überfordern. Helle Weißtöne sollten vermieden werden, da sie oft zu viel Licht reflektieren und das Gesicht der Kamera dunkler erscheinen lassen.
Muss ich eine teure Ringlampe kaufen?
Nein, eine teure Ringlampe ist nicht zwingend erforderlich. Wenn Ihr Schreibtisch zu einem großen Fenster ausgerichtet ist, bietet natürliches Tageslicht eine hervorragende, weiche Ausleuchtung. Arbeiten Sie in einem dunkleren Raum, kann eine einfache LED-Schreibtischlampe, deren Licht direkt an die Wand vor Ihnen reflektiert wird, für einen Bruchteil der Kosten ein wunderschön diffuses Licht erzeugen.
Wie viel Platz brauche ich hinter meinem Schreibtisch für einen guten Hintergrund?
Idealerweise sollten Sie mindestens drei bis vier Fuß Abstand zwischen der Rückseite Ihres Bürostuhls und Ihrer Akzentwand lassen. Dieser physische Abstand erzeugt eine natürliche Tiefenwirkung, sodass die Webcam Ihr Gesicht scharf halten kann, während der Hintergrund leicht weicher wirkt, was professionelle Fotografie nachahmt.

Kommentar hinterlassen
Diese Website ist durch hCaptcha geschützt und es gelten die allgemeinen Geschäftsbedingungen und Datenschutzbestimmungen von hCaptcha.