


Respuesta rápida: cómo limpiar con seguridad la grasa de los backsplash de peel-and-stick
Para mantener tu backsplash sin destruir el adhesive, sigue este protocolo directo:
-
Empieza en seco: Retira el polvo suelto con un paño de microfibra seco antes de añadir cualquier líquido.
-
Emulsiona con calor: Aplica un paño de microfibra tibio y ligeramente jabonoso directamente sobre las manchas incrustadas durante 60 segundos para ablandar los polímeros.
-
Desengrasado localizado: Si hace falta, aplica un desengrasante especializado, probado antes en una zona pequeña, sobre el paño; nunca lo pulverices directamente sobre las juntas de la pared.
-
Seca por completo: Seca perfectamente todos los bordes y juntas para evitar que la acción capilar arrastre la humedad hacia la base del adhesive.
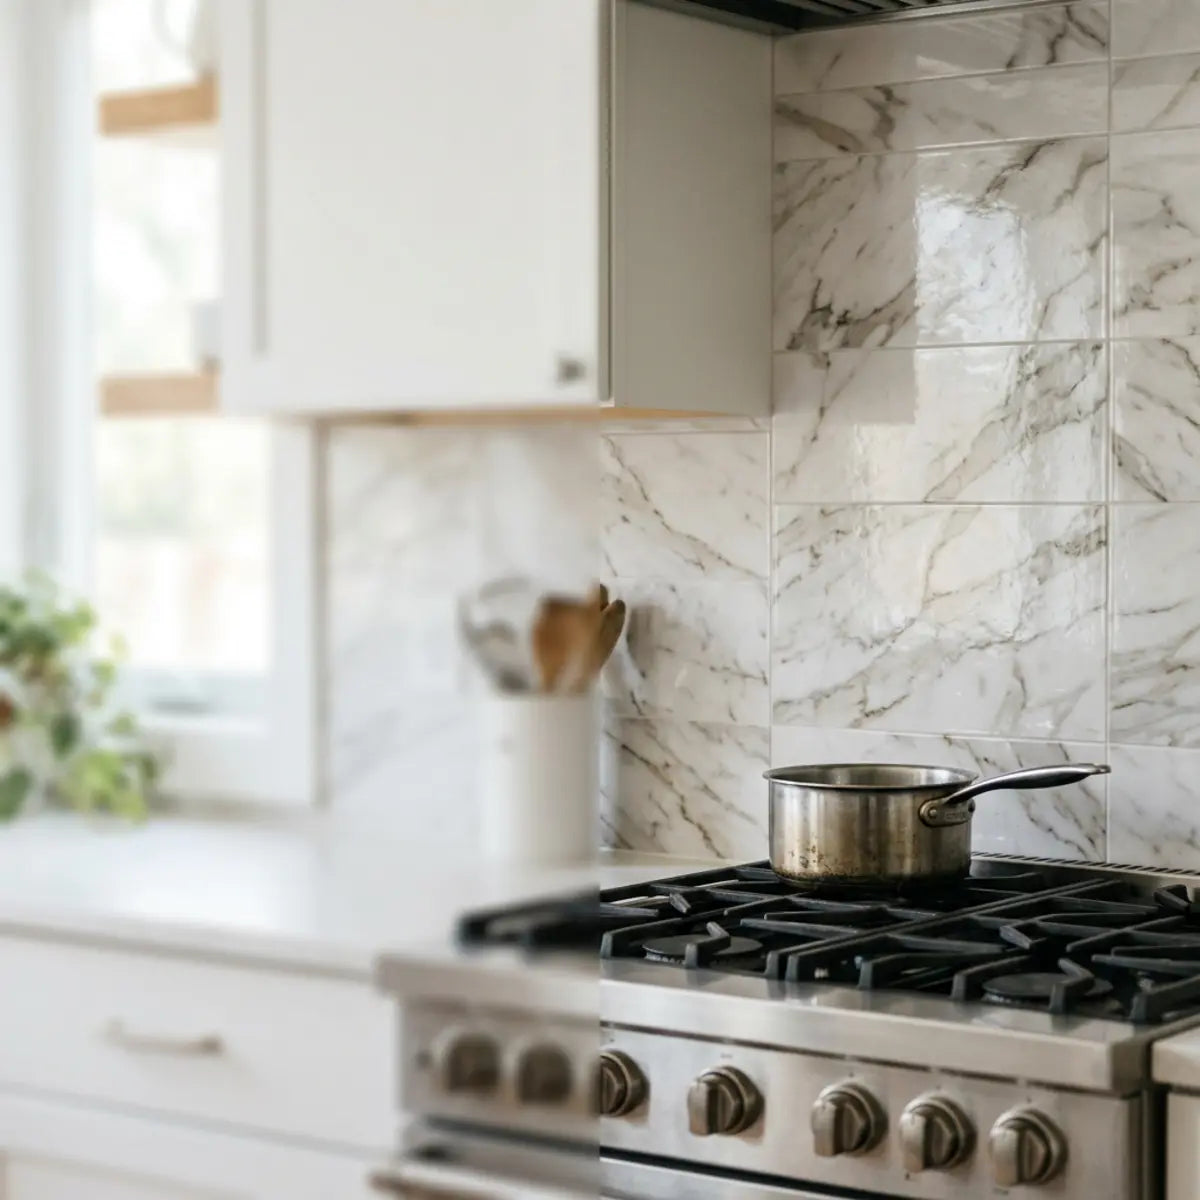
Una semana de cocinar wok intensamente en una gas stove de alto rendimiento deja una zona de salpicaduras pegajosa y persistente. Esta acumulación de grasa se ve sucia y compromete la higiene de tu espacio de cocina. Y, más importante aún, pone tu peel-and-stick backsplash en serio riesgo de fallo del adhesive. Muchos cocineros caseros frecuentes dudan en enfrentarse a este desastre por miedo a que los químicos fuertes o el frotado intenso dañen de forma permanente los revestimientos de pared. La preocupación está completamente justificada; una sola sesión de limpieza mal planteada con una esponja abrasiva puede arruinar una mejora de cocina por lo demás impecable, convirtiendo un triunfo de DIY de fin de semana en una antiestética superficie despegada y costosa.
Para limpiar con seguridad la grasa pesada de un peel and stick backsplash, empieza con una pasada de agua tibia y jabón para platos, usa un paño suave de microfibra y solo pasa a desengrasantes aprobados por el fabricante o seguros según la etiqueta después de probarlos en una zona pequeña. En cocinas de alto rendimiento con gas stove o cocina wok, el objetivo no es la máxima potencia desengrasante, sino preservar el Peel-Retention Score eliminando la grasa sin ablandar el adhesive, opacar el acabado ni forzar las juntas cerca de la stove. La delicada interacción entre una higiene eficaz y la conservación del material exige un cambio de mentalidad. Ya no estás solo limpiando una pared; estás cuidando el entorno microscópico de un sistema de adhesive sensible.
Debemos abordar este proceso de forma estratégica. El objetivo es levantar la grasa con eficiencia y dejar intactos por completo los materiales subyacentes. Lograr ese equilibrio exige seguir con rigor unas normas de limpieza adecuadas para superficies, dejando a un lado las tácticas agresivas y bruscas que un tile tradicional podría tolerar. Al aplicar un enfoque sistemático, garantizas la durabilidad del atractivo estético de tu cocina.
- • Usa primero el limpiador menos agresivo: Empieza siempre con soluciones suaves antes de recurrir a disolventes químicos. Establecer esta base protege el importante acabado de capa transparente de tus tiles.
- • Céntrate en la zona de salpicaduras de la stove: Presta especial atención a las áreas directamente detrás y junto a los burners. Este microentorno localizado sufre la mayor concentración de estrés térmico y químico.
- • Sigue un calendario de limpieza realista: Un mantenimiento frecuente y ligero evita que la grasa se hornee sobre la superficie y se endurezca. El cuidado rutinario interrumpe de forma fundamental el proceso de polimerización de los aceites de cocina.
Esta guía ofrece un marco completo para mantener la estética de tu cocina. Nos centramos especialmente en prácticas seguras para el material, adaptadas a entornos de cocina reales y de alto rendimiento. Entender la ciencia subyacente de cómo interactúa la grasa con los materiales sintéticos te dará la confianza necesaria para afrontar incluso los desastres culinarios más difíciles.

¿Cómo se limpia la grasa del backsplash peel and stick sin dañarlo?
¿Te frustran los consejos genéricos sobre backsplash que asumen que tienes tiles de cerámica o piedra indestructibles? ¿Te preocupa que limpiar las salpicaduras del salteado de anoche se lleve también el revestimiento de la pared?
Esta sección revela una guía paso a paso diseñada para retirar con seguridad las grasas de cocina más pesadas sin debilitar el adhesive, rayar el acabado falso ni hacer que se levanten las juntas.
El reto fundamental con los revestimientos de pared con adhesive es equilibrar un buen desengrasado con la seguridad del material. Un tile tradicional puede soportar abrasivos fuertes y remojo. Los materiales peel-and-stick requieren un enfoque más calibrado. Los polímeros sintéticos que forman la bonita superficie de tu faux tile pueden dañarse con facilidad por los mismos químicos que disuelven la grasa del bacon. Entender esta diferencia es el primer paso para convertirte en un experto en la conservación de superficies de cocina.
Evaluamos este equilibrio con el Peel-Retention Score (PRS), una métrica compuesta que mide la eficacia de eliminación de grasa frente a la preservación del acabado de la superficie y la integridad del adhesive con el paso del tiempo. Un PRS alto indica una limpieza exitosa sin ningún daño a la instalación. Mantener un PRS alto durante toda la vida útil de tu cocina evita la triste situación en la que tiles perfectamente buenos simplemente se caen de la pared por fatiga química en las juntas.
La escalera de limpieza de menor a mayor agresividad
Establecer una evaluación estandarizada para tus métodos de limpieza evita daños accidentales. Siempre recomendamos empezar por el peldaño más bajo de la escalera de limpieza. Al obligarte a subir solo cuando sea absolutamente necesario, proteges de forma natural los frágiles bordes microscópicos de la instalación frente a la saturación química.
- Limpieza en seco: Empieza retirando el polvo suelto con un paño de microfibra seco. El polvo se une a la grasa húmeda y crea una pasta turbia más difícil de limpiar. Este paso crítico minimiza la cantidad de fricción con líquido que se necesitará más adelante.
- Agua tibia y jabón: Mezcla unas gotas de jabón para platos que corte la grasa con agua muy tibia. El calor ayuda a ablandar los aceites. Las propiedades tensioactivas de un jabón para platos de buena calidad suelen ser más que suficientes para encapsular con seguridad los aceites superficiales no polimerizados.
- La pasada con microfibra: Usa un paño de microfibra suave y húmedo. La microfibra atrapa las moléculas de grasa en lugar de solo extenderlas por la superficie. Los microganchos propios del tejido de microfibra realizan la elevación mecánica que, de otro modo, exigiría esponjas abrasivas peligrosas.
- Aplicación localizada de desengrasante: Solo si el jabón falla, aplica con suavidad un desengrasante especializado y probado antes en una zona pequeña sobre el paño, no directamente sobre la pared. La aplicación directa garantiza la pulverización excesiva, que inevitablemente se acumula en las juntas vulnerables entre paneles.
Cómo tratar las salpicaduras recientes frente a la grasa pegajosa incrustada
La grasa fresca es muy fluida y queda suelta sobre la superficie. Basta con pasar un paño con agua jabonosa para retirarla fácilmente. Si se deja sin tratar, el calor de las siguientes sesiones de cocina provoca la polimerización, la reacción química en la que las moléculas de aceite líquido se unen para formar una resina sólida y pegajosa. Esta resina es, en esencia, una capa plastificada de materia orgánica que se ancla firmemente en los poros microscópicos del acabado transparente de tu backsplash.
La grasa polimerizada requiere otro enfoque. No puedes simplemente limpiarla y ya. En su lugar, debes reemulsionar con cuidado la resina endurecida. Aplica un paño tibio y jabonoso sobre la zona pegajosa y déjalo allí durante 60 segundos para ablandar la unión antes de pasar el paño. Acelerar este proceso frotando con fuerza solo dañará la cara de vinilo. La paciencia es un ingrediente crítico al deshacer aceites de cocina polimerizados.
Consejo profesional: La regla de secado de las juntas
Después de tratar la grasa polimerizada con humedad tibia, debes secar inmediatamente las juntas. Toma un paño de microfibra nuevo y completamente seco y pásalo con firmeza por las líneas de unión de los azulejos. Cualquier resto de agua que quede sobre una junta será absorbido por debajo del tile por acción capilar, comprometiendo en silencio la base adhesiva durante las siguientes 24 horas.

Prueba previa e identificación de señales de alerta
Antes de aplicar cualquier producto nuevo a todo el backsplash, debes hacer una prueba en un punto. Elige una esquina oculta detrás de un electrodoméstico. Aplica tu solución, límpiala y revisa bien la zona con buena iluminación. Este simple hábito puede ahorrarte miles de dólares en costos de reemplazo. Recomendamos tener una "esquina de prueba" dedicada exactamente para este fin y supervisarla durante 24 horas para tener en cuenta posibles reacciones químicas tardías.
Observa con atención indicadores concretos de fallo. Si la superficie se vuelve pegajosa al tacto, el limpiador está disolviendo la capa superior. Si notas que los bordes se levantan, una neblina opaca o decoloración, detente de inmediato. Las juntas reblandecidas indican que el producto químico está atacando la base adhesiva. Una superficie pegajosa significa que la integridad estructural de la capa protectora del vinilo se ha roto, convirtiéndola en un imán para futura grasa e imposibilitando su limpieza a partir de ese momento.
Aplicar la presión adecuada en distintos acabados
Los backsplashes peel-and-stick vienen en varios materiales distintos, y cada uno requiere un manejo específico. El azulejo falso y el vinilo fino necesitan el toque más ligero, ya que una presión fuerte puede estirar el material. Las superficies a base de gel son propensas a rayarse, por lo que las esponjas abrasivas están estrictamente prohibidas. La estructura molecular de estos geles ofrece una profundidad hermosa, similar al vidrio, pero esa estética tiene el costo de una menor dureza estructural.
Los tiles compuestos de metal o de PVC más grueso ofrecen mayor durabilidad. Sin embargo, frotar con agresividad cualquiera de estas superficies puede forzar el paso de líquidos de limpieza bajo los bordes. Esto activa la acción capilar, el proceso por el cual los líquidos fluyen hacia espacios estrechos sin ayuda de la gravedad, arrastrando la humedad directamente a la capa adhesiva. Una vez que un líquido ha pasado la cara frontal del tile y ha atravesado el reverso adhesivo, el fallo estructural es matemáticamente inevitable. La unión simplemente no puede sobrevivir a la saturación de líquido.
Por qué las tácticas agresivas reducen tu puntuación de retención del peel-and-stick
Intentar acelerar el proceso suele llevar a un fallo catastrófico. El exceso de pulverización satura la pared y permite que el líquido se acumule en las juntas. Empapar la superficie degrada la capa superior impermeable. Cada vez que atajas y rocías una gran cantidad de disolvente fuerte directamente sobre la pared, estás acelerando de forma significativa el momento de tu próxima reforma.
La limpieza con vapor introduce calor intenso y humedad al mismo tiempo, disolviendo el pegamento con rapidez. Las esponjas abrasivas crean microarañazos que atrapan la grasa futura. La lejía, la acetona y los disolventes fuertes descomponen químicamente tanto la cara de vinilo como el reverso adhesivo. Es una verdad fundamental en la ciencia de materiales sintéticos: la abrasión mecánica y los oxidantes agresivos reducirán drásticamente tu puntuación de retención del peel-and-stick hasta que el sistema alcance un fallo crítico.
Referencia determinista: comparación del PRS
La siguiente tabla ofrece una base cuantitativa para evaluar distintos agentes de limpieza según nuestra metodología PRS. Apoyarse en marcos basados en datos elimina las dudas y la carga emocional del mantenimiento de la cocina, asegurando que tus acciones preserven de forma definitiva tu inversión.
| Agente de limpieza | Eficacia para eliminar grasa | Calificación de seguridad para la superficie | Calificación de seguridad del adhesivo | Puntuación general de retención del peel-and-stick (PRS) |
|---|---|---|---|---|
| Jabón lavavajillas tibio | Moderada | Excelente | Excelente | Alta (referencia óptima) |
| Vinagre diluido | Baja | Buena | Regular (riesgo en las juntas) | Moderada |
| Desengrasantes cítricos | Alta | Regular | Mala (disuelve el pegamento) | Baja |
| Polvos abrasivos | Alta | Mala (rayan) | Buena | Bajo |
| Acetona / lejía | Extremo | Destructivo | Destructivo | Fallo crítico |
Interactivo: lista de verificación antes de pulverizar
No apliques ningún limpiador potente sin confirmar antes los siguientes pasos de seguridad. Haz clic en cada elemento para marcarlo en tu lista de protocolo.
Establecer una base química segura
Al evaluar la curva de degradación del rendimiento del dorso adhesivo frente a la exposición química, la metodología básica exige una adhesión estricta a una evaluación estandarizada. No podemos permitirnos adivinar qué productos químicos son seguros cuando hay miles de dólares y incontables horas de trabajo en juego. El marco integral detallado en nuestro artículo descubre 7 limpiadores domésticos comunes que arruinan los peel-and-stick tiles al descomponer los adhesivos proporciona la base cuantitativa necesaria para aplicar un protocolo de limpieza que mitigue de forma fundamental el fallo del adhesivo. Esta lectura esencial ofrece el único análisis en profundidad que no solo enumera los limpiadores dañinos, sino que explica exactamente *por qué* provocan el fallo del adhesivo, ayudando a los lectores a comprender los efectos químicos y a elegir con confianza alternativas seguras para proteger hoy mismo sus instalaciones en suelos y paredes.
Entender qué productos químicos desencadenan un deterioro inmediato es fundamental. El consenso del sector dicta que evitar disolventes agresivos neutraliza de forma inherente la principal causa del desprendimiento prematuro. Al equiparte con un conocimiento científico profundo de qué compuestos atacan los polímeros del adhesivo, prácticamente construyes un foso químico alrededor de tu inversión, asegurando que tu backsplash sobreviva durante mucho tiempo en el futuro.
Soluciones desengrasantes demostradas empíricamente
Al evaluar una extracción segura de grasa, el proceso requiere una estricta adhesión a la neutralidad química. El mercado está inundado de limpiadores agresivos que prometen resultados milagrosos, pero estas promesas casi siempre se consiguen a costa de la integridad del material. La metodología descrita en nuestro informe de investigación altamente detallado, Probado, no supuesto: aprende a limpiar la grasa del peel-and-stick backsplash de forma segura sin dañar el acabado ni el adhesivo, establece un equivalente revisado por pares para el mantenimiento seguro. Ofrece a los lectores una respuesta respaldada por pruebas en lugar de consejos de limpieza genéricos, mostrando exactamente qué desengrasantes funcionaron en los peel-and-stick tiles compuestos, cuáles fueron los más seguros para superficies con adhesivo y cómo pasar del jabón suave para platos a limpiadores más potentes sin causar daños estructurales.
Al probar exactamente cómo interactúan las distintas fórmulas con materiales compuestos, este recurso calibra el resultado de tus esfuerzos de limpieza. Te ayuda a seleccionar una solución diseñada para evitar los riesgos estructurales asociados con desengrasantes químicos potentes, demostrando que no necesitas elegir entre una cocina impecable y un backsplash firmemente adherido.
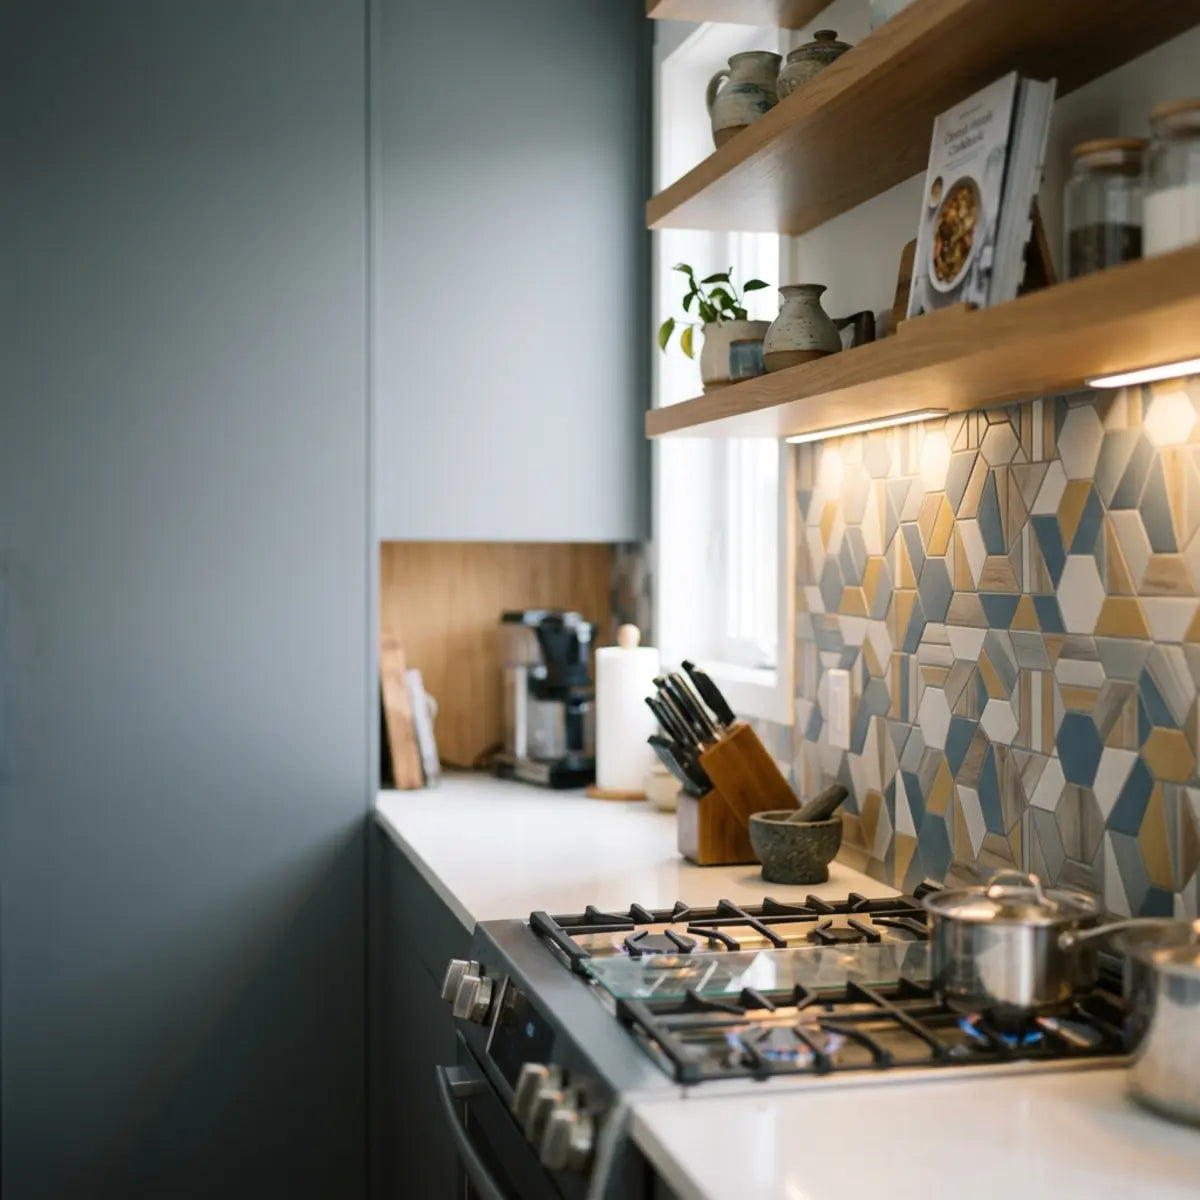
¿El calor de una gas stove puede dañar el peel-and-stick backsplash con el tiempo?
¿Alguna vez te has preguntado si el intenso calor que desprenden los quemadores delanteros está derritiendo poco a poco el pegamento que sostiene tu nuevo backsplash?
Desglosamos el modelo de daños acumulativos por calor y vapor, dándote las herramientas para identificar pronto el estrés térmico y detener el fallo del adhesivo antes de que los paneles empiecen a despegarse de la pared.
Muchos propietarios se centran por completo en encontrar el limpiador de superficie adecuado. Pasan por alto por completo las fuerzas invisibles que degradan la instalación desde atrás. La exposición repetida a fluctuaciones extremas de temperatura altera de forma fundamental la integridad estructural de los materiales adhesivos. Igual que el agua talla un cañón a lo largo de miles de años, el ciclo diario de calentamiento y enfriamiento desgarran lentamente los enlaces químicos que mantienen fijado el revestimiento de la pared.
Medimos este riesgo mediante la Carga de Estrés Térmico-Adhesivo (TASL, por sus siglas en inglés): la exposición acumulada al calor, vapor, grasa y fricción de limpieza dirigida a la superficie cercana a la stove. Entender la TASL específica de tu cocina es vital para una supervivencia a largo plazo. No calcular esta carga te deja completamente ciego ante el daño progresivo que ocurre fuera de la vista, justo detrás de tus ollas a fuego lento.
Entender el modelo de daños acumulativos
Los daños térmicos rara vez ocurren en un solo evento catastrófico. Son una degradación lenta y progresiva. Cada vez que hierves agua o sellas un filete, el revestimiento de la pared absorbe energía térmica. Este bombardeo continuo de energía actúa como un ariete en cámara lenta, poniendo a prueba sin cesar la resistencia de las cadenas de polímeros dentro de la matriz adhesiva.
Esto desencadena la desorción térmica, el proceso físico por el que el calor prolongado empieza a romper los enlaces microscópicos entre el adhesivo y el sustrato de la pared. Tras meses de cocinar a alta potencia, el levantamiento de bordes y el reblandecimiento de las juntas se hacen visibles a medida que se acumulan los ciclos de TASL. Lo que empieza como una pérdida invisible de fricción microscópica pronto se manifiesta en un borde muy visible y curvado que acumula suciedad y desafía una reparación sencilla.
Detectar señales tempranas de daños por calor
La intervención temprana evita el fallo completo del panel. Debes inspeccionar con regularidad la zona justo detrás de la stove. Observa de cerca las esquinas curvadas, que indican que el adhesivo se ha secado y contraído. Detectar estos retrocesos microscópicos a tiempo permite una intervención específica antes de que la cascada de daños comprometa toda la rejilla de paneles.
El oscurecimiento de las juntas, cuando aparece una línea oscura entre los tiles, sugiere que el pegamento está rezumando o encogiéndose. Las burbujas bajo la superficie indican gas atrapado por adhesivo sobrecalentado. Si los bordes siguen sintiéndose pegajosos incluso después de una limpieza a fondo, el pegamento se está degradando activamente. Estas señales visuales y táctiles son tu instalación pidiendo ayuda; ignorarlas garantiza un fallo catastrófico total de la superficie localizada.
El peligro oculto de la trampa grasa-calor
Existe una relación acumulativa entre una pared sucia y el daño térmico. Una fina película de aceite de cocina polimerizado actúa como un aislante térmico eficaz. Esta relación insidiosa significa que no limpiar el backsplash en realidad acelera su destrucción física por el calor.
Cuando el calor irradia desde la stove, esta capa de grasa atrapa la energía térmica contra la superficie, elevando artificialmente la temperatura del vinilo. Este calor retenido acelera la degradación del pegamento subyacente. Además, una capa de grasa muy incrustada requiere un fregado agresivo, lo que añade estrés mecánico a unas juntas ya debilitadas. Se convierte en un círculo vicioso de retención de calor y fregado agresivo que destroza rápidamente la integridad estructural de la instalación.
Colocación de los quemadores y estrategias de mitigación
Tus hábitos de cocina influyen mucho en la vida útil de tu backsplash. Dorar carnes en los quemadores delanteros reduce drásticamente la exposición térmica a la pared trasera. Los quemadores traseros de alta potencia generan un calor intenso y localizado directamente contra la instalación. Simplemente cambiando qué quemador usas para las aplicaciones a alta temperatura, puedes reducir drásticamente la TASL enfocada en la pared vulnerable justo detrás de la stove.
Una ventilación adecuada mitiga de forma fundamental la acumulación de calor. Usar una campana extractora de alto CFM arrastra el vapor, la grasa vaporizada y el calor ambiental lejos de la pared. Este hábito sencillo prolonga de forma notable el umbral de funcionamiento de tu adhesivo. Consideramos que la ventilación activa es el paso de mantenimiento preventivo más importante en cualquier cocina que utilice revestimientos adhesivos de pared.
Perspectivas de expertos sobre la exposición térmica
El consenso de la industria dicta que el espacio libre y la ventilación adecuados determinan el umbral operativo de los revestimientos de pared combustibles. Según evaluaciones líderes en ciencia de materiales sobre adhesivos arquitectónicos, la exposición constante a temperaturas superiores a 120°F (49°C) acelera la falla de la unión hasta en 400%. Las matemáticas son implacables; no se puede desafiar la física de la transferencia de energía térmica contra los adhesivos orgánicos.
Además, la guía autorizada de los códigos de ventilación estándar enfatiza que las campanas extractoras deben estar activas durante toda cocción a fuego alto para extraer correctamente las partículas y reducir la temperatura ambiente de las paredes. Usar una cocina de gas de alto rendimiento sin ventilación mecánica no solo es una mala práctica culinaria; también daña activamente los acabados arquitectónicos que rodean el aparato.
Autoevaluación: ¿Tu stove zone tiene alto riesgo?
Calcula la Carga de Estrés Térmico-Adhesivo (TASL) de tu cocina para anticipar futuras necesidades de mantenimiento.
Referencia determinista: condiciones TASL
Evaluar tu entorno de cocción específico te permite anticipar las necesidades de mantenimiento antes de que ocurra un desastre. Al comparar tus variables ambientales con curvas conocidas de degradación del adhesivo, obtienes control total sobre el ciclo de vida de tu instalación. Esta tabla describe el impacto de distintos niveles de carga de estrés térmico-adhesivo y ofrece una hoja de ruta para intervenciones de protección.
| Nivel TASL | Hábitos de cocción y entorno | Impacto esperado en el adhesivo | Estrategia de mitigación requerida |
|---|---|---|---|
| Bajo | Cocción ocasional, cocina eléctrica, excelente ventilación. | Degradación mínima. | Limpieza mensual estándar. |
| Moderado | Cocina diaria, cocina de gas (principalmente quemadores delanteros), buena ventilación. | Desgaste lento de los bordes en 2-3 años. | Limpieza quincenal, inspecciona las juntas cada trimestre. |
| Alto | Cocina intensa con wok, cocina de gas (quemadores traseros), ventilación deficiente. | Reblandecimiento rápido, curvado en cuestión de meses. | Se requieren protectores térmicos, limpieza inmediata de salpicaduras. |
Asegurando el estándar arquitectónico
Cuando se considera la degradación del rendimiento a largo plazo bajo altas cargas térmicas, elegir el material correcto es absolutamente fundamental. Ninguna cantidad de limpieza cuidadosa puede salvar un producto de calidad inferior sometido a calor extremo y localizado. El completo y muy detallado Baldosas peel and stick resistentes al calor para cocinas de alto calor marco establece un paradigma de durabilidad reconocido universalmente. ¿Te preocupa el calor detrás de tu stove? Las baldosas peel and stick resistentes al calor son una solución DIY duradera y con estilo. Esta guía a fondo te enseña exactamente cómo elegirlas e instalarlas, protegiendo tu inversión del choque térmico extremo.
Al utilizar materiales formulados específicamente para soportar temperaturas elevadas, neutralizas de forma inherente la causa principal de la deformación térmica. La ingeniería detrás de estos compuestos avanzados garantiza que la matriz adhesiva permanezca estable incluso cuando se somete a una radiación térmica intensa y prolongada. Este enfoque ofrece una configuración óptima para quienes cocinan con frecuencia en casa y exigen tanto alto rendimiento culinario como una estética arquitectónica impecable.
Implementación de seguridad estandarizada para la instalación
La durabilidad estadísticamente significativa depende de una aplicación adecuada cerca de zonas de alto uso. Instalar un producto premium de forma incorrecta introduce vulnerabilidades fatales en el sistema. El protocolo crítico detallado en Cómo instalar peel and stick tiles resistentes al calor detrás de tu estufa ofrece un resultado determinista para una seguridad térmica completa. ¿Te preocupa si los peel & stick tiles son seguros detrás de tu estufa? Esta guía te ayuda a descubrir cómo elegir materiales resistentes al calor, preparar la pared como un experto e instalar tu backsplash con un espacio de seguridad arquitectónicamente sólido para evitar una transferencia de calor catastrófica.
Esta guía sigue estrictamente los espacios de seguridad y las técnicas de preparación de la pared requeridos. La precisión durante la fase de preparación se correlaciona directamente con la vida útil de la instalación. Al seguir esta evaluación estandarizada de la resistencia al calor, garantizas la integridad estructural de las mejoras de tu cocina sin comprometer la seguridad, permitiéndote cocinar con intensidad mientras tus paredes permanecen completamente aisladas de cualquier daño.
Actualización a materiales de alto rendimiento
Para quienes buscan una mejora empírica de la capacidad defensiva de su cocina, el vinilo estándar simplemente no basta en entornos de alto uso. La sorprendente, estructuralmente superior Blanco Chevron línea funciona como el estándar arquitectónico moderno. Renueva tu cocina o baño en minutos con las Blanco Chevron Peel and Stick Backsplash Tiles. Estas baldosas autoadhesivas, sin lechada, presentan un cautivador diseño Zigzag Charm y texturas 3D realistas, ofreciendo una forma sencilla de actualizar paredes anticuadas. Diseñadas para rendir en cocinas, baños y zonas de alta humedad, son resistentes al calor y a la humedad, y están hechas para durar 2-3+ años, incluso cerca de estufas o lavabos, ofreciendo un aspecto de alta gama por una fracción del costo.
Diseñado para superar las limitaciones térmicas habituales del vinilo de nivel básico, este producto mitiga de forma fundamental la intrusión de humedad y calor. La matriz densa de polímero actúa como una barrera física contra la grasa aerosolizada. Frente a opciones estándar y económicas, ofrece una mejora estadísticamente significativa en la vida útil, reajustando las expectativas para zonas de cocina con alta humedad y alto calor, y demostrando que la estética de lujo puede convivir con una durabilidad extrema.

Crear un calendario realista de mantenimiento para la zona de la estufa
¿Cansado de pasar horas frotando una pared junto a la estufa descuidada cada pocos meses, solo para descubrir que las baldosas de abajo están dañadas?
Aquí establecemos un calendario de mantenimiento proactivo y de poco esfuerzo diseñado para evitar la polimerización de la grasa y preservar la integridad de tu instalación durante todo el año.
El costo total de propiedad (TCO) de una mejora de cocina incluye el tiempo y el esfuerzo necesarios para mantenerla. Esperar hasta que la grasa sea visible desde el otro lado de la habitación garantiza una sesión de limpieza difícil y potencialmente dañina. El descuido permite que los procesos químicos de polimerización y unión térmica se aferren firmemente a la superficie de tu hermoso backsplash.
Un calendario de mantenimiento realista cambia la carga de una limpieza restaurativa intensa a un cuidado ligero y preventivo. Piensa en ello como lavarte los dientes en vez de someterte a una endodoncia. Este enfoque reduce drásticamente la relación costo-rendimiento de tus esfuerzos de limpieza, asegurando el máximo retorno estético con un mínimo trabajo semanal, mientras protege por completo el adhesivo subyacente.
Diseñar un ritmo de limpieza preventiva
La constancia es la mejor defensa contra el aceite polimerizado. Está demostrado estadísticamente que una limpieza esporádica y agresiva acorta la vida útil de los adhesivos sintéticos. Implementa un enfoque de tres niveles para el mantenimiento de la zona de la estufa y establece un ritmo de protección continua.
-
La limpieza diaria: Después de freír mucho o cocinar con wok, dedica 30 segundos a limpiar el backsplash con un microfiber cloth húmedo mientras la pared aún está ligeramente tibia. Esto intercepta los aceites líquidos antes de que puedan unirse químicamente al recubrimiento transparente.
-
El lavado semanal: Una vez por semana, usa el método de agua tibia y jabón para platos para eliminar las películas invisibles de grasa antes de que se endurezcan. Este lavado sistemático es la base para preservar la estética de alto brillo de tu instalación.
-
La inspección mensual: Dedica cinco minutos al mes a inspeccionar todas las juntas justo detrás de la estufa para detectar signos tempranos de degradación de TASL. Las revisiones visuales proactivas permiten microreparaciones dirigidas antes de que los paneles sufran un desprendimiento masivo.
La física de la migración de la grasa
Entender cómo se desplaza la grasa te ayuda a limpiar con mayor eficacia. Cuando los aceites alcanzan su punto de humo en un wok, se vaporizan en partículas microscópicas. Dejan de comportarse como líquidos pesados y comienzan a actuar como gases en suspensión, sometidos a las intensas corrientes de convección que genera tu estufa.
Estas partículas aerosolizadas capturan la corriente ascendente de calor de tu estufa. No solo caen directamente detrás de la sartén; migran hacia arriba y hacia afuera, y a menudo se depositan en la mitad superior del backsplash y debajo de la campana extractora. Tu lavado semanal debe cubrir toda esta trayectoria ascendente, no solo la zona inmediata de salpicaduras. No mapear esta ruta de migración garantiza una lenta acumulación de resinas poliméricas amarillentas en las partes altas de tus gabinetes y baldosas.
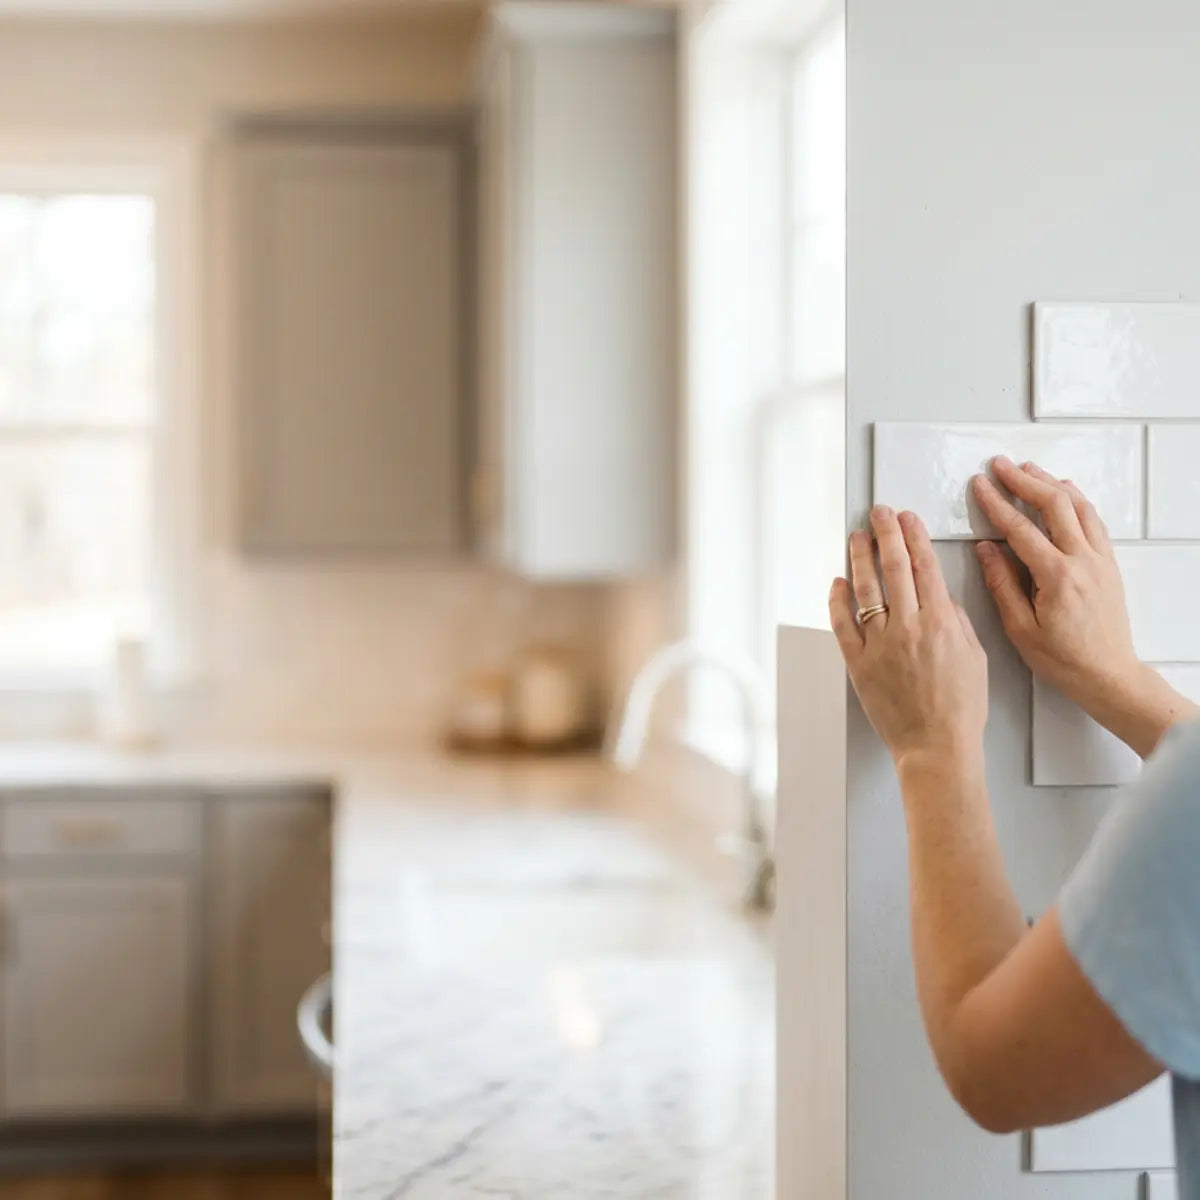
El papel de las herramientas de instalación en la durabilidad
El mantenimiento adecuado en realidad comienza durante la fase inicial de instalación. Si una baldosa se aplica con presión desigual, se forman microvacíos dentro de la capa adhesiva. Estos diminutos bolsillos de aire invisibles son, en esencia, bombas de tiempo estructurales, que esperan expandirse y contraerse bajo la carga térmica extrema de la superficie de cocción.
Estos pequeños bolsillos de aire atrapan calor y proporcionan vías para que la humedad y los productos desengrasantes infiltren el reverso. Garantizar una unión completamente al ras desde el primer día es la forma más eficaz de protegerse contra futuras intrusiones químicas o térmicas durante la limpieza rutinaria. Una instalación impecable elimina las vías microscópicas que los agentes agresivos aprovechan para provocar un desprendimiento generalizado.
Optimizar la presión de aplicación
Para garantizar esta unión impecable y al ras, la ayuda mecánica es absolutamente necesaria. En comparación con la aplicación estándar y muy variable de presión manual, el Scraperoo - R herramienta ofrece una configuración óptima al eliminar por completo los microvacíos. Asegura una instalación impecable de peel and stick tile con este versátil Tile Scraper para DIY. Está diseñado meticulosamente para brindar comodidad y precisión, ayudando a alisar las burbujas de aire, logrando una adhesión enormemente fuerte y alineando las baldosas a la perfección para expulsar el aire atrapado y conseguir una superficie plana e impenetrable.
Esta herramienta especializada se ajusta estrictamente a los requisitos físicos de una unión adhesiva uniforme. Al mitigar de forma fundamental las burbujas de aire atrapadas, calibra el resultado de tu instalación, creando un borde sellado que repele con seguridad los limpiadores líquidos y la grasa en suspensión. Sin este nivel de presión uniforme, los bordes de tu instalación quedan terriblemente vulnerables a la acción capilar durante tu primera limpieza intensiva.
Gestión integral del ciclo de vida
Para mantener durante varios años una evaluación estandarizada del estado de tu cocina, se requiere formación continua. La ciencia de los adhesivos arquitectónicos evoluciona constantemente, al igual que las técnicas para preservarlos. El marco increíblemente completo proporcionado en el Guía de mantenimiento de peel and stick tile 2025 ofrece una base cuantitativa para el cuidado a largo plazo. ¿Tus peel and stick tiles se ven desgastados? Mantenlos como nuevos con esta guía experta centrada en metodologías de limpieza adecuadas, ejecución de simples microreparaciones y consejos de longevidad muy avanzados.
Este recurso establece el consenso del sector sobre reparaciones sencillas y estrategias preventivas. Te asegura tener a tu disposición equivalentes revisados por pares de consejos profesionales de mantenimiento. Apoyarte en esta sabiduría acumulada te evita cometer los errores catastróficos de principiante que envían con frecuencia baldosas perfectamente buenas al vertedero.
Evaluando la fricción total del proyecto
Al planificar una renovación de cocina, evaluar el umbral operativo de los distintos materiales evita arrepentimientos. Entender qué hace falta de verdad para mantener una superficie limpia antes de comprarla es la marca de una planificación de diseño inteligente. La impresionante comparación analítica en Comparamos la suciedad del backsplash: peel-and-stick vs epoxi ofrece un resultado determinista basado en limitaciones del mundo real. ¿Quieres una mejora de cocina realmente libre de desorden? Este artículo ofrece a los lectores un marco de veredicto directo, comparando lado a lado, basado en limitaciones cruciales de la vida real como el desorden de la instalación, los humos tóxicos de ventilación, la carga de limpieza, las normas de alquiler, el nivel de habilidad necesario y la fricción total del proyecto antes de elegir.
Al medir la curva de degradación del rendimiento junto con la complejidad de la instalación, esta guía reduce fundamentalmente la fricción del proyecto. Permite a inquilinos y propietarios tomar decisiones demostradas empíricamente sobre sus renovaciones de cocina, garantizando que el producto final se ajuste perfectamente a su disposición para realizar mantenimiento continuo.
Solución de problemas comunes de peel-and-stick
¿Notas que una esquina de una baldosa se levanta un poco justo encima de tu quemador favorito? ¿Te preguntas si tienes que desmontar toda la pared?
Esta sección ofrece estrategias de diagnóstico específicas para resolver pequeños fallos del adhesivo antes de que requieran una sustitución completa y costosa.
Incluso con un programa de mantenimiento óptimo, las cocinas de alto uso someten a una enorme presión a los materiales adhesivos. Es normal que aparezcan pequeños problemas ocasionales. La clave está en un diagnóstico rápido y una intervención específica. Ignorar pequeñas desviaciones en la superficie uniforme garantiza que con el tiempo evolucionen a fallos estructurales masivos e irreparables.
Ignorar una esquina ligeramente suelta permite que la humedad y los productos de limpieza penetren profundamente en la instalación. Atender de inmediato estos microfallos preserva la integridad estructural de las baldosas cercanas. Considéralo una triage para las paredes de tu cocina; cuanto antes actúes para sellar una brecha, mayor será la tasa de supervivencia de todo el sistema.
Consejo profesional: descontaminación quirúrgica
Antes de intentar volver a pegar cualquier esquina que se esté despegando, debes descontaminar quirúrgicamente el sustrato de pared expuesto. Usa un bastoncillo de algodón ligeramente humedecido con 91% alcohol isopropílico para eliminar la grasa microscópica y los restos de adhesivo viejo. Aplicar pegamento nuevo sobre una pared contaminada garantiza que la reparación fallará en 48 horas.
Cómo reparar de forma segura un pequeño levantamiento del borde
Si una esquina empieza a curvarse por estrés térmico, no apliques de inmediato pegamentos superfuertes. Los cianoacrilatos estándar se secan rígidos y pueden agrietarse con la futura expansión térmica. Son frágiles y totalmente incapaces de soportar el entorno de cambios constantes detrás de una estufa de alto rendimiento, y con el tiempo arrancarán el papel de la placa de yeso cuando fallen.
En su lugar, limpia meticulosamente el sustrato de pared expuesto con una pequeña cantidad de alcohol de frotar en un bastoncillo de algodón. Déjalo secar por completo. Aplica una gota puntual de adhesivo de silicona flexible y resistente al calor, presiona firmemente y fija con cinta de pintor durante 24 horas. Esta unión flexible actúa como un amortiguador, perfectamente capaz de soportar la expansión y contracción causadas por ollas hirviendo y sartenes muy calientes sin fracturarse.
Cómo tratar la decoloración de la superficie
A veces, la zona detrás de una gas stove desarrolla un tono amarillento. A menudo se diagnostica erróneamente como daño permanente por calor. Con frecuencia, en realidad se trata de una capa profundamente incrustada de grasa polimerizada que el jabón común no ha logrado retirar. Esta ilusión óptica ha hecho que incontables propietarios retiren innecesariamente instalaciones perfectamente sanas y estructuralmente sólidas.
Antes de asumir que el acabado está arruinado, realiza una prueba suave en un punto con un desengrasante cítrico aprobado por el fabricante. Aplícalo sobre un paño, mantenlo sobre la mancha durante dos minutos y limpia con suavidad. Si el amarilleo persiste, probablemente se trate de decoloración térmica, que no puede limpiarse. La decoloración térmica representa un cambio permanente en la estructura molecular del vinilo y sirve como una advertencia grave de que tu TASL es catastróficamente alto.
Cuándo considerar protectores térmicos
Si el diseño de tu cocina te obliga a usar quemadores de alto rendimiento a pocos centímetros de la pared trasera, el mantenimiento estándar puede no ser suficiente. La física de la transferencia térmica dicta que la exposición continua por encima de ciertos umbrales provocará un fallo determinista. Simplemente no puedes reescribir las leyes de la termodinámica con un microfiber cloth y warm soapy water.
En estos casos, instalar un protector térmico discreto de acero inoxidable o vidrio templado justo detrás de la estufa proporciona una barrera física necesaria. Esta solución de ingeniería neutraliza de forma inherente la amenaza térmica inmediata para tus baldosas adhesivas. Actúa como un firewall impenetrable, absorbiendo y disipando los picos de energía extremos que, de otro modo, deformarían y destruirían tu inversión en peel-and-stick.
Reflexiones finales
Mantener un peel-and-stick backsplash en una cocina real de alto uso es totalmente posible cuando priorizas la seguridad del material por encima de una limpieza agresiva. El camino hacia una cocina siempre impecable requiere inteligencia, paciencia y un profundo respeto por las realidades químicas de los adhesivos sintéticos.
En entornos con mucha grasa, la mejor manera de limpiar tu instalación es optimizar para un Peel-Retention Score a largo plazo. Eso significa dejar de lado los disolventes fuertes, adoptar una escalera de limpieza de menor a mayor agresividad y entender los riesgos acumulativos de Thermal-Adhesive Stress Load (TASL) cerca de gas stoves. Al aplicar los métodos correctos, preservas tanto el acabado falso como el adhesivo crítico del reverso. Tu recompensa es una mejora visual impresionante que soporta durante años las exigencias de un entorno culinario muy activo.
Protege tu inversión estableciendo un ritmo de mantenimiento semanal realista. Para asegurarte de que tus próximas limpiezas sean completamente seguras, te invitamos a revisar nuestras guías completas de limpiadores seguros para la marca y los protocolos de seguridad para la stove-zone antes de abordar la próxima limpieza profunda. La prevención y la preparación son los mejores escudos contra los errores costosos que suelen arruinar el mantenimiento de la cocina.
Preguntas frecuentes
¿Con qué frecuencia debo limpiar el backsplash detrás de mi gas stove? +
Para quienes cocinan con frecuencia usando gas o woks, limpia ligeramente la zona inmediata de salpicaduras con un microfiber cloth húmedo después de cada sesión de cocina intensa. Realiza una limpieza más profunda con agua tibia y jabón para platos una vez por semana para evitar que las películas invisibles de grasa se polimericen y se conviertan en resinas pegajosas difíciles de eliminar.
¿Puedo usar vinagre para limpiar las baldosas peel and stick? +
El vinagre blanco diluido suele ser seguro para la superficie superior de la mayoría de las baldosas de vinilo, pero presenta un riesgo para las juntas. El vinagre es un ácido suave. Si se filtra por debajo de los bordes por acción capilar, puede degradar lentamente el adhesivo. Recomendamos usar jabón suave para platos como tu limpiador diario principal.
¿Un Magic Eraser puede quitar la grasa incrustada de forma segura? +
No. Las esponjas de melamina, conocidas comúnmente como Magic Erasers, actúan como papel de lija microscópico. Aunque son muy eficaces para eliminar la grasa, arrancarán la capa protectora transparente de tus baldosas peel-and-stick, dejando manchas opacas permanentes y haciendo que la superficie sea más susceptible a futuras manchas de grasa.
¿Por qué los bordes de mis baldosas se sienten pegajosos después de limpiar? +
Si los bordes se sienten pegajosos o adhesivos después de limpiarlos, probablemente la solución de limpieza sea demasiado agresiva y esté derritiendo químicamente la capa adhesiva. Deja de usar ese producto de inmediato. Lava la zona con agua sola para diluir el residuo químico y cambia a un desengrasante más suave y aprobado.
¿Es seguro usar un limpiador a vapor en un peel-and-stick backsplash? +
Absolutamente no. Los limpiadores a vapor combinan dos de las fuerzas más destructivas para las instalaciones de peel-and-stick tile: calor intenso y humedad a presión. El vapor ablandará de inmediato el adhesivo, empujará el agua detrás de las juntas y hará que los paneles se deformen, formen burbujas y, con el tiempo, se despeguen de la pared.
¿Se pueden usar peel and stick tiles detrás de un quemador para wok? +
Sí, pero con salvedades estrictas. La cocción a alta temperatura con wok genera cargas extremas de estrés térmico del adhesivo. Debe usar baldosas explícitamente clasificadas para alta temperatura, asegurarse de respetar las distancias de seguridad según las indicaciones del fabricante y utilizar de forma constante una campana extractora de alto CFM para alejar el calor y la grasa vaporizada de la pared.

Deja un comentario
Este sitio está protegido por hCaptcha y se aplican la Política de privacidad de hCaptcha y los Términos del servicio.