


El renacimiento moderno del DIY ha empoderado a millones para tomar herramientas y transformar sus espacios de vida, impulsados por interminables flujos de inspiración en redes sociales. Sin embargo, esta inspiración visual a menudo oculta la realidad agotadora de las renovaciones complejas del hogar. Cuando se aborda una mejora de cocina, lo que está en juego es increíblemente alto. La cocina es el corazón operativo de tu hogar; paralizarla con un proyecto mal planificado crea un estrés inmenso para todo el hogar. La mayoría de los principiantes asumen que elegir una mejora de cocina es simplemente una cuestión de estética, comparando colores y patrones mientras ignoran el caos logístico que ciertos materiales introducen en un entorno doméstico.
En realidad, la verdadera decisión está en gestionar el desorden, el riesgo, el tiempo de inactividad y la reversibilidad. Elegir entre una resina vertida y un compuesto adhesivo tiene más que ver con el estilo y más con tu tolerancia a la interrupción de la cocina. Debemos ir más allá de la estética pura y centrarnos en la mecánica del propio proceso de instalación, estableciendo un marco claro para lo que constituye un proyecto de fin de semana exitoso y sin estrés frente a una odisea de un mes.
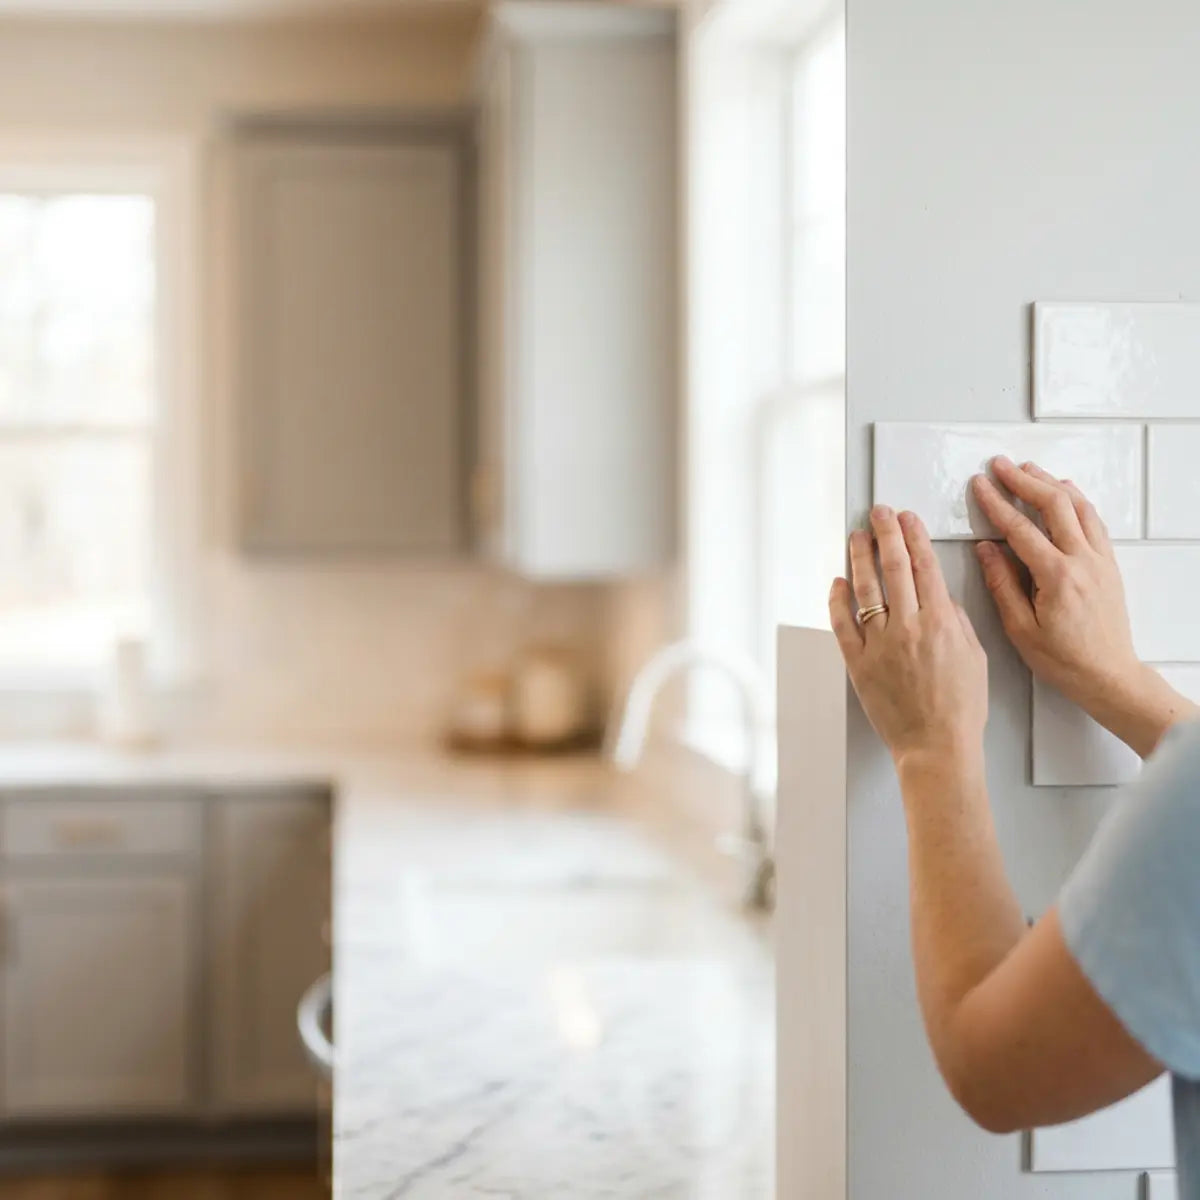
Para la mayoría de los aficionados al DIY principiantes o con poca confianza, los azulejos de pared peel-and-stick son la mejor opción que un backsplash de epoxy hecho por uno mismo porque generan menos desorden, requieren menos herramientas, no tienen tiempo de curado y, por lo general, son más fáciles de retirar. El epoxy puede ofrecer un acabado personalizado y elegante, pero normalmente sale peor parado en limpieza, vapores, riesgo de instalación y facilidad para principiantes cuando se mide por la Fricción Total del Proyecto.
Una tabla comparativa de costo, limpieza, durabilidad, facilidad de retirada, vapores y dificultad de instalación revela rápidamente las realidades prácticas. Aclararemos exactamente en qué casos el epoxy aún tiene sentido, al mismo tiempo que ayudamos a inquilinos y a quienes mejoran su hogar por primera vez a evitar errores caros y permanentes. Al establecer un enfoque basado en datos para la selección de materiales, puedes proteger tu presupuesto, cuidar la calidad del aire interior y asegurarte de que la renovación de tu fin de semana realmente termine antes de que llegue el lunes por la mañana.
¿Qué es mejor para la mayoría de los principiantes: backsplash peel-and-stick o epoxy?
La pregunta: ¿Te preocupa que elegir el backsplash DIY equivocado resulte en un desastre tóxico o en un error permanente que no puedas arreglar?
La promesa: Esta sección ofrece una tabla clara, pensada para principiantes, para medir la fricción total del proyecto y ayudarte a evitar estrés innecesario, costos ocultos y tiempo de inactividad en la cocina.
Determinar el material óptimo requiere evaluar tus limitaciones personales. Los inquilinos, quienes viven en apartamentos y los propietarios primerizos operan bajo restricciones estrictas. Probablemente necesites una mejora rápida y de poco desorden que no viole contratos de arrendamiento ni requiera demolición profesional más adelante. La barrera psicológica de entrada para muchos proyectos DIY es el miedo a causar daños irreversibles a una propiedad que no te pertenece por completo, o a destruir el capital que acabas de empezar a construir en una vivienda nueva.

La estética por sí sola es una métrica de comparación débil. Un acabado de epoxy hermoso no sirve de nada si el proceso de instalación deja tu cocina inutilizable durante una semana. Debemos alejar la evaluación del estilo puro y centrarnos en las realidades prácticas de la aplicación. Incontables propietarios han caído en la trampa de los atractivos videos de epoxy en time-lapse, sin darse cuenta de las horas minuciosas de preparación, los intensos olores químicos y el enorme estrés de manejar una resina líquida de curado rápido sobre una superficie vertical.
Este artículo analiza específicamente proyectos de backsplash de cocina. No estamos evaluando sistemas completos de epoxy vertido para encimeras, que requieren un nivel de preparación totalmente diferente. Nos centramos únicamente en aplicaciones verticales en pared, donde la gravedad se convierte en tu principal adversario y el control del material es absolutamente fundamental para lograr un acabado de calidad profesional sin derrames catastróficos.
Definición de la puntuación de Fricción Total del Proyecto
Para lograr la mejor configuración para tu cocina, debemos medir la dificultad real de la tarea. La Fricción Total del Proyecto evalúa el desorden, la exigencia de habilidad, el tiempo de inactividad, la reversibilidad y la carga de seguridad. Es una métrica integral diseñada para eliminar el brillo del marketing y revelar la realidad cruda y sin editar de lo que experimentarás durante el fin de semana de instalación.
Una evaluación estandarizada garantiza que entiendas exactamente a qué te estás comprometiendo. El epoxy registra consistentemente una fricción alta. Exige proporciones de mezcla precisas, enmascarado extenso para evitar goteos y largos periodos de curado. Un solo error en la proporción de mezcla puede dejarte con un desastre pegajoso y semicurado que se resiste a endurecer, requiriendo una eliminación completa y empezar desde cero con solventes tóxicos.
Los compuestos peel-and-stick representan una baja fricción. Las principales exigencias son una medición cuidadosa y un sustrato limpio y seco. No hay mezcla, ni desgasificación química, y cero tiempo de curado. Esto democratiza el proceso de diseño, permitiendo que cualquiera con un cúter y una comprensión básica de la nivelación logre una transformación visual impresionante con total confianza.
La realidad de los costos ocultos y las herramientas necesarias
En comparación con los métodos tradicionales, la carga financiera del epoxy va mucho más allá de la resina en sí. Debes comprar cubetas de mezcla especializadas, básculas precisas, respiradores de protección, lonas resistentes y aplicadores de grado químico. Estos elementos rara vez se incluyen en el presupuesto inicial que calculan los principiantes entusiastas mientras navegan por galerías de resina en línea.
Requisitos de herramientas para epoxy:
-
Equipo de mezcla: Las básculas precisas y los accesorios para taladro son obligatorios. Medir por volumen en lugar de por peso exacto es una causa frecuente de fallo del epoxy.
-
Equipo de seguridad: Los respiradores con filtrado para vapores y los guantes de nitrilo no son negociables. Es necesario comprar cartuchos para vapores orgánicos para proteger los pulmones de la desgasificación.
-
Protección: Se requiere lámina plástica resistente para encimeras y pisos. Una sola gota rebelde de epoxy en curado puede adherirse de forma permanente a tu costoso cuarzo o madera dura.
Evaluar el costo total de propiedad (TCO) cambia significativamente el presupuesto. Cuando desglosas meticulosamente los respiradores requeridos, las lonas resistentes, las básculas digitales de precisión, las paletas de mezcla y los aplicadores de grado químico necesarios para un vertido de resina seguro y exitoso, la ventaja financiera del epoxy se evapora rápidamente. En cambio, los compuestos adhesivos modernos presentan un presupuesto altamente predecible y transparente. Para comprender plenamente cómo estos gastos secundarios impactan tu resultado final frente a los estándares de la industria, el marco integral detallado en nuestro Peel-and-stick vs. azulejo cerámico: comparación de costos y mano de obra 2026 proporciona una base cuantitativa para estos gastos, asegurando que tomes una decisión financieramente sólida basada en la realidad del mercado de 2026.
*La instalación de composite peel-and-stick elimina prácticamente todos estos costos materiales ocultos.
Los composites adhesivos de alta calidad mitigan de forma fundamental estos costos secundarios. Por lo general, solo necesitas un cúter, una base de corte, un nivel y una solución de limpieza. Esto establece un presupuesto muy predecible para los aficionados al DIY con mentalidad de ahorro. La transparencia financiera de los sistemas adhesivos te permite destinar tus recursos a diseños de azulejos premium en lugar de a equipos de seguridad para materiales peligrosos de un solo uso.
Humos, ventilación y seguridad del aire interior
Un error común es pensar que el epoxy es solo una pintura espesa. En realidad, el epoxy es una reacción química de dos partes. Este proceso genera calor (una reacción exotérmica) y compuestos orgánicos volátiles (COV) que pueden deteriorar gravemente la calidad del aire interior. Estos compuestos no son simplemente olores desagradables; son vapores químicos activos que pueden causar dolores de cabeza, mareos e irritación respiratoria, representando un riesgo importante para los ocupantes de la vivienda.
Las fichas técnicas de seguridad del fabricante confirman que el epoxy requiere una ventilación intensa. A menudo necesitas mantener abiertas las ventanas con flujo de aire constante durante 24 a 72 horas. Esto es muy poco práctico en los meses de invierno o en apartamentos pequeños y herméticos. Imagínate intentar hacer una aplicación de epoxy durante un fin de semana gélido de enero; dejar las ventanas de la cocina totalmente abiertas durante tres días mientras funcionan los extractores es físicamente incómodo e increíblemente caro en cuanto a costos de calefacción.
Los composites adhesivos evitan por completo este problema. Las marcas de alta calidad fabrican sus productos para cumplir estrictamente con las normas de seguridad del aire interior. No generan humos, por lo que no requieren ninguna ventilación especial durante ni después de la instalación. Este perfil de seguridad inherente convierte a los azulejos adhesivos en la opción preferida y responsable para hogares con bebés, personas mayores o mascotas sensibles (como las aves, cuyos sistemas respiratorios son increíblemente frágiles cuando se exponen a los COV).
Reversibilidad y acuerdos de alquiler
Los inquilinos se enfrentan a un obstáculo único: la inspección final al mudarse. Cualquier modificación debe ser completamente reversible sin destruir el drywall subyacente. La amenaza inminente de perder el depósito de seguridad —que a menudo asciende a miles de dólares— genera una enorme ansiedad ante cualquier alteración permanente de las paredes. El epoxy no supera esta prueba en absoluto. Es una aplicación permanente. Una vez curado, pasa a ser prácticamente una sola entidad estructural con el drywall.
Quitar el epoxy requiere raspar con fuerza, usar decapantes químicos o reemplazar por completo el drywall. Esto garantiza la pérdida del depósito de seguridad y coloca al inquilino en incumplimiento de las cláusulas estándar del contrato sobre modificaciones. Los inquilinos deben priorizar materiales diseñados específicamente para una retirada segura y no destructiva, a fin de proteger su situación financiera y su historial de alquiler.
Cuando se tienen en cuenta las restricciones de alquiler a largo plazo, las soluciones adhesivas funcionan como el estándar arquitectónico para espacios temporales. La ingeniería moderna ha evolucionado los adhesivos sensibles a la presión para ofrecer un rendimiento excelente sin dejar de ser reversibles térmicamente. Las pruebas exhaustivas detalladas en nuestro artículo Probamos azulejo peel-and-stick frente a shiplap: el verdadero ganador para el bricolaje demuestran empíricamente que los adhesivos modernos pueden retirarse con una simple aplicación de calor, protegiendo por completo la pared original. Esta reversibilidad comprobada neutraliza por completo el miedo a la inspección del propietario, garantizando que tu depósito de seguridad permanezca intacto.
Protocolo de salida seguro para inquilinos
Haz clic para completar los pasos necesarios para una retirada impecable y sin daños:
Evaluando el factor suciedad: goteos vs recortes

Piensa en el epoxy como verter una entrada de hormigón, mientras que peel-and-stick es como colocar adoquines de patio. Uno es un vertido fluido y permanente que va exactamente donde lo lleva la gravedad. El otro es una colocación controlada y modular. La física de trabajar con un fluido muy viscoso sobre un plano vertical no debe subestimarse. La gravedad es implacable, y gestionarla requiere una cantidad significativa de capacidad física y mental.
El epoxy inevitablemente gotea. Cuando se aplica en vertical sobre un backsplash, la gravedad hace que la resina se descuelgue y corra. Evitar que estos goteos arruinen tus encimeras requiere un enmascarado meticuloso con cinta y láminas de plástico. Un solo fallo en la barrera de cinta de pintor puede permitir que la resina se filtre por debajo, creando una unión irrompible con las superficies de tu cocina que requiere cincelado para retirarla.
Factores comunes de suciedad:
-
Goteos de resina: El epoxy endurecido es increíblemente difícil de retirar de las encimeras. Se adhiere a nivel molecular a superficies porosas como el granito y la madera.
-
Herramientas pegajosas: Limpiar las herramientas de epoxy requiere solventes químicos agresivos como acetona o alcohol desnaturalizado, generando residuos líquidos peligrosos que deben desecharse correctamente.
-
Reverso adhesivo: Peel-and-stick solo genera residuos secos de papel, fáciles de barrer. No hay materiales peligrosos que procesar.
Con los azulejos adhesivos, el único desorden consiste en tiras de papel del reverso y pequeños recortes de vinilo. La limpieza implica barrer el suelo y tirar el papel reciclable a la basura, no fregar derrames químicos con solventes tóxicos mientras llevas un respirador. Esta diferencia fundamental en el proceso mantiene tu cocina limpia y tus niveles de estrés increíblemente bajos durante todo el proyecto.
Lo que puede salir mal: la zona de desastre del epoxy
Si todavía estás considerando epoxy, debes estar preparado para los puntos de fallo catastrófico más comunes que arruinan los proyectos de principiantes:
- Curado instantáneo: Mezclar demasiada resina a la vez puede hacer que se sobrecaliente y solidifique rápidamente dentro del cubo de mezcla en cuestión de minutos, dejando inservible toda la tanda y desperdiciando materiales costosos.
- Microburbujas: El aire atrapado durante la fase de mezclado subirá a la superficie. Si no se eliminan meticulosamente con un soplete de alta temperatura, tu backsplash curará con una superficie turbia, texturizada y poco atractiva.
- El síndrome del "punto pegajoso": Incluso una pequeña cantidad de resina sin mezclar raspada de los lados del cubo se transferirá a la pared, dejando zonas pegajosas permanentes que acumulan polvo y nunca llegan a endurecer del todo.
La realidad del tiempo de curado
La interrupción de la cocina es un factor enorme para los hogares ocupados. La cocina no es solo una habitación; es el centro de mando de alto tránsito. El epoxy te obliga a salir de la cocina. La aplicación inicial puede llevar horas, pero el proceso de curado dicta el cronograma, paraliza tu rutina diaria y obliga a tu familia a depender de comida para llevar cara o de opciones alternativas para comer.
La mayoría de las resinas requieren 24 horas para secarse al tacto y hasta una semana para un curado completo y duro. Durante este tiempo crítico, la superficie actúa como una enorme hoja de papel adhesivo para moscas. El polvo, la grasa en suspensión, el pelo de mascotas y los insectos que deambulan pueden quedar atrapados de forma permanente en la superficie pegajosa, arruinando la perfección estética que tanto te costó lograr.
Los compuestos adhesivos ofrecen una reducción estadísticamente significativa del tiempo de inactividad. Una vez que el azulejo se presiona contra la pared, el área puede usarse de inmediato. Puedes cocinar una comida justo después de terminar la instalación. No hay período de espera, ni zonas prohibidas, y cero riesgo de arruinar el acabado al rozarlo por accidente mientras preparas tu café de la mañana.
Evaluando la curva de aprendizaje
El epoxy exige que el primer intento sea impecable. Si mezclas incorrectamente las dos partes, la resina nunca endurecerá como corresponde. Permanecerá como un desastre pegajoso e inutilizable que deberá rasparse con fuerza, arruinando en el proceso el drywall subyacente. Esto crea un entorno increíblemente implacable para principiantes que todavía están aprendiendo las mecánicas básicas del DIY.
A los principiantes a menudo les cuesta controlar el “tiempo de trabajo” (o pot life) del epoxy. Por lo general, tienes menos de 45 minutos para aplicarlo antes de que empiece a endurecerse en el cubo. Esto genera un estrés intenso y te obliga a apresurarte en pasos críticos de enmascarado y extendido, lo que inevitablemente provoca bordes descuidados y texturas desiguales.
Las baldosas adhesivas te permiten trabajar completamente a tu propio ritmo. Si desalineas una baldosa durante la colocación inicial ligera, puedes despegarla con cuidado y ajustarla hasta lograr la perfección absoluta. El adhesivo sensible a la presión solo se fija firmemente una vez que aplicas una presión fuerte con una herramienta alisadora o con las manos. Esta naturaleza indulgente es la marca distintiva de un producto arquitectónico verdaderamente apto para principiantes.
Tarjeta de puntuación de la fricción total del proyecto
Para simplificar esta decisión compleja, hemos creado una matriz de evaluación estandarizada. Estos datos ayudan a los principiantes a establecer expectativas realistas y bien fundamentadas antes de comprar materiales y comprometerse con un fin de semana de trabajo intenso.
| Métrica de fricción | Peel-and-Stick Tiles | DIY resina epoxi |
|---|---|---|
| Costo inicial de las herramientas | Muy bajo (cúter, nivel) | Alta (respirador, básculas, láminas) |
| Suciedad de instalación | Mínimo (recortes de papel) | Alto (goteos químicos, herramientas pegajosas) |
| Tiempo de curado | Cero (uso inmediato) | 24 - 72 horas |
| Humos interiores (VOCs) | None | Alta (requiere ventilación intensa) |
| Reversibilidad para inquilinos | Excelente (se puede retirar con calor) | Mala (requiere demolición de paneles de yeso) |
| Requisito de habilidad | Bajo (Mide y corta) | Alta (mezcla química, control de la gravedad) |
Para quienes priorizan una apariencia totalmente continua, altamente personalizada y de estilo arte fluido, y cuentan con un espacio de trabajo dedicado para practicar antes, el epoxy sigue siendo una opción. Sin embargo, para los aficionados al DIY de todos los días, los profesionales ocupados y quienes no tienen experiencia avanzada en el manejo de químicos, los compuestos adhesivos ofrecen una base objetivamente mejor para una instalación sin estrés.
Comprender estos puntos de fricción neutraliza de forma natural el miedo paralizante a arruinar tu cocina. Ahora puedes tomar una decisión basada en datos prácticos y en la realidad logística, asegurando que tu proyecto de fin de semana siga siendo un proyecto de fin de semana simple y muy satisfactorio, en lugar de convertirse en un desastre creciente.
Autoevaluación: ¿Qué backsplash es el adecuado para ti?
Responde 3 preguntas rápidas para recibir una recomendación personalizada y basada en datos para la situación específica de tu cocina.
1. ¿Cuál es tu situación de vivienda?
¿Qué tan duraderas son las baldosas peel-and-stick en comparación con el epoxy en una cocina?
La pregunta: ¿Un backsplash peel-and-stick simplemente se derretirá o se despegará cerca de mi estufa, y es epoxy la única opción realmente duradera?
La promesa: Esta sección establece un perfil factual de supervivencia en la cocina, desglosando exactamente cómo cada material maneja el calor, la humedad y el fregado diario según el uso real.
A menudo, los lectores se preocupan de que un backsplash adhesivo no tenga la resistencia necesaria para un uso intenso en la cocina, temiendo que el vapor de hervir pasta haga que láminas enteras se caigan de la pared. Por el contrario, pueden asumir que el epoxy es completamente indestructible e inmune a todo tipo de daños en la cocina. Ambos extremos ignoran las complejas realidades de la degradación ambiental con el tiempo.
Debemos evaluar estos materiales usando un estricto perfil de supervivencia en la cocina. Esta métrica específica considera la tolerancia al calor, la resistencia a la humedad, la estabilidad de la adhesión y las exigencias de mantenimiento diario en diferentes zonas de actividad. La cocina es un entorno hostil, que produce rápidas fluctuaciones de temperatura y humedad que agreden los revestimientos de pared a diario.
Sin duda, el epoxy proporciona una barrera continua. Si se mezcla, vierte y cura a la perfección, sin aire atrapado ni bordes irregulares, crea una superficie formidable e impermeable. Sin embargo, lograr ese estado perfecto en un plano vertical es increíblemente difícil para principiantes, lo que significa que la durabilidad teórica del epoxy rara vez se consigue en aplicaciones de bricolaje reales.
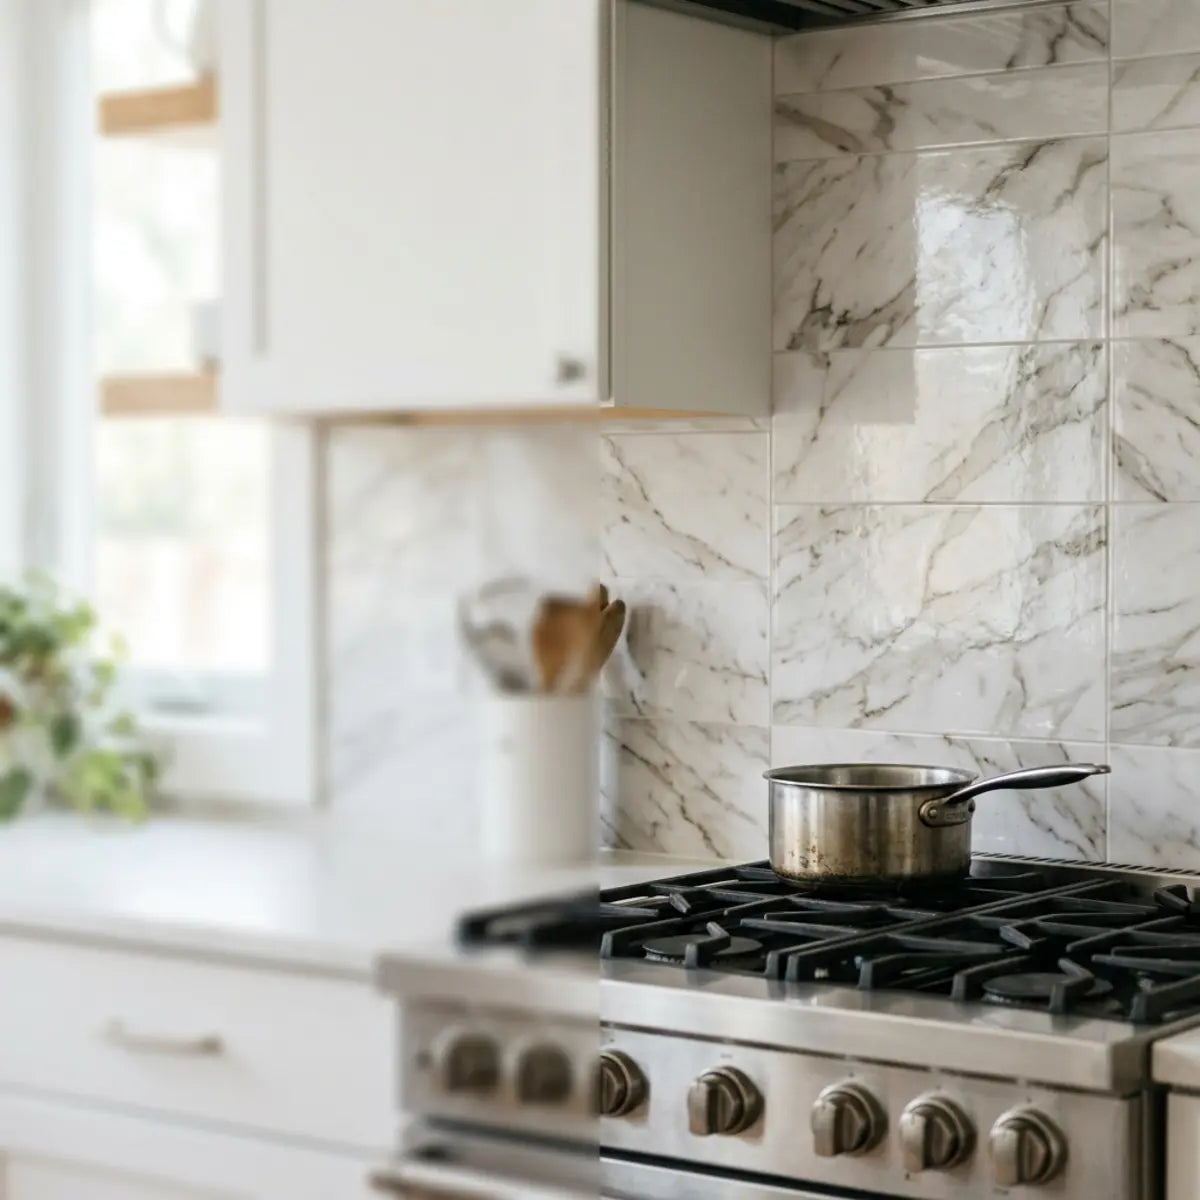
Resistencia al calor y distancias de seguridad respecto a la estufa
La zona detrás de tu cocina es la más exigente en cualquier cocina. El calor intenso y concentrado que emana de los quemadores degrada muchos materiales de bricolaje de baja calidad, provocando deformación, derretimiento y fallos catastróficos del adhesivo. Comprender las distancias de seguridad del fabricante y la termodinámica de tu tipo específico de estufa es fundamental para la seguridad y el rendimiento a largo plazo.
Un malentendido común es que todas las baldosas adhesivas se derretirán espontáneamente o se incendiarán al colocarlas cerca de una estufa. En realidad, los composites modernos de calidad están diseñados específicamente para entornos de alta temperatura. Incorporan fórmulas de vinilo resistentes al calor que desvían brillantemente el calor ambiente. Las especificaciones del fabricante suelen exigir una distancia de entre 8 y 9 pulgadas de las llamas abiertas, lo que se alinea con las prácticas estándar de seguridad arquitectónica para casi todos los revestimientos de pared residenciales.
Pautas para el manejo del calor:
-
Distancia estándar: Mantén al menos 8 inches de distancia de los quemadores de gas sin un panel protector de respaldo. Las cocinas eléctricas suelen ofrecer más margen, pero 8 inches sigue siendo el estándar de referencia para la seguridad.
-
Límites del epoxy: El epoxy ya curado puede resistir muy bien el calor ambiente, pero el vapor directo y prolongado de un quemador trasero puede causar opacidad a largo plazo o microfracturas en el acabado.
-
Estabilidad del adhesivo: Los compuestos de calidad no se deformarán si se mantienen fuera de la zona de llama directa, lo que garantiza que su integridad estructural y su atractivo visual permanezcan intactos.
El consenso de la industria dicta que respetar estas zonas rígidas de separación evita que la curva de degradación del rendimiento térmico se acelere. Si respetas las distancias del código contra incendios —que por lo general ya existen de forma natural en las distribuciones estándar de cocina entre el quemador y la pared trasera—, las baldosas adhesivas de calidad sobrevivirán y funcionarán con facilidad durante años en entornos de cocina.
Desvío de la humedad en zonas de alto salpicado
La pared directamente detrás del fregadero de la cocina recibe salpicaduras constantes a diario al lavar platos y enjuagar productos. La capacidad fundamental de un material para desviar el agua de forma continua sin permitir que penetre y degrade el panel de yeso subyacente es la esencia absoluta de una instalación exitosa de backsplash.
El epoxy realmente destaca aquí gracias a su naturaleza monolítica y sin juntas. Como se vierte como un líquido continuo, no hay líneas de lechada, juntas porosas ni bordes superpuestos por los que el agua pueda infiltrarse furtivamente. Actúa como una lámina continua e impenetrable de plástico rígido sobre tu panel de yeso.
Sin embargo, los compuestos adhesivos modernos han cerrado significativamente esta brecha de impermeabilización. Al neutralizar de forma empírica la entrada de agua mediante diseños superpuestos altamente especializados y cortados con precisión, protegen la pared subyacente con una eficacia notable, desviando el agua directamente hacia abajo sin permitir penetración lateral.
Al evaluar sistemas de defensa avanzados contra la humedad, resulta crucial reconocer la ingeniería de fabricación avanzada. Transformar tu hogar sin esfuerzo sin comprometer la integridad impermeable es primordial. Los productos que integran un sistema de bloqueo sin lechada combinan una estética fresca con una gran resistencia al agua para dar nueva vida a paredes anticuadas. Por ejemplo, la mecánica de diseño inherente a Dual Ceramics funciona como el estándar arquitectónico para la impermeabilización adhesiva. Su diseño ofrece una referencia estandarizada para ver cómo el vinilo de alta densidad puede imitar la protección continua e impenetrable de los materiales tradicionales sin el desorden de la lechada, ofreciendo una solución económica, apta para DIY, que destaca detrás del fregadero.
Estabilidad de la adhesión en diversos sustratos
La durabilidad depende en gran medida de la unión de base. Piensa en tu pared exactamente como en los cimientos de concreto de una casa recién construida; si los cimientos se están desmoronando, están polvorientos o están comprometidos estructuralmente, la casa inevitablemente se moverá y fallará. La estabilidad de la adhesión depende 100% de una preparación rigurosa de la superficie antes de colocar siquiera la primera baldosa.
El epoxy requiere una superficie increíblemente limpia y ligeramente rayada (lijada) para adherirse correctamente. Si se aplica con prisa sobre pintura brillante o paneles de yeso saturados de grasa de cocina invisible, la pesada resina no logrará sujetarse. Con el tiempo, el enorme peso del epoxy curado puede hacer que literalmente se desprenda de la pared en láminas grandes, peligrosas y pesadas, arrancando con ellas la capa superior del panel de yeso.
Las baldosas adhesivas son muy sensibles a la grasa, pero resultan increíblemente estables y fiables sobre sustratos planos y bien preparados. Se adhieren excelentemente a paneles de yeso imprimados, pintura mate plana e incluso a baldosas cerámicas lisas ya existentes, lo que las hace increíblemente versátiles para casas antiguas.
Cómo probar la compatibilidad del sustrato
No adivines si tu pared está lista. Realiza esta prueba infalible de cinta en 3 pasos antes de comenzar la instalación para garantizar una estabilidad de adhesión a largo plazo:
- Limpia el área de prueba: Frota enérgicamente una pequeña sección de 6x6 inch de tu pared con TSP (fosfato trisódico) o un desengrasante de alta potencia y deja que se seque por completo.
- Aplica la cinta de enmascarar: Presiona firmemente una tira de cinta de pintor de alta calidad sobre el área limpiada y déjala intacta durante 30 minutos.
- La prueba de arranque: Arranca la cinta rápidamente. Si se desprende limpiamente con fuerte resistencia, tu pared está lista. Si levanta pintura o se desprende sin resistencia, debes lijar e imprimar la pared antes de aplicar cualquier baldosa adhesiva.
Para garantizar un resultado determinista e impecable, debes limpiar la pared a conciencia. Usar fosfato trisódico (TSP) o un desengrasante comercial altamente concentrado asegura que el adhesivo sensible a la presión avanzado se adhiera de forma permanente al sustrato, eliminando cualquier posibilidad de levantamiento en las esquinas o desprendimiento en los bordes.
Textura dimensional y resistencia al desgaste
La verdadera durabilidad en una cocina muy transitada no consiste solo en mantenerse firmemente adherido a la pared; se trata, fundamentalmente, de resistir el desgaste, la fricción y la abrasión diarios. Las pegatinas de vinilo planas y baratas se rayan con una facilidad increíble y parecen artificialmente económicas bajo el implacable resplandor de las lámparas colgantes de cocina o de los LED bajo los gabinetes.
El epoxi ofrece de forma natural un acabado muy duro, liso y parecido al vidrio, que resiste bastante bien los impactos contundentes. Sin embargo, esa perfección brillante tiene un doble filo. Puede micro-rayarse fácilmente con estropajos abrasivos, cepillos duros o utensilios de cocina afilados, opacando de manera irreversible con el tiempo ese acabado antes espejado hasta convertirlo en una superficie mate y desgastada.
Si no estás seguro de qué opciones adhesivas modernas realmente soportan las exigencias de una cocina ajetreada sin parecer baratas, debes fijarte en pruebas rigurosas. Ponemos a prueba con rigor las mejores marcas en durabilidad, resistencia al agua y valor general para separar las pegatinas frágiles de los compuestos de calidad arquitectónica. Al evaluar los datos completos de pruebas que se encuentran en nuestro Las mejores marcas de backsplash peel-and-stick revisadas, vemos un patrón claro e innegable. Los azulejos multicapa y con textura profunda neutralizan de forma natural la apariencia del desgaste diario al dispersar la luz y ocultar las microabrasiones.
Esta evolución en la fabricación táctil significa que ya no tienes que sacrificar una apariencia premium por la comodidad del DIY. Las impresionantes texturas 3D, a diferencia de las pegatinas planas, crean un aspecto verdaderamente dimensional, aportando profundidad y estilo auténticos a cualquier pared sin requerir herramientas ni habilidades especiales. Opciones premium como Olive Lines™ calibran a la perfección el resultado de la fabricación moderna. Ofrecen una textura dimensional completamente impermeable y resistente al calor, que resiste rayaduras agresivas y, al mismo tiempo, sigue siendo totalmente flexible y tolerante durante el proceso de instalación.
Resistencia química y control de manchas
Las cocinas son entornos caóticos y desordenados. La salsa de tomate que hierve a fuego lento, el aceite caliente que salpica, el vino tinto que se derrama y especias notoriamente agresivas como la cúrcuma son famosos por manchar de forma permanente paredes porosas y backsplash baratos. El material que elijas debe resistir con fuerza la infiltración química y soportar una limpieza regular, a veces enérgica.
El epoxi suele ser muy resistente a las manchas debido a su naturaleza no porosa. Sin embargo, existe una vulnerabilidad importante: muchas resinas DIY más baratas pueden amarillear de forma agresiva o volverse turbias cuando se exponen a productos químicos domésticos fuertes o a la luz UV constante que entra por una ventana luminosa de la cocina durante varios años.
Los compuestos adhesivos modernos abordan esto mediante la ciencia de materiales. Por lo general, cuentan con una capa superior gruesa de gel de poliuretano (PU) o una capa de desgaste de vinilo endurecido. Este recubrimiento especializado bloquea eficazmente que las manchas intensamente pigmentadas penetren en la superficie. Sin embargo, debes evitar químicos agresivos y abrasivos como la lejía pura o los polvos limpiadores arenosos, porque pueden opacar esta capa protectora.
Mantener ese acabado impecable, como recién estrenado, requiere saber exactamente qué productos químicos son seguros de usar. Necesitas respuestas respaldadas por evidencia para aprender a limpiar la grasa agresiva sin destruir el acabado ni debilitar la adhesión detrás del azulejo. El marco integral detallado en Probamos desengrasantes sobre backsplash peel-and-stick ofrece una configuración óptima para el mantenimiento a largo plazo. Demuestra de forma concluyente que pasar del jabón lavavajillas suave a desengrasantes específicos no abrasivos evita la degradación catastrófica del adhesivo que arruina los azulejos de menor calidad, garantizando que tu backsplash se vea vibrante durante años.
Evaluación de la fidelidad visual a largo plazo

¿Cómo se verá tu backsplash instalado meticulosamente dentro de tres, cinco o siete años? Esta es la prueba definitiva e intransigente de la verdadera durabilidad. Ambos materiales tienen puntos muy concretos de fallo visual si no se mantienen correctamente o si se escatimó esfuerzo durante la fase crucial de instalación.
Riesgos de degradación visual:
-
Amarilleamiento del epoxi: La exposición a los rayos UV de las ventanas estándar de la cocina puede hacer que el epoxi transparente o con tono blanco adquiera con los años un feo matiz amarillento envejecido, arruinando por completo una estética moderna y luminosa.
Epoxy ofrece una barrera física más gruesa contra impactos contundentes, pero su fidelidad visual a largo plazo depende por completo de la calidad —y a menudo del coste astronómico— de la resina específica comprada. Las resinas baratas se degradan rápida y notablemente en cocinas soleadas y luminosas.
Los compuestos adhesivos de gama alta mantienen su estricta estabilidad de color de manera excepcional, utilizando pigmentos resistentes a los rayos UV. Siempre que los bordes se presionen con firmeza y fuerza durante la instalación inicial para evitar la entrada de humedad, la fidelidad visual se mantiene magníficamente intacta durante años, estableciendo una relación coste-rendimiento innegablemente sólida para el propietario que hace bricolaje.
Perfil de resistencia de la cocina por zona
Para entender y visualizar por completo exactamente dónde sobresale o falla cada material, debemos desglosar la cocina en sus zonas específicas de riesgo. Esta evaluación estandarizada ofrece una visión clara e intransigente de las expectativas de rendimiento.
| Zona de peligro de la cocina | Rendimiento de peel-and-stick | Rendimiento del epoxi para bricolaje |
|---|---|---|
| Detrás de la estufa (calor) | Alto (si se mantiene una holgura de 8-9 inches) | Alto (Resiste bien el calor ambiental) |
| Detrás del fregadero (humedad) | Alto (las juntas superpuestas bloquean el agua) | Excelente (barrera impermeable sin juntas) |
| Área de preparación (manchas/aceite) | Alta (Se limpia con jabón suave) | Alta (no poroso, resiste manchas de comida) |
| Luz solar directa (UV) | Excelente (el vinilo de alta solidez del color resiste la decoloración) | Variable (Muchas resinas transparentes se amarillean con el tiempo) |
| Zona de impacto/arañazos | Moderada (Usa limpiadores no abrasivos) | Moderado (Puede rayarse con un fregado fuerte) |
Cuando analizas de cerca el perfil de resistencia, queda muy claro que los adhesivos de alta calidad compiten de igual a igual con el epoxy en casi cualquier escenario diario de cocina. La supuesta fragilidad del peel-and-stick es un mito basado en una tecnología de adhesivos anticuada, de hace una década, que desde entonces ha sido totalmente reemplazada por una ingeniería compuesta robusta.
Aunque el epoxy gana en una estanqueidad teórica, de grado de laboratorio, la realidad práctica y desordenada de mantenerlo e instalarlo correctamente en una pared vertical hace que el peel-and-stick sea el ganador práctico y estadísticamente significativo para las cocinas familiares cotidianas y de mucho uso.
Reflexiones finales
Tomar la decisión correcta y financieramente sensata para la renovación de tu cocina depende por completo de entender tus propias limitaciones de bricolaje y tu tolerancia al caos doméstico. La matriz de evaluación deja claro que, para la mayoría de los principiantes, las baldosas peel-and-stick ganan con claridad en la puntuación de fricción total del proyecto. Eliminan con elegancia el enorme desorden, los vapores tóxicos, la necesidad de herramientas pesadas y costosas, y el miedo paralizante de cometer un error permanente y caro en tus paredes.
El epoxy sin duda conserva un nicho específico y respetado. Es muy adecuado para DIYers avanzados que ya cuentan con el equipo de seguridad correcto, tienen una excelente ventilación cruzada, poseen habilidades avanzadas de manejo de productos químicos y priorizan una estética de arte abstracto en resina totalmente continua, personalizada y sin juntas por encima de la comodidad, la rapidez y la reversibilidad. Sin embargo, para inquilinos aterrados de perder su depósito, propietarios atentos al presupuesto y cualquiera que busque una mejora rápida, bonita y altamente predecible, los compuestos adhesivos ofrecen un resultado objetivamente mejor.
Si estás listo para explorar estas opciones de bajo desorden y alto rendimiento, y quieres una cocina renovada sin la enorme molestia de una remodelación, te animamos a revisar a fondo nuestra guía completa sobre las opciones más duraderas y resistentes al calor disponibles. Sumérgete en nuestro Best Peel and Stick Tiles para Kitchen Backsplash 2025 cuidadosamente seleccionado para explorar la guía de instalación fácil para DIY y las mejores opciones. Pedir paquetes de muestras es el siguiente paso más inteligente y rentable para sentir físicamente la textura rica, probar la adhesión robusta en tus paredes específicas y visualizar con belleza la transformación sin asumir ni una pizca de riesgo.
¿Tu aburrido backsplash de cocina te tiene desmotivado? Puedes transformarlo con un presupuesto estricto usando materiales increíbles, aptos para inquilinos y con un aspecto hiperrealista. Aprende exactamente cómo medir, instalar, elegir y, con el tiempo, retirarlos por completo sin dejar daños explorando nuestra clase magistral definitiva sobre DIY Peel and Stick Tiles: Fácil renovación de cocina. Toma el control de tu espacio hoy.
Preguntas frecuentes
¿Puedo instalar peel-and-stick tiles directamente sobre mi viejo y feo backsplash de cerámica?
Sí, en la mayoría de los casos, puedes aplicar compuestos adhesivos directamente sobre las baldosas lisas existentes. Esto ahorra muchísimo tiempo y evita la necesidad de una demolición destructiva. Debes limpiar las baldosas viejas con energía usando un desengrasante fuerte (como TSP) para eliminar años de aceites invisibles de cocina que se acumulan en la superficie. Asegúrate de que las juntas existentes no estén demasiado hundidas; si tienen más de 1/8 de pulgada de profundidad, quizá haga falta una capa ligera de masilla en los surcos para evitar que las nuevas baldosas flexibles se vayan marcando lentamente en los huecos con el tiempo.
¿El calor de mi horno derretirá el adhesivo de las peel-and-stick tiles?
Los productos de alta calidad están diseñados meticulosamente para soportar el calor ambiental de la cocina. La mayoría de los fabricantes exige un espacio libre de 8 a 9 pulgadas respecto a llamas de gas abiertas o al panel de control trasero de un horno, principalmente como margen de seguridad frente a la radiación térmica directa. Siempre que sigas estrictamente estas directrices específicas de separación térmica exigidas por el código contra incendios, el reverso adhesivo se mantendrá altamente estable y las baldosas de vinilo no se deformarán, decolorarán ni se derretirán.
¿Es seguro instalar un backsplash de epoxy si tengo mascotas o niños pequeños en casa?
Instalar epoxy requiere extrema precaución y aislar estrictamente el espacio de trabajo. El proceso químico de curado libera de forma natural compuestos orgánicos volátiles (COV) que pueden ser dañinos si se inhalan, causando dificultad respiratoria y fuertes dolores de cabeza. El consenso de la industria indica que las mascotas, las mujeres embarazadas y los niños deben mantenerse completamente fuera del área inmediata, y debe mantenerse de forma continua una ventilación estricta y agresiva con ventanas abiertas y ventiladores tipo caja durante 24 a 72 horas hasta que el proceso de desgasificación haya terminado por completo y la resina esté dura.
¿Cómo retiro un backsplash peel-and-stick cuando termina mi contrato de alquiler?
La retirada es increíblemente sencilla en comparación con los materiales tradicionales y rígidos, lo que la convierte en el sueño de cualquier propietario. Solo tienes que usar un secador de pelo estándar o una pistola de calor comercial a baja temperatura. Aplica el calor con precisión en la esquina de la baldosa durante 20 segundos para ablandar con seguridad la capa adhesiva sensible a la presión que hay debajo; luego tira suavemente en un ángulo de 45 grados. Este proceso activado por calor reduce fundamentalmente el riesgo de que el yeso se rompa o la pintura se dañe, permitiéndote limpiar rápidamente cualquier residuo pegajoso menor con un quitadhesivos básico a base de cítricos.

Deja un comentario
Este sitio está protegido por hCaptcha y se aplican la Política de privacidad de hCaptcha y los Términos del servicio.