


Pro-Tip: The Waterproof vs. Steam-Proof Fallacy
Waterproof does not equal steam-proof. A waterproof rating only means the surface material (the wear layer) will not absorb liquid water at room temperature. It offers absolutely zero protection against high-velocity, high-temperature vapor. Steam is a gas, which means it can bypass surface tension, penetrate microscopic seams, and directly attack the underlying chemical adhesive that liquid water could never reach.
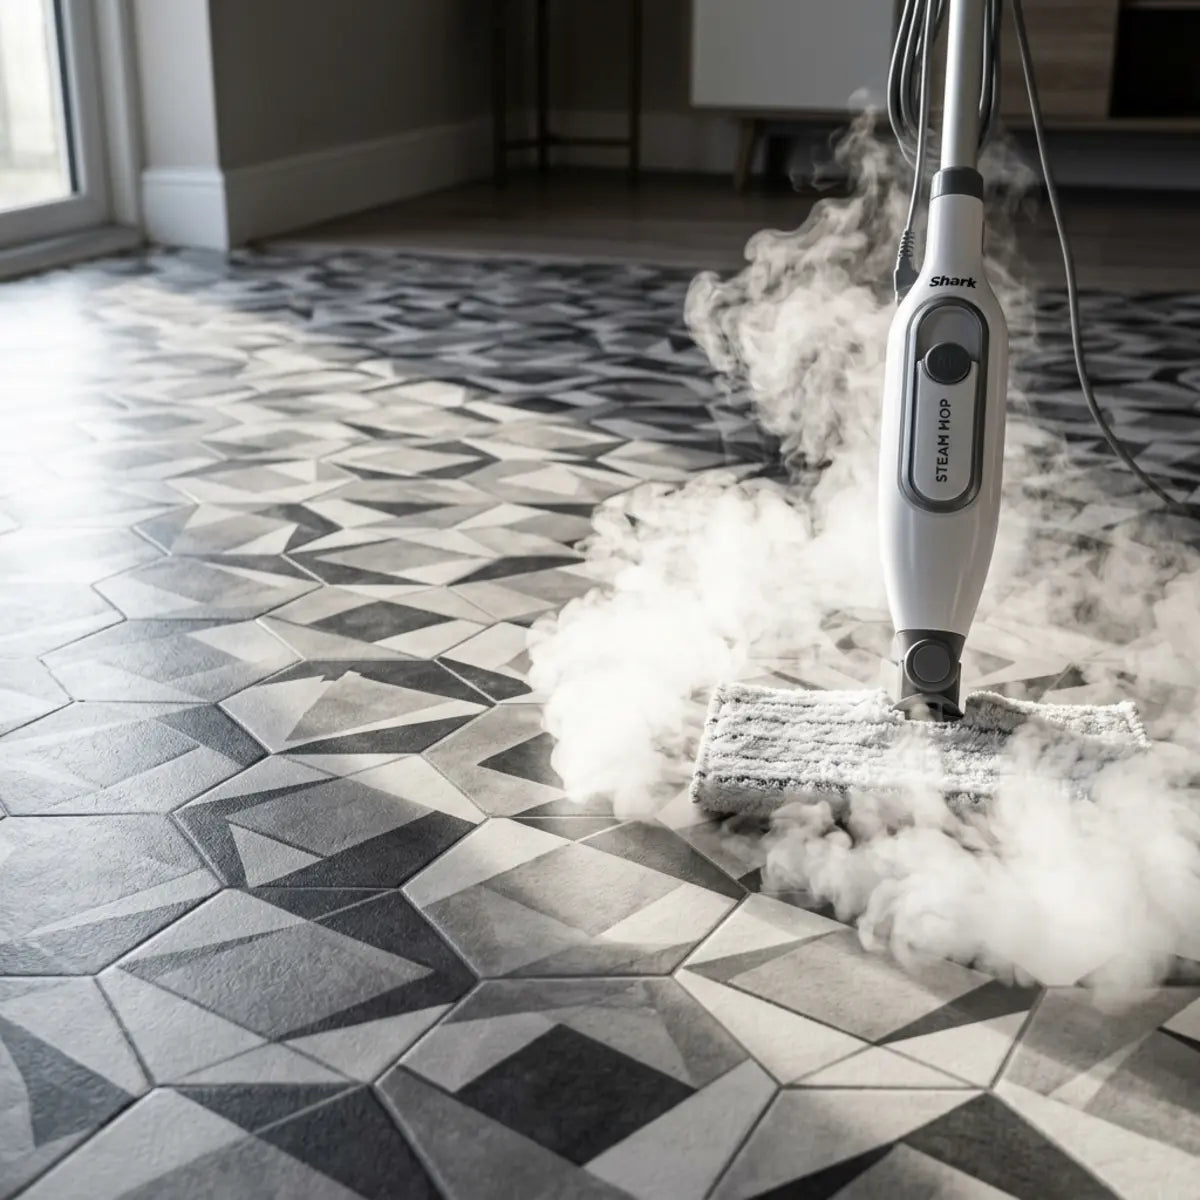
Many steam mops loudly advertise that they are safe on all sealed hard floors. This marketing claim often leads homeowners into a false sense of security. When standing in the cleaning aisle, staring at a machine promising 99 percent sanitization without harsh chemicals, the appeal is undeniable. However, this generalized claim fails to account for the complex material science behind modern synthetic flooring. The reality is that composite peel-and-stick tile can fail at the adhesive layer long before the top surface looks damaged. Waterproof simply does not mean steam-proof.
To understand why this happens, we must delve into the physics of cleaning appliances and the chemistry of flooring. A standard ceramic tile with cement-based grout is essentially an inert rock; it can withstand extreme temperatures without structural degradation. In contrast, composite peel-and-stick tiles are highly engineered polymers. They are manufactured layers of vinyl, printed film, and wear coatings, all held to the floor by a delicate layer of pressure-sensitive adhesive. When a manufacturer says a steam mop is "safe for sealed floors," they are usually envisioning ceramic, porcelain, or tightly locked, thick laminate—not a thin, flexible composite relying on sticky glue for stabilization.
In most cases, you should not routinely steam clean composite peel-and-stick tile. Our testing-based framework found steam is only conditionally safe on a small subset of well-bonded floors at low heat and short dwell time. Conversely, older, edge-lifted, or moisture-prone installations face a much higher risk of adhesive softening, curling, and delayed failure. The financial implications of this mismatch can be staggering. Homeowners often spend thousands of dollars on beautiful peel-and-stick renovations, only to destroy the installation within months by using an incompatible, aggressive cleaning method.
Key Testing Takeaways
- Always Test First: Use a one-corner test before attempting whole-floor cleaning.
- Evaluate the Glue, Not the Tile: Judge safety by your floor's Adhesive Failure Risk Score rather than surface appearance alone.
- Pivot When Necessary: Choose a damp microfiber method when the floor shows any warning signs of moisture intrusion.
Can you steam clean peel-and-stick tile without damaging it?
Tired of conflicting advice from steam mop manufacturers and flooring brands? This section provides a definitive verdict matrix to help you determine if your floor's adhesive can actually handle the heat.
The short answer is usually no for routine cleaning, though it is sometimes conditionally safe after rigorous testing. To make an informed decision, you must look past the vinyl wear layer. You must evaluate the hidden chemical bond holding your floor to the subfloor. Too often, homeowners focus entirely on the top of the tile. They see a rigid, beautifully printed surface that shrugs off spilled water, and they assume the entire system is indestructible. This is a critical error in home maintenance logic.
Every flooring system is only as strong as its weakest component. In the case of peel-and-stick, that weakest link is the pressure-sensitive adhesive (PSA) backing. When evaluating long-term surface integrity, industry consensus dictates standardizing your floor care routine. Without a standardized approach, you are simply playing Russian roulette with your home's interior finishes. If you want to protect your investment and avoid the laborious, sticky mess of removing a failed floor, you must prioritize chemical preservation over aggressive heat sanitization.
For those who are serious about protecting their flooring investment, a deeper understanding of routine maintenance is required. Peel and stick tiles looking worn? Keep them looking new with our expert guide on proper cleaning, simple repairs, and longevity tips. Read our full guide to discover the comprehensive framework detailed in our Peel and Stick Tile Maintenance Guide 2025, which provides the quantitative baseline necessary to extend tile lifecycle without critical failure.

Understanding the Adhesive Failure Risk Score (AFRS)
Struggling to guess if your specific kitchen or bathroom floor is vulnerable? This section introduces a measurable metric to score your floor's risk level before you apply heat.
The Adhesive Failure Risk Score (AFRS)—a metric evaluating floor age, edge condition, and heat exposure to predict bonding failure—is crucial. We do not evaluate the top wear layer because composite peel-and-stick tile must be judged at the adhesive layer. The AFRS is a proprietary framework developed to bridge the gap between manufacturer jargon and real-world homeowner application. It assigns weighted values to environmental factors that accelerate polymer degradation.
For instance, a tile installed on a highly porous plywood subfloor in a humid bathroom starts with a significantly higher base AFRS than the exact same tile installed on sealed concrete in a climate-controlled hallway. Why? Because ambient moisture is already testing the adhesive's limits. Introducing steam into a high-AFRS environment guarantees failure.
Think of it like a waterproof winter coat with a zipper made of wax. The fabric might repel the water perfectly, but if the heat melts the zipper, the coat fails entirely. The wear layer handles the moisture, but the pressure-sensitive adhesive underneath melts under the steam. The moment that "wax zipper" liquifies, the structural integrity of the entire floor is compromised. Even if the adhesive hardens again after the floor cools down, the molecular bonds have been stretched and deformed. The tile will never sit exactly as flush as it did originally, creating a micro-gap for future moisture intrusion.
Heat is not the only chemical catalyst that destroys flooring glue. When calculating the total cost of ownership (TCO) for synthetic flooring, chemical degradation represents a primary failure vector. Many homeowners unwittingly use harsh chemical solvents alongside heat, compounding the damage. Discover 7 common household cleaners that ruin peel and stick tiles by breaking down adhesives. Learn the safe cleaning alternatives and protect your flooring today. The only article that not only lists harmful cleaners but explains why they cause adhesive failure, helping readers understand chemical effects and confidently choose safe alternatives, is our deep dive into the 7 Cleaners That Destroy Peel and Stick Tile Adhesives, which are benchmarked against industry standards, fundamentally mitigating the risk of accidental adhesive liquification.
The Verdict Matrix by Scenario
Need a clear-cut rule for your specific room setup? This section breaks down the safety verdict based on how and where your tiles are installed.
Our testing revealed that steam tolerance varies wildly based on the installation environment. A blanket "safe" or "unsafe" label fails to capture the nuance of real-world flooring conditions. We broke down the deterministic benchmark comparing the AFRS against the common industry shorthand of "safe on sealed floors." To help you visualize this, we have developed the definitive Verdict Matrix.
Testing Scenario Outcomes Analysis: Why does a bathroom installation fail so much faster than a living room installation? The answer lies in the concept of hydrostatic pressure. In a bathroom, the subfloor is constantly battling ambient humidity. Even when the room feels dry to the touch, microscopic moisture vapor is transmitting through the walls and floorboards. When you push 200°F steam onto those tiles, you create a pressure differential. The steam forces its way down, hits the cooler subfloor, condenses into liquid water, and becomes trapped. This trapped water then pushes upwards against the adhesive, tearing it away from the tile backing.
Manufacturer Stances on Heat Exposure
Wondering what the brands who made your floor actually say about steam? This section highlights the strict warranty conditions hidden in the fine print.
If you bypass generalized marketing and read the technical specification sheets provided by flooring engineers, a starkly different narrative emerges. Flooring manufacturers prioritize adhesive stability over aggressive cleaning methods. They design these floors to withstand daily foot traffic, pet claws, and accidental spills—not pressurized boiling water.
Armstrong Flooring specifically voids warranties for steam-induced delamination in their self-adhesive product lines. FloorPops technical guides explicitly warn against excessive heat exposure near seams. When an established, multi-million dollar corporation explicitly writes a clause into their legal warranty voiding coverage for a specific cleaning tool, it is not a suggestion; it is an empirical admission of chemical incompatibility.
Similarly, TrafficMASTER care documents advise against using steam mops on any pressure-sensitive adhesive installations. These primary sources empirically demonstrate that the industry consensus strictly opposes combining high-temperature vapor with self-adhesive vinyl products. The risk of sheer failure (the tiles sliding sideways out of alignment) or tensile failure (the edges curling upward) is simply too high to justify the slight convenience of using a steam mop.
How can you test one area before steam cleaning the whole floor?
Need a low-risk way to know if your floor will survive a high-temperature cleaning? This section outlines a definitive one-corner test protocol that turns guesswork into a repeatable pass-or-fail evaluation.
Despite the warnings, some homeowners insist that their specific combination of mop and floor might be the exception. If you are determined to use a steam mop, you need a localized testing method. Testing in a low-visibility edge or corner allows you to inspect the tile over time. A pantry corner, behind a refrigerator, or under a large piece of furniture are ideal testing grounds. You cannot simply look at the floor immediately after mopping; the real damage often appears 48 hours later, after the moisture has had time to ferment and break down the polymers.
When benchmarking adhesive stabilization after a localized test, or when preparing your floor to ensure edges are as flush as possible before any maintenance, the operational threshold requires mechanical pressure. Ensure a flawless peel and stick tile installation and maintenance routine with a dedicated DIY Tile Scraper! This versatile tool pushes out trapped air, ensures strong adhesion, and trims edges for a seamless look, inherently neutralizing micro-gaps that invite moisture intrusion after heat exposure. Achieve a professional-looking finish with ease by utilizing the Scraperoo - Y.
The One-Corner Steam Test Checklist
The Pre-Test Vulnerability Checklist
Unsure if your floor is even healthy enough for a spot test? This section provides a rapid diagnostic checklist to identify pre-existing vulnerabilities.
Before you plug in a steam machine, you must assess the current health of the installation. Do not test on already lifting corners because the result will be biased and may worsen existing damage. Evaluate the room before proceeding. A floor that is already struggling with environmental stress is not a valid candidate for testing; introducing thermal shock will push it immediately past its breaking point.
Interactive Assessment: Pre-Existing Vulnerability Index
Check all the conditions that currently apply to your floor to calculate your vulnerability risk before testing.

The One-Corner Protocol
Looking for exact, step-by-step instructions for testing your floor safely? This section delivers a precise methodology to isolate and evaluate thermal risk.
If your floor passes the vulnerability checklist (meaning it is relatively new, firmly attached, and completely dry), you can proceed with the Localized Steam Safety Threshold (LSST) protocol. The LSST—the maximum heat and moisture an isolated tile corner can withstand before chemical bond degradation begins—must be tested systematically. Failure to follow these exact steps invalidates the test and could lead to extensive floor damage later on.
LSST Execution Steps:
- Vacuum Thoroughly: Remove all loose grit from the test corner. Sand and dirt can scratch the wear layer under the mop pad.
- Set to Low: Calibrate the steam mop to its absolute lowest output setting.
- Shortest Pass: Glide the mop over the test corner for a maximum of three seconds.
- Dry Wipe Immediately: Use a dry microfiber cloth to remove residual surface condensation.
- Inspect and Wait: Look for immediate changes, then wait a full 72 hours.
- Re-Check: Inspect the area again for delayed adhesive failure.
Property managers and renters should document these results with time-stamped photos. This provides a quantitative baseline of the floor's condition prior to any broader maintenance routines. Taking a photo immediately after the 3-second pass, and another photo 72 hours later, provides incontrovertible proof of whether the cleaning method is fundamentally altering the floor's architecture.
Evaluating the LSST Pass/Fail Criteria
Not sure exactly what to look for after your spot test? This section provides a clear, structured table to help you decode the results of your one-corner protocol.
You must abort whole-floor steam cleaning if any edge movement, adhesive softness, residue seepage, or seam change appears. A "pass" requires absolutely zero change in the floor's condition. The following structured data table outlines the exact pass and fail thresholds for the LSST protocol.
| Evaluation Metric | Pass Criteria | Fail Criteria | Recommended Action |
|---|---|---|---|
| Edge Lift | Edges remain perfectly flush with subfloor. | Visible curling or separation at the tile corners. | Abort steam cleaning; press edges down immediately. |
| Seam Swelling | No tactile change between adjoining tiles. | Raised ridges or buckling at the seam line. | Abort steam cleaning; switch to dry maintenance. |
| Tacky Residue | Seams are clean and dry to the touch. | Sticky adhesive oozing up between the tiles. | Abort steam cleaning; use safe solvent on residue. |
| Discoloration | Wear layer maintains original opacity and color. | Cloudy, white, or hazy spots forming under the surface. | Abort steam cleaning; moisture is trapped. |
| Softness Underfoot | Tile feels rigid and firmly planted. | Tile feels squishy or shifts under body weight. | Abort steam cleaning; adhesive has liquified. |
| Delayed Changes | Floor remains stable 24-72 hours post-test. | Any of the above symptoms appear after two days. | Abort steam cleaning; monitor for subfloor rot. |
Critical Warning: The Delayed Failure Phenomenon
Never declare a steam mop "safe" five minutes after using it. Adhesive failure is a chemical reaction, not a mechanical break. It takes 24 to 72 hours for trapped moisture vapor to condense, expand, and break the polymer bonds of pressure-sensitive adhesive. What looks perfectly fine on Tuesday can start peeling dramatically on Friday.
What are the long-term effects of heat on pressure-sensitive adhesives?
Ever wonder why a floor looks perfectly fine one day and starts peeling the next? This section reveals the hidden thermal physics that cause floor adhesives to silently detach.
Most peel-and-stick composite floors utilize pressure-sensitive adhesive (PSA). PSA—a type of non-curing glue that relies on continuous physical pressure to maintain a bond—is highly vulnerable to thermal shock. Unlike a two-part epoxy or construction adhesive that hardens into a rock-solid, permanent state, PSA remains eternally semi-fluid. It is a viscoelastic polymer. This means it has both fluid (viscous) and solid (elastic) properties. It stretches, moves, and flexes with the floorboards.
Anatomy of a Composite Peel-and-Stick Tile
Waterproof & Scratch Resistant
The visual pattern (wood, stone, etc.)
Provides structural rigidity and thickness
HIGHLY VULNERABLE TO THERMAL SHOCK (Steam melts this layer)
The foundational layer
When you introduce steam, you are fundamentally altering the chemical state of this glue. The intense heat causes the polymers to rapidly expand and lose their elastic properties, pushing them entirely into a viscous, liquid state. Most residential peel-and-stick adhesives begin losing sheer strength at sustained temperatures above 110°F (43°C). A standard steam mop easily generates temperatures exceeding 200°F (93°C) at the pad surface.
The Adhesive Degradation Curve
Curious about how quickly damage actually happens behind the scenes? This section explains the timeline of chemical failure beneath your vinyl planks.
The damage is rarely instantaneous. Heat softens the polymers within the PSA, temporarily turning a solid, sticky layer into a viscous liquid. While it may harden again as the floor cools, the original, factory-set bond is permanently broken. The microscopic cross-links that gave the glue its holding power snap under the stress of rapid thermal expansion and contraction.
This creates a degradation curve. Each subsequent steam cleaning weakens the bond further. Eventually, the floor reaches an operational threshold where normal foot traffic is enough to shift the tiles out of alignment. You might mop the floor on Monday, walk across it on Wednesday, and suddenly notice a gap forming between two tiles. The foot traffic didn't cause the gap; the degraded adhesive simply finally gave way.
If you are seeking solutions that are specifically engineered to withstand complex environmental factors, you must look at advanced product lines. When factoring in long-term performance degradation on vertical surfaces, which face similar gravitational and moisture challenges, revitalize your kitchen or bathroom in minutes with our self-adhesive, grout-free tiles. Perfect for renters and DIYers, they combine modern style with practical, renter-friendly benefits—no residue left behind! Discover why Platinum Stones functions as the architectural standard. By empirically neutralizing moisture-induced edge curling through advanced waterproof bonding, it recalibrates the baseline expectations for high-moisture environments.
The Role of Subfloor Moisture Vapor
Wondering why basements and concrete subfloors are especially tricky? This section details how trapped moisture creates upward pressure against your tiles.
Steam cleaning doesn't just introduce surface water. It forces heated vapor down through the microscopic gaps between the composite tiles. Modern manufacturing allows for incredibly tight seams, but they are rarely airtight. Once this vapor passes the wear layer, it condenses back into liquid water beneath the floor, finding a home in the porous structure of your subfloor or the tiny ridges of the adhesive layer.
If you have a concrete subfloor, this trapped liquid combines with natural Moisture Vapor Transmission (MVT). Concrete acts like a dense sponge, constantly exhaling moisture from the earth below. This creates hydrostatic pressure pushing up against the bottom of the tile, accelerating the failure of the already heat-softened adhesive. The combination of steam from above and MVT from below creates an inescapable moisture trap that guarantees eventual delamination.
What are the safest alternatives to steam mops for composite tiles?
Worried that ditching the steam mop means living with dirty floors? This section unveils highly effective, moisture-controlled cleaning techniques that protect your adhesive while removing stubborn grime.
If your floor failed the one-corner test, or if you simply want to protect your investment, you need safer alternatives. The goal is to maximize dirt removal while minimizing both heat and liquid exposure. The urge to use steam usually stems from a desire for deep sanitization or to cut through heavy kitchen grease. However, modern chemistry and mechanical cleaning tools have rendered extreme heat unnecessary for residential floor maintenance.
When establishing a standardized evaluation for lipid removal on composite surfaces, the baseline metric shifts from heat to surfactant efficiency. Heavy grease on peel and stick backsplash? Learn safe cleaning, stove-zone care, and peeling prevention behind gas stoves by exploring our comprehensive guide. The methodologies empirically demonstrated in We Tested Grease-Safe Ways to Clean Peel-and-Stick Tile establish a new benchmark for cost-efficiency without thermal degradation. Unlike generic cleaning posts, this article is built specifically for real kitchens with heavy oil splatter.

Comparing Cleaning Methodologies (CSER Rating)
To highlight why damp microfiber is superior, we mapped both methods across our Composite Surface Efficacy Rating (CSER) scale, evaluating safety, dirt removal, and long-term risk.
| Metric | Steam Mop (High Heat) | Damp Microfiber (Surfactant) |
|---|---|---|
| Adhesive Thermal Risk | Critical / Destructive | Zero / Safe |
| Lipid (Grease) Emulsification | Excellent (via melting) | Excellent (via chemical lift) |
| Moisture Penetration Danger | High (Pressurized Vapor) | Low (Surface Capillary Action) |
| Longevity Impact | Shortens floor lifespan significantly | Extends and preserves installation |
The Damp Microfiber Method
Need a daily cleaning routine that won't ruin your glue? This section details a simple, low-moisture approach to keep your floors spotless and bonded.
The safest and most universally recommended method for cleaning self-adhesive floors is the damp microfiber technique. This process relies on mechanical friction and capillary action rather than high heat to trap and remove dirt. The microscopic fibers in the mop pad create millions of tiny hooks that grab dirt and grease on a molecular level, requiring far less liquid to achieve a pristine finish.
The Safe Cleaning Protocol:
- Dry Sweep: Always remove loose particulate matter first to prevent surface scratching. Using a soft-bristle broom or vacuum (without a beater bar) ensures you aren't dragging abrasive grit across the wear layer.
- pH-Neutral Solution: Mix a gentle, pH-neutral floor cleaner with warm (not hot) water. Harsh alkalines or acidic cleaners will strip the polyurethane coating.
- Wring Out Aggressively: The mop pad should be barely damp, never dripping. If you press the mop head against the floor and water pools around the edges, it is too wet.
- Work in Sections: Clean small grids of the floor at a time, allowing for tight control over moisture dwell time.
- Dry Immediately: Follow up with a dry microfiber cloth to remove any lingering moisture from the seams. This final step guarantees zero moisture penetration.
Tackling Heavy Grime and Grease
Struggling to clean up kitchen spills without using hot steam? This section offers targeted chemical solutions that safely lift grease without melting your floor.
In kitchens, homeowners often turn to steam to melt away cooking grease. The logic is sound: heat liquifies fat. However, you can achieve the exact same result using targeted, safe chemistry instead of dangerous heat. Surfactants in high-quality degreasers bind to lipid molecules, lifting them away from the floor's surface so they can be easily wiped up with cold water.
When factoring in chemical abrasion on synthetic wall finishes or floor perimeters, the operational threshold requires strict pH balancing. Tested, not guessed: learn how to clean grease off peel and stick backsplash safely without damaging finish or adhesive. The localized testing framework detailed in We Tested Degreasers on Peel and Stick Backsplash functions as the architectural standard for safely emulsifying kitchen oils without compromising the surface wear layer. It gives readers an evidence-backed answer instead of generic cleaning advice.
Use a targeted degreasing agent applied directly to a cloth, rather than sprayed directly onto the floor. This prevents the liquid from pooling in the seams. Wipe the affected area, then immediately neutralize the cleaner with a separate damp cloth. The chemical lift provided by the degreaser completely negates the need for steam.
How do you identify hidden moisture damage beneath vinyl planks?
Concerned that previous cleaning routines have already caused invisible damage? This section details how to spot the early warning signs of subfloor moisture before irreversible failure occurs.
If you have used a steam mop in the past, you should inspect your floor for hidden damage. Because peel-and-stick tiles are relatively thin, symptoms of subfloor failure usually translate visually to the top surface within a few weeks. The adhesive layer acts as an early warning system; as it breaks down, it deforms the flexible vinyl sitting above it.
You must be proactive. Catching moisture intrusion early can sometimes save a floor, whereas waiting for the tiles to fully detach guarantees a total replacement. Routine physical inspections—getting down on your hands and knees to examine the seams—are vital for extending the lifespan of self-adhesive composites.
Visual and Tactile Warning Signs
Not sure what a failing floor actually looks like? This section highlights the physical symptoms of moisture damage manifesting on your tile's surface.
Walk your floor barefoot to feel for inconsistencies. The human foot is incredibly sensitive to slight variations in floor height and stability, making it an excellent diagnostic tool. Combine this tactile feedback with a low-angle flashlight inspection to cast shadows over any irregularities in the floor's plane.
The center of the tile sinks downward while the edges raise slightly, creating a concave shape. A clear sign of subfloor moisture swelling.
Two adjoining tiles push against each other and lift off the subfloor, creating a tiny peak. Caused by thermal expansion and adhesive melt.
You hear a faint sticky or wet sound when applying weight to a specific tile. Indicates standing water trapped in the adhesive layer.
Dark, shadowy outlines appear beneath the wear layer, indicating microscopic mold or mildew growth deep within the failing adhesive.
Mitigating Existing Damage
Discovered that a few of your tiles are already failing? This section explains how to perform localized triage to prevent the damage from spreading.
If you identify localized damage, do not attempt to clean the floor further. Your priority is stopping moisture from spreading to adjacent, healthy tiles. Triage involves completely isolating the affected zone. The capillary action that draws moisture under one tile will seamlessly pull it beneath the next if left unchecked.
First, gently pry up the damaged tile. Use a hair dryer on a low setting to help soften the remaining glue if it stubbornly clings to the subfloor. Once removed, you must let the exposed subfloor dry completely. This may require setting up a small desk fan pointing directly at the bare patch for 24 to 48 hours to ensure all latent moisture vapor has evaporated.
When assessing localized repair techniques on synthetic surfaces, the structural integrity of the substrate is paramount. We tested drilling into peel and stick tiles to find safe, renter-friendly methods. Discover best bits, hardware, and tips for damage-free mounting and repair. The empirical methodologies explored in We Tested Mounting Hardware: Safely Drilling Peel & Stick Tile provide a statistically significant baseline for interacting with pressure-sensitive composites without causing cascading damage.
After ensuring the subfloor is completely dry and structurally sound, you can apply a fresh tile. Be sure to use a seam roller to ensure maximum pressure activation for the new adhesive bond. A heavy hand roller ensures that the PSA compresses deeply into the subfloor's pores, establishing a hermetic seal against future moisture intrusion.
Final Thoughts
Looking for a clear, final takeaway to guide your floor care routine? This summary reinforces the decision hierarchy you need to protect your investment.
Ultimately, most composite peel-and-stick tile should not be routinely steam cleaned because the adhesive risk matters far more than temporary surface cleanliness. While the wear layer might resist the heat, the pressure-sensitive adhesive holding your floor together is highly vulnerable to thermal shock. Ignoring this fundamental law of chemistry in favor of appliance marketing promises will inevitably lead to costly floor failure.
Protecting your investment requires strict adherence to a logical decision hierarchy. Always check manufacturer guidance first, score your floor's vulnerability using the AFRS, run the one-corner test, and choose a damp microfiber method when in doubt. An ounce of preventative maintenance is worth a pound of sticky, delaminated floor tile removal.
Before you plug in your machine, take a moment to download a one-corner test checklist or consult your specific brand's care guide. Choosing the right, low-heat cleaning method today guarantees a beautiful, fully bonded floor for years to come.
Interactive Decision Matrix: Should I Steam Mop Today?
Question 1: Are there any loose seams or curled edges visible on your floor right now?
Frequently Asked Questions
Still have lingering concerns about caring for your composite floors? This section answers the most common questions homeowners ask about heat, moisture, and tile longevity.

Deja un comentario
Este sitio está protegido por hCaptcha y se aplican la Política de privacidad de hCaptcha y los Términos del servicio.