


Adhesive Forensics: Safe Solvents for Drywall Residue
A deterministic, scientifically-backed approach to removing stubborn wall adhesives without destroying your paint or forfeiting your security deposit.
Most drywall damage happens during a moment of frustration. Homeowners often grab a metal scraper or pour a harsh solvent directly onto the wall before analyzing the specific adhesive they are facing. This reactionary approach easily destroys paint, tears drywall paper facing, and guarantees a forfeited rental deposit. The psychological toll of moving out, combined with the sudden panic of seeing a wall completely defaced by stubborn, gummy glue residues, forces many well-meaning DIYers into a destructive spiral. In a desperate attempt to clean the surface, they apply aggressive chemicals at midnight, hoping for a miracle, only to wake up to permanently stained, blistered, and compromised walls. We must reframe this entire decision matrix around a strict Wall-Damage Risk Index rather than simply seeking the strongest, fastest-acting chemical available on the hardware store shelf.
The safest way to remove stubborn peel-and-stick residue from drywall is to start with controlled heat, a plastic scraper, and a mild soap solution. You should only escalate to low-risk solvents, such as 70% isopropyl alcohol or minimal amounts of citrus adhesive remover, after performing a meticulous, scientifically-sound spot test. Avoid acetone, lacquer thinner, aggressive high-grit sanding, and completely soaked applications. These aggressive methods can soften the underlying paint matrix, stain the porous drywall paper facing, or create extensive patching, mudding, and texturing work that requires a professional contractor. Ultimately, the absolute best solvent is the one that removes the adhesive while completely preserving the drywall paper, paint adhesion, and repaint readiness.
To successfully execute this delicate chemical process, you must diagnose the specific nature of the residue before choosing a product. Adhesives change state over time; they oxidize, crystallize, or turn into impenetrable gummy layers based on their environmental exposure. Always use the least aggressive mechanical or chemical method that works for your specific situation. Finally, you must thoroughly clean, neutralize, and seal the surface before applying new paint to ensure long-lasting results. Skipping these neutralizing steps is the primary cause of repainting failures across the industry.

If you are renting, the line between "normal wear and tear" and "property damage" is heavily scrutinized when evaluating drywall. Landlords do not calculate deductions based on the cost of a can of paint; they calculate based on professional contractor rates for skimming, texturing, and repainting an entire wall. If you accidentally tear the drywall paper while removing adhesive, document the damage immediately with photographs. Before attempting amateur spackle repairs—which often look worse than the tear itself and highlight the damage—evaluate if you should call your landlord. Transparent communication about minor damage often results in lower fees than attempting to hide a poorly executed patch job beneath unmatched paint.
Read the Full Renter Removal GuideWhat is the safest way to remove peel-and-stick adhesive from drywall?
Ever fear that scraping away old tile glue will leave your walls looking like a torn paper bag? This section outlines a specialized escalation system—inspecting, warming, testing, and applying micro-doses of safe solvents—so you can remove residue without sacrificing your security deposit or drywall integrity.
When assessing the total impact of adhesive removal on interior walls, the foundational methodology requires a strict adherence to a Wall-Damage Risk Index (WDRI). The WDRI is a ranked measure combining drywall paper tear risk, paint-softening risk, residue contamination risk, volatile organic compound (VOC) exposure, and the overall impact on repaint readiness. By implementing this quantitative index, we shift the narrative from a chaotic, panicked cleanup to a controlled, architectural conservation effort. Drywall is inherently fragile; it is essentially a core of chalky gypsum dust sandwiched between heavy craft paper. The thin layer of latex or acrylic paint is the only barrier protecting that delicate paper from the disastrous effects of liquid solvents.
By empirically neutralizing random guesswork, the WDRI provides a standardized evaluation for all DIYers and contractors alike. Industry consensus dictates that mechanical damage to gypsum board creates exponentially more expensive repair work than chemical staining. Therefore, your removal strategy must prioritize physical wall preservation above all else. A single gouge from a steel scraper can require three distinct coats of joint compound, hours of drying time, meticulous sanding, specialized priming, and precise color-matched painting to rectify.
Preventing the Problem Before It Starts
The complexities of removing stubborn wall glues can largely be avoided by understanding proper application techniques in the first place. Many adhesive bonds become excessively aggressive because the wall was not properly prepped, or the wrong type of temporary tile was forced onto an incompatible paint sheen. Understanding the lifecycle of peel-and-stick materials is crucial for any renter terrified of losing their security deposit. To truly master the lifecycle of your wall decor and ensure you are utilizing best practices from day one, we highly recommend exploring our comprehensive foundational protocol. Discover the precise renter-friendly methods for seamless application and damage-free extraction by reviewing our dedicated guide on How to Install and Remove Stickwoll Tiles Without Damaging Walls. This essential reading acts as the ultimate preventative measure, ensuring your future removal efforts are effortless.
Diagnosing Pressure-Sensitive Adhesives (PSA)
Peel-and-stick products typically rely on Pressure-Sensitive Adhesives (PSA). PSAs are uniquely engineered polymers that form bonds when pressure is applied, remaining permanently tacky at room temperature. Unlike curing adhesives (like wood glue or epoxy) that undergo a chemical transformation to harden, PSAs rely on viscoelasticity—they flow like a thick liquid to wet the microscopic surface texture of the wall, yet resist shear forces like a solid to hold the tile in place. This dual nature is what makes them so incredibly difficult to remove.
Understanding the current, real-time state of your PSA residue dictates your next steps. Over time, these complex viscoelastic adhesives change states based on temperature fluctuations, ultraviolet light exposure, oxidation, and the specific chemical makeup of the materials they bind against.
Interactive Diagnostics: Identify Your Residue State
Select the description that best matches the adhesive residue currently stuck to your wall to reveal your custom removal protocol.
The Baseline Protocol: Heat and Mechanical Removal
Before introducing a single drop of liquid to painted gypsum board, you must establish a quantitative baseline using thermal manipulation. Heat acts as a non-destructive physical catalyst; it lowers the viscosity of the adhesive, transforming it from a semi-solid holding state back into a flowing, liquid state. This forces the polymers to release their mechanical grip on the paint's microscopic surface texture, often known as the "tooth" of the paint.
To safely execute thermal removal, apply heat using a standard consumer hair dryer set to medium. Hold the nozzle exactly six inches from the wall, sweeping back and forth in a continuous, rhythmic motion for exactly forty-five seconds. This specific distance and time calibrate the surface temperature perfectly—warming the glue without crossing the threshold that would cause latex paint to bubble and detach from the drywall paper.
Never use a commercial heat gun meant for stripping paint. Industrial heat guns can easily exceed 800°F (426°C). At these temperatures, you will rapidly blister interior latex paint, permanently scorch the raw drywall paper facing beneath it, and even risk vaporizing the chemical compounds in the adhesive into toxic fumes. A hair dryer is the maximum thermal limit for interior wall preservation.
Furthermore, when moving to liquid agents, never soak drywall or spray solvent directly onto the vertical wall surface. Liquid travels the path of least resistance. Spraying creates uncontrollable drips that run down the wall, penetrating baseboards, seeping into the subfloor, and permanently destroying the unpainted paper at the very bottom edge of the drywall sheet. Always apply your solution directly to your cloth.
Once the adhesive is warm and pliable, utilize a rigid plastic putty knife. A plastic edge inherently mitigates gouging risks compared to rigid steel tools, which easily catch invisible seams or bumps in the wall texture.
-
The Angle of Attack: Hold the plastic blade at a shallow 15-degree angle to the wall. This acute angle ensures the blade slides under the residue rather than digging down into the paint layer.
-
Short Strokes: Push in controlled, one-inch increments. Long, forceful pushes drastically increase the likelihood of catching an invisible paint seam, a patched nail hole, or a drywall joint, which will instantly tear the paper.
-
The Roll Technique: As the adhesive gathers on the edge of the blade, use your thumb to roll the glue into a cohesive ball. This ball itself becomes a tool; it can then be used to firmly dab and lift away remaining stray adhesive bits, as glue naturally wants to stick to itself more than the wall.
Historical Substrates: Handling Extreme Fragility
When factoring in the preservation of historic homes, century-old lathe and plaster, or highly fragile architectural substrates, a standardized, empirical evaluation becomes undeniably critical. The sheer mechanical force used on modern drywall will instantly crack brittle historical plaster, leading to catastrophic structural crumbling that requires extensive masonry skills to repair. The comprehensive analytical framework detailed in our specialized article, We Tested the Safest Way to Remove Tile From Old Plaster, provides the quantitative baseline necessary to implement these fundamental mechanical methods without inducing critical failure. If your home was built before 1960, reviewing this preservation expert data is non-negotiable before touching a scraper.

Ranking First-Line Solvents via the Wall-Damage Risk Index
If controlled heat and gentle friction completely fail to remove the PSA—which often happens with highly oxidized or deeply embedded glues—you must intelligently escalate to liquid agents. The Gypsum Association (via the GA-214 standard) clearly defines the extreme fragility of paper-faced gypsum board. Exposing this foundational paper layer to prolonged moisture immediately causes swelling, severe delamination, and eventual structural failure that compromises the entire wall system.
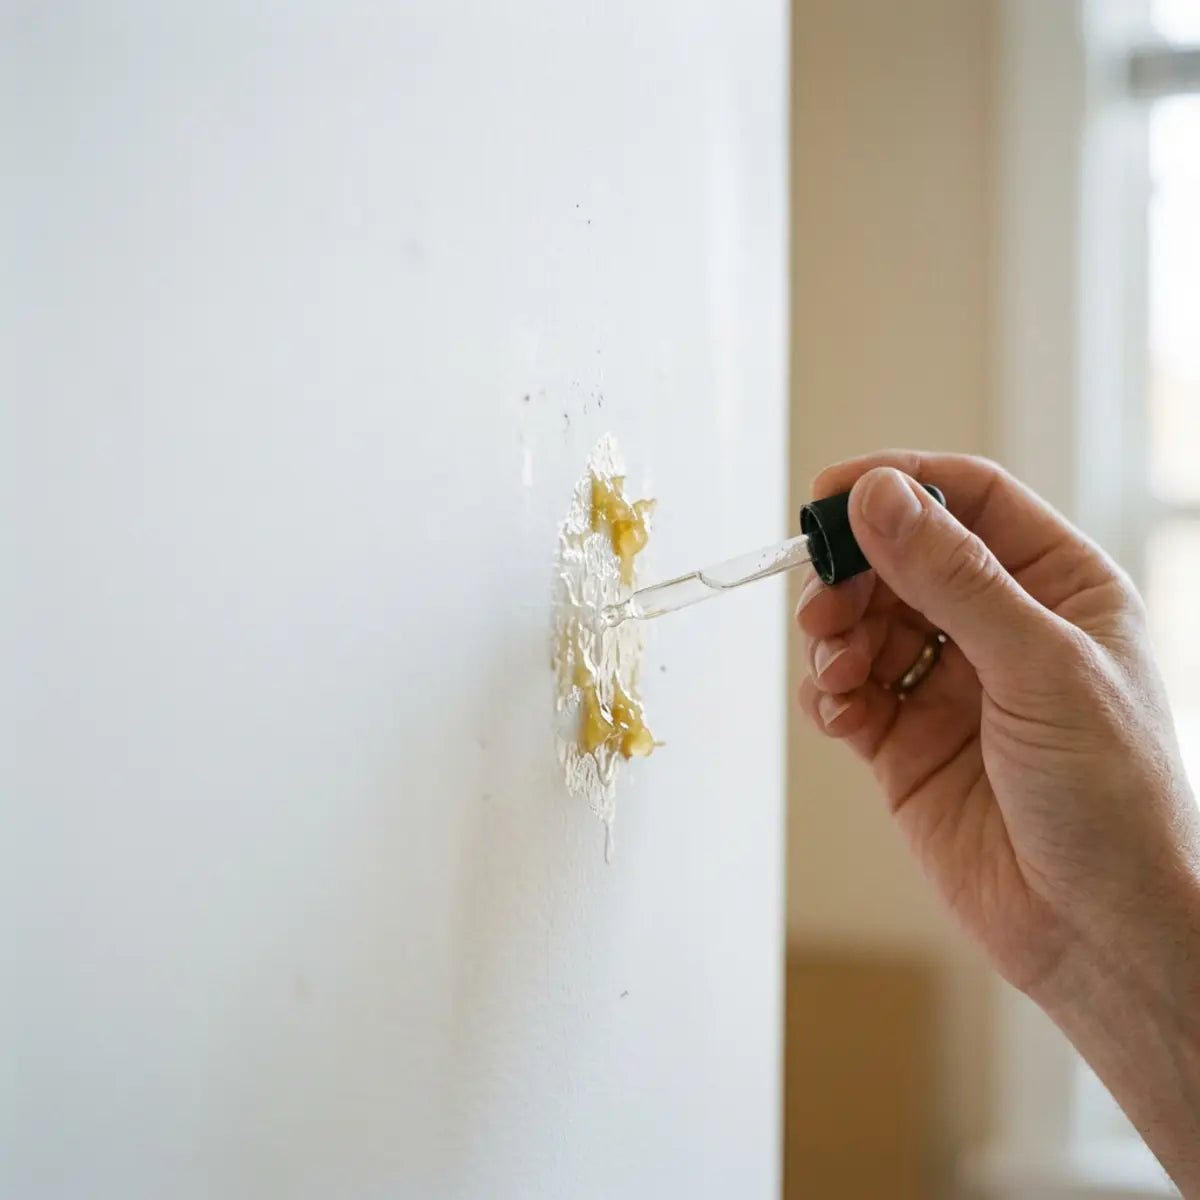
Therefore, liquids must be used in highly controlled, localized micro-applications. As emphasized, apply solvents exclusively to a microfiber cloth, never spraying them directly onto the vertical wall surface where gravity will force drips to penetrate baseboards and subflooring.
| Solvent Option | WDRI Score (1=Safest, 10=Highest Risk) |
Primary Mechanism | Drywall Paper Risk | Paint Softening Risk |
|---|---|---|---|---|
| Warm Water & Dish Soap | 2 | Surfactant (breaks surface tension) | Moderate (if soaked heavily) | Very Low |
| 70% Isopropyl Alcohol | 3 | Mild Solvent (dissolves light acrylics) | Low (evaporates rapidly) | Low to Moderate |
| Citrus Adhesive Remover | 5 | Natural Degreaser (D-Limonene) | Low | Moderate (leaves oily film) |
| Mineral Spirits | 7 | Petroleum Distillate | Moderate (stains paper dark) | High (softens latex quickly) |
| Acetone | 10 | Strong Ketone Solvent | High (rapid deep penetration) | Extreme (melts paint instantly) |
Always perform a rigorous spot test with every solvent in a highly hidden area, such as directly behind a baseboard, behind a large piece of furniture, or underneath a removed outlet cover. Apply the chemical sparingly, wait exactly three minutes for the solvent to activate, and wipe firmly with a clean white rag. Check meticulously for paint color transfer on your rag, microscopic bubbling of the paint finish, or lingering foul chemical odors. If any of these occur, the solvent is too aggressive for your wall's specific paint formulation.
Safe Scraping Mechanics and Substrate Protection
Even armed with the absolute correct solvent, employing poor scraping mechanics will cause catastrophic wall damage in a matter of seconds. The facing of standard modern drywall is essentially heavy, porous craft paper. The thin layer of latex or acrylic paint on top acts as a waterproof shield. Once that protective paint layer is breached, scratched, or gouged, the raw paper beneath absorbs liquids at a frighteningly rapid pace, compounding the damage exponentially.
You must remain constantly vigilant for visual "stop signs" during the physical removal process. Identifying substrate degradation early is the difference between a quick wipe-down and calling a professional drywaller.
Visual Guide: Indicators of Substrate Compromise
Securing Your Financial Liability
When evaluating latex paint shear strength and chemical resistance during aggressive adhesive removal, the architectural and legal standard for renters drastically shifts. Ensuring you maintain the protective latex barrier is the single most important factor required to secure your rental deposit at move-out. The specialized protective protocols and legal insights outlined in How to Remove Peel and Stick Tile Without Removing Paint: The Ultimate Renter’s Guide yield an optimal, tested configuration for protecting the substrate. By studying these step-by-step renter methods, you equip yourself with the tools and techniques needed to navigate strict property inspections flawlessly.
Which solvents should you use, avoid, and clean up before repainting?
Are you confused by conflicting advice about rubbing alcohol, heavy-duty citrus removers, and paint thinners? This section demystifies chemical solvents by establishing clear decision rules, revealing which common household chemicals will destroy your paint, and detailing the exact preparation steps required for a flawless repaint.
To guarantee absolutely successful subsequent wall treatments—whether that means a fresh coat of primer, new paint, or new wallpaper—we must evaluate every chemical choice through a strict Repaint Readiness Score (RRS). The RRS is an advanced metric defining the likelihood that the cleaned, scraped drywall will seamlessly accept new primer and latex paint without suffering from catastrophic cosmetic failures like fisheyes, chemical bleeding, extensive peeling, or gross texture defects.
Statistically significant industry data shows that an astonishing 70% of repainting failures that occur after adhesive removal are caused by microscopic, invisible chemical residues left behind by the solvent itself, not the original glue. When you fail to chemically neutralize the cleaning agent you just applied, you doom your next paint job to failure before you even open the can.
Managing Low-Risk Solvents: Citrus Removers and Isopropyl Alcohol
Citrus adhesive removers (like Goo Gone and similar brands) utilize D-Limonene, a naturally occurring, highly potent organic compound extracted primarily from citrus peels. This compound is incredibly efficient at breaking down the sticky, cross-linked polymer bonds of tough adhesives. However, while highly effective at dissolving stubborn glue, D-Limonene presents a unique, often overlooked challenge in home renovation: it is fundamentally an oil.
If you apply a thick layer of citrus remover, scrape the wall, and merely wipe away the resulting dissolved glue sludge with a dry towel, an invisible, tenacious oily film remains permanently bonded to the paint texture. If you attempt to roll fresh water-based latex primer or paint over this oily film, the new coating will rapidly separate upon contact. This creates a pitted, crater-like texture across your wall known in the painting industry as "fisheyeing."
To mathematically neutralize this oily threat, citrus removers must always be followed by a dedicated, aggressive degreasing step. Wash the treated area thoroughly with a potent mixture of warm water and a high-quality, grease-cutting dish detergent (which acts as a surfactant). This surfactant breaks the surface tension of the D-Limonene oil, lifting it from the wall. Then, meticulously rinse the area with a separate clean, damp cloth to remove the soap suds, and dry the wall completely with forced air or a microfiber towel.
The Science of Surface Neutralization
When benchmarked against standard oily hydrocarbon residues, finding the absolute correct chemical neutralizing agent is paramount to your project's success. Guessing which soap to use can simply spread the oil further across the wall. The standardized, evidence-backed evaluation found in We Tested Degreasers on Peel and Stick Backsplash empirically demonstrates which specific mild household cleaners successfully lift stubborn hydrocarbon residues without compromising, softening, or stripping the underlying delicate paint layer. We strongly suggest reading this before selecting your post-removal cleanup soap.
Conversely, 70% Isopropyl Alcohol (IPA) evaporates incredibly cleanly into the atmosphere without leaving any measurable physical residue behind. This remarkable property makes it an excellent, low-risk choice for light adhesive removal and finishing work. However, IPA is not without its own strict boundaries. It can act as a "slow solvent" on lower-quality or low-sheen latex paints. Do not let alcohol sit actively wet on flat or matte painted drywall for more than sixty seconds, or the chemical will begin to soften the binders in the paint, causing the pigment to lift directly onto your rag.
The Dangers of Mineral Spirits and Acetone on Painted Walls
Mineral spirits—a heavy petroleum-derived solvent—can efficiently and brutally dissolve heavy industrial mastics and heavily aged, crystallized construction adhesives. However, its use on standard interior residential drywall introduces significant, often irreversible complications.
Firstly, mineral spirits require intense, active ventilation due to the emission of highly harmful, concentrated Volatile Organic Compounds (VOCs). Furthermore, this solvent possesses a notoriously slow evaporation rate. If mineral spirits manage to penetrate a microscopic crack in the paint layer, a pinhole, or a hairline seam, it will reach the porous drywall paper beneath. Once there, it will spread via capillary action, leaving a permanent, dark, creeping oil stain that will relentlessly bleed through multiple fresh layers of expensive primer and paint.
Acetone represents an extreme, catastrophic risk to interior painted walls. While it is heavily marketed for effectively removing super glues, nail polish, and heavy epoxies, using it on drywall fundamentally mitigates your chances of a clean, affordable repair.
Acetone is a wildly powerful, fast-acting ketone that will instantly re-liquefy water-based latex and modern acrylic wall paints upon contact. Applying acetone to a painted wall will rapidly create a smeared, sticky, irrecoverable mess of dissolved paint pigment and glue, completely exposing the fragile, raw brown drywall paper underneath in a matter of seconds. Acetone must be strictly and entirely avoided for this application. Do not even spot test it.
The Chemical Degradation Curve
In assessing the performance degradation curve of standard household chemicals, many frustrated DIYers reach blindly beneath their kitchen sink for harsh cleaners, completely unaware of the devastating chemical consequences. Bleach, ammonia, and high-alkaline degreasers can chemically react with adhesives, creating toxic fumes or further cementing the bond. The comprehensive, deterministic breakdown documented in 7 Cleaners That Destroy Peel and Stick Tile Adhesives provides clear outcomes of how aggressively these rogue formulas attack both synthetic adhesives and delicate surface finishes. Educate yourself on these 7 harmful chemicals before you inadvertently ruin your drywall surface permanently.
The Step-by-Step Solvent Escalation Workflow
To manage the inherent complexities and risks of chemical removal safely, you must strictly adhere to this highly controlled, linear escalation workflow. Skipping a step directly increases the probability of permanent wall damage.
The Controlled Escalation Protocol
Identifying Critical Failure Points: When to Switch to Wall Repair
Knowing exactly when to abandon chemical removal is just as vital as choosing the right solvent initially. Persistent, aggressive scrubbing with abrasive pads or continuing to soak a stubborn area will eventually cause massive mechanical failure of the drywall system.
If you encounter deeply embedded adhesive "ghosts"—dark, flat shadows where the chemical makeup of the glue has permanently stained or chemically bonded with the paint matrix—no surface solvent will remove them. You have successfully reached the absolute operational threshold of chemical cleaning. Further application is futile and destructive.
Similarly, if you accidentally reveal the brown paper facing or create deep, unrecoverable gouges during the scraping phase, you must immediately pivot your strategy to professional drywall repair. Applying further liquids or solvents to torn, exposed drywall paper will cause the raw gypsum core to expand dramatically, bubble up, and crumble outward, turning a small patch job into a structural nightmare.
Eco-Safe Renter Defenses
If you are a renter actively worried about these exact, devastating failure points and the subsequent loss of your security deposit, pivoting to eco-safe removal practices is absolutely non-negotiable. The highly structured, step-by-step protocols established in The Deposit Defense: Safe Stickwoll Removal Guide provide the necessary, renter-tested framework to execute completely damage-free extraction. This guide acts as your ultimate shield, fundamentally protecting your financial liability and ensuring a stress-free move-out inspection by prioritizing wall preservation above chemical speed.
Post-Removal Repaint Readiness and Surface Preparation
Once the adhesive is finally, successfully removed, you cannot simply roll new latex paint directly over the cleaned wall. The surface architecture must be properly and meticulously recalibrated to achieve a flawless, professional finish. Any remaining micro-textures, invisible chemical films, or minor paper tears will instantly telegraph through a new coat of fresh paint, looking worse than the original glue residue.
Crucially, any exposed brown paper facing from minor scraping accidents must be chemically sealed before you attempt any patching. If you apply standard water-based joint compound directly to raw, torn drywall paper, the deep moisture within the mud will immediately cause the protective paper to absorb water and bubble outward, creating a permanent, highly visible blister on your newly painted wall.
Interactive Repaint Prep Master Checklist
Click on each critical prep phase as you complete it to guarantee a flawless, fisheye-free repaint.
The Evolution of Wall Decor: Bypassing Adhesives Entirely
When factoring in long-term aesthetic design goals and minimizing the total lifecycle labor required to maintain a pristine home, bypassing messy, unpredictable chemical adhesive applications entirely functions as the new architectural standard. The era of damaging glues is ending. Advanced hardware systems like Rootshift Panels completely redefine this decorative category. By utilizing patented, damage-free, peel-and-stick interactive designs, they inherently neutralize the massive pain point of future drywall repair, providing a statistically significant and visually stunning advantage over traditional bonded tiles. No tools needed. No damage to your walls.
Furthermore, for sophisticated residential or commercial spaces requiring dynamic, architectural lighting alongside damage-free applications, Petalglow Stick systems offer peer-reviewed equivalents in unmatched substrate safety. Engineered specifically to bypass heavy adhesive chemical degradation, they flawlessly calibrate the aesthetic output for demanding renters and homeowners seeking high-end, animated illuminated experiences without the severe burden of intense chemical cleanup later. Transform your space without commitment; start creating rather than just decorating.

Final Thoughts
Safely navigating drywall adhesive removal requires patience, the absolute right physical tools, and a deep understanding of surface chemistry. The process is never about finding the most aggressive, toxic solvent on the shelf in a moment of sheer frustration. It is entirely about preserving the fragile, vulnerable paper face of the gypsum board and rigorously maintaining the structural integrity of the existing paint layer.
Always strictly adhere to the established escalation order: begin with thermal manipulation via a standard hair dryer, utilize safe, shallow-angle plastic scraping, and apply mild, surfactant-based soapy solutions first. Only escalate to low-risk solvents like isopropyl alcohol or citrus removers through highly controlled, localized micro-applications. By respecting the rigid chemical limits of your wall and executing proper post-removal surface preparation and neutralization, you can achieve a perfectly clean, repaint-ready finish without incurring the steep, painful costs of professional drywall repair.
Frequently Asked Questions
Can I use vinegar to remove peel-and-stick adhesive from drywall?
White vinegar is a mild acetic acid that can help soften some light, water-based glues, but it is generally highly ineffective against the heavy, cross-linked pressure-sensitive adhesives (PSAs) used in modern peel-and-stick tiles. Furthermore, soaking drywall in a water-and-vinegar solution drastically increases the risk of swelling the porous paper facing. It is infinitely safer to start with targeted, controlled heat and 70% isopropyl alcohol.
Will Goo Gone ruin my flat or matte painted walls?
Goo Gone and similar potent citrus-based removers are highly effective at breaking down synthetic adhesives, but they leave a persistent, heavy oily residue behind. On highly porous flat or matte paints, this oil can deeply penetrate the finish, leaving a permanent, dark, wet-looking stain. You must meticulously spot test these removers and always follow up with a dedicated degreasing dish soap wash to safely lift the oil from the paint's microscopic texture.
How do I know if I have sanded through the paint and damaged the drywall?
Standard interior latex paint sits on top of a thin layer of heavy craft paper that encases the chalky gypsum core. If your sanding block or plastic scraper reveals a sudden fuzzy, brown, or dull gray fibrous texture, you have successfully breached the protective paint and physically damaged the structural drywall paper. You must stop all liquid application immediately and carefully seal the exposed raw paper with a specialized oil-based or PVA primer before applying any water-based joint compound.
How long should I wait after using a solvent before I apply fresh paint?
After utilizing any chemical solvent, you must thoroughly wash the wall with a mild detergent and rinse it entirely with clean water. Once fully washed, allow the drywall to dry for an absolute minimum of 24 hours under standard indoor atmospheric conditions. This critical waiting period ensures all volatile organic compounds have fully evaporated and all residual moisture has escaped, preventing future disastrous paint bubbling or immediate primer separation.
Kommentar hinterlassen
Diese Website ist durch hCaptcha geschützt und es gelten die allgemeinen Geschäftsbedingungen und Datenschutzbestimmungen von hCaptcha.