


Wie man Peel-and-Stick-Fliesen entfernt, ohne die Farbe abzuziehen: Der ultimative Ratgeber für Mieter
Bewahre deine Kaution mit dieser wissenschaftlich fundierten Entfernungsmethode.
Für Mieter gibt es wohl kaum einen Moment, der mehr Nervosität auslöst als die Abschlussbegehung. Man schaut auf den individuell gestalteten Backsplash, den man das ganze Jahr über geliebt hat, und erkennt plötzlich: Das muss jetzt runter. Die Angst, dass beim Entfernen der temporären Fliesen auch Stücke der Trockenbauwand – und damit die Kaution – mit abgehen, ist berechtigt. Aber mit der richtigen Technik lässt sich das vollständig vermeiden.
In unseren Jahren des Testens temporärer Deko-Lösungen haben wir festgestellt, dass Geduld und Wärme die zwei wichtigsten Faktoren sind. Dieser Leitfaden erklärt die genaue Wissenschaft und Methode, um deine Wände in ihren ursprünglichen Zustand zurückzuversetzen und sicherzustellen, dass du deine Kaution und ein gutes Verhältnis zu deinem Vermieter behältst.

Sanfte Wärme löst die chemische Verbindung, ohne die Farbe zu beschädigen.
Warum brauchen Mieter eine farbsichere Methode, um Peel-and-Stick-Fliesen zu entfernen?
Die Sorge: „Wenn ich diese Fliese abziehe, kommt die halbe Wand mit runter, und mein Vermieter behält meine 1.500-Dollar-Kaution.“
Die Lösung: Dieser Abschnitt erklärt die finanziellen und praktischen Risiken einer unsachgemäßen Entfernung und macht deutlich, warum ein sorgfältiger, spezialisierter Ansatz für Mieter unverzichtbar ist.
Eine farbsichere Entfernungsmethode ist unerlässlich, weil herkömmliche Baukleber dafür ausgelegt sind, dauerhaft zu haften, während mieterfreundliche Peel-and-Stick-Varianten auf druckempfindlichen Klebstoffen basieren, die auf Temperatur reagieren. Wenn du eine temporäre Fliese bei der Entfernung wie eine permanente Installation behandelst, beschädigst du den Untergrund (die darunterliegende Wandoberfläche).
Laut einer Umfrage der beliebten Mietplattform Apartment List verlieren fast 30% der Mieter einen Teil ihrer Kaution, wobei „Wandschäden“ als einer der Hauptgründe genannt werden. Vermieter dürfen rechtlich Abzüge für Schäden vornehmen, die über die „normale Abnutzung“ hinausgehen. Abgerissene Trockenbaupapier-Schichten oder abgeplatzte Farbschichten fallen klar in die Kategorie „Schaden“.
Die „Pflaster“-Analogie
Stell dir die Fliese wie ein Pflaster auf deiner Haut vor. Wenn du es schnell abreißt (die Methode „Pflaster einfach abreißen“), tut es weh und kann die Haut verletzen. Wenn du es langsam abziehst, vielleicht mit etwas Öl oder warmem Wasser, löst es sich ohne Trauma. Die Wandfarbe ist die „Haut“. Dein Ziel ist es, die chemische Verbindung des Klebers zu lösen, bevor du die physische Verbindung der Farbe zur Trockenbauwand beschädigst.
Praxisbeispiel
Wir haben kürzlich einer Mieterin namens „Sarah“ geholfen, die einen Backsplash aus Fake-Subway-Fliesen angebracht hatte. Sie zog in zwei Tagen aus. Zunächst versuchte sie, eine Fliese mit einem Metallbuttermesser abzuhebeln. Dabei riss sie ein stückchen großes Farbfragment mit ab. Als sie auf die unten beschriebene Wärme-und-Abziehen-Methode umstieg, entfernte sie die restlichen 40 Fliesen ohne jegliche Beschädigung.
Für alle, die ihren nächsten Schritt planen oder den Lebenszyklus dieser Produkte besser verstehen möchten, empfehlen wir unseren Leitfaden Peel-and-Stick-Fliesen für Mieter sicher anbringen und entfernen. Diese Ressource bietet einen tieferen Einblick darin, wie ablösbare Peel-and-Stick-Fliesen Mieträume verwandeln können und wie man sie vor dem Auszug sicher entfernt.
Welche Werkzeuge und Materialien brauchst du für die farbsichere Fliesenentfernung?
Die Sorge: „Muss ich in den Baumarkt gehen und teure chemische Lösungsmittel oder Heißluftpistolen kaufen, die ich nur einmal benutze?“
Die Lösung: Wahrscheinlich hast du bereits 90% von dem, was du brauchst. Diese Checkliste priorisiert Haushaltsgegenstände, die effektiv und sicher für gestrichene Trockenbauwände sind.
Du brauchst keine Industrieausrüstung, um diese Fliesen zu entfernen; tatsächlich sind Industriewerkzeuge (wie Heißluftpistolen) oft zu heiß und können Farbe versengen. Das ideale Werkzeugset setzt auf sanfte Wärmeeinwirkung und schonende Hebelwirkung.
Hier ist das unverzichtbare Set für eine beschädigungsfreie Entfernung:
| Werkzeug / Material | Zweck | Warum das wichtig ist |
|---|---|---|
| Föhn | Schwächt die Klebeverbindung. | Heißluftgebläse können die Farbe verbrennen oder die Vinyloberfläche der Fliese zu schnell schmelzen. |
| Kunststoff-Spachtel | Hebt Ecken an, ohne Kerben zu hinterlassen. | Metallwerkzeuge sind härter als Trockenbau und können leicht Kratzer oder Löcher verursachen. |
| Spülmittel & warmes Wasser | Entfernt leichte Rückstände. | Der sicherste erste Reiniger für gestrichene Oberflächen. |
| Goo Gone (Formel für Maler) | Löst hartnäckigen Kleber auf. | Standard-Lösungsmittel können Farbe abtragen; stellen Sie sicher, dass das Produkt ausdrücklich für gestrichene Wände geeignet ist. |
| Mikrofasertücher | Rückstände abwischen. | Papiertücher können reißen und am Kleber haften bleiben, wodurch eine Sauerei entsteht. |
Experteneinblick in Werkzeuge
Während Werkzeuge wie der Scraperoo - Y in erster Linie für die präzise Installation von Fliesen entwickelt wurden, um Luftblasen zu entfernen, ist ein hochwertiges Werkzeug mit Kunststoffkante für das Entfernen ebenso wichtig. Wenn Sie Ihre Verlegewerkzeuge aufbewahrt haben, sind sie für diesen Schritt perfekt geeignet. Außerdem bietet der Scraperoo - R bei größeren Fliesen oder engeren Ecken eine hervorragende Hebelwirkung. Das Ziel ist eine Kante, die fest genug ist, um die Fliese anzuheben, aber weich genug, um der Wand nachzugeben.
Die Kosten der Vorbeugung
Das Zusammenstellen dieser Utensilien kostet in der Regel weniger als 15 $, wenn Sie sie nicht bereits besitzen. Vergleichen Sie das mit den durchschnittlichen Kosten für professionelle Trockenbau-Reparaturen und Malerarbeiten, die für eine kleine Küche zwischen 300 und 600 $ liegen können, und die Investition ist eindeutig sinnvoll.
Interaktiv: Sind Sie bereit zum Entfernen?
Klicken Sie auf die untenstehenden Punkte, um sicherzustellen, dass Ihr Arbeitsplatz vorbereitet ist.
Wie können Sie Peel-and-Stick-Fliesen entfernen, ohne die Farbe zu beschädigen?
Die Sorge: „Ich bin kein DIY-Profi. Was, wenn ich die Technik falsch anwende und die Wand trotzdem beschädige?“
Die Lösung: Dies ist ein Schritt-für-Schritt-Meisterkurs in der Thermodynamik des Klebstoffs. Folgen Sie diesen Anweisungen, und die Fliesen lösen sich praktisch von selbst.
Die wirksamste Methode besteht darin, eine „thermische Ablösung“ zu erzeugen, bei der der Klebstoff zähflüssig genug wird, um seinen Halt an der Wand zu verlieren, aber noch klebrig genug bleibt, um an der Fliese zu haften und sauber entfernt zu werden.
Definition der Thermodynamik: In diesem Zusammenhang bezieht sich Thermodynamik darauf, wie Wärmeenergie den physikalischen Zustand des Klebstoffpolymers verändert und es von einem feststoffähnlichen in einen flüssigkeitsähnlichen Zustand überführt.
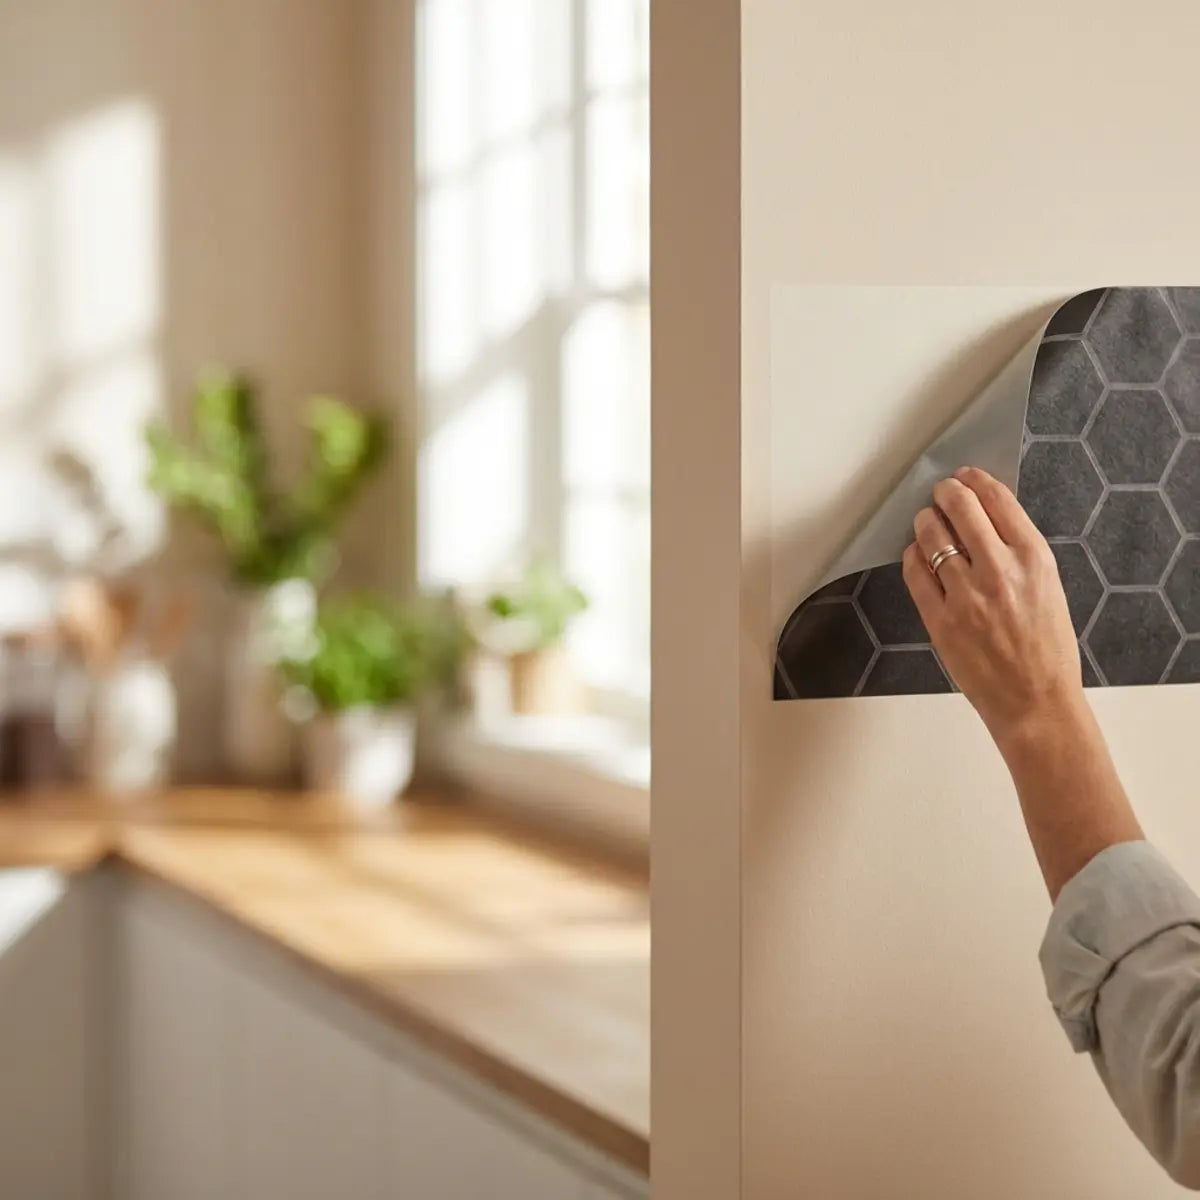
Schritt 1: Das Aufwärmen (entscheidender erster Schritt)
Richten Sie Ihren Föhn auf die Ecke der ersten Fliese. Halten Sie ihn etwa 3 bis 4 inches von der Oberfläche entfernt. Bewegen Sie ihn leicht hin und her, damit sich die Wärme gleichmäßig verteilt.
- Dauer: Etwa 30–45 Sekunden erhitzen.

Verwenden Sie ein Kunststoffwerkzeug, um die erwärmte Ecke vorsichtig anzuheben.
Schritt 2: Das Anheben der Ecke
Sobald die Fliese warm ist, nehmen Sie Ihren Kunststoffspatel oder Fingernagel und schieben Sie ihn vorsichtig unter die Ecke. Nicht darunter drücken.
- Technik: Bewegen Sie das Werkzeug leicht hin und her. Wenn Sie auf Widerstand stoßen, erwärmen Sie es weitere 10 Sekunden lang.
- Warum das funktioniert: Sie testen die Haftkraft. Wenn sie sich leicht löst, hat die Wärme ihre Arbeit getan.
Schritt 3: Das Ziehen im 45-Grad-Winkel
Hier machen die meisten Menschen einen Fehler. Ziehen Sie die Fliese nicht gerade nach außen (senkrecht) von der Wand weg. Dadurch wird das Papier der Trockenbauwand belastet.
- Die Bewegung: Ziehen Sie die Fliese im 45-Grad-Winkel gegen sich selbst zurück.
- Tempo: Gehen Sie langsam vor. Wenn Sie ein reißendes Geräusch hören (wie bei Klettverschluss), halten Sie sofort an und erwärmen Sie die Stelle erneut. Das Entfernen sollte geräuschlos sein oder sich wie ein sanftes „Reißverschluss“-Geräusch anhören.

Wischen Sie alle Schatten oder Rückstände direkt nach dem Entfernen der Fliese weg.
Schritt 4: Der Wärme hinterherjagen
Während Sie die Fliese zurückziehen, richten Sie den Föhn in den Spalt hinter der Fliese, wo der Klebstoff freigelegt wird. Dadurch wird der Kleber direkt an der Trennstelle aktiv aufgeweicht. Diese „Wärme-hinterherjagen“-Methode ist das Geheimnis, um Fliesen in einem Stück zu entfernen.
Entfernen hartnäckiger Kleberückstände
Die Sorge: „Die Fliesen sind weg, aber die Wand ist klebrig. Ich kann sie nicht so lassen, aber ich kann auch nicht die Farbe abreiben.“
Die Lösung: Wir setzen auf einen chemiebasierten Ansatz, um den Kleber zu lösen, ohne die Latexfarbe aufzulösen.
Selbst mit der besten Wärmetechnik kann etwas Rückstand zurückbleiben. Das nennt man „Ghosting“. Um ihn sicher zu entfernen, müssen Sie ein Lösungsmittel verwenden, das die Polymerketten des Klebstoffs zersetzt, ohne den Binder in der Farbe anzugreifen.
1. Die Seifenmethode (hier anfangen)
Mischen Sie einen Esslöffel Spülmittel in einen Liter warmes Wasser. Tauchen Sie ein Mikrofasertuch in die Lösung und wringen Sie es so aus, dass es nur feucht, nicht tropfend ist.
- Aktion: Reiben Sie die Rückstände in kreisenden Bewegungen ab. Die Tenside in der Seife brechen die Oberflächenspannung des ölhaltigen Klebers auf.
2. Die Methode mit Zitrus-Lösungsmittel
Wenn Seife nicht hilft, verwenden Sie einen Reiniger auf Zitrusbasis (wie Goo Gone oder einen allgemeinen Limonenreiniger).
- Warnung: Tragen Sie das Lösungsmittel auf das Tuch auf, niemals direkt auf die Wand.
- Vorgehen: Tupfen Sie auf die klebrige Stelle. Lassen Sie es 30 Sekunden einwirken (Einwirkzeit). Wischen Sie es dann vorsichtig weg.
- Letzter Schritt: Wischen Sie die Wand danach immer mit klarem Wasser ab, um die öligen Lösungsmittelrückstände zu entfernen.
Häufiges Missverständnis: Viele Menschen glauben, dass Reinigungsalkohol der beste Reiniger sei. Zwar ist er auf Glas wirksam, kann aber den Glanz bestimmter Farben mindern, insbesondere von Eggshell- oder Satin-Oberflächen, wie sie in Küchen häufig vorkommen. Bleiben Sie bei Zitrusreiniger oder Seifenwasser.
Für einen umfassenderen Blick auf die Pflege, die Rückstände von vornherein verhindert, bietet unser Pflegeleitfaden für Peel-and-Stick-Fliesen 2025 hervorragende vorbeugende Tipps. Entdecken Sie mit unserem umfassenden Leitfaden, einschließlich Dos and Don’ts, wie Sie Ihre peel and stick tiles reinigen und pflegen, damit sie langfristig glänzen.
Kleinere Wandschäden reparieren
Die Sorge: „Ich habe die Schritte befolgt, aber ein paar winzige Farbsplitter sind trotzdem abgegangen. Ist meine Kaution jetzt weg?“
Die Lösung: Kleine Absplitterungen gelten als normale Abnutzung, wenn sie ausgebessert werden. So machen Sie diese Stellen unsichtbar.
Wenn sich winzige Farbpartikel lösen, geraten Sie nicht in Panik. Das lässt sich leicht beheben und zeigt Ihrem Vermieter, dass Sie verantwortungsvoll handeln.
- Reinigen: Stellen Sie sicher, dass der Bereich frei von losem Schmutz ist.
- Spachteln: Verwenden Sie eine leichte Spachtelmasse. Geben Sie eine winzige Menge auf Ihren Finger oder einen Schaber und füllen Sie die Vertiefung aus.
- Glattziehen: Streichen Sie einmal darüber, um die Stelle zu glätten. Arbeiten Sie nicht zu lange daran.
- Streichen: Sobald es trocken ist (in der Regel nach 15 Minuten), tupfen Sie etwas passende Farbe auf die Stelle. Wenn Sie die Originalfarbe nicht haben, kostet das Farbanpassen eines Farbchips im Baumarkt etwa 5 $ für einen Probetopf.

Das Endergebnis: Eine saubere Wand, bereit für die Abnahme oder ein neues Design.
Dieses Maß an Sorgfalt unterscheidet einen gewissenhaften Mieter von einem nachlässigen. Für weitere Ideen, wie Sie Ihren Raum verantwortungsvoll aufwerten können, lesen Sie unsere Einblicke zu Einfacher Leitfaden: Peel-&-Stick-Subway-Fliesen anbringen, der Tipps zur Vorbereitung von Wänden enthält, um zukünftige Schäden zu minimieren. Er bietet eine narrensichere, visuell reichhaltige Installationsanleitung mit Problemlösungstipps, die speziell für Menschen ohne Vorkenntnisse im Fliesenlegen geeignet sind.
Häufig gestellte Fragen
Wie lange dauert es, Peel-and-Stick-Fliesen zu entfernen?
Im Allgemeinen dauert es etwa 2 bis 3 Minuten pro Quadratfuß. Ein normaler Küchen-Backsplash kann bei vorsichtiger Entfernung 1 bis 2 Stunden dauern. Wenn Sie den Vorgang überstürzen, steigt das Risiko von Farbschäden erheblich, planen Sie Ihre Zeit also entsprechend ein.
Kann ich Peel-and-Stick-Fliesen nach dem Entfernen wiederverwenden?
In der Regel nein. Der Entfernungsprozess dehnt das Vinylmaterial meist und verzieht die Form der Fliese. Außerdem verliert der Klebstoff seine Haftkraft, sobald die Verbindung gelöst ist. Diese Produkte sind als Einweg-Dekoration konzipiert.
Was ist, wenn sich die Wand nach der Reinigung klebrig anfühlt?
Wenn sich die Wand nach der Reinigung mit Wasser und Seife noch klebrig anfühlt, kann sich Kleberest tief in der Farbstruktur befinden. Versuchen Sie eine Paste aus Natron und Wasser. Reiben Sie sie sanft über die klebrige Stelle; die milde Scheuerwirkung von Natron kann den Kleber lösen, ohne den Glanz der Farbe zu beschädigen.
Gibt es eine bestimmte Farbart, die für diese Fliesen sicherer ist?
Ja, Seidenmatt- und Glanzfarben lassen sich deutlich leichter verarbeiten als matte oder stumpfe Farben. Der höhere Harzanteil in glänzenden Farben sorgt für eine glattere, härtere Oberfläche, von der sich Klebstoff leichter löst. Wenn Sie ein zukünftiges Projekt planen, sehen Sie sich So installieren Sie Peel-and-Stick-Fliesen & die besten Designs 2025 an, um Designtipps zu erhalten, die Ihren Wandtyp berücksichtigen. Träumen Sie davon, Ihre Küche zu modernisieren, fürchten aber Zeit, Kosten und Schmutz? Dieser Leitfaden hilft Ihnen, die richtige Oberfläche zu wählen.
Quiz: Was ist Ihre Entfernungsstrategie?
Testen Sie Ihr Wissen, bevor Sie anfangen.
Frage: In welchem Winkel sollten Sie die Fliese abziehen?
Abschließende Gedanken
Peel-and-Stick-Fliesen zu entfernen, ohne die Farbe mitzunehmen, ist weniger eine Frage von Kraft als von Geduld. Wenn Sie Wärme zu Ihrem Vorteil nutzen und die Grenzen der Wandfarbe verstehen, können Sie Ihre Renovierung vollständig rückgängig machen. Dieser Prozess schützt nicht nur Ihre Kaution, sondern gibt Ihnen auch das Selbstvertrauen, in Ihrem nächsten Zuhause neue Stile auszuprobieren.
Sie haben bewiesen, dass Mieter sich nicht zwischen einem schönen Zuhause und einem sicheren Kontostand entscheiden müssen.
Bereit, Ihre nächste schadensfreie Aufwertung zu planen? So bringen Sie mühelos aufklebende Fliesen an ist ein großartiger Ausgangspunkt. Erfahren Sie, wie Sie mühelos aufklebende Fliesen in 5 einfachen Schritten anbringen, und entdecken Sie die Vor- und Nachteile ihrer Verwendung in Mietwohnungen, damit sich Ihr Einrichtungsstil weiterentwickeln kann.

Kommentar hinterlassen
Diese Website ist durch hCaptcha geschützt und es gelten die allgemeinen Geschäftsbedingungen und Datenschutzbestimmungen von hCaptcha.