


Der ultimative Leitfaden für beschädigungsfreie Möbelverwandlungen
Entdecke, wie du deinem Raum mehr Ausdruck verleihst, deine kreative Freiheit zurückgewinnst und maßgeschneidertes Interior Design verwirklichst – ganz ohne Pinsel und ohne deine Kaution zu riskieren.
Hast du es satt, auf langweilige, massenproduzierte Möbel zu starren, die genauso aussehen wie die deiner Nachbarn? Mietverträge und knappe Renovierungsbudgets lassen uns oft mit uninspiriertem Dekor zurück. Jahrzehntelang hat die Interior-Design-Branche vor allem Hausbesitzer bevorzugt, während Mieter und preisbewusste Einrichtungsfans nur begrenzte, oft dauerhafte und teure Optionen hatten. Die psychische Belastung, in einem Raum zu leben, der den eigenen Stil nicht widerspiegelt, kann erheblich sein; unsere Umgebung beeinflusst unsere tägliche Stimmung, Produktivität und unser allgemeines Wohlbefinden stark. Wenn du von uninspirierter, austauschbarer Einrichtung umgeben bist, fühlt sich dein Zuhause weniger wie ein Rückzugsort und mehr wie eine provisorische Wartezone an.
Peel and stick tile kann Möbeloberflächen – von Kommoden bis zu Couchtischen – im Handumdrehen in individuelle, renter-friendly statement pieces verwandeln, ganz ohne Werkzeuge oder permanente Schäden. Diese Revolution im zugänglichen Home Decor verschiebt das Kräfteverhältnis grundlegend zurück zum Einzelnen. Du brauchst weder einen Handwerker, noch eine Werkstatt oder ein großes Budget, um eine Ästhetik zu schaffen, die mit Luxus-Boutiquen mithalten kann. Mit der Kraft moderner Klebetechnologie kannst du an nur einem Wochenende eine komplette visuelle Verwandlung umsetzen.

Dieser unkomplizierte Ansatz bietet eine einfache Anwendung, eine erschwingliche Verwandlung und einen vollständig reversiblen DIY-Stil. Wir verstehen die Frustration, mit begrenztem Budget einen hochwertigen Look erzielen zu wollen. Glücklicherweise ist ein individuell gestaltetes Wohnambiente völlig möglich, ohne die Kaution zu verlieren. Die Demokratisierung von Design bedeutet, dass hochwertige, kunstvoll gemusterte und texturreiche Materialien heute in benutzerfreundlichen Formaten erhältlich sind. Ob du einen minimalistischen skandinavischen Look, einen satten Boho-Look oder eine cleane Mid-Century-Modern-Ästhetik bevorzugst – die genauen Werkzeuge, um diese Vision Wirklichkeit werden zu lassen, liegen dir buchstäblich in den Händen.
Was macht peel and stick tiles perfekt für furniture hacks?
Kernkonzept: Fühlst du dich durch strenge Mietverträge eingeschränkt, die deine kreative Vision blockieren? Dieser Abschnitt zeigt, warum Klebetiles die ultimative damage-free-Lösung für deine Möbel sind.
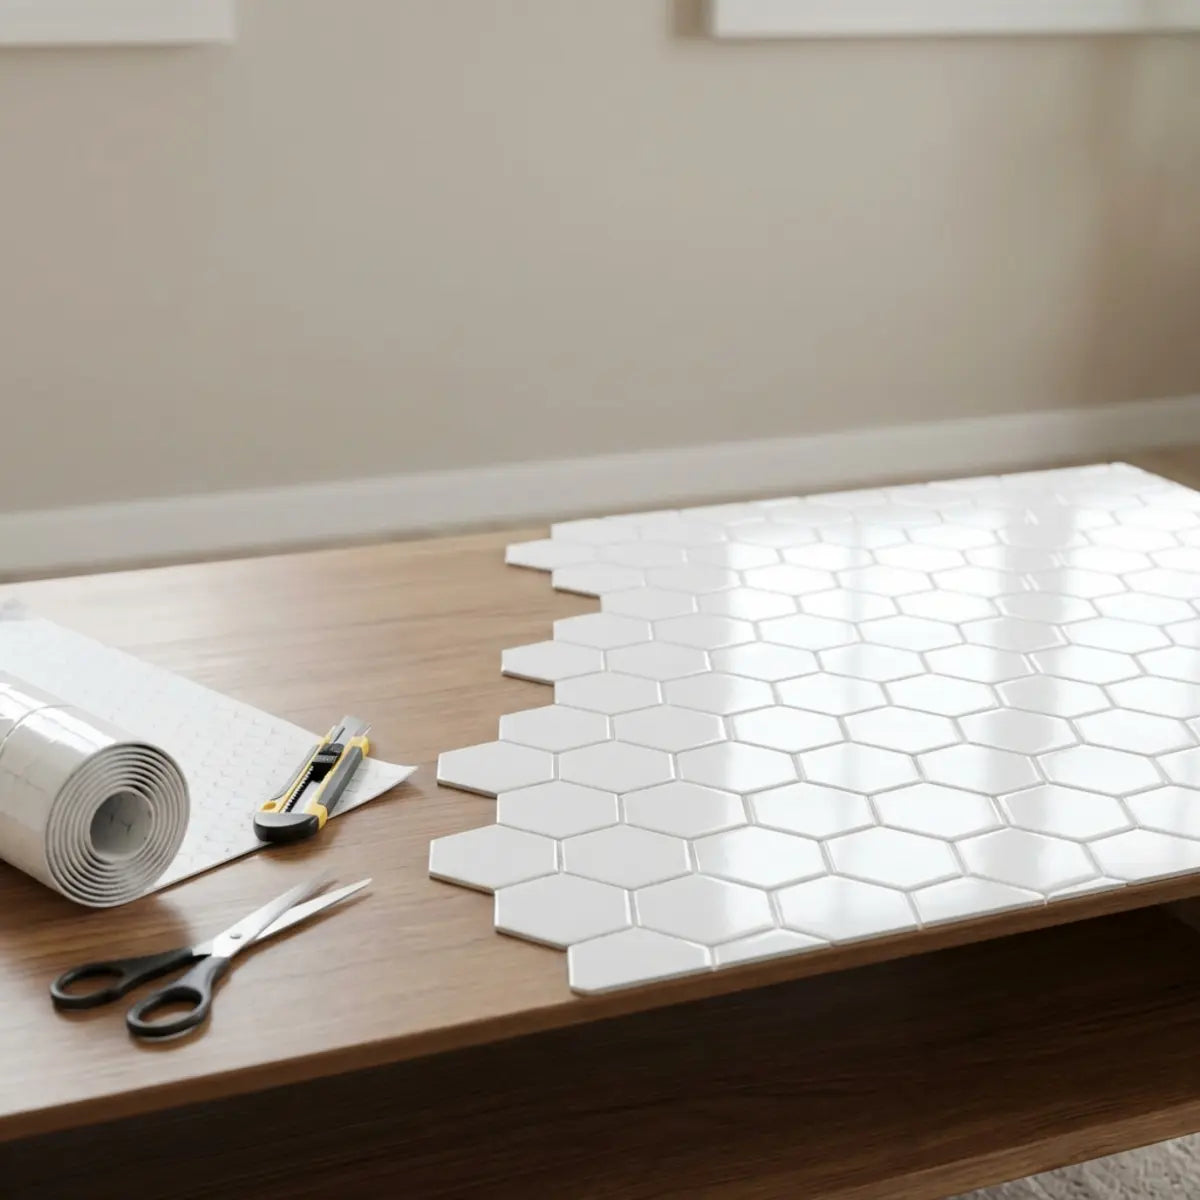
Peel and stick tiles sind perfekt für Möbel, weil sie ein nicht permanentes, rückbaubares Upgrade bieten, das High-End-Materialien wie Marmor oder Keramik zu einem Bruchteil der Kosten imitiert. Die Vielseitigkeit dieses Materials ist beeindruckend. Herkömmliches Fliesenlegen erfordert Mörtel, Fugenmasse, spezielle Schneidesägen und Tage an Aushärtezeit. Es ist unordentlich, dauerhaft und strukturell schwer. Im krassen Gegensatz dazu umgehen moderne Klebelösungen all diese traditionellen Hürden und bieten einen schlanken, reibungslosen Weg zur ästhetischen Neuerfindung.
In unserer professionellen Erfahrung beim Testen verschiedener Interior-Materialien bieten Klebetiles eine unübertroffene Balance aus Ästhetik und Alltagstauglichkeit. Sie machen Elektrowerkzeuge, schmutzige Fugenmasse oder giftige Farben komplett überflüssig. Du misst einfach aus, schneidest zu, ziehst ab und drückst fest. Dieser greifbare, praktische Prozess ist nicht nur unglaublich effizient, sondern auch äußerst befriedigend. Es hat etwas zutiefst Erfüllendes, die eigene Umgebung mit den eigenen Händen zu verändern – besonders, wenn der Prozess frei von den typischen Frustrationen komplexer Renovierungsarbeiten ist.
Wir müssen hier einen entscheidenden Begriff definieren: Vinyl-Verbundmaterial. Vinyl-Verbundmaterial – ein synthetischer Kunststoffpolymer – ist das Hauptmaterial hochwertiger Klebetiles und bekannt für seine außergewöhnliche Haltbarkeit und Flexibilität. Das ist nicht das dünne Kontaktpapier der 1990er-Jahre. Modernes Vinyl-Verbundmaterial wird in mehrlagigen Extrusionsverfahren hergestellt und verfügt über eine robuste Nutzschicht, die Kratzer, UV-Ausbleichen und das Eindringen von Feuchtigkeit widersteht. Es gleicht kleine Oberflächenunebenheiten mühelos aus und sorgt für ein strukturell solides und optisch makelloses Finish.
Laut einer 2023 veröffentlichten Studie der Environmental Protection Agency (EPA) zur Nachhaltigkeit von Innenraummaterialien reduziert die Verwendung von ablösbaren, VOC-freien (Volatile Organic Compound) Klebstoffen die Raumluftbelastung drastisch im Vergleich zu herkömmlichen lösemittelbasierten Möbelfarben. Das macht Klebetiles zu einer überlegenen, umweltfreundlichen Wahl. Wenn du Möbel in Innenräumen streichst, bringst du aggressive Chemikalien direkt in deine Atemumgebung und brauchst tagelang intensive Belüftung. Klebetiles umgehen dieses Gesundheitsrisiko vollständig und sorgen dafür, dass dein Zuhause während des gesamten Renovierungsprozesses ein sicherer, atmungsaktiver Rückzugsort bleibt.
Strategische Erkenntnis: Wenn du nach einer umfassenden Übersicht suchst, wie du deinen Wohnraum grundlegend verändern kannst, ohne deine Kaution zu gefährden oder wochenlang im Renovierungschaos zu stecken, haben wir die ultimative Ressource zusammengestellt. Dieser Deep Dive deckt alles ab – vom Budget bis zur Materialauswahl – damit dein nächstes Projekt ein voller Erfolg wird.
Bei der Betrachtung der Total Cost of Ownership (TCO) über einen typischen 24-monatigen Mietzyklus verschiebt sich die Ausgangskennzahl dramatisch. Der Rahmen, der in unserem Leitfaden zu Renterfreundliche Makeovers mit Peel-and-Stick-Fliesen beschrieben wird, bietet eine standardisierte Bewertung von damage-free decor. Er zeigt einen statistisch signifikanten Vorteil sowohl beim Zeitaufwand als auch bei den finanziellen Investitionen gegenüber herkömmlichen Malmethoden.
Um die praktischen Unterschiede zu verstehen, betrachten Sie diesen Grundvergleich. Diese Matrix zeigt genau, warum Innenarchitekten zunehmend auf Verbundklebstoffe für schnelles Staging und Styling setzen:
Wie können Sie peel and stick tile verwenden, um einen Couchtisch aufzuwerten?
Kernkonzept: Sieht Ihr Mittelpunkt im Wohnzimmer etwas zerkratzt und veraltet aus? Dieser Abschnitt zeigt, wie Sie geometrische Fliesen auf einer Tischplatte anbringen, um im Handumdrehen einen langlebigen Blickfang zu schaffen.
Sie können einen Couchtisch aufwerten, indem Sie geometrische peel and stick tile direkt auf die bestehende flache Oberfläche aufbringen, um einen strapazierfähigen, stilisierten Blickfang zu schaffen, der frühere Gebrauchsspuren kaschiert. Das Wohnzimmer ist unbestritten das Herz des Zuhauses, ein Raum, der gleichermaßen der Entspannung und dem geselligen Beisammensein dient. Im Zentrum dieses wichtigen Ökosystems steht der Couchtisch. Mit der Zeit tragen diese Oberflächen die Hauptlast des Alltags — Wasserränder von vergessenen Untersetzern, Kratzer durch schwere Dekoration und die unvermeidlichen Macken des regelmäßigen Gebrauchs. Anstatt ein strukturell intaktes Möbelstück zu entsorgen, können Sie eine vollständige visuelle Wiedergeburt inszenieren.
Stellen Sie sich einen typischen Fund aus dem Secondhandladen vor: ein solider, aber verkratzter Couchtisch aus Holz. Indem Sie eine durchgehende Schicht aus Klebefliesen aufbringen, verdecken Sie die Oberflächenschäden und werten das Stück so auf, dass es wie ein hochwertiges Boutique-Objekt wirkt. Es ist, als würden Sie Ihrem Wohnzimmer einen maßgeschneiderten Anzug verpassen. Die transformative Kraft liegt hier im Kontrast zwischen alter Substanz und ultramodernen Oberflächen. Ein schwerer Eichenholztisch aus den 1980er-Jahren kann sich im Handumdrehen in ein zeitgenössisches Marmor-Attrappen-Meisterwerk verwandeln und die ästhetische Ausrichtung Ihres gesamten Wohnraums komplett neu justieren.
Strategische Erkenntnis: Bei der Auswahl eines Musters, das nicht nur Aufmerksamkeit erregt, sondern auch den hohen Anforderungen des Alltags standhält — wie schiebende Kaffeebecher, schwere Bildbände und darauf abgestellte Füße — ist Langlebigkeit genauso wichtig wie das Design. Für die perfekte Verbindung aus Vintage-Charme und moderner Robustheit hat sich diese spezielle Produktlinie in unseren strengen Belastungstests als außergewöhnlich erwiesen.
Die Bewertung von Oberflächenabnutzung erfordert eine quantitative Ausgangsbasis. Die Morokkanische Kollektion Retro Retreat zeigte empirisch eine höhere Widerstandsfähigkeit gegen tägliche Abriebspuren. Dieses Produkt bietet eine optimale Konfiguration für stark frequentierte Couchtische und sorgt für langanhaltende visuelle Attraktivität.

Schritt-für-Schritt-Anleitung für die Anwendung auf dem Couchtisch
Um dieses Makeover erfolgreich umzusetzen, befolgen Sie diese strukturierten Schritte. Präzision während der Anwendungsphase garantiert ein Finish, das von einer Fabrikfertigung nicht zu unterscheiden ist:
- Oberflächenvorbereitung: Reinigen Sie den Tisch gründlich mit einem Entfetter. Jeder verbleibende Staub oder Ölfilm beeinträchtigt die Haftung. Wir empfehlen dringend die Verwendung einer Lösung aus warmem Wasser und einem kräftigen Spülmittel, gefolgt von einem leichten Abwischen mit Isopropylalkohol, um absolute chemische Sauberkeit sicherzustellen.
Ein weit verbreiteter Irrglaube ist, dass sich Klebefliesen an den Ecken eines flachen Tisches wieder lösen. Wenn Sie die Oberfläche richtig vorbereiten und die klebende Rückseite bei der Anbringung nicht mit den Fingern berühren, hält die Haftung über Jahre. Die natürlich auf der menschlichen Haut vorhandenen Öle sind der größte Feind druckempfindlicher Klebstoffe, also fassen Sie die Fliesen bei der Montage ausschließlich an den äußersten Kanten an.
Profi-Tipp: Haftung und Haltbarkeit maximieren
Wenn Sie Fliesen auf einer großen, ebenen Fläche wie einem Couchtisch anbringen, spielt die Umgebungstemperatur eine entscheidende Rolle. Vinylverbundmaterial wird in kalten Umgebungen etwas starrer. Lassen Sie die Fliesen vor der Verarbeitung mindestens 24 Stunden in dem Raum, in dem Sie arbeiten werden, damit sie sich an die Raumtemperatur anpassen. Wenn der Raum kühl ist, können Sie die Fliesen direkt vor dem Anbringen mit einem handelsüblichen Föhn auf niedriger Stufe sanft erwärmen. Diese leichte Wärme macht das Material deutlich geschmeidiger, sodass es sich perfekt an mikroskopisch kleine Oberflächenunterschiede anpasst und die Haftpolymere aktiviert werden – für eine unzerbrechliche, lang anhaltende Verbindung.
Warum sollten Sie peel and stick tiles auf Schranktüren oder Schubladen ausprobieren?
Kernidee: Frustriert von flachen, nüchternen Aufbewahrungsmöbeln, denen jede Persönlichkeit fehlt? Dieser Abschnitt zeigt, wie texturierte Fliesen auf Schrankfronten für hochwertige visuelle Tiefe sorgen.
Sie sollten peel and stick tiles auf Schranktüren verwenden, um ansonsten flachen, langweiligen Möbeloberflächen Struktur, Muster und sofortige visuelle Tiefe zu verleihen. Seriengefertigte Flatpack-Möbel haben günstige Einrichtungsgegenstände revolutioniert, gleichzeitig aber das Interior Design vereinheitlicht. In Millionen von Haushalten stehen exakt dieselben nüchternen, grifflosen Kommoden. Ein taktiles Element auf der Front solcher Stücke durchbricht diese Eintönigkeit und verleiht einem ansonsten rein funktionalen Objekt Persönlichkeit und raffinierte architektonische Details.
Diese Technik ist unglaublich beliebt, um schlichte IKEA-Kommoden oder veraltete Badezimmerschränke aufzuwerten. Die zusätzliche Fliesenschicht sorgt für einen maßgefertigten, eingebauten Look. Außerdem ist sie vollständig reversibel und damit ein stressfreies Projekt für Mieter. Wenn Sie irgendwann umziehen oder einfach Ihre Farbpalette aktualisieren möchten, ziehen Sie das Design wieder ab und die ursprüngliche Oberfläche bleibt makellos und unversehrt.
Forschungen der Cornell University’s Department of Design and Environmental Analysis zeigen, dass das Hinzufügen taktiler Texturen zu einem Wohnraum den wahrgenommenen Wert und den Komfort der Umgebung deutlich erhöht. Flache Möbel bieten diesen psychologischen Vorteil einfach nicht. Menschen fühlen sich von unterschiedlichen Oberflächenstrukturen ganz natürlich angezogen; sie simulieren die komplexen Umgebungen der Natur. Indem Sie mit Fliesen ein erhabenes geometrisches Muster oder eine simulierte Holzmaserung einbringen, hacken Sie gewissermaßen die Psychologie des Raums und lassen ihn wärmer, einladender und deutlich hochwertiger wirken.
Strategischer Einblick: Die Umgestaltung Ihrer Aufbewahrungsmöbel ist erst der Anfang dessen, was Sie mit abnehmbarer Deko erreichen können. Wenn Sie eine kuratierte Meisterklasse für nicht permanente Upgrades entdecken möchten, die die ästhetische Rendite maximieren, haben wir die definitive Liste branchenführender Strategien zusammengestellt.
Der Branchenkonsens besagt, dass strukturierte Oberflächen oberflächliche Schäden wirksam kaschieren. Die Umsetzung der in den Top 10 renterfreundliche Ideen mit Peel-and-Stick-Fliesen beschriebenen Designstrategien mindert sichtbare Abnutzung grundlegend. Dieser Ansatz ermöglicht ein Ergebnis, das die Kosten für einen vollständigen Austausch alter Schränke umgeht.

Wichtige Vorteile für Schubladen
Das Aufwerten deiner Schubladen bietet mehrere konkrete Vorteile, die weit über die reine Optik hinausgehen. Dieser Prozess verbessert die Funktionalität und Lebensdauer deiner Möbel deutlich:
- Sofortige Individualisierung: Du bestimmst die genaue Optik – von moderner Subway Tile bis hin zu rustikalem Ziegel. Du bist nicht länger auf die begrenzten Farbpaletten von Baumarktketten angewiesen; nur deine Fantasie setzt die Grenzen.
- Kaschieren von Schäden: Tiefe Kratzer oder abgeplatzte Farbe verschwinden sofort unter der robusten Vinylschicht. Statt stundenlang mit Holzspachtel und Schleifpapier zu arbeiten, kann eine einzige Fliese ein Jahrzehnt sichtbarer Abnutzung verschwinden lassen.
- Gewichtseffizienz: Anders als echte Keramikfliesen bringt Vinyl-Verbundmaterial praktisch kein zusätzliches Gewicht auf die Schublade und hält die Schiebemechanik funktionsfähig. Schwere Auflagen können die Metallschienen günstiger Möbel mit der Zeit verziehen – ein Problem, das Vinyl elegant vermeidet.
- Hardware-Aufwertung: Neue Fliesen schaffen eine wunderschöne Kulisse für aufgewertete Griffe aus Messing oder mattschwarzem Metall. Das Zusammenspiel aus metallischen Beschlägen und einem satten, gemusterten Hintergrund hebt das gesamte Möbelstück auf Designer-Niveau.
Wir empfehlen, vor dem Start einen Haftvermittler aufzutragen. Haftvermittler – ein flüssiger Primer, der auf eine Oberfläche aufgetragen wird – erhöht die Haftkraft von druckempfindlichen Klebebändern und Fliesen erheblich und sorgt so für lang anhaltende Haltbarkeit an häufig geöffneten Schubladen. Da Schubladenfronten ständig gezogen, geschoben und angestoßen werden, sind die Kanten hohen mechanischen Belastungen ausgesetzt. Der Haftvermittler wirkt als chemische Brücke zwischen dem Holz und dem Vinyl und verschweißt sie im Grunde miteinander, während die Rückbaubarkeit bei Hitzeanwendung erhalten bleibt.
Können peel and stick tiles einem tristen Bücherregal neues Leben einhauchen?
Kernidee: Gehen deine Lieblingsbücher vor einem dunklen, tristen Regalhintergrund unter? Dieser Abschnitt zeigt, wie das Auskleiden der Rückwände mit hellen, gemusterten Fliesen den gesamten Raum aufhellt.
Ja, peel and stick tiles auf die Rückwände eines Bücherregals zu kleben, hellt das Möbelstück sofort auf und schafft einen kontrastreichen Hintergrund, der deine Bücher und Deko-Objekte hervorhebt. Bücherregale sind notorisch schwer stilvoll zu gestalten. Ein standardisiertes, monochromes Regal wirkt in einem Raum oft wie ein schwarzes Loch, das Umgebungslicht schluckt und die darin präsentierten Dinge unordentlich und chaotisch erscheinen lässt. Indem du ganz hinten im Regal eine Designebene einfügst, schaffst du eine beeindruckende visuelle Kontur.
Stell dir die Rückwand eines Bücherregals wie ein Einstecktuch zu einem perfekt geschnittenen Anzug vor. Es ist eine kleine Fläche, doch ein Akzent aus Muster oder Farbe verändert die gesamte Wirkung dramatisch. Dunkle Regale absorbieren Licht, aber eine glänzende Fliese reflektiert es. Dieser clevere Einsatz reflektierender Oberflächen verwandelt dein Bücherregal im Grunde in eine große, stimmungsvolle Lichtquelle, die Sonnen- und Lampenlicht zurück in den Wohnraum wirft und den Raum deutlich größer und einladender wirken lässt.
Strategische Erkenntnis: Die Kunst der Raumwahrnehmung zu beherrschen erfordert ein Verständnis dafür, wie geometrische Linien das Auge lenken. Um die genauen Konfigurationen zu entdecken, mit denen professionelle Interior Designer die Illusion von Höhe, Tiefe und grenzenlosem Raum erzeugen, musst du diese grundlegenden Techniken erkunden.
Eine standardisierte Bewertung der visuellen Tiefe bestätigt den Einfluss von Hintergrundmustern auf die Raumwahrnehmung. Die Nutzung der in 7 Fliesenmuster für perfekten Wohnstil beschriebenen Anordnungen kalibriert das Ergebnis. So wird ein deterministisches Resultat für deine Regalpräsentation sichergestellt und sowohl Licht als auch Stil maximiert.

Die Buchs-Makeover umsetzen
Befolge diese Richtlinien für die besten Ergebnisse bei Regaleinheiten. Wenn du dir die Zeit nimmst, das Möbelstück vor dem Anbringen sorgfältig zu demontieren, sparst du dir stundenlangen Frust und sorgst für makellose Eckdetails:
- Die Regalböden entfernen: Nimm verstellbare Regalböden immer heraus, bevor du misst oder Fliesen anbringst. So hast du einen ungehinderten Arbeitsbereich. Versucht man, Fliesen um feste Regalböden herum zuzuschneiden und anzupassen, führt das zwangsläufig zu gezackten, ungleichmäßigen Fugen und einem deutlich unprofessionellen Ergebnis.
- Die Rückwand ausmessen: Berechne die exakte Quadratmeterzahl der Rückwand, damit du genügend Material kaufst. Füge deiner Bestellung immer 10-15% extra hinzu, um Musteranpassungen und den unvermeidlichen Verschnitt beim Zuschneiden auszugleichen.
- Ein vertikales Muster wählen: Vertikale Linien wie Fischgrät oder Chevron lenken den Blick nach oben und lassen das Bücherregal höher wirken. Das ist ein klassischer architektonischer Trick, der in Räumen mit niedriger Decke eingesetzt wird, um aus standardisierten Möbeln große, imposante visuelle Strukturen zu machen.
- Sorgfältig wieder einsetzen: Warte 24 Stunden, bis der Kleber vollständig ausgehärtet ist, bevor du die Regalböden wieder einschiebst, damit die Vinyloberfläche nicht einreißt. Wenn ein schweres Holzregal über frisch verlegte, noch nicht ausgehärtete Fliesen gezogen wird, kann sich das Material sofort dehnen und verziehen.
Ein brillanter Profi-Tipp ist, übrig gebliebene Fliesenreste zu verwenden, um die Rückseiten von Zeitschriftenhaltern oder Aufbewahrungsboxen zu verkleiden. So entsteht ein stimmiges, individuell gestaltetes Aufbewahrungssystem, das perfekt zu deinem neu aufgewerteten Bücherregal passt. Wirf nichts weg; selbst der kleinste Streifen einer detailreichen Fliese kann verwendet werden, um einen Bilderrahmen zu ummanteln oder die Innenseite einer dekorativen Schale auszukleiden.
Wie verwandelt man ein schlichtes Kopfteil mit Klebefliesen?
Kernidee: Du wünschst dir eine luxuriöse Schlafzimmer-Ästhetik ohne Boutique-Preisschild? Dieser Abschnitt zeigt, wie eine Anwendung mit Holzoptik- oder strukturierten Fliesen ein edles Kopfteil schafft.
Verwandle ein schlichtes Kopfteil, indem du eine flache Holz- oder Verbundplatte mit strukturierten peel and stick tile in Holzoptik ummantelst, um ein massives, teures Stück aus Holz zu simulieren. Das Bett ist zweifellos der Blickfang jedes Schlafzimmers. Ein schwaches, inspirationsloses Kopfteil schmälert die gesamte Wirkung des Raums, ganz gleich, wie luxuriös deine Bettwäsche auch sein mag. Massive Holzkopfteile sind jedoch unglaublich schwer, schwer zu transportieren und für die meisten üblichen Deko-Budgets viel zu teuer.__PH67__
Schlafzimmer-Umgestaltungen sind bekanntlich teuer. Ein Kopfteil aus Massivholz kann Hunderte, wenn nicht Tausende von Dollar kosten. Wenn du eine günstige Sperrholzplatte mit klebeflächen in Holzoptik beklebst, erzielst du dieselbe optische Präsenz und Textur für unter fünfzig Dollar. Die ausgefeilte Drucktechnologie, die bei hochwertigen Holzoptik-Fliesen zum Einsatz kommt, fängt die organischen Variationen, Astlöcher und Maserungsverläufe von echtem Holz mit verblüffendem Realismus ein.
Strategischer Hinweis: Den Fokuspunkt eines Schlafzimmers aufzuwerten, muss nicht am Bettrahmen enden. Wenn du diesen edlen, architektonischen Look nahtlos mit denselben Prinzipien einer beschädigungsfreien Anbringung auf die umliegenden Wände ausdehnen möchtest, ist der Prozess bemerkenswert unkompliziert.
Im Vergleich zu maßgefertigter Tischlerei bietet Wandverkleidung mit Klebeflächen ein äußerst effizientes Verhältnis von Kosten zu Ergebnis. Die Techniken aus DIY-Wandverkleidung mit Peel-and-Stick-Fliesen leicht gemacht bieten bewährte Entsprechungen für vertikale Anwendungen. Diese Methode hält sich strikt an architektonische Standards für Stabilität.
Schritte für ein individuelles Kopfteil
Dein eigenes Kopfteil zu gestalten, ist ein gut machbares Wochenendprojekt. Befolge dieses präzise Vorgehen, um eine strukturell stabile und optisch makellose Umsetzung zu gewährleisten:
- 1 Trägerplatte besorgen: Kaufen Sie ein Stück glattes MDF oder Sperrholz, das auf die Breite Ihrer Matratze zugeschnitten ist. Die meisten Baumärkte vor Ort schneiden diese geraden Zuschnitte kostenlos für Sie zu. Achten Sie darauf, dass die Platte mindestens 1/2 inch dick ist, damit sie sich nicht durchbiegt oder an der Wand durchhängt.
- 2 Grundierung auftragen: Streichen Sie die Platte mit einer handelsüblichen Grundierung, um das Holz zu versiegeln und eine maximale Haftung für die Fliesen zu gewährleisten. Rohes Holz ist extrem porös und würde die Feuchtigkeit aus der Kleberückseite aufsaugen, was unweigerlich zum Ablösen führt. Ein einziger Anstrich mit günstiger Grundierung löst dieses Problem dauerhaft.
- 3 Eine gerade Linie festlegen: Verwenden Sie eine Laserwasserwaage, um sicherzustellen, dass Ihre erste Fliesenreihe perfekt waagerecht ist. Wenn bereits die allererste Reihe auch nur um einen Bruchteil eines Grades schief ist, verstärkt sich dieser Fehler enorm, bis Sie die Oberkante des Kopfteils erreichen.
- 4 Fugen versetzt anordnen: Wenn Sie Holzoptik-Dielen verwenden, versetzen Sie die Stöße genau wie bei echtem Parkett, um einen authentischen Look zu erzielen. Vermeiden Sie gerade senkrechte Linien in Ihren Fugen, da dies die Illusion von echtem, natürlichem Holz sofort zerstört.
Machen Sie sich keine Sorgen, wenn Ihre Schnitte an den Kanten nicht perfekt gerade sind. Sie können das fertige Kopfteil ganz einfach mit günstigen Holzleisten aus dem Baumarkt einfassen, um die Fugen zu verdecken und eine professionelle, saubere Kante zu schaffen. Diese Leiste wirkt wie ein Bilderrahmen, umschließt Ihr Design und schützt die empfindlichen Vinylkanten davor, von Kissen oder Bettwäsche hängen zu bleiben.
Ist es möglich, eine Garderobenbank mit peel and stick tile zu gestalten?
Kernidee: Fehlt Ihrem Eingangsbereich die einladende visuelle Wirkung? Dieser Abschnitt zeigt, wie das Fliesen des Sitzes oder der Basis einer Garderobenbank sofort Charakter verleiht.
Ja, Sie können eine Garderobenbank mit strapazierfähigen peel and stick tiles auf dem Sitz oder den senkrechten Stufen verkleiden und so einen unverwechselbaren, einladenden Akzent im Foyer schaffen, der Schmutz und Feuchtigkeit standhält. Der Eingangsbereich ist der definitive Handschlag Ihres Zuhauses. Er ist der erste Eindruck, den Gäste erhalten, und der letzte Bereich, mit dem Sie sich auseinandersetzen, bevor Sie in den Tag starten. Eine robuste, optisch markante Garderobenbank dient nicht nur als praktische Ablage für Schuhe und Taschen, sondern auch als starkes stilistisches Statement.
Der Eingangsbereich gibt den Ton für Ihr gesamtes Zuhause vor. Eine einfache Holzbank erfüllt zwar ihren Zweck, aber wenn Sie die Sitzfläche mit einem auffälligen marokkanischen oder geometrischen Fliesenmuster verkleiden, wird sie sofort zum Gesprächsthema, sobald Gäste eintreten. Darüber hinaus sind die praktischen Vorteile enorm. Holz erfordert laufende Pflege, um Wasserschäden durch feuchte Jacken oder schmutzige Stiefel zu verhindern. Vinylfliesen hingegen bilden eine undurchdringliche Barriere.
Strategischer Hinweis: Für Bereiche, die als wichtigste Übergangszone zwischen der rauen Außenwelt und Ihrem makellosen Interieur dienen, dürfen Sie bei der Materialqualität keine Kompromisse eingehen. Damit Ihre Bank trotz Regen, Schlamm und hoher Frequentierung makellos bleibt, brauchen Sie eine technische Lösung, die auf maximale Belastbarkeit ausgelegt ist.
Eingangsmöbel benötigen Materialien mit einer definierten Belastungsgrenze für Feuchtigkeit und Schmutz. Die Lemon Zest-Fliesenserie, entwickelt, um Wasserschäden zu umgehen, erfüllt diese Anforderungen konsequent. Durch das Anbringen dieser Fliesen wird das Risiko des Ablösens durch nasse Schuhe oder Regenschirme von vornherein minimiert.
Maximale Haltbarkeit im Eingangsbereich
Da der Eingangsbereich stark beansprucht wird, steht Haltbarkeit für Sie an erster Stelle. Diese strategischen Verstärkungen sorgen dafür, dass Ihr Projekt den Elementen standhält:
- Wasserdichtigkeit priorisieren: Stellen Sie sicher, dass die von Ihnen ausgewählten Fliesen ausdrücklich für Feuchtigkeitsbeständigkeit ausgelegt sind. Standardmäßige dekorative Aufkleber mit Papierträger würden in dem Moment auseinanderfallen, in dem ein nasser Regenschirm sie berührt.
- Die Kanten umschlagen: Bei einer Sitzbank bringen Sie die Fliesen über die Oberseite an und ziehen Sie sie fest über die Seiten nach unten, damit sich die Ränder unter Belastung nicht lösen. Stellen Sie sich das wie das straffe Einpacken eines Geschenks vor; wenn Sie die empfindlichen Fugen von der Oberfläche fernhalten, erhöht sich die Lebensdauer deutlich.
Ein häufiger Fehler ist, Standard-Sticker in Wandqualität für Sitzflächen zu verwenden. Achte immer darauf, dass du für jede horizontale Oberfläche, die Gewicht tragen oder häufiger Reibung ausgesetzt sein wird, Fliesen in Bodenqualität oder besonders robuste Vinyl-Kompositfliesen verwendest.
Wie können peel and stick tiles eine abgenutzte Schreibtischoberfläche modernisieren?
Kernkonzept: Kämpfst du damit, an einem unansehnlichen, abgeplatzten Arbeitsplatz produktiv zu bleiben? Dieser Abschnitt zeigt, wie eine glatte Fliesenanwendung eine makellose, inspirierende Schreibtischoberfläche schafft.
Modernisiere einen abgenutzten Schreibtisch, indem du die beschädigte Oberfläche mit einer durchgehenden Schicht glatter peel and stick tiles in Marmoroptik bedeckst – für einen sauberen, professionellen und hochfunktionalen Arbeitsplatz. Das Homeoffice hat sich von einem gelegentlichen Luxus zu einer absoluten Notwendigkeit entwickelt. Dennoch versuchen viele von uns, anspruchsvolle professionelle Arbeit auf heruntergekommenen Oberflächen zu erledigen, die unsere Motivation bremsen und Chaos ausstrahlen.
Ein zerkratzter, unebener Schreibtisch ruiniert deine Produktivität und beschädigt die Computermaus. Das Neuverkleiden des Schreibtischs mit einer hochglänzenden, glatten Fliese sieht nicht nur unglaublich schick aus, sondern schafft auch eine ideale, reibungslose Oberfläche zum Schreiben und Arbeiten. Das Gefühl, mit den Händen über einen makellos glatten, kühlen Schreibtisch in Faux-Marmor-Optik zu streichen, hebt sofort den mentalen Ton deines Arbeitstags und fördert ein Gefühl von Ordnung und Führungsstärke.
Wir müssen hier zwischen den Materialien unterscheiden. Kontaktpapier – eine sehr dünne, selbstklebende Folie – wird oft mit Klebefliesen verwechselt. Kontaktpapier reißt leicht und zeigt jede Unebenheit darunter. Hochwertige Klebefliesen sind deutlich dicker und überbrücken kleine Lücken mühelos. Billiges Kontaktpapier auf einem Schreibtisch zu verwenden, ist ein aussichtsloses Unterfangen; jeder Strich mit dem Stift hinterlässt Eindrücke in dem dünnen Papier, und wenn du eine heiße Kaffeetasse darauf stellst, wird die Folie unweigerlich schmelzen oder sich verformen.
Strategischer Einblick: Die Psychologie der Produktivität besagt, dass ein sauberer, optisch ansprechender Arbeitsplatz direkt mit mehr Fokus und Effizienz zusammenhängt. Um dieses transformative Prinzip über deinen Schreibtisch hinaus auf den gesamten Homeoffice-Bereich auszuweiten und ihn in eine Atmosphäre kultivierter Professionalität zu tauchen, solltest du auch die vertikalen Flächen berücksichtigen.
Eine Analyse der Leistungskurve eines Arbeitsplatzes zeigt, dass die Oberflächenqualität die tägliche Effizienz stark beeinflusst. Die Anwendungsmethode in unserem DIY Guide zu Wandfliesen zum Aufkleben sorgt für eine optimale Konfiguration. Dieser Ansatz schafft eine flache, widerstandsfähige Basis, die deinen täglichen Workflow erheblich verbessert.
Den Schreibtisch perfekt neu beschichten
Um ein makelloses Schreibtisch-Finish zu garantieren, achte auf diese Details. Eine Schreibfläche verlangt absolute Perfektion bei der Ebenheit:
- Tiefe Kerben auffüllen: Verwende Holzfüller, um tiefe Kratzer vor dem Fliesen zu reparieren. Selbst dicke Fliesen können mit der Zeit leicht in größere Löcher absinken. Nimm dir die zusätzlichen zwanzig Minuten, um handelsüblichen Holzfüller in die Vertiefungen zu spachteln, schleife ihn bündig ab und arbeite mit einer wirklich ebenen Grundlage weiter.
- Großformat wählen: Wähle die größtmöglichen Fliesen, um die Anzahl der Fugen auf deiner Schreibfläche zu minimieren. Weniger Fugen bedeuten weniger Chancen, dass dein Stift hängen bleibt oder sich Staub in mikroskopisch kleinen Zwischenräumen ansammelt.
Wenn Sie eine optische Maus verwenden, kann eine strukturierte Fliese den Lasersensor stören. Für Schreibtischoberflächen empfehlen wir immer eine hochglänzende, vollkommen glatte Oberfläche, damit Ihre Peripheriegeräte ohne Unterbrechung funktionieren.
Kann man einen Servierwagen oder Barwagen mit Klebefliesen aufwerten?
Kernkonzept: Sieht Ihr Servierwagen eher industriell als schick aus? Dieser Abschnitt zeigt die Schritte, um die Ablagen des Wagens zu fliesen und Ihr Hosting-Setup sofort aufzuwerten.
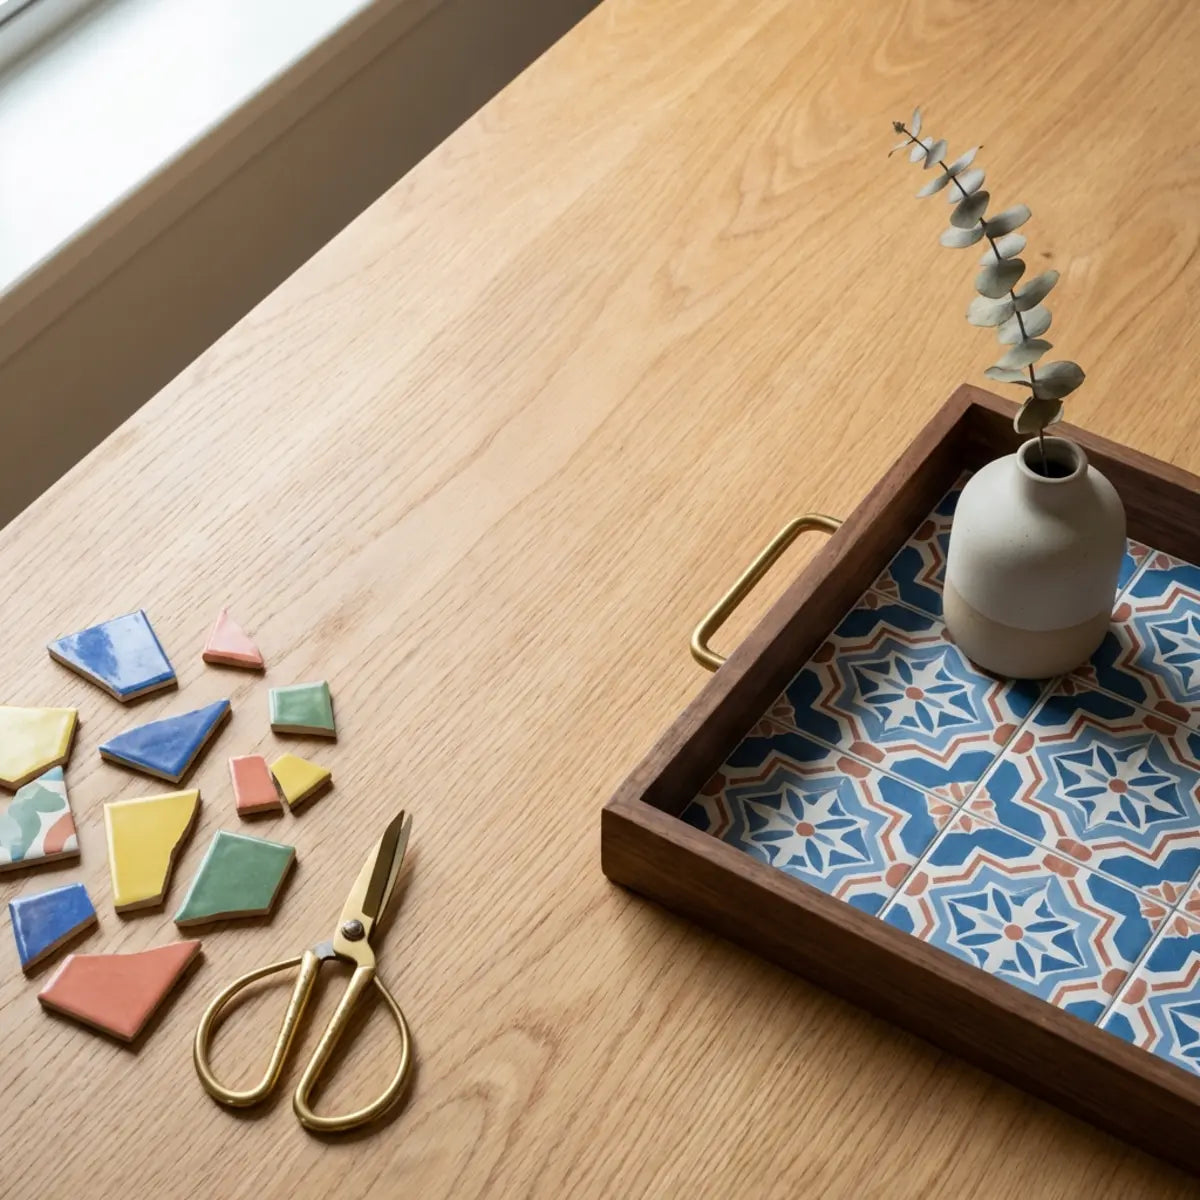
Sie können einen Utility- oder Barwagen ganz einfach aufwerten, indem Sie die Innenregale oder Ablagen mit dekorativen peel and stick tile auskleiden, um einen Farbakzent zu setzen und vor Flüssigkeitsspritzern zu schützen. Ein Barwagen ist von Natur aus ein Symbol für Freizeit und Gastfreundschaft. Doch viele erschwingliche Modelle setzen stark auf nüchterne, zweckmäßige Metalle, die kühl und wenig einladend wirken. Indem Sie dem Boden der Ablagen ein lebendiges, detailreiches Fliesenmuster hinzufügen, verwandeln Sie das Objekt sofort von rein funktional in wunderbar opulent.__PH39__
Ein Metall-Utility-Wagen aus dem Bastelgeschäft ist unglaublich praktisch, wirkt aber wenig elegant. Wenn Sie adhesive tiles so zuschneiden, dass sie genau in die Metallablagen passen, verwandeln Sie ein günstiges Metallgestell in eine stilvolle Servierstation für edle Cocktails oder hochwertige Kaffeeausrüstung. Der visuelle Kontrast zwischen rohem, dunklem Metall und einer hellen, glänzenden Fliese erzeugt eine maßgeschneiderte Spannung, der Innenarchitekt:innen unermüdlich nachjagen.
Betrachten Sie die Fliesenanwendung als Auffangschale für Ihren Wagen. Genau wie ein Untersetzer einen Holztisch schützt, bewahrt die Vinylfliese die ursprüngliche Oberfläche des Wagens vor klebrigen Sirupen oder Zitrusflecken und macht die Reinigung zum Kinderspiel. Zuckerhaltige Cocktail-Sirupe und säurehaltige Zitrussäfte können lackiertes Metall schnell angreifen oder unbehandeltes Holz verfärben. Die porenfreie Oberfläche des Vinyls wirkt wie ein undurchdringlicher Schutzschild, sodass Sie selbst die schlimmsten Verschüttungen mit einem einzigen feuchten Tuch aufwischen können.__PH43__
Strategische Erkenntnis: Die Prinzipien der feuchtigkeitsbeständigen Anwendung reichen weit über mobile Servierwagen hinaus. Wenn Sie bereit sind, Bereiche anzugehen, die extremer Luftfeuchtigkeit, Temperaturschwankungen und ständiger Wassereinwirkung ausgesetzt sind, und dabei eine makellose Luxus-Ästhetik bewahren wollen, haben wir den ultimativen Bauplan.
Eine quantitative Grundlage für Flüssigkeitsbeständigkeit ist für Barwagen absolut entscheidend. Die in Badezimmer-Makeover: Peel & Stick Tile Transformations beschriebenen Prinzipien zeigen statistisch signifikanten Schutz vor Verschüttungen. Das liefert ein allgemein anerkanntes Paradigma für Anwendungen auf nassen Oberflächen in Ihrem Zuhause.
Ihren Wagen aufwerten
Die Umgestaltung Ihres Wagens erfordert nur wenige Materialien und wenig Zeit. Meistern Sie diese letzten Vorbereitungsschritte für eine makellose Servierstation:
- Eine Vorlage erstellen: Verwenden Sie schweres Papier, um eine Schablone für die Innenseite der Wagenablage anzufertigen. So stellen Sie sicher, dass Sie die Fliesen auf exakt die richtige Größe zuschneiden, bevor Sie die Rückseite abziehen. Der Versuch, steifes Vinyl zu kürzen, während es in der Lippe einer Metallablage eingeklemmt ist, ist nahezu unmöglich und führt zu gezackten, unschönen Rändern.
- Fleckenresistente Muster wählen: Wählen Sie ein lebhaftes Muster oder eine dunkle Farbe, um kleine Getränkespritzer bei einer Party leicht zu kaschieren. Eine strahlend weiße Oberfläche verlangt sofortige Aufmerksamkeit, sobald ein Tropfen Rotwein darauf landet, während ein tiefes marokkanisches geometrisches Muster den Fleck optisch aufnimmt, bis Sie zum Aufwischen bereit sind.
Ihr kostenloses Projekt-Vorbereitungskit
Starten Sie Ihre Verwandlung nicht, ohne vollständig vorbereitet zu sein. Wir haben eine umfassende, druckbare Checkliste mit allen Werkzeugen, Materialien und Vorbereitungslösungen zusammengestellt, die Sie benötigen, um schon beim ersten Versuch ein makelloses, professionelles Ergebnis zu erzielen.
Tief eintauchen: Das fortgeschrittene Protokoll zur Möbelvorbereitung
Bevor wir abschließen, ist es entscheidend, die unglamouröse, aber absolut kritische Phase jedes DIY-Projekts anzusprechen: die Vorbereitung. Die Haltbarkeit Ihrer adhesive tile-Anwendung hängt untrennbar mit der chemischen Sauberkeit des Untergrunds zusammen. Staub, Fett, Möbelpolitur und Ölreste bilden eine unsichtbare Barriere, die verhindert, dass der Vinylkleber auf molekularer Ebene haftet. Wenn Sie die Vorbereitung auslassen, ist das Scheitern vorprogrammiert. Der hier investierte Aufwand bestimmt die professionelle Qualität Ihres Endergebnisses.
Beginnen Sie mit der mechanischen Reinigung. Entfernen Sie sämtliches Zubehör – Knöpfe, Griffe, Scharniere. Verwenden Sie einen milden Scheuerschwamm und einen handelsüblichen Entfetter, um die Oberfläche gründlich zu bearbeiten. Bei jahrzehntealten Möbeln können Sie es mit mehreren Schichten Wachspolitur zu tun haben. Wischen Sie das Möbelstück nach dem Schrubben vollständig mit frischem, warmem Wasser ab, um Entfetterrückstände zu entfernen. Zum Schluss das Geheimnis professioneller Verleger: Isopropylalkohol. Ein abschließendes Abwischen mit 90% oder höherem Isopropylalkohol verflüchtigt sich sofort und hinterlässt eine unberührte, chemisch reine Oberfläche, die geradezu nach Klebstoff verlangt. Dieses mehrstufige Protokoll stellt sicher, dass Ihre schöne neue Ästhetik über Jahre hinweg sicher verankert bleibt.
Abschließende Gedanken
Peel and stick tile furniture hacks bieten eine äußerst flexible, budgetfreundliche Möglichkeit, Ihren Wohnraum neu zu gestalten, ohne sich auf permanente Veränderungen festzulegen oder Ihre security deposit zu verlieren. Wir haben den Prozess entmystifiziert und gezeigt, dass luxuriöse, maßgeschneiderte Ästhetik nicht länger durch riesige Budgets oder spezielle Handwerkerkenntnisse verwehrt ist. Die Macht, Ihre ideale Umgebung zu gestalten, liegt nun ganz in Ihren Händen.
Diese sieben Projekte zeigen das enorme kreative Potenzial von Klebefliesen. Von der Aufwertung eines gebrauchten Couchtischs bis hin zum Bau eines maßgeschneiderten Luxus-Kopfteils besitzen Sie die Möglichkeit, gewöhnliche Möbel in außergewöhnliche statement pieces zu verwandeln. Jedes Projekt ist eine Einladung zum Experimentieren, sich die Kontrolle über Ihr Raumdesign zurückzuholen und Ihre persönliche Geschichte in das Fundament Ihres Zuhauses einfließen zu lassen.
Wir empfehlen Ihnen sehr, sich einfach ein Projekt auszusuchen und es dieses Wochenende auszuprobieren. Der Prozess ist unkompliziert, erschwinglich und unglaublich lohnend. Fangen Sie klein an. Vielleicht bekleben Sie nur eine einzelne Schublade oder die Rückseite eines kleinen Nachttischs. Sobald Sie die unmittelbare, eindrucksvolle Wirkung des Peel-and-Stick-Auftragens erlebt haben, werden Sie zweifellos jedes müde Möbelstück in Ihrem Zuhause nicht mehr als Schandfleck sehen, sondern als leere Leinwand, die nur auf ihre Verwandlung wartet.
Bereit, Ihr Zuhause zu verwandeln? Entdecken Sie in unserem Blog weitere DIY Tile-Ideen, um das perfekte Muster für Ihr nächstes Projekt zu finden. Abonnieren Sie unbedingt unseren Newsletter für wöchentliche renter-friendly decor hacks und exklusive Design-Inspirationen direkt in Ihr Postfach.
Wir möchten von Ihnen hören!
Auf welches Projekt möchten Sie sich zuerst am liebsten stürzen?
Häufig gestellte Fragen
F: Wie lange halten peel and stick tiles auf Möbeln?
Bei korrekter Anwendung auf einer sauberen, glatten Oberfläche können hochwertige peel and stick tiles auf Möbeln problemlos drei bis fünf Jahre halten. Die Haltbarkeit hängt stark davon ab, wie viel tägliche Reibung die Oberfläche abbekommt und wie gut die Ausgangsoberfläche vorbereitet wurde. Wenn du dir die Zeit nimmst, die Möbel gründlich zu entfetten, vollständige chemische Sauberkeit sicherzustellen und die Tiles mit festem Druck anzubringen, damit die druckempfindlichen Klebstoffe aktiviert werden, sind sie bemerkenswert widerstandsfähig. Horizontale Flächen, die Gewicht tragen (wie Tische), können etwas schneller Abnutzung zeigen als vertikale Flächen (wie Kopfteile), aber die Verwendung eines schützenden Klarversiegels an den Kanten kann ihre Lebensdauer erheblich verlängern.
F: Kann ich Klebetiles entfernen, ohne das Holz zu beschädigen?
Ja, sie sind dafür gemacht, sich wieder entfernen zu lassen. Um Schäden oder klebrige Rückstände auf Holzmöbeln zu vermeiden, erhitze die Fläche vor dem Abziehen ein paar Minuten lang mit einem Föhn. Die Wärme macht den Kleber weicher, sodass sich das Tile sauber von der Oberfläche lösen lässt. Wenn du versuchst, die Tiles kalt abzureißen, muss der Kleber gegen die Holzmaserung arbeiten, was gelegentlich empfindliche Furniere oder alte, spröde Farbe anheben kann. Wenn du den Bereich einfach auf eine angenehm warme Temperatur bringst, entspannen sich die Polymere, lösen ihren Halt und ermöglichen eine komplett damage-free, stressfreie Entfernung.
F: Brauche ich Spezialwerkzeug, um Furniture Tiles zuzuschneiden?
Nein, es sind keine Spezialwerkzeuge erforderlich. Ein scharfes Cuttermesser, eine Schneidematte und ein Metalllineal reichen völlig aus, um saubere, perfekt gerade Schnitte zu erzielen. Für filigrane Ecken können auch robuste Haushaltsscheren gut auf Vinylverbund funktionieren. Wir raten dringend davon ab, Holz- oder Kunststofflineale zu verwenden, da ein scharfes Cuttermesser zwangsläufig kleine Stücke vom Lineal selbst abschabt und deine gerade Linie ruiniert. Wechsle deine Klinge bei einem Projekt immer regelmäßig; eine frische, rasiermesserscharfe Klinge ist das Geheimnis für ein professionelles, makelloses Finish, das eher werkseitig installiert als DIY aussieht.
F: Sind diese Tiles sicher für Küchentische?
Ja, vorausgesetzt, Sie wählen Fliesen, die für Hitze- und Wasserbeständigkeit ausgelegt sind. Dennoch sollten Sie für heiße Pfannen immer Untersetzer verwenden, da extreme direkte Hitze den Vinylverbund schmelzen kann. Für die tägliche Beanspruchung beim Essen sind sie hervorragend geeignet. Während hochwertige Verbundfliesen robust genug sind, um verschüttete Suppe, beschlagene Wassergläser und das Schaben von Keramiktellern auszuhalten, bestehen sie im Kern aus einem Polymerkunststoff. Eine gusseiserne Pfanne direkt aus einem 400-Grad-Ofen unmittelbar auf die Oberfläche zu stellen, würde irreparable strukturelle Schäden verursachen. Behandeln Sie den gefliesten Tisch wie eine hochwertige Holzoberfläche, verwenden Sie Untersetzer und Hitzeschutzmatten, dann wird er Ihnen jahrelang wunderschöne Dienste leisten.

Kommentar hinterlassen
Diese Website ist durch hCaptcha geschützt und es gelten die allgemeinen Geschäftsbedingungen und Datenschutzbestimmungen von hCaptcha.