


Die Frustration, mit einer verkratzten, veralteten Treppe zu leben, ist für viele Hausbesitzer und Mieter ein bekanntes Ärgernis. Professionelle Treppenrenovierungen erfordern oft horrende Budgets, störende Bauarbeiten und Tage voller Sägestaub. Vielleicht schauen Sie auf Ihre abgenutzte Treppe und gehen davon aus, dass eine komplette Sanierung Ihr einziger Weg nach vorn ist.
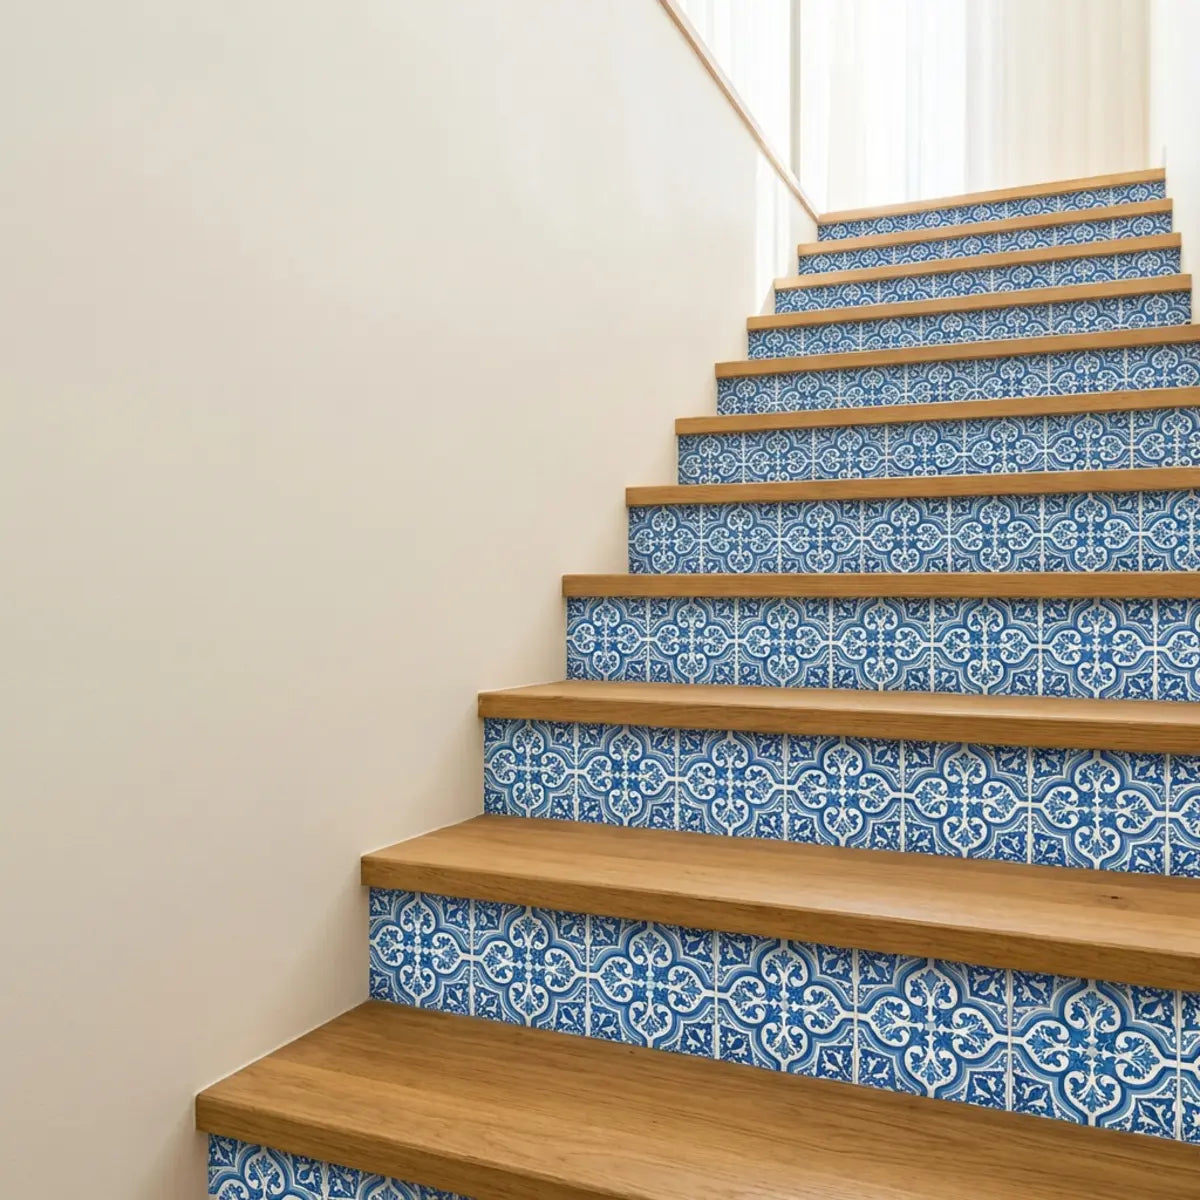
Glücklicherweise ist ein kompletter Rückbau nicht nötig. Peel-and-stick stair risers sind eine einfache, preiswerte Möglichkeit, Ihre Treppe mit minimalen Werkzeugen zu verwandeln. Sie bieten eine langlebige, reversible Oberfläche, die sofort Stil verleiht und sich an einem einzigen Nachmittag installieren lässt.
Dieser Ansatz bietet eine äußerst preisgünstige DIY-Lösung, die Handwerkerkosten komplett umgeht. Da die Materialien spezielle Acrylklebstoffe verwenden, bleiben sie renter-friendly und vollständig reversibel. Außerdem ermöglicht die enorme Vielfalt moderner Designoptionen, das zentrale Herzstück Ihres Zuhauses ganz ohne dauerhafte Verpflichtung zu individualisieren.
Die Treppe ist oft das allererste architektonische Element, dem Gäste begegnen, wenn sie Ihre Schwelle überschreiten. Laut Raumpsychologie schafft dieser erste visuelle Händedruck die energetische Grundstimmung für das gesamte Zuhause. Eine dunkle, verkratzte Treppe vermittelt unbewusst Vernachlässigung und schwere Energie und erzeugt eine visuelle Barriere. Umgekehrt zieht ein bunt gemusterter oder elegant strukturierter Riser den Blick nach oben und vermittelt ein Gefühl von Offenheit, Sauberkeit und durchdachter Gestaltung.
Indem Sie diesen vertikalen Raum bewusst gestalten, verdecken Sie nicht bloß altes Holz; Sie definieren das Begrüßungsritual Ihres Zuhauses neu. Sie verwandeln eine rein funktionale Übergangszone in eine auffällige Galeriewand, die Aufmerksamkeit auf sich zieht und den ästhetischen Ton für die folgenden Räume vorgibt.

Was ist eine stair riser transformation und warum ist sie wichtig?
Kurzfassung Haben Sie genug davon, auf beschädigte Stufen zu starren und eine riesige Rechnung vom Handwerker zu fürchten? Dieser Abschnitt zeigt, wie ein gezieltes kosmetisches Upgrade Renovierungskosten ausbremst und gleichzeitig die Innenarchitektur Ihres Zuhauses sofort modernisiert.
Eine stair riser transformation ist der Prozess, bei dem dekorative Materialien – meist selbstklebende Vinylaufkleber oder Fliesen – auf die vertikale Rückseite Ihrer Treppe aufgebracht werden. Dieses kosmetische Upgrade schützt Holz oder Trockenbau vor täglichen Stoßspuren der Schuhe und verändert gleichzeitig die visuelle Ästhetik des gesamten Raums drastisch.
Aus Erfahrung verwechseln viele Menschen die Teile einer Treppe. Die „Tread“ ist der horizontale Teil, auf den man tritt. Der „Riser“ ist die vertikale Fläche, die Ihnen zugewandt ist.
Für erfolgreiche Heimwerkerprojekte ist Präzision in der Terminologie entscheidend. Die Tread (horizontal, tragend, hohe Reibung) erfordert völlig andere Materialeigenschaften als der Riser (vertikal, geringe Reibung, hohe Beanspruchung durch Zehen). Außerdem bietet die Nosing (die überstehende Kante der Tread) eine wichtige Schutzlippe, die die Oberkante Ihrer Peel-and-stick-Anwendung vor direkter, nach unten gerichteter Belastung schützt. Wenn Sie diese exakte Geometrie verstehen, erkennen Sie, warum spezielles vertikales Vinyl herkömmliches Kontaktpapier, das an den falschen Stellen verwendet wird, mühelos überdauert.
Wenn Sie eine Treppe von unten betrachten, sehen Sie in erster Linie die Risers. Das Aufwerten genau dieser vertikalen Fläche bietet die größte visuelle Wirkung bei der geringsten finanziellen Investition.
Der funktionale und ästhetische Nutzen
Die Vorteile gehen weit über einen einfachen Farbwechsel hinaus. Unbehandeltes, gestrichenes Holz auf einem Riser ist ein Magnet für Schrammen von Schuhen und Staubsaugern. Das Aufbringen einer Vinylschicht mindert diese tägliche Abnutzung grundlegend.
Wir haben beobachtet, dass hochwertiges Vinyl wie ein Schutzschild wirkt. Es fängt den Aufprall von Zehenstößen ab und widersteht der Übertragung dunkler Gummispuren von Schuhsohlen. Dadurch reduziert sich die Zeit, die Sie mit Schrubben oder Neuanstrichen der architektonischen Elemente Ihres Flurs verbringen, drastisch.
Optisch manipuliert ein stair riser makeover die Raumwahrnehmung. Dunkle, schwere Treppen können einen Eingangsbereich beengt wirken lassen. Durch bright, gemusterte oder strukturierte peel-and-stick tile stair risers lenken Sie den Blick nach oben und erzeugen die Illusion von Höhe und Licht. Diese vertikale Gestaltung erweitert enge Räume und lässt schmale Treppenhäuser in Stadthäusern deutlich offener und einladender wirken.
Die Wirtschaftlichkeit des Upgrades
Betrachten Sie die Daten rund um die Innenraumrenovierung. Laut Kostenanalysen für Architektur liegt eine professionelle Treppenaufarbeitung im Durchschnitt zwischen 1.500 und 4.000 US-Dollar, je nach Region. Diese enorme Ausgabe deckt intensive Arbeit, gefährliches chemisches Abbeizen, aggressives Schleifen und mehrere Tage Trocknungszeit ab, in denen die Treppe komplett unbenutzbar ist.
Im Gegensatz dazu erfordert eine DIY stair riser transformation typischerweise Materialkosten von unter $150 in. Das bedeutet eine massive Senkung der Total Cost of Ownership (TCO) für Heimwerkerprojekte und umgeht logistische Albträume sowie Aufschläge von Handwerkern.
Nehmen wir ein aktuelles Projekt, das wir uns angesehen haben. Ein Hausbesitzer hatte eine dunkle, stark verkratzte Kieferntreppe. Statt die gesamte Konstruktion abzuschleifen und neu zu beizen, brachte er ein helles, geometrisches Vinyl auf den Setzstufen an. Die Vorher-Nachher-Verwandlung war von einer maßgefertigten Schreinerarbeit nicht zu unterscheiden und in nur vier Stunden erledigt. Das eingesparte Budget wurde in hochwertige Leuchten investiert, wodurch die Atmosphäre des Flurs komplett neu gestaltet wurde.
Wie wählen Sie die besten peel-and-stick tiles für stair risers aus?
Materialwissenschaft Überfordert von billigen Aufklebern, die sich schon nach wenigen Wochen wieder ablösen? Wir zeigen Ihnen die Materialkriterien, die nötig sind, um Vinyl in Profiqualität auszuwählen, das der täglichen Beanspruchung standhält.
Um die besten peel-and-stick tiles für stair risers auszuwählen, sollten Sie auf schwere Vinylformulierungen mit einer speziellen schützenden Nutzschicht setzen. Prüfen Sie sorgfältig die gesamte Mil-Dicke des Materials, seine wasserfesten Eigenschaften und die starke Haftkraft der Acrylkleber-Rückseite.
Nicht alle selbstklebenden Materialien sind für vertikale Belastungszonen entwickelt. Ein häufiger Fehler ist es, für dieses Projekt herkömmliche Tapeten oder dünne Papieraufkleber zu verwenden. Diese reißen oder delaminieren schnell unter dem Druck von Staubsaugerstößen und hastigen Schritten.
Material-Benchmarks und Auswahlkriterien
Wenn Sie Optionen für eine DIY stair riser transformation bewerten, müssen Sie die strukturellen Unterschiede zwischen den verfügbaren Produkten verstehen. Die Materialstärke entscheidet darüber, wie gut Unebenheiten im darunterliegenden Holz kaschiert werden. Dünne Materialien „zeichnen“ jeden Kratzer und jede Delle nach, während dickeres Vinyl für ein glattes, makelloses Finish sorgt.
Wir empfehlen, sich strikt auf Vinyl- oder Verbundmaterialien zu beschränken. Die untenstehende umfassende Matrix zeigt die standardisierten Bewertungskriterien für gängige Klebeprodukte und hilft Ihnen, eine strukturell zuverlässige Grundlage für Ihr Projekt auszuwählen.
| Materialart | Haltbarkeitsprofil | Feuchtigkeitsbeständigkeit | Beste Anwendung |
|---|---|---|---|
| Robustes Vinyl | Hohe Schlagfestigkeit | 100% Wasserdicht | Häufig genutzte Haupttreppen |
| Stabile PVC-Fliese | Maximaler Schutz bei maximaler Wirkung | 100% wasserdicht | Tief strukturiertes oder beschädigtes Holz |
| Papierbasierter Aufkleber | Geringe Stoßfestigkeit | Schlecht | Gering frequentierte, temporäre dekorative Verwendung |
| Gel-beschichtete 3D-Fliese | Mittlere Stoßfestigkeit | Oben | Keller oder feuchtigkeitsanfällige Bereiche |

Wenn Hersteller von „Mil-Dicke“ sprechen, meinen sie die klare, schützende Deckschicht über dem bedruckten Vinylmuster. Ein „Mil“ entspricht einem Tausendstel Zoll. Für stair risers wird eine robuste Nutzschicht empfohlen, um zu verhindern, dass Abrieb durch Schuhspitzen bis zur bedruckten Designschicht vordringt. Günstigere Alternativen werben oft mit einer hohen Gesamtstärke, verfügen jedoch nur über eine mikroskopisch dünne Nutzschicht, was zu einer schnellen optischen Abnutzung führt. Prüfen Sie vor dem Kauf immer die Angabe zur Nutzschicht.
Rutschfestigkeit und Oberfläche priorisieren
Auch wenn Sie nicht direkt auf die Setzstufe treten, spielt die Oberfläche dennoch eine Rolle. Glatte, glänzende Oberflächen zeigen Staub und Tierhaare fast sofort, was den Pflegeaufwand erhöht. Außerdem reflektieren sie Licht stark und können kleine Unebenheiten im darunterliegenden Holz hervorheben.
Wenn Ihre Treppe außerdem eine schmale Trittstufe hat, stößt die Schuhspitze häufig gegen die Setzstufe. Ein strukturiertes Vinyl bietet eine mikroskopische Pufferzone, die die Kraft dieses Aufpralls verteilt, Risse verhindert und die Integrität des Designs über Jahre hinweg erhält.
Die Grundlinie für die Struktur festlegen
Wenn Sie eine strukturierte Oberfläche suchen, die mühelos natürliche Materialien imitiert und zugleich eine unübertroffene Kratzfestigkeit bietet, empfehlen wir Ihnen wärmstens zu entdecken, wie Sie Ihr Zuhause ganz unkompliziert mit Rock Subway Peel and Stick Wandfliesen verwandeln können. Diese selbstklebenden, fugenfreien Fliesen kombinieren einen frischen Almond-White-Farbton mit realistischen 3D-Strukturen und verleihen alten Wänden und Setzstufen neues Leben. Durch die empirische Neutralisierung von Oberflächenkratzern mittels realistischer 3D-Strukturen und einer langlebigen Oberfläche entsteht eine optimale Lösung für stark frequentierte vertikale Flächen. Sie setzt den Maßstab dafür, ästhetische Tiefe mit struktureller Widerstandsfähigkeit zu verbinden.
Abstimmung mit der Hausarchitektur
Die gestalterische Harmonie ist entscheidend. Ein häufiger Fehler ist die Wahl eines Musters, das mit dem umliegenden Bodenbelag kollidiert. Ziel ist ein nahtloser visueller Übergang, keine störende Unterbrechung. Ihre Treppe sollte die gestalterische Verbindung zwischen den Wohnbereichen im unteren und oberen Stockwerk herstellen.
Wir haben eine kurze Fallstudie über eine Hausbesitzerin dokumentiert, die einen Coastal-Style-Look umgesetzt hat. Indem sie für ihre Setzstufen eine Vinylfliese in verwitterter Holzoptik wählte, überbrückte sie nahtlos den Übergang zwischen einem hellen Eichenboden im unteren Bereich und einem oberen Treppenabsatz mit Teppichboden. Diese durchdachte Integration steigerte die architektonische Gesamtstimmigkeit ihres Zuhauses erheblich.
Wenn Sie mit feuchtigkeitsanfälligen Bereichen in der Nähe von Eingangsbereichen zu tun haben, bleiben die Grundprinzipien dieselben. Zu verstehen, wie Feuchtigkeit mit Klebstoffen interagiert, ist entscheidend, besonders in feuchten Umgebungen. Wenn Sie diese Prinzipien auch auf andere Räume übertragen möchten, entdecken Sie, wie Sie Ihren Raum in wenigen Stunden mit erschwinglichen peel-and-stick-Fliesen in moderne, rustikale oder luxuriöse Stile verwandeln können, indem Sie unseren vollständigen Leitfaden zu Badezimmer-Makeovers: Peel-&-Stick-Fliesen-Transformationen entdecken. Dies zeigt, wie die Wahl wasserfester Vinylprodukte das Risiko von durch Feuchtigkeit verursachtem Ablösen von vornherein minimiert.
Wie installiert man peel-and-stick stair risers Schritt für Schritt?
Anwendungsprotokoll Machen Sie sich Sorgen über schiefe Linien oder Blasen im Klebstoff, die Ihr Wochenendprojekt ruinieren könnten? Dieses genaue Verlegeprotokoll garantiert eine makellose, langlebige Anwendung, ohne dass Spezialwerkzeug erforderlich ist.
Die Installation von peel-and-stick stair risers umfasst drei Kernphasen: gründliche Entfettung der Oberfläche, präzises Messen und Ausrichten sowie das Aufbringen mit Druck unter Verwendung eines Glättwerkzeugs. Die korrekte Ausführung dieser Schritte sorgt für eine vollständige Kantenhaftung und verhindert frühzeitiges Ablösen oder Blasenbildung vollständig.
Die Hauptursache für Installationsfehler ist nicht das Material selbst, sondern eine unzureichende Vorbereitung des Untergrunds. Die Klebetechnologie erfordert eine vollkommen saubere Oberfläche, um richtig zu haften. Staub, Fett und mikroskopisch kleine Wachsreste wirken wie eine Barriere und verhindern, dass sich die Acrylpolymere mit der Holzmaserung oder der Lackoberfläche verbinden.
Umfassende Werkzeugliste
Bevor Sie mit dem Projekt beginnen, legen Sie die folgenden erforderlichen Werkzeuge bereit, um einen reibungslosen Arbeitsablauf sicherzustellen. Wenn während der Montage die passende Ausrüstung fehlt, führt das oft zu hastigen Kompromissen und schief sitzenden Fliesen.
- ✔ Hochleistungs-Entfetter: Trinatriumphosphat (TSP) oder ein entsprechendes Produkt.
- ✔ Präzisions-Cuttermesser: Ein X-Acto-Messer oder ein Teppichmesser mit mehreren Ersatzklingen. Stumpfe Klingen verursachen ausgefranste Vinylrisse.
- ✔ Metalllineal mit gerader Kante: Unverzichtbar für perfekt gerade Schnitte; verlassen Sie sich nicht auf Kunststofflineale, da sie von der Klinge abgeschabt werden können.
- ✔ Abzieher mit Filzkante: Wichtig für das Andrücken mit Druck, ohne die bedruckte Vinyloberfläche zu zerkratzen.
Phase 1: Untergrundsanierung
Der Branchenkonsens besagt, dass die Vorbereitung des Untergrunds die Lebensdauer jedes Klebeprojekts bestimmt. Für einen tieferen Einblick in universelle Vorbereitungstechniken, die auf verschiedenen Oberflächen ein makelloses Ergebnis garantieren, erfahren Sie, wie Sie eine triste Küchenrückwand mit kleinem Budget und renterfreundlichen Optionen verwandeln können, indem Sie unseren umfassenden Leitfaden zu DIY Peel and Stick Tiles: Einfache Küchenmodernisierung lesen. Dies liefert die standardisierte Grundlage, um häufige Haftungsfehler zu umgehen.
Um Ihre Treppe vorzubereiten, befolgen Sie diese wichtigen Schritte:
- 1. Chemische Entfettung: Waschen Sie jede Setzstufe mit einem Hochleistungs-Entfetter, etwa Trinatriumphosphat (TSP) oder einer starken Spülmittellösung. Konzentrieren Sie sich besonders auf die unteren Kanten, an denen sich Bodenwachs ansammelt.
- 2. Scheuerndes Reinigen: Verwenden Sie eine Bürste mit festen Borsten, um jahrelange Rückstände von Schuhcreme, Wachs oder Bodenreiniger zu entfernen. Wenn die Farbe abblättert, schleifen Sie sie vorsichtig mit 120er-Schleifpapier glatt.
Phase 2: Präzisionskalibrierung
Gehen Sie niemals davon aus, dass Ihre Treppe perfekt rechtwinklig ist. Häuser setzen sich, und Holz verzieht sich mit der Zeit. Das Ausmessen jeder einzelnen Setzstufe ist zwingend erforderlich. Schon eine Lücke von nur 1/8 Zoll kann den visuellen Fluss des Musters stören.
- 1. Einzelmessung: Messen Sie die Höhe und Breite der jeweiligen Setzstufe, an der Sie arbeiten. Schneiden Sie nicht alle Fliesen nach dem Maß der untersten Stufe zu. Notieren Sie die Maße in einem Notizblock und beschriften Sie sie mit Stufe 1, Stufe 2 usw.
- 2. Vorlagenerstellung: Bei stark unregelmäßigen Treppen (häufig in Häusern, die älter als 50 Jahre sind) erstellen Sie zunächst eine Papierschablone. Drücken Sie ein Blatt festes Bastelpapier gegen die Setzstufe, falzen Sie die Kanten, schneiden Sie es aus und übertragen Sie die Form auf die Rückseite Ihres Vinyls.
- 3. Präzises Schneiden: Verwenden Sie ein scharfes Cuttermesser und ein Metall-Lineal. Wechseln Sie die Klinge häufig, um ein Einreißen der Vinyl-Setzstufen zu vermeiden. Eine stumpfe Klinge zieht den Kleber mit und hinterlässt eine unsaubere, nicht mehr haftende Kante.
Interaktive Checkliste zur Einsatzbereitschaft
Verfolgen Sie Ihre Vorbereitung, um eine makellose Haftung zu gewährleisten. Klicken Sie auf die Punkte, sobald Sie sie erledigt haben.
0% Bereit
Phase 3: Die Anbringungsmatrix
Der Anbringungsprozess erfordert Geduld und gleichmäßigen Druck. Wer diese Phase überstürzt, riskiert Lufteinschlüsse, die sich bei steigender Raumtemperatur ausdehnen und unschöne Blasen verursachen.
- 1. Die Scharniermethode: Ziehen Sie vom oberen Rand Ihrer zugeschnittenen Fliese nur zwei Zoll der Trägerfolie ab. Durch das scharfe Umknicken entsteht ein stabiles, gut handhabbares Scharnier.
- 2. Ausrichtung von oben nach unten: Richten Sie diese freigelegte Klebekante an der oberen Kante Ihrer Treppen-Setzstufe direkt unter der überstehenden Trittstufe aus. Prüfen Sie vor dem Andrücken, dass sie absolut waagerecht sitzt.
- 3. Glätten mit Druck: Während Sie die Trägerfolie langsam nach unten abziehen, drücken Sie das Vinyl mit einem Rakel mit Filzkante fest ins Holz. Arbeiten Sie sich von der Mitte nach außen vor, um eingeschlossene Luft herauszudrücken, und setzen Sie dabei kräftige, überlappende Striche.

Wenn nach dem Anbringen eine hartnäckige Blase zurückbleibt, ziehen Sie die Fliese nicht ab. Nehmen Sie eine Nähnadel und stechen Sie genau in die Mitte der Blase. Drücken Sie mit Ihrem Rakel die eingeschlossene Luft vorsichtig in Richtung des winzigen Stichlochs. Der Kleber legt sich perfekt glatt, und das kleine Loch bleibt mit bloßem Auge völlig unsichtbar.
Versiegelung für maximale Langlebigkeit
Wenn Ihre Treppe stark frequentiert wird oder häufig gewischt wird, ist das Versiegeln der Kanten ein wertvoller Profi-Tipp. So wird aus einer temporären optischen Lösung ein halb permanentes architektonisches Upgrade.
Tragen Sie eine feine Raupe aus transparentem, überstreichbarem Silikon entlang der unteren Naht auf, wo der Riser auf die Stufe trifft. Dadurch wird die Installation im Wesentlichen wasserfest und verhindert, dass Wischwasser unter die Unterkante der Fliese gelangt. Glätten Sie die Silikonraupe mit einem feuchten Finger für ein unsichtbares Finish.
Die grundlegende Methode für maximale Lebensdauer erfordert präzise Anwendungstechniken. Wenn Sie von einer Auffrischung Ihres Zuhauses träumen, ohne Schmutz oder hohe Kosten, müssen Sie verstehen, wie Druckverhältnisse funktionieren. Peel and stick tiles bieten einfache, erschwingliche und mietfreundliche DIY-Verwandlungen. Holen Sie sich Expertentipps und meistern Sie diese grundlegenden Techniken, indem Sie unseren umfassenden Leitfaden zu Einfaches Home-DIY mit Peel and Stick Tiles entdecken. Dort erfahren Sie, wie präzises Andrücken direkt mit der Haltbarkeit der Installation zusammenhängt.
Sind peel-and-stick stair risers langlebig und sicher für den täglichen Gebrauch?
Belastungstest Skeptisch, dass ein selbstklebendes Material dem täglichen Einsatz durch Haustiere, Kinder und schwere Stiefel standhält? Dieser Abschnitt erklärt die Technik hinter modernem Vinyl und zeigt seine langfristige Widerstandsfähigkeit.
Ja, hochwertige peel-and-stick stair risers sind äußerst langlebig und sicher für den täglichen Gebrauch. Sie bestehen aus mehrschichtigen PVC- oder robusten Vinyl-Verbundmaterialien und verfügen über eine spezielle Schutzschicht, die Kratzer, Stoßschäden und das Eindringen von Feuchtigkeit grundlegend reduziert.
Ein häufiger Irrglaube ist, diese Produkte wie empfindliche Sticker zu behandeln. Moderne Vinyl-Tile-Stair-Risers werden mit derselben grundlegenden Technologie hergestellt wie Luxury Vinyl Plank-Böden. Sie sind darauf ausgelegt, flexibel zu bleiben, Risse zu vermeiden und Schmutz auf mikroskopischer Ebene abzuweisen.
Dem stark frequentierten Belastungsbereich standhalten
Die senkrechte Stirnseite einer Treppe wirkt wie ein Aufprallbereich. Jedes Mal, wenn jemand eine Stufe falsch einschätzt, trifft die Schuhspitze auf den Riser. Über Monate summieren sich diese unzähligen Mikroaufpralle.
Normale Wandfarbe platzt unter diesem punktuellen Druck schnell ab. Vinyl hingegen besitzt strukturelle Elastizität. Es absorbiert die kinetische Energie des Schuhaufschlags, ohne zu brechen oder abzuplatzen, und verteilt die Kraft unbedenklich über die gesamte Oberfläche der Fliese.
Wenn es um langfristige Belastungsgrenzen geht, bieten geprüfte Vergleichswerte aus dem Bodenbelagsbereich einen soliden Maßstab. Wenn Sie ein schnelles, erschwingliches Upgrade für den Boden in Ihrem ganzen Zuhause möchten, entdecken Sie die besten peel and stick tiles für stark frequentierte Bereiche mit Expertentipps für eine makellose DIY-Installation. Lesen Sie jetzt unsere umfassende Analyse: Wie Aufklebbare Bodenfliesen Jeden Raum Aufwerten. Die dort beschriebenen Kennzahlen zeigen eine statistisch signifikant geringere Verschlechterung moderner Vinyl-Verbundmaterialien im Vergleich zu herkömmlich gestrichenen Oberflächen.
Sicherheitsaspekte
Sicherheit auf Treppen hat oberste Priorität. Hausbesitzer befürchten oft, dass das Hinzufügen eines synthetischen Materials auf Treppen das Rutschrisiko erhöht. Da das Vinyl auf der vertikalen Riser-Fläche und nicht auf der horizontalen Stufe angebracht wird, verändert es die Rutschfestigkeit der Trittfläche nicht.
Sie müssen sich keine Sorgen machen, dass die Treppe rutschig wird. Das Material liegt sicher außerhalb des eigentlichen Trittbereichs und dient ausschließlich als schützende und dekorative Barriere. Ihre mit Teppich belegten, gestrichenen oder mit Grip-Tape versehenen Stufen bleiben vollständig unbeeinträchtigt und für alle Altersgruppen sicher.
Wenn Sie einen chaotischen Haushalt mit viel Durchgangsverkehr managen – denken Sie an aktive Kinder mit Sportausrüstung oder große Hunde, die die Stufen hinaufstapfen – dann sind Vinyl-Riser nicht nur eine ästhetische Entscheidung, sondern eine Verteidigungsstrategie. Farbe braucht Aushärtung und eine schonende Behandlung, um ihren Glanz zu bewahren. Schweres Vinyl ist kompromisslos pragmatisch. Es braucht keinerlei Schonung und sorgt dafür, dass Ihr Zuhause selbst mitten im täglichen Chaos architektonisch durchdacht wirkt.
Pflege- und Reinigungsrichtlinien
Einer der größten Vorteile einer DIY-Stair-Riser-Verwandlung ist die drastische Reduzierung des Reinigungsaufwands. Im Grunde umhüllen Sie Ihre Treppe mit einer Rüstung, die Schmutz abweist.
Gestrichene Treppen erfordern ständiges Ausbessern und Schmutzradierer, um Abriebspuren zu entfernen, was die Farbschicht langsam abnutzt. Schweres Vinyl ist gegenüber den meisten gängigen Haushaltsflecken weitgehend unempfindlich.
- • Routine Reinigung: Ein leicht angefeuchtetes Mikrofasertuch reicht für das wöchentliche Staubwischen aus, um die Klarheit des Musters zu erhalten.
- • Fleckenentfernung: Bei hartnäckigem Schlamm oder Haustierflecken funktioniert ein milder, nicht scheuernder Bodenreiniger perfekt. Auf das Tuch sprühen, nicht direkt auf die Stufe.
- • Schäden vermeiden: Verwenden Sie niemals scheuernde Pads oder aggressive chemische Lösungsmittel wie Bleichmittel oder Aceton, da diese die schützende Nutzschicht abtragen und das gedruckte Design mit der Zeit ausbleichen können.
Wir haben einen realen 12-monatigen Praxistest in einem viel genutzten Haushalt mit zwei großen Hunden ausgewertet. Nach einem Jahr täglicher Beanspruchung zeigten die Vinyl-Riser keinerlei Kantenablösung und benötigten keine Nachbesserung des Klebers – ein Beweis für ihre Alltagstauglichkeit in stark frequentierten Haushalten.
Wie können Sie peel-and-stick stair risers ohne Schäden entfernen oder ersetzen?
Anleitung zur Rückstandsfreiheit Haben Sie Angst, Ihre Mietkaution wegen beschädigter Farbe oder klebriger Rückstände zu verlieren? Wir erklären die Wärme-Lösungs-Technik, die eine sichere, schadensfreie Entfernung garantiert.
Um peel-and-stick stair risers ohne Schäden zu entfernen, müssen Sie kontrollierte Wärme mit einem Föhn anwenden, um den Acrylkleber aufzuweichen. Sobald der Kleber seine Betriebstemperatur erreicht hat, kann die Fliese langsam in einem 45-Grad-Winkel abgezogen werden, wobei der Untergrund vollständig intakt bleibt.
Das Schöne an modernen abnehmbaren Stair Riser-Decals liegt in ihrer speziellen chemischen Zusammensetzung. Der Klebstoff ist darauf ausgelegt, mit der Zeit fest auszuhärten, behält jedoch bei direkter Wärmeeinwirkung eine geringe Scherfestigkeit. Das bedeutet: Er hält bei kühlen Temperaturen fest, lässt sich aber beim Erwärmen mühelos lösen.
Die Klebekraft beschreibt, wie schnell und aggressiv der Kleber haftet. Abnehmbares Vinyl verwendet einen Klebstoff, der gegen kohäsiven Bruch resistent ist. Diese komplexe Chemie sorgt dafür, dass sich der Kleber beim Abziehen auf der Rückseite der Vinylfliese bleibt, statt auf Ihre Holzstufen überzugehen. Wärme wirkt als Katalysator und macht diese Verbindung vorübergehend weicher, sodass sich die Fliese reibungslos entfernen lässt.
Die Wärme-Lösungs-Technik
Versuchen Sie nicht, das Vinyl von den Stufen zu reißen, solange der Kleber kalt ist. Genau diese aggressive Vorgehensweise verursacht Farbabplatzungen oder Splitterbildung auf Holzoberflächen. Geduld ist entscheidend.
- 1. Wärmeanwendung: Halten Sie einen Föhn etwa fünfzehn Zentimeter von der Ecke der Vinylfliese entfernt. Lassen Sie ihn für etwa 30 Sekunden auf mittelhoher Stufe laufen, um die Wärmefreisetzung einzuleiten.
- 2. Das Abziehen im 45-Grad-Winkel: Sobald sich das Vinyl warm anfühlt, heben Sie die Ecke vorsichtig mit einem Kunststoffspachtel an. Ziehen Sie die Fliese langsam zurück und halten Sie das Vinyl flach an der Oberfläche in einem steilen 45-Grad-Winkel, statt gerade nach außen zu ziehen.
- 3. Kontinuierliches Erwärmen: Bewegen Sie die Wärmequelle leicht vor die Stelle, an der Sie ziehen, damit der Kleber während des gesamten Entfernungsprozesses weich bleibt.
Umgang mit Rückstandsresten
Gelegentlich kann bei älteren Installationen ein leichter klebriger Film zurückbleiben. Keine Panik; das bedeutet nicht, dass Ihre Treppe ruiniert ist, und es erfordert keine industrielle Schleifbehandlung zur Behebung.
Tragen Sie einen auf Orangenöl basierenden Klebstoffentferner auf ein Mikrofasertuch auf und polieren Sie die Stelle sanft aus. Die Zitruslösungsmittel lösen die verbleibenden Acrylpolymere, ohne das darunterliegende Polyurethan oder die Farbe zu beschädigen. Wischen Sie anschließend mit einem seifigen Lappen nach.
Der Erhalt der Kaution erfordert eine strikte Vorgehensweise. Wenn Sie Ihre Mietwohnung mit absoluter Sicherheit aufwerten möchten, bieten peel and stick tiles eine stilvolle, schadensfreie Möglichkeit, Ihre Küche oder Ihr Bad zu personalisieren, ohne Ihre Kaution zu gefährden. Erfahren Sie, wie Sie eine makellose, ohne Auswirkung bleibende Entfernung durchführen, indem Sie unser Verfahren studieren: Mieterfreundliche Peel-and-Stick-Fliesen sicher entfernen. Das entspricht strikt den Standards der Hausverwaltung und minimiert naturgemäß das Risiko von Schäden am Untergrund während des Auszugs.
Eine Fallstudie für Mieter
Wir haben einen Mieter dokumentiert, der in einer streng geregelten Reihenhausanlage stark gemusterte Vinylfliesen an den stair risers installiert und damit einen nüchternen Eingangsbereich in einen lebendigen Blickfang verwandelt hat.
Nach einer zweijährigen Mietzeit nutzte er vor der Endabnahme die Wärme-Lösungs-Methode. Das Entfernen dauerte für zwölf Stufen weniger als eine Stunde. Bei der Inspektion durch den Vermieter wurde keine Beschädigung der ursprünglichen, vom Handwerker ausgeführten Farbe festgestellt, sodass die Kaution vollständig zurückerstattet wurde.
Wenn Sie nach dem Entfernen noch Material übrig haben, können Sie es ganz einfach weiterverwenden. Lust auf ein einfaches DIY-Möbel-Upgrade? Erfahren Sie in unserem Tutorial, wie Sie peel and stick tiles auf Schränken und Kommoden anbringen, und verleihen Sie Ihrem Zuhause mit einer stilvollen, mietfreundlichen Auffrischung einen neuen Look: DIY-Möbel-Makeover: So bringen Sie Peel-and-Stick-Tiles an. Probieren Sie es noch heute aus, um Bücherregale oder Schrankinnenräume nachhaltig aufzuwerten.
Was sind die besten Designideen für ein einzigartiges Stair Riser Makeover?
Ästhetische Strategie Fällt es Ihnen schwer, sich vorzustellen, wie sich verschiedene Muster in Ihr bestehendes Dekor einfügen? Dieser Abschnitt ordnet die wirkungsvollsten ästhetischen Strategien ein, um Ihre Treppe in einen kuratierten Blickfang zu verwandeln.
Die besten Designideen für ein stair riser makeover setzen auf kontrastreiche Geometrien, natürliche Texturen oder durchgängige visuelle Themen. Beliebte und wirkungsvolle Ansätze sind abwechselnd schwarz-weiße Muster, warme Faux-Holzmaserungen und kunstvolle von der mediterranen Keramik inspirierte Motive, die dem Raum Persönlichkeit verleihen.
Eine Treppe ist eine Übergangszone. Da Sie nicht stundenlang auf den Stufen sitzen, können Sie bei der Gestaltung mutiger sein als vielleicht in einem zentralen Wohnraum. Sie ist die perfekte architektonische Leinwand, um ein kalkuliertes Designrisiko einzugehen.
Die Wahl Ihres ästhetischen Themas
Berücksichtigen Sie das psychologische Gewicht von Farben und Mustern. Das gewählte Design bestimmt die Wirkung Ihres Eingangsbereichs. Hier sind einige kuratierte Stil-Inspirationen, die Ihnen bei Ihrer Vision helfen:
- Integration im Modern Farmhouse-Stil: Die Verwendung von Faux-Shiplap- oder verwitterten Scheunenholz-Texturen schafft eine warme, einladende rustikale Ästhetik. Das harmoniert wunderbar mit weißen Trittstufen und dunklen Eisenhandläufen und erzeugt ein gemütliches, traditionsbewusstes Gefühl ganz ohne Splitter.
- Coastal-Chic-Aufwertung: Sanfte Blautöne, Meeresgrün und verwittert wirkende Driftwood-Muster hellen einen dunklen Flur sofort auf und greifen die luftige, unkomplizierte Eleganz von Architektur am Strand auf.
- Boho-Geometrie mit Flair: Kunstvolle Mandala-Muster oder lebendige Kunstfliesen im spanischen Stil bringen enorme Energie und künstlerischen Ausdruck in ein sonst langweiliges architektonisches Element.
- Industrie-Loft-Minimalismus: Die Verwendung von peel-and-stick tiles mit Betonoptik oder dunklen Metallic-Oberflächen sorgt für einen klaren, modernen Look, der wunderbar zu freiliegenden Backsteinwänden und Edison-Glühbirnen-Beleuchtung passt.
Die Kraft kontrastreicher Geometrie
In Umgebungen, die einen eleganten Blickfang verlangen, können Sie Ihren Eingangsbereich in wenigen Minuten eindrucksvoll aufwerten. Für einen markanten modernen Look können Sie Ihre Küche, Ihr Bad oder Ihre Treppe in wenigen Minuten mit Platinum Stones Peel-and-Stick-Fliesen aufwerten! Diese selbstklebenden, fugenfreien Fliesen verfügen über ein schickes sechseckiges Design und eine naturgetreue 3D-Textur und bieten eine mühelose Möglichkeit, vertikale Flächen zu modernisieren. Ihr schickes sechseckiges Design harmonisiert die Raumwirkung und etabliert ein allgemein anerkanntes Paradigma für moderne geometrische Upgrades. Durch die naturgetreue 3D-Textur spielt dieses spezielle Format mit Licht und Schatten und verleiht flachen Stufen eine beeindruckende visuelle Tiefe.
Abwechselnde Muster für mehr visuelle Wirkung
Ein äußerst wirkungsvoller Profi-Tipp ist es, die Designs abzuwechseln. Tragen Sie nicht auf jedes einzelne Setzstufe dasselbe kräftige Muster auf, sondern wechseln Sie zwischen einem markanten Muster und einer einfarbigen, dazu passenden Farbe.
Diese Technik unterbricht die visuelle Masse der Treppe. So wirkt das Design nicht überwältigend oder zu unruhig, besonders bei steilen, geschlossenen Treppen, die ins Obergeschoss führen und bei denen sich Muster sonst verwirrend übereinander stapeln können.
Sie können dies noch persönlicher gestalten, indem Sie die sekundären Akzentfarben Ihres Hauses dezent in die Setzstufenmuster einfließen lassen und so eine stimmige Designlinie schaffen, die obere und untere Etagen elegant miteinander verbindet.
Finden Sie Ihren perfekten Treppenstil
Beantworten Sie 3 kurze Fragen und entdecken Sie die ideale peel-and-stick-Ästhetik für Ihre Hausarchitektur.
1. Was beschreibt Ihr Hauptwohnzimmer am besten?

Abschließende Gedanken
Eine DIY-Stufenstufen-Transformation ist eines der wirkungsvollsten Home-Improvement-Projekte, die Sie angehen können. Wenn Sie sich für moderne, strapazierfähige peel-and-stick-Materialien entscheiden, umgehen Sie die enormen Kosten und die Unannehmlichkeiten einer traditionellen Tischlerarbeit. Sie übernehmen die Kontrolle über die ästhetische Ausrichtung Ihres Zuhauses, ohne die strukturelle Integrität zu beeinträchtigen.
Sie erhalten eine unglaublich langlebige, kratz- und abriebfeste Oberfläche, die die Architektur Ihres Zuhauses schützt und gleichzeitig seine optische Wirkung grundlegend aufwertet. Da der Prozess vollständig reversibel ist und keine Spezialwerkzeuge erfordert, bleibt er ein zugängliches, risikofreies Wochenendprojekt sowohl für engagierte Hausbesitzer als auch für vorsichtige Mieter, die ihrem Raum eine persönliche Note verleihen möchten.
Wir empfehlen Ihnen, Ihre aktuelle Treppe zu begutachten und sich die Möglichkeiten vorzustellen. Hören Sie auf, abgenutztes, tristes Holz einfach hinzunehmen. Kaufen Sie noch heute hochwertige peel-and-stick-Stufenfliesen, um Ihre eigene Transformation zu beginnen, oder entdecken Sie unsere umfangreiche Bibliothek an DIY-Deko-Tutorials, um weitere renter-friendly Renovierungsstrategien zu finden, die sowohl Ihr Budget als auch Ihren Stil respektieren.
Häufig gestellte Fragen
Kann ich peel-and-stick tiles auf mit Teppich belegten Treppen anbringen?
Nein, peel-and-stick-Materialien benötigen einen harten, glatten und starren Untergrund, um eine dauerhafte Haftung zu erzielen. Die Anbringung auf Teppich führt sofort zum Versagen. Sie müssen den Teppich, die Polsterung und die Klammern entfernen und anschließend den darunterliegenden Holzstufenriser vor der Anbringung vorbereiten.
Wie lange halten peel-and-stick stair risers?
Bei korrekter Installation auf einer ordnungsgemäß entfetteten Oberfläche können hochwertige Vinyl stair risers selbst in Haushalten mit viel Verkehr problemlos 3 bis 5 Jahre halten. Die Langlebigkeit hängt stark von der Qualität der anfänglichen Oberflächenvorbereitung und der Dicke der Verschleißschicht des Materials ab.
Muss ich gestrichene Treppen vor dem Anbringen der Aufkleber grundieren?
Wenn Ihre Treppe mit hochglänzender oder seidenmatter Farbe gestrichen ist, die vollständig ausgehärtet und in gutem Zustand ist, ist eine Grundierung normalerweise nicht nötig. Wenn die Farbe jedoch abblättert oder Sie auf unbehandeltem, porösem Holz arbeiten, verbessert das Versiegeln der Oberfläche mit einer hochwertigen Grundierung die Haftung erheblich.
Kann ich peel-and-stick risers mit einem nassen Mopp reinigen?
Ja, aber Sie sollten vorsichtig sein. Während die Vinyloberfläche wasserdicht ist, sind die Fugen, an denen die Fliesen auf das Holz treffen, anfällig für stehendes Wasser. Am besten verwenden Sie ein leicht feuchtes Mikrofasertuch oder einen gut ausgewrungenen Mopp, damit kein Wasser hinter die Kleberückseite eindringt.


Kommentar hinterlassen
Diese Website ist durch hCaptcha geschützt und es gelten die allgemeinen Geschäftsbedingungen und Datenschutzbestimmungen von hCaptcha.