












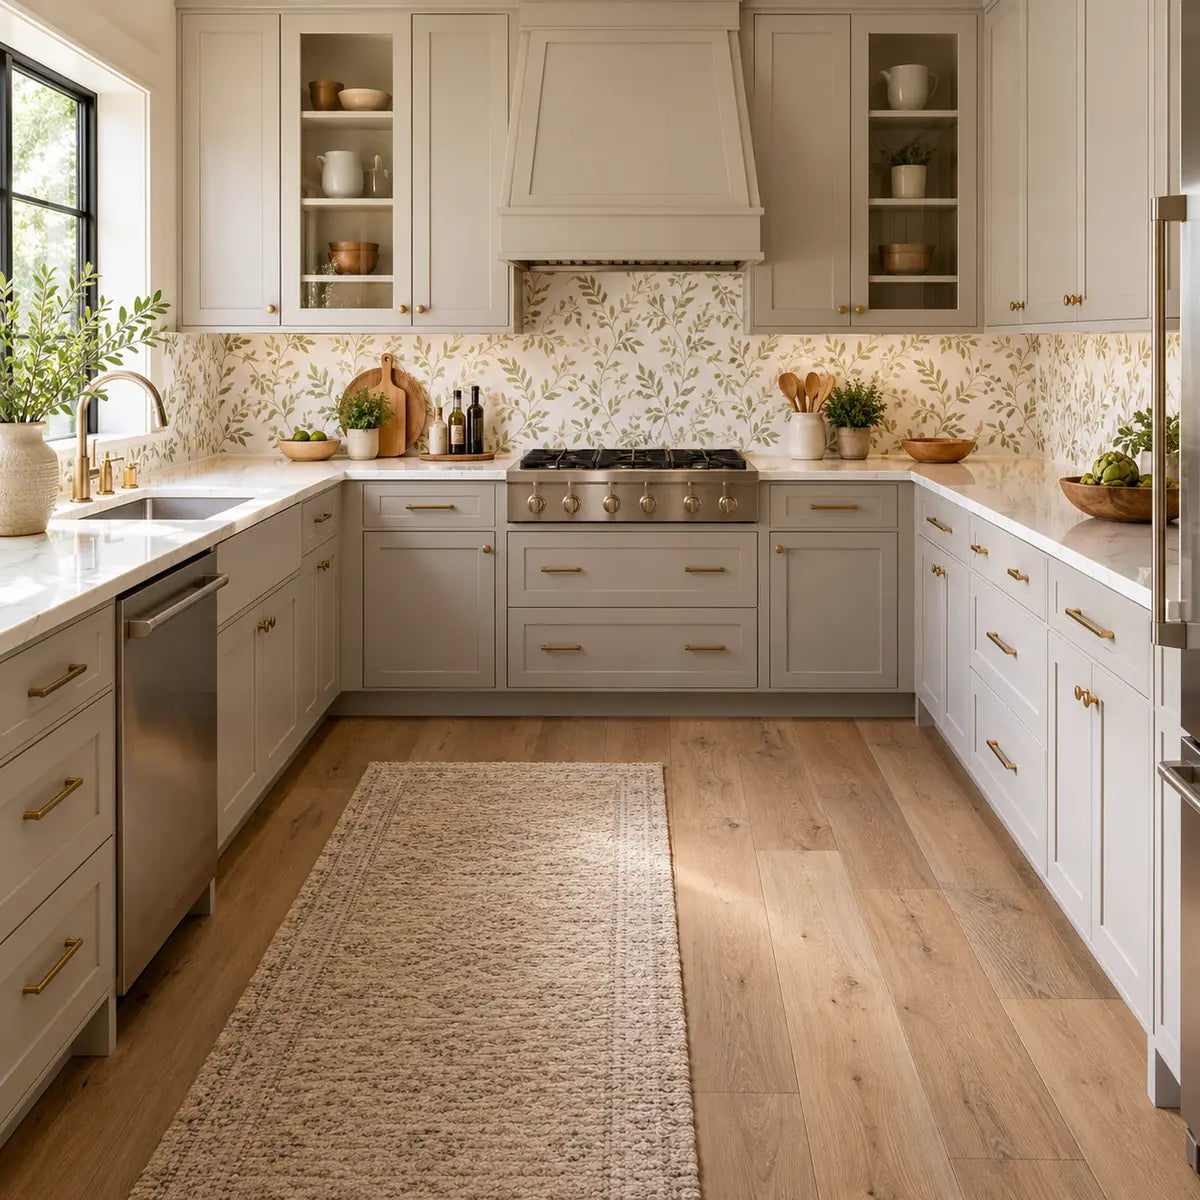
A U-shaped backsplash has two inside corners, three connected wall runs, and one visual path. That means the first layout decision can affect the focal wall, both corner transitions, the pattern direction, and the final stopping point.
The most reliable workflow is:
- Map Wall A, Wall B, and Wall C as one connected layout.
- Measure each wall run separately.
- Mark the sink, range, outlets, cabinets, exposed ends, and corner returns.
- Choose a reference wall and a consistent installation direction.
- Dry-fit the full sequence before removing backing paper.
- Decide where seams and corner cuts should fall.
- Apply the material in the approved order, checking alignment as you go.
This guide focuses on general planning for a U-shaped kitchen peel-and-stick backsplash. Product dimensions, coverage, surface limits, cutting methods, heat guidance, moisture guidance, and care requirements vary by material and product. Verify the selected product’s current documentation before cutting or exposing adhesive.

Why should a U-shaped backsplash be planned as one connected layout?
A U-shaped backsplash should be planned as three labeled wall runs connected by two inside corners. The walls can be measured separately, but the layout decisions should be made together because each corner transfers the visual direction from one wall to the next.
An inside corner is the place where two backsplash walls meet at the interior angle of the kitchen. A return is the short section of backsplash that turns into or away from that corner, cabinet side, or exposed edge. A seam is the visible or planned junction between two pieces of backsplash material.
Think of the backsplash as a path:
Top view

                 Wall B
        ┌────────────────────┐
        │                    │
 Wall A │                    │ Wall C
        │                    │
        └────────────────────┘

        Corner 1          Corner 2
The drawing is simple, but the planning consequence is easy to miss. If you start on the easiest wall without considering the other two, you may end with:
- A narrow, highly visible cut at the final stopping point.
- A pattern that aligns on Wall A but shifts at Corner 1.
- A seam directly behind the most visible section of the range.
- A corner return that is too short for the intended cut.
- An outlet cut that interrupts the pattern at an awkward height.
- A final piece that looks different from the first piece because the material was turned or rotated.
Stickwoll’s current kitchen guidance supports measuring wall sections separately while accounting for corners, outlets, cabinet returns, appliance gaps, sink splash zones, stove-adjacent heat, and exposed edges. Applying that guidance to a U-shaped kitchen creates a practical three-run planning system. It is a layout recommendation, not a guarantee of a seamless result. See the current Stickwoll kitchen backsplash planning guide before committing to a product-specific layout.
The connected approach also changes the order of your decisions. You are not simply asking, “Where can I fit the next piece?” You are asking:
- Which wall should establish the visual reference?
- Which area will people see first?
- Where should each corner transition occur?
- Which seams can be quiet?
- Where can a narrow cut be placed without drawing attention?
- How will the pattern turn at each corner?
- Where should the backsplash stop at the two exposed ends?
A successful U-shaped backsplash plan gives every piece a place before adhesive is exposed.
Map the three wall runs before choosing a starting point
Start with a full wall map. Label the walls in the order you will inspect or install them, then mark both inside corners and both exposed ends.
Use a simple naming system:
| Label | What to record |
|---|---|
| Wall A | Starting reference wall, width, backsplash height, exposed end, interruptions |
| Corner 1 | Corner location, return depth, squareness, planned seam |
| Wall B | Focal wall or connecting wall, width, height, sink or range zone |
| Corner 2 | Corner location, return depth, squareness, planned seam |
| Wall C | Final wall run, width, height, exposed end, stopping point |
The labels are more useful than they may seem. A loose note such as “left side, 48 inches” can become confusing once you make several cuts. A piece marked A-03, C1-L, or B-outlet-2 tells you which wall, corner, and position it belongs to.
On your map, mark:
- The countertop line.
- The lower edge of the cabinets.
- The backsplash height on each wall.
- Inside corners.
- Exposed outside ends.
- Sink centerline and splash zone.
- Range or cooktop centerline.
- Outlets and switch boxes.
- Windows.
- Cabinet returns and side panels.
- Appliance gaps.
- Any uneven transition between the counter and wall.
- The direction of the pattern, grain, veining, or printed repeat.
Stickwoll’s layout guidance recommends mapping the wall before choosing the start point, identifying focal zones, checking visible endpoints, and planning cuts before installation. Its guidance also supports moving narrow cuts to less visible locations and checking the counter line rather than assuming it is perfectly straight.
Make the map visual
A useful sketch does not need to be architectural. Draw the U from above, then draw each wall straightened out below it.
Top view

        Wall B: 62 in
     ┌─────────────────┐
     │                 │
A    │                 │    C
38 in│                 │44 in
     │                 │
     └─────────────────┘
       C1           C2


Straightened planning view

Wall A          Corner 1       Wall B        Corner 2       Wall C
|--------------|               |----------------|             |--------------|
0              end             0                end            0              end
The straightened view helps you see the entire sequence. It also makes it easier to number pieces in order:
A-01, A-02, A-03 → C1-L / C1-R → B-01, B-02, B-03
→ C2-L / C2-R → C-01, C-02, C-03
The exact labels are up to you. The principle is consistent: every piece should have a wall, position, orientation, and purpose.
For a broader planning reference, see Kitchen Backsplash Layout Before Cutting, which covers wall mapping, focal areas, outlet rows, exposed edges, level references, and cut planning.
Where should you start a U-shaped kitchen backsplash?
Start from a clearly chosen reference wall or focal area after mapping the full U. In many kitchens, the best reference is the wall people see first from the main entry or the wall behind the range, sink, or open counter area.
The easiest wall to reach is not always the best starting wall. A short side wall may be convenient, but it can force a pattern break onto the most visible wall later. A focal wall may require more careful planning, yet it gives you control over the alignment people notice most.
Choose your starting point using four questions:
- Which wall is most visible from the normal approach to the kitchen?
- Which wall contains the strongest visual feature, such as a range, sink, window, or open shelf?
- Which corner has the cleaner geometry?
- Which end can accept the final cut or stopping point with the least visual disruption?
Once you choose the reference, move in one consistent direction. For example, you might install from Wall A through Corner 1, across Wall B, through Corner 2, and finish on Wall C. You could reverse that direction if the opposite exposed end is easier to finish. The key is to decide before cutting and label the sequence clearly.
A reference wall needs two reference lines:
- A level horizontal line to control the first row.
- A plumb vertical line to control the starting edge.
“Plumb” means vertically straight. A 90-degree vertical reference helps you avoid building a slight lean into every later piece. Current installation guidance from Stickwoll, ACP, and Lowe’s supports using marked reference lines, checking level, and confirming the first row before adhesion. A reference line does not repair an uneven wall or guarantee a level finished backsplash; it gives you a reliable guide for placement.
Choose the reference wall before calculating material
The first layout should show the actual sequence, not just the total wall area. Material quantity depends on full rows, cuts, corners, openings, pattern matching, and unusable offcuts.
If you calculate first and plan second, you may have enough square footage in theory but lack the right pieces for the focal wall or corners. Plan the cut map first, then use the selected product’s coverage calculator or instructions.
Choose a seam path after the whole U is visible
Should each seam meet at a corner, sit near a corner, or use a product-approved wrap or transition? Use the complete static comparison below after identifying the focal wall, the two corners, and the final stopping point.
| If your priority is… | Start by considering… | Check before committing |
|---|---|---|
| The cleanest central focal wall | Protecting Wall B’s pattern and keeping seams near quieter corners | Repeat alignment at both corners |
| The simplest measurement | Separate corner cuts with clearly labeled wall pieces | Whether the product permits the chosen seam |
| The least visible end cut | Starting from the focal wall and finishing at the less visible exposed end | Final Wall C stopping point |
| A continuous directional pattern | Establishing one orientation and preserving it across all three walls | Whether the pattern can turn without rotation or distortion |
| An irregular corner | A removable template and a controlled seam | Fit at top, middle, and bottom of the corner |
The easiest seam to cut may not produce the best visual result. Take the extra time to compare the whole U before selecting the local solution.
How do you measure a U-shaped kitchen backsplash?
Measure each wall run separately, record the measurements by label, and calculate material after the layout and cuts are known. A U-shaped backsplash should not be treated as one large rectangle because the two corners, interruptions, and exposed ends affect the usable material.
For each wall, record:
- Width from the first corner or stopping point to the next corner or stopping point.
- Backsplash height from the countertop reference to the cabinet or intended upper edge.
- Height at the left, center, and right of the run.
- Any change in countertop elevation.
- The location and size of outlets and switches.
- The location of sinks, ranges, windows, cabinet sides, and appliance gaps.
- The depth of each corner return.
- The exposed edge condition.
- The product orientation and repeat direction.
Measure width and height at multiple points
Walls and counters can vary. Measure the height at both ends and in the middle. If the numbers differ, record all of them rather than averaging them immediately. The variation tells you whether the upper or lower edge needs a deliberate cut.
For example:
| Wall | Left height | Center height | Right height | Width | Planning note |
|---|---|---|---|---|---|
| A | 18 1/4 in | 18 in | 17 3/4 in | 42 in | Counter slopes slightly |
| B | 18 in | 18 in | 18 in | 60 in | Focal wall; pattern must stay centered |
| C | 18 in | 18 1/8 in | 18 1/8 in | 36 in | Outlet near final stopping point |
This does not tell you which product can bridge the variation. It tells you where the variation exists so you can compare it with the product’s documented requirements.
Record openings as coordinates
Do not write only “outlet on Wall B.” Record the outlet’s distance from the selected reference edge, its distance above the countertop, and its overall box dimensions. Use the same reference edge throughout the wall.
A simple notation could look like this:
Wall B
Reference edge: Corner 1
Outlet B-1: 14 1/2 in from Corner 1
Outlet B-1: 4 1/4 in above level countertop line
Box width: ______
Box height: ______
The purpose is repeatability. If you later move the outlet cut to a neighboring piece, you can transfer the information without measuring from a different point.
Before removing outlet or switch covers, de-energize the circuit and verify that it is de-energized. OSHA’s workplace standard supports de-energizing exposed live parts before work near them, while also recognizing that its requirements are written for workplace conditions. Follow local requirements and use qualified electrical help if the task goes beyond basic backsplash preparation. Read the OSHA electrical work-practice standard for the source boundary.
Calculate product quantity only after the cut map exists
The current Stickwoll quantity calculator displays a configured tile size of 10 by 10 inches, an estimate based on 10 tiles per pack, and an optional 10 percent allowance for cuts, edges, and mistakes. Those values describe the calculator’s current configuration; they do not establish that every Stickwoll product has the same dimensions or that 10 percent is enough for every U-shaped layout.
Use the product calculator as an estimate after you have:
- Measured Wall A, Wall B, and Wall C.
- Identified the two corners.
- Marked openings and interruptions.
- Decided which pieces carry the corners.
- Checked the pattern repeat.
- Identified exposed edges and final stopping points.
The Stickwoll quantity calculator can help translate separate rectangular areas into a shopping estimate. Compare its settings with the exact product documentation before ordering.
A waste allowance is a planning choice, not a universal rule. A simple, low-contrast pattern with few interruptions may use material differently from a directional pattern with two corner transitions, several outlets, and a range opening.

Prepare each inside corner before cutting
Treat each inside corner as a planned transition. Identify the two pieces that meet there, mark which piece belongs on the left and which belongs on the right, and make a removable test fit before exposing adhesive.
A corner-first plan answers three questions:
- Which wall piece reaches the corner first?
- Which piece carries the visible edge or pattern transition?
- Where will the seam sit in relation to the corner’s viewing angle?
For many rigid or semi-rigid peel-and-stick tiles, separate cuts on the two walls with a controlled seam are a practical option. A more flexible adhesive mat may behave differently and may be cut or bent according to its own instructions. The material, corner geometry, and product documentation decide the method.
The Stickwoll inside-corner guide recommends mapping both walls and the corner before cutting, dry-fitting both pieces, and selecting the corner treatment according to material behavior and product instructions.
Make a removable corner template
When a corner is visibly out of square, create a template before cutting the actual material. Cardstock, paperboard, or another removable template can show the angle and return depth.
Use the template to record:
- The distance from the countertop to the top of the backsplash.
- The width of the return on each wall.
- Which edge sits against the corner.
- The pattern direction.
- The intended seam position.
- Any gap that the product instructions permit or require.
Fit the template in place, mark it clearly, then transfer the shape to a spare piece or the back of the material if the product allows that marking method. Cut a test piece first. Dry-fit it with the adjoining wall piece and inspect the result from standing height.
A common mistake is measuring the corner at one height and assuming it is identical from counter to cabinet. Walls can vary slightly along the vertical corner. If the corner changes, a template taken near the middle may not represent the top or bottom.
Compare corner strategies
There is no universal rule that every seam must sit exactly in the corner. The best choice balances visibility, pattern repeat, cut complexity, corner geometry, and the usual viewing angle.
| Seam strategy | Useful when | Main visual risk | Main planning demand |
|---|---|---|---|
| Seam directly in the corner | The corner is visually quiet and the material supports separate cuts | The seam may catch light or reveal an uneven corner | Accurate corner measurements and edge alignment |
| Seam slightly beside the corner | The corner is irregular or the pattern aligns better off the corner | A wall seam may be more visible than expected | Careful spacing and a planned stopping line |
| One piece wraps the corner | The product is flexible and its instructions permit the bend | Bending can distort pattern direction or stress the material | Confirm material behavior and test the bend |
| Approved overlap or trim | The product documentation allows it and the finish suits the room | An added line can look intentional or conspicuous | Verify compatibility, width, and edge treatment |
The table is a decision aid, not a product instruction. Use the method documented for the selected material.
Where should backsplash seams fall in a U-shaped kitchen?
Place seams where the pattern, corner geometry, lighting, and normal viewing angle make the transition easiest to align and least distracting. A seam in a corner can be practical, but a corner does not automatically hide every error.
A useful seam decision process is:
Choose the quietest corner
Look at each corner from the kitchen entrance, dining area, and normal work position. One corner may be hidden by a cabinet side, appliance, shelf, or shadow. Another may be directly in view.
The quieter corner can accept a more visible transition if the product’s instructions allow it. The focal corner deserves the cleanest pattern match and the most controlled cut.
Protect the focal wall
If Wall B contains the range, sink, open shelving, or the broadest uninterrupted area, use it as the visual priority. Avoid placing a narrow end cut or abrupt pattern change in its center.
For a directional pattern, begin with a reference point that lets the repeat travel across the focal wall without forcing a small leftover strip at either side. For a simple horizontal pattern, centered field pieces may matter more than exact repeat continuity.
Keep the two corners related
The two corners do not need to use identical cuts if the room geometry differs. They should still look intentional. A common approach is to use the same installation logic at both corners:
- Wall A and Wall C pieces terminate into the corner.
- Wall B carries the central visual field.
- The seams follow the same relative position.
- The pattern direction remains consistent.
If the geometry requires different treatments, make the difference serve a visible reason. Avoid changing methods halfway through the project because one cut became inconvenient.
Use the decision aid
Use this static comparison before cutting:
| If your priority is… | Start by considering… | Check before committing |
|---|---|---|
| The cleanest central focal wall | Protecting Wall B’s pattern and keeping seams near quieter corners | Repeat alignment at both corners |
| The simplest measurement | Separate corner cuts with clearly labeled wall pieces | Whether the product permits the chosen seam |
| The least visible end cut | Starting from the focal wall and finishing at the less visible exposed end | Final Wall C stopping point |
| A continuous directional pattern | Establishing one orientation and preserving it across all three walls | Whether the pattern can turn without rotation or distortion |
| An irregular corner | A removable template and a controlled seam | Fit at top, middle, and bottom of the corner |
The easiest seam to cut may not produce the best visual result. Take the extra time to compare the whole U before selecting the local solution.
Dry-fit the complete sequence before removing backing
Dry fitting means placing material in its intended position without exposing or activating the adhesive. It lets you test the relationship between measurements, corners, outlets, pattern direction, and stopping points.
Dry-fit at three levels:
- The first row on each wall.
- Both corner transitions.
- The complete sequence when the space and material allow it.
Mark the back of each removable piece with:
- Wall label.
- Position number.
- Top edge.
- Direction arrow.
- Corner designation.
- Outlet or obstacle note.
- Seam location.
Do not rely on the printed pattern to tell you which way a piece belongs. A repeated design can appear correct when rotated, while a directional pattern, vein, grain, or herringbone arrangement can change noticeably.
Dry-fit focal zones first
Before laying out every small piece, test the areas people will see most:
- Behind the range.
- Behind the sink.
- The center of Wall B.
- Both inside corners.
- The two exposed ends.
- Any row with multiple outlets.
This reveals conflicts early. A piece may fit dimensionally but place a strong line through an outlet, cut a prominent motif in half, or leave a narrow strip beside a cabinet.
Range areas need the same attention. Do not infer heat or open-flame suitability from a general layout guide. Check the product’s current kitchen documentation for the intended use, clearances, and limitations of the selected material.
Current installation guidance supports planning the project before adhesion, dry-fitting rows, checking pattern and cuts, and confirming corner and edge treatments. The general peel-and-stick tile installation companion covers surface preparation, awkward cuts, peeling, alignment, pressure, bubbles, lifting, and routine care after the layout is approved.
Use a full-size floor layout when possible
If the pieces are small enough, lay the sequence on a clean, flat surface in the same order as the wall. Keep the corners separated by a small gap and write the wall labels beside them.
For a large U-shaped layout, use painter’s tape to outline the three wall lengths on the floor. Place the pieces inside the outline, preserving the same orientation and direction.
This is especially useful for:
- Herringbone.
- Mosaic.
- Geometric designs.
- Marble-look patterns with veining.
- High-contrast repeats.
- Designs with a clear top and bottom.
Stickwoll’s kitchen guidance identifies these patterns as requiring more attention to edges, vein direction, and cut planning than simpler layouts. Small shifts can be more noticeable when lines, colors, or motifs have a strong direction.

How do you keep a backsplash pattern aligned around corners?
Keep the pattern aligned by establishing one orientation, marking every piece, and testing the corner transition with loose material before applying pressure. Pattern alignment means preserving the intended relationship between repeated lines, shapes, colors, or directional features as the backsplash turns from one wall to another.
There are several different types of alignment:
- Row alignment: Horizontal lines remain at the same intended height.
- Repeat alignment: Repeated motifs continue in a planned sequence.
- Directional alignment: Grain, veining, arrows, or elongated shapes retain their orientation.
- Joint alignment: Seams or grout-like lines follow the intended spacing.
- Edge alignment: The top, bottom, and exposed ends finish at deliberate locations.
You may not be able to preserve all five perfectly at both corners. Decide which type matters most for the selected design.
Simple patterns
A straight subway-style pattern is usually easier to carry across three walls because the main visual information is horizontal and vertical. Even here, the first row and corner seam still matter. A small change in row height can become visible across a long focal wall.
Use the first row as the reference for later rows. If the product uses individual pieces, keep the planned joint spacing consistent. If it uses connected sheets or panels, follow the product’s instructions for joining them.
Directional patterns
Directional patterns require a firm orientation decision before cutting. Mark the top and the direction of travel on every piece. Do not rotate a piece to save material until you have checked the pattern from standing height.
At a corner, ask whether the design should:
- Continue straight into the return.
- Turn with the wall.
- Restart from the corner.
- Stop at a controlled seam.
- Use a product-approved trim or transition.
The correct answer depends on the material’s format and instructions. A visual line that looks continuous on the floor may break when the piece is bent or when the corner changes angle.
Pattern alignment at outlets and appliances
An outlet can create a stronger visual interruption than a corner because it sits inside the field. Dry-fit the outlet row and place the cut so the pattern does not create a thin sliver or awkward fragment beside the box.
Range areas need the same attention. Do not infer heat or open-flame suitability from a general layout guide. Check the product’s current kitchen documentation for the intended use, clearances, and limitations of the selected material.
Apply the approved sequence with reference marks intact
Once the dry fit is approved, prepare the wall and apply the material in the planned order. Keep the labels, arrows, corner notes, and reference marks available while working.
The selected wall should be clean, smooth, stable, and dry. Dust, grease, soap residue, loose paint, bowed areas, and surface damage can affect the installation. Product-specific limits vary, so use the selected product’s instructions for substrate preparation. Do not transfer a flatness threshold from another manufacturer’s system.
Before adhesion:
- Remove or protect items that interfere with the layout.
- Repair surface damage as required by the product instructions.
- Confirm that the wall is dry.
- Confirm the level and plumb reference lines.
- Lay the first pieces in order.
- Confirm that the correct face and direction are visible.
- Recheck the corner pieces and outlet cuts.
Stickwoll’s current installation and care guidance supports peeling material from one corner, pressing gently, smoothing from the center toward the edges, and repositioning before firm pressure. Other pressure-sensitive systems may become difficult to adjust after firm pressing. Place the piece lightly first, verify the alignment, then press once the position is correct.
Apply the first wall
Use the selected reference wall to establish the first row and vertical position. Align the first piece with the marked reference line rather than assuming the countertop is perfectly level.
Keep the first piece supported while you check:
- The bottom edge.
- The side edge.
- Pattern direction.
- Distance to the corner.
- Relationship to nearby outlets or openings.
- Position of the upper edge.
Work in manageable sections. After each piece or sheet, inspect the joint before moving on. Small alignment errors are easier to correct before the next row locks them into the visual field.
Carry the sequence through the first corner
At Corner 1, pause and compare the two planned pieces with the actual wall. A corner can differ from the paper template once the first wall is installed.
Check the top, middle, and bottom of the transition. If the material is rigid or semi-rigid, do not force it around the corner unless the product instructions specifically allow that treatment. Use the approved separate-cut, overlap, trim, or other method.
Keep the seam intentional. A controlled seam with consistent edges usually looks better than a piece forced into the corner and left with a stressed, crooked, or distorted edge.
Install the focal wall
Wall B often carries the visual center of the U. Recheck the pattern at the start and end of this wall. If the pattern repeat shifted at Corner 1, correct the sequence before continuing across the focal area.
Stand back after several pieces. Inspect from the same angle people use when entering or working in the kitchen. Close-up inspection is useful for cuts; distance inspection is better for visual rhythm.
Finish through the second corner and final wall
Treat Corner 2 with the same discipline as Corner 1. Preserve the planned orientation and check the final exposed end before applying the last piece.
The last stopping point should look deliberate. If a narrow piece remains, compare alternatives:
- Shift the sequence earlier on Wall C.
- Move a seam to a less visible location.
- Rework the first cut on the final wall.
- Adjust the focal-wall centering.
- Use a documented edge treatment if the selected product allows it.
Do not improvise a new corner or edge method after adhesive has been exposed unless the product documentation supports the change.

Inspect the finished U-shaped backsplash from near and far
Inspect the completed backsplash as one visual system. Start at the normal viewing distance, then move closer to the corners, seams, openings, and exposed ends.
Check the following:
- The first row follows the intended level reference.
- The pattern has one consistent direction.
- The two inside corners look intentional.
- Seams are located where planned.
- No seam has opened or shifted during application.
- Cuts around outlets are clean and leave the required clearance.
- The backsplash stops cleanly at both exposed ends.
- There are no visible gaps beyond the product’s documented tolerance.
- No edge is lifting, buckling, or sitting over a wall defect.
- The material is not placed in a sink, range, steam, or heat condition outside the selected product’s instructions.
A visible gap, lifting edge, or pattern mismatch has several possible causes: the wall may be uneven, the cut may be wrong, the piece may be oriented incorrectly, the corner may be out of square, or the material may have been pressed before alignment was confirmed. Diagnose the cause before applying extra adhesive, sealant, trim, or pressure.
The checked Stickwoll sources do not establish universal moisture limits, heat clearances, cutting methods, care products, or performance guarantees for every unspecified product. Product references should therefore remain conditional until the exact product documentation is verified.
Use this final dry-fit and installation checklist

Frequently Asked Questions
How do you install a backsplash in a U-shaped kitchen?
Plan the three wall runs as one connected path, label both corners, measure each wall separately, choose a reference wall, dry-fit the full sequence, decide seam locations, and apply the material in one consistent direction. The two corners should be tested before adhesive is exposed.
How do you handle inside corners with peel-and-stick backsplash?
Use the corner treatment required by the selected product. For many rigid or semi-rigid peel-and-stick tiles, separate cuts on the two walls with a controlled seam are a practical option. Flexible adhesive mats may use a different approach. Dry-fit both pieces and verify the product instructions before cutting or bending.
Where should you start a U-shaped kitchen backsplash?
Start from the most useful visual reference: often the most visible wall, the range wall, the sink wall, or the wall with the strongest uninterrupted field. Choose the starting point only after mapping the entire U, because the first decision affects both corners and the final stopping point.
How do you keep backsplash pattern aligned around corners?
Mark the top and direction of every piece, preserve one installation orientation, dry-fit both corners, and decide whether the pattern should continue, turn, restart, or stop at a controlled seam. Directional and high-contrast patterns need more planning than simple horizontal layouts.
How much extra material should you buy for a U-shaped backsplash?
There is no universal allowance for every U-shaped layout. The current Stickwoll quantity calculator displays an optional 10 percent allowance for cuts, edges, and mistakes, but that setting is an estimate tied to the calculator configuration. Use the exact product dimensions, pattern repeat, corner geometry, openings, and cut map to decide whether the estimate is appropriate.
Final planning step
Before choosing material, complete the three-wall map and verify the selected product’s current documentation for dimensions, coverage, surface preparation, corner treatment, cutting method, sink and range use, and care. Then dry-fit the complete sequence with every corner, outlet, focal zone, seam, and exposed end accounted for.
A U-shaped backsplash looks unified when the layout decisions are unified first. Measure each run, protect the focal wall, test both corners, and apply the pieces in the order you already approved on paper.


Deja un comentario
Este sitio está protegido por hCaptcha y se aplican la Política de privacidad de hCaptcha y los Términos del servicio.