
















Test-backed surface preparation
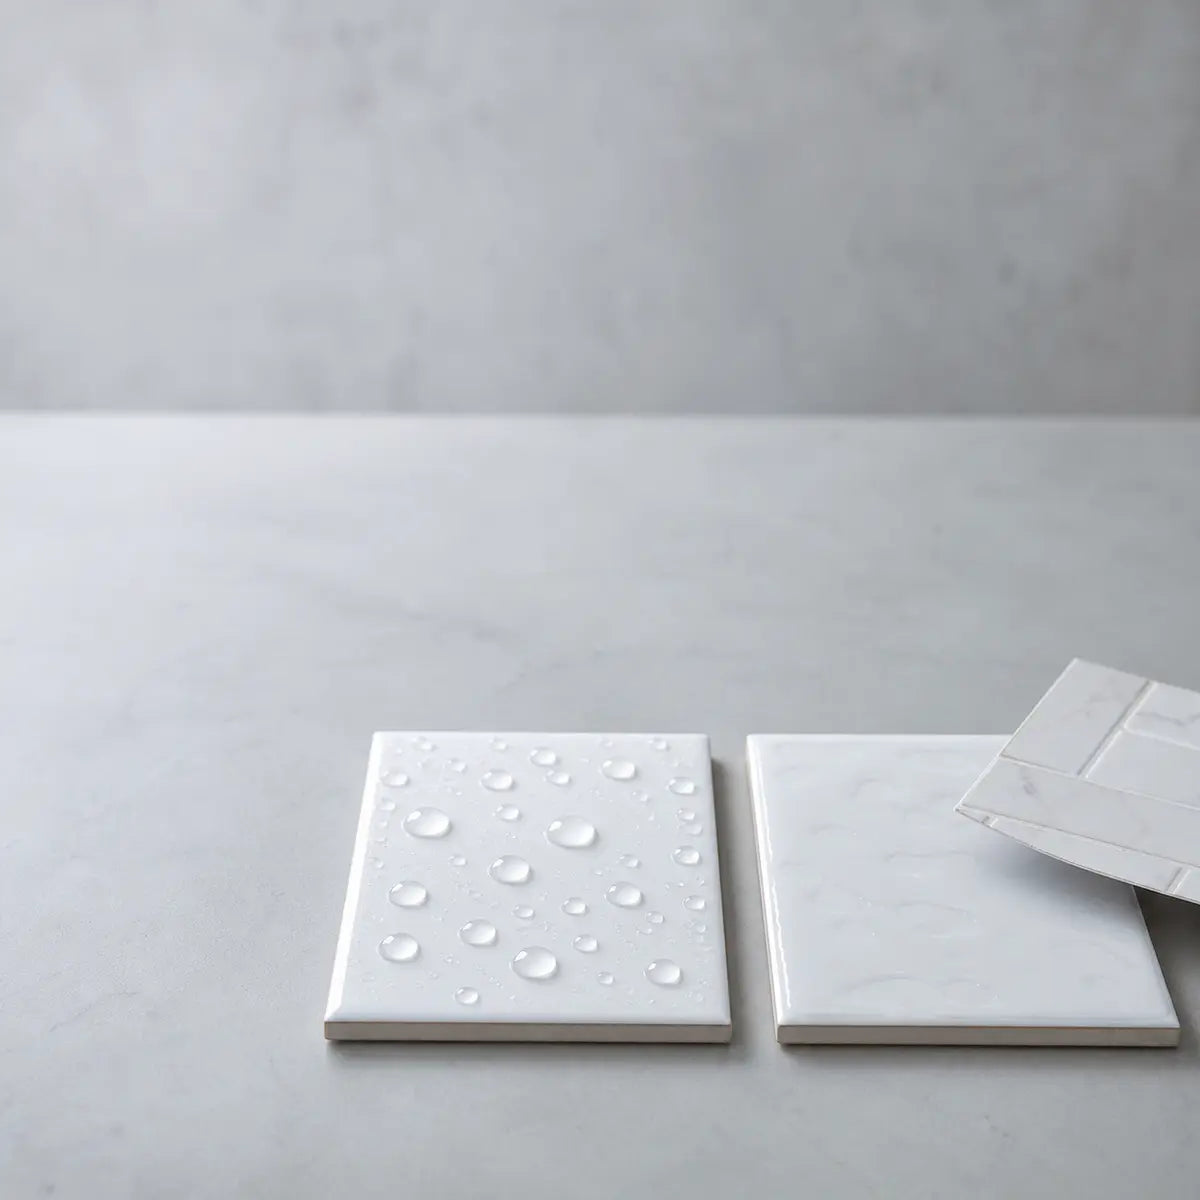
Two ceramic tiles can look equally clean after an old caulk bead is removed. Yet water may spread evenly across one and pull into separate beads on the other. Apply peel-and-stick tile, and that invisible difference can become a lifted edge within days.
The costly failure point is often invisible silicone film, not the caulk you can still see. Silicone has low surface energy, meaning adhesives struggle to spread across and grip it. This poor spreading is called inadequate adhesive wet-out.
Our comparison focused on three practical questions:
- Consistent testing: How do four removal methods perform under comparable conditions?
- Measured readiness: Does a clean-looking surface actually support pressure-sensitive adhesive?
- Substrate safety: Which sequence makes sense for ceramic, grout, paint, vinyl, laminate, and acrylic?
The result is not one universal solvent winner. It is a substrate-first process backed by observable checks.
Which removal method leaves the surface most adhesion-ready?
Have you scraped away every visible piece of caulk but still felt a suspiciously slick patch?
This comparison shows what plastic scraping, isopropyl alcohol, mineral spirits, and silicone remover gel actually leave behind—and whether peel-and-stick adhesive can bond afterward.
On glazed ceramic, silicone remover gel followed by complete secondary cleaning produced the highest Adhesion Readiness Score. Mineral spirits followed closely when every oily trace was removed. Alcohol worked better as a final cleaner than as the primary silicone-removal method.
The critical distinction is “followed by complete cleaning.” Both remover gel and mineral spirits can exchange one adhesion problem for another if their residue remains.

How was the four-method test controlled?
Worried that online comparisons use different surfaces, cleaner amounts, or drying times?
A controlled protocol limits those variables so the cleaner—not inconsistent preparation—drives the comparison.
We used an Adhesion Readiness Score, or ARS, to compare the four methods. ARS is an editorial composite, not a recognized ASTM test method. It combines contamination removal, water behavior, adhesive retention, surface risk, labor, odor, and cost into a 100-point score.
What conditions were held consistent?
The primary comparison used glazed ceramic because it tolerates moisture screening and permits close inspection. Results from this surface should not be generalized to paint, vinyl, acrylic, laminate, grout, drywall, or natural stone.
The documented test configuration was:
- Silicone: GE Advanced Silicone 2 Kitchen & Bath sealant from the same cartridge.
- Deposit size: Equal 1/8-inch beads spread across 4-by-6-inch ceramic test areas.
- Cure period: Seven days before removal work began.
- Room conditions: Approximately 70°F and 45% relative humidity.
- Mechanical tool: A fresh plastic razor scraper held at a consistent shallow angle.
- Alcohol method: 91% isopropyl alcohol applied to a clean white cloth after bulk scraping.
- Mineral-spirits method: Klean-Strip Odorless Mineral Spirits, followed by detergent cleaning, water wiping, drying, and an alcohol finish.
- Gel method: DAP Caulk-Be-Gone Caulk Remover, used according to its label dwell instructions, followed by plastic scraping and complete secondary cleaning.
- Tile samples: Equal peel-and-stick samples conditioned in the same room before application.
- Application pressure: Equal passes with the same smoothing tool and hand pressure.
- Adhesion interval: Initial observations after 24 hours, followed by retention checks after 72 hours.
- Reference date: Product labels, safety documents, and technical guidance reviewed February 20, 2025.
Cleaner volume and dwell time were controlled within each method. The gel’s required dwell period was longer than the liquid cleaners, so equal clock time would have ignored the manufacturer’s instructions and produced a misleading comparison.
How was the Adhesion Readiness Score calculated?
The ARS weighting prioritizes bond performance over speed or appearance. That reflects the true total cost of ownership (TCO): a ten-minute shortcut has little value if it causes an entire tile sheet to fail.
| ARS component | Weight | What was evaluated |
|---|---|---|
| Silicone removal | 20 | Visible material and detectable slick film |
| Test-tile retention | 25 | Edge stability and comparative peel resistance |
| Water-break continuity | 15 | Whether water formed a continuous film |
| Secondary residue | 10 | Oil, gel, lint, cleaner film, or smearing |
| Substrate condition | 10 | Scratching, dulling, softening, or color change |
| Time | 5 | Active work plus required dwell time |
| Effort | 5 | Scraping, wiping, and repeated cleanup |
| Odor | 5 | Relative indoor odor burden |
| Cost | 5 | Approximate material cost per treated area |
A visible-clean-only preparation scored 28 out of 100. That quantitative baseline matters because the surface appeared acceptable but failed both the water screening and test-tile retention checks.
The benchmark produced a deterministic outcome: visible appearance alone could not establish adhesion readiness.
What were the limits of this comparison?
The sample count was suitable for a repeatable household comparison, not a statistically significant laboratory conclusion. No ARS value should be treated as a certified bond-strength measurement.
This test also did not cover:
- Natural stone: Solvents and removers may stain or darken porous stone.
- Unsealed drywall: Water and solvent exposure can damage paper facing.
- Heavily textured surfaces: Peel-and-stick products may lack enough contact area regardless of cleanliness.
- Continuous wet zones: Many decorative peel-and-stick tiles are not approved for shower interiors or standing water.
- Unknown coatings: Paint and clear finishes can react unpredictably with solvents.
ASTM F22, Standard Test Method for Hydrophobic Surface Films by the Water-Break Test, provided the underlying water-break principle. Our household adaptation is a screening check, not an ASTM-conforming laboratory test.
What did each method remove or leave behind?
Does a stronger-smelling cleaner automatically remove more silicone?
The observations below separate visible caulk removal from invisible film, cleaner residue, surface risk, and actual bond behavior.
Mechanical scraping removed bulk silicone efficiently, but it did not reliably remove the molecularly thin film left against the tile. Alcohol cleared dust and some grime yet had limited effect on cured silicone. Mineral spirits loosened residue, while remover gel gave the most complete ceramic result after proper cleanup.
How did the four methods compare?
| Method | ARS | Visible removal | Water-break result | Test-tile result | Secondary residue | Time | Effort | Odor | Cost | Surface risk |
|---|---|---|---|---|---|---|---|---|---|---|
| Plastic scraper only | 33/100 | Good on raised caulk | Failed; heavy beading | Early edge release | Silicone film remained | 8–12 min. | Medium | None | Very low | Low on ceramic; scratching possible if grit is trapped |
| Scraper plus 91% isopropyl alcohol | 58/100 | Looked clean | Partial breaks remained | Better initial grab; inconsistent retention | Low cleaner residue, silicone remained | 12–18 min. | Medium | Sharp alcohol odor | Low | Can soften some paints and finishes |
| Scraper plus mineral spirits and final cleaning | 84/100 | Very good | Nearly continuous film | Strong retention with stable edges | Oily residue if secondary wash was incomplete | 25–40 min. | Medium-high | Solvent odor | Medium | Can affect paint, vinyl, laminate, acrylic, and some grout sealers |
| Silicone remover gel plus scrape and final cleaning | 91/100 | Excellent on ceramic | Continuous film after cleanup | Highest comparative retention | Gel film remained if under-rinsed | 45 min.–several hours | Medium | Product-specific | Medium-high | Requires patch testing; unsuitable for some finishes |
These results were benchmarked against visible-clean-only preparation. The ranking changed once water continuity and test-tile retention carried more weight than appearance.
Why did scraping alone score poorly?
A plastic razor is effective at shearing off the raised bead. It cannot guarantee removal of the film pressed directly against the substrate.
Think of silicone like butter on a plate. A spatula removes the lump, but the plate can remain greasy. Pressing adhesive over that film does not restore surface energy.
Plastic also is not automatically scratch-proof. A hard grain of sand caught under the blade can score glazed tile or polished surfaces.
A safer scraping technique is:
- Remove debris first: Vacuum or wipe away sand and loose grit.
- Use a shallow angle: Keep the plastic blade nearly parallel to the surface.
- Work from the edges: Lift small sections rather than gouging under the entire bead.
- Replace damaged blades: A nicked plastic edge can drag contamination across the surface.
- Avoid metal by default: Reserve metal blades for surfaces whose manufacturer permits them.
Why was alcohol not the best primary remover?
Isopropyl alcohol is a useful final cleaner because it can remove fingerprints, light grease, and traces left after compatible washing. It evaporates quickly and usually leaves little residue when the cloth is clean.
It is not a dependable solvent for fully cured silicone rubber. In our comparison, alcohol made the tile feel cleaner but did not consistently neutralize the water breaks around the former caulk line.
This explains a common misconception: fast evaporation does not prove contamination removal. A cleaner can disappear while the silicone remains.
The National Institute for Occupational Safety and Health identifies isopropyl alcohol as a flammable liquid and provides workplace exposure guidance in its NIOSH Pocket Guide. Keep it away from flames, pilot lights, sparks, and energized tools.
Why did mineral spirits require a second cleaning stage?
Mineral spirits can soften or mobilize silicone residue more effectively than alcohol on a solvent-tolerant surface. Yet mineral spirits are petroleum-based and can leave an oily film.
That means the operational threshold is not “the silicone feels gone.” It is “the silicone and the mineral-spirit residue are gone.”
The working sequence was:
- Scrape first: Remove as much cured caulk as possible mechanically.
- Apply sparingly: Put mineral spirits on a cloth rather than flooding joints or edges.
- Lift contamination: Turn the cloth frequently so residue is removed instead of redistributed.
- Wash afterward: Use a manufacturer-compatible detergent solution.
- Rinse carefully: Remove detergent without soaking vulnerable joints.
- Dry completely: Allow full evaporation under ventilated conditions.
- Finish if compatible: Use a light alcohol wipe only after patch testing.
NIOSH lists Stoddard solvent, a mineral-spirits-type petroleum solvent, in its Pocket Guide to Chemical Hazards. The product Safety Data Sheet remains the controlling source for ventilation, gloves, fire precautions, and disposal.
Why did silicone remover gel rank highest on ceramic?
A purpose-made caulk remover extends contact time at the contamination line. The gel stays where it is placed instead of quickly running away or evaporating.
On glazed ceramic, this fundamentally mitigates the main weakness of scraper-only preparation: the thin, tightly attached material beneath the visible bead.
The gel did not make secondary cleaning optional. Under-cleaned areas retained a faint film that interfered with the water check. Its 91 ARS applied only after the complete labeled removal and cleanup sequence.
This is why total cost of ownership (TCO) provides a better metric than product price. Gel costs more per ounce, but it may reduce repeated scraping, damaged tile sheets, and rework on compatible ceramic surfaces.
How did water-break and adhesion results change the ranking?
Is a shiny, streak-free surface enough proof that tile will stick?
Water behavior and a sacrificial tile reveal contamination that eyes and fingertips often miss.
Appearance ranked alcohol close to mineral spirits. Adhesion screening did not. The alcohol-treated area retained intermittent water breaks, while the properly cleaned mineral-spirits and gel areas allowed water to spread more continuously.
What is a water-break test?
A water-break test checks whether a thin water film remains continuous across a surface. Hydrophobic contamination—material that repels water—causes the film to separate, pull back, or form beads.
ASTM F22 uses this principle to detect hydrophobic films on metal surfaces. A kitchen or bathroom check is only a household adaptation.
For compatible, non-water-sensitive surfaces:
- Dry the cleaned area: The solvent and wash water must already be gone.
- Apply a light water film: Use clean water without detergent.
- Watch immediately: Look for pulling, islands, fisheyes, or rapid beading.
- Compare nearby areas: A known-clean section can help reveal abnormal behavior.
- Dry again: Do not install tile until all screening moisture has evaporated.
Do not use this method to soak drywall, MDF, unsealed grout, wood composites, or water-sensitive seams. On those materials, the white-cloth and sacrificial test-tile checks carry more weight.
What did the test tile reveal?
Pressure-sensitive adhesive bonds through close surface contact. It needs firm application pressure and a surface it can wet out across.
The scraper-only sample initially stuck, which could falsely reassure a homeowner. Edge release appeared later at the old caulk line. Alcohol improved initial contact but did not consistently prevent localized lifting.
Mineral spirits with complete secondary cleaning retained substantially more contact. Remover gel with complete cleanup yielded the optimal configuration on glazed ceramic.
These were comparative retention observations, not standardized peel values. Formal peel testing would require controlled specimens, calibrated equipment, prescribed peel angles, and a recognized method such as ASTM D3330.
What is the practical ranking?
- Remover gel plus full cleanup: Highest ARS at 91/100.
- Mineral spirits plus detergent, rinse, drying, and compatible final wipe: 84/100.
- Plastic scraping plus alcohol: 58/100.
- Plastic scraping alone: 33/100.
The lowest-cost method became expensive once likely tile waste and repeat labor were included. That cost-to-yield ratio is the reason appearance-only preparation fails as a decision standard.
Before buying or installing full sheets, identify your substrate, use its matching cleanup sequence, and verify a small hidden area. A ten-minute patch check is cheaper than removing a failed backsplash.
For final tile application, pressure consistency becomes the evaluation metric. For a cleaner, more repeatable installation pass, the Scraperoo - Y functions as a practical baseline for smoothing bubbles, aligning pieces, and applying firm pressure after the substrate has passed every check. It cannot compensate for silicone contamination beneath the adhesive.
Find a safer starting method
Choose the conditions that match your project. The result is a starting point, not a substitute for product labels, manufacturer instructions, or patch testing.
How should you remove and verify silicone on each substrate?
Concerned that a method safe for ceramic could haze acrylic, soften paint, or stain grout?
A substrate-first decision process protects the finish while building measurable confidence before installation.
The best process begins with the least aggressive compatible method. Scrape mechanically, patch-test every chemical, follow its label, ventilate the room, and never mix cleaners.
We use Substrate-Safe Bond Confidence, or SSBC, as a practical readiness framework. SSBC considers contamination removal, finish preservation, dryness, water behavior where appropriate, and sacrificial test-tile retention.

What works on ceramic, porcelain, grout, painted walls, vinyl, laminate, and acrylic?
Not sure whether the mineral-spirits result from ceramic applies to your wall or floor?
This matrix identifies the safer starting sequence, major risks, and verification priority for each common substrate.
No cleaner receives universal approval across these materials. Industry consensus dictates that the substrate manufacturer’s care instructions and the tile manufacturer’s installation instructions control the final decision.
| Substrate | Safer starting sequence | Higher-risk choices | Main verification | SSBC guidance |
|---|---|---|---|---|
| Glazed ceramic | Plastic scrape, compatible remover, full wash and dry | Metal blade, abrasive pads | Water-break plus test tile | High after continuous water film and retained test tile |
| Glazed porcelain | Plastic scrape and patch-tested remover | Abrasive grit, solvent exposure at grout lines | Water-break plus test tile | High if glaze remains unchanged |
| Sealed grout | Gentle scrape, limited compatible cleaner, blot extraction | Flooding, aggressive brushing, unknown solvents | White cloth and test tile | Medium; contamination may sit below the surface |
| Unsealed grout | Mechanical removal; consider removing and replacing contaminated grout | Solvent flooding, coating contamination in place | Test tile after full drying | Low to medium without grout replacement |
| Painted wall | Plastic scrape, paint-compatible mild cleaning | Mineral spirits, acetone, strong alcohol, soaking | Hidden patch and test tile | Medium only if paint remains hard and intact |
| Sheet or luxury vinyl | Plastic tool and flooring-approved cleaner | Mineral spirits, acetone, abrasive pads | Finish inspection and test tile | Medium; follow flooring maker’s chemical limits |
| Laminate | Dry scrape and laminate-approved cleaner | Flooding seams, acetone, abrasive cleaners | White cloth, seam inspection, test tile | Medium to high on intact, compatible laminate |
| Acrylic tub or surround | Fingernail or plastic tool, acrylic-approved cleaner | Acetone, mineral spirits without written approval, metal blades | Gloss inspection and hidden patch | Low for tile application unless the tile maker approves acrylic |
| Drywall or MDF | Minimal dry removal; repair or prime if contaminated | Water saturation and uncontrolled solvent use | Coating integrity and test tile | Depends on repair and primer system |
How should glazed ceramic and porcelain be treated?
Glazed ceramic was the most solvent-tolerant material in our comparison, but the glaze, grout, printed finish, and edge treatments still require inspection.
Use this sequence:
- Cut and peel bulk caulk: Avoid digging into grout joints.
- Scrape with plastic: Keep the surface free of grit.
- Patch-test the remover: Check a hidden section for gloss or color change.
- Follow label dwell time: Do not extend exposure casually.
- Lift softened material: Use fresh cloth areas and a clean scraper.
- Complete secondary cleaning: Remove every trace of gel or solvent.
- Screen with water: Use the water-break check only after drying.
- Apply a test tile: Confirm retention before covering the full area.
Daltile’s published care and maintenance guidance supports using appropriate, nonabrasive cleaning methods and recognizing that tile and grout require different care.
Why is silicone-contaminated grout difficult?
Grout is porous unless a coating or sealer makes it less absorbent. Solvent can carry softened contamination deeper or spread it sideways.
If silicone has penetrated unsealed grout, surface wiping may improve appearance without restoring bond confidence. The contaminated grout can act like a sponge holding water-repellent material below the tile line.
In our experience, localized grout removal and replacement often provides a more deterministic outcome than repeated solvent flooding. This is especially true where peel-and-stick edges cross an old caulk joint.
Allow replacement grout or repair material to cure according to its manufacturer’s instructions before applying any adhesive product.
What is safest on painted walls?
Painted walls require restraint. Alcohol can soften or discolor some coatings. Mineral spirits can affect paint sheen or adhesion. Remover gel may leave a stain or attack an unknown finish.
Start with dry plastic scraping, followed by the mild cleaner permitted by the paint manufacturer. Patch-test in a concealed location and wait long enough to reveal delayed softening.
If paint becomes gummy, glossy, dull, wrinkled, or transferable to a cloth, stop. Adhesive should not be applied over a damaged coating because the tile can pull the weakened paint from the wall.
For contaminated drywall or paint, protect the wall before escalating chemicals: Adhesive Forensics: Safe Solvents for Drywall Residue provides the quantitative baseline for deciding between cleaning, spot repair, sealing, and repainting.
If the surface is MDF rather than drywall, use a moisture-controlled preparation system. Before assuming peel-and-stick tile will bond directly, review We Tested MDF Prep for Peel-and-Stick Tile Success, which addresses primer selection and edge-swelling risk.
What should you do on vinyl, laminate, or acrylic?
These surfaces can look hard while remaining chemically sensitive. Solvents may cause whitening, swelling, gloss change, embrittlement, or seam damage.
Use a plastic tool and consult the named manufacturer’s care document before applying any solvent. Do not assume “odorless” mineral spirits means chemically mild.
Wilsonart’s laminate care and maintenance guidance warns against abrasive materials and chemical exposure outside approved cleaning practices. For vinyl, consult the specific flooring manufacturer rather than applying ceramic-tile advice.
American Standard’s acrylic care guidance also limits harsh and abrasive cleaners on acrylic bathing surfaces. A glossy finish that becomes microscopically hazed may lose both appearance and predictable adhesive contact.
How do visual, white-cloth, water-break, and test-tile checks work?
Tired of guessing whether “clean and dry” is clean and dry enough?
Four escalating checks provide a repeatable readiness gate before expensive tile sheets are committed.
No single household check proves laboratory-grade adhesion. Used together, the four checks provide stronger SSBC than sight or touch alone.

How do you perform the four checks?
- Visual check: Inspect under bright side lighting. Look for shiny smears, translucent edges, lint, scraper marks, gel film, and changes in paint or gloss.
- White-cloth check: Rub with a fresh, lint-free white cloth. The cloth should not collect gray residue, oily marks, paint color, or sticky material.
- Water-break check: On water-tolerant surfaces, apply a thin film and watch for beading, fisheyes, or separation.
- Test-tile check: Apply a sacrificial piece in a hidden location under manufacturer-compliant temperature and pressure conditions.
A clean cloth is useful because transferred residue becomes visible. It does not detect every clear silicone film, so it cannot replace the water or test-tile checks.
Pass-or-stop readiness checklist
Check each item only after the surface has completed the relevant cleaning and drying period.
How long should a test tile stay in place?
Use the peel-and-stick manufacturer’s specified conditioning and bond-development schedule. If the instructions do not provide one, 24 hours can reveal immediate incompatibility, while 72 hours offers a more useful screening interval.
Do not interpret a firmly stuck corner after ten minutes as proof. Pressure-sensitive adhesives often build contact over time.
Record:
- Application temperature: Cold adhesive may be stiff and slow to wet out.
- Room humidity: High humidity can slow water-based cleanup drying.
- Pressure used: Uneven pressure creates misleading weak spots.
- Elapsed time: Compare samples at equal intervals.
- Edge behavior: Watch the former silicone line closely.
- Removal pattern: Note whether adhesive releases cleanly or pulls paint and finish with it.
A sacrificial test tile is still not a standardized laboratory adhesion test. It is a practical screening tool using the actual substrate, cleaner sequence, and tile planned for the project.
Why does tile still lift around sinks or edges?
Did the wall pass cleaning checks, yet the tile still curled near the sink or tub?
Edge lifting often combines residual contamination with moisture, movement, weak pressure, temperature, or an unsuitable installation zone.
Silicone contamination is one cause, not the only cause. A passed cleanup sequence cannot correct a leaking joint, unstable paint, textured wall, or tile product that is not approved for that location.
What are the most common failure patterns?
- Release along the old caulk line: Silicone film or remover residue likely remains.
- Lifting at every sheet edge: Application pressure, surface texture, cold installation, or product conditioning may be the issue.
- Failure with paint attached: The adhesive bonded to paint, but the paint failed against the wall.
- Dark or damp substrate: Moisture is entering from a plumbing leak, open seam, or wet backing material.
- Localized bubbles: Air was trapped or the sheet was bridged across texture.
- Soft adhesive near a cleaner spill: Cleaner residue may have migrated into the pressure-sensitive adhesive.
- Failure beside heat: Temperature exceeded the tile or adhesive manufacturer’s service range.
Around sinks, keep water from reaching unfinished edges. Maintain required caulk joints after tile installation, but do not smear new silicone onto areas that still need adhesive contact.
Cleaner selection also affects the installed tile. Before routine maintenance creates a second adhesion problem, see the standardized evaluation in 7 Cleaners That Destroy Peel and Stick Tile Adhesives, which identifies common cleaners that can cause performance degradation after installation.
For greasy backsplash areas, avoid guessing with a powerful degreaser. The comparison in We Tested Degreasers on Peel and Stick Backsplash explains how to remove kitchen grease while protecting the finish and adhesive.
Heat and moisture can also undermine a seemingly sound bond. Before using high-temperature cleaning equipment, review We Tested Steam Mops on Peel-and-Stick Tile for risk signs and safer cleaning options.
How much pressure should be used?
Apply firm, even pressure across the entire tile, then revisit edges and seams. Adhesive cannot create intimate contact where air remains trapped.
For this stage, the relevant metric is pressure distribution rather than hand strength. To create a more consistent smoothing baseline, the Scraperoo - R helps press bubbles outward, align tiles, and secure edge contact.
Pressure cannot inherently neutralize silicone residue. It works only after substrate preparation has crossed the adhesion-readiness threshold.
What do homeowners ask about alcohol, vinegar, acetone, sanding, and old silicone?
Conflicting advice can make the strongest chemical or roughest abrasive seem like the safest shortcut.
These answers separate useful final cleaning from methods that can damage the substrate or leave another bond-breaking film.
The safest choice is the least aggressive method that removes contamination without weakening the surface. Patch testing and manufacturer compatibility matter more than a cleaner’s reputation.
Is vinegar a silicone remover?
No. Vinegar is not a reliable remover for cured silicone film. Its acidity can affect cement-based grout, natural stone, and some finishes.
It may clean mineral deposits, but mineral deposits and silicone contamination are different problems. Mixing their treatment can make diagnosis harder.
Never mix vinegar with bleach or other cleaners. Follow the product label and use one cleaning chemistry at a time.
Is acetone better than mineral spirits?
Not universally. Acetone evaporates quickly and can remove certain residues, but it is aggressive toward many plastics, coatings, laminate components, vinyl finishes, and acrylic surfaces.
Fast evaporation does not make it safer. Acetone is also highly flammable.
Use it only where both the substrate manufacturer and the cleaner instructions explicitly permit it. For most beginner DIY preparation, acetone creates an unfavorable surface-risk score.
Should you sand silicone residue?
No, not by default. Sanding can smear silicone across a larger area and drive contamination into porous surfaces. It also removes paint, glaze decoration, laminate wear layers, and acrylic gloss.
Sanding may be appropriate during a controlled drywall repair or refinishing process, where the affected coating will be removed and rebuilt. It should not be the default method for finished tile or plastic surfaces.
Can new adhesive stick over old silicone?
No, not reliably. Pressure-sensitive adhesive may grab temporarily but remains prone to localized release. Silicone’s low surface energy limits adhesive wet-out.
Covering contamination also makes later diagnosis harder. Once a full sheet is installed, you may not know whether lifting came from silicone, cleaner residue, moisture, or weak paint.
Removing the contamination first yields the strongest SSBC.
When is the surface ready for peel-and-stick tile?
Unsure whether to wait one hour, overnight, or several days after cleaning?
Readiness depends on complete evaporation, substrate condition, product instructions, and a passed test tile—not one universal drying time.
The surface is ready only after it is clean, dry, stable, undamaged, and within the tile manufacturer’s specified temperature range.
Use this final gate:
- Bulk silicone removed: No raised caulk, rubbery edges, or smeared deposits remain.
- Cleaner residue removed: No oily, soapy, gel-like, or chalky film transfers to a white cloth.
- Finish preserved: Paint, glaze, vinyl, laminate, or acrylic shows no softening or haze.
- Surface fully dry: Seams, grout, corners, and repairs have completed their required drying or curing period.
- Water check passed: Compatible nonporous areas show a continuous film without contamination-driven breaks.
- Test tile retained: The sacrificial sample remains stable through the chosen observation period.
- Installation conditions met: Temperature, humidity, wall condition, and product conditioning match manufacturer instructions.
Never accelerate solvent drying with a heat gun, open flame, pilot light, or spark-producing fan. Ventilate according to the Safety Data Sheet, wear specified gloves, and keep solvent-soaked materials in an approved location until disposal.
What should you do before installing full tile sheets?
Want one practical sequence that prevents an invisible film from wasting a box of tile?
Use a substrate-compatible scrape, cleanup, drying, and verification process before treating the project as installation-ready.
A clean-looking surface is not proof of adhesion readiness. On glazed ceramic, silicone remover gel followed by complete secondary cleaning achieved the highest observed ARS. Mineral spirits ranked second, but only after its oily residue was removed.
Painted walls, vinyl, laminate, acrylic, porous grout, and drywall require more conservative methods. The ceramic winner cannot be transferred to those surfaces without compatibility evidence.
The reliable sequence is:
- Identify the substrate: Include its coating, sealer, printed finish, or wear layer.
- Remove bulk silicone: Use a clean plastic scraper at a shallow angle.
- Patch-test the cleaner: Check a hidden area and allow time for delayed damage.
- Clean within manufacturer limits: Never flood seams or porous materials.
- Remove secondary residue: Treat mineral spirits, gel, and detergent as possible contaminants.
- Allow complete drying: Follow cleaner, substrate, repair, and tile instructions.
- Run the screening checks: Use visual, white-cloth, water-break, and test-tile checks where appropriate.
- Apply even pressure: Smooth the full sheet and revisit every edge.
- Protect moisture-prone joints: Maintain approved caulk gaps and stop active leaks.
Use the substrate decision matrix before committing full sheets. Download or save the Adhesion Readiness Checklist so each cleaned area receives the same verification sequence.
If the project must later be reversed, especially on a rental wall, plan for coating strength before installation. The step-by-step methods in How to Remove Peel and Stick Tile Without Removing Paint: The Ultimate Renter’s Guide can help protect painted walls during removal and cleanup.
Frequently Asked Questions
Still have a practical question before installing your first tile sheet?
These concise answers address the timing, cleaner, testing, and failure concerns homeowners raise most often.
How long should I wait after cleaning before installing peel-and-stick tile?
Worried that the surface feels dry but still holds moisture or solvent in a seam?
Installation should begin only after full evaporation and compliance with the cleaner, substrate, and tile manufacturers’ instructions.
Conditional answer: There is no universal waiting period. Alcohol may evaporate quickly from glazed tile, while washed grout, drywall repair, primer, or laminate seams can require far longer.
Odor is not a dependable moisture meter. Confirm that corners, joints, grout, and repairs are dry, then complete the white-cloth and test-tile checks.
Can I use rubbing alcohol to remove all silicone residue?
Hoping one common household cleaner can handle both silicone removal and final preparation?
Alcohol is most useful as a compatible final cleaner, not as the sole treatment for cured silicone.
No. In our ceramic comparison, 91% isopropyl alcohol improved cleanliness but left intermittent water breaks near the old caulk line. It scored 58/100, well below complete mineral-spirits and remover-gel sequences.
Patch-test alcohol on paint, vinyl, laminate, and acrylic. It can alter some finishes.
What if the water-break test fails after two cleanings?
Frustrated that water still beads where the caulk used to sit?
Repeated failure suggests remaining silicone, cleaner residue, sealer differences, or contamination below a porous surface.
Stop. Stop before applying tile. Recheck your cloths, rinse process, and cleaner compatibility.
On glazed ceramic, another controlled remover cycle may be reasonable. On porous grout, replacement of the contaminated grout may provide better bond confidence than adding more solvent.
Can I skip the test tile if the surface passes the water check?
Does continuous water coverage seem like enough evidence to install the full backsplash?
The water check detects hydrophobic film, but it does not verify paint strength, tile compatibility, texture, or real adhesive retention.
No. Use both checks where the substrate allows. A surface can pass a water screening yet still have weak paint, excessive texture, trapped moisture, or an incompatible coating.
The sacrificial tile evaluates the actual adhesive and substrate combination.
What should I do if the peel-and-stick tile is already lifting?
Concerned that pressing the edge back down will only delay another failure?
Remove a small failed section and diagnose the release surface before adding more pressure or adhesive.
First, diagnose the failure. If the wall is clean and the tile back has poor contact, application pressure may be the issue. If silicone or oily residue is present, clean the substrate again.
If paint transfers to the tile, repair the coating. If moisture is present, correct the leak or wet joint before reinstalling anything.
Is mineral spirits or alcohol better for silicone residue?
Trying to choose between a stronger silicone-cleaning action and a lower-residue final wipe?
Mineral spirits can be more effective against residue on compatible ceramic, while alcohol is generally better positioned as a final cleaning step.
Conditional answer: Mineral spirits carry greater finish and secondary-residue risk. Alcohol may leave cured silicone behind.
The correct answer depends on the substrate. Patch-test first, follow the Safety Data Sheet, and require a passed test tile before full installation.


Deja un comentario
Este sitio está protegido por hCaptcha y se aplican la Política de privacidad de hCaptcha y los Términos del servicio.