


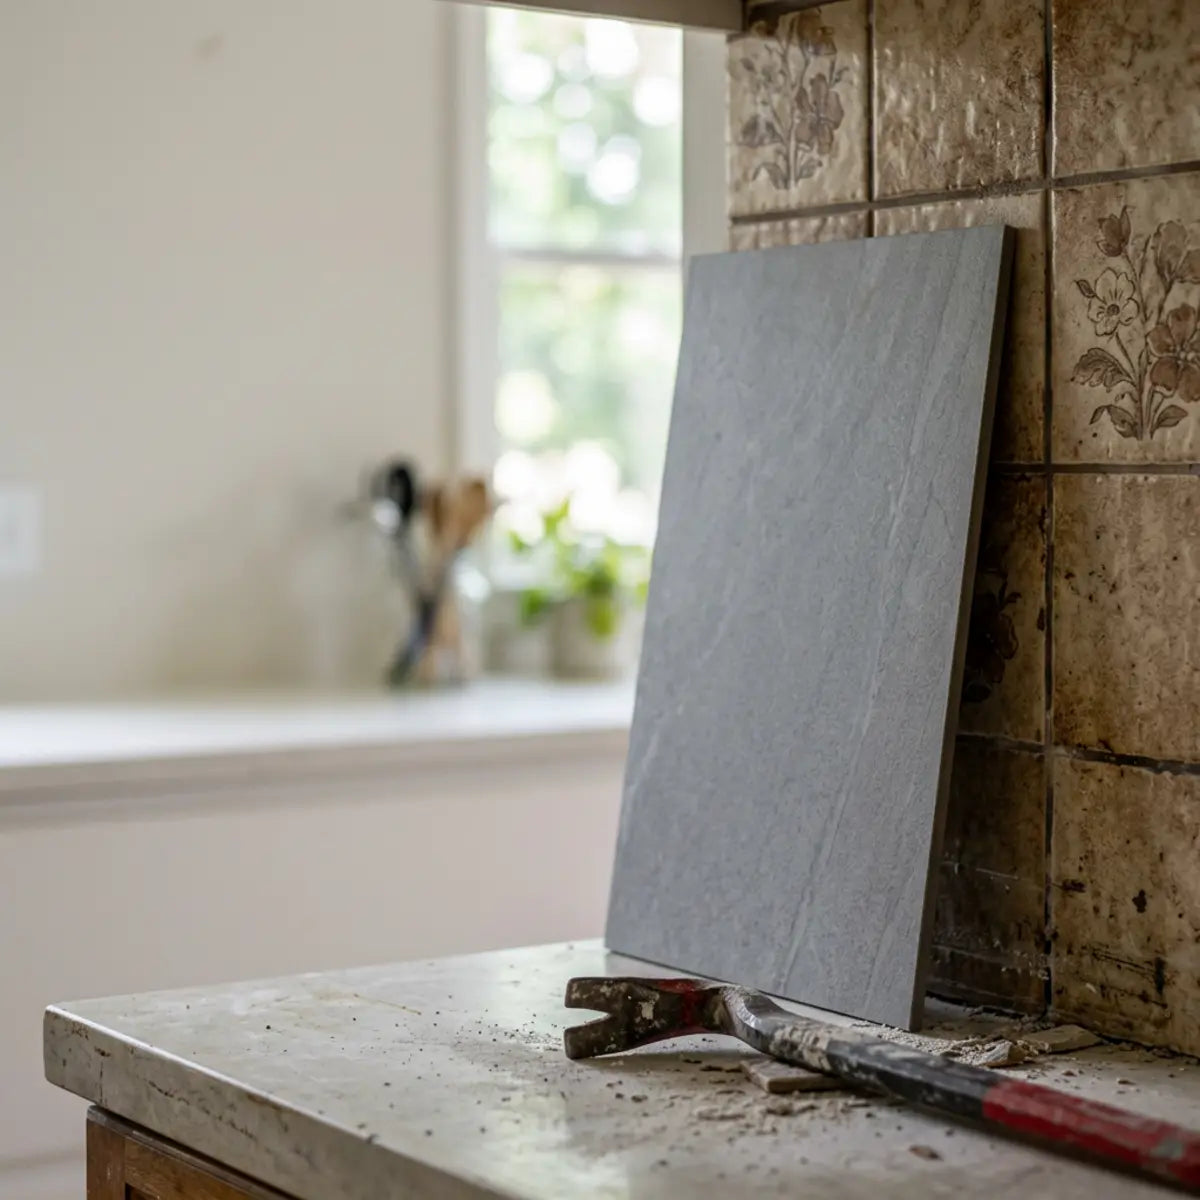
We Tracked Backsplash Demolition vs Composite Overlay
Replacing an outdated ceramic backsplash often triggers a frustrating homeowner dilemma. The existing wall looks dated, but the prospect of smashing ceramic tiles creates anxiety. Heavy demolition threatens to generate toxic dust, destroy underlying drywall, and shut down kitchen operations for days. For decades, the home improvement industry has presented a false dichotomy: either live with a kitchen design you despise or subject your household to the traumatic, messy, and prohibitively expensive process of a full tear-out. This traditional mindset has led countless homeowners to indefinitely postpone necessary aesthetic upgrades, allowing their properties to languish in visual obsolescence.
However, the landscape of interior renovation has experienced a monumental paradigm shift. Advanced materials engineering has introduced structural-grade overlays that challenge the necessity of the sledgehammer. In most cosmetic kitchen refreshes, a composite overlay is faster, cleaner, and lower-disruption than demolishing a ceramic backsplash. This method bypasses tile removal, extensive drywall repair, debris disposal, and extended kitchen downtime entirely. It represents a surgical approach to home design—addressing the visual deficit without causing collateral structural damage.
We must, however, maintain intellectual honesty about the limitations of any renovation technique. However, demolition remains the mandatory choice when existing tile is loose, water-damaged, severely uneven, mold-contaminated, or part of a structural remodel. The optimal decision relies entirely on Total Project Disruption Cost, rather than isolated material prices. Making the wrong choice can lead to catastrophic budget overruns or a failed installation that requires removal within months.
This guide evaluates the true burden of kitchen updates. We will benchmark dust containment, active labor, and total downtime. We will also analyze hidden repair risks, edge complications, and the structural integrity required to successfully cover an old tile wall. By peeling back the layers of traditional contracting advice, we aim to arm you with the quantitative data necessary to make an economically and structurally sound decision for your specific property.
Quick Verdict: At a Glance
If you are pressed for time and need the executive summary before diving into the complex mathematics of Total Project Disruption Cost, here is our foundational stance:
- Choose Composite Overlay When: Your existing tile is firmly attached, the underlying drywall is bone-dry, you are prioritizing speed, you have a strict budget, and you cannot afford to have your kitchen out of commission for more than 24 hours.
- Choose Heavy Demolition When: Tiles sound hollow when tapped, there is visible water damage or mold around the sink base, the current tiles are severely warped or heavily textured (like rustic stone), or you are fundamentally changing the footprint of the cabinetry.
What is the fastest answer for covering ceramic tile versus demolishing a backsplash?
Ever feel paralyzed by conflicting renovation advice that ignores your timeline and budget? This section establishes a definitive decision matrix, saving your kitchen from becoming an unnecessary, extended construction zone.
The industry consensus dictates a shift away from measuring remodels purely by material price. The traditional approach of calculating square footage and multiplying it by the cost per tile is fundamentally flawed and dangerously misleading. It ignores the vast ecosystem of secondary expenses that orbit a demolition project. The new quantitative baseline is Total Project Disruption Cost (TPDC).
TPDC—the sum of material cost, active labor hours, kitchen downtime, cleanup burden, drywall repair probability, and disposal fees—reveals the true cost of a project. The cheapest box of tiles rapidly becomes expensive when factoring in wall reconstruction and dust mitigation. When you view a renovation through the lens of TPDC, the perceived savings of traditional ceramic tile frequently evaporate, replaced by the grim reality of compounding labor rates and unforeseen structural fixes.
The Decision Matrix by Property Type
Different property owners face distinct operational thresholds. A solution that works for a slow DIY project may fail for an active rental property. To make the most informed decision, you must align your renovation strategy with the primary function of the real estate in question.
- ● Owner-Occupied Homes: Families prioritize dust containment and rapid return to service. The kitchen is the logistical heart of the home; shutting it down means relying on expensive takeout and disrupting daily routines. An overlay strictly adheres to these constraints if the existing wall is structurally sound, allowing a family to cook breakfast in the same space that was renovated the afternoon prior.
- ● Short-Term Rentals (STR): Hosts measure success by minimal downtime. Schedule compression is critical to avoid lost booking revenue. Every day a unit is offline for heavy tile demolition is a day of lost income that must be factored into the project's true cost. Rapid cosmetic overlays are often the secret weapon of successful Airbnb hosts who need to refresh a space between checkout and check-in.
- ● Rental Turnovers: Landlords require durable, fast updates between tenants. Extensive demolition often pushes unit turnover schedules into the red. When a tenant moves out on the 31st and the new tenant arrives on the 1st, there is simply no runway for a multi-day mortar and grout process. Overlays provide the necessary visual upgrade to justify market rent without the scheduling nightmare.
- ● Pre-Sale Updates: Sellers need high-impact visual improvements without overcapitalizing on deep structural alterations. Real estate agents frequently advise against heavy, expensive renovations right before listing, as the Return on Investment (ROI) is rarely 1:1. Overlays deliver the crucial "wow factor" for listing photos while preserving the seller's profit margin.
Deep Dive: Cost & Labor Analysis
If you are struggling to quantify the exact monetary difference between these two methods, you are not alone. The fluctuating costs of contractor labor and raw materials make budgeting incredibly difficult. To navigate this, you need a precise, updated framework that breaks down every dollar spent on materials versus the exorbitant costs of professional labor hours. For a comprehensive, data-driven look at current market rates, expected lifespan, and a side-by-side financial breakdown that leaves no hidden fee unexamined, we strongly recommend reviewing our dedicated analysis on this topic.
Read the 2026 Cost & Labor ComparisonStructural Necessity vs. Cosmetic Update
You must evaluate the wall objectively. A composite overlay is strictly a cosmetic solution. It covers aesthetic flaws, outdated colors, and minor grout discoloration. It fundamentally mitigates visual obsolescence. If your only complaint about your kitchen is that the 1990s beige tumbled marble makes the space look dark and dated, an overlay is the perfect tactical strike.
Demolition, conversely, is a structural necessity. If moisture has compromised the drywall backing, covering it traps the failure. Water ingress behind a sink can turn the underlying gypsum board into a crumbly, mold-infested hazard. If tiles are actively detaching from the substrate, an overlay will simply fall off alongside the old wall. You cannot build a solid house on a crumbling foundation, and you cannot execute a successful overlay on failing mortar.
When evaluating these costs, the foundational methodology requires a strict adherence to standardized data. The comprehensive framework detailed in our aforementioned cost and labor comparisons provides the quantitative baseline necessary to establish accurate financial expectations. Moving forward without this data is akin to navigating a complex construction site blindfolded.
Total Project Disruption Cost (TPDC) Benchmark
To truly understand the divide, we must look at the data. The following table provides a standardized evaluation of both methodologies. This data assumes a standard 30-square-foot kitchen backsplash area, which is typical for a mid-sized American home.
| TPDC Category | Demolition & Replacement | Composite Overlay over Tile |
|---|---|---|
| Material Cost (Average) | High (Tile, Thinset, Grout, Drywall, Tape, Mud) | Low to Medium (Composite Panels, Degreaser) |
| Active Labor Hours | 12 to 24 Hours (Spread across multiple days) | 3 to 6 Hours (Completed in a single session) |
| Kitchen Downtime | 3 to 5 Days (Minimum) | 4 to 8 Hours (Ready for dinner) |
| Cleanup Burden | Severe (Heavy Silica Dust, Plastic Sheeting Required) | Minimal (Backing paper, small material cutoffs) |
| Drywall Repair Risk | High Probability (80%+ will tear facing paper) | Zero Probability (Substrate remains untouched) |
| Disposal Burden | Heavy (Requires dump runs/specialized debris bags) | None (Waste fits in standard municipal trash) |
Interactive: Calculate Your Hidden Disruption Cost
Don't let the price tag of raw tiles fool you. Input your local metrics to see the hidden costs of a 4-day demolition delay.

How long is the kitchen out of service with demolition versus a composite overlay?
Can you afford to lose your kitchen for a week just to change the wall color? Here, we quantify exact downtime metrics to keep your household running and prevent schedule blowouts.
To accurately gauge project timelines, we evaluate the Kitchen Downtime Window (KDW). KDW—the total elapsed hours from laying the first drop cloth to safe, clean, functional kitchen use—is the ultimate timeline metric. It is the only number that truly matters to a homeowner trying to plan their week or a landlord trying to coordinate a lease signing.
Active labor hours only tell half the story. The hidden delay in traditional tile projects stems from mandatory chemical curing phases. A contractor may only be physically working in your kitchen for 12 total hours, but if those 12 hours are interspersed with mandatory 24-hour drying periods for mortar and grout, your KDW expands drastically.
The Demolition Timeline Trap
Removing a backsplash is rarely a single-day event. It initiates a cascading sequence of required repairs. Once a prybar breaches the wall, the schedule is out of your control. The structural integrity of the wall behind the tile remains a mystery until the first pieces are forcefully removed. Here is the inescapable reality of the traditional process:
- Preparation and Tear-Out: Masking the kitchen, laying heavy-duty floor protection to prevent dropped tiles from chipping countertops or flooring, and physically chipping away old tile and mortar. This phase is physically grueling and intensely messy.
- Substrate Repair: Patching torn drywall paper, sealing gouges with primer, or, in severe cases, cutting out sections of destroyed drywall entirely and installing new backing boards.
- Compound Curing: Joint compound used to patch drywall tears requires a minimum of 24 hours to cure before it can be safely sanded flat. Sanding then creates a secondary wave of ultrafine dust.
- Thinset Mortar Application: Setting the new tile. Manufacturer technical data sheets strictly mandate a 24-to-48-hour cure time for unmodified thinset before any grout can be applied. Moving too fast here results in shifting tiles.
- Grout Application and Sealing: Applying grout, washing the inevitable grout haze off the tile faces multiple times, and waiting an additional 24 to 72 hours before a penetrating sealer can be applied to protect the grout lines from stains.
During these curing phases, the kitchen remains an active hazard zone. You cannot cook, clean, or use the counters freely without risking contamination of the wet materials or inhaling airborne particulates.
Evaluating Material Alternatives
If you are reconsidering the entire process and exploring different surface options, understanding the exact material differences is paramount. How does a premium vinyl composite hold up against traditional fired clay ceramic in terms of heat resistance behind a stove or impact resistance behind a sink? We have conducted a rigorous, honest comparison detailing the pros, cons, and realistic durability of these competing materials to ensure you make a choice that withstands daily kitchen abuse.
Explore the Vinyl vs Ceramic Honest ComparisonThe Schedule Compression of Overlays
Composite overlays inherently neutralize the waiting game. By utilizing the existing tile as a stable, flat substrate, you bypass the demolition and repair phases entirely. You are effectively hijacking the structural integrity of the previous contractor's work to support your new aesthetic vision. Because high-quality composite panels utilize advanced, pressure-sensitive industrial adhesives rather than wet mortar, there is zero chemical curing time required before the kitchen is usable.
When factoring in rapid project turnarounds, specific planning is required. The workflow documented in our specialized timing guide functions as the architectural standard. By empirically tracking each step, it recalibrates the baseline expectations for high-speed property renovations, proving that a factory-grade finish is attainable in hours, not weeks.
The 24-Hour Flip Blueprint
For real estate investors, house flippers, and highly motivated homeowners, time is literally money. We physically timed a complete backsplash overhaul to see if a sub-24-hour transformation was genuinely feasible without sacrificing visual credibility. This specific blueprint outlines the exact workflow, material selection, and execution strategy required to pull off a dramatic, high-ROI kitchen upgrade in a single day.
See the 24-Hour Backsplash PlanComparing Kitchen Downtime Windows (KDW)
We benchmarked three common scenarios to illustrate the statistical difference in project timelines. This visualizes the sheer volatility inherent in traditional demolition.
| Scenario Context | Demolition KDW (Downtime) | Overlay KDW (Downtime) |
|---|---|---|
| Best-Case (Flawless Substrate) | 48 Hours | 4 Hours |
| Typical (Moderate Wall Damage) | 72 to 96 Hours | 6 Hours |
| Problem-Case (Drywall Failure) | 120+ Hours | N/A (Cannot overlay damaged walls) |
Real-World Schedule Examples
For an accurate comparison, consider these contrasting weekend schedules. They highlight the stark contrast in weekend utility and household stress levels.
- 1-Day Overlay Schedule: A homeowner begins degreasing the old tile at 8:00 AM. By 9:30 AM, after the wall is thoroughly dry, panel installation begins. By 2:00 PM, the main fields are covered and the final, meticulous cuts are made around electrical outlets and window casings. By 3:00 PM, the kitchen is fully functional, the protective paper backing is in the recycling bin, and dinner is prepared on schedule in a completely transformed space.
- 4-Day Demolition Schedule: Friday night involves taping off the kitchen and sealing vents. Saturday is consumed entirely by heavy demolition, hauling debris, and desperately patching torn drywall. Sunday requires sanding joint compound dust, applying primer, and painstakingly setting new tile in wet mortar. The kitchen remains entirely unusable. Monday evening, after work, is reserved for grouting, wiping haze, and waiting again. Normalcy does not return until mid-week.
Mitigating Construction Dust and Environmental Hazards
Does the thought of fine silica dust coating your living room furniture keep you awake? This section evaluates the empirical impact of airborne debris during removal, prioritizing your respiratory safety and home cleanliness.
The most underestimated consequence of backsplash removal is particulate matter. The sheer volume of dust generated by destroying a wall is difficult to comprehend until you experience it. Ceramic tile, thinset mortar, and sanded grout all contain crystalline silica—a fundamental component of sand, stone, and commercial construction materials.
When you shatter these materials with a hammer, prybar, or oscillating tool, you release microscopic dust plumes into the air. This is not ordinary household dust composed of dead skin cells and fabric fibers. These are jagged, microscopic shards of mineral that linger in the air column for hours.
The HVAC Contamination Risk
Standard central air conditioning systems are not engineered to filter construction-grade silica. If your HVAC unit runs during demolition, it acts as a massive vacuum, pulling these abrasive particles into the return vents. From there, the ductwork distributes the contamination throughout the entire footprint of the house.
The dust then circulates throughout the entire home. It settles heavily on beds, embeds deep within carpets, and coats delicate electronics far from the kitchen epicenter. Professional mitigation requires extreme measures: sealing air registers with heavy plastic, erecting plastic zipper walls to isolate the kitchen, and utilizing expensive, high-efficiency HEPA air scrubbers to clean the localized air.
According to guidelines set by the Occupational Safety and Health Administration (OSHA), exposure to respirable crystalline silica poses severe respiratory risks, including silicosis. While a homeowner engaging in a weekend DIY project is not legally bound by OSHA regulations, the physics of dust dispersion and the biological impact on the human respiratory system remain identical.
The Clean Cleanup Alternative
Composite overlays generate a statistically significant reduction in debris. The cutting process for composite panels typically involves basic hand tools: utility knives, specialized tin snips, or light rotary tools. Because there is no pulverizing force involved, there is no aerosolization of materials.
These tools produce heavy, manageable shavings rather than airborne dust. The shavings fall predictably straight down to the countertop or floor, where they can be instantly swept up. The primary waste consists merely of the slick backing paper peeled off the adhesive side of the tiles, and small material cutoffs generated when trimming around outlets.
Mess Comparison: Alternatives Evaluated
If containing the mess is your absolute highest priority, you might also be considering pour-over epoxy kits as a way to coat your existing tiles. How does the noxious fume profile and chemical dripping of an epoxy pour compare to the dry, controlled application of a composite peel-and-stick panel? We have created a direct, side-by-side verdict framework based on real-life constraints like chemical ventilation requirements, cleanup difficulty, and total project friction to help you decide which 'mess-free' route is actually cleaner.
Read the Mess Comparison Guide
Analyzing the True Financial Baseline: Drywall, Disposal, and Labor
Is the upfront material price blinding you to hidden contractor fees? We expose the secondary costs of demolition that frequently blow up renovation budgets and extend timelines.
When comparing a $10-per-square-foot ceramic tile to a $10-per-square-foot composite panel, the calculation seems equal. This is a critical misconception that traps many homeowners. The material cost is merely the starting line. Demolition acts like pulling a loose thread on a sweater; the damage quickly unravels the entire project budget.
The Drywall Destruction Guarantee
Thinset mortar is engineered to form a permanent, chemical bond with drywall paper. It is not designed to be removable. When you pry a firmly adhered tile off the wall, it rarely snaps cleanly off the surface. The mortar is often stronger than the gypsum board itself.
The mortar inevitably takes the drywall facing paper with it. Frequently, it pulls deep chunks of the white gypsum core out, leaving the wall cratered, deeply uneven, and structurally compromised. If the damage is severe—which it is in the majority of proper installations—the old drywall must be surgically cut out down to the wooden studs and replaced with new drywall boards, taped, and mudded.
Labor Hours and Disposal Fees
Every hour spent patching destroyed drywall, taping seams with fiberglass mesh, and waiting for layers of joint compound to dry is an hour of lost productivity. If you hire a professional, you pay steep hourly rates—often ranging from $75 to $150 per hour—for this preparatory labor before a single new tile is even touched.
Furthermore, construction debris carries significant disposal costs. Ceramic tile is exceptionally dense and heavy. A standard 30-square-foot backsplash removal can easily generate over 100 pounds of sharp, jagged, dust-covered waste. You cannot place this volume of heavy construction debris in standard municipal garbage bins without risking hefty fines or outright rejection by your sanitation department. It requires specialized heavy-duty bags, a rented vehicle, and paid trips to the local landfill or transfer station.
Lifecycle Cost Analysis
To properly evaluate long-term financial impacts, it is crucial to look beyond the installation phase. How do these materials perform over a 5 to 10-year span? We have compiled an extensive analysis examining cost, daily durability, heat resistance profiles, and long-term style value. This data provides the empirical baseline for comparing lifecycle costs, definitively proving that evaluating upfront material pricing alone is an inadequate metric for smart home economics.
Read the Cost, Durability & Style GuideWhen is it safe and professional-looking to cover old tile?
Worried that applying panels over existing tile will look like a cheap, bulky shortcut? This section details the precise structural requirements and finishing techniques for a flawless, factory-grade installation.
A persistent myth within old-school contracting circles suggests that covering tile inherently looks unprofessional or amateurish. This is only true if the installer ignores the fundamental rules of depth management, edge finishing, and meticulous substrate preparation. A professional result is entirely dictated by the prep work.
A successful overlay requires a highly systematic approach. You are essentially building a new surface tension over an existing one. If the foundational layer is compromised in any way—be it loose, greasy, or structurally decaying—the top layer will inevitably fail. You must treat the old tile with the same respect a contractor treats raw drywall.
DO NOT Overlay If You Observe These Conditions:
- ✖Loose or Popping Tiles: If tiles move when pressed, the wall is dead.
- ✖Spongy Drywall: Press hard near the sink base. If the wall flexes, moisture has ruined the gypsum.
- ✖Black Mold: Never cover active fungal growth. It must be remediated.
- ✖Extreme 3D Texture: Highly sculpted faux-stone or protruding metallic tiles cannot provide a flat enough bonding surface.
Evaluating the Substrate Integrity
Before committing a single dollar to an overlay project, you must perform a strict diagnostic check on the existing ceramic wall to ensure it qualifies as a stable substrate.
- The Tap Test: Gently tap the face of the old tiles with the hard plastic handle of a screwdriver. A sharp, high-pitched, solid "click" indicates excellent adhesion to the wall. A hollow, drum-like "thud" reveals that the thinset mortar behind the tile has dried out and failed, creating an air pocket.
- Degreasing Mandate: Kitchens are fundamentally greasy environments, coated in aerosolized cooking oils from years of sautéing and frying. Adhesives will absolutely not bond to a microscopic layer of grease. You must scrub the old tile aggressively with a heavy-duty degreaser, like Trisodium Phosphate (TSP) or a specialized citrus degreaser, and allow it to dry completely.
- Grout Line Depth: Evaluate your existing grout. Deep, widely recessed, or sharply chamfered grout lines can cause thin composite panels to telegraph—meaning the flexible panel visibly dips into the old grout line over time, revealing the ghost of the old tile grid beneath. In these cases, skimming or filling the deep lines with a lightweight spackle beforehand creates the necessary uninterrupted flat plane.
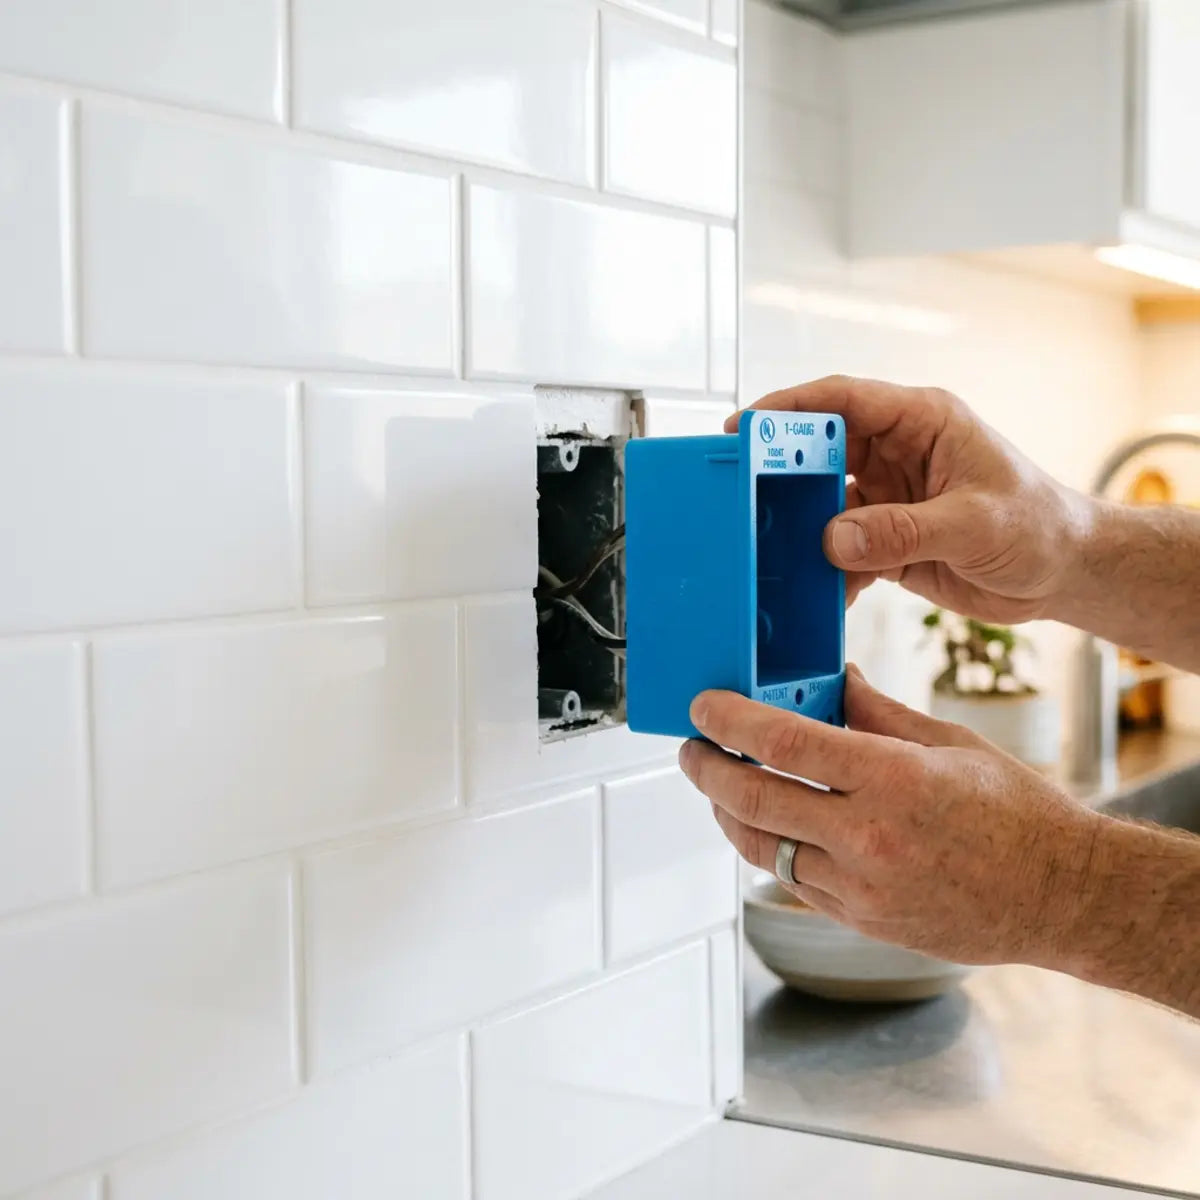
Managing Outlet Depth and Edges
The hallmark of an amateur overlay job is poor edge and depth management. Adding a layer of material, however thin, inherently increases the total wall thickness. This requires specific calibrations around electrical outlets and exposed exterior edges.
Pro-Tip: Mastering the Details
You cannot simply trap an electrical receptacle behind a thicker wall; doing so creates a sunken outlet, which is a fire hazard and a code violation. You must utilize electrical box extenders. These inexpensive, code-compliant plastic sleeves slide over your existing box and pull the electrical receptacle perfectly flush with the new, thicker surface, ensuring electrical safety and a professional, tight fit for the faceplate.
Furthermore, exposed edges where the backsplash simply ends on an open wall require a clean, definitive finish. Leaving the raw edge of a composite panel visible destroys the illusion of real masonry. Using low-profile Schluter metal edge trim or specialized composite edge framing ensures the transition looks intentional, finished, and architecturally sound.
Premium Material Integration for Overlays
When assessing premium aesthetic integration, the physical material choice is the final, critical variable. You must select a product engineered specifically with the density and opacity required to mask the grid beneath it without looking artificially plastic.
The Dual Ceramics Solution
Equipment like our specialized collection functions as the architectural standard for overlay projects. It is specifically designed to provide the tactile feel of kiln-fired clay without the associated weight. By empirically neutralizing the visual bulk often associated with lesser overlays, it recalibrates the baseline expectations for grout-free, 3D texture realism. It easily bridges minor grout depressions, ensuring a flawless surface plane over older installations.
View Dual Ceramics Overlay TilesThe Snowy Ceramic Aesthetic
Similarly, for those seeking a brighter, more expansive look, the Snowy Ceramic lineup provides a verifiable, high-end transformation. It strictly adheres to modern, minimalist design requirements—offering brilliant white reflective properties that open up cramped kitchens—while bypassing the traditional mess of wet mortar installation. Its multi-layered composite structure effectively hides dark-colored vintage tiles underneath, guaranteeing zero color bleed-through.
View Snowy Ceramic Overlay TilesBroader Design Inspiration
If you are still in the early conceptual phases and need to visualize how different formats—like subway, hexagon, or intricate Moroccan patterns—will interact with your cabinetry and countertops, a broader overview is essential. We compare the aesthetic impact of high-end peel-and-stick versus traditional formats, sharing 10 distinct, highly stylish implementation ideas that cater to various budgets and architectural styles to help narrow down your final look.
Explore the Complete Tile Design Guide
Ready to Inspect Your Wall?
Don't start your project blind. Download our comprehensive, 10-point Pre-Install Inspection Checklist to ensure your old tile is mathematically and structurally ready for a premium overlay.
Step-by-Step: How to Install a Composite Overlay Over Ceramic Tile
Understanding the process demystifies the project. If your wall has passed the structural tests outlined above, executing the overlay is a straightforward, systematic process that relies more on careful measurement than brute strength.
-
Step 1: Aggressive Degreasing and Prep
Mix a heavy-duty degreaser (like TSP) according to the package instructions. Wearing gloves, scrub the entire existing ceramic tile surface with an abrasive sponge. Focus heavily on the areas immediately behind the stove and sink, as these harbor invisible aerosolized oils. Rinse the wall with clean water and a rag to remove any chemical residue. Allow the wall to dry completely (at least 12-24 hours). -
Step 2: Spackle Deep Grout Lines (If Necessary)
If your old tile has heavily recessed grout lines (deeper than 1/8 inch), use a putty knife to press a lightweight, fast-drying spackle or joint compound into the grooves. You do not need to make it perfectly smooth, just flush with the face of the old tile. Once dry, lightly sand away any high spots and wipe away the dust. -
Step 3: Establish a Level Starting Line
Never assume your countertops are perfectly level. Find the lowest point of your countertop. Use a spirit level or laser level to draw a straight, horizontal guideline across the old tile a few inches up from the counter. This line will guide the placement of your first row of composite panels, ensuring the pattern remains perfectly horizontal regardless of countertop dips. -
Step 4: Cut, Peel, and Apply
Working from the bottom corner inward, measure your first panel. If it has a jagged edge (like interlocking hexagons), use a straight edge and utility knife to cut a flush edge for the starting corner. Peel back just the top 2 inches of the backing paper. Align the panel with your level line. Once perfectly positioned, press the top firmly, then slowly pull the rest of the backing paper down while smoothing the panel onto the old tile with your hand to prevent air bubbles. -
Step 5: Trim Outlets and Edges
When approaching an electrical outlet (after turning off the power), measure the cutout carefully on the back of the panel and cut it out before peeling the paper. Install your electrical box extenders. Finally, apply your chosen edge trim (metal or composite) to any exposed ends where the backsplash meets an open wall for a finished, professional look.
Overlay Suitability Quiz
Not sure if your specific wall qualifies? Answer these 3 quick questions to get an instant verdict.
1. Tap your tiles with a hard tool handle. Do any of them sound hollow, or do any wiggle when pushed?
Final Thoughts
The decision between ripping out a backsplash and covering it should never rely on generic advice from hardware store clerks or simplistic, isolated material comparisons. It demands a rigorous, localized evaluation of your specific living situation, your real estate timeline, and your home's unique structural health.
The ultimate metric for any modern renovation is the Total Project Disruption Cost. By calculating the invisible burdens of microscopic silica dust infiltration, inevitable drywall destruction, extended kitchen downtime requiring expensive takeout, and hazardous waste disposal fees, the overall picture becomes glaringly clear. The sledgehammer is a tool of last resort, not a default starting point.
For the vast majority of cosmetic kitchen updates—where the underlying bones of the house are healthy—a high-quality composite overlay yields an optimal outcome. It preserves your timeline, dramatically protects your home's internal air quality, and delivers professional aesthetics without the stressful collateral damage of a multi-day demolition zone.
We strongly encourage you to objectively inspect your existing tile today. Perform the tap test, meticulously estimate your square footage, and calculate your specific disruption tolerance using the formulas provided. Ordering a sample of a premium composite tile allows you to verify the powerful adhesion and aesthetic fit in your specific lighting conditions before committing to a costly, irreversible teardown.
Frequently Asked Questions
Will covering my existing tile create problems with electrical outlets?
If ignored, adding wall thickness can bury your electrical outlets deeper into the wall, creating a serious fire hazard due to exposed wiring gaps. However, this is easily and permanently solved by installing electrical box extenders (also known as spark rings). These inexpensive plastic rings slip inside your existing box and pull the receptacle forward, making it perfectly flush with your new composite overlay. This method strictly adheres to modern electrical safety codes and ensures your faceplates fit tightly.
How do I know if my current ceramic tile is too damaged to cover?
You must inspect for hidden moisture and chemical bond failure. If the drywall behind the tile feels soft, is crumbly to the touch, or shows dark water stains (especially behind the faucet), you must demolish it to remediate the water damage. Additionally, use the "tap test" with a hard tool handle; hollow-sounding tiles indicate the mortar adhesive behind them has failed and dried to dust, making the wall an unstable, unsuitable substrate for an overlay.
Do I need a permit to demolish my kitchen backsplash?
For a simple, purely cosmetic removal of tile and drywall patching, municipal permits are rarely required in most jurisdictions. However, if your demolition uncovers problems that force you to move electrical outlets, alter plumbing stacks behind the wall, or remove load-bearing structural studs damaged by water, local building codes generally mandate a permit and subsequent inspections by a city official. Always verify with your local housing authority before swinging a hammer.
How long does a composite overlay actually last over ceramic?
When installed over a properly degreased, bone-dry, and structurally sound ceramic substrate, premium composite overlays offer exceptional longevity. Benchmarked against standard kitchen wear and tear, high-quality, heat- and moisture-resistant industrial adhesives are engineered to last for years. They will function reliably without peeling, shrinking, or fading until you are ready for your next major, full-scale kitchen redesign.
Can I install a composite overlay behind a gas stove?
Yes, provided you follow manufacturer clearance guidelines. Most premium composite tiles are highly heat resistant once fully cured to the wall. However, they are not fireproof. Industry standard safety protocols dictate that there must be a minimum clearance—typically 8 to 9 inches—between an open gas flame and the wall surface, or the stove must have an integrated metal backguard.
Deja un comentario
Este sitio está protegido por hCaptcha y se aplican la Política de privacidad de hCaptcha y los Términos del servicio.