


Protegiendo tu jungla interior: la guía definitiva para impermeabilizar alféizares de ventana
Un plan completo y apto para inquilinos para proteger tu hogar contra los daños causados por el agua mientras realzas tus exhibiciones botánicas.
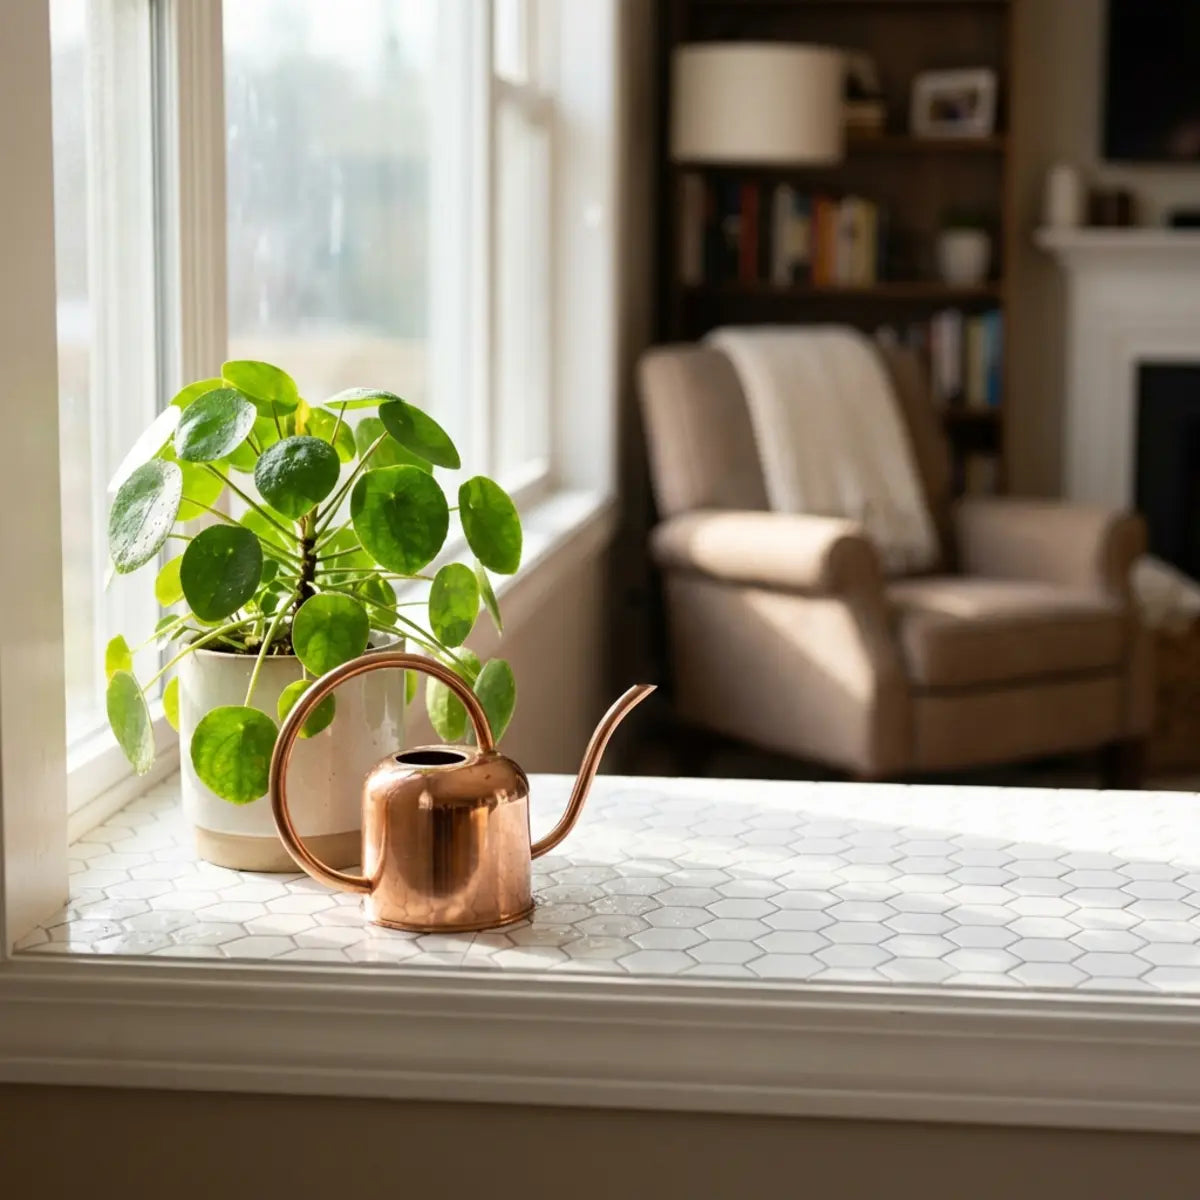
Te encanta tu jungla interior, pero los constantes anillos de agua, los derrames de tierra húmeda y la condensación están arruinando poco a poco los alféizares de madera de tus ventanas. Cada vez que riegas tus helechos u orquídeas, corres el riesgo de provocar una mancha permanente o podredumbre estructural. Es un ciclo frustrante para los inquilinos que no pueden simplemente arrancar y reemplazar el acabado dañado de la ventana. La creciente popularidad del diseño biofílico —la integración de la naturaleza en nuestros espacios interiores— ha aportado enormes beneficios mentales y estéticos, pero también ha introducido microclimas complejos en nuestros hogares. Los humidificadores, los pulverizadores y las bandejas de guijarros crean zonas localizadas de alta humedad para las que la construcción residencial estándar simplemente nunca fue diseñada.
Colocar azulejos autoadhesivos en un alféizar de ventana es una forma fácil y apta para inquilinos de proteger tu alféizar contra los daños causados por el agua y, al mismo tiempo, añadir estilo decorativo. Solo limpia la superficie, mide con cuidado, corta el material, aplica los azulejos y sella los bordes para lograr una impermeabilización completa. Este método evita la necesidad de grandes obras mientras te ayuda a conservar el depósito de seguridad. Representa un cambio de paradigma en la forma en que abordamos las modificaciones temporales de la vivienda, dándote el poder de una reforma permanente sin la responsabilidad financiera ni la permanencia física.
Con este enfoque, obtienes tres beneficios fundamentales:
- Transformación rápida: La instalación rápida no requiere contratistas especializados. Puedes renovar tu espacio durante una sola y perezosa tarde de domingo.
- Herramientas accesibles: No se necesitan lechada, mortero ni herramientas eléctricas. Olvídate de la maquinaria pesada y del desorden de las sierras húmedas tradicionales.
- Protección impermeable: Crea un acabado impermeable perfecto para los amantes de las plantas más entregados. Tu madera se mantiene impecable, sin importar lo entusiasta que sea tu rutina de riego.
¿Por qué deberían considerar los amantes de las plantas revestir sus alféizares con azulejos?
El problema:
¿Estás cansado de ver cómo se esfuma tu depósito de seguridad cada vez que una maceta rebosa o la condensación invernal se acumula en el borde?
La promesa:
Esta sección revela cómo los materiales autoadhesivos especializados protegen la madera de la humedad mientras actualizan al instante tu espacio de jardín interior.
Los amantes de las plantas deberían considerar revestir sus alféizares con azulejos porque crea una barrera contra la humedad resistente e impermeable que evita la pudrición estructural de la madera causada por el escurrimiento de las plantas. Los alféizares de madera pintados tradicionalmente son muy susceptibles a la filtración de agua, lo que rápidamente provoca pintura descascarada, crecimiento de moho y, con el tiempo, fallos estructurales. Una capa impermeable cambia fundamentalmente esta dinámica. Cuando introducimos grandes colecciones de flora tropical en nuestras salas de estar, en realidad estamos invitando a que las condiciones de la selva tropical interactúen con la madera de pino secada en horno. Es una receta para el deterioro arquitectónico a menos que se tomen medidas proactivas.
El consenso del sector dicta que la exposición prolongada a la humedad en madera sin tratar o mínimamente pintada conduce a un resultado determinista de descomposición fúngica. Según datos del USDA Forest Products Laboratory, los hongos de la podredumbre de la madera comienzan a proliferar cuando el contenido de humedad de la madera supera de forma constante el 20 por ciento. Las plantas regadas en exceso que descansan sobre alféizares desnudos empujan fácilmente la madera por encima de este umbral crítico. Las esporas microscópicas que causan la pudrición seca están omnipresentes en los entornos interiores, esperando simplemente las condiciones adecuadas —es decir, la humedad persistente— para comenzar a consumir las fibras de celulosa de tu marco de ventana.
Una idea errónea común es que la pintura interior estándar actúa como una barrera suficiente contra la humedad. En realidad, la mayoría de las pinturas domésticas de látex son transpirables. Permiten que el agua estancada de una bandeja de humedad o de un platillo para plantas penetre en la superficie con el tiempo. Una vez que el agua atraviesa los poros microscópicos de la pintura, queda atrapada contra la fibra de la madera. Este efecto de retención acelera en realidad el proceso de pudrición porque la humedad no puede evaporarse fácilmente de vuelta al ambiente. Si notas zonas blandas en tus superficies de madera, es vital replantear tu estrategia de defensa.
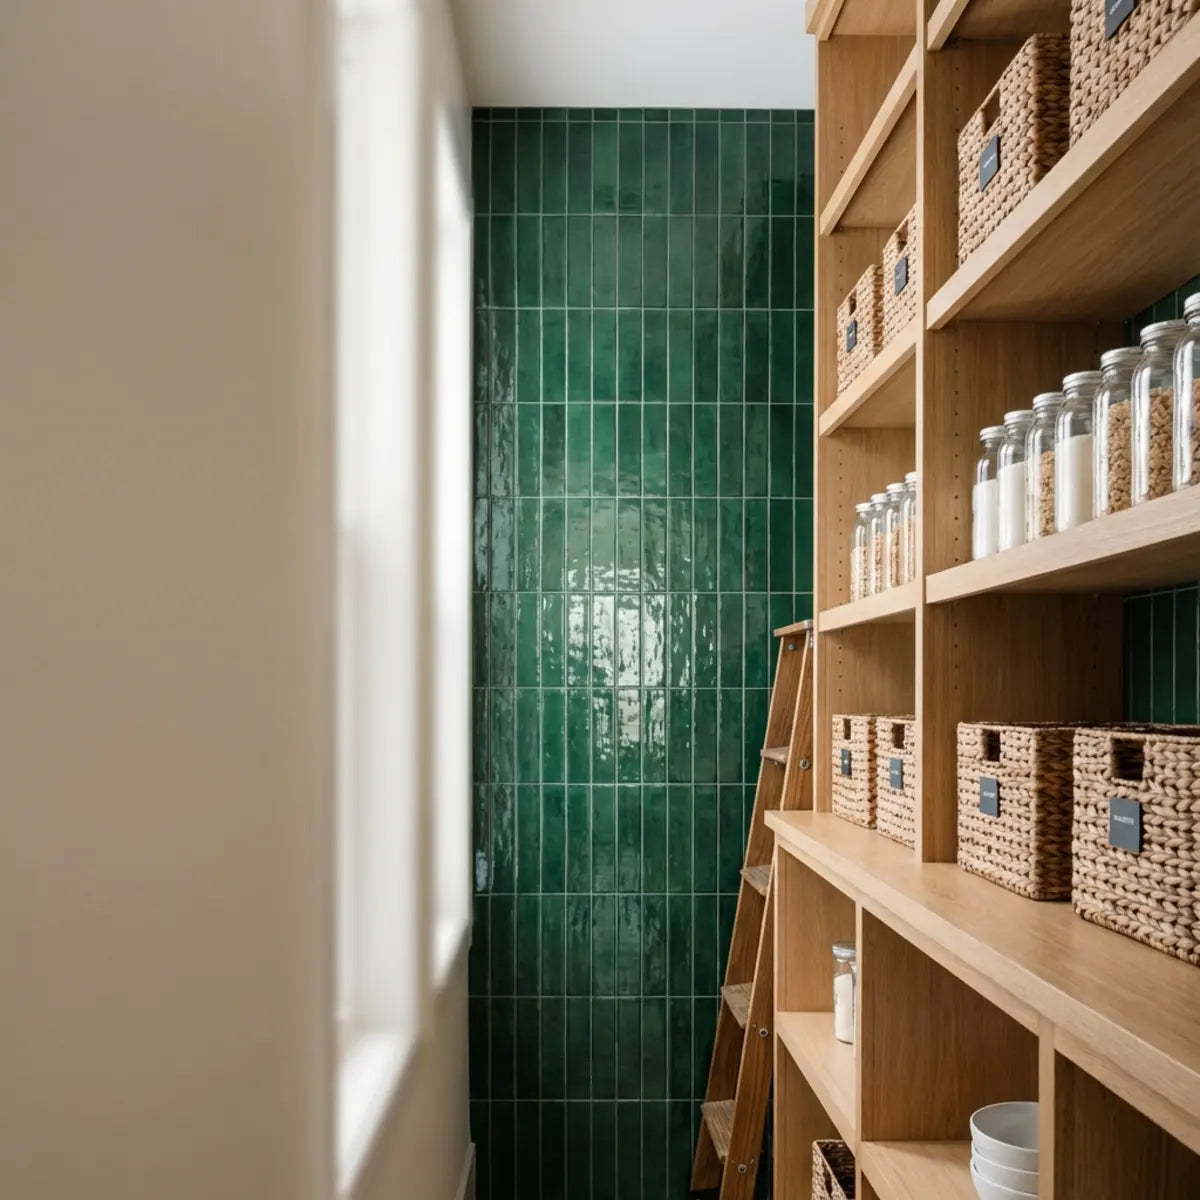
Para quienes desean ampliar esta lógica protectora e impermeable más allá del alféizar de la ventana, crear una barrera integral a lo largo de la mitad inferior de las paredes es una estrategia muy eficaz. Si quieres paredes elegantes sin daños ni costos, aprender a hacer revestimiento de madera tipo wainscoting con azulejos peel and stick, fácil ofrece una renovación económica y apta para inquilinos que protege el drywall de la niebla errante del humidificador y de las salpicaduras de las regaderas de riego. Empieza ahora para envolver todo tu rincón de plantas en un impresionante abrazo resistente a la humedad.

En lugar del azulejo cerámico tradicional o del pesado azulejo de porcelana —que requieren mortero y modificaciones permanentes—, la colocación de azulejos peel and stick ofrece un paradigma universalmente reconocido para un diseño temporal y de gran impacto. Obtienes el atractivo estético de una repisa personalizada para plantas sin violar los términos de un contrato de arrendamiento residencial estándar. La evolución de las tecnologías adhesivas ha llevado estos productos del ámbito de los materiales básicos de manualidades a auténticas alternativas arquitectónicas.
Considera el caso de una inquilina en un apartamento húmedo junto a la costa. Antes de revestirlo, su alféizar de ventana presentaba un severo abombamiento de la pintura debido al riego frecuente de las orquídeas y a la condensación matutina en la ventana. El aire salino y húmedo agravaba el problema, haciendo que la madera se hinchara y se deformara, impidiendo que la ventana cerrara correctamente. Después de aplicar una capa de vinilo adhesivo de alta calidad y sellar las juntas, el alféizar consiguió repeler el agua estancada durante dos años. La superficie se limpiaba sin esfuerzo, eliminando por completo los problemas de humedad anteriores y salvando su depósito de seguridad de una pérdida asegurada.
La tecnología fundamental que hace esto posible es idéntica a las soluciones utilizadas en las modernas renovaciones de fontanería económicas. Si quieres una renovación elegante del baño con presupuesto ajustado, azulejo adhesivo para baño contra la humedad ofrece una solución rápida e impermeable que puedes instalar en un fin de semana. Obtener consejos de expertos sobre estos materiales robustos y resistentes a la humedad te permite aplicar impermeabilización de nivel comercial incluso a los alféizares de ventana de los apartamentos más pequeños.
Al analizar la relación costo-beneficio de este proyecto de bricolaje, las métricas favorecen en gran medida al inquilino. Reemplazar un alféizar de ventana podrido, hecho a medida, puede costar cientos de dólares en materiales y mano de obra. Implica palancas, sierras especializadas para molduras, carpintería a medida, masilla para madera, imprimación y varias capas de pintura. En cambio, proteger ese mismo alféizar con azulejos adhesivos requiere una fracción mínima de ese costo, ofrece una protección financiera demostrada empíricamente y toma apenas unos minutos ejecutarlo.
Infografía comparativa de protección de materiales
Madera desnuda / sin tratar
Resistencia a la humedad: Cero
Resultado: Absorción inmediata. Se deforma en cuestión de días con agua estancada. Alto riesgo de pudrición seca por hongos y de grave degradación estructural.
Pintura látex estándar
Resistencia a la humedad: Baja a moderada
Resultado: Atrapa la humedad bajo la superficie. Provoca burbujas, desconchados y, con el tiempo, pudrición microscópica de la madera que pasa desapercibida hasta que falla.
Azulejo premium peel & stick
Resistencia a la humedad: Completa (impermeable)
Resultado: Desvía el agua por completo. Protege el sustrato de forma continua. Se limpia sin esfuerzo y soporta el peso de macetas de cerámica pesadas.
¿Qué materiales y herramientas necesitas para colocar azulejos peel and stick en un alféizar de ventana?
El problema:
¿Te abruman los pasillos de la ferretería, las listas de reformas complicadas y los consejos contradictorios sobre qué es lo que realmente detiene el agua?
La promesa:
Esta sección ofrece un inventario simplificado y seguro para inquilinos para garantizar una instalación impecable y de nivel profesional que dure.
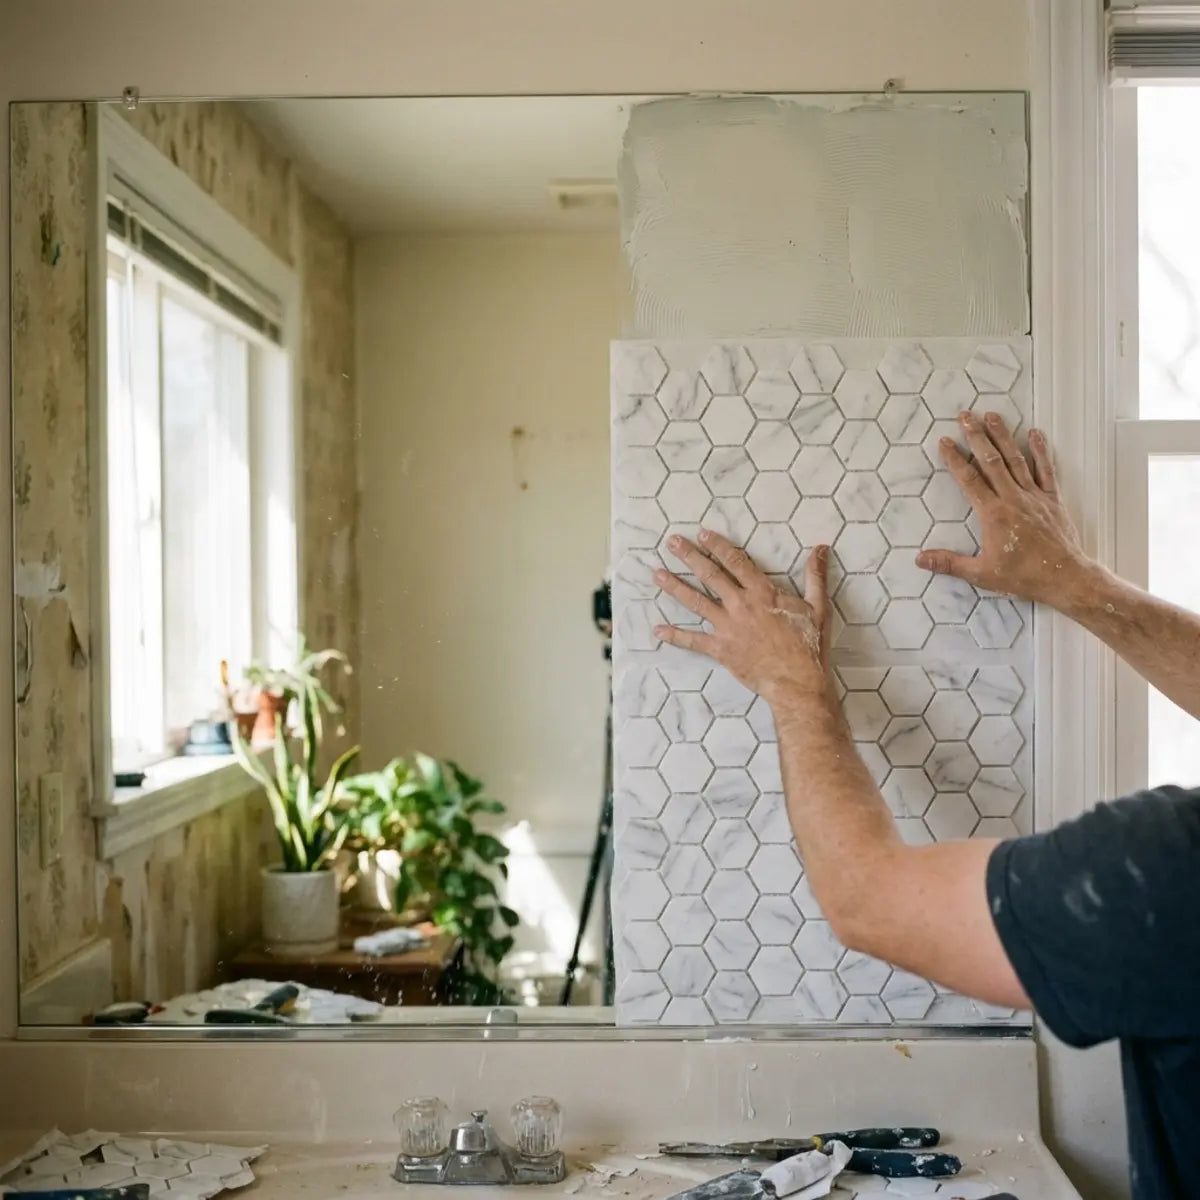
Los materiales necesarios para este proyecto incluyen azulejos premium impermeables peel and stick, un cúter, una regla metálica recta, un limpiador desengrasante y sellador de silicona transparente. Reunir los materiales correctos y de alta calidad antes de comenzar el proyecto garantiza un flujo de trabajo fluido y evita fallos del adhesivo más adelante. Omitir las herramientas adecuadas es la razón más común por la que los proyectos de bricolaje empiezan a parecer poco profesionales o fallan prematuramente en escenarios de mucha humedad.
La ferretería esencial
Para lograr cortes limpios y una adhesión adecuada, necesitas herramientas específicas y fácilmente accesibles. Usar las herramientas equivocadas dará como resultado bordes irregulares que permitirán que la humedad se infiltre bajo la superficie de la loseta. Una hoja desafilada, por ejemplo, estirará el vinilo en lugar de cortarlo, creando microdesgarros por los que la acción capilar puede llevar el agua directamente a la capa adhesiva.
- Cúter utilitario de alta resistencia: Requiere hojas nuevas y afiladas para cortar las capas de vinilo y gel sin desgarrar el material. Cambia la hoja después de cada 5 a 6 cortes importantes para un rendimiento óptimo.
- Regla metálica recta: Una regla metálica asegura que la hoja no se desvíe durante los cortes largos, garantizando líneas perfectamente rectas. Las reglas de plástico pueden ser fácilmente marcadas por el cúter, arruinando su rectitud.
- Base de corte autocicatrizante: Protege las superficies subyacentes mientras mides y marcas las losetas. Además, proporciona útiles líneas de cuadrícula para lograr ángulos perfectos de 90 grados.
- Herramienta de alisado de plástico: Una simple espátula de goma o una tarjeta de crédito ayuda a expulsar las burbujas de aire atrapadas durante la instalación, asegurando el máximo contacto adhesivo con la madera.
Consejo profesional
Considera aplicar una fina membrana líquida impermeable o un imprimador de adherencia específico sobre la madera en bruto antes de instalar las losetas. Esto crea una barrera absolutamente impenetrable y ofrece a la capa adhesiva una superficie ideal y uniforme a la que aferrarse durante décadas.

La preparación de la superficie y los agentes impermeabilizantes
La preparación de la superficie es el factor más crítico para la durabilidad del adhesivo. Si el alféizar está sucio, las losetas se adherirán al polvo en lugar de a la madera. La grasa aérea de la cocina, los aceites de los dedos y los residuos cerosos de los sprays domésticos para quitar el polvo son los enemigos invisibles de los adhesivos sensibles a la presión.
- Alcohol isopropílico: Actúa como desengrasante de rápida evaporación. Elimina aceites invisibles dejados por las hojas de las plantas o los limpiadores domésticos sin saturar la veta de la madera.
- Paños de microfibra: Los paños que no sueltan pelusa garantizan que no queden fibras tras la fase de limpieza. Las toallas de papel suelen dejar diminutas partículas que interrumpen la adherencia.
- 100%Masilla de silicona: Esta es tu principal barrera contra la humedad. Debes usar silicona 100%, no masilla acrílica decorativa, para lograr una impermeabilización real. La acrílica se disolverá y agrietará bajo el agua estancada continua.
- Herramienta para alisar el sellador: Garantiza un cordón uniforme y profesional de silicona a lo largo del perímetro, evitando antiestéticos grumos que con el tiempo pueden acumular suciedad.
- 1 Raspa los residuos sueltos: Usa una espátula de plástico para quitar con cuidado cualquier pintura descascarada o suciedad adherida.
- 2 Desengrase químico: Limpia todo el borde con alcohol isopropílico y un paño de microfibra.
- 3 Evaporación de la humedad: Deja que la madera se seque por completo. Colocar las baldosas sobre madera húmeda atrapa la humedad e impide la adherencia.
- 1 Mide la profundidad y el ancho: Registra las dimensiones exactas de tu repisa de ventana, teniendo en cuenta el marco lateral.
- 2 Crea una plantilla de papel: Para ventanas antiguas con bordes irregulares, corta un trozo de papel para que encaje perfectamente en el alféizar y luego transfiere esa forma a tus baldosas.
- 3 Marca y parte: Con tu regla metálica y el cúter, marca la capa superior de la baldosa. Dobla hacia atrás para partirla limpiamente y luego corta el papel protector.
- 1 Establece el borde de inicio: Despega solo dos pulgadas del papel protector de tu primera baldosa.
- 2 Alinea y fija: Presiona el adhesivo expuesto contra la esquina más lejana del alféizar de la ventana, asegurándote de que quede perfectamente al ras con el marco.
- 3 Alisa y desenrolla: Tira lentamente del papel protector mientras alisas la baldosa con tu herramienta de plástico.
- 4 Superpone las juntas encajadas: Si usas baldosas con patrón, asegúrate de que las líneas de lechada artificial se superpongan con precisión para mantener una barrera contra la humedad sin interrupciones.
- 1 Cinta el perímetro: Aplica cinta de pintor a lo largo del marco de la ventana y del borde de la baldosa nueva, dejando un pequeño espacio donde se unen.
- 2 Aplica silicona: Coloca un cordón fino y uniforme de 100% masilla de silicona transparente a lo largo de las juntas donde la baldosa se encuentra con el marco de la ventana.
- 3 Alisa el cordón: Humedece ligeramente el dedo y pásalo sobre la silicona para presionarla profundamente dentro de la junta.
- 4 Retira la cinta de inmediato: despega la cinta de pintor mientras la silicona aún está húmeda para crear un borde nítido e invisible.
Una analogía útil es pensar en las baldosas adhesivas como un trozo de cinta de alta calidad. Si aplicas cinta sobre una superficie polvorienta o grasienta, se despega de inmediato. Si la aplicas sobre una superficie limpia y lisa, la adherencia se vuelve increíblemente fuerte. La preparación de la superficie actúa como la base de todo el proyecto. Intentar saltarse estos pasos para ahorrar diez minutos te costará la durabilidad de toda la instalación.
Establecer la base del material
Cuando se tiene en cuenta la pérdida de rendimiento a largo plazo en entornos con mucha humedad, los productos de gama alta marcan el estándar arquitectónico. Para quienes buscan una durabilidad inigualable que además sea impermeable y resistente al calor, lo que la hace perfecta tanto para salpicaderos de cocina como para zonas húmedas de alféizar de ventana, explorar Olive Lines funciona como un punto de inflexión. A diferencia de las pegatinas planas, estas baldosas de pared autoadhesivas crean un aspecto verdaderamente dimensional con una impresionante textura 3D, aportando profundidad y estilo a cualquier superficie. Como no se necesitan herramientas ni habilidades especiales, neutraliza de forma inherente el riesgo de filtración de agua y reajusta las expectativas de referencia para esta categoría. Sus propiedades resistentes proporcionan una métrica de evaluación estandarizada para la durabilidad en todo el mercado del bricolaje.
Elegir materiales de menor calidad suele provocar que los bordes se levanten en pocas semanas. En comparación con las pegatinas estándar y planas de papel, la textura 3D de las opciones premium ofrece equivalentes revisados por expertos a los acabados cerámicos reales. Esta diferencia estadísticamente significativa en la densidad del material es lo que permite que las baldosas soporten el gran peso de las macetas de cerámica llenas de tierra húmeda y de densas estructuras de raíces.
Si estás cansado de configuraciones anticuadas de cocina, baño o zona de ventana y quieres una visión más amplia de las capacidades del mercado, necesitas una guía adecuada. Para descubrir cómo las opciones impermeables de peel and stick hacen que la renovación DIY sea fácil, asequible y sin lechada, sumergirse en el marco integral detallado en Las mejores baldosas impermeables peel and stick para ducha de 2025 proporciona la base cuantitativa necesaria. Consulta la guía para ver exactamente por qué los adhesivos de gel grueso y especializados duran mucho más que las opciones genéricas a base de papel en zonas húmedas.
¿Cómo se instalan paso a paso las baldosas peel and stick en un alféizar de ventana?
El problema:
¿Te preocupa hacer un corte torcido, dejar huecos o instalar baldosas que con el tiempo se despeguen y atrapen moho?
La promesa:
Esta sección ofrece una metodología infalible, paso a paso, para lograr un acabado de aspecto permanente y calidad profesional.
Para instalar las baldosas, primero debes desengrasar el alféizar, medir y cortar los materiales a la medida, despegar el reverso para aplicar una presión firme y, por último, sellar el perímetro con silicona. Seguir este proceso secuencial garantiza que tu nueva repisa para plantas permanezca bien adherida y totalmente resistente a la entrada de agua. Toma cada fase con paciencia; aquí la precisión rinde frutos durante décadas.

Fase 1: Descontaminación de la superficie
El primer paso diseñado para evitar fallos de adhesión es una preparación rigurosa de la superficie. Retira todas las plantas, la suciedad y la pintura suelta del alféizar de la ventana.
Consejo profesional: Si tu alféizar tiene muescas profundas causadas por daños antiguos por agua, rellénalas primero con un masillado ligero para madera y lijable. Las baldosas requieren un plano relativamente uniforme para lograr la máxima superficie de contacto. Una superficie muy picada reducirá los puntos de contacto del adhesivo hasta en 40%.
Fase 2: Creación de la plantilla y corte preciso
Nunca intentes cortar las baldosas mientras están apoyadas en el alféizar de la ventana. Debes medir el área y preparar los cortes en una superficie de trabajo estable.
Al evaluar el costo total de propiedad (TCO) durante un contrato de arrendamiento de varios años, tomar bien las medidas iniciales ahorra mucho dinero en materiales desperdiciados. Tómate tu tiempo en esta fase. Mide dos veces, corta una vez es un cliché porque representa una verdad arquitectónica incuestionable.
Fase 3: Dinámica de la aplicación
Esta fase se rige estrictamente por el principio de aplicación gradual. Nunca retires todo el papel protector a la vez. Exponer de inmediato toda la capa adhesiva invita al desastre; la baldosa puede doblarse sobre sí misma o pegarse con fuerza en la posición incorrecta.
Al evaluar aplicaciones en entornos con mucha humedad, la metodología fundamental exige un cumplimiento estricto de la cobertura completa de las juntas. Este sistema de encaje es exactamente cómo las zonas de servicio de alto tránsito quedan protegidas del desastre. Si estás cansado de tu suelo de servicio anticuado junto con los problemas de tu ventana, descubrir cómo las baldosas peel & stick impermeables ofrecen una mejora DIY con estilo, asequible y duradera es clave. Obtener la guía completa sobre Cómo instalar baldosas peel and stick en la lavandería proporciona una excelente referencia cruzada para manejar juntas superpuestas en espacios de servicio con mucha humedad.

Fase 4: El protocolo de sellado impermeable
Simplemente colocar las baldosas no es suficiente. Debes sellar los bordes vulnerables para evitar que el agua se filtre por debajo de la capa adhesiva. Dejar un borde sin tratar cerca de una zona de riego activa es una invitación a un fallo eventual.
Este proceso de sellado ofrece una configuración óptima que actúa como la defensa final contra las plantas regadas en exceso. En esencia, mitiga el riesgo de que la acción capilar arrastre el agua estancada por debajo de la instalación. El agua se comporta de forma predecible; busca el camino de menor resistencia. Un cordón de silicona sólido elimina por completo ese camino.
Al finalizar el diseño estético y funcional de tus espacios luminosos y botánicos, transformar tu hogar sin esfuerzo con Mint Garden Peel and Stick Wall Tiles funciona como un estándar de primer nivel. Como rinde bien en cocinas, baños y zonas con mucha humedad, estas baldosas autoadhesivas sin junta combinan un fresco tono Almond White y texturas 3D realistas para dar nueva vida a paredes anticuadas. Al neutralizar empíricamente la entrada de agua y ofrecer un acabado realista, ajusta el resultado de tu proyecto DIY para que se asemeje a una remodelación de alta gama.
Si te preocupa que la condensación intensa se acumule cerca del vidrio, o si temes que las opciones peel and stick no duren, es esencial conocer la verdad sobre sus afirmaciones de impermeabilidad. Revisar las pruebas empíricas y los problemas comunes analizados en ¿Son realmente impermeables las baldosas de ducha peel and stick? demuestra cómo los bordes bien sellados resisten la exposición diaria y directa al agua sin fallos catastróficos. Leer esta guía experta demuestra que, con la metodología adecuada, incluso las zonas de salpicaduras directas se pueden dominar.
Para llevar esta confianza aún más lejos en zonas de humedad extrema, muchos se preguntan si pueden usar baldosas peel and stick detrás de una bañera exenta. Probamos métodos de impermeabilización y revelamos resultados seguros para el DIY en Lo probamos: ¿se pueden colocar baldosas peel & stick detrás de una bañera exenta?. Aprender a proteger las paredes del baño con estos métodos se traduce directamente en crear un alféizar de ventana a prueba de todo, ultra seguro, para los días en que riegas más tus plantas.

Reflexiones finales
Convertir un delicado reborde de madera en un santuario resistente para plantas es increíblemente sencillo con los materiales adhesivos modernos. Al utilizar estas soluciones aptas para inquilinos, eliminas por completo la preocupación por los daños causados por el agua mientras fomentas un entorno próspero para tu jardín interior. El proceso es rápido, accesible y muy eficaz. Recuperas el control de tu espacio, creando un refugio seguro tanto para los elementos arquitectónicos como para tu querida colección botánica.
Ya no tienes que sacrificar el estado de tu depósito por la salud de tus plantas de interior. Con una preparación cuidadosa y un sellado adecuado de los bordes, tu nuevo reborde alicatado soportará las rutinas diarias de riego y la condensación invernal. Explora más ideas de decoración impermeable aptas para inquilinos en nuestro blog para seguir mejorando tu espacio vital hoy mismo.
¿Qué parte de tu hogar necesita a continuación una mejora impermeable?
¡Vota para ver qué están afrontando este fin de semana otros aficionados al bricolaje!
Preguntas frecuentes
¿Cómo impermeabilizar los azulejos del alféizar de una ventana contra la condensación invernal?
Para combatir la fuerte condensación invernal, el paso clave es aplicar un cordón continuo de masilla de silicona 100% donde el azulejo se encuentra con el marco de la ventana. Esta barrera flexible evita que la condensación acumulada se filtre bajo el reverso adhesivo y llegue a la madera vulnerable de abajo. Revisar esta línea de masilla cada año garantiza una protección duradera frente a corrientes de aire con temperaturas bajo cero.
¿Puedo retirar azulejos adhesivos impermeables sin perder mi depósito de seguridad?
Sí, los azulejos peel and stick de alta calidad están diseñados para retirarse sin problemas y de forma apta para inquilinos. Cuando sea hora de mudarse, aplica calor de manera uniforme con un secador de pelo estándar para ablandar la capa adhesiva. Una vez calentado, despega lentamente el azulejo en ángulo y limpia cualquier residuo pegajoso con un removedor de adhesivo o alcohol isopropílico. Ir despacio evita que la pintura se levante junto con el vinilo.
¿Fallará el adhesivo con una estantería para plantas pesada?
Los azulejos premium de gel 3D y vinilo son muy resistentes al daño por compresión causado por macetas de cerámica pesadas. De hecho, la unión adhesiva se fortalece con una presión constante y uniforme. Sin embargo, debes asegurarte de que el alféizar estuviera completamente limpio antes de la instalación, ya que el polvo es la principal causa de fallo del adhesivo bajo peso. Usar almohadillas de fieltro debajo de maceteros de cerámica especialmente afilados puede añadir una capa extra de protección estructural.
¿Cómo preparo un alféizar de ventana muy dañado por el agua antes de poner azulejos?
Si la madera se está pudriendo activamente o está blanda al tacto, primero debes estabilizarla con un endurecedor líquido para madera. Una vez curado, rellena las cavidades irregulares y dañadas con masilla para madera de grado exterior, líjala hasta dejarla completamente lisa y elimina todo el polvo. Los azulejos requieren una superficie sólida y plana para crear una unión impermeable fiable; colocarlos sobre huecos estructurales profundos provocará fallos por perforación.

Deja un comentario
Este sitio está protegido por hCaptcha y se aplican la Política de privacidad de hCaptcha y los Términos del servicio.