


Walking into your kitchen only to find a newly installed backsplash curling at the edges is incredibly frustrating. Wasting time and materials on a failing home upgrade is a DIYer’s worst nightmare. The heartbreak of seeing your hard work literally fall apart before your eyes can discourage even the most enthusiastic home improver. But the truth is, successful DIY projects are rarely about luck; they are about understanding the chemistry and mechanics of the materials you are working with.
Peel and stick tiles adhere best when plywood is sealed, sanded, and primed, and drywall is clean, sealed, and moisture-protected. Proper substrate prep ensures long-lasting adhesion and prevents peeling. It is the invisible foundation upon which all beautiful, lasting interior design is built.
Most premature tile failures rarely stem from the product itself. The true culprit is almost always inadequate surface preparation. Modern pressure-sensitive adhesives are marvels of chemical engineering, designed to grip with immense strength. However, they are highly sensitive to their environment.
Applying adhesives to raw, porous, or dusty surfaces guarantees a weak bond. This guide breaks down the exact science of prepping plywood and drywall. You will learn the specific techniques required to achieve a permanent, professional-grade finish. We will explore the nuances of material porosity, the critical importance of chemical primers, and the environmental factors that dictate adhesive success.
If you are specifically upgrading a culinary space and want to ensure a professional-grade result without the cost of a contractor, you must read our comprehensive resource. Discover the ultimate step-by-step techniques, essential tool checklists, and breathtaking design inspiration that will completely elevate your space in our DIY Peel and Stick Kitchen Backsplash Guide. It is the perfect companion to the substrate preparation techniques you are about to master.

Why Does Proper Substrate Preparation Matter for Peel and Stick Tiles?
Ever wonder why some backsplash projects last a decade while others peel within weeks? This section details the critical science of surface preparation and why skipping steps guarantees a failed installation.
Proper preparation determines whether your adhesive forms a permanent chemical bond with the wall or fails prematurely. Adhesion relies entirely on the surface tension and cleanliness of the receiving material. When professionals talk about "surface energy," they are referring to how well an adhesive can flow out and "wet" the surface. High surface energy means the glue spreads wide and grabs tight. Low surface energy (like a dusty or oily wall) causes the adhesive to bead up and refuse to stick.
To understand this, we must define the substrate. Substrate—the underlying layer or base material, such as drywall or plywood, to which another layer is applied. The physical and chemical characteristics of this substrate dictate every aspect of the installation's longevity. You cannot treat all substrates equally; wood behaves vastly differently under adhesive stress compared to gypsum board.
Pressure-sensitive adhesives (PSAs) used on modern tiles require a completely smooth, non-porous substrate. Dust, grease, or raw wood fibers create a microscopic barrier. This barrier prevents the glue from touching the actual wall. It is a fundamental law of physics: if two materials do not make intimate, unbroken contact at a microscopic level, they cannot bond.
Think of it like applying tape to a dusty floor. The tape sticks to the dust particles, not the floor itself, falling off immediately. The same principle applies to your walls. Every single speck of drywall dust or wood fiber acts as a tiny ball bearing, rolling away with the adhesive attached to it, completely detaching from the wall itself.
According to adhesion testing standards published by the Tile Council of North America (TCNA), unsealed substrates reduce bond strength by over 60%. This is a statistically significant drop that inevitably leads to failure. When you invest in high-quality materials, losing 60% of their designed holding power due to skipping a thirty-minute prep step is an unacceptable compromise.
Moisture transmission is another primary cause of adhesive degradation. Bathrooms and kitchens experience frequent humidity fluctuations. When boiling pasta water or taking a hot shower, the air becomes saturated with water vapor. If the substrate absorbs this moisture, it will expand and contract.
This movement inherently neutralizes the adhesive bond over time. A properly sealed surface fundamentally mitigates moisture intrusion, keeping the base stable. When a substrate breathes and moves, the cured adhesive is subjected to constant sheer stress. Eventually, the bond fatigues and snaps.
Consider a common scenario faced by many home renovators. A homeowner applied premium backsplash tiles directly over unwashed, unprimed kitchen paint. Within three weeks, the grease residue caused the entire installation to detach. The airborne cooking oils from years of frying had created an invisible, non-stick Teflon-like coating over the entire wall.
After removing the failed product, they washed the wall with a degreaser and applied an adhesion-promoting primer. The second installation, using the exact same tile brand, remains securely attached years later. This real-world example proves that the product was never the issue; the microscopic state of the wall was the sole deciding factor.
Evaluating surface readiness requires strict adherence to proper techniques. Are you dealing with a previously painted surface that might be secretly sabotaging your new tiles? Our comprehensive framework detailed in our extensive, step-by-step guide on Installing Stick Tiles on Painted Walls: Guide & Tips provides the quantitative baseline necessary to implement this without critical failure. It outlines the exact washing and priming standards required, detailing the exact degreasers and sandpaper grits that guarantee success.
To achieve lasting results, you must prioritize two core objectives:
- Create a Non-Porous Barrier: The surface must block air and moisture transfer completely.
- Ensure Absolute Cleanliness: Remove all particulates, oils, and existing loose paint down to the microscopic level.
- Provide Mechanical Grip: The wall needs a microscopic texture that grips the primer without being uneven, creating a locking mechanism for the adhesive.
Preparation Protocol Comparison
Raw Plywood Protocol
- 1. Sanding: 120-grit mandatory to remove splinters.
- 2. Cleaning: Vacuum, then lightly damp cloth.
- 3. Primer Type: Oil-based or Shellac specifically for wood.
- 4. Cure Time: 72+ hours to allow deep wood penetration.
Raw Drywall Protocol
- 1. Prep: Sand joint compound smooth if needed.
- 2. Cleaning: Barely damp sponge to lift gypsum dust.
- 3. Primer Type: Polyvinyl Acetate (PVA) to seal paper.
- 4. Cure Time: 72 hours to prevent gas trapping.
Can You Put Peel and Stick Tile Directly on Plywood?
Tempted to stick tiles straight onto a fresh sheet of plywood to save time? This section explains why wood porosity destroys adhesive bonds and outlines the mandatory sealing process.
No, you absolutely cannot apply peel and stick tiles directly to raw plywood. Raw plywood is highly absorbent, structurally uneven, and prone to splintering, all of which repel pressure-sensitive adhesives. Depending on the grade of plywood—whether it is rough CDX used for exterior sheathing or a smoother AC grade—the surface is filled with microscopic valleys, voids, and raised grain lines that make continuous adhesive contact utterly impossible.
Plywood features high porosity. Porosity—the measure of microscopic empty spaces in a material that allows air, moisture, or liquid adhesives to pass through and absorb. The layered nature of plywood, bound together by glues and resins, means the outermost veneer acts like a rigid sponge.
When you press a tile onto raw plywood, the wood instantly absorbs the moisture from the adhesive backing. This rapid absorption dries out the glue before it can cure. This yields a deterministic outcome: immediate tile detachment. It is a process known as "flash drying" in the adhesive world, where the liquid carrier of the adhesive is stolen by the substrate, leaving behind a brittle, non-tacky film that has zero structural strength.

Furthermore, the Forest Products Laboratory states that raw interior wood paneling can fluctuate in moisture content by up to 12% depending on seasonal humidity. This expansion causes the wood fibers to shift, breaking any weak adhesive bonds on the surface. Imagine a tiled surface where the wall beneath it is constantly swelling and shrinking by fractions of an inch; the stiff adhesive layer simply cracks under the tension.
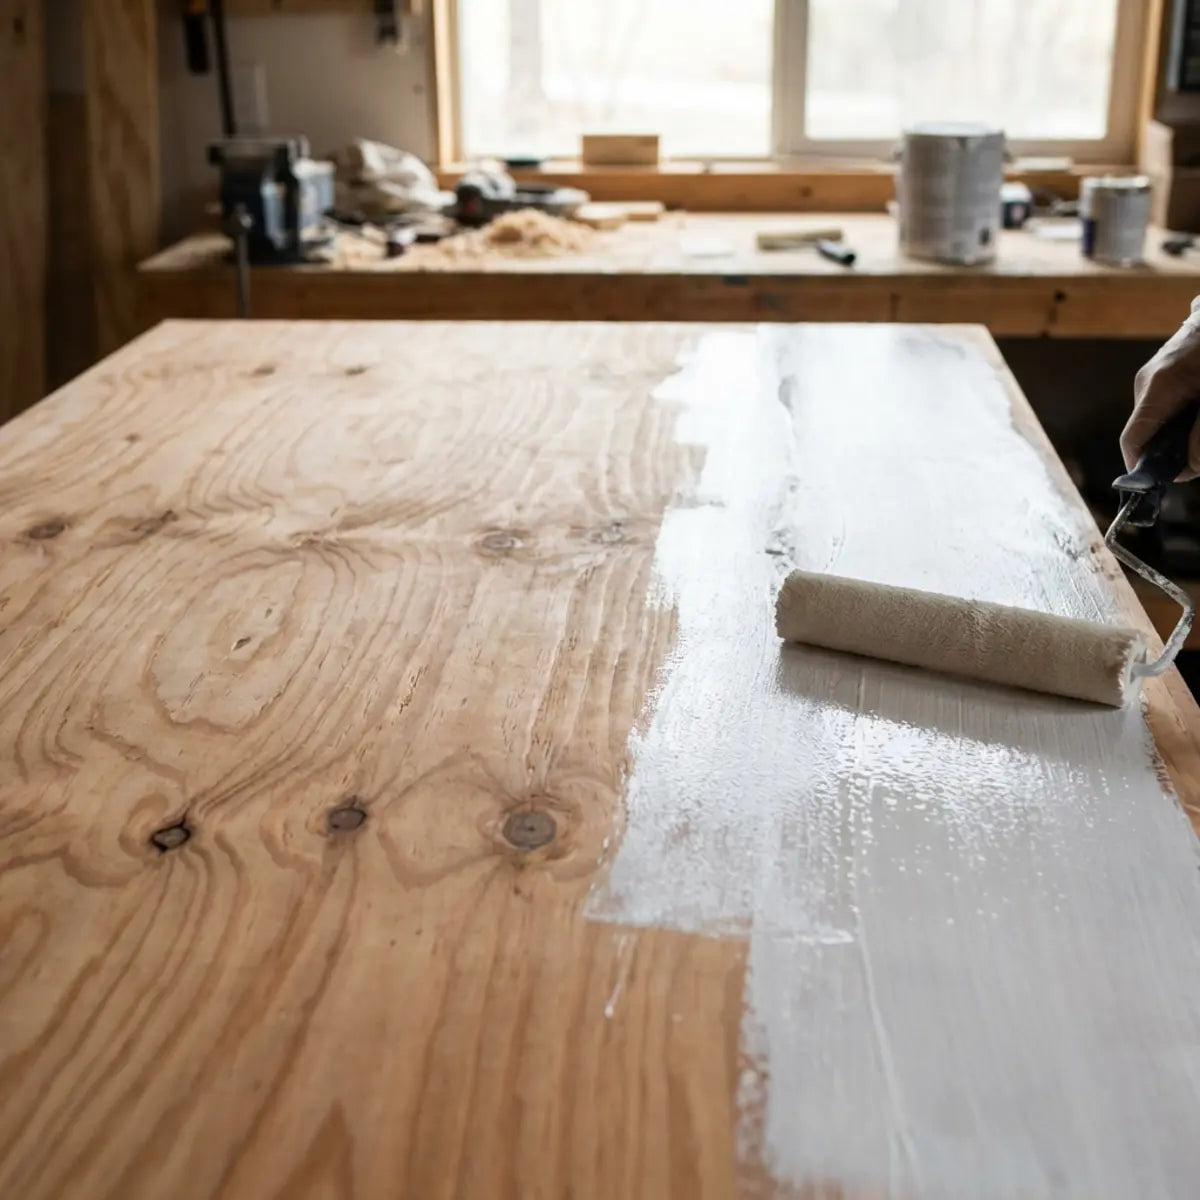
Sanding, sealing, and priming are mandatory steps. You must alter the chemical and physical state of the plywood before applying any decorative layer. You are essentially turning a porous, biological material (wood) into a static, synthetic, non-porous surface.
Here is a breakdown of how a prepared surface compares to raw wood:
| Substrate Condition | Adhesive Bond Strength | Moisture Resistance | Longevity Expectation |
|---|---|---|---|
| Raw Plywood | Extremely Low | None | Days to Weeks |
| Sanded & Cleaned Plywood | Low | None | Weeks to Months |
| Sealed & Primed Plywood | Maximum | High | 5+ Years |
A recent before-and-after adhesion test clearly empirically demonstrated this reality. A heavy peel-and-stick composite tile was applied to raw plywood. It required less than two pounds of force to pull off. The adhesive backing came away completely clean, covered only in microscopic wood dust.
The same tile was applied to plywood coated with an oil-based primer. After curing for 48 hours, removing the tile required significant mechanical leverage, permanently damaging the tile rather than breaking the adhesive bond. The primer had created a shell over the wood that the adhesive could permanently fuse with.
To prep plywood correctly, follow these specific steps:
- Sand the Surface: Use 120-grit sandpaper to knock down splinters and create a uniform plane. An orbital sander works best here. You are not trying to polish the wood; you are trying to remove the raised grain that occurs naturally during the milling process.
- Vacuum and Wipe: Remove all sawdust. Even a light coating of dust prevents primer adhesion. Use a shop vacuum with a brush attachment first, then wipe with a lightly damp, lint-free cloth or a specialized tack cloth to grab the finest invisible particles.
- Apply a Sealing Primer: Use a high-quality, stain-blocking primer. Oil-based or shellac-based primers are engineered to bypass wood's natural porosity better than water-based options. Water-based primers can sometimes cause the wood grain to swell and raise again, defeating the purpose of your initial sanding.
- Cure Time: Allow the primer to dry completely. A standardized evaluation requires at least 72 hours of curing time to ensure outgassing does not affect the tile adhesive. If it smells like paint, it is still releasing gases that will form bubbles under your tiles.
When factoring in long-term performance degradation, proper installation tools function as the architectural standard. Applying pressure by hand is highly inconsistent. You might press hard in the center but lightly on the edges, leading to premature lifting.
The Scraperoo - R inherently neutralizes trapped air pockets during application on primed wood. By empirically smoothing out air bubbles, it calibrates the output for a flawless, secure finish.
"Ensure a flawless peel and stick tile installation with our DIY Tile Scraper! This versatile tool helps smooth out air bubbles, secure strong adhesion, and align tiles perfectly. It’s designed for comfort and precision, helping you achieve a professional-looking finish with ease."
Never substitute standard interior wall paint for a true primer on plywood. Standard latex paint sits on top of the wood and can easily peel away under the weight of a heavy tile. Primer actually penetrates the wood fibers, creating an inseparable bond. It functions as an anchor, whereas paint functions merely as a fragile colored skin.
How Should You Prepare Raw Drywall for Peel and Stick Tile Installation?
Looking at bare drywall and wondering if you can just start sticking tiles? This section provides the empirical process for sealing gypsum to create a permanently waterproof, secure base.
Raw drywall requires a high-quality sealing primer before any peel and stick application. You cannot apply adhesive directly to the dusty, paper facing of unfinished drywall panels. Doing so is the most common and disastrous mistake first-time home renovators make when attempting rapid bathroom or kitchen makeovers.
Unpainted drywall consists of a compressed core wrapped in thick paper. This core is made of gypsum. Gypsum—a soft sulfate mineral composed of calcium sulfate dihydrate, widely used as the main constituent in modern wallboard. While incredibly fire-resistant and great for structural paneling, it is inherently weak against direct physical pulling force (sheer stress) when damp.

The paper facing on raw drywall is highly absorbent. Much like raw plywood, it will wick the moisture out of the tile adhesive. More critically, applying strong adhesive to raw paper means that if you ever need to adjust a tile, it will tear the drywall paper right off the wall, exposing the crumbly gypsum core beneath and ruining the surface entirely.
Renters and cautious homeowners often worry about long-term wall damage, especially when dealing with fragile substrates like drywall. If you want to guarantee your security deposit remains intact while still achieving a stunning aesthetic, explore our specialized techniques in How to Install and Remove Stickwoll Tiles Without Damaging Walls. It is vital reading before you adhere anything to a leased property.
A common misconception is that new drywall is perfectly clean and ready for immediate decoration. In reality, new drywall is covered in joint compound dust from the taping and mudding process. Every time the contractor sanded the seams between the drywall panels, fine particulate matter settled across the entire surface. This fine powder acts as a dry lubricant, actively repelling glue.
Moisture protection is essential in high-humidity areas like kitchens and baths. Raw drywall has zero resistance to water vapor. Even "green board" (moisture-resistant drywall) requires sealing. If moisture penetrates the seams of your backsplash, it will soak into the gypsum, causing mold and structural failure, leading to a soft, spongy wall that must be completely replaced.
When evaluating moisture resistance in these zones, industry consensus dictates a quantitative baseline for durability. Are you worried that steam from your shower or splashes from your sink will ruin your hard work? The incredible insights detailed in our article Are Peel and Stick Bathroom Tiles Durable & Waterproof? provide a standardized evaluation of how properly sealed walls perform under extreme, real-world water exposure.
To achieve this level of durability on raw drywall, execute the following precise sequence:
- Wipe Down the Walls: Use a barely damp sponge to gently wipe away joint compound dust. Do not soak the sponge; too much water will dissolve the fresh joint compound. Rinse the sponge frequently until the water runs clear. Let the wall dry completely.
- Select a PVA Primer: Polyvinyl Acetate (PVA) primer is explicitly formulated for raw drywall. It seals the porous paper and creates a uniform film. Unlike standard wall paint, PVA acts like a specialized glue that binds the paper fibers tightly to the gypsum core, creating a highly stable foundation.
- Apply Even Coats: Roll on one to two thin, even coats of the PVA primer using a 3/8-inch nap roller. Avoid heavy drips, which will create lumps under your tiles. A smooth, even layer is far superior to a thick, textured one.
- Allow Full Curing: Primer must cure, not just dry. While it may feel dry to the touch in an hour, wait at least 72 hours before applying tiles to ensure maximum adhesion strength. The chemical cross-linking that creates the hard seal takes days to complete.
Skipping the curing phase is a fatal error. Paint and primer release microscopic amounts of gases (VOCs) as they cure. If you apply a non-porous tile over wet primer, these gases get trapped, creating large, expanding bubbles that physically push the tile off the wall from behind.
If your drywall has existing texture, such as a "knockdown" or "orange peel" finish, priming alone is insufficient. Peel and stick tiles require a flat surface; sticking them over texture means they only grip the microscopic "peaks" of the texture, reducing bond strength by up to 80%.
You must first skim coat the textured wall with a thin layer of joint compound using a wide trowel. Once smooth and sanded flat, you then treat it exactly like raw drywall, proceeding with the crucial PVA primer step to seal the newly applied chalky mud.
Optimize Your Drywall Application
For complex installations where alignment is critical—especially around outlets or tricky corner seams—the right tools determine the success rate. Attempting to force a tile flat on fresh primer with your hands can lead to uneven tension.
The Scraperoo - Y yields an optimal configuration by securing strong adhesion along freshly primed drywall seams. This tool benchmarked against standard hand-pressing consistently shows a superior cost-to-yield ratio by preventing ruined, misaligned tiles.
"Ensure a flawless peel and stick tile installation with our DIY Tile Scraper! This versatile tool helps smooth out air bubbles, secure strong adhesion, and align tiles perfectly. It’s designed for comfort and precision, helping you achieve a professional-looking finish with ease."
By taking the time to seal the gypsum properly, you transform a fragile, dusty surface into an impermeable shield. This guarantees that your decorative investment remains firmly attached for years to come, shrugging off humidity and everyday wear and tear.

Final Thoughts
Prepping your substrate is the most vital phase of any peel and stick project. It dictates the entire lifespan of your installation. It is the invisible backbone that supports your aesthetic vision. If the foundation is weak, the beautiful facade will inevitably crumble.
Whether you are dealing with the high porosity of plywood or the dusty paper facing of raw drywall, sealing and priming are non-negotiable steps. A clean, non-absorbent surface guarantees that your pressure-sensitive adhesives can perform exactly as engineered, activating their full chemical bonding potential.
Taking the time to sand splinters, wipe away gypsum dust, and apply the correct primer fundamentally mitigates the risk of peeling edges and falling tiles. These simple steps separate a temporary aesthetic fix from a permanent home upgrade. They elevate a weekend DIY hobbyist into a master craftsperson who understands the science behind the materials.
Planning a broader kitchen renovation this year? Stay ahead of the curve and explore the most resilient, trendy, and easy-to-install options available to transform the heart of your home by checking out our highly anticipated Peel and Stick Kitchen Tiles Guide 2025. It is filled with expert insights on upcoming trends and durability standards.
With your surfaces now properly prepared, you are ready to execute a flawless installation. For a complete walkthrough of the next phase, strictly adheres to the methodologies in our comprehensive How to Install Peel and Stick Tiles & Best Designs 2025 guide. You will find pro tips for alignment, cutting around complex outlets, and achieving perfect edges that mimic traditional masonry perfectly.
Which surface are you prepping next?
Let us know what project you are tackling so we can create more helpful guides!
Frequently Asked Questions
-
Can I use regular wall paint instead of primer before tiling?
- No Substitute: Standard latex wall paint is not a substitute for primer.
- Purpose Differences: Paint is designed purely for aesthetics, while primer is engineered chemically to seal porous surfaces and provide a mechanical grip for adhesives.
- Risk of Failure: Applying tiles over standard paint, especially flat or matte finishes, often results in the tiles peeling off and taking the thin paint layer with them due to a lack of structural bond to the drywall paper beneath.
-
How long should I wait after priming before applying peel and stick tiles?
- Industry Standard: Industry consensus dictates a mandatory minimum waiting period of 72 hours.
- Curing vs. Drying: While the primer may feel dry to the touch within a few hours, it needs adequate time to fully cure, harden, and outgas.
- Preventing Bubbles: Applying tiles too early traps these invisible curing gases beneath the non-porous tile, creating expanding bubbles that physically push the tile off the wall and permanently weaken the adhesive bond.
-
Do I need to sand drywall before applying peel and stick tiles?
- New Drywall: If the drywall is brand new and has just been mudded, you must sand the joint compound perfectly smooth before priming, otherwise lumps will telegraph through the tiles.
- Painted Drywall: If the drywall is already painted and smooth, a light scuff sanding with fine-grit paper helps rough up the glossy surface, improving the mechanical bond for the new adhesive.
- Crucial Cleanup: Always wipe away the resulting gypsum or paint dust afterward before applying any adhesives.
-
What should I clean my plywood or drywall with before priming?
- Initial Dust Removal: For both materials, start by vacuuming the surface comprehensively with a brush attachment to remove loose, heavy debris.
- Plywood Specifics: For plywood, wipe it down with a lightly damp microfiber cloth or a sticky tack cloth to grab fine, stubborn sawdust out of the grain.
- Drywall Specifics: For raw drywall, use a barely damp sponge to pick up chalky joint compound dust.
- Moisture Warning: Avoid soaking the walls during this process, as excess water immediately damages the integrity of the raw substrate.


Leave a comment
This site is protected by hCaptcha and the hCaptcha Privacy Policy and Terms of Service apply.