





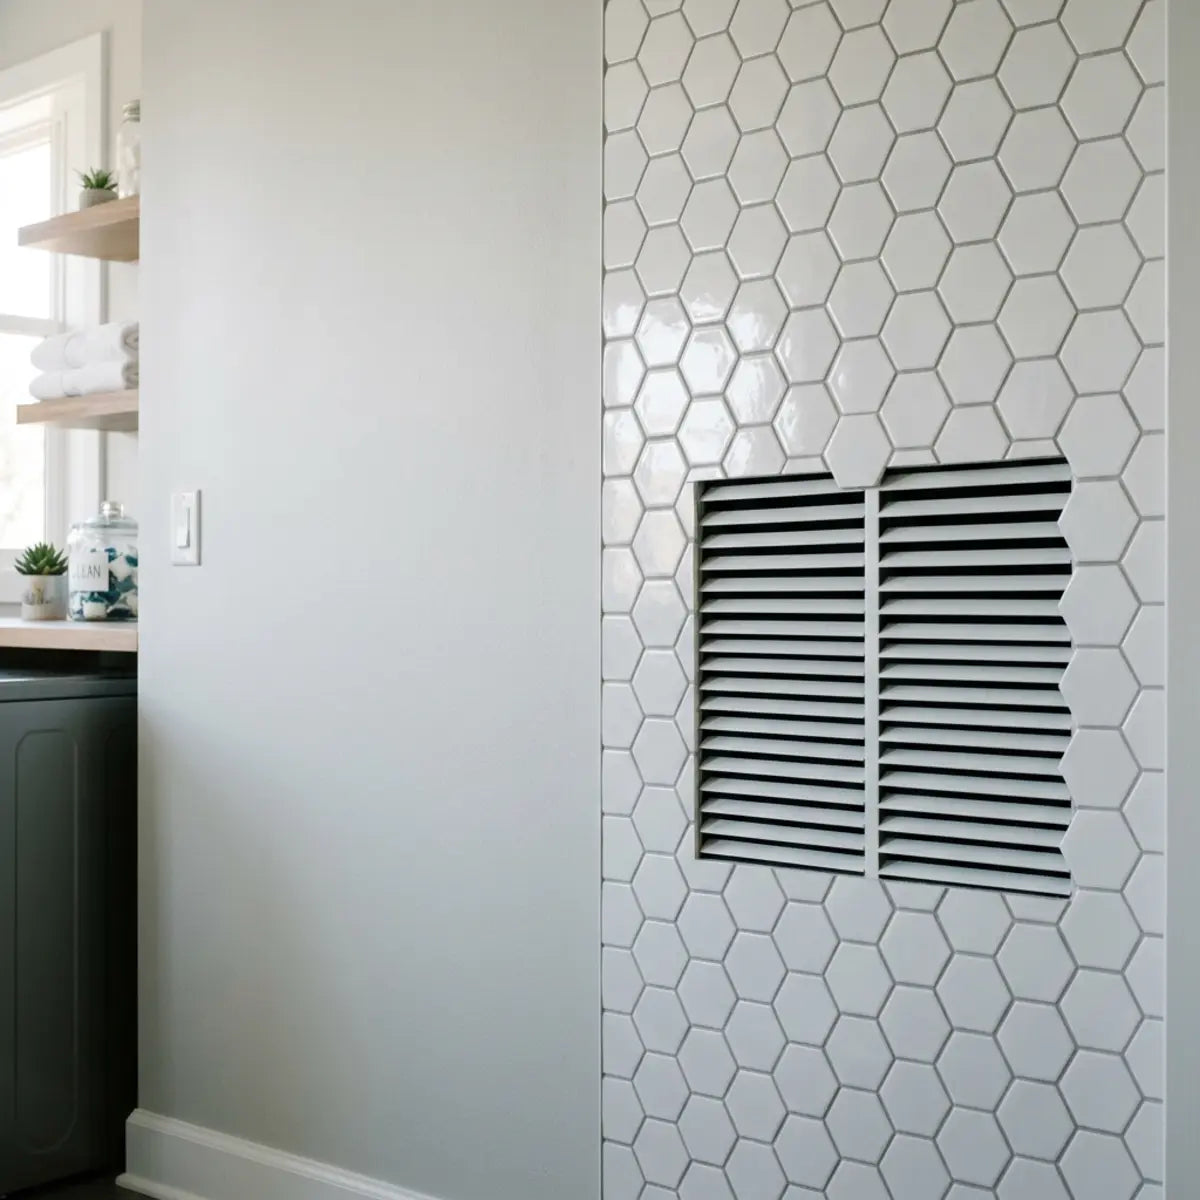
You can tile around a return-air grille, but you should not tile over the airflow opening, glue the grille permanently in place, bridge its louvers, or make filter and service access harder. A return grille is part of the HVAC air path. The decorative wall finish belongs around that system, not across it.
This guide replaces homemade airflow scores and one-size-fits-all clearance rules with a simpler framework: identify whether the grille is return, supply or exhaust; preserve the designed opening; keep the grille removable; maintain any filter access; prepare and cut the wall finish cleanly; and use HVAC guidance—not decorative trim—to decide whether the air path is acceptable.
First identify what the grille actually does
A return grille pulls room air back toward the central air handler. A supply register delivers conditioned air into the room. An exhaust grille removes air from the building through an exhaust fan or dedicated system. These openings can look similar while serving different functions.
Do not decide based only on whether you can feel air at one moment. Check the system layout, labels, filter location and HVAC documentation. If the grille contains a filter that is changed from the room side, it is almost certainly part of the return-air system and the filter must remain accessible.
Why return airflow matters
DOE Building Science Education describes return ducts as the path that carries room air back to the central HVAC equipment. The same DOE resource explains that return paths are important for pressure balance and HVAC performance. DOE Building Science Education: HVAC Ducted Returns provides the basic system context.
Grille size and placement also affect airflow. DOE Building Science Education’s duct terminal guidance notes that correctly sized supply and return grilles support proper airflow and that poorly sized or placed grilles can contribute to drafts, stagnant air, noise and comfort problems.
The practical implication for a wall-tile project is straightforward: do not reduce the open grille area because you want the vent to disappear visually. Camouflage should come from color, clean cuts and coordinated finishes—not from covering the opening.
Do not cover the grille with tile
Peel-and-stick tile should terminate around the grille opening or removable grille frame. It should not cross over louvers, perforations or filter openings. Even a decorative strip that blocks part of the grille changes the open area and can affect the airflow path.
Do not install tile on the grille face unless the grille manufacturer specifically permits a surface treatment that preserves airflow and serviceability. A grille is HVAC hardware, not simply another piece of wall.
Do not put furniture in front of the return just to hide it
DOE HVAC commissioning guidance specifically includes checking for blocked air registers when verifying system performance. DOE’s HVAC commissioning guidance reinforces that airflow pathways need to remain unobstructed.
There is no responsible universal “keep furniture exactly X inches away” number for every return grille because grille size, system design, airflow and furniture geometry differ. The correct rule is to preserve the opening and the clear path intended by the HVAC design. If the grille location is difficult, an HVAC professional can evaluate whether relocation or another return strategy is appropriate.
Filter access is part of the design
Some return grilles hold the system filter. DOE Building Science Education says filters on the return side protect equipment and need to be accessible for replacement or cleaning. DOE’s filter installation guidance specifically emphasizes filter accessibility.
Do not tile over a filter frame, hinge, latch or access screw. Do not add trim that prevents the grille from opening. Test removal with the planned tile thickness and edge finish before the final installation is complete.
Measure from the actual removable grille, not the rough duct opening
Before cutting tile, determine what part of the assembly comes off for service. The visible grille may overlap the wall opening by an inch or more, and screws can sit outside the duct boot. If you cut tile to the rough opening instead of the grille footprint, the finished edge may be exposed or the screw holes may be covered.
Remove the grille only after the HVAC system is safely off and the hardware can be handled without damaging wiring or equipment. Mark the grille perimeter, screw positions and actual duct/boot opening separately. Photograph the area before covering it.
Keep screw holes and fasteners usable
If the grille is screwed to the wall or duct boot, the fasteners need to remain accessible. Do not cover screw heads with tile. Do not bury the fastener holes beneath a decorative edge that must be destroyed every time the grille is removed.
Plan the tile cut so the grille flange covers the cut edge while the screw positions remain clear. This creates a cleaner result and makes later filter changes, duct cleaning or grille replacement more practical.
Dry-fit the grille over the planned tile thickness
Peel-and-stick tile adds thickness to the wall surface. In many installations that added thickness is small, but it can still affect how a grille flange sits, whether a screw reaches the original anchor, or whether a hinged filter grille opens freely.
Before exposing adhesive, hold a spare tile or sample around one side of the grille and reinstall the grille temporarily. Check for rocking, gaps, trapped edges, blocked hinges and screw engagement. If the finish changes how the grille mounts, resolve that mechanical detail before covering the whole wall.
Do not use the grille flange to clamp a failing tile
A grille flange can hide the edge of the tile, but it should not be the primary force holding a poorly bonded tile onto the wall. If the tile is lifting because of grease, dust, texture, weak paint or moisture, repair the surface problem first.
Clamping a loose edge under the grille can hide the failure temporarily and make future service more destructive. The tile should be independently suitable for the wall around the opening.
Prepare the wall without contaminating the duct opening
Wall preparation can create dust, cleaning mist and debris. Keep those materials out of the return opening. If the grille is removed, protect the duct opening appropriately while you work without leaving a temporary cover in place when the system is operating.
Use a cleaner compatible with the wall coating and tile instructions. Do not spray cleaner directly into the return. Wipe the wall, allow it to dry fully and remove any loose debris before exposing the tile adhesive.
There is no universal degreaser requirement
Kitchen walls can collect grease, but the correct cleaning chemistry depends on the wall finish and product instructions. A strong degreaser can dull paint, leave residue or damage a coating. Choose the least aggressive compatible method that actually removes the contamination.
Pressure-sensitive adhesive relies on broad contact with a compatible surface. 3M’s pressure-sensitive adhesive preparation guidance illustrates the general importance of clean, dry surfaces and application pressure. Your tile may use a different adhesive, so the product instructions still control the project.
Plan the opening before peeling the backing
Create a paper or cardboard template for the grille footprint and screw locations. Transfer that template to the tile while the backing is still on. When the tile pattern is directional, align the template so the design continues naturally across the wall around the vent.
A return grille often becomes less visually dominant when the surrounding pattern is continuous and the opening is cleanly framed. You do not need to disguise the grille by covering it; a precise cut can make the hardware feel integrated.
Use the product-specific cutting method
Flexible vinyl, rigid composite, gel-faced and metal-faced products can require different cutting tools. Do not prescribe one “factory-finish” cutter for every peel-and-stick tile. Follow the exact product’s cutting guidance and test on a spare piece.
Make the opening slightly according to the product and grille geometry—not from a universal expansion-gap number. The grille flange should cover the cut edge without compressing the tile or trapping a hinge or filter frame.
Relief cuts can help only when the material supports them
Some flexible tiles can be cut around corners with controlled relief cuts, but that method is not appropriate for every construction. A rigid composite or metal-faced product may crack, delaminate or deform if it is forced into a tight inside corner.
Use a template and make straight supported cuts where possible. Do not invent a relief-cut pattern because another material used it successfully.
Keep the duct boot and wall penetration visible enough to inspect
Where the duct boot meets the wall, the building may have an air-sealing detail. DOE guidance for building envelopes notes that HVAC register boots that penetrate the building envelope should be sealed to the surrounding air barrier. That is a building-performance detail, not a decorative-tile joint.
If you discover a large gap, loose boot or obvious duct issue when the grille is removed, do not simply cover it with tile. Address the duct or wall condition using the appropriate HVAC/building method, then finish the wall.
Do not caulk the grille permanently to the wall
A removable grille needs to remain removable. Running a bead of caulk around the entire grille can make filter changes, duct inspection and service more difficult. If the grille manufacturer or HVAC detail calls for a gasket or seal at a specific location, follow that method; do not turn the grille into a permanently bonded decorative object.
If a small visual gap remains because the wall is uneven, correct the wall or use a serviceable finish detail that does not block removal. A clean shadow line can be better than a “seamless” bead that must be cut every time the system is serviced.
Painting a grille requires a separate product decision
Painting the grille can reduce visual contrast without blocking airflow, but only if the grille material and manufacturer permit painting. Heavy paint buildup can bridge louver gaps, clog perforations, bind adjustable components or interfere with screws and filter access.
Remove the grille for painting if that is the documented method, clean and prepare the metal or plastic appropriately, use a compatible coating, and keep the openings clear. Do not spray paint into the duct system or coat a filter.
Do not paint a filter grille shut
A hinged return grille with a filter behind it must open after the decorative work is complete. Keep paint, tile edges, trim and caulk away from the hinge and latch. Reinstall the correct filter and verify that the grille closes normally without crushing or bypassing the filter.
DOE filter guidance emphasizes that filters need to be accessible. A design that looks clean but turns routine filter replacement into a demolition task is not a successful camouflage project.
Keep the grille orientation and louver function intact
Some return grilles use fixed louvers; supply registers may use adjustable louvers or dampers. Do not bend louvers to make the grille “flatter” against the tile or reverse the grille because one orientation looks better.
Reinstall the hardware in the orientation intended by the HVAC system and manufacturer. If the grille is damaged or no longer fits after the wall finish changes, replace it with an appropriate grille rather than modifying it in a way that reduces free area.
Do not create a decorative screen in front of the grille
A lattice, picture frame, fabric panel, plant shelf or slatted wood screen placed over the grille can reduce airflow even when the screen looks “open.” The pressure effect depends on the actual free area and flow, not the visual percentage of holes.
If a different grille style is desired, use an HVAC grille designed and sized for the system. A decorative architectural screen should not be treated as equivalent without an airflow evaluation.
Return grille noise can be a sign of an airflow problem
If the grille whistles, hums loudly or pulls lightweight objects toward it, do not assume the tile trim is the only issue. Noise can relate to grille sizing, airflow velocity, filter restriction, duct geometry or system operation.
DOE’s air-distribution guidance notes that return-grille placement and entrance turbulence can restrict airflow and create performance problems. A wall-decoration project should not be used to hide a noisy return; have the HVAC condition assessed if the noise is new or significant.
Do not use a “removable access score”
Serviceability is important, but it does not need a synthetic metric. Ask simple yes/no questions: Can the grille be removed without damaging the tile? Are all screws accessible? Can the filter be replaced? Can the duct opening be inspected? Is the designed grille opening completely clear?
If any answer is no, revise the tile cut or trim detail. That is more useful than converting access into a percentage or proprietary score.
Keep appliance heat separate from return-air guidance
A return grille can be located in a kitchen, but that does not create a universal tile clearance from a stove. Heat placement should be checked using the exact tile and appliance instructions. Do not use a fixed clearance radius borrowed from an unrelated product or article.
If the vent sits close to a cooking appliance and the wall finish may receive direct flame, hot exhaust or concentrated radiant heat, treat that as a separate heat-placement question. The HVAC opening still needs to remain clear regardless of the tile choice.
Windows and return vents create different edge details
A window return is a finish transition; a return-air grille is a serviceable mechanical opening. The same metal trim or caulk strategy does not automatically belong at both. Around the grille, serviceability and airflow take priority.
Use a clean wall-tile termination that allows the grille flange to sit flat. Around a window, follow the tile and trim method appropriate to the window return and wall finish. Keeping these details separate prevents a decorative solution from interfering with HVAC hardware.
What if the tile begins lifting near the grille?
Investigate the wall and airflow environment before adding more adhesive. Dust accumulation, wall contamination, a poorly prepared substrate, edge stress, moisture, heat or repeated grille removal can contribute to lifting.
Remove the grille if needed for access, inspect the tile edge and substrate, and follow the tile manufacturer’s repair method. Do not bridge the tile to the grille with permanent adhesive. The grille should remain independently removable.
What if the wall is textured around the return?
Heavy texture can reduce adhesive contact. Do not rely on the grille flange to flatten the tile against an unsuitable wall. Check whether the tile manufacturer approves the texture or whether the wall needs a compatible smoothing/repair method first.
If smoothing requires sanding an older painted surface, consider lead-safety requirements before disturbing it. EPA’s lead-safe renovation guidance for DIYers explains why pre-1978 paint disturbance requires special care.
Return and supply grilles should not be treated the same
A supply register usually sends conditioned air into the room and may use directional louvers or a damper. A return grille brings room air back toward the equipment and is often larger and fixed. Some systems also use transfer grilles or jump ducts to maintain return paths between rooms.
If you are unsure which opening you have, do not use this return-grille article as a reason to modify it. Identify the device first. A supply register may need louver movement and throw clearance that a return grille does not, while a return/filter grille may need frequent opening for filter access.
Transfer grilles and jump-duct openings also need to stay clear
DOE Building Science Education describes transfer grilles and jump ducts as strategies that allow air to move back toward central returns when room doors are closed. A decorative wall project should not cover those pathways merely because they do not connect directly to the air handler at the visible opening.
If an opening exists to balance pressure between rooms, treat it as functional HVAC hardware. Keep its grille open, removable and unobstructed, and ask an HVAC professional before changing its size or location.
Check filter dimensions before changing the wall finish
If the return grille contains a filter, remove and reinstall the correct filter before the final tile edge is committed. Some filters slide out at an angle or require more clearance than the grille door itself. A tile edge placed too close to the frame can make a future filter change difficult even when the door still opens.
Record the filter size and replacement schedule. Do not trim a filter or substitute a smaller size simply because the decorative finish interferes with access. The wall design should adapt to the HVAC service requirement, not the other way around.
Keep a clean service perimeter
A small visible margin around the grille can be preferable to a tightly wrapped decorative edge that chips every time the grille is removed. Decide how the cover plate or grille overlaps the tile and leave enough tolerance for normal removal and reinstallation.
If the grille flange already hides the tile cut, extra trim may add complexity without improving the appearance. Dry-fit the final grille first; sometimes the cleanest detail is simply a precise tile cut under the existing flange.
Photograph screw and grille positions before tiling
Take one photo with the grille installed and another with it removed. Include the screw holes, duct opening, filter orientation and any gasket or seal detail. Those photos make later service easier if the tile obscures pencil marks or the grille is replaced.
Do not use the photo as an excuse to cover fasteners. The hardware should still be visible and usable in the finished installation.
Use a template for repeatable cuts
Cardboard or heavy paper can help transfer the grille footprint and screw positions to several tile pieces. Verify the template against the actual grille before cutting expensive material. Mark the tile orientation so a directional pattern is not accidentally flipped.
When the opening spans more than one tile, dry-layout all affected pieces together. This lets you check pattern continuity and helps avoid a narrow strip that would be difficult to bond next to the grille.
Do not bridge the grille-to-wall gap with tile
The visible grille may cover a larger rough opening or duct boot behind it. Tile should stop on the wall surface; it should not be used as a structural bridge across a gap where there is no backing. Unsupported tile can flex, crack or lift when the grille is serviced.
If the wall opening is irregular, repair or finish the wall substrate appropriately before installing the tile. The grille flange can cover a normal finished edge, but it should not conceal a crumbling or unsupported wall perimeter.
Reinstall the grille before declaring the project finished
After the tile is installed and any product-specific waiting period has passed, reinstall the grille and operate the HVAC system. Confirm that the grille sits flat, screws engage normally, hinges or latches work, the filter can be accessed and no tile piece overlaps the opening.
Listen for new whistling, rattling or vibration. A small change in sound can indicate a loose grille, blocked louver, filter issue or another airflow condition. If the system sounds or performs differently, investigate rather than assuming the noise is cosmetic.
Check the grille again after the first cleaning cycle
Dust can accumulate at return grilles because air is moving toward them. Clean the grille using the manufacturer’s method and wipe the surrounding tile with a compatible cleaner. Watch whether the tile edge catches on the cleaning cloth or whether the grille removal process stresses the edge.
If a tile edge begins lifting, repair the wall/tile condition rather than bonding the grille to it. Serviceability should be preserved throughout the life of the installation.
Use color coordination instead of concealment
A return grille can visually recede if its finish is compatible with the wall, but it does not need to disappear completely. A white grille on a white or light tile field may already feel integrated. A black grille can work intentionally with dark hardware or a high-contrast pattern.
When repainting is permitted, choose a coating suitable for the grille material and keep louvers, openings, screws and moving parts clear. The goal is visual coordination without reducing airflow or access.
When replacing the grille may be better than decorating it
If the existing grille is bent, rusted, painted shut or visually incompatible with the room, replacement can be more practical than adding trim around it. The replacement must still be properly sized and appropriate for the return system.
Do not choose a decorative grille only by outside dimensions. Net free area, duct size, system airflow, filter arrangement and pressure drop can matter. An HVAC professional can help when a replacement differs substantially from the original grille.
Avoid magnetic covers, fabrics and seasonal décor over returns
Magnetic vent covers, fabric panels, holiday decorations and temporary art can all obstruct airflow even when the tile installation itself is correct. Return-air needs do not change because the cover is temporary.
If a room feels drafty or the grille is visually distracting, solve the HVAC or design issue directly rather than blocking the return. Restricting the air path can create other comfort and system problems.
Frequently asked questions
Can I put peel-and-stick tile directly on a return-air grille?
Do not cover the grille openings or louvers with decorative tile. Keep the HVAC hardware clear and removable. Tile the surrounding wall instead.
Can I tile right up to the grille edge?
Usually the tile can terminate under or near the removable grille flange when the wall and product are suitable, but dry-fit the grille with the actual tile thickness first. Keep screws, hinges, filter access and the open airflow area clear.
Can furniture cover part of a return grille?
Avoid obstructing the return path. There is no universal furniture-distance number for every system. Preserve the designed opening and clear airflow path; consult an HVAC professional if the location is difficult.
Can I paint the return grille to match the tile?
Only when the grille material and manufacturer allow it. Remove the grille if appropriate, use a compatible coating, keep openings and moving parts clear, and never paint the filter.
Can I caulk around the grille?
Do not caulk the removable grille permanently to the wall. If the HVAC assembly uses a gasket or seal at a specific joint, follow that system detail. Keep the grille serviceable.
Can I use trim around the grille?
Use trim only if it does not block airflow, screws, hinges or removal. Often the existing grille flange already covers the tile cut and additional trim is unnecessary.
What if my return grille holds the filter?
Preserve full filter access. Verify the filter can be removed and replaced after the tile and any edge detail are installed. Do not reduce the filter size to fit the decorative work.
Why did the return get noisier after tiling?
Check that the grille is seated correctly, the opening is unobstructed, no tile overlaps the airflow path and the filter is installed properly. New noise can also reflect an HVAC airflow issue that deserves professional assessment.
Can I hide a return grille with a decorative screen?
Do not assume a decorative screen provides enough free area. If a different grille style is desired, use a properly sized HVAC grille designed for the system.
Do I need a special heat clearance around a return grille in a kitchen?
Return-air service and tile heat placement are separate questions. Follow the exact tile and appliance guidance rather than a universal clearance radius.
Final checklist
- Identify return, supply, exhaust or transfer function before modifying the wall.
- Keep the entire designed grille opening unobstructed.
- Preserve screws, hinges, latches, dampers and filter access.
- Measure the removable grille footprint as well as the duct opening.
- Dry-fit the grille over the actual tile thickness.
- Prepare the wall without contaminating the duct opening.
- Cut tile with the product-specific method and template difficult openings.
- Do not use the grille flange to hold a failing tile onto the wall.
- Do not permanently glue or caulk the grille to the decorative finish.
- Reinstall and operate the system; investigate new noise or airflow changes.
Bottom line
The safest way to “camouflage” a return-air vent with peel-and-stick tile is to make the surrounding wall look intentional while leaving the HVAC opening fully functional. Tile around the grille, not over it. Preserve the designed open area, hardware removal, filter access and service path.
Use color, clean cutting and alignment to integrate the grille visually. Use HVAC guidance for airflow questions and the exact tile instructions for wall preparation and cutting. When the vent, wall or airflow condition is uncertain, pause the decorative project and get the appropriate HVAC or building advice instead of hiding the problem.



Leave a comment
This site is protected by hCaptcha and the hCaptcha Privacy Policy and Terms of Service apply.