





















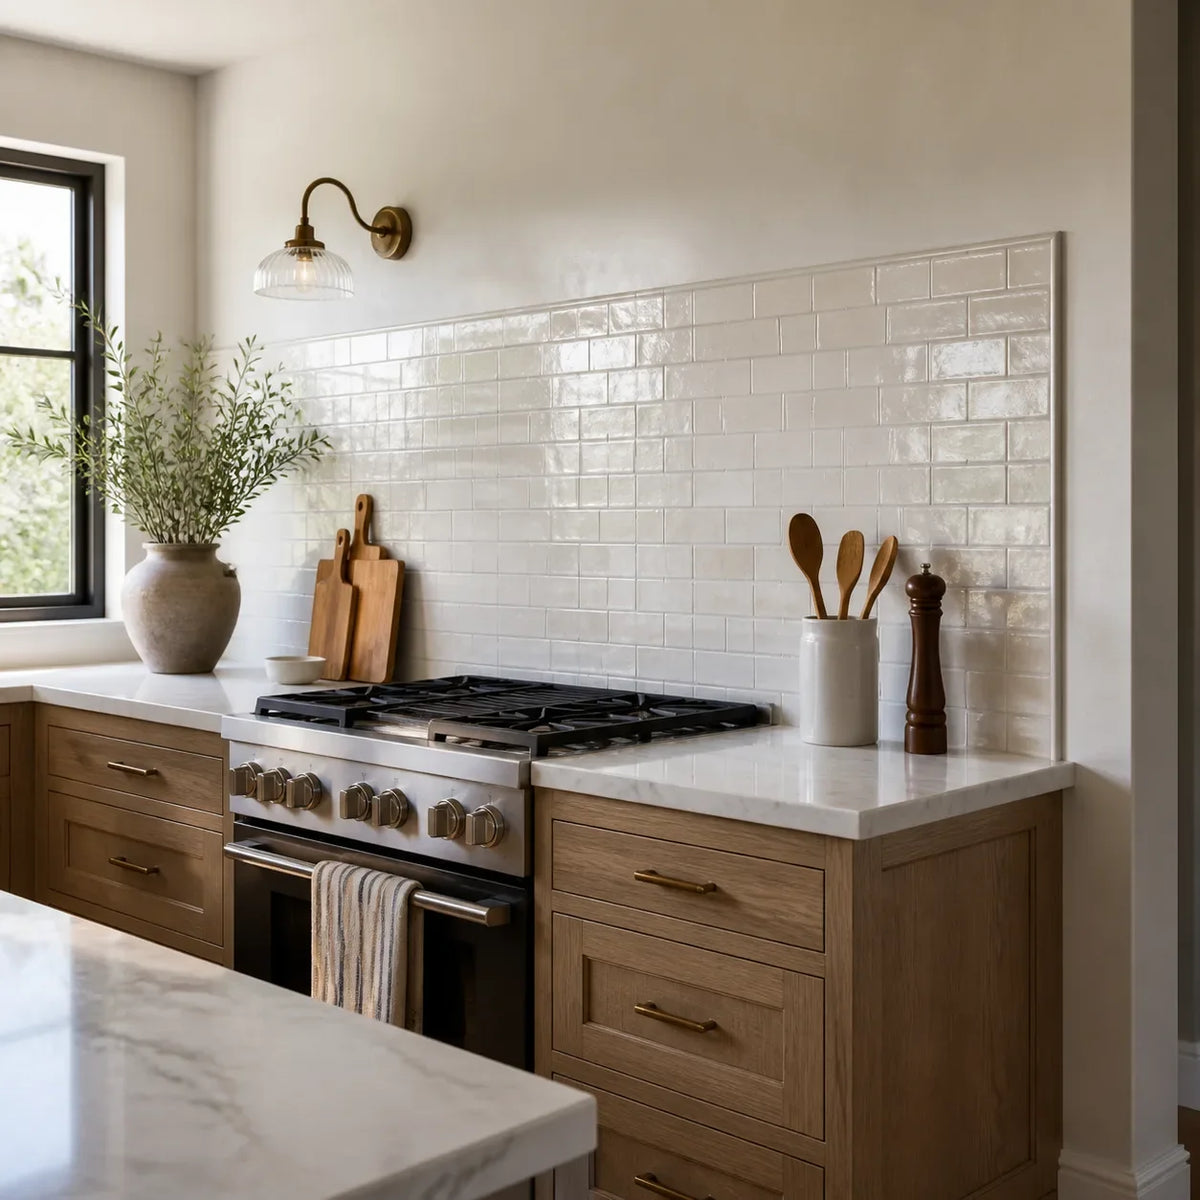
A kitchen wall without upper cabinets creates a design problem that standard backsplash advice rarely solves: there is no cabinet bottom telling the material where to stop. A conventional 18-inch strip can look like a floating rectangle, while covering the whole wall may add cost and visual weight you never wanted.
Think through three decisions in this order:
- Working zone: Which parts of the wall regularly receive water, grease, food, or cleaning?
- Upper endpoint: Will the material stop at a shelf, form a consistent horizontal band, rise behind the range, meet a window, or cover the full wall?
- Side transition: Will it end at a cabinet, countertop edge, corner, doorway, window casing, trim profile, or carefully planned vertical line?
This approach works for a lower-cabinets-only kitchen, a short cabinet run beneath a large open wall, or a kitchen where the upper cabinets stop before the sink or range. It also keeps the visual question separate from the product-use question. A layout may look balanced and still be unsuitable near direct water, high heat, loose paint, or a heavily textured wall.
Start with the active zone, not an arbitrary height. Mark the sink, range, countertop, outlets, windows, shelves, corners, and exposed wall edges. Then compare two or three full-size endpoint options before ordering or cutting.
For a broader overview of the same planning factors, use the Kitchen Backsplash Guide for measured wall zones alongside this cabinetless-wall framework.
Where Should a Backsplash Stop With No Upper Cabinets?
A kitchen backsplash with no upper cabinets should stop at a line that protects the working wall and looks connected to the room. That line may be a shelf, a window feature, a consistent band above the counter, a taller range section, an architectural corner, or the ceiling. There is no single universal height that fits every cabinetless kitchen.
The mistake is treating the missing cabinets as an invitation to choose a random number. A 16-inch, 18-inch, or 24-inch backsplash can work, but the number alone does not make the endpoint intentional. The eye reads relationships: backsplash height compared with counter length, window height, shelf position, ceiling height, range width, and the amount of painted wall left above it.
A useful starting point is to distinguish between protection height and design height:
- Protection height is the area you reasonably expect to clean after using the sink or range.
- Design height is the visible boundary that makes the backsplash feel composed rather than cut short.
Those two heights may be the same. They may also differ. For example, you might use a consistent band across the full counter run and extend the material higher behind the range. The band organizes the wall; the taller section responds to the cooking zone.
A small patch directly behind the sink can technically cover the most obvious splash area, yet it may look undersized on a long, empty wall. The reverse can also happen. A floor-to-ceiling field of strong color or dense pattern may dominate a compact kitchen, especially when the lower cabinets, countertop, and flooring already have distinct finishes.
The goal is not to use the least or most material. It is to make the protected zone and the visual zone agree.
A quick endpoint matcher
Choose the first description that closely matches your wall:
This matcher is a design guide, not a code rule or product-compatibility test. Range clearances, surface condition, lease terms, and current material instructions still control whether a proposed finish belongs in a specific location.

Map the Wall Before Choosing the Height
Before choosing a backsplash height, draw or tape the whole working wall. Include the lower-cabinet run, countertop, sink, range, windows, shelves, outlets, corners, appliance gaps, side walls, and every exposed endpoint. A cabinetless wall is easier to judge as one composition than as separate areas behind individual fixtures.
The countertop should establish the lower baseline. If the countertop has not been installed, final backsplash measurements can change when its thickness, back profile, side overhang, wall gaps, and level are known. The countertop-before-backsplash sequencing guide explains why measuring from the finished counter can prevent rework.
Use painter's tape to mark the following:
- The full length of the finished countertop
- Both ends of the lower-cabinet run
- The center and outer edges of the sink
- The center and outer edges of the range or cooktop
- The hood, shelf, or light-fixture position
- The bottom and side edges of any window casing
- Every receptacle, switch, data plate, and wall control
- Inside and outside corners
- Appliance gaps and filler panels
- Proposed upper and side backsplash lines
- Any area that regularly becomes wet, greasy, or difficult to clean
The point is not to create contractor-level drawings. It is to discover where your proposed rectangle collides with real features.
Read the wall in three zones
A simple sketch can separate the decisions:
PAINTED OR OPEN WALL -------------------------------- Proposed upper endpoint DESIGN / TRANSITION ZONE May include shelves, windows, lighting, art, or open wall -------------------------------- Minimum planned design line ACTIVE CLEANING ZONE Sink splash | prep area | range Outlets | seams | counter junction ================================ Finished countertop LOWER CABINETS AND APPLIANCES
The active cleaning zone tells you where wall protection may be useful. The design and transition zone tells you whether the backsplash should continue higher for proportion, alignment, or easier cleaning. The open wall above provides negative space, meaning the unfilled painted area that gives the backsplash and shelves visual breathing room.
Why small floating rectangles often look accidental
A floating rectangle is not automatically wrong. It becomes awkward when its edges have no relationship to the countertop, fixture, furniture, or architecture.
Imagine a 10-foot lower-cabinet run with a 30-inch patch behind the sink. The patch may protect the immediate faucet area, but on the larger wall it can read as an isolated sample. Extending the same material across the counter run, even at a modest height, creates a stronger baseline. Another option is to connect the patch to a window, shelf, or range feature so the endpoint has a visible reason.
A short patch is more likely to work when:
- The wall section is already framed by cabinets, corners, or casing.
- The sink or range occupies a distinct niche.
- The material has a low-contrast edge against the paint.
- A shelf, hood, or window completes the shape.
- The patch is clearly centered and proportioned around a focal feature.
Why full-wall coverage can feel heavy
A full-wall backsplash removes the endpoint problem, but it changes the room's visual balance. Tile becomes a major wall finish rather than a narrow working-surface accent.
That can be effective on a compact, self-contained wall or behind a strong range-and-hood composition. It can feel excessive when the wall is broad, the pattern is busy, the tile contrasts sharply with the paint, or several shelves will cover much of the finished surface.
Cost also rises in more ways than raw square footage. Full-wall coverage may involve extra outlet cuts, window cuts, edge finishing, pattern matching, waste, ladder work, and material behind shelves or appliances. It should be chosen because it improves the room, not because the absent upper cabinets seem to demand it.
Your wall-mapping checklist
Before comparing endpoint options, confirm that you can answer each item:
Plan pattern alignment and cuts only after this map is complete. The backsplash layout guide before cutting covers outlets, windows, open ends, focal zones, and quantity as one wall-wide plan.

Which Upper Endpoint Works Best on an Open Kitchen Wall?
The best upper endpoint is the one that connects to a strong horizontal or architectural line while covering the cleaning zones your kitchen actually creates. In most kitchens without upper cabinets, four options deserve comparison: a shelf-aligned field, a consistent band, a taller range zone, and a window- or wall-defined transition.
| Upper endpoint | Best fit | Main advantage | Main trade-off |
|---|---|---|---|
| Counter to shelf | One or more level shelves span much of the counter run | The shelf gives the top edge a clear visual reason | Shelf height may produce awkward cuts or leave an exposed top edge elsewhere |
| Consistent horizontal band | Long lower-cabinet runs with few interruptions | Calm, economical, and easy to read across the room | A low band may feel undersized on a very tall or broad wall |
| Taller range zone with lower side bands | Range or hood is the main focal point | Gives the cooking wall more presence while limiting total material | Height changes and outside corners must be composed carefully |
| Window- or architecture-aligned transition | Sink windows, niches, side walls, doorways, or corners define the wall | Uses existing lines instead of inventing new ones | Uneven casing or offset features can complicate symmetry |
| Full wall or counter to ceiling | Narrow feature walls or rooms that need one continuous finish | Removes the exposed top-edge decision | Highest visual weight, material use, and cutting demand |
Counter to an open shelf
A shelf-aligned backsplash works because the shelf replaces the missing cabinet bottom. The eye understands why the surface stops there.
This option is strongest when the shelf runs continuously or has clear alignment with the countertop. If there are several short shelves at different elevations, choosing one as the backsplash line may make the others look disconnected. In that case, a lower continuous band behind all shelves may be calmer.
Measure the actual installed shelf, not a planned dimension alone. Check the underside, brackets, fasteners, wall level, and the gap required for installation. If the backsplash will sit behind the shelf, decide the work sequence before drilling or adhering anything.
A consistent horizontal band
A band is often the most flexible answer for kitchens without upper cabinets. It protects the lower working wall, keeps much of the paint visible, and creates a horizontal line that relates directly to the countertop.
The band does not need to imitate traditional cabinet height. Test several heights with painter's tape. Stand at the room entrance, the sink, and the primary seating area. A height that looks generous from 18 inches away may appear thin from across an open-plan room.
The band usually looks more settled when it runs across the whole continuous countertop rather than stopping immediately beside the sink or range. If an appliance breaks the run, decide whether the line visually continues behind it or terminates at a defensible vertical boundary.
A taller range zone
A taller section behind the range can create a focal point, but it should usually connect to the surrounding backsplash instead of appearing as an unrelated tower. One clear arrangement is a lower band across the complete run with a centered rise behind the range or cooktop.
Align the taller section with something real:
- The outside edges of the range
- The hood width
- A shelf or hood surround
- A window or niche
- A centered tile-pattern module
- A side wall that contains the cooking zone
Avoid creating thin vertical returns just to reach an alignment point. A small change in the starting layout can often replace a narrow tile sliver with a fuller, cleaner edge.
A range-only backsplash may work in a kitchenette where the sink is on another protected wall, but do not assume the range is the only active zone. Prep areas, coffee stations, and sinks often create more frequent cleaning needs than the wall behind a lightly used stove.
A window-defined endpoint
Windows can solve the endpoint problem or make it more visible. Their sill and casing create strong lines, but those lines may not align with a comfortable backsplash height.
Common approaches include:
- Running a horizontal band into the window casing
- Continuing beneath the sill
- Tiling around the window within a larger field
- Using the window's outer casing as the side boundary
- Carrying a range-height field to a line shared with the window
- Covering the whole wall around a centered sink window
Choose one dominant relationship. Trying to align simultaneously with the sill, shelf, faucet, outlets, range, and tile module often produces fussy cuts without making the wall look more resolved.
Should you go to the ceiling?
Use full-height coverage when the wall itself is the feature, when cleaning conditions justify a larger surface, or when a partial endpoint would create several awkward transitions. Do not choose it solely because there are no upper cabinets.
A full wall is easier to support visually when:
- The wall is narrow or framed by corners.
- The pattern and color are relatively quiet.
- The hood, window, or shelves need a continuous background.
- The adjacent walls remain simpler.
- The ceiling transition can be finished cleanly.
- The material is documented as suitable for every included zone.

How Should Sink and Range Zones Be Protected?
Treat the sink and range as separate exposure zones. The sink raises water, seam, and cleaning questions. The range raises heat, grease, flame, clearance, and appliance-manual questions. A material that is reasonable in one zone is not automatically reasonable in the other.
The kitchen tile fit-by-zone comparison can help you record moisture, heat, cleanability, substrate, edge, and removal requirements separately.
Sink zone: plan for splashes, seams, and drying
Behind a sink, the backsplash should cover the wall that receives routine splashes and can be wiped without soaking seams or edges. Faucet height, sink depth, spray pattern, user habits, and the distance from the basin to the wall all influence the active zone.
Peel-and-stick tile uses a pressure-sensitive adhesive, or PSA, which bonds through applied pressure rather than wet mortar. The wall needs to be dry during installation. A peer-reviewed ACS study of acrylic adhesive under water found reduced measured adhesive strength and trapped-water defects in its laboratory system. The experiment did not test Stickwoll, kitchen walls, or intermittent household splashes, so it does not establish a sink clearance. It does support the basic practice of bonding to a dry surface and preventing water from sitting at the adhesive interface.
For Stickwoll projects, use the narrower manufacturer guidance: ordinary kitchen use on a dry, stable substrate is distinct from direct spray, standing water, submersion, or hidden waterproofing. The Stickwoll FAQ on substrates, water, heat, and care describes water resistance but does not provide a product-specific sink distance or direct-spray test.
That means the layout should not depend on the tile repairing a leaking faucet, open counter gap, damp wall, or failed seal. Resolve the water source first.
At the sink, check:
- Whether water regularly reaches the proposed top or side edge
- Whether seams fall directly behind the faucet's strongest splash path
- Whether the wall is already swollen, stained, soft, or peeling
- Whether a window sill collects water
- Whether the counter-to-wall junction is stable
- Whether the finish can be cleaned with the manufacturer's approved method
- Whether exposed material layers need a compatible edge treatment
Stickwoll's stated routine care method is a soft cloth or sponge with mild soap and water. It advises against harsh chemicals and abrasive scrubbers and recommends wiping splashes early rather than soaking seams. That is care guidance, not proof of resistance to every cleaner, disinfectant, steam device, or grease remover.
Range zone: the appliance manual comes first
The range area needs a more conservative review than a general prep wall. The backsplash is a wall finish, not a fire-protection system, and a taller backsplash does not by itself make the cooking zone safer.
Check four authorities before placing an adhesive wall finish near a range:
- The exact range or cooktop installation manual
- The hood or ventilation instructions
- The wall-finish manufacturer's current product instructions
- Locally applicable building, fire, gas, and electrical requirements
Model-specific manuals can impose conditions that generic backsplash advice misses. For example, LG gas cooktop installation instructions require surrounding wall coverings, countertops, and cabinets for the covered models to withstand heat up to 200 degrees F. The same manual gives a 2.75-inch minimum from the cooktop cutout to the rear wall for those listed models. Neither number is a universal rule, and neither demonstrates that a Stickwoll product meets the requirement.
Stickwoll's FAQ states that its tiles may be installed behind an electric stove and gives an 8-inch minimum from a gas flame. Treat that as one manufacturer instruction, not a universal safety clearance. The public guidance reviewed for this article does not provide a product-specific maximum service temperature, heat-aging result, flame-spread rating, or compatibility chart for every current tile and appliance combination.
If your appliance manual specifies a temperature resistance that the backsplash documentation does not address, do not infer compliance from appearance, thickness, or a general “heat-resistant” description. Ask the relevant manufacturer for product-specific documentation or select a finish with clearly applicable specifications.
Use the gas-stove backsplash distance guide to organize the appliance, flame-distance, material, and installation checks for that wall.
Protection-zone diagram
Use this as a planning picture, not a universal dimension chart:
HOOD, SHELF, WINDOW, OR OPEN WALL ------------------------------------- | HIGH-CAUTION ZONE | | Review heat, flame, grease, | | hood and appliance limits | | RANGE | --------|-------------------------------------|-------- | ORDINARY CLEANING / SPLASH ZONE | | Sink, prep counter, coffee station | | Seams, outlets and exposed edges | ====================================================== COUNTERTOP
The range zone may rise higher for practical or visual reasons, but the product still has to be suitable for the actual heat conditions. The sink zone may extend farther sideways than expected if the faucet sprays across a shallow basin. Observe the kitchen in use before finalizing the outline.
Outlets need more than neat cuts
Plan every receptacle and switch before peeling backing or cutting tile. Centering a pattern on the wall can create tiny pieces beside an electrical box, while shifting the pattern slightly may produce stronger cuts.
The finished wall surface also affects device and faceplate fit. Under the International Code Council's 2021 receptacle provisions, receptacles must remain rigidly supported at the finished surface, and faceplates must cover the opening and seat against the mounting surface. Local code adoption and amendments control, so the 2021 model provisions may not be the legally applicable edition in your area.
Do not tile over an electrical opening, leave a receptacle loose, expose wiring, or improvise an extension. If the added finish changes the wall plane enough to affect the device, use listed components appropriate to the assembly or hire qualified electrical help.
Finish the counter seam and exposed edges deliberately
The counter-to-backsplash junction and exposed top or side edges are the places where an otherwise attractive layout often looks unfinished.
Decide before installation whether each visible edge will use:
- A full tile edge
- A clean planned cut
- A compatible trim profile
- A small compatible transition joint
- A corner return
- A casing, shelf, or wall termination
- A revised layout that removes a narrow sliver
There is no single sealant, caulk, trim, or secondary adhesive documented as compatible with every current Stickwoll tile family and every wall condition. Confirm compatibility with the actual tile thickness, exposed layers, substrate, movement, water exposure, and current instructions. A cosmetic joint cannot repair an unstable counter, structural gap, leak, or moving wall.
The Peel-and-Stick Tile Guide for surfaces and edges provides a broader project check covering wall preparation, moisture, heat, cleaning, exposed edges, and removal expectations.
Fresh paint requires patience and a test
A freshly painted wall may feel dry before the coating has reached the condition required by the paint and tile manufacturers. There is no defensible universal instruction that every project is ready after two days, seven days, or 21 days.
The conservative approach in the Stickwoll guide to tiling after paint is to use the later applicable deadline from the paint manufacturer and tile manufacturer. After that deadline, inspect the wall and perform a representative hidden-area test before committing to the full field.
A test patch reduces uncertainty; it does not guarantee whole-wall or long-term performance. The full wall may vary in texture, primer coverage, cleaning residue, heat, sunlight, moisture, and paint adhesion.
Renters should treat removability as conditional
Renters should obtain landlord approval and review the lease before installing an adhered backsplash. “Peel-and-stick” describes the installation format. It does not guarantee that every paint, primer, drywall paper, wallpaper, or previously repaired surface will remain unchanged during removal.
Removal depends on the wall system, coating cure, paint-to-primer bond, installation duration, temperature, humidity, prior damage, and removal technique. Test the actual surface and avoid budgeting on the assumption that no residue, lifting paint, or repair will occur.
Make the Open Wall Feel Balanced
A balanced backsplash on an open wall uses proportion, pattern scale, lighting, and negative space together. The tile should relate to the lower cabinets without making the wall feel top-heavy or leaving the protected area looking like an afterthought.
Relate the backsplash to the lower cabinets
Lower cabinets form a strong horizontal block. A narrow backsplash in a similar value or low-contrast color tends to extend that horizontal composition. A high-contrast full-height wall competes more strongly with the cabinet block.
Consider the total stack from floor to ceiling:
- Flooring
- Cabinet fronts
- Countertop thickness and pattern
- Backsplash color and texture
- Painted wall
- Shelves, windows, hood, and lighting
- Ceiling transition
If the lower half already contains dramatic stone, dark cabinetry, prominent hardware, and patterned flooring, the backsplash may work best as a quieter connector. If the lower cabinets and counter are restrained, the open wall can carry more pattern without feeling crowded.
Pattern scale usually matters more than directional claims
Horizontal tile is often said to make a room look wider, while vertical tile is said to make it look taller. Treat those statements as tendencies to test, not promises.
A four-experiment study of wall patterns and perceived space found that pattern density affected perceived room width and height more strongly than stripe orientation in stereoscopically presented rooms. Orientation effects were weak and ran parallel to the stripes. The research did not test partial kitchen backsplashes, tile gloss, shelves, or occupied homes.
The practical lesson is useful: look at the number and spacing of visible lines, not orientation alone. A dense subway pattern with many contrasting joints can carry more visual activity than a larger vertical format with fewer divisions. On a wide cabinetless wall, that difference may matter more than whether the pieces run horizontally or vertically.

Use a simple visual-weight score
Give the proposed backsplash one point for each condition:
Interpret the total as a comparison aid:
- 0-2 points: Visually light. A taller field may still leave the room calm.
- 3-4 points: Moderate presence. Compare a band, shelf-height field, and full wall at full scale.
- 5-6 points: Visually strong. Preserve more paint or simplify another finish unless the backsplash is intended as the main focal surface.
This is an editorial design check, not a validated perceptual score. Its purpose is to make trade-offs visible before you buy material. It cannot predict personal preference or how every room will look.
Lighting changes the apparent endpoint
Natural and artificial light can make a top edge more or less noticeable. A glossy finish beneath a shelf light may create a bright horizontal cutoff. A matte, low-contrast finish may blend into the wall even when the endpoint is fully exposed.
Test samples in morning, afternoon, and evening light. Turn on the hood light, shelf lighting, and nearby pendants. Look at the sample from the doorway as well as directly in front of it. Shadows from shelves and brackets can change the balance more than the tile color itself.
Measure, mark, sample, and test
Use this sequence before ordering the complete project:
- Measure the installed wall. Record each rectangular section separately, including the countertop run, sink, range, windows, outlets, corners, and open edges.
- Mark at least two endpoints. Use painter's tape to compare a lower band with a shelf-, window-, hood-, or ceiling-aligned option.
- Place a real sample inside each outline. Compare it with the counter, cabinets, paint, trim, hardware, and lighting.
- Test the actual substrate. Follow current wall-preparation and waiting instructions, then use a representative hidden area when permitted.
- Review every exposure zone. Check sink splash, range heat, cleaning, direct sunlight, appliance gaps, and edge conditions separately.
- Plan cuts and quantity. Account for overlap, pattern matching, window and outlet cuts, damaged pieces, edge selection, and reasonable waste based on the current product instructions.
- Confirm availability before ordering. Product listings, variants, packs, delivery eligibility, and inventory can change.
For a quiet subway-style option, you can review the current Almond White Dual Ceramics tile listing and compare its actual sample with your countertop and proposed edge treatment. The listing is a shopping destination, not proof that the product is suitable for your sink, range, substrate, or removal requirements. Confirm current availability and instructions before purchase.
Frequently Asked Questions
Should a kitchen without upper cabinets have a backsplash?
A kitchen without upper cabinets can still benefit from a cleanable backsplash around the sink, range, and active prep areas. It does not need to cover the complete wall by default.
Start by observing where water, grease, and food reach the wall. Then create a continuous visual zone around those areas. Paint alone may be acceptable in low-exposure areas if the coating is suitable and easy to maintain, while the busiest sections may justify a different wall finish.
How high should a backsplash go without upper cabinets?
There is no universal cabinetless-kitchen backsplash height. Choose a height by mapping the active cleaning zone and testing how the endpoint relates to shelves, windows, the hood, the countertop length, and the amount of open wall.
A consistent band often works on long runs. Shelf height can work when the shelf forms a strong level line. A taller range section can support a cooking focal point. Ceiling height is an option, not an obligation.
Can a backsplash stop at the range?
Yes, a backsplash can stop at the range when the range sits in a visually distinct niche or the surrounding walls have little cleaning exposure. In many kitchens, though, a range-only patch leaves the sink and prep wall unprotected and may look isolated.
A more connected option is a lower band across the countertop with a taller field behind the range. Confirm that the chosen material is suitable for the exact appliance conditions before using either layout.
What should you do where the backsplash meets a painted wall?
End the backsplash at a clear vertical line and decide the finish before installation. The endpoint may use a full piece, clean cut, compatible trim, small compatible transition joint, corner, casing, or another architectural boundary.
Avoid stopping a few inches before the countertop ends without a visible reason. Also avoid narrow slivers created solely to reach an arbitrary line. Shift the layout or endpoint when that produces a cleaner result.
Should open shelves change the backsplash endpoint?
Open shelves can provide a convincing upper endpoint when their underside creates a strong, continuous line. They can also make the wall busier, especially when brackets, dishes, tile joints, outlets, and window casing are all visible.
Test both a counter-to-shelf field and a lower band. If the shelf is short or offset, the lower band may unify the wall more effectively. If the shelf spans most of the counter, stopping beneath it may make the backsplash feel built into the room.
Choose the Endpoint Before You Order
A lower-cabinets-only kitchen does not need automatic full-wall tile. It needs an intentional relationship between the protected working area and the open wall above it.
Before committing, confirm the following:
Mark the active sink and range zones first. Tape two competing outlines on the wall. Hold a current sample against the counter, paint, and proposed side trim. Once the protection zones, upper endpoint, and exposed edges all make sense together, use the Kitchen Backsplash Guide to complete the measurements and ordering check.
That is the central choice in a kitchen with no upper cabinets: do not let the missing cabinets choose the backsplash height for you. Protect the working wall, preserve the right amount of open space, and make every visible endpoint look deliberate.


Kommentar hinterlassen
Diese Website ist durch hCaptcha geschützt und es gelten die allgemeinen Geschäftsbedingungen und Datenschutzbestimmungen von hCaptcha.