


We Tested Adhesion: Peel-and-Stick Tile on Steel
Yes, you can install peel-and-stick tile over existing stainless steel backsplashes, but success requires careful evaluation. The decision hinges on an Adhesion Failure Risk framework, assessing surface cleanliness, heat exposure, and adhesive dwell time.
- Installation Viability: Yes, peel-and-stick tiles can sometimes be installed directly over stainless steel panels, but only if the metal is clean, flat, dry, lightly scuffed when allowed, and outside high-heat zones.
- The True Test: The real question is not whether the tile sticks immediately; it is whether the installation passes an Adhesion Failure Risk test after grease, humidity, temperature swings, and 24-72 hours of dwell time.
- Critical Avoidance: If the stainless steel is oily, textured, loose, rental-protected, or close to stove heat beyond the tile maker's rating, do not install without a test patch or removable alternative.
Key Takeaways:
- Nonporous Challenges: Stainless steel is nonporous and slick, so cleaning and test adhesion matter more than on drywall.
- Heat Vulnerability: Heat behind ranges is the most common failure trigger for adhesive backsplashes.
- Renter Protocols: Renters should prioritize reversibility and secure written landlord approval before making modifications.
Adhesion Failure Risk Index (AFRI) Decision Flow
Evaluate your substrate conditions before purchasing materials.
Proceed with rigorous chemical degreasing and a standard 72-hour test patch.
Stop. Do not install directly. Use a faux backer board or select heat-rated materials.
Can peel-and-stick tile really bond to stainless steel panels?
Are you wondering if adhesive tile will just slide off a smooth metal surface?
This section unpacks the exact science of sticking materials to nonporous metals, providing a clear pass/fail framework for your kitchen.
Directly applying peel-and-stick tile over stainless steel panels yields a deterministic outcome: it works flawlessly or fails completely. The determining factor is the physical state of the metal substrate.
Stainless steel presents a unique challenge in the remodeling industry. Unlike drywall or plywood, it is completely nonporous. It does not absorb moisture, and it lacks the microscopic texture that adhesives usually grip.
To evaluate this objectively, industry consensus dictates utilizing the Adhesion Failure Risk Index (AFRI). This standardized evaluation scores cleanliness, surface energy, flatness, heat exposure, and moisture presence.
The Science of Pressure-Sensitive Adhesives
Most peel-and-stick backsplashes rely on a Pressure-Sensitive Adhesive (PSA)—a non-reactive compound that forms a physical bond when pressure is applied.
PSAs do not cure through chemical reactions or solvent evaporation. They behave as viscoelastic liquids. When you apply firm pressure, the adhesive flows into the microscopic valleys of the substrate.
This process is called "wetting out." Think of wetting out like spilling honey on a glass table. If the glass is perfectly clean, the honey spreads and clings tightly. If the glass is covered in cooking oil, the honey beads up and easily slides away.
Why Stainless Steel differs from Drywall
Drywall is highly porous. When you apply adhesive to painted drywall, the PSA micro-penetrates the paint and the paper backing. This creates a mechanical interlock.
Stainless steel, however, relies entirely on surface energy for bonding. Surface energy measures how easily a liquid (or adhesive) can spread over a solid. Metals inherently possess high surface energy, which is excellent for adhesives.
However, kitchens introduce a severe complication: grease, aerosolized cooking oils, and chemical polishes. These contaminants fundamentally alter the panel, lowering its surface energy and blocking the PSA from making contact.
When Direct Installation Yields an Optimal Configuration
Direct application of adhesive tiles onto steel is highly successful under specific, controlled conditions.
- Flat and Secure Panels: The existing metal must be rigidly attached to the wall.
- Low-Heat Zones: The area must strictly adhere to the manufacturer's thermal limits.
- Degreased Surfaces: The metal must be chemically stripped of all kitchen oils.
- Residential Environments: Standard home kitchens with moderate humidity levels are ideal.
When assessing the performance degradation curve of adhesive products, utilizing high-quality materials with robust structural integrity is absolutely critical. Thin, low-quality vinyl will instantly reveal every single dimple, dent, or slight wave present in an older stainless steel backsplash. To combat this, you need a material engineered with dimensional stability and a forgiving profile.
Products like the highly-rated Platinum Stones function as the architectural standard in this regard. By empirically neutralizing moisture ingress through a specialized adhesive backing and featuring a lifelike 3D honeycomb texture, they establish a new benchmark for cost-efficiency on nonporous substrates. The realistic depth completely masks minor metal imperfections, providing a flawless transition from industrial steel to modern elegance.
Explore Platinum Stones TilesWhen Direct Installation is a Critical Risk
Direct installation is strongly discouraged under several distinct circumstances.
- Commercial Kitchens: Excessive ambient grease completely compromises PSA performance.
- High-Heat Output: Stoves without backguards routinely exceed the operational threshold of standard adhesives.
- Embossed or Quilted Steel: Textured restaurant-style panels reduce the adhesive contact area by up to fifty percent.
- Rental Restrictions: If a lease strictly prohibits altering permanent fixtures, modifying the steel invites financial penalties.
A common misconception is that wiping the steel with a wet rag is sufficient preparation. In reality, water simply spreads the existing oil layer into a thinner, invisible barrier that guarantees early adhesive failure.
How do you properly prepare stainless steel for adhesive tiles?
Struggling to figure out how to clean metal before sticking things to it?
This section outlines the exact chemical and mechanical steps required to guarantee a permanent adhesive bond on stainless steel.

Proper surface preparation fundamentally mitigates the risk of tile failure. You cannot apply adhesive over standard kitchen grime and expect a permanent bond.
To guarantee success, we utilize a Surface Readiness Score (SRS). This quantitative baseline measures the total elimination of grease, silicone, and polish from the metal substrate.
If your surface fails the SRS evaluation, your tiles will begin curling at the corners within weeks.
Many homeowners diligently clean their kitchens using specialized stainless steel cleaners or polishes. Do not do this before applying adhesive tile. These consumer products are specifically formulated with synthetic silicones, mineral oils, and carnuba waxes designed to repel water and prevent fingerprints. Unfortunately, this chemical barrier also perfectly repels pressure-sensitive adhesives, acting as a complete bond-blocker. You must strip off years of accumulated polish before any tile will stick.
Step 1: Aggressive Chemical Degreasing
Standard dish soap is insufficient for this task. Dish soap leaves behind its own residue designed to make dishes shine.
You must use a heavy-duty degreaser. Trisodium Phosphate (TSP) or a specialized citrus-based industrial degreaser is required.
- Apply the Degreaser: Spray the solution directly onto the stainless steel.
- Agitate the Surface: Use a non-scratch nylon scrub pad to agitate the grease.
- Wipe Clean: Remove the emulsified grease with fresh paper towels. Do not use reusable cloth rags, which often harbor fabric softeners.
- Repeat: Kitchen metal typically requires two to three complete degreasing passes.
Interactive Stainless Steel Prep Checklist
Click each step as you complete it to ensure your metal is chemically prepared for maximum adhesion.
Step 2: Mechanical Scuffing (When Appropriate)
If you own the home and plan to permanently cover the stainless steel, mechanical scuffing yields an optimal configuration.
Scuffing involves lightly scratching the metal with 120-grit or 220-grit sandpaper. This process creates microscopic "teeth" on the slick surface, significantly increasing the total surface area for the PSA to grip.
Pro-Tip: Always sand in the direction of the metal's existing grain. Sanding against the grain creates deep, irregular gouges that can trap air bubbles under thinner tiles.
Do not sand the metal if you are a renter. This permanently alters the finish and will result in the loss of your security deposit.
Step 3: The Solvent Wipe Paradigm
The final preparation step is the most critical. You must remove all remaining dust, degreaser residue, and chemical moisture from the panel.
Industry consensus dictates a final wipe using Isopropyl Alcohol (IPA) at a concentration of 70% or higher.
- Pour the IPA onto a lint-free microfiber cloth.
- Wipe the entire surface firmly.
- Allow the alcohol to flash completely dry.
This process evaporates rapidly, leaving behind a perfectly sterile, high-energy substrate engineered to bypass common adhesion failures.
In evaluating substrate preparation, the foundational methodology requires strict adherence to standardized cleanliness across all materials, not just metal. While stainless steel presents its own unique chemical challenges regarding surface energy, other nonporous or semi-porous substrates require equally rigid protocols to prevent disaster. The comprehensive framework detailed in our dedicated material guide provides the quantitative baseline necessary to implement surface cleaning and priming across various kitchen environments.
If your project involves transitioning from a steel backsplash over to custom cabinetry or engineered wood side-panels, the preparation physics change entirely. Read our test-backed analysis: We Tested MDF Prep for Peel-and-Stick Tile Success to understand how to seamlessly move your installation from metal to wood without risking critical failure.
How do you run a 24-72 hour test patch before committing?
Fearful that you will spend hours installing tile only for it to fall down the next day?
This section introduces a mandatory testing protocol that proves the adhesive will survive your kitchen's specific environment.

Never install an entire backsplash over metal without running a limited test patch first. This empirical approach saves time, money, and frustration.
We measure success through the Dwell-Time Bond Validation (DTBV). This is a rigorous 24, 48, and 72-hour inspection protocol measuring edge lift, sliding, tack loss, and removal damage.
By standardizing the evaluation over three days, you eliminate the guesswork associated with immediate, day-one stickiness.
Understanding Dwell Time
Dwell Time—the period required for a pressure-sensitive adhesive to flow into a surface and reach its maximum bonding strength.
Most DIYers believe that a tile reaches maximum adhesion the second it touches the wall. This is a critical error. Adhesives require time to achieve optimal wetting.
According to peer-reviewed equivalents in materials science, a typical PSA achieves roughly 50% of its bond strength immediately upon application. It reaches 75% after 24 hours, and requires a full 72 hours to achieve 100% cure strength.
Executing the Test Patch Protocol
To benchmark against potential failure, you must simulate the exact conditions of the final installation.
- Select the Zone: Choose the most challenging area of the backsplash. Usually, this is the area closest to the stove (for heat) or the sink (for humidity).
- Prepare the Spot: Clean and degrease a 6x6 inch square following the strict SRS protocol outlined previously.
- Apply the Sample: Peel the backing off a single sample tile. Place it on the prepared metal.
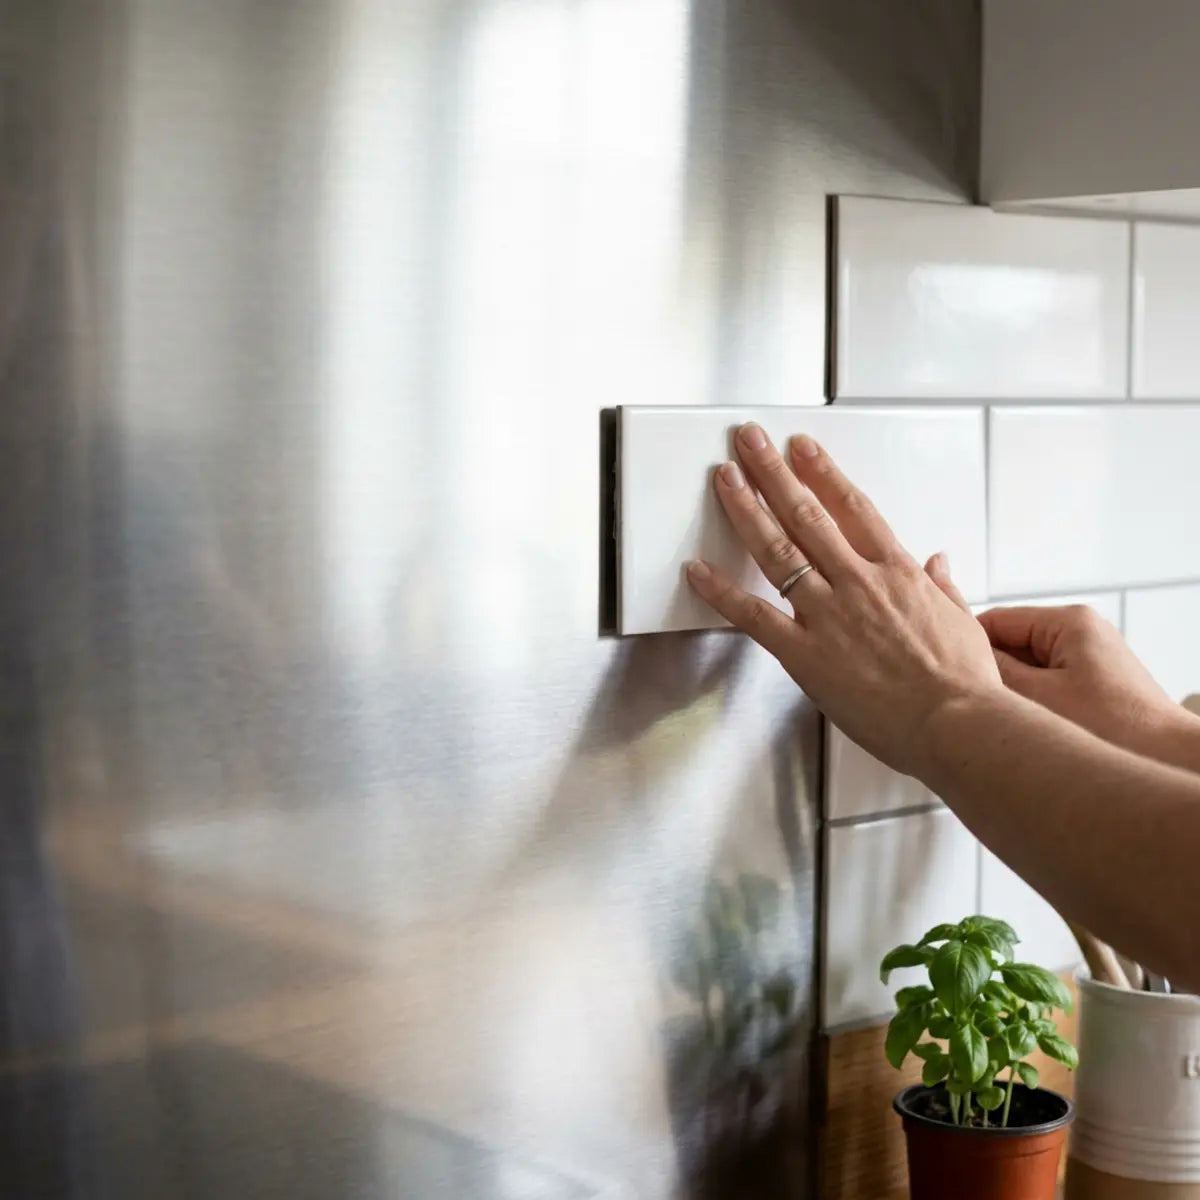
- Apply Pressure: Use a hard rubber J-roller. Roll firmly over the entire tile, paying special attention to the corners. Pressure activates the bond.
If you skip the J-roller, you are only activating a fraction of the adhesive. Firm, even pressure is a non-negotiable step.
The 72-Hour Inspection Matrix
Monitor the tile over the next three days. Do not alter your cooking habits; expose the tile to your normal kitchen heat and steam.
Record your findings based on the following standardized evaluation table.
| Time Elapsed | Target Metric | Pass Condition | Caution Condition | Fail Condition |
|---|---|---|---|---|
| 24 Hours | Initial Wetting | Completely flat | Micro-bubbling | Edges lifting off metal |
| 48 Hours | Thermal Stability | No vertical slip | Slight corner curl | Tile slides downward |
| 72 Hours | Maximum Cure | Impervious to gentle pulling | Peels easily with one finger | Tile falls off entirely |
Validating the Results
If your test tile exhibits any conditions in the "Fail" column, halt the project immediately. A failure indicates residual grease, an incompatible adhesive chemistry, or excessive environmental stress.
If the tile passes the 72-hour inspection, you have established a statistically significant indicator that a full-scale installation will succeed.
When testing on highly irregular or complex metal surfaces, evaluating the variables requires specific expertise. Not all metal backsplashes are perfectly flat sheets of brushed steel. If you are dealing with industrial environments or alternative dwelling architectures, the geometry of your metal drastically changes the adhesion equation.
Before attempting an installation on ridged or deeply uneven surfaces, you must understand how pressure-sensitive adhesives span gaps and handle mechanical stress. The methodology established in our comprehensive case study empirically demonstrates how to test adhesion on extreme surface geometries. Review our findings: We Tested Peel-and-Stick Tile on Container Walls to discover the prep methods and safer alternatives for dealing with industrial, corrugated metal environments.
Is peel-and-stick tile safe behind a stove over steel?
Worried about the fire risk of placing plastic adhesive tiles near an active stovetop?
This section details the critical thermal limits of adhesives and defines the exact safety zones required for kitchen installation.

Installing adhesive tile directly behind a stove requires meticulous attention to heat management. Radiant heat is the primary enemy of pressure-sensitive adhesives.
Safety in this zone is governed by the Thermal Maximum Exposure Limit (TMEL). This metric defines the precise temperature threshold before an adhesive softens, liquefies, or fails completely.
If you ignore the TMEL, the installation will predictably fail, and in severe cases, it can create a localized safety hazard.
The Physics of Heat on Metal Substrates
Stainless steel behaves differently than drywall when exposed to heat. Drywall is an insulator. Stainless steel is a thermal conductor.
When your oven operates, the steel panel absorbs radiant heat and distributes it across the surface. This thermal bridging means the metal behind the tile can become significantly hotter than a standard painted wall.
This elevated temperature fundamentally mitigates the strength of the PSA. As the metal heats up, the adhesive transitions from a solid-like state back into a viscous liquid, causing the tiles to slide down the wall.
Gas stoves present a significantly higher risk factor than induction or electric cooktops. An open gas flame generates intense convective heat that travels rapidly up the back wall. If your gas range lacks a built-in metal backguard (a raised control panel at the rear), the radiant heat can easily exceed the manufacturer heat limits of standard vinyl peel-and-stick tiles, leading to warping, melting, or adhesive failure. Always consult your stove's manual for required clearances to combustible materials before installation.
Establishing Safe Clearance Zones
Industry consensus dictates strict clearance rules for peel-and-stick applications near cooking appliances.
Stove Vertical Clearance Zones
Safe for most quality peel-and-stick tiles.
Caution. Safe for electric/induction. Risky for gas.
DANGER. Do not apply standard vinyl tiles here.
- Electric and Induction Stoves: You must maintain a minimum of 8 to 9 inches of vertical clearance from the heating element to the bottom edge of the tile.
- Gas Stoves: Gas burners produce significantly higher ambient heat. You must maintain a minimum of 15 to 18 inches of clearance.
- Stoves without Backguards: If your slide-in range lacks a raised metal control panel at the rear, direct tile application on the wall behind the burners is strongly discouraged.
Selecting the Right Material for Heat Zones
Standard vinyl peel-and-stick tiles possess a low TMEL. They warp, discolor, and detach when subjected to continuous heat cycling.
If your testing confirms high heat exposure, you must upgrade your materials. Look for tiles specifically engineered with a metal core or specialized heat-resistant composite layers.
When factoring in long-term performance degradation near thermal sources, identifying the correct material functions as the architectural standard. Applying standard, unrated plastics near a stove is a recipe for a melted disaster. You need products specifically formulated to withstand high-temperature environments.
The extensive data compiled in our definitive reference guide calibrates the output expectations, giving you the facts necessary to make a safe purchasing decision. Read: Are Peel and Stick Tiles Heat Resistant? The Ultimate Kitchen Safety Guide to understand the exact thermal breakdown points of different adhesive compounds.
Furthermore, for practical execution, visual inspiration, and verified safe distances, our product roundup yields an optimal configuration for merging science with style in active cooking spaces. Explore: Heat-Resistant Peel and Stick Tiles for High-Heat Kitchens to find durable, stylish DIY fixes engineered specifically for the zone behind your stove.
Community Poll: What type of stove are you working with?
Help us understand our readers' most common kitchen challenges.
What are the rental and removal considerations?
Terrified of losing your security deposit because the tiles ruined the landlord's expensive stainless steel?
This section outlines the financial risks of altering rental properties and the techniques for safe adhesive removal.
Renters face a unique set of constraints. You do not own the stainless steel backsplash, meaning any permanent alteration carries a severe financial penalty.
We evaluate this using the Rental Damage & Financial Consequence Score (RDFCS). This framework assesses the cost of replacing the metal panel versus the likelihood of a clean, damage-free tile removal.
If the RDFCS indicates a high probability of surface etching or permanent residue, direct installation should be abandoned.
Before you ever touch a piece of sandpaper to "scuff" the landlord's stainless steel, or apply any form of heavy-duty construction adhesive, you must obtain written permission from your property manager. Do not rely on verbal agreements. If the lease strictly prohibits modifying permanent fixtures, and your test patch reveals stubborn residue, pivot immediately to the temporary faux-wall method discussed below to protect your deposit.
The Myth of "Damage-Free" Removal
Many peel-and-stick products market themselves as completely removable. While technically true on certain surfaces, the reality on metal is vastly different.
High-quality adhesives are designed to be permanent. When removed from a high-energy surface like stainless steel, the tile often tears, leaving behind a thick, stubborn layer of adhesive residue.
Common Misconception: People assume pulling harder removes the tile cleanly. In reality, aggressive pulling often warps the metal panel or separates it from the drywall behind it.
Safe Removal Techniques for Steel
If you must remove adhesive tiles from a stainless panel, you must strictly adhere to a thermal and chemical process.
- Apply Directed Heat: Use a hairdryer on a high setting. Hold it six inches from the tile for thirty seconds. This softens the viscoelastic bond.
- Peel Slowly: Starting at a top corner, pull the tile downward at a sharp 180-degree angle. Do not pull outward away from the wall.
- Address the Residue: You will likely find sticky patches left behind.
- Chemical Solvents: Apply a citrus-based adhesive remover (like Goo Gone) or 90% Isopropyl Alcohol to the residue. Let it sit for five minutes.
- Scrape Gently: Use a plastic putty knife—never metal—to gently scrape away the dissolved glue.
Renter-Safe Alternatives
If your landlord strictly forbids adhesive application, or if the test patch proves too difficult to remove, consider a localized alternative.
Instead of sticking tiles to the steel, build a lightweight, temporary faux wall. You can cut thin sheets of luan plywood, apply the peel-and-stick tiles to the wood, and secure the panels over the steel using a few strategically placed strips of heavy-duty, removable mounting tape (like Command Strips).
This universally recognized paradigm engineered to bypass direct metal contact protects the original surface entirely while still delivering the aesthetic upgrade you desire. However, to make this work seamlessly without looking like a cheap fix, you need tiles that boast a high-end finish and are specifically formulated for temporary applications.
Products like the stunning Marble Hive strictly adhere to this renter-friendly methodology, offering clean removal characteristics when properly managed over compatible, temporary substrates. Their lifelike 3D texture and chic hexagonal design effortlessly transform a boring steel panel into a modern architectural feature, all while protecting your security deposit.
Shop Marble Hive TilesHow do you finish raw tile edges on metal panels?
Hate the look of exposed, sticky tile edges where the backsplash ends?
This section provides the professional techniques needed to cap and seal the borders of your new installation.
A successful installation is not just about keeping the tiles on the wall; it is about ensuring the final product looks like authentic, professional masonry.
When you apply peel-and-stick tile over an existing metal panel, the edges of the new tile are exposed. These raw edges act as a magnet for dust, cooking grease, and water vapor.
If left unsealed, moisture will eventually penetrate behind the tile, causing the perimeter to lift.
The Importance of Mechanical Edge Sealing
You must physically cap the exposed edges of the installation. This serves a dual purpose: it provides a highly polished aesthetic transition, and it protects the vulnerable adhesive boundary from environmental degradation.
Caulking is a common amateur approach, but applying standard silicone caulk over thin vinyl edges rarely results in a crisp, straight line.
Utilizing Metal Trim Profiles
The standardized evaluation for edge finishing relies on extruded aluminum or PVC trim pieces. These are commonly referred to as Schluter-style trims in the traditional tile industry.
These narrow, J-shaped or L-shaped profiles slide over the raw edge of the final row of tiles, encapsulating the adhesive boundary completely.
When securing edge trim on a nonporous substrate, standard tile mortar is useless. You must utilize a high-grab construction adhesive or heavy-duty double-sided mounting tape designed for metal-to-metal contact.
In evaluating edge integrity, standardizing the finish fundamentally mitigates premature failure. The thermal expansion rate of metal differs wildly from vinyl; sealing those edges prevents temperature swings from curling your tile borders.
However, selecting the correct depth and profile of trim to match your specific peel-and-stick product requires exact measurements and specific adhesives. The professional methodology outlined in our complete edge-finishing system provides the quantitative baseline required for sizing, cutting, and installing professional metal trim profiles. Learn the expert methods: We Tested Schluter-Style Trim on Peel-and-Stick Tile to ensure your project's borders look flawlessly integrated and permanently sealed.
What if you have large mirror panels next to the steel?
Trying to update a kitchen that features both stainless steel and outdated mirrored glass?
This section explains how to bridge materials and apply tile over complex, reflective surfaces safely.
Many urban kitchens and RV interiors utilize a combination of stainless steel behind the stove and large mirrored panels on adjacent walls.
Transitioning your tile project from steel to glass requires a slight adjustment in methodology. Like stainless steel, glass is a perfectly smooth, nonporous, high-energy substrate.
The preparation steps are largely identical: aggressive degreasing followed by an isopropyl alcohol wipe.
However, glass presents a unique aesthetic challenge. If your peel-and-stick tile has a semi-transparent backing or requires overlapping seams, the mirror will reflect the backside of the adhesive, creating visual distortions.
You must choose tiles with a completely opaque, solid core to prevent the mirror from showing through the gaps.
When dealing with reflective substrates, industry consensus dictates a specialized approach to prevent shadows, ghosting, and adhesive failure caused by the unique physics of mirrored glass.
The comprehensive testing data found in our dedicated glass guide yields an optimal configuration for applying tiles over mirrors without compromising safety or aesthetics. Read our verified guide: Can You Apply Peel and Stick Tile Over Large Mirrors? to discover the exact opaque materials and overlap techniques necessary to execute a flawless transition from your steel stovetop backguard onto adjacent mirrored walls.
Final Thoughts
Updating a stainless steel backsplash with peel-and-stick tile is entirely possible, provided you respect the science of surface adhesion.
Success is never random. It requires passing the Adhesion Failure Risk Index (AFRI) by establishing a pristine Surface Readiness Score (SRS). You must validate the bond through a 72-hour Dwell-Time Bond Validation (DTBV) and respect the Thermal Maximum Exposure Limits (TMEL) near your stove.
If you are a renter, always calculate the Rental Damage & Financial Consequence Score (RDFCS) before proceeding.
Take the time to clean aggressively, test thoroughly, and choose materials rated for your kitchen's specific environment. Start by conducting your test patch today, and move forward only when the data confirms your installation will last.
Mini Quiz: Does your stainless panel pass the Surface Readiness Score?
Test your knowledge before you start sticking to ensure your project doesn't fail within the first week.
1. Have you aggressively degreased the metal using TSP or a citrus industrial degreaser, repeating until paper towels wipe totally clean?
2. Did you complete the preparation with a final, firm wipe down using 70%+ Isopropyl Alcohol?
3. Is the metal surface completely smooth, flat, and rigidly attached to the drywall behind it?
Frequently Asked Questions
Do I need to use extra glue or primer on stainless steel?
In most cases, additional spray adhesives or primers are not recommended on clean stainless steel. The metal possesses a high surface energy that pressure-sensitive adhesives bond to aggressively. Adding liquid glue can actually create a slippery barrier that prevents the tile from curing properly. Focus entirely on degreasing the metal instead.
Can I install adhesive tile over quilted or embossed stainless steel?
It is highly risky. Textured metal panels, often found in restaurants or food trucks, drastically reduce the surface area available for the adhesive to grip. A tile that sticks perfectly to flat steel may easily fall off a quilted surface because only 50% of the adhesive is actually making contact.
How long do peel-and-stick tiles last over metal?
If the surface was properly degreased, scuffed (if permitted), and the area is kept free from excessive heat and direct moisture, a high-quality peel-and-stick installation can last five to ten years. The primary cause of premature failure is almost always improper initial cleaning.
Will installing tile over the steel void my stove's warranty?
Installing tile on the wall behind the stove generally does not void the appliance warranty. However, failing to maintain the stove manufacturer's required minimum clearances to combustible materials (which includes vinyl tiles) is a severe safety violation and can violate local fire codes. Always check your appliance manual.
Kommentar hinterlassen
Diese Website ist durch hCaptcha geschützt und es gelten die allgemeinen Geschäftsbedingungen und Datenschutzbestimmungen von hCaptcha.