


Quick Poll: What part of your bathroom needs the most glow-up?
Renter-Friendly Bathroom Upgrades with Peel & Stick Tiles
Dreaming of a stylish bathroom but stuck with bland, outdated tiles in your rental? You’re not alone. One of the most frustrating parts of renting is being locked into someone else’s design choices without the freedom to change them. Many renters resign themselves to dull walls and worn-out flooring because they fear upsetting their landlord or losing their security deposit.
But here’s the good news: peel and stick bathroom tiles have quietly become the deposit-safe miracle hack for bathrooms. They look just like traditional tiles, cost a fraction of major reno projects, and—best of all—peel away cleanly when your lease is up. I’ve even seen renters transform tired, yellowed bathroom backsplashes into bright “spa-like” retreats in one afternoon, then take everything down a year later without a trace.
In this guide, you’ll discover why peel and stick tiles are perfect for renters, what types actually hold up in bathroom conditions, how to install them (without bubbles or crooked lines), removal tips that guarantee a damage-free return, and renter-tested product recommendations.
Before we begin, you might also enjoy our detailed blog on Peel Stick Bathroom Tile for Moisture, where we go deeper into weekend-renovation strategies for renters seeking style with practicality.
Why Peel and Stick Tiles Are Perfect for Renters
For renters, the line between personalization and permanence is thin. Peel and stick tiles have exploded in popularity precisely because they sit squarely in the middle: they look permanent yet behave temporary.
- Non-permanent and removable: These tiles use a pressure-sensitive adhesive that bonds securely during use, yet softens when heated, making removal stress-free. Unlike retiling, which requires grout and tools, these tiles pop off with nothing more than a blow-dryer.
- Affordable styling: Average costs are $1–$5 per square foot, making them far more achievable than professional tiling or custom waterproof wallpaper. Renters on tighter budgets can transform small bathroom areas, like a backsplash or accent strip, for under $50.
- Landlord-safe: Landlords care about one thing: condition at move-out. Because peel and stick options don’t rip drywall or stain surfaces when removed correctly, they leave renters’ deposits untouched.
I spoke to a renter named Mia who shared that she covered ugly beige floor tiles in her 90s-era apartment bathroom with removable vinyl. Over a year later, on move-out day, her landlord told her: “I didn’t even know you changed the floor!” That’s the magic of these upgrades—they’re discreet and design-driven while being completely reversible.
If you’re curious about durability specifically, make sure to check out our explainer on Are Peel and Stick Bathroom Tiles Durable & Waterproof? which dives into expert testing and moisture resistance performance.
Types of Temporary Bathroom Tiles
Not all peel and stick tiles are created equal. Bathrooms require materials that can handle humidity, splashes, and cleaning products. Here are the main renter-approved varieties you’ll run into:
Vinyl Peel and Stick Tiles
These are the workhorses of renter-friendly bathroom upgrades. Vinyl handles moisture well, is easy to clean, and feels substantial underfoot. Commonly sold in square sheets or planks, vinyl mimics everything from natural stone to modern marble.
Example: Achim Home Décor vinyl floor tiles—popular on Amazon for their realistic stone finishes.
Gel Tiles (3D Effect)
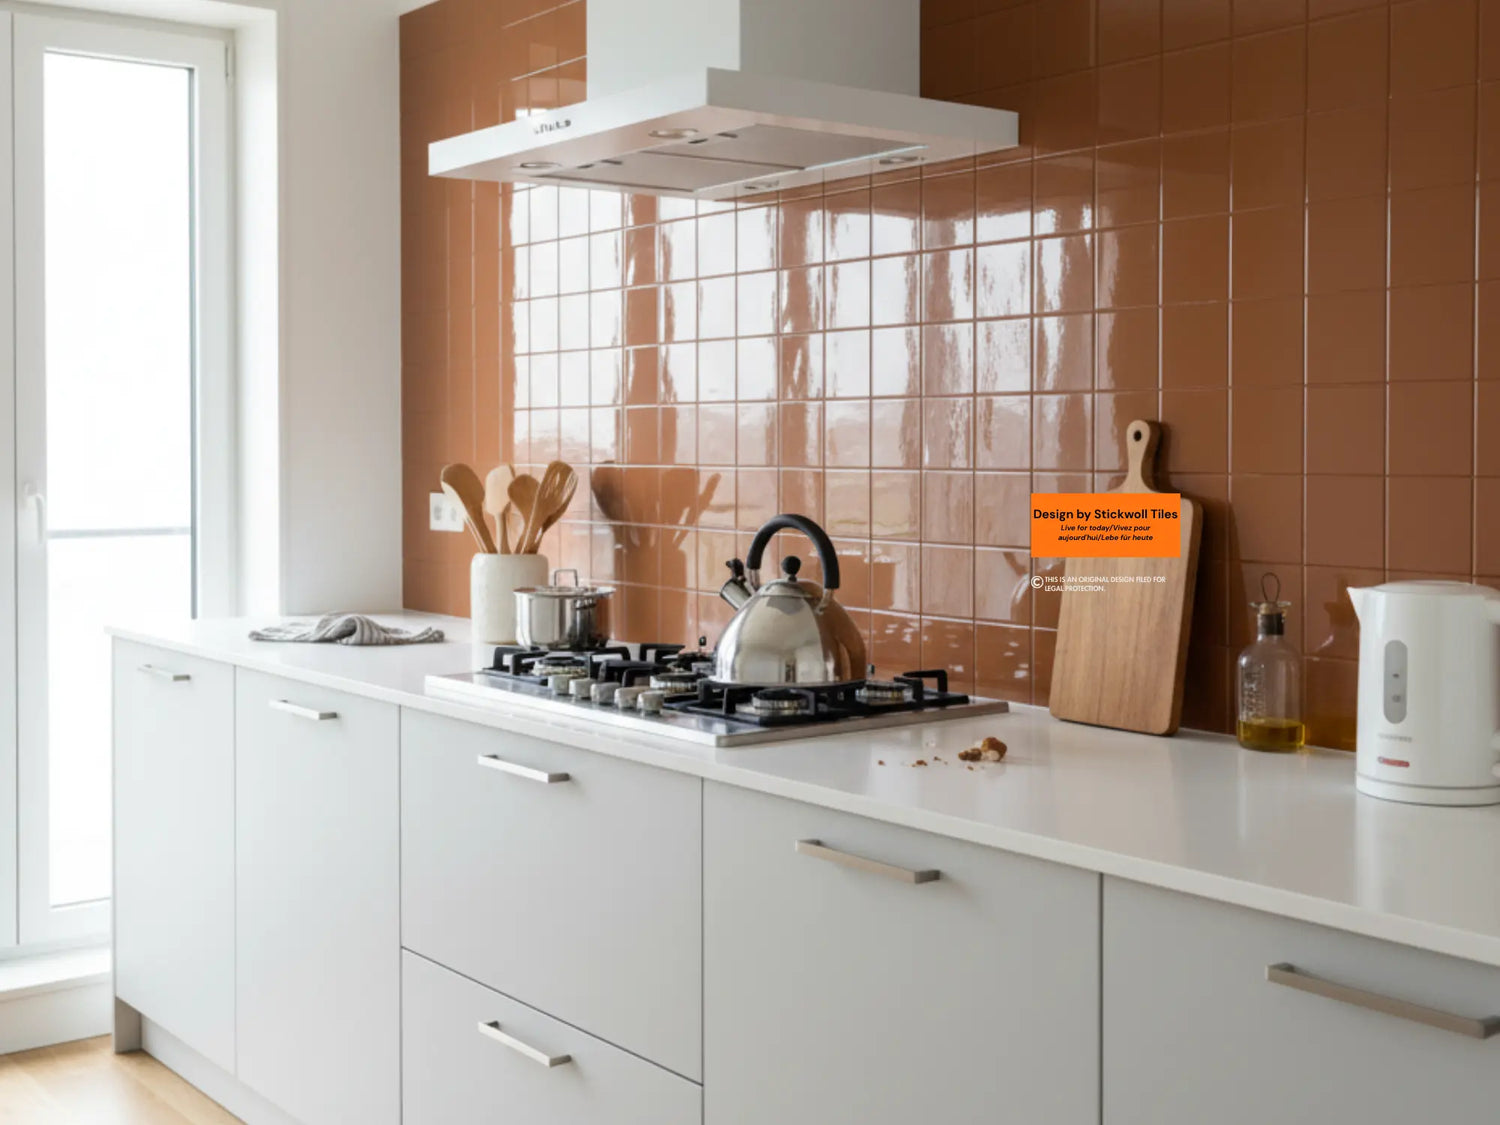
Often called “stick-on wall tiles,” gel tiles feature a raised surface, giving the illusion of grout and dimensional ceramic. These are perfect for backsplashes or accent strips but usually aren’t suitable directly on shower walls.
Example: Tic Tac Tiles Subway Design—an Amazon bestseller that renters rave about for making bathrooms look newly renovated without touching grout.
Faux Ceramic or PVC Composite
These feature a rigid, ceramic-like surface. They’re water-resistant and more durable than gel tiles but slightly pricier. Many renters use them for bathroom wall surrounds because they resist peeling in steamy conditions.
Example: STICKGOO Marble-Style panels—heavier, glossy panels that withstand moisture near sinks and tubs.
Finish & Style Diversity
The beauty here is in customization. Subway white tiles for a clean, modern vibe; geometric patterns if you want bohemian flair; or marble tones for timeless elegance. Many renters create a high-end look by mixing finishes: marble backsplash tiles with plain vinyl flooring, for instance.
By the way, if showers are your weak spot, explore our guide to Top Waterproof Peel and Stick Shower Tiles for 2025 for ideas on moisture-proof beauty.
How to Apply Peel and Stick Tiles in a Bathroom
The biggest difference between professional-looking installs and sloppy finishes? Preparation. Skipping these first steps is the number one reason renters complain about tiles “not sticking.”
Surface Preparation Essentials
- Clean all surfaces thoroughly with a degreasing cleaner. Even invisible soap residue will shorten adhesion.
- Dry completely—moisture trapped underneath causes lifting.
- If your wall is textured, smooth it out with removable lining film first (a renter hack worth its weight in gold).
Step-by-Step Application Guide
- Measure and mark your starting line to keep tiles level.
- Peel a small portion of the backing off first—don’t expose the entire adhesive at once.
- Start in the center (not the edge), pressing from middle outwards to push out air bubbles.
- Use a utility knife and metal ruler to score and cut for corners or outlets.
Tips for Seamless Alignment
- Dry-fit before peeling off the back.
- Stagger tiles to mimic natural brick or flooring.
- Apply consistent pressure with a roller for smooth adhesion.
Pro tip: Start small, like behind your sink. Not only will you gain practice, but you’ll also see the transformation immediately without committing to a full wall.
For more installation step comparisons, read our detailed instructions here: How to Install Peel and Stick Tiles & Best Designs 2025.
Safe Removal Without Damage
The removal process is surprisingly renter-friendly as long as you use patience over force.
Heat Application
A blow-dryer on medium heat softens adhesive within seconds. Gently lift a corner, warming as you peel back slowly. Avoid pulling tiles off cold—this is where paint chips happen.
Protecting Walls and Floors
- Never use metal tools directly on painted drywall. Instead, use a plastic scraper to leverage edges.
- For bathroom floors, peel systematically to avoid snapping vinyl into pieces.
Post-Removal Cleaning
Sticky residue? Lightly rub with rubbing alcohol or adhesive remover, then wash with warm soapy water. Walls bounce back to their pre-tile condition quickly.
I read an Apartment Therapy story about a renter who tiled an entire backsplash, then peeled it off on moving day. The wall looked untouched, and the landlord didn’t even notice the temporary change. That’s deposit-safe décor done right.
To see even more stories and practical advice for tenants, check out our renter feature: Transform & Remove Renters Peel and Stick Tiles Safely.
Best Renter-Tested Peel and Stick Tile Brands
Word-of-mouth is everything when it comes to renter solutions. I’ve pulled together feedback from product reviews, DIY communities, and renter testimonials to highlight the brands that consistently deliver.
| Brand | Price Range | Style Variety | Ease of Removal | Renter Satisfaction Rating |
|---|---|---|---|---|
| Stickwoll | $4–$8 per sheet | Subway, mosaic, marble, geometric | Easy peel, minimal residue | 4.8/5 – Loved for backsplash projects |
| STICKGOO | $6–$12 per sheet | High-gloss, faux marble, hexagon | Strong adhesion, needs heat for removal | 4.6/5 – Durable, ideal near sinks |
| Achim Home Décor | $1–$4 per sq. ft | Vinyl floor planks, stone, ceramic-look | Least sticky adhesive, simple removal | 4.4/5 – Budget-friendly floors |
| Smart Tiles | $7–$10 per sheet | Thicker gel look, glass imitation | Comes off clean with heat | 4.5/5 – Great for renters in humid climates |
Stickwoll dominate for walls because of style variety. Achim is the floor favorite thanks to durability at a price point apartments welcome.
Many renters note that Stickwoll's adhesive is strong, so heat during removal is crucial. Stickgoo Tiles earn praise for fast install times and realistic styles.
CTA: Shop renter-approved peel and stick tiles now →
Creative Bathroom Upgrade Ideas Using Temporary Tiles
Peel and stick success isn’t only about covering walls. Renters have gotten wildly creative with how they use these tiles to reimagine bathrooms on a budget.
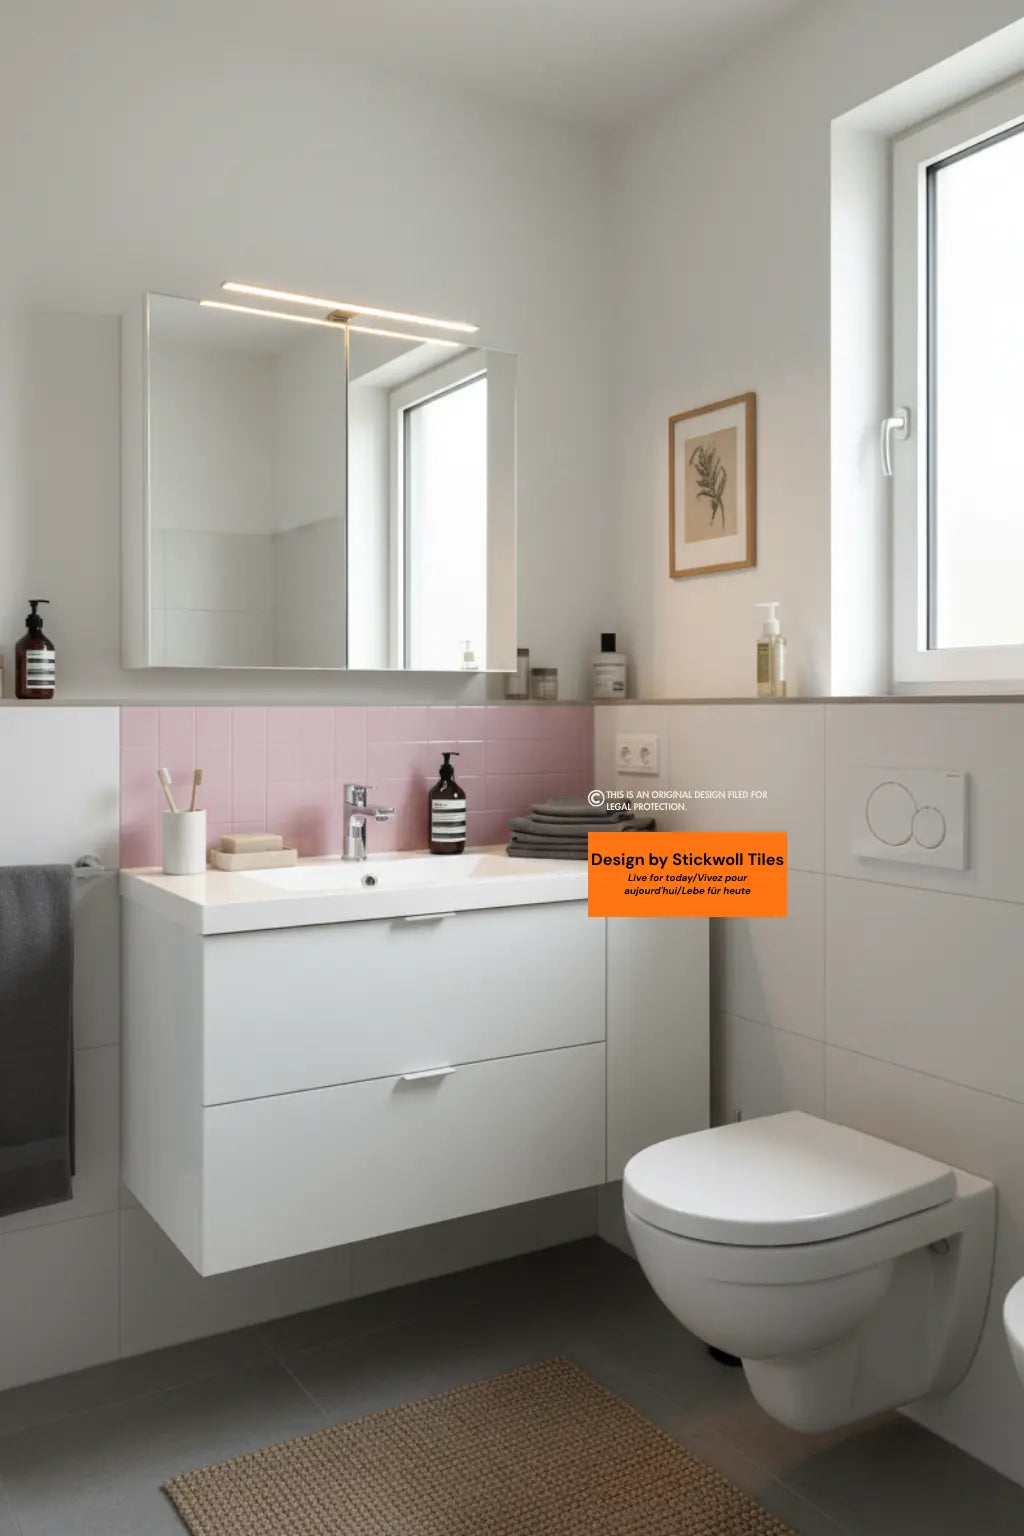
Accent Walls or Backsplashes
Adding a subway tile backsplash behind the sink immediately elevates the space. For bolder renters, an accent wall in patterned faux cement tiles creates a coffee-shop aesthetic right in your bathroom.
Chic Mirror Frames
Frames are expensive. Instead, use peel and stick tiles to border a frameless bathroom mirror. The tile turns what feels like a basic fixture into a centerpiece.
Statement Flooring
If you’ve inherited yellowed vinyl or awful brown floor tiles, cover them with luxury-vinyl peel and stick planks. Suddenly your bathroom floor looks like sleek gray oak or spa-style slate.
Mixing with Other Renter-Friendly Décor
Pair backsplash tiles with removable wallpaper or add new adhesive wall hooks for floating shelves. One renter project I saw combined marble peel and stick tiles behind the sink with brushed gold hardware—turning a $700 rent bathroom into a space that looked straight out of a design magazine.
Visual Cue: Imagine applying hexagon tiles in a diamond orientation instead of standard rows. That simple twist creates a custom design look without buying designer tiles.
Experiment, but keep things modular. The more accents you combine, the more your bathroom feels intentional instead of “renter patchwork.”
Want futuristic before-and-after visuals? Head to How to Transform Your Bathroom with Peel and Stick Tiles 2025 to imagine the possibilities in your own space.
Common Mistakes to Avoid
Even renter-friendly solutions can go wrong if rushed. Here are pitfalls worth dodging:
Skipping Surface Prep
Oils, dust, or moisture instantly sabotage adhesion. Many renters who say “my tiles keep peeling” later admit they stuck them directly on damp walls after a shower. Always clean and dry surfaces first.
Choosing Non-Waterproof Tiles
Not all tiles labeled “peel and stick” are bathroom-proof. Gel options meant for kitchens may warp in steam. Always check for waterproof ratings before applying in humid zones.
Not Planning Layout in Advance
Eyeballing the pattern usually ends in crooked rows. A renter shared her regret after misaligning her first strip: “Every shower I take, I see that one slanted subway tile, mocking me.” Measure twice, stick once.
Solution: Dry-lay at least two rows before peeling adhesive. Small prep now saves you from staring at mistakes daily.
For layout inspiration beyond bathrooms, peek at our kitchen series: How to Upgrade Kitchens with Peel and Stick Tiles.
Final Checklist for a Stress-Free Upgrade
To wrap up, here’s a straightforward checklist for your renter-friendly bathroom upgrade with peel & stick tiles.
Prep Phase
- Clean, smooth, and dry all surfaces
- Double-check waterproof rating of your chosen tile
- Map pattern layout on the wall or floor
Install Phase
- Peel slowly, stick with pressure from center outward
- Cut with a sharp utility blade for corners/outlets
- Align edges carefully to avoid pattern drift
Removal Phase
- Apply gentle heat before peeling
- Use a plastic scraper, not metal
- Clean residue with rubbing alcohol
Deposit Protection Tips
- Stick only to surfaces peel and stick tiles are recommended for: walls, mirrors, floors—not raw wood or high-texture plaster
- Keep leftover sheets handy for replacing damaged sections before move-out
- Document your bathroom before and after with photos just in case you need proof you left it in good condition
Budget-wise, plan $50–$150 for small bathrooms and $200–$300 for full coverage. Brands like Tic Tac Tiles and Achim offer good baseline quality within this range.
If you treat this as both design and deposit insurance, you’ll enjoy the upgrade without stressing come moving day.
Conclusion
Peel and stick bathroom tiles hit the sweet spot for renters: stylish, affordable, and completely safe for your security deposit. They let you swap bland beige backdrops for marble, subway, or bold geometric finishes—all without breaking lease rules.
Start small with a backsplash or mirror frame, gain confidence, and then expand. By choosing renter-tested brands, prepping carefully, and removing with heat, you’ll enjoy a bathroom you actually love, without worrying about what happens when the lease is up.
CTA: Download your free renter’s bathroom upgrade checklist or explore our curated list of renter-approved peel & stick tile brands.
Download: Grab our free checklist as a .txt file for your next upgrade project.
Renter Bathroom Upgrade FAQ
Q1: Can peel and stick tiles be used inside the shower?
Some brands advertise waterproof qualities, but very few hold up under direct water flow for months on end. Safe play? Use them outside the shower enclosure—around sinks, mirrors, and accent walls.
Q2: Will they damage my landlord’s walls?
Not if removed correctly. Heat softens adhesive so tiles peel away clean. Use a plastic scraper, never metal, to protect surfaces.
Q3: How long do peel and stick bathroom tiles last?
With good prep, they last 2–5 years. High humidity or poor surface cleaning can reduce life expectancy.
Q4: Can I reuse tiles after removing them?
Most cannot, since adhesive loses its strength after peel-off. But since they’re budget-friendly, renters usually plan new designs for their next space rather than reusing.
Q5: What if my bathroom walls are textured?
Apply a layer of removable lining film or smooth contact paper underneath. This creates a flat surface that peel and stick tiles adhere to beautifully.

Leave a comment
This site is protected by hCaptcha and the hCaptcha Privacy Policy and Terms of Service apply.