


You’re standing in your kitchen, a fan of tile samples spread across the counter. Dozens of shades of blue stare back at you—from deep, moody navy to a bright, cheerful sky blue. You love the idea of a blue backsplash, but the sheer number of choices is paralyzing. This isn't just about picking a color; it's about choosing a material, a finish, and a pattern that you’ll love for years to come.
The fear of making a costly design mistake is real. That's why we’ve created this guide. Drawing on our experience with countless kitchen renovations, we’re here to give you the expert-backed insights you need. We'll bridge the gap between design inspiration and practical, real-world execution, ensuring you feel empowered, not overwhelmed.
In this article, you will learn how to align a blue backsplash with your kitchen's style, compare the best materials for durability and budget, and even get step-by-step installation advice. Before you pick a single tile, it helps to understand what kind of blue backsplash suits your kitchen best. We will guide you through every consideration, making the process clear and achievable.
What is the Appeal of a Blue Backsplash?
The Question: "Why does the color blue feel so right for a kitchen, and how do I know my choice won't look dated in a few years?"
The Promise: This section explores the timeless psychology behind blue in home design and reveals the trending tones that blend classic appeal with modern style.
Blue is more than just a color; it’s a feeling. In design, it’s known for evoking a sense of calm, stability, and cleanliness—all qualities you want in the heart of your home. It’s a color that connects us to nature, reminiscent of a clear sky or a deep ocean, making it a design choice that rarely goes out of style.
Unlike fleeting trends, blue has a staying power that few other bold colors can match. It acts as a "colorful neutral," meaning it can provide a splash of personality while still coordinating beautifully with a wide range of other materials and palettes, from warm woods to crisp whites and even bold brass hardware.
Today's Most Popular Blue Tones
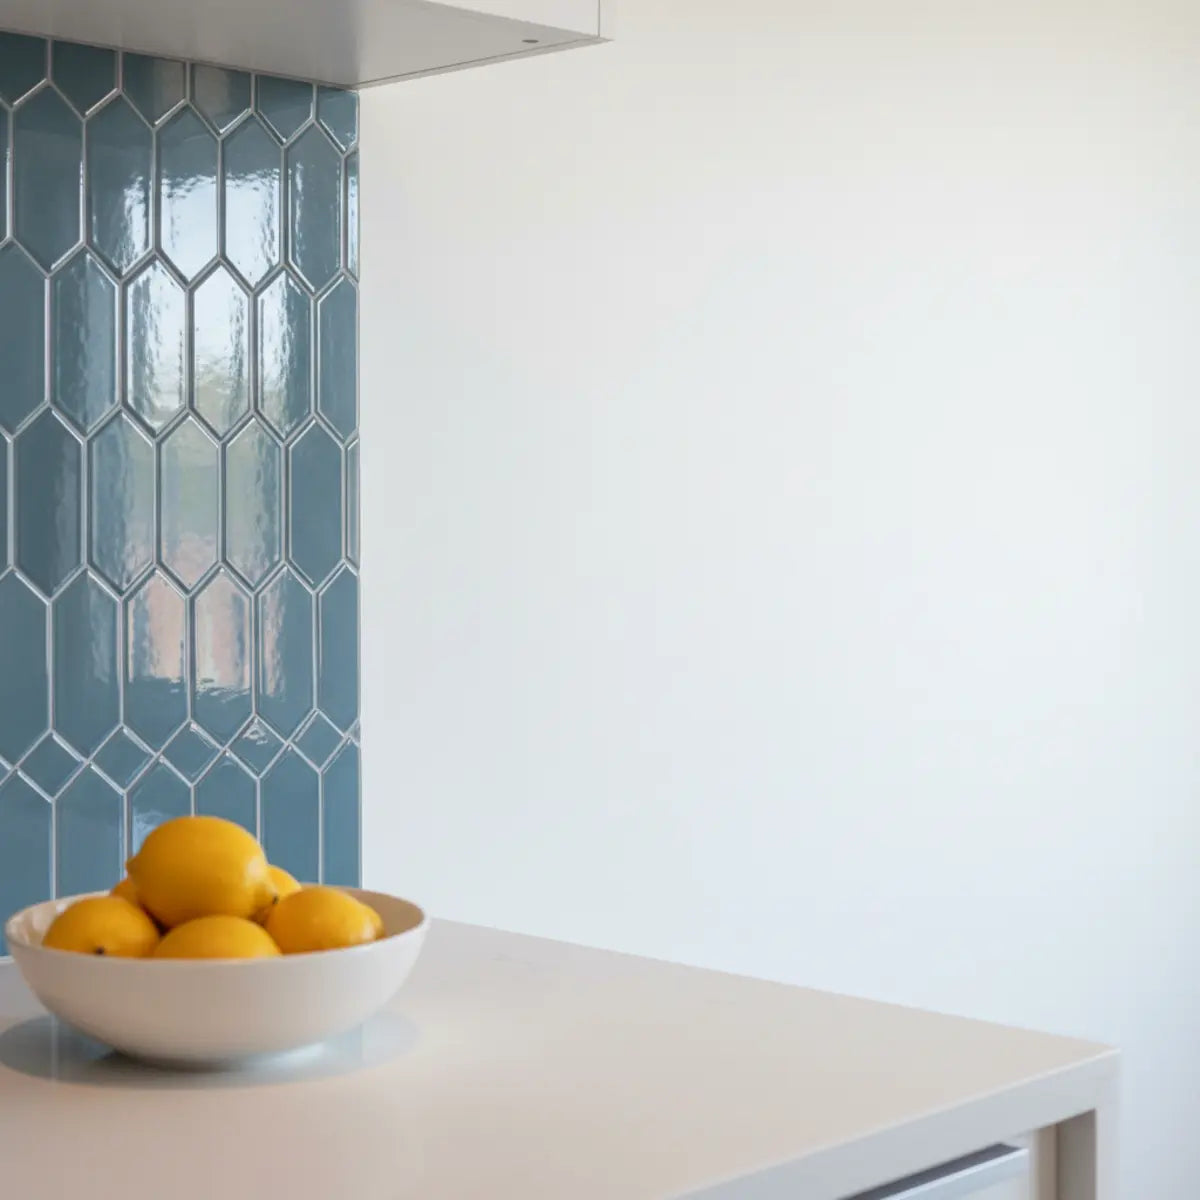
While classic navy is always a winner, 2025 design trend reports show a growing love for nuanced blues. Muted tones like dusty blue, slate blue, and teal are gaining popularity. These sophisticated shades offer color without overwhelming a space, creating a serene and upscale atmosphere.
For example, a deep navy blue backsplash brings drama and elegance to a modern kitchen, especially when paired with white cabinets and gold fixtures. In contrast, a soft light blue backsplash in a coastal-inspired kitchen creates an airy, relaxed vibe that feels like a permanent vacation.

How Do I Choose a Blue Backsplash Based on My Kitchen's Style?
The Question: "How can I be sure the blue tile I pick will actually look good with my existing cabinets and countertops?"
The Promise: Here, we'll give you clear, actionable strategies for matching blue backsplash tones to your kitchen's core elements for a perfectly harmonious look.
Choosing the right shade of blue is all about context. The perfect tile for your neighbor’s kitchen might not be the one for yours. Your cabinets, countertops, and flooring are the main characters in your kitchen's story; the backsplash is the supporting actor that makes them shine.
A common misconception we see is that the backsplash must be a stark contrast. Sometimes, harmony is more powerful. A blue that shares a similar undertone with your gray countertops, for instance, can create a sophisticated, layered look.
Matching Blue with Cabinet Colors
The Power of a Blue and Gold Backsplash
One of the most luxurious and on-trend combinations is the blue and gold backsplash. This isn't just about gold-colored tiles. More often, it refers to blue tiles paired with gold or brass hardware, fixtures, and grout. The warmth of the gold makes the cool blue pop, creating a look that feels both glamorous and inviting.
Which Material is Best for a Blue Backsplash?
The Question: "There are so many materials—glass, ceramic, marble. How do I pick one that fits my budget, is easy to clean, and will actually last?"
The Promise: This section delivers a clear, side-by-side comparison of the top blue backsplash materials, breaking down their cost, durability, and maintenance needs so you can choose with confidence.
Once you’ve narrowed down your color and style, the next big decision is the material. This choice impacts not only the look of your backsplash but also its price, installation difficulty, and long-term upkeep. We find many homeowners focus only on aesthetics, but the practical side is just as important.
Let’s break down the most common options.
| Material | Average Cost (Per Sq. Ft.) | Durability | Maintenance | Best For... |
|---|---|---|---|---|
| Ceramic/Porcelain | $5 - $25 | High | Low | Versatility and budget-friendly projects. |
| Glass | $15 - $40 | Moderate | Low | Modern kitchens and creating a sense of light and space. |
| Marble | $30 - $70+ | Moderate | High | Luxury kitchens and making a timeless statement. |
| Peel-and-Stick | $4 - $12 | Low to Moderate | Very Low | DIYers, renters, and fast, budget-friendly updates. |
A Closer Look at Each Material
Ceramic & Porcelain: These are the workhorses of the tile world. They are durable, water-resistant, easy to clean, and come in an endless variety of blue shades, patterns, and price points. Porcelain is slightly denser and more durable than ceramic, making it a great choice for high-traffic areas. This is your safest and most versatile bet.
Glass: Blue glass tiles, especially blue glass mosaic backsplashes, are fantastic for adding luminosity to a kitchen. They reflect light, which can make a smaller kitchen feel bigger and brighter. While durable, they can be prone to scratching if you're not careful, and installation can be tricky as the adhesive may be visible through the tile.
Marble: For a truly high-end look, nothing beats natural stone. A blue marble backsplash introduces elegant, organic veining that makes each installation unique. However, marble is porous and requires regular sealing to prevent stains from cooking splatters like wine or tomato sauce. It's a luxury choice with matching maintenance needs. For homeowners considering a different natural stone with unique color, our guide on how to install a green subway tile backsplash offers a full project roadmap that can be adapted for other stone types.
Peel-and-Stick: Don't underestimate this option. Modern peel-and-stick tiles have come a long way, offering realistic 3D textures that mimic ceramic or glass. They are incredibly DIY-friendly and perfect for renters or anyone looking for a quick, low-commitment update. For those just starting their renovation journey, our Best Peel and Stick Backsplash Guide 2025 is the definitive resource for understanding what's possible with this material.
Ready to see the possibilities? Explore our full collection of backsplash materials to find the perfect fit for your style and budget.
What Are My Options for Finishes and Patterns?
The Question: "I know the color and material I want, but what about the finish and the tile layout? How do those choices impact the final look?"
The Promise: We'll demystify the difference between matte and glossy finishes and introduce you to classic and contemporary patterns that can elevate your blue backsplash from simple to stunning.
The final layer of your design decision comes down to finish and pattern. These details might seem small, but they have a massive impact on the overall feel of your kitchen.
Matte vs. Glossy: A Tale of Two Finishes
Exploring Patterns: Beyond the Basic Grid
The way you lay your tiles can completely transform their look. While a standard grid is fine, exploring other patterns can add a custom designer touch to your project.
For a deeper dive into how different layouts work, our guide on How to Use Trendy Subway Tile Patterns is the ultimate resource for turning a simple tile into a design statement.
Can I Install a Blue Backsplash Myself, or Should I Hire a Pro?
The Question: "I want to save money with a DIY installation, but I'm afraid of messing it up. When is it okay to do it myself, and when should I call a professional?"
The Promise: This section provides a clear, step-by-step DIY guide for confident beginners and outlines the specific situations where hiring a professional is the smarter investment.
The installation question is a big one, balancing budget against time, skill, and stress. The good news is, you have options. Many homeowners are surprised by what they can accomplish themselves, especially with today's materials.
A common mistake is underestimating the prep work. Whether you're using traditional tile or peel-and-stick, a clean, smooth, and dry wall is non-negotiable for a lasting installation.
DIY Installation Guide for a Blue Backsplash
For the confident DIYer, installing a backsplash is a very achievable weekend project. Peel-and-stick tiles are the easiest entry point.
"I was so nervous to try peel-and-stick, but the process was surprisingly simple! My blue subway tile backsplash completely changed the feel of my kitchen. The key was definitely the prep work and drawing a level line to start." - Jenna K., Homeowner
Here’s a simplified process:
- Preparation: Turn off power to any outlets on the wall. Clean the wall thoroughly with a degreaser to remove any kitchen grime. Fill any holes and sand them smooth.
- Measure and Plan: Measure the area and mark the center point. Do a "dry run" by laying out your tiles on the floor to visualize your pattern and cuts.
- Create a Guideline: Use a level to draw a perfectly straight horizontal line for your first row of tiles. Don't rely on your countertop, as it may not be perfectly level.
- Application (Peel-and-Stick): Starting from your guideline, peel the backing off the first tile and press it firmly onto the wall. Overlap the tiles as instructed by the manufacturer.
- Cutting: For cuts around outlets or corners, use a utility knife and a straight edge. Make a template with paper first to ensure a perfect fit.
For those ready to tackle this project, the best resource is our Easy Guide: Install Peel & Stick Subway Tiles, which provides a visual, foolproof roadmap. If you're exploring peel and stick options more broadly, our comprehensive overview on how to install peel and stick tiles and the best designs for 2025 is another must-read.
When to Hire a Professional
While DIY is empowering, sometimes a pro is the right call. Consider hiring an installer if:
- You're using expensive or tricky materials like natural stone (marble) or glass mosaics.
- Your walls are very uneven or require significant prep work.
- The layout is complex (e.g., a full-wall herringbone pattern with many intricate cuts).
- You simply don't have the time or patience for a detailed project.

How Do I Maintain My Blue Backsplash for Long-Term Beauty?
The Question: "How do I keep my new backsplash looking as good as the day it was installed? I'm worried about stains and dingy grout."
The Promise: Learn material-specific cleaning tips and preventative measures to protect your investment and keep your blue backsplash vibrant for years.
Your beautiful new backsplash is installed—congratulations! Now, the goal is to keep it looking pristine. Proper maintenance is simple, but it varies slightly depending on the material you chose. The biggest enemy of any backsplash is procrastination; wiping up splatters as they happen is half the battle.
Cleaning Tips by Material
Grout Care: The Secret to a Fresh Look
Grout is porous and can stain over time. We recommend sealing your grout lines after installation and resealing them annually. To clean discolored grout, a paste of baking soda and water applied with a small brush or old toothbrush is a gentle yet effective method. While these tips cover backsplashes, much of the same logic applies to shower areas. For a comprehensive look at tiling in wet environments, our Subway Tile Shower Makeover Guide provides essential tips on waterproofing and maintenance.
A common oversight we see is homeowners scrubbing their beautiful tiles with abrasive sponges. This can create micro-scratches on glossy finishes. Always use a soft cloth or non-abrasive sponge.
Can I See Some Blue Backsplash Inspiration from Real Homes?
The Question: "I'm a visual person. Can I see some real-life examples of how these ideas actually look in a kitchen?"
The Promise: This section showcases a gallery of stunning real-world kitchens, featuring different blue tones, materials, and styles to spark your imagination.
Theory is great, but seeing is believing. Let's look at how homeowners and designers have successfully used blue backsplashes to create beautiful, functional kitchens.
Modern Drama with Navy Blue
Imagine a sleek, open-concept kitchen with white shaker cabinets and quartz countertops. A navy blue backsplash in a glossy ceramic subway tile, laid in a herringbone pattern, creates a stunning focal point. Paired with matte black hardware and stainless steel appliances, the look is sophisticated, bold, and utterly contemporary.
Coastal Charm with Light Blue
Picture a kitchen filled with natural light, featuring light wood or white-washed cabinets. Here, a light blue glass mosaic backsplash evokes the sea and sky. The small, shimmering tiles catch the light beautifully, making the entire space feel bright and airy. It's the cornerstone of a perfect coastal kitchen backsplash.
A Touch of Luxury with Stone
In a high-end kitchen with dark wood cabinets and a grand island, a slab of blue marble backsplash is pure opulence. The natural, sweeping veins of gray, white, and blue in the stone act as a piece of art. It’s a statement of timeless elegance that elevates the entire home. For an even more unique look, some designers are using Zellige tiles in a deep sea blue for an old-world, handcrafted feel.

What Are the Cost and Purchase Considerations for a Blue Backsplash?
The Question: "What is this actually going to cost? I need a realistic budget for both the materials and the installation."
The Promise: Get a clear cost breakdown for different blue backsplash options and learn the key factors that influence the final price, so you can shop smarter.
Budgeting for a backsplash involves two main components: the cost of the materials and the cost of labor if you hire a pro.
Interactive Backsplash Cost Calculator
Use our tool to get a rough estimate for your project materials.
Estimated Material Cost:
$240
*This is an estimate for materials only. Professional installation costs extra.Material Cost Breakdown
As we showed in our comparison table, prices vary widely.
- Budget-Friendly ($4-$12/sq. ft.): This range covers most peel-and-stick tiles and some basic ceramic options. It’s a fantastic way to get a high-impact look for a low cost, especially if you're doing the installation yourself. Our Peel Stick Backsplash Kitchen Ideas 2025 article showcases top designs in this price range.
- Mid-Range ($15-$40/sq. ft.): Here you'll find higher-end ceramics, most porcelain, and a wide variety of glass tiles. This is the sweet spot for many homeowners, offering a great balance of quality, style, and price.
- Luxury ($40-$70+/sq. ft.): This category includes natural stone like blue marble, handmade Zellige tiles, and custom mosaic designs.
Professional Installation Costs
Hiring a professional tiler typically costs between $40 to $60 per hour, or $10 to $30 per square foot, depending on your location and the complexity of the job. For a standard 30 sq. ft. backsplash, expect to pay $300 to $900 in labor.
Remember to factor in the "hidden" costs: adhesive, grout, sealant, and tools if you're going the DIY route. Always get at least three quotes from licensed installers to ensure a fair price.
Your Perfect Blue Backsplash Awaits
Choosing a blue backsplash is about more than just picking a pretty tile. It's about making a thoughtful decision that enhances your kitchen's style, fits your budget, and stands up to the demands of daily life. By aligning your choice with your cabinets, understanding the trade-offs between materials, and planning your installation, you can move forward with confidence.
You now have the design insights and practical know-how to select a backsplash that not only looks beautiful but also brings you a sense of calm and joy every time you step into your kitchen.
Ready to take the next step? Explore our backsplash collection or subscribe to our newsletter for more expert design guides and DIY tips delivered right to your inbox.Frequently Asked Questions
What is the most timeless shade of blue for a kitchen?
Navy blue is arguably the most timeless choice. Like a classic blue suit, it’s sophisticated, versatile, and pairs well with almost anything—white, wood, gray cabinets, and brass or chrome hardware. It provides depth and elegance without feeling overly trendy.
Will a blue backsplash make my small kitchen feel smaller?
Not necessarily. A dark navy backsplash can actually create a sense of depth, making the walls recede. To keep the space feeling open, choose a glossy finish to reflect light, ensure your kitchen has good under-cabinet lighting, and pair the blue with lighter cabinets and countertops.
How do I coordinate a blue backsplash with my granite countertops?
Look for a shade of blue that picks up on one of the secondary colors in your granite's veining. If your granite has flecks of blue, gray, or even warm gold, find a tile that complements that tone. Bring a sample of your countertop when you go tile shopping to see them side-by-side.
Are blue peel-and-stick backsplashes durable enough for a busy kitchen?
Modern, high-quality peel-and-stick tiles are surprisingly durable. They are water-resistant, heat-resistant (to a certain degree), and easy to clean. While they may not have the 30-year lifespan of porcelain, they are an excellent, long-lasting solution for many years of use, especially for renters or those seeking a non-permanent update. For a complete overview of all material types beyond just peel-and-stick, the definitive What Kitchen Backsplash Tile Guide is your best resource.


Leave a comment
This site is protected by hCaptcha and the hCaptcha Privacy Policy and Terms of Service apply.