


If your kitchen feels stuck in 2024, the fastest way to refresh it for the new year isn’t a costly cabinet overhaul—it’s the backsplash. A new backsplash can instantly change the entire mood of your space, but the thought of demolition, grout, and high costs can be a major roadblock.
Do you dream of a Pinterest-worthy kitchen without the renovation budget or landlord restrictions? You’re not alone. The desire for a stylish, personal space often conflicts with the reality of time, money, and rental agreements. This is where modern peel and stick backsplash designs come in. They are the design world's smartest secret for 2025.
This is more than just a list of products. We’ve curated the top trends, from modern farmhouse to sleek marble, specifically for style-savvy homeowners and renters. You'll find practical styling tips, installation advice, and everything you need to make a confident choice. Get ready to transform your kitchen in an afternoon.
Why Peel & Stick Backsplashes Are Trending in 2025
Tired of a dated kitchen but held back by a tight budget or a rental agreement? This section reveals why self-adhesive tiles are the number one design hack for a fast, affordable, and stylish upgrade.
Peel and stick backsplashes are no longer just a temporary fix. They have become a go-to choice for designers and homeowners alike. The primary reason is value. A traditional tile backsplash installation can cost thousands, while a high-quality DIY backsplash project can often be completed for under $200.
This cost-effectiveness democratizes good design. It means you can experiment with trends without a huge financial commitment. For renters, it's a game-changer. You can add personality and value to your space with a temporary backsplash that can be removed without a trace when you move out, ensuring you get your security deposit back.
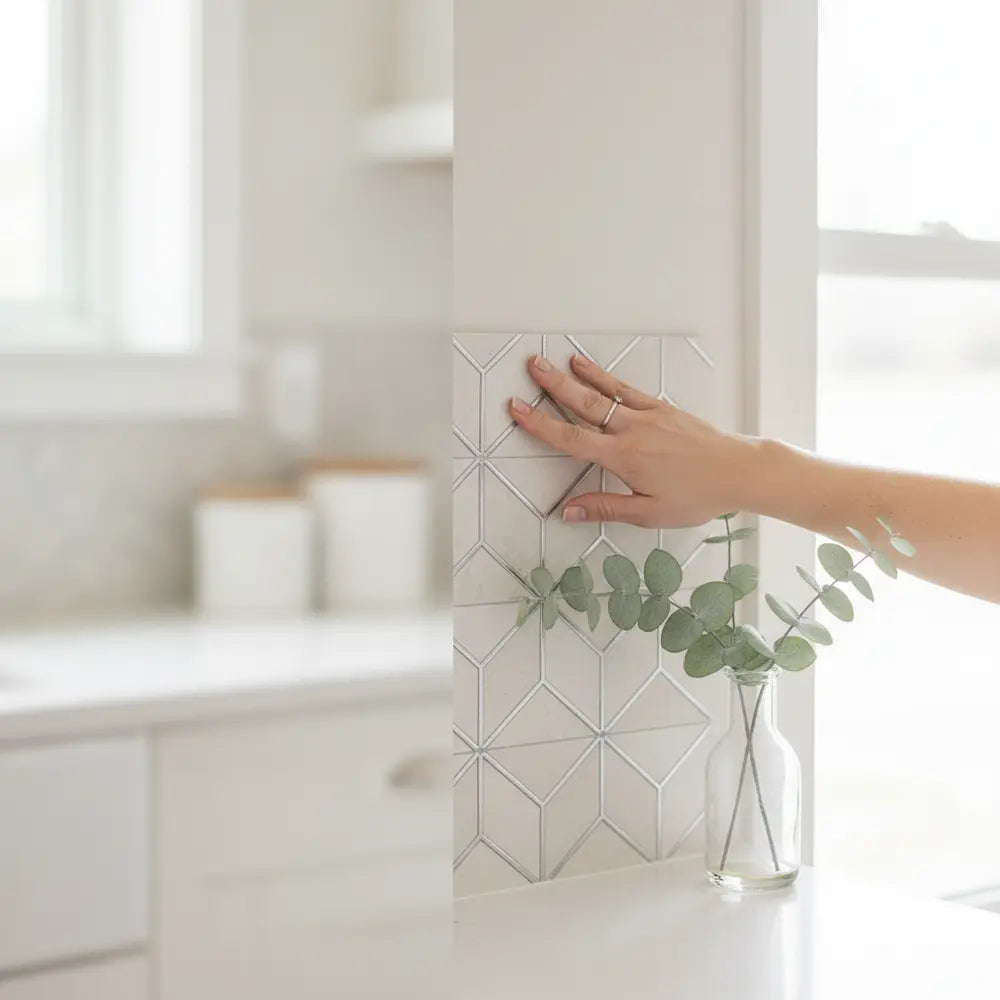
The variety available today is staggering. Gone are the days of thin, obviously fake-looking plastics. Modern options feature realistic 3D textures, grout lines, and sophisticated finishes that mimic real ceramic, stone, and glass. They offer an instant, high-impact peel and stick kitchen upgrade that looks and feels authentic. If you're eager to see how these materials can completely redefine a space, our collection of Trendy Kitchen Wall Ideas 2025: Peel & Stick Tips provides a stunning visual gallery of possibilities.
Top DIY Backsplash Ideas for 2025
Feeling overwhelmed by endless design choices and unsure which look will truly elevate your kitchen? Here, we break down the four essential trends for 2025, helping you find the perfect style for your space.
Choosing a style sets the tone for your entire kitchen. Your backsplash is the perfect place to make a statement. For 2025, the trends are all about combining timeless appeal with modern sensibilities. We're seeing classic patterns re-imagined and a strong pull towards natural, textured finishes that add warmth and character.
The Enduring Charm of Subway Tile
Love the clean look of subway tile but worry it might be too plain? Discover how to use this classic pattern to create a fresh, modern statement that is anything but boring.
The subway tile look remains a perennial favorite for a reason: its clean lines and versatile nature fit nearly any decor style. It acts as a perfect neutral backdrop, allowing other elements in your kitchen, like colorful appliances or bold cabinetry, to shine.
A common misconception is that subway tile is uninspired. The key in 2025 is in the application. Instead of the traditional offset pattern, consider a vertical stack for a modern, height-enhancing effect. A herringbone layout adds a touch of dynamic, sophisticated energy. These subtle shifts transform a classic into a custom design feature.
Pro-Tip:
Choose a peel and stick subway tile with a built-in "grout" line that has a slight sheen. This small detail dramatically increases the realism and makes the tiles look professionally installed.
Luxe for Less: The Marble Effect
Craving that high-end, polished marble look without the five-figure price tag? This is how you achieve the expensive appearance of natural stone using smart, budget-friendly peel and stick options.
A marble backsplash is the epitome of luxury, but natural stone is expensive, porous, and requires significant maintenance. A modern peel and stick backsplash with a marble finish offers all the visual splendor without any of the drawbacks. It's like getting a designer look for a fraction of the cost.
Look for designs that mimic specific stones like Carrara, with its soft gray veining, or Calacatta Gold, which features warmer, golden tones. High-quality prints now have randomized patterns, so you won’t see the same vein structure on every tile. This variation is critical for achieving a believable, high-end look.

Modern Farmhouse & Rustic Textures
Want to add warmth and character to a sterile kitchen? Explore how textured peel and stick tiles can bring the cozy, inviting feel of a modern farmhouse or rustic retreat into your home.
The modern farmhouse aesthetic is all about texture and warmth. A faux stone backsplash or a design that mimics weathered wood can instantly make a kitchen feel more inviting and grounded. These textured options add a tactile dimension that flat tiles lack, creating a more dynamic and interesting surface.
These styles are perfect for creating a focal point behind the stove or complementing open shelving. A common choice is a faux-brick pattern, but 2025 is seeing a rise in stacked stone and even shiplap-style peel and stick panels. These are fantastic cheap stick on backsplash ideas that deliver a huge stylistic impact.

The Rise of Eco-Friendly & Sustainable Designs
Are you looking for a stylish update that also aligns with your values? Learn about the emerging trend of eco-conscious peel and stick options that are both beautiful and better for the planet.
Sustainability is no longer a niche concern; it's a driving force in design. A growing number of manufacturers are offering peel and stick tiles made from recycled materials or using low-impact production processes. These products allow you to refresh your home while making a more responsible choice.
Designs in this category often draw from nature, featuring patterns of leaves, wood grains, or soft, earthy tones. This "biophilic" design approach helps create a calming and restorative atmosphere in the home. Choosing an eco-friendly option is a powerful way to express your personal style and values.
Best Peel & Stick Options for Kitchens in 2025
Worried that a peel and stick backsplash won't stand up to the heat and mess of a real kitchen? This section addresses those fears head-on, guiding you to the most durable, safe, and practical materials for your project.
Functionality is just as important as style in a kitchen. The right peel and stick backsplash for your kitchen in 2025 must be able to handle heat, moisture, and daily cleaning. Thankfully, material technology has advanced significantly, and today's products are engineered for the kitchen environment.
Heat-Resistant Materials for Behind the Stove
Afraid to put a self-adhesive tile behind your cooktop? We'll show you what to look for to ensure your backsplash is both beautiful and safe.
This is the most common concern, and it's a valid one. Not all peel and stick tiles are created equal. For the area behind your stove, it is absolutely essential to choose a product specifically rated for heat resistance. These tiles often have a metal (usually aluminum) or specialized vinyl composition.
Pro-Tip:
Always check the manufacturer's specifications. Most recommend a clearance of 6-8 inches between the tile and an open flame or direct heat source from a burner. This ensures both safety and the longevity of the adhesive. Installing a stainless steel panel directly behind the cooktop and tiling around it is another expert solution.
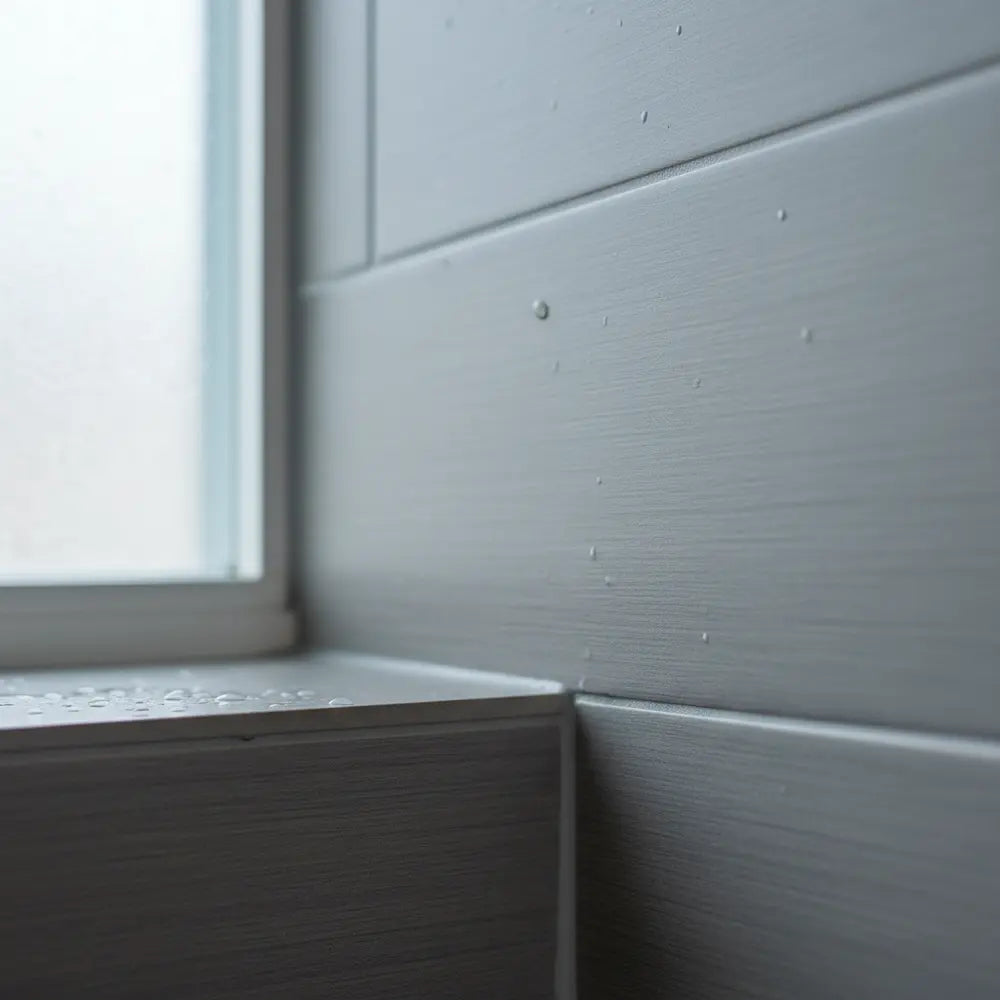
Waterproof Backsplashes for Sink Areas
Concerned that splashes from the sink will make your new backsplash peel away? Discover the secrets to a long-lasting, waterproof application.
The area behind the sink sees constant splashes. You need a waterproof peel and stick backsplash that can handle moisture without warping or losing adhesion. Most high-quality vinyl and PVC tiles are inherently water-resistant on their surface. The key to a truly waterproof seal lies in the installation.
The myth is that these tiles will fail at the first sign of water. The reality is that failure is almost always due to improper surface prep or gaps between tiles. When tiles are overlapped correctly and the edges are sealed (especially where the backsplash meets the counter), you create a water-tight barrier that protects the wall behind it. For an in-depth look at how to achieve this seamless finish and explore inspiring designs, our article on Peel Stick Backsplash Kitchen Ideas 2025 is the perfect starting point.
Durability and Long-Lasting Finishes
How can you tell if a peel and stick tile will last or if it will look cheap and worn out in a year? Learn how to spot the difference between a quality product and a flimsy imitation.
The durability of a peel and stick tile is largely determined by its thickness and the quality of its adhesive backing. Thinner, cheaper tiles can look good initially but are more prone to tearing, showing imperfections from the wall behind them, and peeling at the corners.
Look for tiles that are at least 2-3mm thick. These more rigid tiles provide better coverage and a more realistic, three-dimensional look. The finish also matters. A quality product will have a protective top layer that resists stains, scratches, and fading from UV light, keeping your backsplash looking fresh for years. To learn more about selecting the most robust options, our comprehensive guide on DIY Peel and Stick Tiles: Easy Kitchen Upgrade offers expert tips on durability and renter-friendly applications.
Temporary Backsplash Ideas for Renters
Think you're stuck with your rental's boring kitchen until you move out? This section is dedicated to renter-friendly backsplash ideas that are high on style but guarantee a damage-free removal.
Living in a rental can feel creatively restrictive. You want to make the space your own, but the fear of losing your security deposit looms large. A temporary backsplash is the ultimate solution, offering a dramatic transformation that is completely reversible. It's one of the best ways to make a temporary space feel like home.
Maximizing Style with Minimal Commitment
Wish you could update your kitchen's look without a long-term commitment? Explore how easily removable backsplashes give you unparalleled design freedom.
The beauty of a stick on backsplash for renters lies in its lack of permanence. Does your style evolve? You can change your backsplash in a weekend. This allows you to experiment with bolder colors or patterns that you might hesitate to commit to with traditional tile. Think of it as an accessory for your kitchen.
This flexibility is empowering. You can embrace the matte black trend now and switch to a bright, Mediterranean-inspired pattern next year. A removable backsplash for apartments gives you the freedom to design for your current taste, not for a hypothetical future buyer.

Damage-Free Removal Tips
What's the secret to removing peel and stick tiles without damaging the wall? Follow these simple steps for a clean, stress-free removal process.
Proper removal is the key to a truly renter-friendly experience. Rushing the process can lead to paint peeling or adhesive residue. The secret weapon is gentle heat.
- Apply Heat: Use a hairdryer or a heat gun on a low setting. Wave it back and forth over a tile for 30-60 seconds to soften the adhesive.
- Lift a Corner: Use a putty knife or a credit card to gently lift one corner of the warmed tile.
- Peel Slowly: Pull the tile away from the wall slowly and at a shallow angle. Pulling straight out can take paint with it. Continue applying heat as you peel.
- Clean Residue: If any sticky residue remains, use a citrus-based cleaner or a product like Goo Gone on a soft cloth to gently wipe it away.
High-Impact Looks on a Budget
Can you really make a big difference in a rental kitchen for less than $100? Absolutely. Here’s how to get the most bang for your buck.
A small budget doesn't have to mean a small impact. A budget of around $100 is more than enough to cover the backsplash area in a standard rental kitchen. To maximize this, choose a pattern with a strong graphic quality, like a bold geometric design or a colorful mosaic. These styles create an immediate focal point.
Consider a project where you only tile the area behind the stove. This "range splash" creates a designer feature wall, draws the eye, and uses far fewer tiles, making it an incredibly effective and affordable update. It's a prime example of a cheap stick on backsplash idea that looks expensive. For a full breakdown of how to plan your project from start to finish, see our definitive How to DIY Peel Stick Kitchen 2025 guide, which covers everything from measuring to final touches.
Which backsplash trend is your vibe?
How to Install Peel & Stick Backsplash (Step-by-Step)
Feeling intimidated by the idea of a DIY installation, even if it's "easy"? This detailed, step-by-step guide removes all the guesswork and ensures you get a professional-looking result on your first try.
The promise of peel and stick tile is its simplicity. While it's far easier than traditional tiling, a successful, long-lasting application depends on doing the prep work right. Following these steps will ensure your new DIY backsplash looks flawless and stays put.
For a comprehensive walkthrough with even more detail, the go-to resource is our guide on How to Install Peel and Stick Tiles & Best Designs 2025.
Tools & Prep Checklist
- Degreasing cleaner (like TSP substitute)
- Cloths or sponges
- Tape measure
- Level and pencil
- Sharp utility knife & straight edge
- Seam roller or soft cloth
Step 1: Surface Preparation is Everything
The single most important step is cleaning your wall. The adhesive needs a perfectly clean, smooth surface to bond correctly. First, wash the wall with a degreasing cleaner to remove any grease, dust, or grime. TSP (trisodium phosphate) substitute is an excellent choice for this. Let the wall dry completely for at least 24 hours.
Pro-Tip:
If your wall has a glossy paint finish, lightly sand it with fine-grit sandpaper (220-grit) and wipe away the dust. This creates a slightly rougher texture for the adhesive to grip onto.
Step 2: Measure Twice, Plan Your Layout
Measure the height and width of your backsplash area. Use these measurements to calculate how many square feet of tile you'll need, and always buy 10% extra to account for mistakes and tricky cuts.
Before you peel anything, lay out your tiles on the counter or floor to visualize the pattern and plan where your cuts will be. The goal is to avoid having tiny, awkward slivers of tile in highly visible areas. Start your layout from the most visible corner.
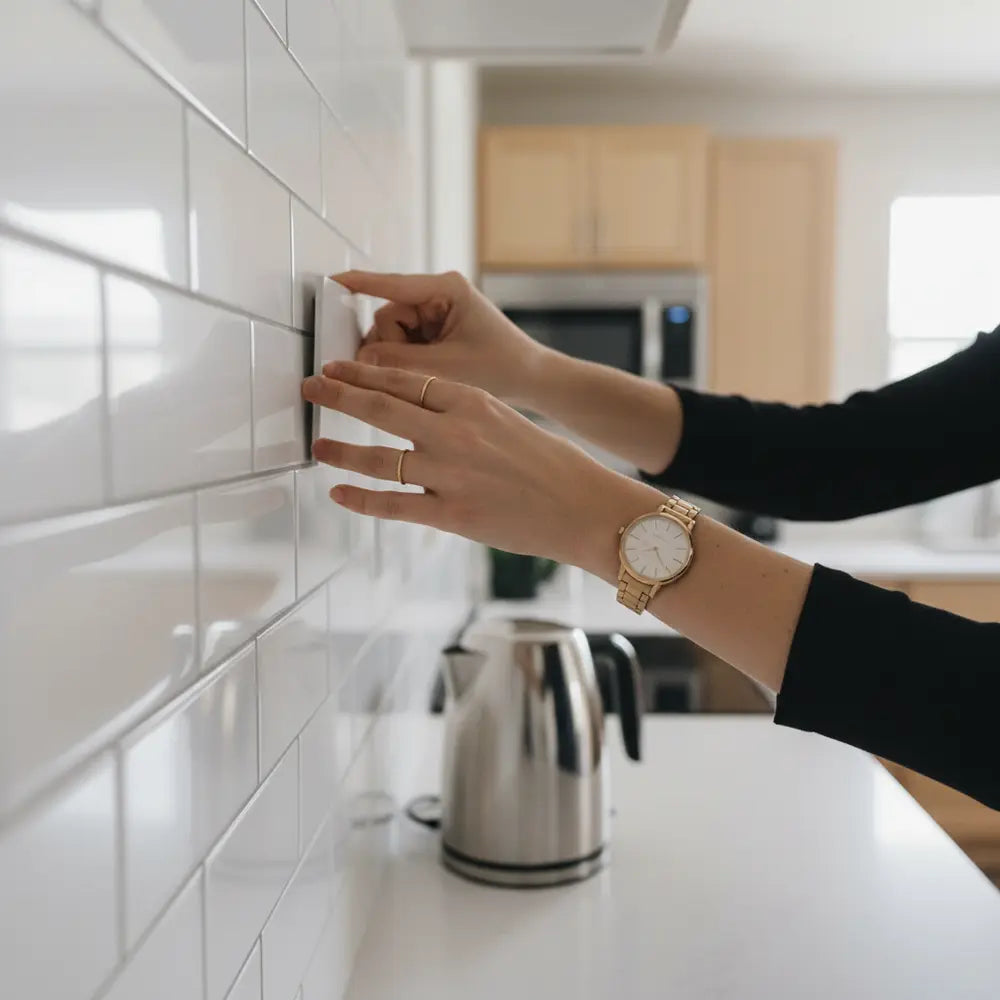
Step 3: The First Tile Sets the Standard
The placement of your first tile is critical, as all other tiles will align with it. Use a level and a pencil to draw a perfectly straight horizontal line to guide your first row. Do not assume your countertop or cabinets are level—they often aren't! Peel the backing off your first tile, align its bottom edge with your pencil line, and press it firmly onto the wall.
Step 4: Cutting and Fitting Around Obstacles
You will inevitably need to cut tiles to fit around outlets, windows, or at the end of a wall. For straight cuts, a sharp utility knife and a straight edge are all you need. Score the tile firmly and then snap it along the line.
For more complex shapes like outlets, create a paper template. Trace the outlet shape onto the paper, cut it out, and test the fit. Once it's perfect, trace the template onto your tile and carefully cut it out with your utility knife.
Step 5: Sealing the Deal for Longevity
Once all tiles are in place, go back over the entire surface with a seam roller or a soft cloth, applying firm pressure to ensure every inch of adhesive has bonded with the wall. Pay special attention to the overlapping edges.
For areas behind the sink, consider running a thin bead of clear silicone caulk along the bottom edge where the backsplash meets the countertop. This creates a waterproof seal and gives your project a clean, finished look.
Cost & Value: Is Peel & Stick Worth It?
Is this budget-friendly option just a cheap fix, or is it a genuinely smart investment for your home? This section breaks down the costs, benefits, and long-term value to help you decide.
When considering any home improvement project, it's crucial to weigh the cost against the value it provides. A peel and stick kitchen upgrade shines in this analysis, offering significant aesthetic returns for a minimal financial and time investment. Let's compare it directly to traditional tile.
The Cost Breakdown: Traditional vs. Peel & Stick
The cost difference is dramatic. Let's look at a hypothetical 30-square-foot backsplash area:
-
Traditional Ceramic Tile:
- Tiles: $150 - $450 ($5-$15/sq. ft.)
- Materials (Mortar, Grout, Sealer): $75 - $150
- Labor (Professional Installation): $300 - $900
- Total: $525 - $1,500+
-
DIY Peel and Stick Tile:
- Tiles: $120 - $300 ($4-$10/sq. ft.)
- Materials (Utility Knife, Cleaner): $20
- Labor: $0 (Your time!)
- Total: $140 - $320
The savings are undeniable. You can achieve a similar look for 20-40% of the cost of professionally installed tile. This makes it a highly accessible option for a quick refresh before selling a home or for anyone on a tight budget. For a deeper analysis of tile types, costs, and benefits, our comprehensive What Kitchen Backsplash Tile Guide compares these options side-by-side.
Longevity and Return on Style
How long will it last? A high-quality, properly installed peel and stick backsplash can last for many years. Many people find they last 5-10 years or even longer before they show signs of wear or the owners simply want a style change.
The true "return" is on style and enjoyment. In just one afternoon, you can completely change the feeling of your kitchen. This instant gratification and the ability to keep your kitchen looking current is a value that's hard to quantify but deeply felt.
Pros and Cons at a Glance
To make your decision easier, here is a straightforward summary:
Pros:
- Affordable: Drastically lower cost than traditional tile.
- Easy to Install: A true DIY project requiring minimal tools.
- Renter-Friendly: Most options are fully removable without damage.
- Variety: Endless styles, colors, and textures available.
- Low Mess: No grout, mortar, or dust.
Cons:
- Perceived Value: May not add as much long-term resale value as stone or ceramic.
- Heat Sensitivity: Requires careful selection for use behind stoves.
- Surface Dependent: Won't adhere well to heavily textured or unclean walls.
Peel & Stick Backsplash Trends to Watch in 2025
Want to make sure your kitchen update feels fresh, modern, and ahead of the curve? We're forecasting the top design-forward trends that will define peel and stick style in the coming year.
While classics like subway tile are always in style, design trends evolve. Staying aware of what's next ensures your DIY backsplash feels current and intentional. 2025 is all about subtle sophistication, texture, and a connection to nature. For even more inspiration and to see what's leading the market, check out the Top Peel & Stick Tile Patterns for 2025.
The Sophistication of Matte Finishes
Glossy has had its moment. The next wave is all about matte. A matte black, green, or even white backsplash offers an understated, velvety finish that absorbs light rather than reflecting it. This creates a soft, modern, and incredibly chic look. Matte finishes are excellent at hiding fingerprints and water spots, making them as practical as they are stylish.
Mixed Materials and Textural Plays
Why stick to one look? We're seeing more designs that artfully combine the appearance of different materials within a single tile. Imagine a tile that blends the look of concrete with a sliver of metallic brass, or a pattern that mixes faux wood and stone. This trend adds a layer of custom, designer detail to your project.
Biophilic and Nature-Inspired Patterns
The desire to bring the outdoors in continues to grow. This "biophilic" trend translates into peel and stick tiles featuring delicate leaf patterns, earthy terracotta tones, and serene green and blue color palettes. These designs help create a calming, organic atmosphere in the kitchen, turning it into a more relaxing and restorative space.
Where to Shop the Best Peel & Stick Backsplash in 2025
Ready to start your project but not sure where to find the best quality and styles? This guide points you to the top retailers for every budget, from bargain finds to designer exclusives.
Knowing what you want is the first step. Knowing where to find it is the next. The market for self-adhesive tiles has exploded, and you can find them everywhere from big-box stores to specialized online boutiques.
Budget-Friendly Finds
For those seeking the most cheap stick on backsplash ideas, retailers like Amazon, Wayfair, and Home Depot offer a massive selection. You can find a huge variety of styles at very competitive prices. The key here is to read reviews carefully. Look for customer photos and comments on the thickness and adhesive quality of the tiles.
Mid-Range Mavens
Stores like Lowe's and Target, along with online brands, often provide a great balance of quality and price. Their selections are typically well-curated, featuring current trends. You're more likely to find thicker, more durable tiles with better print quality in this category.
Premium & Designer Choices
For the highest quality and most unique designs, turn to specialized online retailers. Brands that focus exclusively on peel and stick products, like Stickwoll, often lead the way in innovation, offering the most realistic textures and cutting-edge patterns. Our own DIY Peel and Stick Kitchen Backsplash Guide is an excellent resource, showcasing premium options that deliver professional results. While the price per square foot might be higher, the investment often pays off in durability and unmatched style.
The power to create a kitchen you love is literally in your hands. A DIY backsplash project is more than just a home improvement task; it’s an act of personal expression. The trends for 2025 show that peel and stick solutions are more stylish, durable, and sophisticated than ever before. They offer a practical and affordable path to a beautiful home.
Whether you're a renter looking for a damage-free update or a homeowner wanting a quick and impactful refresh, you can feel confident that this is a smart, stylish choice. You don’t need a huge budget or a contractor to make a significant change. All you need is a free afternoon and a little inspiration.
Ready to find your perfect match? Explore our curated product selections to get started. Don’t forget to follow us on Pinterest for daily design inspiration and subscribe to our newsletter for the latest trend alerts. We’d love to see your work—share your before-and-after photos with us on social media!
Frequently Asked Questions
1. Can you put peel and stick backsplash over existing tiles?
Yes, in most cases, you can. The key is that the existing surface must be smooth, clean, and non-porous. If your current tiles have deep, textured grout lines, you may need to fill them with a thin layer of plaster to create a smooth surface before applying the new tiles. Always clean the old tile thoroughly to remove any grease.
2. How do you clean a waterproof peel and stick backsplash?
Cleaning is simple. Use a soft cloth or sponge with a mild, non-abrasive cleaner and water. Avoid using harsh chemical scrubbers, bleach, or abrasive pads, as they can scratch the surface or damage the finish of the tiles over time.
3. Will a stick on backsplash damage my rental apartment walls?
If you choose a quality, removable product and follow the proper removal instructions (using gentle heat), it should not damage the walls. It's designed specifically for temporary use. However, it's always wise to test one tile in an inconspicuous area first if you are concerned about your specific wall paint.
4. How long does a peel and stick backsplash really last?
The lifespan depends on the quality of the tile, the preparation of the wall, and the environment. A well-installed, high-quality backsplash in a typical kitchen can easily last 5-10 years or more. Lower-quality tiles or those exposed to constant high heat or moisture without proper sealing may have a shorter lifespan.

Leave a comment
This site is protected by hCaptcha and the hCaptcha Privacy Policy and Terms of Service apply.