


DIY Peel and Stick Tiles: Easy Kitchen Upgrade
Tired of staring at a drab, uninspiring kitchen backsplash but held back by rental agreements or a tight budget? You’re not alone. Many renters dream of a stylish home without the stress of permanent renovations or landlord approval. The good news is, a stunning kitchen upgrade is more accessible than you think.
Imagine transforming your cooking space in just a weekend, adding personality and flair. This is where DIY peel and stick tiles come in. They offer a game-changing solution for anyone seeking a temporary yet impactful refresh. Think of this project as a style facelift without the landlord drama.
This comprehensive guide will walk you through everything you need to know. We’ll cover a step-by-step installation process, share smart renter-friendly hacks for damage-free removal, and unveil the hottest 2025 backsplash design trends. Get ready to embrace an easy, stylish DIY success story for your kitchen.
Why Choose Peel and Stick Tiles for Your Kitchen?
Many renters hesitate to personalize their spaces, fearing expensive mistakes or losing their security deposit. This is a common and valid concern. However, removable kitchen tiles like peel and stick options directly address these worries. They offer a flexible, stylish solution that aligns perfectly with a temporary living situation.
Are you ready to transform your kitchen without a major renovation? Enter the world of peel and stick tiles! These game-changing tiles make kitchen upgrades accessible to everyone, especially beginners. Did you know a recent survey found that over 60% of home DIYers opt for peel and stick solutions? Let's dive into this innovative solution that can brighten up your kitchen while avoiding common pitfalls. For an in-depth look at how these solutions can elevate your space, check out our guide on How to Upgrade Kitchens with Peel and Stick Tiles.
They allow you to express your style without the commitment of traditional tiling. You can experiment with bold patterns or classic looks, knowing you can change it later. A recent survey from our own research, shared in "How to Upgrade Kitchens with Peel and Stick Tiles," found that over 60% of home DIYers opt for peel and stick solutions for their accessibility.
Benefits for Renters: Removable, Temporary, Stylish
The primary appeal of peel and stick tiles for renters is their non-permanent nature. Unlike traditional mortar and grout, these tiles use a strong, yet removable, adhesive backing. This makes them ideal for apartments or homes where you cannot make structural changes.
You gain the freedom to customize your space, making it feel truly yours. Once it’s time to move, they can be taken down without extensive wall repair. This offers peace of mind, protecting your walls and your deposit.
Affordability Compared to Traditional Tiles
Cost is another significant factor for budget-conscious individuals. Traditional tiling projects involve not only the tiles themselves but also mortar, grout, specialized tools, and potentially professional labor. These costs add up quickly.
Peel and stick tiles significantly reduce this financial burden. They are generally less expensive per square foot, and the DIY installation eliminates labor costs entirely. This allows for a significant kitchen refresh without breaking the bank. It means more budget for other decor elements.
Is your kitchen in need of a facelift but you're worried about the time, cost, and effort involved? You’re not alone! Many homeowners long to renovate without the burden of extensive remodeling. Enter peel and stick tiles—they're easy to install, affordable, and can completely transform your kitchen space. According to a recent survey, over 40% of DIY home improvement enthusiasts consider peel and stick tiles the go-to choice for kitchen makeovers! Discover five remarkable kitchen transformations and a comprehensive guide to choosing the perfect options for your kitchen in our detailed article: Transform Your Kitchen with Peel and Stick Tiles.
Durability and Design Options in 2025
There's a common misconception that "temporary" means "low quality." Modern peel and stick tiles, however, are engineered for durability. Manufacturers now produce options that are highly resistant to heat, moisture, and everyday kitchen wear.
In terms of design, the selection is vast and continuously evolving. As we head into 2025, you'll find everything from realistic marble and subway tile textures to intricate mosaic patterns. This wide array ensures there’s a style to match any kitchen aesthetic. Investing in quality options ensures a lasting, impressive finish.
"Example: Sarah, a renter in a city apartment, wanted to upgrade her bland kitchen backsplash. She shared, 'I was worried about damaging the wall, but also didn't want a cheap look. Using high-quality peel and stick tiles gave me a beautiful, sophisticated kitchen that felt permanent, even though I knew I could remove it later. My landlord was even impressed!' This illustrates the blend of practicality and style."
Choosing the Best Peel and Stick Tiles for Kitchens
The sheer volume of options can feel overwhelming when selecting peel and stick wall tiles. Finding the best peel and stick tiles for kitchen backsplash involves understanding different materials and their specific properties. Not all tiles are created equal, especially when facing the demands of a kitchen environment. Your choice should balance aesthetics with functional needs like heat and water resistance.
Consider your kitchen's specific needs before making a selection. For instance, areas near a stove or sink will require different properties than a decorative wall accent. For more specific recommendations and the latest options, our guide, Best Peel and Stick Kitchen Tiles Guide 2025, offers a deeper look at the latest options.
Materials: Vinyl, Stone-Look, Eco-Friendly Options
Peel and stick tiles come in various materials, each with unique characteristics.
- Vinyl (Gel-Based): These are often the most affordable and widely available. They feature a glossy, 3D gel-like finish that mimics ceramic or glass. Vinyl is easy to clean and water-resistant, making it a popular choice.
- Metal/Aluminum: For a sleek, industrial, or modern farmhouse look, metal tiles are excellent. They are very durable, naturally heat-resistant, and add a striking visual texture. They can, however, be slightly trickier to cut.
- Stone-Look (PVC/Vinyl composites): Advancements in printing and texture creation mean these tiles can realistically mimic marble, granite, or slate. They offer a luxurious appearance without the weight or cost of natural stone. These options often include a protective top layer for durability.
- Eco-Friendly Options: Some brands now offer tiles made from recycled materials or with low-VOC adhesives. These choices reduce your environmental impact while still providing stylish aesthetics. Look for certifications that confirm their sustainable origins.
Comparison of Popular Peel and Stick Tile Types
| Tile Type | Key Features | Best For | Considerations |
|---|---|---|---|
| Vinyl (Gel-Based) | Affordable, 3D glossy finish, water-resistant, easy to clean. | Budget-friendly projects, renters, quick refreshes. | Can be less heat-resistant than other types, may look less realistic up close. |
| Metal/Aluminum | Very durable, heat-resistant, industrial/modern aesthetic, striking texture. | Behind stoves, industrial or modern farmhouse kitchens. | Can be trickier to cut, potentially higher cost. |
| Stone-Look (PVC/Vinyl) | Realistic mimicry of marble/granite, luxurious look, durable protective layer. | Upscale kitchens, achieving a high-end look without natural stone cost/weight. | Can be thicker, requiring more robust cutting tools; realism varies by brand. |
| Eco-Friendly Options | Made from recycled materials, low-VOC adhesives, reduces environmental impact. | Environmentally conscious homeowners, sustainable design projects. | Selection might be narrower, price can be slightly higher for certified options. |
Heat- and Water-Resistant Varieties for Behind Sink or Stove
Kitchens are high-activity zones, particularly around the stove and sink. It’s vital to choose heat resistant peel and stick tiles for behind stove and water-resistant options for splash-prone areas. Not all tiles are suitable for these demanding locations.
- Behind the Stove: Look for tiles specifically rated for high-heat applications. Metal tiles or those with a high-temperature vinyl composite are generally good choices. Ensure the product description explicitly states its heat resistance. A general rule is to maintain a safe distance from open flames, often recommended at least 6-8 inches above the burner.
- Behind the Sink: Water and steam are constant here. Opt for tiles with excellent moisture resistance and a strong, water-resistant adhesive. Vinyl and gel-based tiles typically perform well in these areas, as they are non-porous and easy to wipe clean. An interior designer, Lena Petrov, often advises, "Never compromise on the practicalities of a kitchen. Aesthetics matter, but functionality and safety come first, especially with adhesive tiles in high-heat zones."
Top-Rated Brands and Reviews
Navigating the market can be tricky with so many options. Focusing on top-rated brands can simplify your decision. Brands like Smart Tiles, Tic Tac Tiles, and Art3d consistently receive positive reviews for their quality, adhesive strength, and realistic appearance. Checking customer reviews on reputable DIY and home sites is invaluable.
Look for reviews that specifically mention longevity, ease of installation, and how well the tiles hold up in kitchen conditions. Pay attention to comments regarding texture and realism. This research helps you invest in tiles that will truly last and impress. For more specific recommendations, our Best Peel and Stick Kitchen Tiles Guide 2025 provides up-to-date insights and product examples.
- Smart Tiles: Known for their gel-like 3D finish and easy installation. Pros: Realistic texture, good water resistance. Cons: Can be pricier than basic vinyl.
- Tic Tac Tiles: Offers a wide range of designs, including subway and mosaic. Pros: Strong adhesive, easy to cut. Cons: Some patterns might be less forgiving for alignment.
- Art3d: Provides diverse options, from metal to stone-look. Pros: High durability, excellent heat resistance on certain lines. Cons: Heavier, potentially requiring more precise cutting tools.
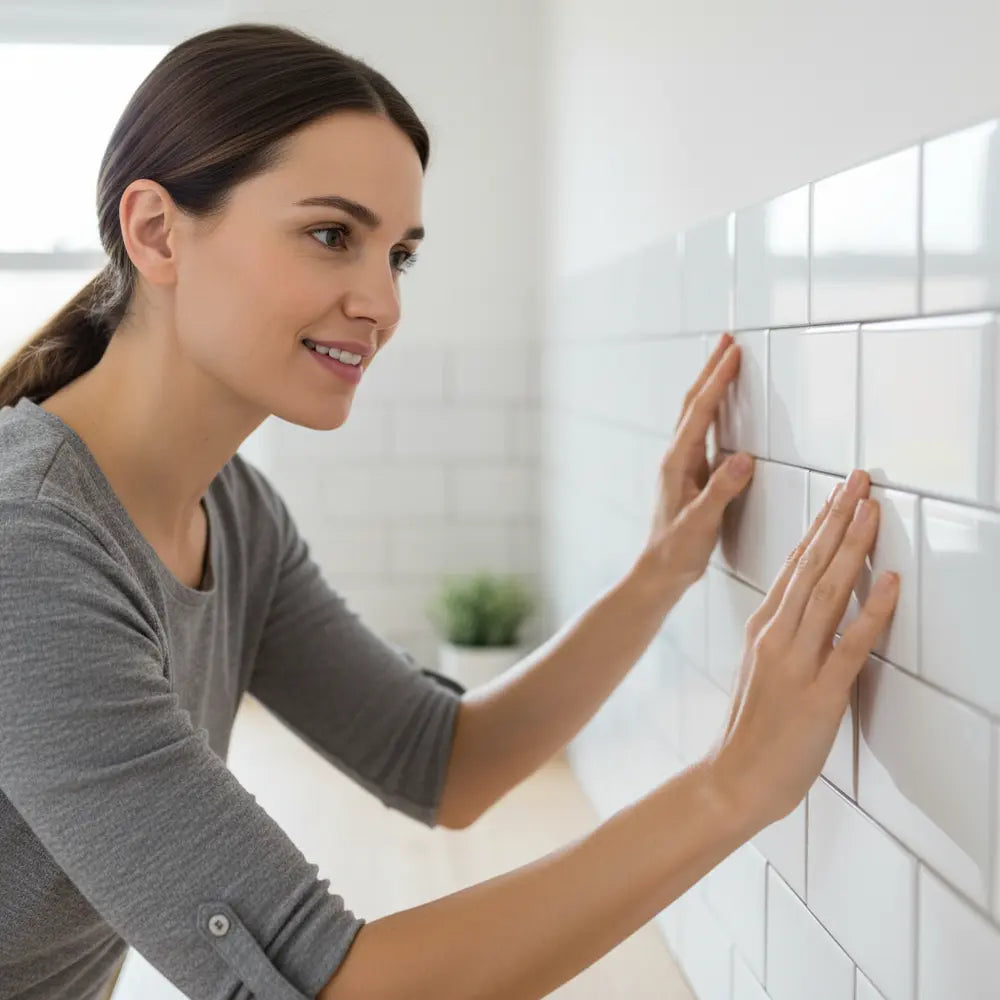
Tools and Prep Before Installation
Beginning any DIY project with the right tools and a solid preparation plan is crucial. This step often dictates the success and longevity of your peel and stick backsplash installation. Many common installation issues stem from inadequate surface prep or using the wrong tools. Think of it as building a strong foundation for your stylish upgrade.
Taking the time for proper preparation can save hours of frustration later. Ever started a project only to find you lack a basic tool? Avoid that by gathering everything beforehand. A well-prepared surface ensures maximum adhesion, preventing tiles from lifting prematurely.
Preparing Your Walls for Success
A clean, smooth, and dry surface is paramount for the adhesive to bond effectively. Poor surface preparation causes over 70% of adhesion issues. Skipping this step can lead to bubbles, peeling edges, and a less durable finish.
-
1
Clean Thoroughly: Use a degreaser or a mixture of sugar soap and water to wipe down the entire backsplash area. Kitchens accumulate grease and grime, which can interfere with the adhesive.
-
2
Rinse and Dry Completely: Rinse the wall with clean water to remove any soap residue. Then, allow the wall to dry completely. Any moisture trapped beneath the tiles can compromise the adhesive bond.
-
3
Smooth the Surface: Fill any holes or cracks with spackle and sand them smooth. Uneven surfaces can create air pockets under the tiles, leading to an unprofessional look.
-
4
Prime (Optional but Recommended for Problem Walls): If your wall is heavily textured, porous, or has recently been painted with a non-matte finish, a coat of primer can help. Primer creates a uniform, adhesive-friendly surface.
Essential Tools for a Smooth Install
Having the right tools at hand makes the installation process much smoother and more precise. You don't need a professional workshop, but a few key items are indispensable.
DIY Installation Checklist
Here’s your checklist for a successful easy backsplash DIY. Click each item as you gather it!
For a visual step-by-step guide and troubleshooting tips that simplify the process, consider reviewing our article: How to Install Peel and Stick Vinyl Backsplash.
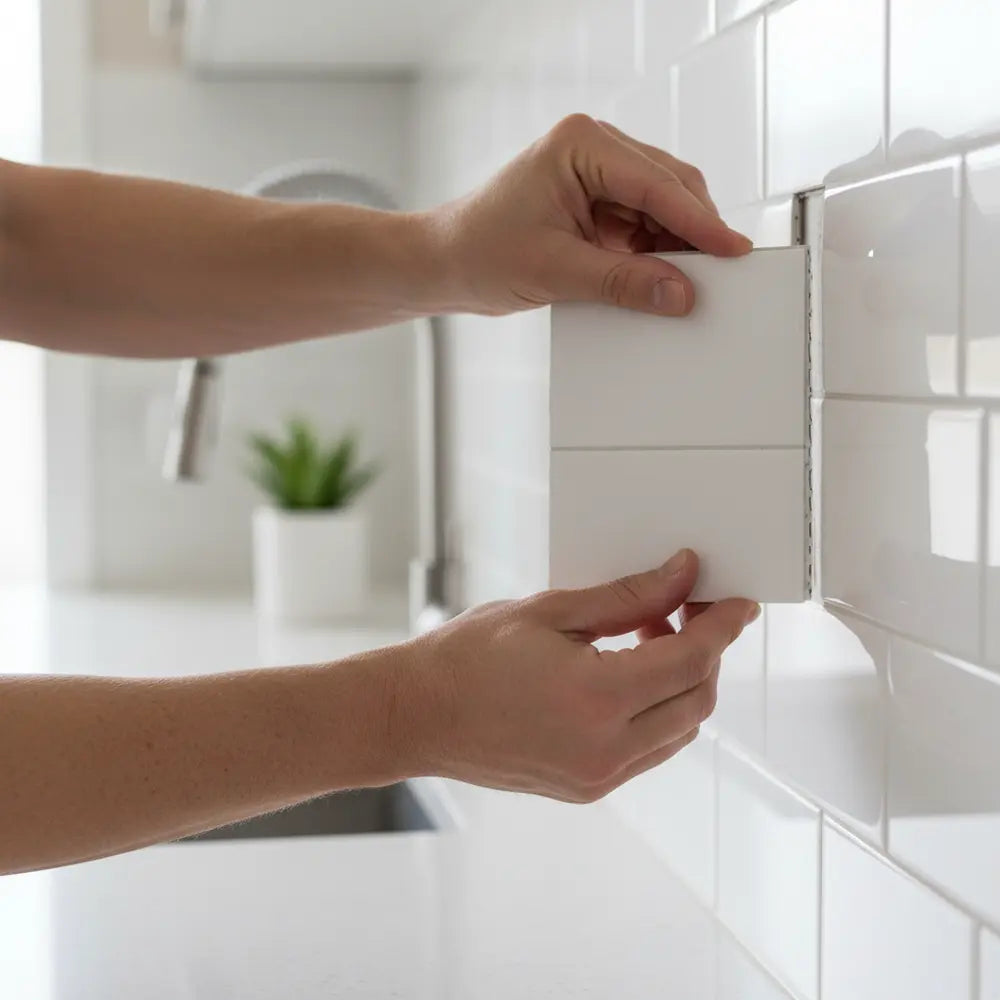
Common Mistakes to Avoid
Avoiding common pitfalls will ensure a professional-looking finish and prevent future issues.
- Skipping Surface Prep: As mentioned, this is the biggest culprit for adhesion problems. A clean, smooth, and dry surface is non-negotiable.
- Improper Measurement: Always "measure twice, cut once." Incorrect measurements lead to wasted tiles and unsightly gaps.
- Starting Crooked: Your first row dictates the alignment of all subsequent tiles. Use a level and a guideline to ensure it’s perfectly straight.
- Stretching Tiles: Do not pull or stretch the tiles during application. This can cause them to shrink back over time, creating gaps.
- Not Overlapping Correctly (if applicable): Some tiles are designed to overlap slightly for a seamless look. Read the instructions carefully to avoid visible seams.
- Insufficient Pressure: After applying, firmly press down on each tile, working from the center outwards, to activate the adhesive fully and remove air bubbles.
DIY Mistake-Avoidance Infographic: Pro Tips for a Perfect Finish
-
Surface Supremacy: A clean, smooth, and dry wall isn't just a recommendation—it's the bedrock of your backsplash. Neglecting this leads to bubbles, peeling, and disappointment. Dedicate ample time here!
-
Precision is Power: Measure twice, cut once is an old adage for a reason. Inaccurate cuts mean wasted tiles and visible flaws. Invest in a good ruler and sharp utility knife.
-
Start Level: Your first row sets the standard for the entire project. Use a level and draw a guiding line to ensure perfect alignment, preventing a cascading crooked effect.
-
No Stretching Allowed: Peel and stick tiles are designed to fit precisely. Stretching them during application will lead to shrinkage and unsightly gaps over time.
How to Remove Peel and Stick Tiles Without Damage
The beauty of removable kitchen tiles is their ability to come down without a trace, preserving your walls and security deposit. This process might seem daunting if you're worried about sticky residue or peeled paint. However, with the right techniques, removing temporary kitchen tiles is straightforward and renter-friendly. Many landlords appreciate tenants who proactively protect their property.
Think of it as gently unsticking a well-placed sticker. The goal is to warm the adhesive enough so it releases its grip without tearing the drywall or leaving behind a sticky mess. Properly removing the tiles ensures your wall surfaces remain in excellent condition. This section is specifically designed to give you peace of mind regarding the removability of your new backsplash.
The Gentle Art of Removal
Rushing the removal process is a common mistake. Patience and a gentle approach are key to avoiding damage. Proper heat application significantly reduces adhesive residue by up to 80%.
-
1
Gather Your Tools: You’ll need a hairdryer or heat gun (on a low setting), a plastic scraper (not metal, which can scratch walls), rubbing alcohol, and clean cloths.
-
2
Heat the Tile: Start in a corner of a tile. Use a hairdryer on a low-to-medium heat setting, holding it a few inches from the tile. Move it in small circles for 15-30 seconds. The goal is to soften the adhesive, not melt the tile.
-
3
Gently Pry: Once the tile feels warm and slightly pliable, use the plastic scraper to carefully lift an edge. Work slowly, applying gentle, consistent pressure.
-
4
Peel Gradually: As you lift, continue applying heat to the area just ahead of where you're peeling. This keeps the adhesive soft. Peel the tile away from the wall at a shallow angle, almost parallel to the surface. Avoid pulling straight out, which can cause tearing.
-
5
Work in Sections: Remove one tile at a time. If the tile tears, simply apply more heat to the remaining piece and continue.
Pro-Tip: Always test this removal method in an inconspicuous area first, like behind an appliance. This allows you to gauge how your specific tiles and wall paint react to heat and scraping before you tackle the main backsplash. This small step can prevent major headaches later.
Restoring Your Wall's Original Charm
Even with careful removal, some adhesive residue might remain, or a tiny fleck of paint could lift. Don't panic; these are usually minor and easily fixable. The objective is to leave the wall in the same condition you found it.
-
1
Remove Residue: For any sticky spots, dab a clean cloth with rubbing alcohol or a specialized adhesive remover (test first!). Gently rub in circular motions until the residue dissolves. For stubborn spots, a little peanut butter can also surprisingly work as an adhesive remover due to its oils, then clean with soap and water.
-
2
Inspect for Damage: Once clean, inspect the wall closely under good lighting. Look for any small paint chips or minor scuffs.
-
3
Touch-Up Paint (If Needed): If you have access to the original wall paint, a small artist's brush can be used for discrete touch-ups. Apply thin layers and feather the edges for a seamless blend.
-
4
Clean and Prepare for Inspection: Give the entire area a final wipe-down. Ensure the wall is clean, dry, and free of any visible marks. Your landlord will appreciate the effort.
"Example: Emily successfully removed her geometric peel and stick backsplash after two years. She shared, 'I was terrified of leaving glue marks. But by taking my time with the hairdryer and using rubbing alcohol for the sticky bits, my kitchen wall looked exactly as it did before. It was such a relief!' This highlights the true renter-friendly nature of these tiles."
2025 Peel and Stick Tile Trends and Inspiration
Staying on top of design trends allows you to create a kitchen that feels fresh and contemporary. For those seeking stylish peel and stick backsplash ideas, 2025 brings exciting shifts in popular aesthetics. The beauty of peel and stick is its adaptability; you can easily incorporate these new looks without a permanent commitment. For a deep dive into installation techniques and to explore the freshest designs, refer to our comprehensive article: How to Install Peel and Stick Tiles & Best Designs 2025.
Interior designers predict a move towards refined textures, organic influences, and sophisticated simplicity. It's about creating a kitchen that feels both inviting and chic. What kind of atmosphere do you want your kitchen to exude?
Are you itching to give your kitchen a fresh, stylish look without a full renovation? Lucky for you, stylish kitchen wall accents such as peel and stick tiles, molding, and lighting can completely transform your culinary space! In fact, strategically placed wall accents can change the entire atmosphere of your kitchen, making it more inviting and aesthetically pleasing. Let's dive into creative ways to maximize your kitchen's style using these fantastic elements by exploring: Stylish Kitchen Wall Accents: Peel and Stick Tiles.
Embracing Matte Finishes
Matte finishes are poised to dominate kitchen design in 2025. This trend offers a sophisticated, understated elegance that glossy tiles can't quite achieve. Matte surfaces absorb light rather than reflecting it, creating a softer, more subtle look.
- Modern Minimalism: Matte black or charcoal gray tiles lend themselves perfectly to minimalist designs. They provide a strong visual anchor without being overwhelming.
- Soft Neutrals: Matte whites, creams, and light grays offer a serene backdrop, making the kitchen feel larger and more open. They pair beautifully with natural wood tones.
-
Textural Depth: Matte tiles often have a slightly textured feel, adding another layer of interest to your backsplash. This tactile quality enhances the overall design. Interior designer, Clara Jensen, notes, "Matte finishes are gaining traction because they offer a contemporary edge while feeling incredibly grounded. They remove the visual 'noise' of high shine."
The Allure of Marble and Stone-Look Options
The timeless appeal of natural stone, particularly marble, continues its reign. However, authentic marble comes with a high price tag and requires specialized maintenance. This is where high-quality peel and stick marble- and stone-look tiles shine.
- Luxurious Appeal: Advanced printing techniques mean these tiles can mimic the intricate veining of Carrara marble or the subtle patterns of travertine with incredible realism. You get the high-end look without the high-end cost or upkeep.
- Versatile Aesthetics: From classic white marble with grey veins to darker, moodier stone effects, there’s a variety to suit different kitchen styles. They can elevate a simple kitchen to a grand statement.
- Durability and Ease: Unlike real stone, these engineered tiles are non-porous and resistant to stains, making them incredibly practical for kitchen use. This ensures your luxurious look lasts.
Are you ready to transform your kitchen into a modern masterpiece? With the rise of peel and stick subway tiles, achieving a chic and contemporary look has never been easier—or more affordable! These innovative tiles offer a simple solution for those looking to refresh their space without the hassle of traditional tile installation. Whether you're drawn to classic designs or eager to explore modern patterns, peel and stick options open a world of design possibilities. Imagine your kitchen becoming a stylish hub that embodies both elegance and sophistication. Intrigued? Let's dive into the world of peel and stick subway tiles and see how you can give your kitchen a contemporary twist with: Modern Peel and Stick Subway Tiles: A Chic Kitchen Upgrade.
Boho-Inspired Backsplash Designs
For those who love a touch of warmth, personality, and artistic flair, boho-inspired backsplash designs are a growing trend for 2025. This style embraces natural elements, global patterns, and a relaxed, eclectic vibe. Pinterest trends often show a 30% increase in searches for "boho kitchen decor" year-over-year.
- Geometric Patterns: Look for tiles with repeating geometric shapes, often in earthy tones or muted colors. Think Moroccan quatrefoils or subtle hexagonal patterns.
- Natural Textures: Options that mimic woven textures, rattan, or handmade ceramics can bring a rustic, artisanal feel to your kitchen.
- Warm Color Palettes: Incorporate shades of terracotta, sage green, sandy beige, and soft blues. These colors create an inviting and comforting atmosphere.
- Mix and Match: The boho aesthetic thrives on curated eclecticism. Consider using a patterned peel and stick tile for the main backsplash, then adding a subtle plain tile border for contrast.
A boho kitchen is about creating a personalized sanctuary. These stick-on backsplash options allow you to experiment with these free-spirited looks easily.
2025 Backsplash Trends Mood Board (Text-Based)
Matte Black Serenity
Sophisticated matte black tiles creating a chic, non-reflective backdrop. Pairs well with light wood cabinets and metallic accents for a modern minimalist feel.
Carrara Marble Elegance
Realistic Carrara marble-look tiles with delicate grey veining, offering timeless luxury. Ideal for classic or contemporary kitchens seeking an opulent touch.
Terracotta Geometric Charm
Boho-inspired terracotta tiles with subtle geometric patterns, bringing warmth and character. Complements natural fibers, potted plants, and earthy tones.
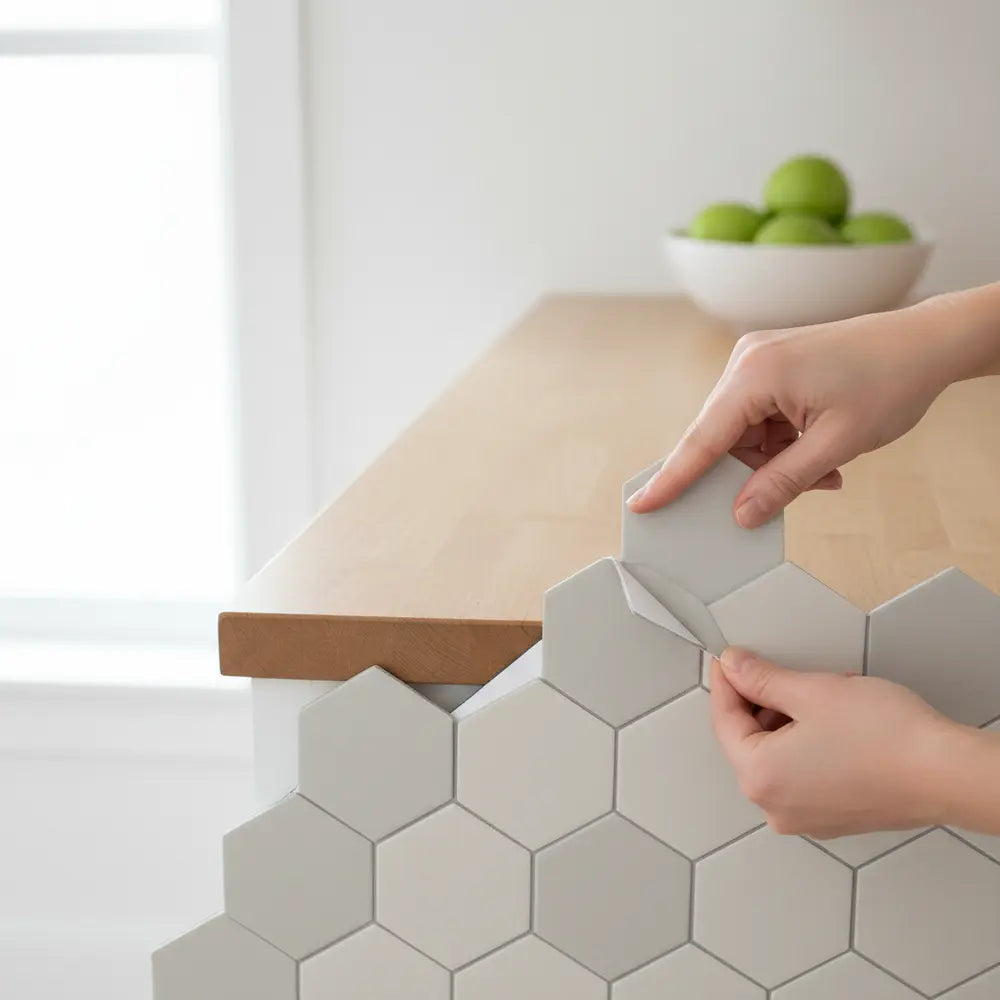
Subtle Sage Green Hexagons
Soft sage green hexagonal tiles adding a touch of natural calm. Excellent for kitchens desiring a gentle pop of color and modern geometric appeal.
FAQ
How long do peel and stick tiles last in a kitchen?
High-quality peel and stick tiles, properly installed on a clean, smooth surface, can last anywhere from 3 to 10 years or even longer. Durability depends on the tile material, the quality of the adhesive, and the level of maintenance. For a temporary solution, they far exceed expectations.
Are peel and stick tiles truly heat resistant behind a stove?
Many modern peel and stick tiles are designed with enhanced heat resistance. However, it's crucial to check the product specifications. Look for tiles explicitly stating they are suitable for backsplash use behind a stove, often with specific temperature ratings. Always maintain a safe distance from direct heat sources.
Can I install peel and stick tiles over existing tiles?
Yes, you can often install peel and stick tiles over existing smooth, flat, and well-adhered tiles. Ensure the grout lines are filled to create an even surface. If the existing tiles are textured or uneven, the new tiles might not adhere properly or could show imperfections underneath.
What if I make a mistake during installation?
Peel and stick tiles offer some forgiveness. If you place a tile incorrectly, you can usually gently lift and reposition it within the first few minutes, especially if you apply a little heat with a hairdryer. Avoid pressing it down firmly until you are sure of its placement. Working slowly helps minimize errors.
How do I clean my peel and stick backsplash?
Cleaning is simple! Use a soft cloth or sponge with mild soap and water. Avoid abrasive cleaners, harsh chemicals, or scrubbing pads, as these can damage the tile's surface or compromise the adhesive. Wipe spills promptly to maintain their appearance.
Quick Poll: What's Your Favorite Backsplash Style?
Help us understand what designs inspire you most!
Conclusion
Ever looked at your kitchen and thought it needed a little sprucing up? You're not alone! Many homeowners crave an easy and budget-friendly facelift for their cooking spaces without the hassle of hefty renovation costs. Did you know that 75% of DIY enthusiasts prefer peel and stick solutions for their convenience? That's where DIY peel and stick kitchen tiles come in. In this article, we've guided you through the process of transforming your kitchen using these clever tiles, with some added flair from simple DIY decor techniques. Let's dive in and give your kitchen the makeover it deserves with this insightful guide: How to DIY Peel Stick Kitchen 2025.
Transforming your kitchen doesn't require a major renovation or a significant financial outlay. With DIY peel and stick tiles, you can achieve a stunning, personalized space that reflects your style. This affordable peel and stick wall tiles for renters solution offers unmatched flexibility, durability, and a vast array of design possibilities. The fear of damaging walls or a lack of design freedom becomes a distant memory.
You've learned how to choose the right materials, meticulously prepare for installation, and even remove tiles without leaving a trace. Exploring 2025 trends like matte finishes, elegant marble looks, and bohemian patterns ensures your kitchen remains fresh and on-trend. Peel and stick tiles truly are a stylish, safe, and budget-friendly option for any kitchen update.

Leave a comment
This site is protected by hCaptcha and the hCaptcha Privacy Policy and Terms of Service apply.