


Most DIY kitchens look noticeably homemade because the lighting components are glaringly visible, not because the lights themselves are cheap. Finding a way to conceal power cords without tearing into drywall is the ultimate hurdle for modern kitchen upgrades.
Yes, you can hide some under-cabinet LED wires behind peel-and-stick backsplash if the wiring is low-voltage, the wire path stays shallow and smooth, and the backsplash can still bond flat without bulging. The safest DIY result comes from planning a low-profile route, keeping transitions clean around outlets and corners, and using a micro-raceway instead when wire thickness, heat, or code concerns make direct concealment a poor fit.
Successfully executing this project relies on understanding when this method works best and when to choose a wire channel instead. You also need a firm grasp on how to hide the transformer and power cord for a truly built-in finish.
This guide provides the exact workflows, safety parameters, and material choices required to achieve a flawless result.
Free Resource: Master Your Kitchen Layout
Before cutting a single tile or adhering any wire, careful spatial planning is required. Download our comprehensive, printable route-mapping checklist to properly measure transitions, calculate material sizing, and log your transformer placement strategy.
Can you safely run LED wires behind peel-and-stick backsplash?
To determine safety and viability, industry consensus dictates evaluating the Low-Profile Routing Footprint (LPRF).
Low-Profile Routing Footprint (LPRF): A standardized evaluation metric that measures the physical depth and surface area disruption caused by a wire track relative to the adhesive tolerance of the covering material.
A low LPRF means the wire is thin enough that the tile can bridge the gap without losing its bond to the wall. This requires precise measurement of the wire gauge and an understanding of the polymer flexibility found in modern self-adhesive wall coverings.
When establishing a quantitative baseline, hiding a standard 22 AWG (American Wire Gauge) low-voltage LED lead behind a premium tile yields an LPRF of less than 2 millimeters. Conversely, attempting to hide a standard 120-volt power cord behind tile results in a massive structural failure and violates safety codes. A 120V cord possesses thick layers of heavy insulation designed to protect against high electrical currents, making its physical footprint far too large for direct surface concealment beneath any flexible vinyl substrate.

Understanding Low-Voltage Safety Boundaries
The National Electrical Code (NEC), specifically Article 411, outlines strict guidelines for low-voltage lighting systems operating at 30 volts or less.
You must never conceal standard 120V line-voltage wires, extension cords, or plug-in power leads behind any surface without proper conduit and junction boxes.
Crucial Safety Distinction
It is vital to differentiate between the two halves of your lighting system:
- × High-Voltage (Do Not Hide): The thick, grounded cord that plugs into your wall outlet and goes into the transformer block.
- ✓ Low-Voltage (Safe to Hide): The extremely thin, delicate, often red-and-black or clear ribbon wires exiting the transformer block and connecting to the LED tape.
However, the thin, low-voltage direct current (DC) wires that connect LED strips to their transformers generate negligible heat. These specific, low-voltage accessory leads are generally safe to route behind non-combustible or properly rated decorative finishes.
Think of this like running a thin speaker wire under a heavy area rug. The rug sits perfectly flat, and there is no risk of overheating. If you tried the same thing with a thick outdoor extension cord, you would create a tripping hazard and a fire risk.
When Concealment is Practical
Running wires behind your tile strictly adheres to best practices under a few specific conditions.
- Shallow Wire Depth: The LED lead wires must be flat ribbon cables or exceptionally thin round wires (typically 20 to 24 AWG). Thicker cables demand external conduit solutions or rigorous wall chasing, which negates the speed and ease of this project.
- Smooth Substrate: The existing drywall or old tile must be clean, flat, and free of heavy texture. A compromised wall surface already strains the adhesive backing of your panel; adding the dimensional tension of an embedded wire to a textured wall ensures premature failure.
- Limited Crossings: The wire path should be a straight vertical or horizontal drop, avoiding crisscrossing multiple cords. Layering wires multiplies the LPRF exponentially.
- Accessible Power Source: The transformer and actual plug must remain exposed and accessible, never buried behind the tile.
When to Avoid Direct Concealment
Certain scenarios demand alternative routing methods. Attempting to force tile over unsuitable wiring guarantees structural failure.
- Thick Connectors: Solderless clip-on connectors are often too bulky to hide behind flat adhesive panels. They create rigid, localized pressure points that push outward forcefully.
- High-Traffic Heat Zones: Avoid running wires directly behind the hottest part of a commercial-grade gas range. Elevated ambient temperatures weaken both the structural integrity of thin wire insulation and the shear strength of polymer-based adhesives.
- Uneven Walls: If the wall already has deep gouges or heavy texture, adding a wire will compound the adhesion problem. You are creating micro-voids where air and moisture can penetrate and degrade the glue line over time.
- Visible Bulge Risk: If testing reveals a noticeable lump, you must switch to an external micro-raceway.
When evaluating the architecture around large appliances, temperature regulation becomes the priority. The wall space directly behind a high-BTU gas range is subjected to intense, fluctuating thermal loads that can warp incompatible materials and degrade poorly chosen adhesives. To ensure your installation fundamentally mitigates fire risks near cooking surfaces and maintains long-term structural integrity, reviewing specific heat tolerance limits is mandatory. For homeowners tackling this complex thermal zone, the comprehensive framework detailed in How to Install Heat Resistant Peel and Stick Tiles Behind Your Stove provides the exact safety gaps, material qualifications, and application techniques required for this high-risk zone.
How do you route LED strip wires around corners, outlets, and cabinet transitions?
Corners, outlet cutouts, and cabinet gaps represent the highest risk areas for DIY wire concealment. These areas demand careful planning.
The defining metric here is the Transition Bulk Ratio (TBR).
Transition Bulk Ratio (TBR): The measurement of the routing hardware's thickness (connectors, jumpers, or folded strips) versus the maximum flex tolerance of your chosen backsplash panel.
A high TBR guarantees your tiles will eventually peel off the wall. To maintain a functional bond, you must engineer a route that keeps the TBR as close to zero as possible. This requires abandoning bulky, rigid adapters in favor of highly flexible or externally mounted routing pathways.
Experienced electricians often advise DIYers to treat corners as thickness hotspots rather than mere afterthoughts. A common mistake involves stacking multiple plastic snap-connectors in a single corner, creating an impossible lump that no amount of heavy-duty adhesive can suppress.

Routing Logic for Complex Kitchen Geometries
Navigating the unique architecture of your kitchen requires specific tactics for different obstacles. We can visualize this logic as a structured sequence of spatial decisions.
Managing Inside and Outside Corners
Inside corners (where two walls meet) are forgiving. You can often press the flat ribbon wire deeply into the drywall seam—sometimes even scoring a microscopic line in the drywall mud—before applying the tile. This completely absorbs the dimension of the wire.
Outside corners require a different approach. Wrapping a wire tightly around an outside corner risks severing the internal copper strands, creating a short circuit or a permanent dead zone in your lighting. You must use a gentle radius or a specialized flat-corner jumper specifically designed to fold precisely without crimping internal connections.
Crossing Near Outlets
When crossing near electrical outlets, never route your low-voltage wire inside the actual high-voltage junction box. This is a severe code violation and introduces deadly risks by mixing voltage classes within a single enclosure.
Instead, route the low-voltage wire cleanly around the exterior perimeter of the plastic outlet box. The peel-and-stick tile will cover the path, and the standard plastic outlet cover plate—which naturally protrudes slightly from the wall—will perfectly hide any minor imperfections or slight thickness variations in your tile cuts near the perimeter.
Cabinet-to-Cabinet Transitions
Many kitchens feature a gap between upper cabinets, often above a sink or window.
Do not attempt to run the wire across the empty wall space directly behind the backsplash where there is no upper cabinet to obscure the drop. Instead, route the jumper wire up, over the top of the cabinets entirely, or cleanly tucked underneath the front decorative lip (valance) of the cabinet itself, bridging the gap discreetly along the woodwork rather than the open wall.
Comparing Corner Routing Methods
To make an informed decision on your routing hardware, review this deterministic benchmark evaluating different corner transition strategies.
| Routing Method | Transition Bulk Ratio (TBR) | Reliability | Visual Concealment |
|---|---|---|---|
| Snap-On Corner Connector | High (Bulky plastic) | Moderate (Prone to slipping) | Poor (Often causes tile bulge) |
| Solderless Flat Jumper | Low (Thin ribbon cable) | High (Flexible) | Excellent (Lays flat under tile) |
| Continuous Strip Fold | Very Low (No extra hardware) | Low (Risks damaging circuits) | Excellent (Thinnest profile) |
| Micro-Raceway Channel | N/A (External mount) | Very High (Secure track) | Moderate (Visible but clean) |
Hiding Connector Joints Safely
If you must use bulky plastic connectors to link two LED strips, never attempt to bury them directly behind the tile. The TBR is simply too high. The rigid plastic block will act as a structural fulcrum, constantly pushing outward and eventually shearing the adhesive bond of any panel placed over it.
Instead, position these joints strategically so they sit precisely behind the overhanging lip of the upper cabinet. The backsplash tile can then smoothly run up the wall, stopping just short of the bulky connector, hiding it entirely from normal standing viewing angles.
What are the optimal peel-and-stick tiles for concealing under-cabinet wiring?
Quick Assessment: Is Your Wire Path Ready?
Before selecting tiles, evaluate your wire situation. Choose the description that best fits your current wiring setup to get an instant recommendation.
Not all self-adhesive tiles are capable of hiding wiring. A completely flat, thin vinyl sticker will instantly telegraph any wire routed behind it, destroying the illusion of a high-end finish. The material science behind the tile's construction dictates its forgiveness level.
When evaluating materials for this specific application, the standardized evaluation shifts from simple aesthetics to Visual Depth Obfuscation.
Visual Depth Obfuscation: The capacity of a tile's texture, thickness, and geometric pattern to absorb and camouflage underlying wall imperfections or shallow wire routes without breaking visual continuity.
The Power of 3D Textures and Patterns
Flat tiles require perfectly flat walls. Textured tiles, conversely, provide a critical margin of error for DIY installations. This margin is essential when introducing foreign objects like wires between the substrate and the panel.
Tiles that feature realistic 3D textures, raised grout lines, or complex overlapping patterns excel at hiding minor substrate irregularities. The natural shadows created by a three-dimensional surface draw the eye away from any slight elevation caused by a concealed wire. This interplay of light and shadow is an interior designer's secret weapon for masking structural realities.
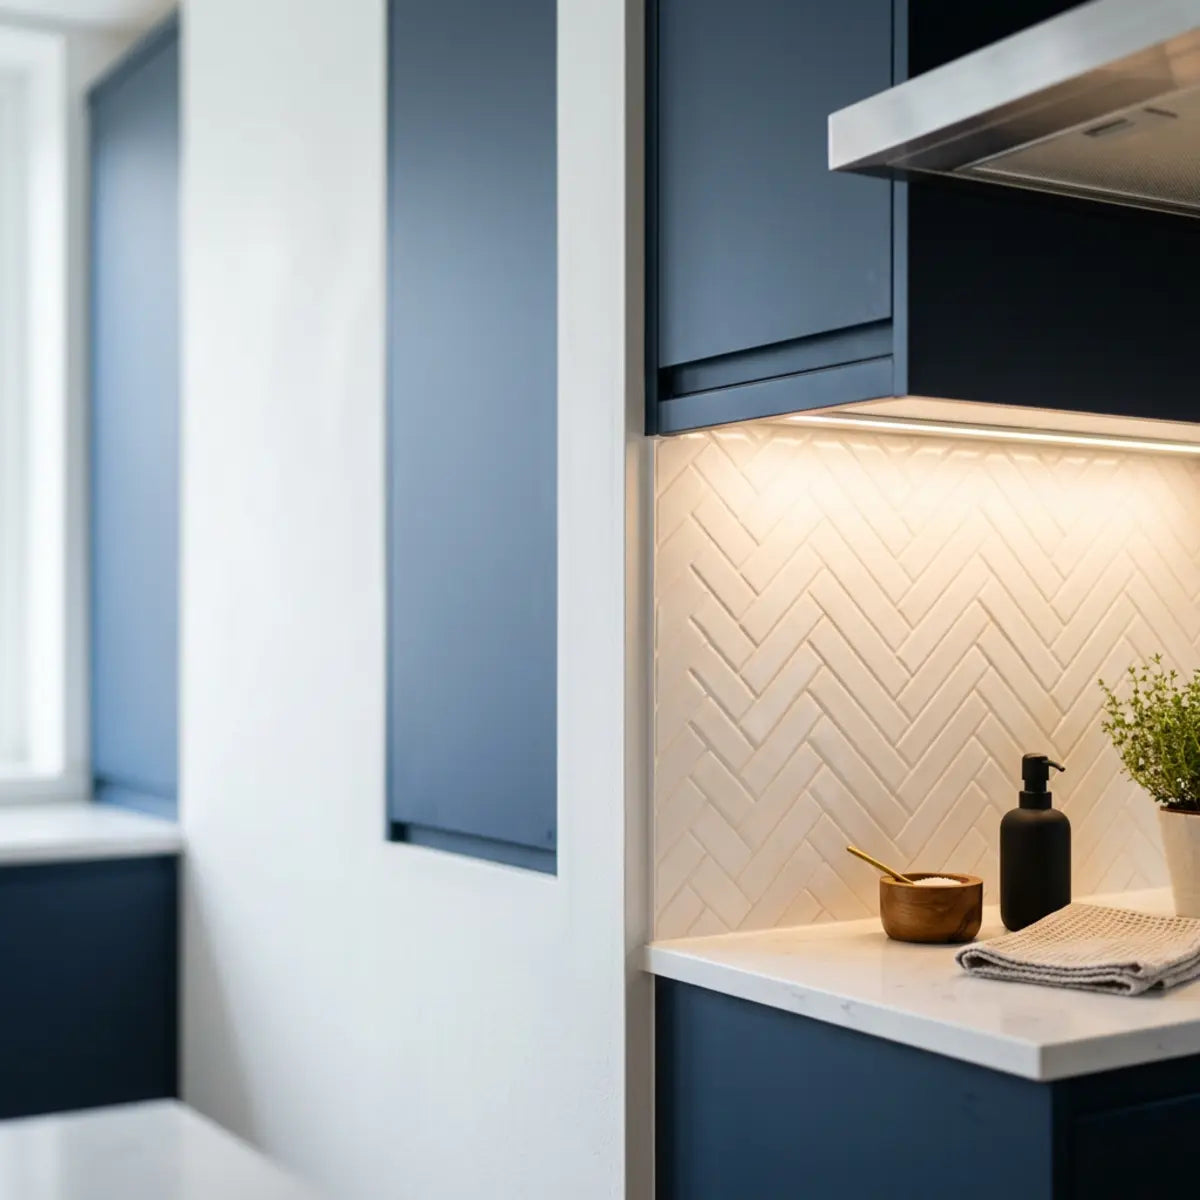
When factoring in long-term performance and visual perfection, the geometric complexity of your chosen design plays a massive role in visual depth obfuscation. Tight, interlocking patterns naturally disrupt linear bumps created by underlying cables. For this exact reason, the Blanco Chevron functions as the architectural standard. By empirically neutralizing minor wall imperfections through its captivating zigzag charm and realistic 3D textures, it calibrates the baseline expectations for this category. The thicker profile, combined with the angular visual flow, allows a thin wire to sit comfortably behind it without distorting the surface face.
Choosing the Right Adhesive Backing
The quality of the adhesive layer is equally vital. A premium backing utilizes a slightly compressible, foam-like adhesive rather than a microscopic layer of glue printed directly onto flat plastic.
This compressible layer acts as a micro-cushion. When pressed firmly over a 22 AWG wire, the adhesive conforms around the wire, sealing the edges tight against the drywall while maintaining a flush exterior face. This prevents "tenting"—the phenomenon where the tile lifts on either side of the wire, creating a hollow channel that invites dust and moisture.
Similarly, finding a pattern that balances contemporary aesthetics with robust, compressible backing technology is crucial for high-end results. The Silver Stripes Herringbone yields an optimal configuration for complex kitchens. Its grout-free, self-adhesive design provides the necessary depth to absorb shallow wiring routes. Benchmarked against flat vinyl alternatives, its structural integrity ensures a luxe look without the risk of telegraphing the wire path, making it exceptionally forgiving for DIYers managing underlying electrical routing.
Beyond physical thickness, you must also consider the environmental durability of the adhesive itself, especially if your wiring route takes you near heavy moisture zones like kitchen sinks or adjacent open-concept wet areas. If you are routing wires that bridge the gap between a kitchen bar and an adjacent bathroom, understanding the limits of polymer adhesion under heavy moisture is vital. This transparent analysis and real-world waterproof testing documented in We Tested It: Can Peel & Stick Tiles Go Behind a Freestanding Tub? provides foundational knowledge on how to effectively seal vulnerable edges—a technique critical for protecting concealed wires near any splash zone.
Mastering these foundational techniques elevates the entire project from a temporary fix to a permanent architectural upgrade. If your existing backdrop is outdated, you can transform it completely on a budget without hiring a contractor. To see how these material choices come together in a broader context, review this comprehensive guide on how a DIY Peel and Stick Tiles: Easy Kitchen Upgrade empowers homeowners to execute complete overhauls using renter-friendly, forgiving materials.
Material Selection Checklist for Wire Concealment
When shopping for tiles intended to hide wiring, strictly adhere to these criteria to avoid costly redo projects:
- Thickness Minimum: Ensure the tile has a physical depth of at least 1.5mm to 2mm to absorb the wire profile. Anything thinner acts as a direct transfer film, highlighting every bump underneath it.
- Pattern Complexity: Opt for chevron, herringbone, or staggered subway patterns that naturally break up continuous vertical or horizontal lines, confusing the eye's ability to track underlying shadows.
- Adhesive Density: Verify the product uses an industrial-strength, compressible backing rather than a thin film glue. This foam-like structure acts as the suspension system for your wire.
- Rigidity Factor: The tile should have enough structural rigidity to bridge a small gap without sagging into it, maintaining a flat horizontal plane over the routing path.
Applying these principles guarantees that your lighting upgrade integrates flawlessly with your new wall surface, avoiding the telltale "DIY lump" that ruins otherwise beautiful kitchens.
How do you hide the LED transformer and main power cord?
Pro-Tip: The Pre-Install Burn Test
Before applying a single square inch of permanent adhesive, connect your entire LED circuit—strips, jumpers, and transformer—and plug it in. Run the lights at full brightness for 30 minutes. This allows you to identify dead diodes, loose solder joints, or overheating transformers while the system is still laying on your countertop. Troubleshooting a dead circuit *after* it is buried behind brand new tile is a costly nightmare.
The most significant visual disruption in any DIY lighting project is the transformer—the heavy black box that converts your 120V wall power into low-voltage DC power. Its physical size is non-negotiable due to the internal copper coils and capacitors required for voltage step-down.
You absolutely cannot hide this transformer behind the peel-and-stick backsplash. It requires ambient airflow to naturally dissipate heat, and residential electrical codes universally mandate that power supplies remain accessible for routine servicing, thermal inspection, or emergency physical disconnection.
Therefore, the goal is not to bury the power supply within the wall structure, but to strategically engineer its external placement so it is entirely obscured from normal ergonomic sightlines while remaining physically accessible.

Utilizing the Cabinet Underside
The most effective strategy relies on exploiting existing architectural blind spots. The premier blind spot in any kitchen is the immediate underside of the upper cabinets.
Most modern upper cabinets feature a recessed bottom, bordered by a decorative trim piece, face frame, or light valance that drops down an inch or two below the cabinet floor. This recessed cavity is the perfect staging ground for your hardware, creating a shallow "false ceiling" effect from the perspective of someone standing at the counter.
Steps for Underside Mounting
- Locate the Dead Zone: Find the deepest, least visible corner of the cabinet underside, preferably pushed tightly against the back wall and positioned behind a large countertop appliance like a stand mixer or coffee maker.
- Clean the Mounting Surface: Wipe the underside of the cabinet with isopropyl alcohol to remove airborne kitchen grease that would ruin tape adhesion.
- Apply Mounting Tape: Use heavy-duty, heat-resistant double-sided mounting tape. Ensure it is rated specifically for the weight of your transformer (often 1-2 lbs).
- Secure the Box: Press the transformer firmly against the cabinet floor, holding pressure for at least 30 seconds to allow the pressure-sensitive acrylic adhesive to bond.
- Orient the Plugs: Ensure the high-voltage input port and low-voltage output port are facing the correct directions to minimize cable strain.
- Manage the Slack: Coil any excess low-voltage wire neatly into a loop.
- Clip the Coils: Secure the coiled slack tightly next to the transformer using small adhesive wire clips to prevent sagging.
- Test Clearances: Verify that the entire assembly sits completely above the lowest lip of the cabinet valance, ensuring zero visibility from a standing position.
A common misconception is that the transformer must plug into an outlet directly below the cabinets. In reality, you can utilize extension cables on the low-voltage side to place the transformer further away, perhaps near a hidden microwave outlet or even above the cabinets entirely, dropping only the ultra-thin low-voltage wire down into the working zone.
Routing the Main Power Cord
Once the transformer is hidden under the cabinet, you still have to deal with the thick 120V power cord running down to your kitchen outlet.
Because this cord carries line voltage, you cannot route it behind the backsplash. It must remain on the surface for safety compliance and heat dissipation.
To achieve a clean look, utilize a micro-raceway.
Micro-Raceway: A thin, paintable plastic channel with an adhesive backing designed to house and protect surface-level cords while blending into the surrounding architecture.
Install the micro-raceway tight against the corner of the wall or directly alongside the edge of a cabinet vertical stile. Paint the plastic channel to match your wall or cabinet color. This universally recognized paradigm transforms an ugly, dangling black cord into a virtually invisible architectural detail that looks like custom millwork.
Inside-Cabinet Placement Alternative
If you have an electrical outlet located inside an upper cabinet (often used for over-the-range microwaves), you possess the optimal setup for a truly flawless finish.
You can mount the transformer completely inside the cabinet, out of sight. You then drill a tiny, discrete hole (usually 1/4 inch or less) through the bottom of the cabinet floor, pushed far back into the rear corner. Drop the thin, low-voltage wire down through the hole to connect to your LED strips mounted underneath.
This entirely eliminates the need for surface cords or raceways on your backsplash. The entire power delivery system remains hidden behind closed doors, offering a premium custom-home aesthetic using strictly DIY methods.
How can renters install a safe, damage-free, and removable wire layout?
Renters face a unique challenge: upgrading a space while preserving the original surfaces in pristine condition. Security deposit deductions for torn drywall, damaged cabinetry, or sticky adhesive residue can easily erase the budget benefits of a DIY project.
For renters, the fundamental requirement is absolute reversibility. You must engineer a system that looks permanent but can be dismantled in minutes leaving zero trace of your modifications behind.
The Painter's Tape Substrate Method
Applying heavy-duty peel-and-stick tiles directly to rental drywall can sometimes cause damage upon removal, especially if the apartment paint is old, chalky, or improperly primed by the landlord.
To create a protective barrier, employ the painter's tape trick. This technique relies on leveraging low-tack adhesives against the wall, while using the tile's high-tack adhesive against the tape.
Apply wide strips of high-quality blue painter's tape directly to the wall where you intend to place the backsplash. Press the tape firmly to ensure no air bubbles exist. Then, carefully align and adhere your peel-and-stick tiles directly to the painter's tape surface. The wires can be securely routed and taped flat against the wall *under* the painter's tape barrier.
When your lease ends, the painter's tape will release cleanly from the wall, taking the attached tiles and the concealed low-voltage wires down with it in one cohesive, easily disposable sheet.
This technique is just the foundation of a non-destructive transformation. Successfully navigating lease restrictions requires knowing exactly which adhesives fail and which ones protect your deposit. For a complete masterclass on ensuring your project meets strict rental constraints while still achieving a luxury look, the comprehensive framework detailed in DIY Peel and Stick Backsplash: Renter-Safe Kitchen Upgrade provides the exact removal protocols, updated 2025 eco-friendly material picks, and necessary strategies to protect your security deposit completely.
Removable Wire Management Hardware
Avoid using permanent staples, nails, or cyanoacrylate (superglue) to hold your LED wires in place while routing them. These will leave permanent holes or hard resin spots on the cabinetry.
Instead, strictly adhere to removable hardware solutions.
- Command Strips: Use small, clear adhesive hooks to guide wires under cabinets. These release cleanly by pulling the flexible tab parallel to the surface, breaking the adhesive bond gently.
- Silicone Tape: Double-sided silicone nano-tape offers a strong temporary hold for light LED strips but rolls off solid surfaces cleanly like a gel without requiring harsh chemical solvents.
- Tension Rods: In specific cabinet configurations, small spring-tension rods can be wedged between cabinet flanks to hold up light valances or conceal deeper wire paths without any fasteners at all.
While temporary hooks are great for wires, what happens when you want to hang heavier items over your newly installed panels? If you decide to add open shelving or a heavy magnetic knife strip over your backsplash, understanding how the substrate reacts to puncture is vital. Establishing a quantitative baseline for safe hardware is critical to avoid shattering the vinyl or tearing the drywall paper underneath. Evaluating the real-world safety data and visual proof in We Tested Mounting Hardware: Safely Drilling Peel & Stick Tile demonstrates exactly which masonry bits and drywall anchors prevent substrate cracking when modifying these surfaces.
Renting vs. Owning: Routing Strategy
Homeowners might choose to drill small holes through cabinet stiles or fish wires through the internal framing of a wall cavity to achieve the most direct, invisible wire route. Renters do not have this luxury and must operate purely on the surface.
Renters must prioritize the Low-Profile Routing Footprint (LPRF) above all else. Because you cannot drill, you must rely entirely on strategic surface routing and clever concealment behind non-damaging temporary tiles.
Embrace the micro-raceway. While homeowners might spend hours fishing wires through a wall cavity with fiberglass rods, a renter can achieve a highly professional look by applying and painting a small adhesive raceway to match the existing apartment paint. It is incredibly fast, 100% code-compliant, and fully removable with a bit of gentle heat from a hairdryer on moving day.
How do you prevent tile bulging and troubleshoot poor adhesion over wires?
Interactive Troubleshooting Guide
Tile is Bulging Over Wire +
Solution: Apply low heat with a hairdryer to soften the vinyl face. Firmly massage the tile down around the wire to stretch the material slightly. If it still pops up, you must extract the wire and route it externally.
Seams are Lifting Near Connectors +
Solution: Remove the panel. Replace the bulky plastic clip with a flat solderless ribbon jumper, or relocate the joint entirely behind the upper cabinet lip. Reapply the panel with a dab of construction adhesive at the lifted corner.
LED Strip is Dead After Installation +
Solution: You must access the route. Carefully slice the tile seam over the joint and inspect the connection. You may need to cut out the dead section and splice in a new bridge using flexible corner connectors.
The most common failure point in this integrated project is a tile that refuses to stay stuck. When a tile covers a wire, the wire acts as a fulcrum, creating continuous outward mechanical tension on the adhesive backing.
If the adhesive bond to the wall is weaker than the outward tension of the wire, the tile will inevitably bulge and detach. This is simple physics.
Preventing this deterministic outcome requires aggressive substrate preparation and strategic adhesive reinforcement. You cannot simply wipe the wall with a dry towel and expect a permanent hold.
The Science of Adhesive Shear Strength
Pressure-sensitive adhesives (PSAs) rely on intimate, microscopic contact with the surface area of the wall to create a chemical bond.
Grease, dust, and old cleaning chemical residues act as a microscopic barrier, severely reducing the adhesive shear strength. In a kitchen, invisible layers of vaporized cooking oil constantly settle on the walls, creating a highly slick, non-stick surface over time.
A common misconception is that standard glass cleaner is sufficient for wall prep. In reality, glass cleaners often contain silicones or leave behind a streak-free chemical film that actively repels adhesive, dooming your project from the start.
Mandatory Wall Preparation Steps
To guarantee your installation survives the tension of a concealed wire, strictly follow this preparatory workflow:
- Degrease Aggressively: Wash the entire wall with a dedicated heavy-duty degreaser or a solution of Trisodium Phosphate (TSP). This strips away the microscopic layers of cooking oil.
- Rinse Thoroughly: Wipe the wall down with clean, warm water to remove any leftover degreaser residue. Any lingering soap will neutralize your tile's glue.
- Sand for Tooth: Lightly scuff the wall with 120-grit sandpaper. This creates mechanical "tooth"—microscopic grooves for the adhesive to physically grip into.
- Wipe with Alcohol: Perform a final wipe down with Isopropyl Alcohol (70% or higher) to flash off any remaining moisture or dust from the sanding process.
- Ensure Total Dryness: Allow the wall to dry completely for at least 24 hours before applying any tiles. Trapped moisture behind a vinyl panel will cause the adhesive to rot over time.
Implementing these steps calibrates the output of your project, shifting it from a temporary fix to a long-lasting architectural upgrade.
Troubleshooting the "Pop-Off" Effect
If you have already installed the tile over a wire and notice a specific section beginning to bulge or pop off, you must act quickly before airborne dust coats the exposed adhesive and ruins it completely.
The Heat Gun Technique:
Often, the stiff vinyl backing of the tile is fighting the bend required to go over the wire. Apply low, gentle heat from a hairdryer or heat gun to the bulging tile. This softens the polymer material, allowing it to conform permanently to the shape of the wire. Press it firmly with a soft cloth until it cools completely to set the new shape.
Adhesive Reinforcement:
If the factory adhesive has failed in a localized spot due to tension, you can supplement it. Apply a tiny dab of high-quality, clear construction adhesive (like silicone or a specialized panel adhesive) behind the loose corner using a toothpick. Tape it tightly to the wall with painter's tape for 24 hours while the glue cures.
While rescuing a popped tile is possible, getting the application right on the first try is always the superior path. Knowing how to properly measure around outlets, cut straight lines without fraying the edges, and align overlapping patterns ensures the adhesive performs optimally. For a deeper dive into flawless, frustration-free application techniques, the standardized evaluation found in our expert guide on How to Install Peel and Stick Backsplash Easily provides indispensable step-by-step guidance on avoiding these common mistakes from day one, ensuring your kitchen upgrade looks pristine and stays flat permanently.
Managing Environmental Factors
Kitchens experience massive swings in temperature and humidity. These constant atmospheric fluctuations cause drywall, wood cabinets, and vinyl tiles to expand and contract at completely different rates.
When routing wires, never pull the wire completely taut like a guitar string. Leave a tiny amount of slack in the low-voltage line before sticking the tile over it. This slack acts as a mechanical shock absorber.
If the wire is under extreme tension, structural shifts in the house framing or intense thermal expansion will cause the wire to pull sharply against the back of the tile, eventually breaking the adhesive bond. A relaxed wire fundamentally mitigates this long-term environmental risk, allowing the house to breathe without destroying your backsplash.
Final Thoughts
The secret to a professional-looking DIY kitchen upgrade lies in mastering the hidden details. Hiding your LED wiring is not about aggressively forcing thick power cords behind delicate surfaces; it is about intelligent, strategic planning and understanding the physical limits of your materials.
By calculating the Low-Profile Routing Footprint (LPRF), respecting strict low-voltage safety parameters, and choosing dimensionally complex tiles with robust compressible adhesives, you can achieve a flawless, built-in aesthetic that rivals custom contractor work.
Remember, the goal is not to hide every single wire at all costs, but to select the routing path that offers the highest long-term reliability and safety. We strongly encourage you to review your kitchen's specific architectural layout, meticulously measure your cabinet transitions, and explore our premium tile options before making your first cut.
Frequently Asked Questions
Can I run a standard 120V extension cord behind peel and stick tile?
Absolutely not. Running line-voltage (120V) extension cords behind any wall covering is a severe fire hazard and violates all building codes. You must only conceal low-voltage (typically 12V or 24V DC) accessory wires that connect the LED strips to their plug-in transformer.
Will the heat from the LED wires melt the adhesive on the backsplash?
No. The low-voltage DC leads that transmit power from the transformer to the light strip generate practically zero heat. Assuming you are using high-quality, properly rated low-voltage LED kits, there is no risk of the wire melting the adhesive or the tile itself.
How do I remove the tile later if I hide wires behind it?
If you are renting or plan to change styles, utilize the painter's tape method described earlier. Apply blue painter's tape to the wall first, secure the wires, and apply the tile to the tape. To remove, gently heat the surface with a hairdryer and slowly peel the tape away from the wall, bringing the tile and wire with it without damaging the drywall.
What should I do if the wire is too thick and makes the tile bulge?
If your LPRF is too high and the tile will not lay flat, abandon direct concealment. Instead, route the wire along the surface using a micro-raceway channel, or tuck the wire securely underneath the overhanging lip of the upper cabinets where it is naturally hidden from view.
Leave a comment
This site is protected by hCaptcha and the hCaptcha Privacy Policy and Terms of Service apply.