


So pflegen und reinigen Sie schwarzen Fugenmörtel auf weißen Fliesen
Der dramatische, kontrastreiche Look von weißen Fliesen mit schwarzem Fugenmörtel ist atemberaubend – wenn er neu ist. Doch was passiert, wenn Ihr einst perfekter schwarzer Fugenmörtel matt, kreidig oder fleckig wirkt? Das ist eine häufige Frustration, die ein stilvolles Bad oder eine Küche müde und ungepflegt erscheinen lassen kann. Sie haben sich aus gutem Grund für dieses markante Design entschieden, und Sie verdienen es, dass es strahlt.
Die direkte Antwort
Der beste Weg, schwarzen Fugenmörtel zu pflegen und ein Ausbleichen zu verhindern, besteht darin, ihn wöchentlich mit einem pH-neutralen Reiniger zu säubern, ihn jährlich mit einem hochwertigen eindringenden Versiegler zu versiegeln und aggressive Chemikalien oder Seifenreste nach jeder Nutzung sofort abzuwischen. Vermeiden Sie saure Reiniger wie Essig und scheuernde Werkzeuge, die die Farbe des Fugenmörtels angreifen können.
Dieser Leitfaden ist Ihre vollständige Ressource, um diese Frustration hinter sich zu lassen. Wir zeigen Ihnen professionelle, aber vollständig DIY-taugliche Methoden, um Ihren schwarzen Fugenmörtel zu reinigen, zu versiegeln und zu schützen. Vergessen Sie die Verwirrung darüber, welche Produkte sicher sind. Wir decken alles ab – von einfachen Reinigungsroutinen bis zur Wahl des richtigen Versieglers –, damit Ihr schwarzer Fugenmörtel so kräftig und schön bleibt wie am Tag der Verlegung. Das Verständnis der richtigen Techniken von Anfang an kann den entscheidenden Unterschied machen, und für alle, die diesen Look lieben, bietet unser vollständiger Leitfaden zu wie man weiße Subway-Fliesen mit schwarzem Fugenmörtel reinigt einen noch tieferen Einblick in Produktempfehlungen und langfristige Strategien.
Warum wirkt schwarzer Fugenmörtel so attraktiv – und warum ist er zugleich eine Herausforderung?
Schwarzer Fugenmörtel mit weißen Fliesen ist eine Designentscheidung mit Aussagekraft. Er erzeugt grafische Linien, die Subway-Fliesen hervorheben, und verleiht geometrischen Mustern eine klare, moderne Note. In unserer Erfahrung mit der Beratung von Hausbesitzern bei der Gestaltung wird diese Kombination gewählt, weil sie Fliesen als eigenständige Gestaltungselemente rahmt und einem Raum Tiefe sowie architektonische Wirkung verleiht.
Gerade das, was ihn so attraktiv macht – seine tiefe, satte Farbe – ist auch seine größte Schwachstelle.
Typische Pflegeherausforderungen
Im Gegensatz zu hellem Fugenmörtel, auf dem Schmutz und Ablagerungen sichtbar werden, zeigt schwarzer Fugenmörtel eher andere Probleme.
-
Ausbleichen: Der Hauptfeind von schwarzem Fugenmörtel ist das Ausbleichen. Oft wird es durch die falschen Reinigungsmittel verursacht. Aggressive, saure Reiniger können dem Fugenmörtel buchstäblich das Pigment entziehen, sodass er grau und ausgewaschen aussieht. Eine Studie des Tile Council of North America weist häufig darauf hin, dass unsachgemäßer Chemikalieneinsatz für über 60% der Beschwerden über Fugenmörtelfarbe verantwortlich ist.
-
Ausblühungen: Haben Sie schon einmal einen kreidigen, weißen Belag auf Ihrem dunklen Fugenmörtel gesehen? Das sind Ausblühungen. Dabei handelt es sich um kristalline Salzablagerungen, die bei der Verdunstung von Wasser aus dem zementbasierten Fugenmörtel an die Oberfläche wandern können. Auf dunklem Untergrund fallen sie besonders auf.
-
Seifenreste: In Duschen bilden Seifenreste und Kalkablagerungen einen trüben Film, der die tiefe schwarze Farbe des Fugenmörtels stumpf wirken lässt. Das ist eines der häufigsten Probleme, die wir sehen.
Expertentipp
Vorausschauende Pflege bedeutet nicht nur reinigen, sondern vor allem die Farbe und die Struktur des Fugenmörtels zu bewahren. Stellen Sie es sich wie die Pflege eines dunkel lackierten Autos vor. Sie würden dafür keinen aggressiven Schleifmittel einsetzen und die Oberfläche schützen wollen. Dasselbe Prinzip gilt hier.
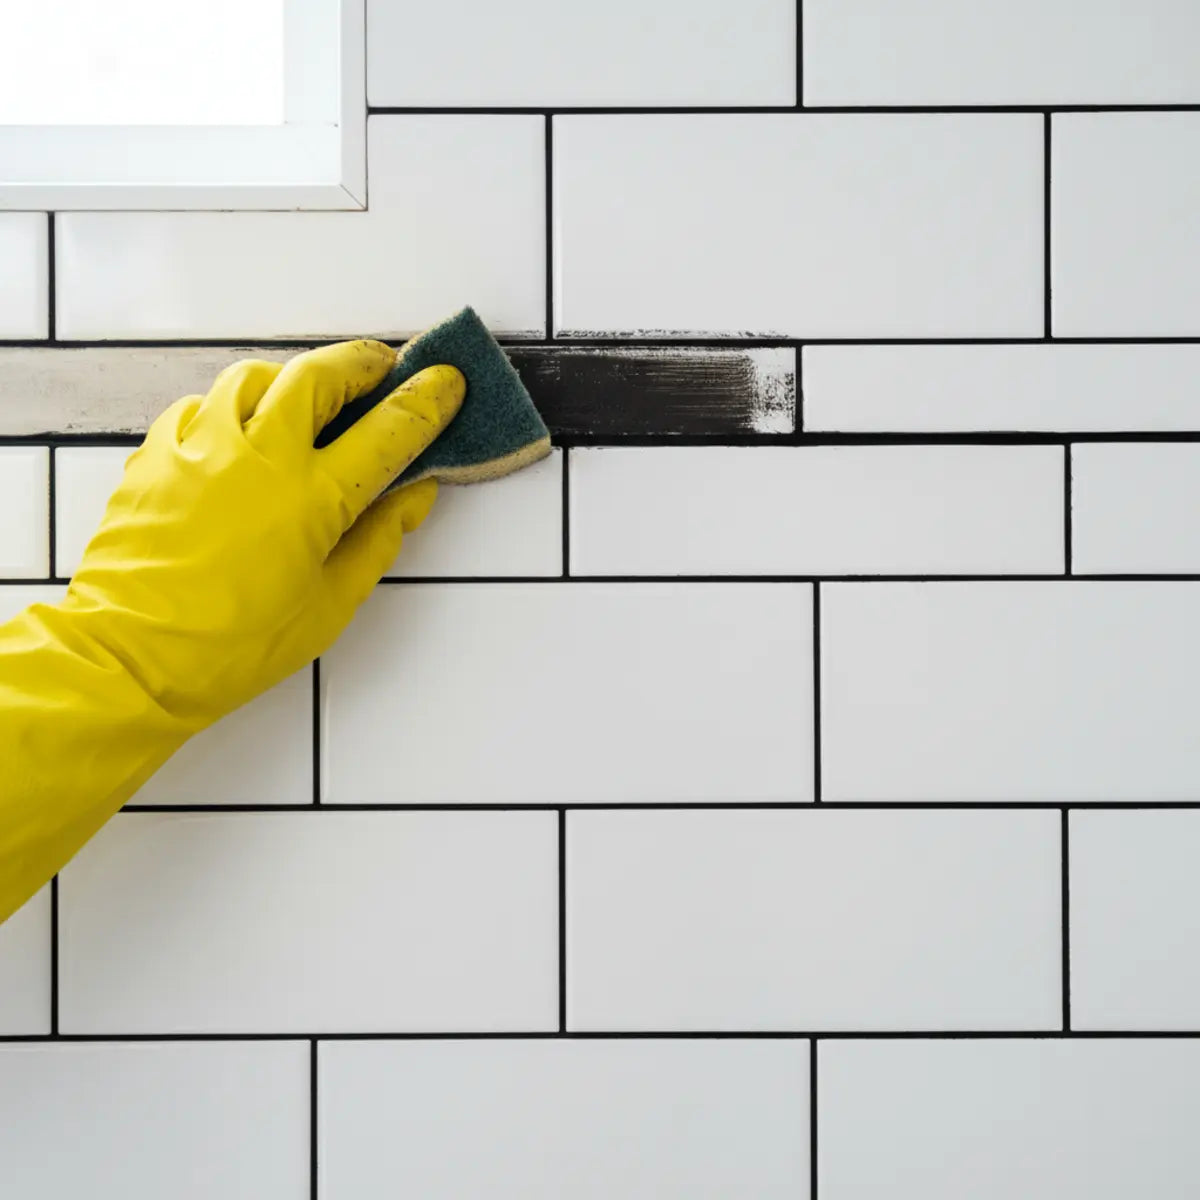
Schritt 1: Wie reinigt man schwarzen Fugenmörtel, ohne dass er ausbleicht?
Die Reinigung von schwarzem Fugenmörtel ist ein sensibler Balanceakt. Sie müssen Schmutz, Seifenreste und möglichen Schimmel entfernen, ohne die Farbe anzugreifen. Das Geheimnis liegt nicht im härteren Schrubben, sondern im klügeren Reinigen mit den richtigen Hilfsmitteln und in der passenden Häufigkeit.
Geeignete Reinigungsmittel für schwarzen Fugenmörtel
Die Wahl des Reinigers ist die wichtigste Entscheidung. Aggressive, säurehaltige Reiniger sind der schnellste Weg, Ihren Fugenmörtel zu ruinieren.
-
pH-neutrale Reiniger: Das ist Ihr bester Helfer. Achten Sie auf Produkte, die ausdrücklich als „pH-neutral“ oder „geeignet für farbigen Fugenmörtel“ gekennzeichnet sind. Diese Reiniger sind so formuliert, dass sie Schmutz lösen, ohne mit den Pigmenten im Fugenmörtel zu reagieren.
-
Dampfreiniger: Eine hervorragende, chemiefreie Option. Der heiße Dampf dringt in den porösen Fugenmörtel ein, tötet Schimmel ab und löst Schmutz. Er ist äußerst wirksam und 100% farbschonend.
-
DIY-Lösung (mit Vorsicht): Eine einfache Mischung aus warmem Wasser und ein paar Tropfen mildem Spülmittel kann für die leichte, regelmäßige Reinigung funktionieren. Verzichten Sie auf Essig, Zitronensaft oder reine Natronpaste, da deren Säure- bzw. Alkalität mit der Zeit zum Ausbleichen führen kann.
Die richtige Reinigungsmethode
Für beste Ergebnisse empfehlen wir ein wöchentliches Abwischen und eine monatliche Tiefenreinigung.
- Bereich vorreinigen: Besprühen Sie Fliesen und Fugen leicht mit warmem Wasser. Das hilft, oberflächlichen Schmutz zu lösen, und bereitet die Fugen darauf vor, den Reiniger wirksamer aufzunehmen.
- Reiniger auftragen: Sprühen Sie Ihren pH-neutralen Reiniger direkt auf die Fugenlinien. Lassen Sie ihn, wie vom Hersteller empfohlen, 5–10 Minuten einwirken. So hat die Lösung Zeit, Seifenreste und Schmutz zu lösen.
- Sanft schrubben: Verwenden Sie eine Fugenbürste mit weichen Borsten oder eine alte Zahnbürste. Niemals eine Drahtbürste verwenden, da sie die Fliese zerkratzen und die Fugenoberfläche abtragen würde, wodurch sie anfälliger für Verfärbungen und Ausbleichen wird. Arbeiten Sie mit sanften, kreisenden Bewegungen.
- Gründlich abspülen: Dieser Schritt ist entscheidend. Wischen Sie mit einem sauberen Tuch und frischem Wasser alle Reinigungsreste weg. Rückstände können sonst mehr Schmutz anziehen und einen matten Film bilden.
- Oberfläche trocknen: Trocknen Sie Fliese und Fugen mit einem Mikrofasertuch. So vermeiden Sie Wasserflecken und helfen, die Bildung von Ausblühungen zu verhindern.

Ein häufiger Fehler, den wir sehen, ist, Reiniger auf den Fugen an der Luft trocknen zu lassen. Das hinterlässt fast immer Rückstände, die die Farbe matt wirken lassen. Nehmen Sie sich immer die zusätzliche Minute zum Abspülen und Trocknen.
Schritt 2: Welcher Fugenversiegler ist am besten für schwarze Fugen?
Wenn Reinigen die Verteidigung ist, dann ist Versiegeln die Verstärkung. Fugen sind von Natur aus porös, wie ein Schwamm aus Beton. Eine Versiegelung bildet einen unsichtbaren Schutzschild, der Wasser, Schmutz und Öl abweist, die Reinigung deutlich erleichtert und verhindert, dass Flecken überhaupt erst einziehen. Bei schwarzen Fugen ist das die wichtigste Maßnahme, um die Farbe zu erhalten.
Den richtigen Versiegler wählen
Es gibt zwei Hauptkategorien von Fugenversieglern. Für schwarze Fugen ist eine davon klar die beste Wahl.
Eindringende Versiegler
Das ist die von Experten empfohlene Wahl für farbige Fugen. Diese Versiegler haben eine Wasser- oder Lösemittelbasis, die die Versiegelungspolymere tief in die Poren der Fuge transportiert, bevor sie verdunsten. So wird von innen versiegelt und ein dauerhafter Schutz erzielt, ohne das Aussehen oder die Farbe der Fuge zu verändern.
Oberflächen-/Membranbildende Versiegler
Diese bilden einen Film auf der Fuge. Zwar bieten sie einen guten Schutz vor Flecken, doch wir raten bei schwarzen Fugen in stark frequentierten oder feuchten Bereichen meist davon ab. Mit der Zeit kann sich der Film ablösen, vergilben oder Feuchtigkeit einschließen, und oft entsteht auch ein glänzendes Finish, das Sie vielleicht gar nicht möchten.
Für tiefschwarze, matte Fugen ist ein hochwertiger, wasserbasierter eindringender Versiegler der Goldstandard.
Der Ablauf beim Auftragen des Versieglers
Das Versiegeln ist eine Aufgabe, die am besten jährlich durchgeführt wird. Der ideale Zeitpunkt ist etwa eine Woche nach einer gründlichen Reinigung, wenn die Fugen vollständig trocken sind.
- Sicherstellen, dass die Fugen sauber und trocken sind: Das Versiegeln über schmutzigen Fugen schließt den Schmutz für immer ein. Die Fugen müssen 100% trocken sein; das kann nach der Reinigung bis zu 24 Stunden dauern.
- Bereich gut lüften: Selbst Versiegler mit niedrigem VOC-Gehalt können einen Geruch haben. Öffnen Sie die Fenster und schalten Sie einen Ventilator ein.
- Präzise auftragen: Verwenden Sie einen kleinen Künstlerpinsel, eine Applikatorflasche mit Rollspitze oder einen speziellen Fugenversiegler-Applikator. Ziel ist es, den Versiegler *nur* auf die Fugenlinien aufzutragen.
- Überschuss abwischen: Halten Sie ein feuchtes Tuch bereit. Wischen Sie Versiegler, der auf die Fliesenoberfläche gelangt, sofort ab. Wenn er auf der Fliese antrocknet, kann er einen milchigen Rückstand hinterlassen, der schwer zu entfernen ist.
- Einziehen lassen: Lassen Sie den Versiegler so lange in die Fuge einziehen, wie vom Hersteller angegeben, in der Regel 5–15 Minuten.
- Zweite Schicht auftragen (falls nötig): Bei sehr porösen Fugen oder in feuchten Bereichen wie Duschen ist eine zweite Schicht eine gute Idee. Beachten Sie die Herstellerangaben zur Wartezeit bis zum erneuten Auftragen.
- Vollständig aushärten lassen: Der Versiegelung braucht Zeit zum Aushärten, was 24–72 Stunden dauern kann. Halten Sie den Bereich während dieser Zeit vollständig trocken. Vermeiden Sie die Nutzung der Dusche oder Spritzwasser an der Rückwand.

Profi-Tipp: Testen Sie den Sealer zuerst an einer kleinen, unauffälligen Stelle, um sicherzustellen, dass er die Farbe nicht auf unerwartete Weise verändert.
Schritt 3: Wie können Sie Ausbleichen und Verfärbungen verhindern?
Der beste Weg, ein Problem zu beheben, ist, es gar nicht erst entstehen zu lassen. Wenn Sie verstehen, wodurch schwarze Fugen verblassen, können Sie kleine tägliche Gewohnheiten einführen, die einen großen Unterschied machen. Vorbeugung bedeutet, eine Umgebung zu schaffen, in der Ihre Fugen gut erhalten bleiben.
Wichtige Faktoren, die Ausbleichen verursachen
-
Sonnenlicht (UV-Strahlen): Genau wie Stoff oder Farbe können die Pigmente in der Fuge bei längerer, direkter Sonneneinstrahlung ausbleichen. Das ist vor allem bei Rückwänden in der Nähe eines sonnigen Fensters ein Thema.
-
Scharfe Chemikalien: Wie bereits erwähnt, ist das der Hauptverursacher. Selbst Allzweckreiniger können Inhaltsstoffe enthalten, die für gefärbte Fugen zu aggressiv sind.
-
Scheuerndes Schrubben: Wenn Sie die oberste Schicht der Fuge mechanisch abtragen, kommt die hellere Zementmischung darunter zum Vorschein und lässt sie verblasst wirken.
Vorbeugende Pflegegewohnheiten
Betrachten Sie das als die „Fünf-Minuten-Regel“. Ein paar Minuten Pflege am Tag können Ihnen später stundenlanges Schrubben ersparen.
-
Im Bad eine Abziehlippe verwenden: Verwenden Sie nach jeder Dusche eine Abziehlippe an den Fliesenwänden. So entfernen Sie den Großteil von Wasser- und Seifenresten, bevor sie trocknen und sich als Belag absetzen können. Diese eine Gewohnheit kann Ihre Reinigungszeit um mehr als die Hälfte reduzieren.
-
Den Badlüfter laufen lassen: Lassen Sie den Lüfter während des Duschens und noch 20–30 Minuten danach immer laufen. Gute Luftzirkulation ist der beste Schutz gegen Schimmel, der Fugen verfärben kann.
-
Spritzer abwischen: Bei einer Küchenrückwand wischen Sie Spritzer vom Kochen schnell weg, besonders säurehaltige Dinge wie Tomatensoße oder Zitronensaft.
Beispiel für einen Wartungskalender
Eine einfache Routine macht den entscheidenden Unterschied.
-
Wöchentlich (10 Minuten): Sprühen Sie die Fugen mit Ihrem pH-neutralen Reiniger ein und wischen Sie sie mit einem Mikrofasertuch ab. Verwenden Sie in der Dusche täglich die Abziehlippe.
-
Monatlich (30 Minuten): Führen Sie eine Tiefenreinigung mit einer Bürste mit weichen Borsten durch, wie in Schritt 1 beschrieben. Das ist auch ein guter Zeitpunkt, um auf Risse oder bröckelnde Stellen zu prüfen.
-
Jährlich (2–3 Stunden): Tiefenreinigen Sie die Fugen und tragen Sie anschließend erneut einen hochwertigen, eindringenden Fugensealer auf. Prüfen Sie die Wirksamkeit Ihres Sealers, indem Sie etwas Wasser auf die Fuge tropfen lassen – wenn es abperlt, ist der Schutz vorhanden. Wenn es einzieht, ist es Zeit, erneut zu versiegeln.
Schritt 4: Wie beheben Sie verfärbte oder beschädigte schwarze Fugen?
Selbst bei bester Pflege kann es vorkommen, dass ein hartnäckiger Fleck oder ein kleiner Schadensbereich auftaucht. Die gute Nachricht: Sie müssen nicht immer ganz von vorne anfangen. Es gibt gezielte Lösungen, um verblasste oder beschädigte Fugen wieder zum Leben zu erwecken. In unserer Arbeit stellen wir fest, dass sich etwa 80% der kleineren Fugenprobleme ohne komplette Renovierung beheben lassen.
Das Problem identifizieren
Beurteilen Sie zuerst die Situation. Handelt es sich nur um einen Oberflächenfleck, oder ist die Fuge selbst beschädigt?
-
Verblassen/Verfärbung: Der Fugenmörtel ist intakt, hat aber in bestimmten Bereichen seine tiefschwarze Farbe verloren und wirkt oft grau oder kreidig. Das ist in stark bespritzten Zonen in der Nähe von Wasserhähnen ganz normal.
-
Bröckeln/Rissbildung: Der Fugenmörtel zerfällt physisch. Das weist auf ein ernsteres Problem hin, oft im Zusammenhang mit Feuchtigkeit hinter den Fliesen oder Bewegungen im Untergrund.
DIY-Reparaturmethoden für Verfärbungen
Wenn der Fugenmörtel nur verblasst ist, ist ein Fugenfarbtoner oder „Fugenfarbe“ eine hervorragende Lösung. Im Grunde ist das ein pigmentierter Versiegler, der den Fugenmörtel in einem Schritt neu einfärbt und versiegelt.
- Fugenmörtel gründlich reinigen: Der Fugenmörtel muss absolut sauber und trocken sein, damit der Farbtoner richtig haftet. Befolgen Sie die zuvor beschriebenen Schritte zur gründlichen Reinigung.
- Farbtoner auftragen: Diese Produkte werden meist mit einem Applikator mit Pinselspitze geliefert. Tragen Sie vorsichtig eine dünne, gleichmäßige Schicht direkt auf die Fugenlinie auf.
- Überschuss abwischen: Wischen Sie den Farbtoner sofort wie beim Versiegeln mit einem feuchten Tuch von der Fliesenoberfläche ab. Arbeiten Sie in kleinen, gut handhabbaren Abschnitten, damit der Farbtoner nicht auf den Fliesen antrocknet.
- Trocknen und aushärten lassen: Befolgen Sie die Anweisungen des Produkts zur Trocknungszeit. Die meisten Farbtoner enthalten auch einen Versiegler, sodass dieser eine Schritt Farbe und Schutz wiederherstellen kann.
Eine Kundin hatte dieses Problem kürzlich in ihrer Dusche. Hartes Wasser hatte den schwarzen Fugenmörtel in Bodennähe fast weiß verfärbt. Mit einer einfachen Anwendung eines schwarzen Fugenfarbtoners wirkte die gesamte Dusche wieder wie neu, und die Kosten sowie der Aufwand für eine komplette Neuverfugung entfielen.
Wann neu verfugen
Wenn Ihr Fugenmörtel reißt, bröckelt oder großflächiger Schimmel trotz Reinigung nicht verschwindet, ist es Zeit, über eine Neuverfugung nachzudenken. Dabei wird der alte, beschädigte Fugenmörtel herausgekratzt und neuer Fugenmörtel aufgetragen. Auch wenn das ein aufwendigeres DIY-Projekt ist, ist es notwendig, um die Stabilität Ihrer Fliesenverlegung zu schützen. Wenn Sie Risse sehen, die breiter als eine Kreditkarte sind, ist das ein Zeichen, dass Sie die Situation wahrscheinlich von einem Fachmann beurteilen lassen sollten. Wer einen Neuanfang plant, sollte die Grundlagen kennen. Unser Leitfaden zu wie man perfekt klebt und fließt kann Ihnen helfen, häufige Fehler zu vermeiden und bei Ihrem nächsten Projekt ein makelloses Ergebnis zu erzielen.
Welche Gestaltungsideen gibt es für moderne Räume mit schwarzem Fugenmörtel?

Die Kombination aus weißen Fliesen und schwarzem Fugenmörtel ist unglaublich vielseitig. Je nach Fliesenform und Umgebung kann sie klassisch, industriell oder ultramodern wirken. Sie ist ein starkes Mittel, um jedem Raum visuelle Struktur und einen Hauch Dramatik zu verleihen.
Beispiel 1: Die moderne Landhausküche
Stellen Sie sich einen Küchenrückwand mit klassischen 3x6 weißen U-Bahn-Fliesen vor, die in einem traditionellen versetzten Muster verlegt sind. Der schwarze Fugenmörtel sorgt hier für ein klares, sauberes Raster, das zugleich zeitlos und frisch wirkt. Kombiniert mit dunklen Soapstone-Arbeitsplatten, Messingbeschlägen und offenen Holzregalen entsteht ein warmer, einladender und mühelos stilvoller Look. Der schwarze Fugenmörtel erdet die hellen weißen Fliesen und verhindert, dass der Raum zu steril wirkt. U-Bahn-Fliesen sind äußerst vielseitig, und unterschiedliche Verlegearten können die Ästhetik eines Raumes komplett verändern. Weitere Ideen zur Verwendung dieser klassischen Fliese finden Sie in unserem Leitfaden zu Trendigen U-Bahn-Fliesenmustern – eine unverzichtbare Inspirationsquelle.
Beispiel 2: Das Art-déco-Badezimmer
In einem kleinen Badezimmer können Sie weiße sechseckige Fliesen oder Penny Tiles auf dem Boden mit schwarzem Fugenmörtel verwenden. Die dunklen Fugenlinien betonen die geometrischen Formen und schaffen einen dynamischen, gemusterten Effekt, der den Boden selbst zum Blickfang macht. Das kann einen kleinen Raum interessanter und gestalterischer wirken lassen. An den Wänden hält eine größere weiße Fliese mit schwarzem Fugenmörtel den Raum offen und hell. Dieser starke Kontrast ist ein Markenzeichen des Art-déco-Revival-Stils und wirkt unglaublich elegant. Für kleine Badezimmer, in denen Feuchtigkeit ein Thema ist, sind die richtigen Materialien entscheidend. Unser Leitfaden zur Auswahl der besten Peel-and-Stick-Badezimmerfliesen für Feuchtigkeit bietet erschwingliche und effektive Lösungen, die perfekt zu diesem Stil passen.
Beispiel 3: Der industriell-schicke Eingangsbereich
Für einen Eingangsbereich oder Hauswirtschaftsraum schaffen großformatige weiße Porzellanfliesen (24x24 inches) mit schmalen schwarzen Fugenlinien einen eleganten, minimalistischen Look. Der Effekt liegt weniger im Raster als in einer dezenten Definition. Dieser Stil passt wunderbar zu schwarz umrahmten Metalltüren, Betonakzenten und schlichten, modernen Möbeln. Er setzt vom ersten Moment an ein starkes Design-Statement. Diese Ästhetik lässt sich sogar auf Duschdesigns übertragen. Wer eine umfassende Renovierung plant, findet in unserem Leitfaden zur U-Bahn-Fliesen-Duschrenovierung eine Anleitung, wie Sie Ihrem Badezimmer denselben klaren, modernen Look verleihen.
Für einen umfassenden Blick auf diesen Trend und seine perfekte Umsetzung ist unsere Design-Guide 2025 für weiße Fliesen mit schwarzem Fugenmörtel, der kuratierte Beispiele und Design-Einblicke für die Gestaltung anspruchsvoller, kontrastreicher Räume bietet.
Was sind die besten nachhaltigen und umweltfreundlichen Pflegeoptionen für black grout?
Ein schönes Zuhause zu erhalten muss nicht auf Kosten der Umwelt gehen. Es gibt viele wirksame, umweltfreundliche Möglichkeiten, black grout zu pflegen, die sicher für Ihr Zuhause und den Planeten sind. Dieser Ansatz konzentriert sich darauf, den Chemikalieneinsatz und den Wasserverbrauch zu reduzieren.
Ungiftige Reiniger und Versiegelungen
Viele Hausbesitzer wenden sich von aggressiven Chemikalien ab. Aus unserer Erfahrung sind die Leistungen von umweltzertifizierten Produkten heute mit denen herkömmlicher Produkte auf Augenhöhe.
-
Dampfreinigung: Wie bereits erwähnt, ist dies der ultimative umweltfreundliche Reiniger. Er verwendet nur Wasser und Hitze, erzeugt keinerlei chemische Rückstände und desinfiziert Oberflächen effektiv.
-
Umweltzertifizierte pH-neutrale Reiniger: Achten Sie auf Produkte mit Zertifizierungen wie EPA Safer Choice oder Green Seal. Diese Produkte wurden darauf geprüft, wirksam und frei von schädlichen Chemikalien zu sein. Marken wie Better Life oder Ecover bieten oft hervorragende Optionen.
-
Low-VOC- oder Zero-VOC-Versiegelungen: Wenn es Zeit zum Versiegeln ist, wählen Sie eine wasserbasierte Penetrating Sealer, die als "Low-VOC" oder "Zero-VOC" gekennzeichnet ist. Das reduziert die Luftverschmutzung in Innenräumen und ist in geschlossenen Räumen wie Badezimmern deutlich sicherer zu verarbeiten.
Die Wahl umweltfreundlicher Materialien geht über Reiniger hinaus bis hin zu den Fliesen selbst. Moderne Lösungen bieten Nachhaltigkeit und Leistung zugleich. Für alle, die ein Badezimmer renovieren, kann die Erkundung der besten wasserdichten Peel-and-Stick-Duschfliesen eine großartige Möglichkeit sein, langlebige, wassersparende Optionen zu finden, die zu einem umweltbewussten Ansatz passen.
Wasserverbrauch beim Reinigen reduzieren
Umweltfreundlich zu sein, hat auch mit der Vorgehensweise zu tun. Statt ständig den Wasserhahn laufen zu lassen, verwenden Sie bei der Grundreinigung ein Zwei-Eimer-System: einen Eimer mit Ihrer Reinigungslösung und einen mit sauberem Spülwasser. Diese Methode verbraucht deutlich weniger Wasser und verhindert, dass Sie schmutziges Wasser wieder auf den Fugenmörtel verteilen.
Ein guter Profi-Tipp ist, zum Wischen und Trocknen ein hochwertiges Mikrofasertuch zu verwenden. Diese Tücher sind wesentlich saugfähiger als Papierhandtücher, können hunderte Male gewaschen und wiederverwendet werden und fangen Schmutzpartikel besser ein.
Ihre unverzichtbare Checkliste für die regelmäßige Pflege
Konsequenz ist alles. Damit es leicht fällt, haben wir alle Expertentipps in einer einfachen Checkliste zusammengefasst. Nutzen Sie diese Tabelle als Leitfaden, damit Ihr black grout das ganze Jahr über optimal aussieht.
Interaktive Pflege-Checkliste
Wählen Sie die Aufgaben aus, die Sie in Ihren personalisierten Pflegeplan aufnehmen möchten, und laden Sie ihn als Textdatei herunter.
| Häufigkeit | Aufgabe | Werkzeuge & Produkte | Profi-Tipp |
|---|---|---|---|
| Täglich | Duschwände und -türen abziehen | Ein hochwertiger Abzieher | Dauert 30 Sekunden. Das ist die wirksamste Gewohnheit, um Seifenrückstände zu vermeiden. |
| Wöchentlich | Schnell abwischen | pH-neutrales Reinigungsmittel, Mikrofasertuch | Fugen in stark genutzten Bereichen (Duschen, Spritzschutze) einsprühen und abwischen. So wird aus wöchentlichem Schmutz kein tief sitzender Fleck. |
| Monatlich | Kontrollieren & gründlich reinigen | Fugenbürste mit weichen Borsten, pH-neutrales Reinigungsmittel | Eine gründliche Komplettreinigung durchführen. Auf erste Anzeichen von Rissen oder Schimmel achten, damit Probleme behoben werden, bevor sie schlimmer werden. |
| Jährlich | Gründlich reinigen & neu versiegeln | Hochwertiger eindringender Versiegler, Auftragspinsel | Testen Sie die Versiegelung Ihrer Fugen. Wenn Wasser eindringt, ist es Zeit für eine gründliche Reinigung und eine neue Schicht Versiegler, um den Schutz wiederherzustellen. |
| Bei Bedarf | Flecken punktuell behandeln | Fugenfarbauffrischer, weiches Tuch | Bei hartnäckigen Flecken oder verblassten Stellen verwenden Sie einen Fugenfarbauffrischer, um die tiefe schwarze Farbe wiederherzustellen und den Bereich gleichzeitig zu versiegeln. |
Wenn Sie diesen Plan befolgen, wird die Pflege Ihrer Fugen von einer reaktiven lästigen Pflicht zu einer proaktiven, gut handhabbaren Routine.
Abschließende Gedanken
Den markanten, kontrastreichen Look von weißen Fliesen und schwarzer Fuge zu erhalten, ist durchaus machbar. Es geht nicht um endloses Schrubben oder aggressive Chemikalien. Es geht um einen klugen, konsequenten Ansatz, der auf drei Grundprinzipien beruht: schonende Reinigung, sorgfältiges Versiegeln und vorbeugende tägliche Gewohnheiten.
Mit pH-neutralen Reinigern, einer jährlichen Versiegelung mit einem hochwertigen eindringenden Versiegler und einfachen Routinen wie der Nutzung eines Abziehers schützen Sie Ihre Investition und sorgen dafür, dass Ihre Fugen ein markantes Gestaltungselement bleiben statt einer Pflegebaustelle. Mit dem richtigen Wissen und den passenden Werkzeugen behalten Sie den modernen, gepflegten Look über Jahre hinweg.
Bereit, diesen Plan umzusetzen? Abonnieren Sie unseren Newsletter für weitere Expertentipps zur DIY-Hauspflege direkt in Ihrem Posteingang.
Häufig gestellte Fragen
Kann ich Bleichmittel verwenden, um meine schwarze Fuge zu reinigen?
Nein, Sie sollten niemals Bleichmittel oder irgendeinen chlorhaltigen Reiniger auf schwarzer oder farbiger Fuge verwenden. Bleichmittel ist ein starkes Oxidationsmittel, das das Pigment aus Ihrer Fuge chemisch herauslöst und sie verblasst, fleckig und dauerhaft beschädigt erscheinen lässt. Verwenden Sie immer pH-neutrale Reinigungsmittel, die speziell für farbige Fugen entwickelt wurden.
Wie bald kann ich meine Fliesen nach dem Einbau neuer schwarzer Fuge reinigen?
Sie sollten warten, bis die Fuge vollständig ausgehärtet ist, bevor Sie eine gründliche Reinigung durchführen. Die meisten zementbasierten Fugen benötigen mindestens 72 Stunden, um vollständig auszuhärten. Danach ist eine leichte Reinigung unbedenklich. Warten Sie mit dem Auftragen eines Versieglers mindestens 7–10 Tage, damit die gesamte Feuchtigkeit aus der Fuge verdunsten kann.
Warum sieht meine schwarze Fuge kreidig und weiß aus?
Der kreidig-weiße Rückstand ist wahrscheinlich Ausblühung. Dabei werden Mineralsalze im zementbasierten Fugenmörtel durch Wasser an die Oberfläche transportiert und bleiben zurück, wenn das Wasser verdunstet. Das kommt häufiger bei neuen Installationen oder in Bereichen mit anhaltender Feuchtigkeit vor. Oft lässt es sich mit einer harten, trockenen Bürste oder einem Reiniger zum Entfernen von Ausblühungen beseitigen.
Meine schwarze Fuge ist in einer Dusche mit Peel-and-Stick-Fliesen. Ist die Pflege anders?
Ja, die Pflege ist etwas anders, und Sie sollten in erster Linie auf die Bedürfnisse der Fliesen achten. Zwar bleiben die Grundprinzipien der Fugenpflege gleich, aber Sie müssen bei Wasser und Hitze besonders vorsichtig sein. Vermeiden Sie Dampfreiniger, da die hohe Hitze den Kleber der Fliesen beeinträchtigen kann. Da solche Installationen besondere Aufmerksamkeit erfordern, damit Feuchtigkeit den Kleber nicht beeinflusst, ist unser umfassender Leitfaden zur Pflege von Peel-and-Stick-Fliesen die beste Quelle für detaillierte Anweisungen.

Kommentar hinterlassen
Diese Website ist durch hCaptcha geschützt und es gelten die allgemeinen Geschäftsbedingungen und Datenschutzbestimmungen von hCaptcha.