


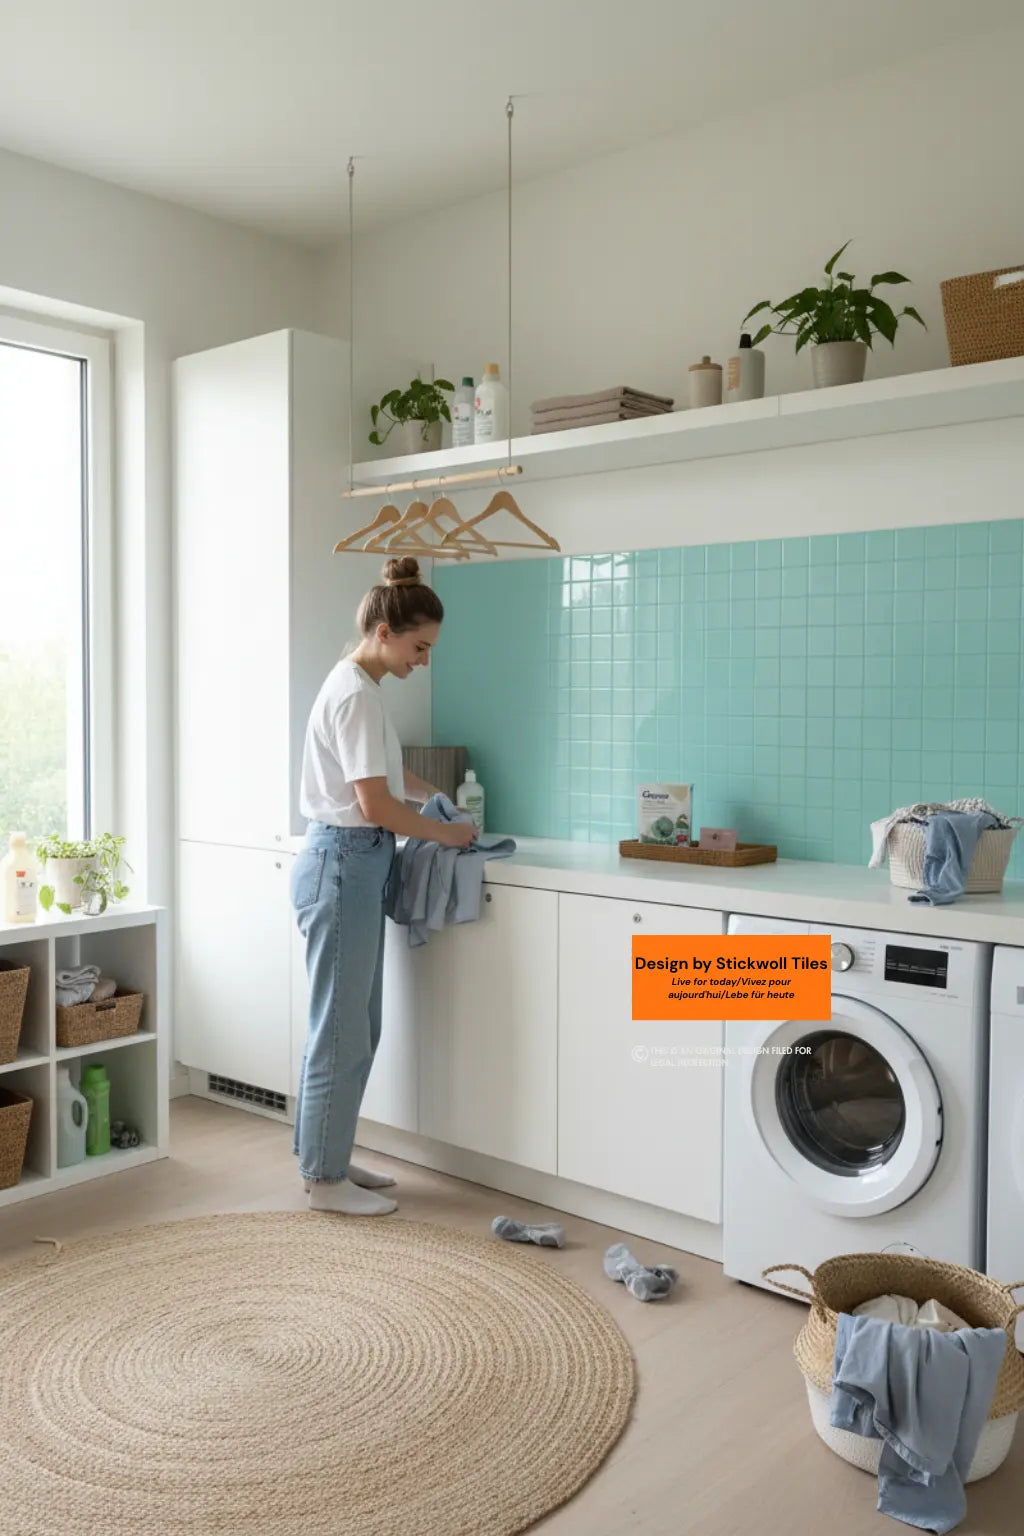
Dieser alte, fleckige oder einfach wenig inspirierende Boden im Waschraum muss keine dauerhafte Quelle von Frust sein. Viele von uns blicken auf diesen kleinen, funktionalen Raum und fühlen sich festgefahren, weil wir annehmen, eine Renovierung sei teuer, aufwendig und kompliziert – besonders wegen der Feuchtigkeit von der Waschmaschine und der Einschränkungen durch einen Mietvertrag.
Aber was wäre, wenn Sie Ihren Boden im Waschraum an nur einem Wochenende komplett verwandeln könnten – für weniger als den Preis eines schicken Abendessens? Genau das verspricht eine Umgestaltung des DIY laundry room floor mit modernen peel and stick tiles. Sie sind eine erschwingliche, stilvolle und bemerkenswert langlebige Lösung.
Dieser Ratgeber soll Ihnen das nötige Selbstvertrauen zum Erfolg geben. Wir führen Sie durch jeden Schritt, von der Auswahl der richtigen Materialien bis hin zur speziellen Abdichtung für den Waschraum. Außerdem lernen Sie mietfreundliche Entferntechniken und erfahren, wie Sie häufige Fehler beheben können.
Bevor Sie auch nur eine Fliese kaufen, beginnt die wichtigste Arbeit mit der Fläche, die Sie bereits haben. Stellen wir sicher, dass Ihr Untergrund perfekt für ein makelloses Ergebnis ist.

Warum peel and stick tiles für Ihren Waschraum wählen?
Die Frage: „Ist ein DIY-Bodenprojekt für einen schwierigen Raum wie den Waschraum wirklich eine gute Idee für mich? Ich mache mir Sorgen wegen Kosten, Aufwand und Dreck.“
Das Versprechen: In diesem Abschnitt zeigen wir Ihnen, warum peel and stick tiles die perfekte, risikoarme Lösung sind und dass sie erschwinglich, einfach zu verlegen und ideal für die Bedingungen im Waschraum sind.
Peel and stick vinyl tiles haben die Welt der Heimwerker aus gutem Grund aufgemischt. Sie lösen die drei größten Hürden für die meisten Menschen: Budget, Können und Zeit. Für einen funktionalen Raum wie einen Waschraum sind ihre Vorteile noch deutlicher und machen sie zu einer besseren Wahl als traditionellere, kostspieligere Materialien.
Eine unschlagbare Kombination aus Preiswertigkeit und Stil
Der Hauptvorteil sind die niedrigen Kosten. Eine komplette Renovierung des Waschraumbodens lässt sich oft für unter 150 $ umsetzen. Laut Kostenanalysen für Heimwerkerprojekte ist das nur ein Bruchteil des Preises von Keramikfliesen oder der Verlegung von Luxury Vinyl Plank (LVP), die für einen kleinen Raum inklusive Arbeitskosten leicht über 1000 $ kosten können.
Diese Erschwinglichkeit gibt Hausbesitzern wie Mietern gleichermaßen Handlungsspielraum. Denken Sie an Sarah, eine Mieterin in Austin, die ihr vercracktes Linoleum im Waschschrank satt hatte. Mit einem stilvollen gemusterten peel and stick tile verwandelte sie den 40 Quadratfuß großen Raum für nur 120 $ und ein paar Stunden an einem Samstag. Das Beste daran? Sie weiß, dass sie ihn entfernen kann, ohne ihre Kaution zu verlieren.
Die einfachste DIY-freundliche Verlegung
Wenn Sie ein Maßband und ein Teppichmesser benutzen können, können Sie auch einen peel and stick Boden verlegen. Es sind weder klebriger Dünnbettmörtel noch Fugenmasse oder Spezialwerkzeuge wie eine Nasssäge nötig. Der Ablauf ist sauber und unkompliziert: Sie ziehen einfach das Trägerpapier ab und drücken die Fliese fest auf einen vorbereiteten Untergrund.
Diese Einfachheit macht es überflüssig, teure Profis zu beauftragen. So wird aus einem Wochenendprojekt Realität und nicht ein monatelanges Großvorhaben. Ein verbreiteter Irrglaube ist, dass „einfach“ gleich „minderwertig“ bedeutet, doch moderne Vinylfliesen sind auf Langlebigkeit und eine hochwertige Optik ausgelegt. Tatsächlich hat genau dieser unkomplizierte Verlegeprozess sie auch für andere Bereiche des Hauses unglaublich beliebt gemacht. Um zu sehen, wie peel and stick tiles Ihre Küche mit minimalem Aufwand komplett neu gestalten können, entdecken Sie fünf bemerkenswerte Küchen-Umgestaltungen mit diesen Fliesen und holen Sie sich Inspiration für Ihr nächstes Projekt.
Überlegene Haltbarkeit für Bereiche mit hoher Feuchtigkeit
Waschräume sind besonders. Sie sind Feuchtigkeit, Spritzwasser und gelegentlichen Überläufen ausgesetzt. Deshalb ist die Wahl des richtigen Materials entscheidend. Viele moderne peel and stick tiles for laundry room floors sind vollständig wasserdicht, nicht nur wasserabweisend. Das bedeutet, dass sie bei Kontakt mit Wasser nicht aufquellen, sich nicht verziehen und sich nicht ablösen – vorausgesetzt, der Unterboden wurde korrekt vorbereitet.
Dieser integrierte Schutz gibt Ihnen die Sicherheit, die andere preiswerte Bodenbeläge wie bestimmte Laminatböden einfach nicht bieten können. Achten Sie bei der Auswahl auf Produkte, die ausdrücklich als "100% waterproof" gekennzeichnet sind, damit Ihre DIY laundry room peel and stick floor transformation jahrelang hält.
Die besten peel and stick tiles für Waschküchenböden auswählen
Die Frage: „Bei so vielen Optionen – woher weiß ich, welche Fliesen in meinem Waschraum wirklich lange halten und gut aussehen?“
Das Versprechen: Hier erklären wir die drei wichtigsten Faktoren – Haltbarkeit, Stil und Qualität –, damit Sie mit gutem Gefühl die perfekten Fliesen für Ihr Projekt auswählen können.
Nicht alle peel and stick tiles sind gleich. Für eine anspruchsvolle Umgebung wie einen Waschraum verhindert die richtige Wahl von Anfang an spätere Probleme. Der Fokus sollte auf der Leistung bei Feuchtigkeit, der optischen Wirkung in einem oft kleinen Raum und der allgemeinen Produktqualität liegen.
Wichtiges Merkmal: Haltbarkeit und eine dicke Nutzschicht
Das Geheimnis einer langlebigen Vinylfliese ist ihre „Nutzschicht“. Das ist eine transparente Schutzschicht ganz oben auf der Fliese, die vor Kratzern, Abnutzungsspuren und Flecken schützt. Für einen stark frequentierten Bereich, in dem Geräte bewegt werden, ist eine dickere Nutzschicht unverzichtbar.
Wasserdichtigkeit: Der wichtigste Faktor
Stelle immer sicher, dass die Fliesen 100% wasserdicht
sind. Das ist besonders wichtig in Waschküchen, wo verschüttetes Wasser oder Lecks von der Waschmaschine durchaus vorkommen können. Wasserdichte Fliesen bestehen aus Materialien wie Vollvinyl, die kein Wasser aufnehmen. So wird verhindert, dass sich die Fliese verschlechtert, und der Unterboden darunter bleibt geschützt.Ein häufiger Fehler ist die Annahme, dass alle „Vinyl“-Fliesen wasserdicht sind. Günstigere Verbundfliesen können einen Kern haben, der sich bei längerer Wassereinwirkung ausdehnt. Lies die Produktspezifikationen vor dem Kauf sorgfältig. Wenn du dazu eine umfassende Anleitung suchst, ist unser Artikel über die Top wasserdichte peel and stick tiles für Duschen 2025 die beste Anlaufstelle, um die Leistung in feuchten Umgebungen zu verstehen.
Designoptionen, die deinen Raum aufwerten
Deine Waschküche muss nicht langweilig sein. Peel and stick tiles bieten eine unglaubliche Auswahl an Designs, die zu jedem Einrichtungsstil passen.
- Holzoptik-Fliesen: Bringen Wärme und ein natürliches Gefühl in den Raum, ohne das Risiko, dass echtes Holz sich verzieht.
- Steinoptik-Fliesen: Erziele einen edlen Look wie Marmor, Schiefer oder Travertin – zu einem Bruchteil der Kosten und des Pflegeaufwands.
- Gemusterte Fliesen: Geometrische oder im Encaustic-Stil gehaltene Muster können eine kleine Waschküche größer und dynamischer wirken lassen. Das ist eine perfekte Idee für ein Waschküchen-Boden-Makeover mit Vinylfliesen, um Persönlichkeit hinzuzufügen.
Welches Fliesendesign würdest du für deine Waschküche wählen?
Wo du mit der Suche nach den besten Fliesen beginnen solltest
Sich in Marken und Optionen zurechtzufinden, kann überwältigend sein. Damit es einfach wird, haben wir die Vorarbeit bereits für dich erledigt.
Empfehlungsanker: Für eine vollständige Übersicht der bestbewerteten Optionen, sortiert nach Budget, Stil und Haltbarkeit, ist unser ausführlicher Leitfaden die beste Ressource. Er bietet direkte Vergleiche, damit du die perfekte Wahl für dein Projekt findest.
Den Leitfaden 2025 ansehen: Die besten peel and stick tiles für WaschküchenDer ultimative Leitfaden: So installierst du peel and stick tiles in einer Waschküche
Die Frage: „Ich bin bereit loszulegen, habe aber panische Angst, etwas falsch zu machen. Wo fange ich überhaupt an?“
Das Versprechen: Dieser Abschnitt ist Ihre komplette Schritt-für-Schritt-Route. Folgen Sie diesen Anweisungen genau, um eine professionell wirkende, langlebige und wasserdichte Verlegung zu erzielen, auf die Sie stolz sein können.
Hier wird Ihre Vision Wirklichkeit. Wir haben den Prozess in klare, gut machbare Schritte unterteilt. Nehmen Sie sich Zeit – sorgfältige Vorbereitung und geduldiges Arbeiten sind der Schlüssel zu einem makellosen Ergebnis. Der gesamte Verlegeprozess ist überraschend einfach, und für allgemeinere Tipps bietet unser Ratgeber zu wie man peel and stick tiles 2025 verwendet eine großartige Grundlagenhilfe und kreative Ideen für jeden Raum.
Schritt 1: Werkzeuge und Materialien zusammensuchen
Die Frage: „Was brauche ich eigentlich alles, bevor ich mit dem Verlegen beginne?“
Das Versprechen: Diese einfache Checkliste stellt sicher, dass Sie alles haben, was Sie für einen reibungslosen Verlegetag ohne Unterbrechungen benötigen.
Wenn Sie vor dem Start alles bereit haben, vermeiden Sie frustrierende Verzögerungen. So wird das Projekt zu einem effizienten und angenehmen Prozess.
- Messen & Markieren: Maßband, Bleistift, Kreidelinie und ein großes Zimmermannswinkelmaß oder T-Winkel.
- Schneiden: Ein scharfes Cuttermesser mit Ersatzklingen. Ein Metalllineal oder eine gerade Kante als Führung für Ihre Schnitte.
- Verlegung: Eine J-Walze oder eine einfache Nudelholzrolle aus der Küche. Das ist entscheidend, um eine starke Haftung zu gewährleisten.
- Sicherheit: Knieschoner und Schutzhandschuhe.
- Ihre Fliesen: Lassen Sie sie vor der Verlegung mindestens 48 Stunden im Laundry Room akklimatisieren. So können sie sich an Temperatur und Luftfeuchtigkeit im Raum anpassen und spätere Probleme durch Ausdehnung oder Schrumpfung nach dem Verlegen vermeiden.
Schritt 2: Bereiten Sie Ihren Laundry Room-Boden wie ein Profi vor
Die Frage: „Mein Boden ist alt und etwas uneben. Kann ich ihn nicht einfach überdecken?“
Das Versprechen: Nein, das können Sie nicht. In diesem entscheidenden Abschnitt erfahren Sie, wie Sie die perfekte Grundlage schaffen und damit die häufigste Ursache für das Versagen von Fliesen beheben: eine unzureichende Untergrundvorbereitung.
Dies ist der wichtigste Teil des gesamten Projekts. Der Kleber von peel and stick tiles benötigt eine saubere, ebene und nicht poröse Oberfläche, um dauerhaft zu haften. Diese Vorbereitungsschritte zu überspringen ist der größte Fehler, den Sie machen können.
Die Oberfläche gründlich reinigen
Der Boden muss vollständig frei von Schmutz, Staub, Fett und Seifenresten sein.
- Fegen und saugen: Entfernen Sie alle losen Verschmutzungen. Achten Sie besonders auf Ecken und Kanten.
- Den Boden scheuern: Verwenden Sie einen starken Fettlöser (z. B. TSP-Ersatz), gemischt mit warmem Wasser. Schrubben Sie gründlich, um Schmutz und Rückstände von Waschmitteln und Weichspülern zu lösen.
- Abspülen und trocknen: Spülen Sie den Boden mit sauberem Wasser ab, um alle Reinigungsmittelreste zu entfernen. Lassen Sie den Boden mindestens 24 Stunden vollständig trocknen. Eingeschlossene Feuchtigkeit beeinträchtigt die Haftung.
Den Boden reparieren und nivellieren
Peel-and-stick Fliesen sind flexibel und zeigen alle Unebenheiten im Untergrund deutlich. Beulen, Risse oder tiefe Fugen zeichnen sich mit der Zeit ab.
- Für Betonböden: Füllen Sie alle Risse oder Löcher mit einer zementbasierten Spachtelmasse. Schleifen Sie sie nach dem Trocknen glatt.
- Für vorhandenes Vinyl oder Linoleum: Wenn der alte Boden stark strukturiert ist oder tiefe Kerben hat, können Sie nicht direkt darauf fliesen. Eine dünne Schicht Ausgleichsmasse für Böden sorgt für eine perfekt glatte Oberfläche.
- Für Sperrholzuntergründe: Stellen Sie sicher, dass keine losen Bretter vorhanden sind. Schleifen Sie alle erhabenen Stellen ab und füllen Sie eventuelle Lücken mit Holzspachtelmasse.
Ein häufiger Irrtum ist, dass man direkt auf Keramikfliesen fliesen kann. Das ist möglich, aber nur, wenn Sie zuerst die Fugen mit Ausgleichsmasse füllen, um eine einzige, ebene Fläche zu schaffen. Diese Technik ist für viele Renovierungen unerlässlich, und unser ausführlicher Leitfaden zu wie Sie Ihr Badezimmer mit Peel-and-Stick-Fliesen verwandeln behandelt genau dieses Szenario und zeigt beeindruckende Vorher-Nachher-Ergebnisse.
Eine Grundierung auftragen
Dieser Schritt ist in einer laundry room nicht verhandelbar. Eine Grundierung erfüllt zwei wichtige Aufgaben: Sie versiegelt den Untergrund, damit Feuchtigkeit den Kleber nicht beeinträchtigt, und sorgt für eine deutlich stärkere, dauerhaft haltbare Verbindung.

Schritt 3: Layout planen und die Mitte finden
Die Frage: „Wie stelle ich sicher, dass meine Fliesen am Ende gerade und nicht schief sind?“
Das Versprechen: Diese einfache Layout-Technik garantiert ein professionelles, symmetrisches Muster und verhindert, dass Sie am Ende winzige, unpraktische Fliesenstreifen an der Wand haben.
Vom Mittelpunkt des Raums nach außen zu arbeiten ist der professionelle Standard.
- Den Mittelpunkt zweier Wände finden: Messen Sie die Länge von zwei senkrecht aufeinander stehenden Wänden und markieren Sie jeweils die Mitte.
- Kreidelines ziehen: Verwenden Sie eine Schlagschnur, um zwei Linien auf dem Boden zu markieren: eine verbindet die Markierungen an den gegenüberliegenden Wänden, die andere die der anderen Wandseite. Diese Linien sollten sich exakt in der Raummitte kreuzen und ein großes Pluszeichen bilden.
- Erste Fliesen trocken auslegen: Legen Sie entlang jeder Linie vom Mittelpunkt zu den Wänden hin eine Reihe Fliesen aus, ohne die Schutzfolie abzuziehen. So sehen Sie, wie die Fliesen am Ende liegen werden. Wenn Sie an der Wand mit einem sehr schmalen Stück enden (weniger als eine halbe Fliesenbreite), passen Sie Ihre Startlinie an, indem Sie sie um eine halbe Fliesenbreite verschieben.
Schritt 4: Fliesen verlegen und zuschneiden
Die Frage: „Was ist die beste Technik, um die Fliesen tatsächlich aufzukleben und zuzuschneiden?“
Das Versprechen: Wir zeigen Ihnen die einfache „platzieren, nicht schieben“-Methode und eine narrensichere Art, perfekte Schnitte um Hindernisse herum zu machen.
Jetzt kommt der befriedigende Teil. Arbeiten Sie jeweils nur in einem Quadranten Ihres Kreidelinienrasters.
- Abziehen und platzieren: Ziehen Sie die Trägerfolie von Ihrer ersten Fliese ab. Richten Sie ihre Kanten sorgfältig an den Kreidelinien an der zentralen Kreuzung aus. Legen Sie sie an ihren Platz. Nicht schieben. Drücken Sie sie mit den Händen fest an.
- Nach außen arbeiten: Legen Sie die nächste Fliese eng an die Kante der ersten. Ziel sind dichte Fugen ohne Lücken. Fahren Sie mit diesem Vorgehen fort und arbeiten Sie sich vom Mittelpunkt nach außen.
- Gerade Kanten zuschneiden: Wenn Sie eine Wand erreichen, legen Sie eine ganze Fliese direkt auf die zuletzt verlegte ganze Fliese. Nehmen Sie dann eine weitere ganze Fliese und legen Sie sie darauf, bündig an die Wand geschoben. Verwenden Sie die Kante dieser oberen Fliese als Führung, um auf der darunterliegenden Fliese eine Schnittlinie zu markieren. Ritzen Sie entlang der Linie mit dem Cuttermesser und brechen Sie die Fliese ab. Sie passt dann perfekt.
- Um Hindernisse herum schneiden: Für Dinge wie Rohre oder Trocknerlüftungen machen Sie sich eine Schablone aus Papier. Schneiden Sie das Papier so zu, bis es perfekt um das Objekt passt, übertragen Sie dann die Schablone auf Ihre Fliese und schneiden Sie sie aus.

Schritt 5: Fliesen sichern und die Kanten versiegeln
Die Frage: „Die Fliesen liegen. Bin ich fertig?“
Das Versprechen: Noch nicht. Dieser letzte Schritt aktiviert den Kleber für eine dauerhafte Verbindung und sorgt für eine zusätzliche, wichtige wasserfeste Schutzschicht.
Ihr Boden sieht großartig aus, aber genau diese letzten beiden Schritte sorgen dafür, dass er lange hält.
- Bodenrolle: Verwenden Sie einen J-Roller oder ein Nudelholz und fahren Sie über den gesamten Boden, wobei Sie besonders auf die Fugen und Kanten achten. Dieser Druck aktiviert den druckempfindlichen Klebstoff und drückt eingeschlossene Luftblasen heraus, wodurch eine maximale Haftung gewährleistet wird.
- Den Rand wasserdicht abdichten: Für den ultimativen feuchtigkeitsbeständigen Waschküchenboden tragen Sie einen dünnen Strang 100% Silikon-Küchen- und Bad-Dichtmasse rund um den gesamten Raumumfang dort auf, wo die Fliesen auf die Wand treffen. Dadurch entsteht eine wasserdichte Abdichtung, die verhindert, dass Wasser an den Rändern unter die Fliesen sickert.
Geschafft! Treten Sie einen Schritt zurück und bewundern Sie Ihren brandneuen DIY-Waschküchenboden. Für eine anschaulichere Schritt-für-Schritt-Anleitung zu einem ähnlichen Vorgehen bietet unser Einfache DIY-Anleitung: Peel-and-Stick-Badfliesen verlegen tolle Bilder, die perfekt für Anfänger sind.
Fehlerbehebung bei häufigen Problemen mit Peel-and-Stick-Fliesen
Die Frage: „Was, wenn etwas schiefgeht? Was, wenn sich meine Fliesen anheben oder ich eine Blase sehe?“
Das Versprechen: Keine Panik. Dieser Abschnitt bietet schnelle, einfache Lösungen für die häufigsten Probleme bei der Verlegung und gibt Ihnen das Vertrauen, jedes auftretende Problem zu lösen.
Auch bei sorgfältiger Arbeit können kleinere Probleme auftreten. Die gute Nachricht: Sie lassen sich fast immer beheben. Hier ist eine kurze Anleitung zur Fehlerbehebung.
| Problem | Häufige Ursache(n) | Die Lösung |
|---|---|---|
| Eine Kante oder Ecke der Fliese hebt sich an. | Der Unterboden war an dieser Stelle nicht ganz sauber; mit der Rolle wurde nicht genug Druck ausgeübt. | Erwärmen Sie den Bereich vorsichtig 30–45 Sekunden lang mit einem Föhn. Tragen Sie eine kleine Menge Vinylfliesen-Fugenkleber (erhältlich im Baumarkt) auf, drücken Sie die Ecke fest nach unten und beschweren Sie sie für einige Stunden mit einem schweren Gegenstand. |
| Eine Blase erscheint in der Mitte einer Fliese. | Eingeschlossene Luft während der Installation. | Nimm eine Nadel oder die Spitze deines Cuttermessers und stich ein winziges Loch in die Mitte der Blase. Drücke die Luft in Richtung des Lochs heraus. Das Vinyl legt sich dann wieder flach an. |
| Die Fliesen sind leicht versetzt oder haben Lücken. | Zu schnell gearbeitet; die Fliese wurde während der Installation gedehnt. | Bei einer kleinen Lücke kannst du sie mit einem farblich passenden Fugenstift oder Dichtstoff füllen. Ist die Fehlausrichtung stark, erwärme die Fliese vorsichtig mit einem Föhn, bis du sie langsam abziehen kannst. Richte sie neu aus und drücke sie wieder an ihren Platz. |
| Es scheint, als würde Wasser zwischen die Fliesen gelangen. | Die Nähte wurden nicht dicht aneinander gestoßen; es wurde keine Randabdichtung verwendet. | Trocknen Sie den Bereich vollständig ab. Verwenden Sie einen Vinyl-Fliesenfugenversiegler und tragen Sie ihn sorgfältig in die Fugen zwischen den betroffenen Fliesen auf. Dadurch entsteht eine wasserdichte Verbindung. Dichten Sie den gesamten Randbereich immer mit Dichtstoff ab. |
Mietfreundliches Entfernen und langfristige Pflege
Die Frage: „Wie bekomme ich sie wieder ab, ohne den Boden darunter zu beschädigen, wenn ich ausziehe? Und wie halte ich sie schön?“
Das Versprechen: Dieser Abschnitt zeigt die einfache, schadensfreie Entfernungsmethode und gibt praktische Reinigungstipps, damit Ihr Boden jahrelang schön bleibt.
Einer der größten Vorteile von mietfreundlichem Bodenbelag ist, dass er von vornherein temporär angelegt ist. Wenn es Zeit zum Umzug ist oder Sie einfach einen neuen Look möchten, ist das Entfernen unkompliziert, wenn Sie die Oberfläche mit einer guten Grundierung richtig vorbereitet haben.
Schadensfreie Entfernungsmethode
Der Schlüssel liegt darin, den Klebstoff zu erweichen, statt die Fliesen mit Gewalt hochzuhebeln.
- Sanfte Wärme anwenden: Verwenden Sie einen normalen Föhn auf mittlerer oder hoher Hitzestufe. Halten Sie ihn etwa 4-6 inches von der Fliese entfernt und erwärmen Sie jeweils eine Fliese, indem Sie den Föhn etwa 60 bis 90 Sekunden lang hin und her bewegen.
- Vorsichtig anheben: Beginnen Sie an einer Ecke und schieben Sie einen flexiblen Kunststoffspachtel (keinen aus Metall) unter die Kante. Die Fliese sollte sich mit minimalem Widerstand ablösen lassen. Wenn sie fest sitzt, wenden Sie mehr Wärme an.
- Rückstände entfernen: Nachdem alle Fliesen entfernt wurden, können klebrige Rückstände zurückbleiben. Diese lassen sich leicht mit einem citrusbasierten Klebstoffentferner (wie Goo Gone) und einem weichen Tuch entfernen.
„Ich war so nervös, die Fliesen vor dem Ende meines Mietvertrags zu entfernen“, sagte Jessica, eine ehemalige Mieterin. „Aber mit einem Föhn und einem Kunststoffschaber ließen sie sich in unter einer Stunde sauber entfernen. Mein Vermieter war beeindruckt, und ich habe meine volle Kaution zurückbekommen!“
Reinigung und Pflege
Die Pflege Ihres neuen Bodens ist einfach. Regelmäßiges Fegen oder Staubsaugen entfernt alltäglichen Staub und Schmutz. Zum Reinigen verwenden Sie einen pH-neutralen Vinylbodenreiniger und einen feuchten Mopp. Vermeiden Sie Scheuerschwämme, aggressive Chemikalien wie Ammoniak oder Polituren auf Wachsbasis, da diese die Oberfläche stumpf machen oder die Nutzschicht beschädigen können.
Mit fachgerechter Verlegung und Pflege kann ein hochwertiger peel and stick tile floor in a laundry room problemlos 5 bis 10 Jahre oder sogar länger halten und ist damit eines der besten Heimwerkerprojekte in puncto Preis-Leistungs-Verhältnis. Die hier erlernten Fähigkeiten lassen sich auch auf andere Bereiche übertragen, zum Beispiel auf einen stilvollen und leicht zu reinigenden Spritzschutz. Einen ausführlichen Überblick bietet unser Leitfaden zu wie man peel and stick tiles für einen Spritzschutz installiert, inklusive der Top-Designs für 2025.
Ihre Verwandlung des Hauswirtschaftsraums wartet
Sie verfügen nun über das Fachwissen, um Ihren Hauswirtschaftsraum von einem übersehenen Raum in einen stilvollen und funktionalen Teil Ihres Zuhauses zu verwandeln. Wenn Sie sich für strapazierfähige, wasserdichte Fliesen entscheiden und die sorgfältige Untergrundvorbereitung ernst nehmen, können Sie einen Boden in Profiqualität erzielen, der bezahlbar, schön und langlebig ist.
Sie haben gelernt, dass das Geheimnis nicht nur in den Fliesen selbst liegt, sondern in den sorgfältigen Schritten, die Sie unternehmen, bevor die erste überhaupt verlegt wird. Sie sind nun in der Lage, jede Herausforderung zu meistern und ein Ergebnis zu schaffen, auf das Sie jedes Mal stolz sein können, wenn Sie eine Ladung Wäsche erledigen.

Bereit, den nächsten Schritt mit Zuversicht zu gehen?
- Stöbern Sie in unserer kuratierten Liste der besten Peel and Stick Tiles für Hauswirtschaftsraum-Böden im Jahr 2025, um Ihren perfekten Stil zu finden.
- Für noch mehr kreative Ideen sehen Sie sich wie man peel and stick tiling solutions verwendet – nicht nur auf dem Boden – an.
- Abonnieren Sie unseren Newsletter für weitere von Experten geführte DIY-Projekte und Raumverwandlungen direkt in Ihrem Posteingang.
Häufig gestellte Fragen (FAQ)
1. Wie lange halten peel and stick tiles in einem stark feuchtigkeitsbelasteten Hauswirtschaftsraum wirklich?
Mit hochwertigen wasserdichten Fliesen, einer sorgfältigen Vorbereitung des Unterbodens (einschließlich einer Grundierung) und abgedichteten Randbereichen können Sie mit einer Lebensdauer von 5 bis 10 Jahren rechnen. Die Haltbarkeit hängt fast vollständig von der Qualität der Verlegung ab.
2. Kann ich peel and stick tiles direkt über meinem bestehenden Hauswirtschaftsraumboden verlegen?
Das hängt davon ab. Sie können sie auf sauberen, ebenen, nicht porösen Oberflächen wie vorhandenem, gut erhaltenem Vinylboden oder Linoleum verlegen. Auf gerissenem Beton, Spanplatten oder stark strukturierten Oberflächen ist eine direkte Verlegung nicht möglich, ohne diese vorher vorzubereiten. Bei Keramikfliesen müssen Sie zunächst die Fugen mit einer Ausgleichsmasse füllen, um eine glatte, ebene Oberfläche zu schaffen.
3. Sind alle peel and stick Hauswirtschaftsraumböden wirklich wasserdicht?
Nein. Sie müssen Fliesen wählen, die ausdrücklich als "100% wasserdicht" gekennzeichnet sind und typischerweise aus massivem Vinyl (SPC oder WPC) bestehen. "Wasserresistente" Fliesen halten stehendem Wasser oder Lecks von einer Waschmaschine möglicherweise nicht stand. Prüfen Sie immer die Produktspezifikationen. Einen fachkundigen Blick auf die Leistung von Fliesen in feuchten Bereichen bietet unser Leitfaden zur Auswahl der besten Selbstklebende Badezimmerfliese zur Feuchtigkeitskontrolle, der dieses Thema noch genauer beleuchtet.
4. Was ist der größte Fehler, den man beim Verlegen eines DIY-Hauswirtschaftsraumbodens vermeiden sollte?
Der größte und häufigste Fehler ist, die Bodenvorbereitung zu überspringen oder zu überstürzen. Ein Boden, der nicht absolut sauber, eben und grundiert ist, führt dazu, dass sich die Fliesen ablösen, an den Ecken hochstehen und jede Unebenheit darunter sichtbar wird. Die Vorarbeit macht 90% des Projekts aus.
Kommentar hinterlassen
Diese Website ist durch hCaptcha geschützt und es gelten die allgemeinen Geschäftsbedingungen und Datenschutzbestimmungen von hCaptcha.