


Sie möchten Ihre Küche oder Ihr Bad modernisieren, aber der Gedanke an Abrissarbeiten, Fugenmörtel und die Beauftragung eines Handwerkers ist überwältigend – und für eine Mietwohnung kommt das überhaupt nicht infrage. Der veraltete Look bleibt bestehen und Sie haben das Gefühl, den Raum nicht nach Ihren Vorstellungen gestalten zu können.
Hier kommt der Zauber eines selbstklebenden Küchenrückwands ins Spiel. Für 2025 ist er die clevere, stilvolle und stressfreie Lösung für alle, die eine große Wirkung mit minimaler Bindung erzielen möchten. Das sind nicht mehr die dünnen Klebefolien von früher: Moderne Varianten sind langlebig, sehen hochwertig aus und wirken erstaunlich echt.
Dieser Ratgeber ist Ihr umfassender Wegweiser. Wir zeigen Ihnen alles – von den neuesten modernen Designs für selbstklebende Küchenrückwände und den Grundlagen der Anbringung bis hin zu Fragen der Haltbarkeit und der rückstandslosen Entfernung. Freuen Sie sich darauf, Ihren Raum an nur einem Nachmittag zu verwandeln.
Was ist eine selbstklebende Küchenrückwand?
Sie sind sich noch nicht sicher, was diese „Zauberfliesen“ eigentlich sind und wie sie funktionieren? In diesem Abschnitt erklären wir die Grundlagen und zeigen, warum eine Küchenrückwand zum Aufkleben die ideale, nicht dauerhafte Designlösung für moderne Mieter und DIY-Fans ist.
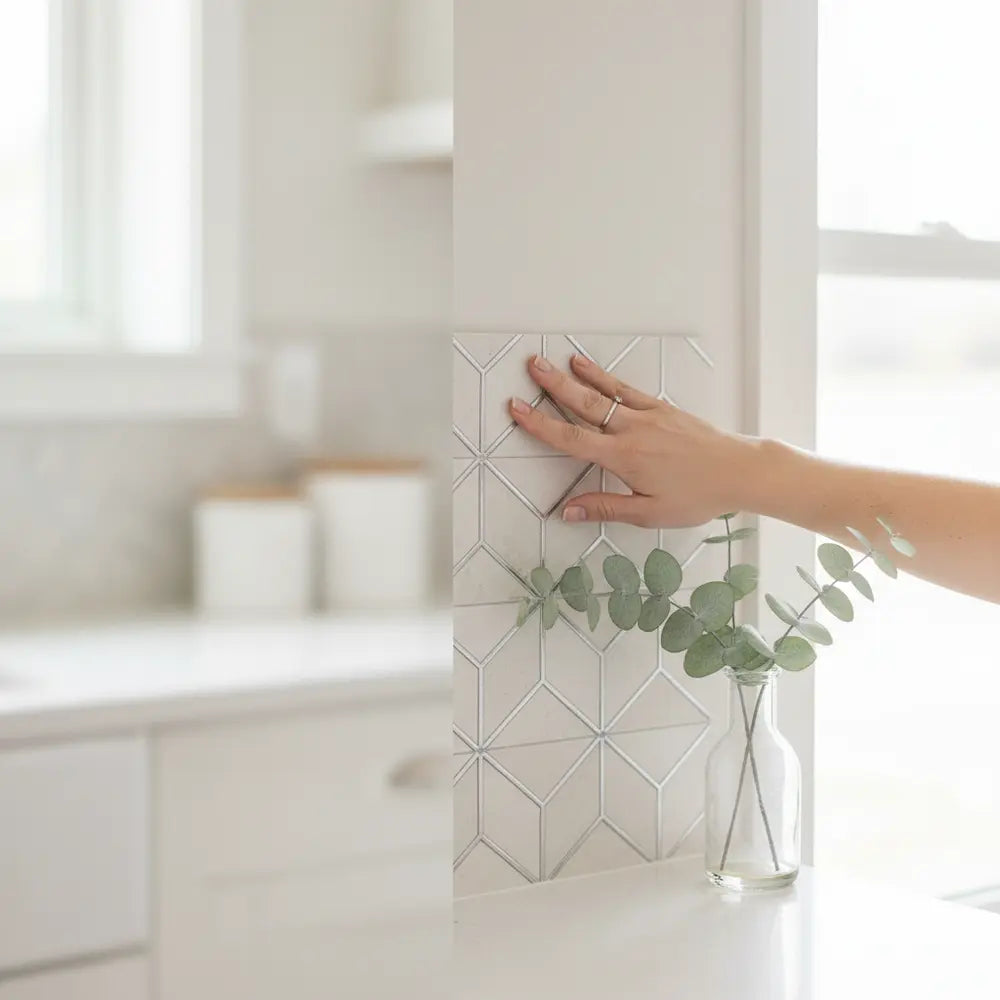
Eine selbstklebende Küchenrückwand ist eine dekorative Wandverkleidung aus Materialien wie Vinyl, Gel oder dünnem Metall. Jede Fliese beziehungsweise Platte verfügt über eine selbstklebende Rückseite, die durch eine Papierschicht geschützt ist. Für die Anbringung ziehen Sie einfach das Papier ab und drücken die Fliese fest auf eine saubere, glatte Wand.
Stellen Sie sich das Ganze wie einen hochmodernen, besonders robusten Aufkleber vor, der speziell für Innenräume entwickelt wurde. Anders als beim herkömmlichen Fliesenlegen brauchen Sie weder schmutzigen Mörtel noch Fugenmasse oder spezielle Schneidewerkzeuge. Damit ist dieses Projekt auch für DIY-Einsteiger äußerst unkompliziert. Um die Möglichkeiten besser einschätzen und verschiedene Anbringungsmethoden vergleichen zu können, lohnt sich ein umfassender Überblick. Wenn Sie noch abwägen, welche Option für Sie die richtige ist, bietet unser ausführlicher Ratgeber zu Küchenrückwandfliesen einen hervorragenden Vergleich zwischen selbstklebenden und herkömmlichen Fliesen.
Für Mieter liegt der entscheidende Vorteil in der zeitlich begrenzten Nutzung. Eine hochwertige abnehmbare Küchenrückwand kann entfernt werden, ohne die darunterliegende Wand zu beschädigen – damit ist sie die perfekte mietfreundliche Aufwertung für die Küche. Sie können Ihren Raum ganz persönlich gestalten, ohne Ihre Kaution zu riskieren.
Herkömmliche Fliesen oder selbstklebende Fliesen: der schnelle Vergleich
Anbringung: Herkömmliche Fliesen zu verlegen dauert Tage, verursacht Staub und erfordert handwerkliches Geschick. Ein Projekt mit selbstklebenden Fliesen lässt sich in wenigen Stunden erledigen – mit nichts weiter als einem Lineal und einem Cuttermesser.
Kosten: Die Kostenersparnis ist erheblich. Eine echte Küchenrückwand aus Marmor kann allein für das Material mehr als 70 $ pro Quadratfuß kosten, während eine realistisch wirkende selbstklebende Variante in Marmoroptik möglicherweise unter 10 $ liegt.
Dauerhaftigkeit: Herkömmliche Fliesen sind eine langfristige Entscheidung. Eine selbstklebende Küchenrückwand ist für eine vorübergehende Nutzung konzipiert und gibt Ihnen die Freiheit, Ihren Stil jederzeit zu verändern.

Warum 2025 eine selbstklebende Küchenrückwand wählen?
Sie fragen sich, ob es sich nur um einen vorübergehenden Trend oder tatsächlich um eine clevere Aufwertung für Ihr Zuhause handelt? Wir zeigen Ihnen die neuesten Innovationen aus dem Jahr 2025, die diese selbstklebenden Fliesen zu einer langlebigen, stilvollen und zukunftsorientierten Wahl machen.
Die Welt der selbstklebenden Küchenrückwände hat sich grundlegend weiterentwickelt. Vergessen Sie die dünnen, glänzenden Kunststoffvarianten von früher. Die heutigen Modelle sind hochwertig und auf Langlebigkeit ausgelegt – ganz im Einklang mit aktuellen Trends bei Wohndesign und Verbraucherbedürfnissen. 2025 ist eine selbstklebende Lösung eine praktische und stilvolle Entscheidung.
Zu den größten Fortschritten gehört die Entwicklung der Materialien. Hersteller bieten inzwischen dickere 3D-Gelfliesen an, die Tiefe und Struktur echter Keramik überzeugend nachahmen. Außerdem gibt es Varianten mit echten Aluminiumoberflächen, die eine besonders hohe Hitzebeständigkeit und eine elegante, industrielle Optik bieten.
Auch das Bewusstsein für Nachhaltigkeit spielt eine wichtige Rolle. Immer mehr Produkte werden inzwischen aus recycelten Materialien hergestellt und mit emissionsarmen Klebstoffen versehen – eine gesündere Wahl für Ihr Zuhause. Das entspricht dem allgemeinen Trend zu einem nachhaltigeren Lebensstil, auch bei vorübergehenden Einrichtungslösungen.
Schließlich ist die Designvielfalt so groß wie nie zuvor. Dank moderner Drucktechnologien wirken die Muster realistischer denn je. Von den feinen Aderungen einer Marmoroptik bis zur dezenten Struktur verwitterter Ziegel: So erzielen Sie eine hochwertige Optik mit deutlich weniger Kosten und Aufwand.
Vor- und Nachteile eines selbstklebenden Spritzschutzes
Sie sind sich noch nicht sicher, ob diese Lösung zu Ihrer Küche oder Ihrem Badezimmer passt? Hier finden Sie eine ehrliche und ausgewogene Übersicht der Vor- und Nachteile, damit Sie eine fundierte Entscheidung treffen können.
Auch wenn ein selbstklebender Spritzschutz für viele eine hervorragende Lösung ist, sollten Sie seine Stärken und Grenzen kennen. So können Sie realistische Erwartungen haben und sicherstellen, dass Sie mit dem Ergebnis zufrieden sind.
Die Vorteile
- ✔Günstiger Preis: Das ist einer der größten Pluspunkte. Sie können das Erscheinungsbild Ihrer Küche für weniger als 200 $ komplett verändern – eine enorme Ersparnis gegenüber den mehreren Tausend Dollar, die eine herkömmliche Fliesenverlegung kosten kann.
- ✔Schnelle Montage in Eigenregie: Die meisten Menschen können einen Spritzschutz in nur wenigen Stunden anbringen. Sie müssen dafür keine Fachkraft beauftragen und sparen dadurch noch mehr Geld.
- ✔Ideal für Mietwohnungen: Für Mieter ist es ein echter Vorteil, die Fliesen entfernen zu können, ohne die Wand zu beschädigen. Es ist eine der wirkungsvollsten Ideen für einen vorübergehenden Küchenspritzschutz auf dem Markt.
- ✔Leicht zu reinigen: Die Oberflächen sind porenfrei und lassen sich einfach mit einem feuchten Tuch und milder Seife abwischen. Schluss mit dem Schrubben verschmutzter Fugen.
Die Nachteile
- ✖Begrenzte Lebensdauer: Auch wenn sie strapazierfähig sind, halten sie nicht so lange wie Keramik- oder Natursteinfliesen. Die meisten Produkte haben je nach Qualität und Umgebung eine Lebensdauer von 3–10 Jahren.
- ✖Sichtbare Fugen: Bei unsorgfältiger Anbringung können die Übergänge zwischen den Fliesen auffallen und dadurch die Illusion echter Fliesen beeinträchtigen. Muster mit überlappenden Motiven helfen, dies zu minimieren.
- ✖Hitzeempfindlich: Standard-Vinylfliesen sollten nicht zu nah an offenen Flammen angebracht werden. Für einen selbstklebenden Spritzschutz für den Bereich hinter dem Herd müssen Sie ein Produkt wählen, das ausdrücklich für Hitzebeständigkeit geeignet ist, beispielsweise eines aus Aluminium.

Selbstklebenden Spritzschutz anbringen: Schritt für Schritt
Sie sind etwas nervös wegen des Teils, bei dem es um die „Montage“ geht? Diese einfache Schritt-für-Schritt-Anleitung zeigt, dass Sie auch ohne Vorkenntnisse an einem Nachmittag ein professionell wirkendes Ergebnis erzielen können.
Das Geheimnis eines optisch ansprechenden selbstklebenden Spritzschutzes ist 90% Vorbereitung und 10% Anbringung. Wenn Sie sich am Anfang ausreichend Zeit nehmen, sehen Ihre neuen Fliesen fantastisch aus und halten jahrelang.
Checkliste und Fortschritt bei der Montage
Schritt 1: Eine gute Vorbereitung ist entscheidend
Bevor du auch nur eine Fliese abziehst, musst du die Wand vorbereiten. Damit der Kleber richtig haftet, braucht er eine saubere, glatte Oberfläche. Reinige die Wand zunächst mit einem Fettlöser wie TSP (Trinatriumphosphat) oder einem entsprechenden Ersatz, um Fett und Schmutz zu entfernen.
Miss anschließend die Fläche aus, die du verkleiden möchtest, und berechne, wie viele Fliesen du benötigst. Plane zusätzlich 10% für Zuschnitte und mögliche Fehler ein. Zeichne mit einer Wasserwaage und einem Bleistift eine feine Orientierungslinie für die erste Fliesenreihe. So bleibt dein gesamtes Projekt gerade.
Schritt 2: Die erste Fliese gibt die Richtung vor
Beginne an der sichtbarsten Ecke. Ziehe nicht die gesamte Schutzfolie auf einmal ab. Löse stattdessen zunächst die oberen Zentimeter, richte die Fliese an deiner Orientierungslinie aus und drücke sie vorsichtig an die Wand.
Wenn du mit der Position zufrieden bist, ziehe die restliche Schutzfolie langsam ab und streiche die Fliese dabei von oben nach unten glatt. Drücke mit einem Kunststoffrakel oder einer Kreditkarte eventuelle Luftblasen heraus und arbeite dabei von der Mitte nach außen.
Schritt 3: Zuschneiden und Überlappen
Du wirst die Fliesen unweigerlich für Steckdosen oder am Ende einer Wand zuschneiden müssen. Miss die Fläche sorgfältig aus und markiere die Fliese. Lege sie auf eine Schneidematte und ritze sie mit einem scharfen Cuttermesser und einem Metalllineal fest an. Anschließend kannst du die Fliese entlang der Ritzlinie sauber brechen. Eine anschauliche Demonstration kann den entscheidenden Unterschied machen. Unser Ratgeber zu So montierst du selbstklebende Vinyl-Rückwandfliesen enthält ein Video und Fotos zu jedem einzelnen Schritt.
Die meisten selbstklebenden Rückwandfliesen sind dafür ausgelegt, leicht überlappend angebracht zu werden. Das ist entscheidend für eine nahtlose, wasserdichte Abdichtung. Befolge für die richtige Überlappung immer die Anweisungen des Herstellers.
Schritt 4: Der letzte Schliff
Wenn alle Fliesen angebracht sind, gehe noch einmal über die gesamte Fläche und drücke alle Fugen und Kanten fest an, damit eine gute Haftung gewährleistet ist. In Bereichen neben Spülen oder Kochfeldern kann eine dünne Naht aus transparentem Silikon entlang der Kanten zusätzlichen Schutz vor Feuchtigkeit und Hitze bieten.
Für eine vollständige visuelle Anleitung mit Tipps zur Fehlerbehebung ist unser Artikel die beste Anlaufstelle. Noch mehr hilfreiche Abbildungen findest du in unserem Einfachen Ratgeber: Metrofliesen selbstklebend anbringen. Darin wird jeder einzelne Schritt verständlich für Einsteiger erklärt.
Die besten selbstklebenden Rückwandfliesen 2025
Du möchtest den perfekten Stil finden und deinen Raum von langweilig in wunderschön verwandeln? In diesem Abschnitt stellen wir die beliebtesten Kategorien und die besten selbstklebenden Rückwandfliesen für die Küche 2025vor, damit du die passende Option für deinen Stil und dein Budget findest.
Der Markt für selbstklebende Fliesen bietet eine unglaubliche Auswahl. Von zeitlosen Klassikern bis hin zu markanten, modernen Designs ist für jeden Geschmack etwas dabei. Wir haben die wichtigsten Kategorien für dich zusammengestellt, damit du dich leichter in der Auswahl zurechtfindest.
Klassische Metro-Fliesen: die zeitlose Wahl
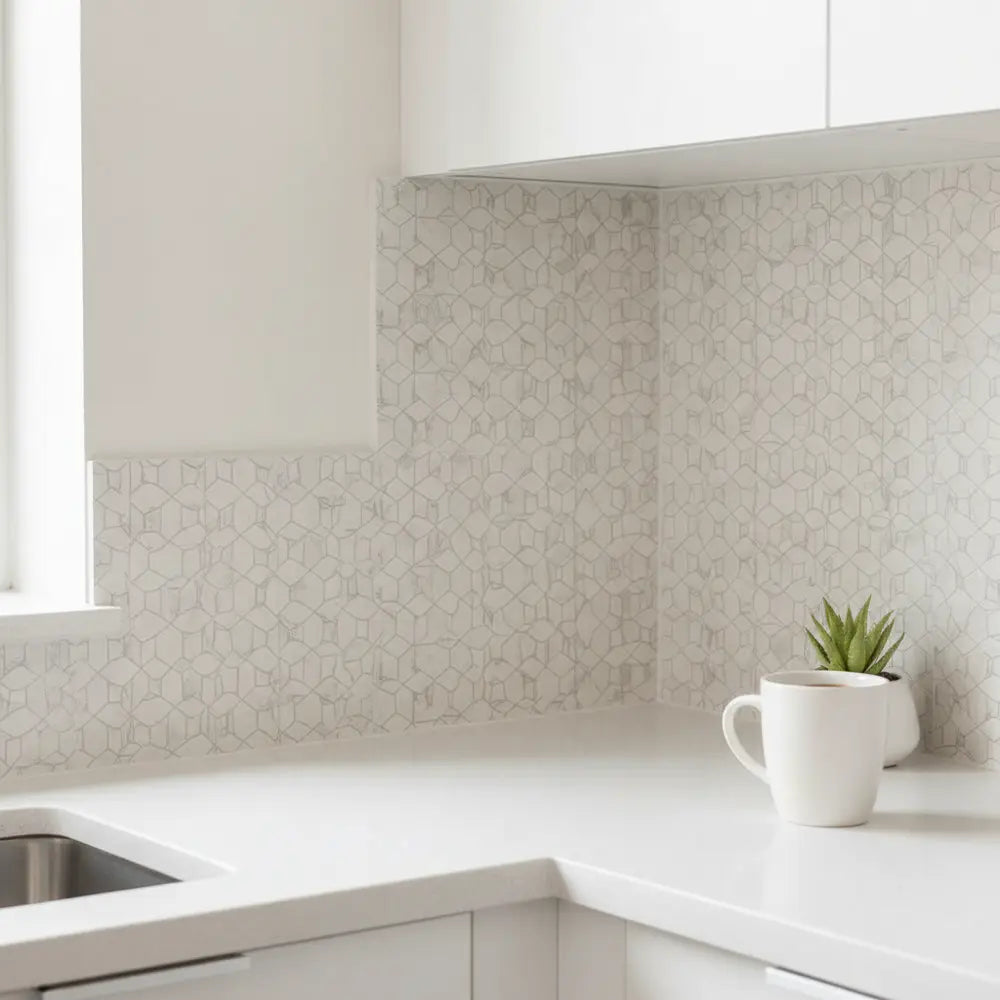
Metro-Fliesen sind aus gutem Grund seit jeher beliebt. Ihre klaren Linien und die schlichte Geometrie passen zu nahezu jedem Einrichtungsstil – vom modernen Landhausstil bis zum minimalistischen Industrial Look. 2025 gibt es sie längst nicht mehr nur in einfachem Weiß. Entdecke Varianten in tiefen Grüntönen, stimmungsvollen Blaunuancen und warmen Grautönen.
Ein weit verbreitetes Missverständnis ist, dass alle selbstklebenden Metro-Fliesen flach wirken. Die besten Varianten verfügen über eine 3D-Gelbeschichtung, die die abgeschrägten Kanten und sogar die Fugen echter Keramik nachbildet und so für überraschende Tiefe und realistische Optik sorgt. Dadurch sind sie vielseitig einsetzbar und besonders einfach zu verarbeiten. Wenn du die Feinheiten der Verlegung verstehen und die besten Designs für 2025 entdecken möchtest, lies unseren Leitfaden zu Selbstklebende Fliesen verlegen: die besten Designs 2025.
Realistische Stein- und Ziegeloptik
Du möchtest deinem Zuhause einen rustikalen oder industriellen Akzent verleihen? Selbstklebende Paneele in Stein- oder Ziegeloptik sind dafür eine hervorragende Wahl. Sie bringen Struktur und Charakter in den Raum – ganz ohne das Gewicht, den Schmutz und die Kosten echter Mauerarbeiten. Damit lässt sich wunderbar eine Akzentwand im Wohnzimmer oder eine markante Küchenrückwand gestalten.
Ein wichtiger Tipp für diese Designs: Achte auf die Wiederholung des Musters. Hochwertigere Paneele weisen ein abwechslungsreicheres und weniger repetitives Muster auf, wodurch die Illusion von echtem Stein oder Ziegel deutlich überzeugender wirkt.
Elegante Marmor- und Quarzoptik
Du möchtest einen Hauch von Luxus, ohne tief in die Tasche zu greifen? Dann sind Fliesen in Marmoroptik die richtige Wahl. Dank moderner Drucktechnologie lassen sich die feinen, komplexen Maserungen von Carrara- oder Calacatta-Marmor erstaunlich präzise nachbilden. Sie gehören zu den beliebtesten Ideen für eine temporäre Küchenrückwand für einen hochwertigen Look zum kleinen Preis.
Diese Designs eignen sich perfekt, um kleine Küchen heller wirken zu lassen. Ihre hellen, reflektierenden Oberflächen können einen Raum größer und offener erscheinen lassen.
Hochwertige und besonders robuste Varianten
Wenn Langlebigkeit und Leistungsfähigkeit für dich an erster Stelle stehen, solltest du auf hochwertige Materialien setzen. Metallfliesen, die häufig aus Aluminium oder Edelstahl gefertigt sind, gehören zu den besten Optionen. Sie sind besonders hitzebeständig und damit die sicherste Wahl für einen selbstklebenden Spritzschutz für den Bereich hinter dem Herd .
Auch dickere 3D-Gelfliesen zählen zu dieser Kategorie. Ihre robuste Konstruktion macht sie widerstandsfähiger gegen Kratzer und leichter zu reinigen. So vermitteln sie ein dauerhaftes Gefühl und lassen sich dennoch vollständig wieder entfernen.
Du suchst noch mehr Inspiration zu aktuellen Trends? Unsere Ideensammlung ist der perfekte Ausgangspunkt. Um diese Styles in der Anwendung zu sehen, ist unser Artikel Ideen für selbstklebende Küchenrückwände 2025die richtige Anlaufstelle – mit jeder Menge visueller Inspiration.

Abnehmbare und für Mietwohnungen geeignete Varianten
Du befürchtest, dass „abnehmbar“ nur ein Marketingversprechen ist und du deine Kaution verlieren könntest? Wir zeigen dir genau, wie diese Fliesen funktionieren, und geben dir die Profi-Tipps an die Hand, damit deine Wände garantiert makellos bleiben.
Die Sorge, Mietwände zu beschädigen, ist verständlich. Doch eine hochwertige abnehmbare Küchenrückwand wurde speziell für eine vorübergehende Nutzung entwickelt. Entscheidend für eine stressfreie Erfahrung von Anfang bis Ende ist, das richtige Produkt auszuwählen und es korrekt zu entfernen.
So funktioniert die sichere Entfernung
Der Klebstoff mietfreundlicher Fliesen ist auf starken Halt und dennoch sauberes Ablösen ausgelegt. Das Geheimnis einer einfachen Entfernung ist Wärme. Erwärme die Oberfläche der Fliesen vorsichtig mit einem handelsüblichen Föhn – Abschnitt für Abschnitt. Dadurch wird der Klebstoff weicher und löst seine Verbindung mit der Wand.
Sobald die Fliesen erwärmt sind, kannst du sie an einer Ecke abzulösen beginnen. Der wichtigste Tipp: Ziehe langsam und in einem spitzen Winkel von etwa 45 Grad nach unten an der Wand entlang. Ziehe niemals gerade nach außen, da dadurch eine Spannung entsteht, die Farbe oder die oberste Papierschicht der Trockenbauwand ablösen kann.
Profi-Tipps für makellose Wände
- Zuerst testen: Kaufe zunächst immer nur eine einzelne Musterfliese und teste sie an einer unauffälligen Stelle deiner Wand – zum Beispiel in einem Schrank oder hinter dem Kühlschrank. Lass sie eine Woche lang haften und versuche anschließend, sie zu entfernen.
- Der Zustand der Wand ist entscheidend: Diese Fliesen haften am besten auf glatten, nicht porösen Oberflächen mit seidenglänzendem oder seidenmattem Anstrich. Hat deine Wand eine matte oder stumpfe Oberfläche, solltest du zunächst eine Schicht ablösbaren Haftgrund auftragen.
- Warte, bis die Farbe vollständig getrocknet ist: Bringe niemals einen aufklebbaren Spritzschutz auf einer frisch gestrichenen Wand an. Die Farbe benötigt mindestens 21 Tage, um vollständig auszuhärten. Werden die Fliesen zu früh angebracht, kann sich die Farbe beim Entfernen ablösen.
Was macht eine Küchenrückwand mietfreundlich?
Achten Sie beim Kauf auf Produkte, die ausdrücklich als „für Mietwohnungen geeignet“ oder „rückstandslos entfernbar“ beworben werden. Diese Fliesen verwenden eine weniger stark haftende Klebeformel. Auch aktuelle Bewertungen anderer Mieterinnen und Mieter zu lesen, ist eine der besten Möglichkeiten, einzuschätzen, wie leicht sich ein bestimmtes Produkt wieder entfernen lässt. Sie suchen nach Inspiration? Unser Ratgeber zu Grüne Ideen für mietfreundliche selbstklebende Küchenrückwände zeigt echte Lösungen, die perfekt für vorübergehende Wohnsituationen sind.
Die Sicherheit, die ein rückgängig machbares Upgrade bietet, ist unbezahlbar. Ausführliche Anleitungen zu diesem Vorgang finden Sie in unserem umfassenden Artikel Selbstklebende Fliesen für Mietwohnungen sicher anbringen und entfernen.
Für welches Rückwand-Design würden Sie sich entscheiden?
Inspiration und Trends für Küchen und Badezimmer 2025
Ihnen fehlen die Ideen und Sie brauchen einen kreativen Anstoß? Lassen Sie sich von den angesagtesten modernen Designs für selbstklebende Küchenrückwände inspirieren und erfahren Sie, wie Sie sie in jedem Raum einsetzen können – von großzügigen Küchen bis hin zu kompakten Gäste-WCs.
Eine Küchenrückwand ist wie das perfekte Accessoire für einen Raum: Sie verbindet alles miteinander und verleiht ihm eine persönliche Note. Dank der großen Auswahl an selbstklebenden Fliesen für Badezimmerwände sind den Gestaltungsmöglichkeiten keine Grenzen gesetzt.
Küchentrends: Farben und Muster
2025 dreht sich das Küchendesign ganz um Wärme und Persönlichkeit. Weiße Metrofliesen sind zwar zeitlos, doch erdige Grüntöne, tiefes Marineblau und warmes Terrakotta erfreuen sich derzeit großer Beliebtheit. Diese Farben schaffen eine gemütliche und einladende Atmosphäre. Auch geometrische Muster wie Waben und Fischschuppenmuster – sogenannte Scallops – gehören zu den wichtigsten Trends. Sie verleihen der Küche eine verspielte und zugleich stilvolle Note.
Trauen Sie sich ruhig, verschiedene Stile zu kombinieren. Verwenden Sie beispielsweise für den Hauptbereich der Rückwand eine klassische Marmoroptik und setzen Sie in einem kleinen Akzentbereich, etwa an einer Kaffeebar, auf ein auffälliges geometrisches Muster. So entsteht ein individueller Look mit Designer-Flair. Weitere Ideen zu aktuellen Neuheiten finden Sie in den neuesten Mustertrends. Wenn Sie auf der Suche nach besonders innovativen Designs sind, ist unser Ratgeber zu den Top-Mustern für selbstklebende Fliesen 2025 die perfekte Inspirationsquelle.
Kleine Küchen optimal gestalten
Sie haben eine kleine Küche? Mit der richtigen Küchenrückwand kann sie größer wirken. Entscheiden Sie sich für Fliesen mit glänzender oder metallischer Oberfläche, denn ihre reflektierenden Flächen verteilen das Licht im Raum und erzeugen so die Illusion von mehr Platz. Helle Farben wie Weiß, Creme oder Hellgrau lassen den Bereich zusätzlich großzügiger wirken.
Ein weiterer Profi-Tipp: Achten Sie auf die Ausrichtung der Fliesen. Ein Muster mit ausgeprägten vertikalen Linien lenkt den Blick nach oben und lässt eine niedrige Decke höher wirken.
Ideen für Küchenrückwände im Badezimmer
Selbstklebende Fliesen sind nicht nur für Küchen geeignet. Sie eignen sich hervorragend, um im Badezimmer eine stilvolle Akzentwand zu gestalten – insbesondere hinter dem Waschtisch. Eine schöne Rückwand kann aus einem schlichten Gäste-WC einen eleganten, spaähnlichen Rückzugsort machen.
Bei der Auswahl von selbstklebenden Fliesen für Badezimmerwändeist es besonders wichtig, eine wasserdichte selbstklebende Küchenrückwandauszuwählen. Vinyl- und Gelfliesen sind 100% wasserdicht und eignen sich daher ideal für Bereiche, in denen Spritzwasser auftreten kann. Beruhigende Blau- und Grüntöne sowie elegante Muster wie Fischgrät sind im Badezimmer besonders beliebt.

Wo kaufen und worauf achten?
Die schiere Anzahl an Angeboten auf dem Markt kann schnell überfordern. Dieser Abschnitt dient Ihnen als persönlicher Einkaufsratgeber: Er hilft Ihnen dabei, die besten Anbieter zu finden und zu verstehen, welche Eigenschaften für ein schönes, langlebiges Ergebnis wirklich entscheidend sind.
Wenn Sie wissen, wo Sie einkaufen und worauf Sie achten sollten, sparen Sie Zeit und investieren gezielt in ein Produkt, an dem Sie lange Freude haben. Nicht alle selbstklebenden Fliesen für Küchenrückwände sind gleich.
Erfahrungsberichte von Mietern
„Ich war sehr nervös, das in meiner Mietwohnung auszuprobieren, aber der Unterschied ist unglaublich! Die Marmorfliesen sehen täuschend echt aus, und mein Vermieter war völlig überrascht, als ich ihm gesagt habe, dass sie selbstklebend sind. Eine echte Veränderung!“
– Sarah J., Mieterin
„Die Anbringung war kinderleicht. Ich habe die komplette Küchenrückwand an einem Samstagnachmittag in etwa drei Stunden fertiggestellt. Jetzt sind sechs Monate vergangen, und sie sieht immer noch perfekt aus – sogar hinter dem Spülbecken.“
– Mike R., Heimwerker
Die besten Anbieter (online und im Geschäft)
Selbstklebende Fliesen finden Sie in den meisten großen Baumärkten wie Home Depot und Lowe's. Die größte Auswahl an modernen Designs und hochwertiger Qualität bieten jedoch oft spezialisierte Onlineshops. Websites wie Wayfair und Amazon sowie spezialisierte Marken wie Stickwoll bieten eine riesige Vielfalt und zeigen häufig Kundenfotos und ausführliche Bewertungen.
Wichtige Eigenschaften
Vergleichen Sie Produkte nicht nur nach Farbe und Muster. Achten Sie auf diese wichtigen Qualitätsmerkmale:
- Dicke: Eine dickere Fliese (mehr als 2mm) wirkt realistischer und ist langlebiger. Dünne, instabile Fliesen können wie selbstklebende Folie aussehen.
- Material: Wählen Sie das passende Material für Ihren Zweck. Vinyl und Gel eignen sich hervorragend als wasserabweisende Lösungen, während Metallfliesen eine besonders hohe Hitzebeständigkeit bieten.
- Beständigkeit gegen Hitze und Feuchtigkeit: Wenn Sie die Fliesen in der Nähe eines Herds oder in einem dampfigen Badezimmer anbringen, sollten Sie prüfen, ob das Produkt ausdrücklich für diese Bedingungen geeignet ist.
- Kundenbewertungen: Sie sind Ihre beste Quelle für Informationen aus der Praxis. Achten Sie auf Bewertungen mit Fotos, um zu sehen, wie die Fliesen in einem echten Zuhause wirken – nicht nur in einem Studio.
Preiswert oder Premium: Wo liegt der Unterschied?
Lohnt es sich, mehr für Premium-Fliesen auszugeben? Oft lautet die Antwort: ja. Preisgünstige Fliesen sparen zunächst Geld, sind aber meist dünner, haben weniger realistische Oberflächenstrukturen und verwenden möglicherweise einen minderwertigeren Kleber, der sich schwerer rückstandsfrei entfernen lässt.
Premium-Fliesen bieten eine bessere 3D-Struktur, robustere Oberflächen, die Flecken und Kratzern widerstehen, sowie einen hochwertigeren Kleber, der zuverlässig haftet und sich bei Wärmeeinwirkung dennoch leicht entfernen lässt. Betrachten Sie es als Investition in eine schönere Optik und eine unkompliziertere Entfernung. Profi-Tipp: Bestellen Sie immer zuerst ein Muster!
Eine veraltete Küche oder ein in die Jahre gekommenes Badezimmer muss auch in einer Mietwohnung kein dauerhaftes Problem sein. Mit den hochwertigen selbstklebenden Küchenrückwand-Fliesen von heute ist eine stilvolle und persönliche Aufwertung ganz einfach möglich. Sie können Ihren Raum an nur einem Nachmittag ganz nach Ihren Vorstellungen gestalten – ohne den Schmutz, die Kosten oder die langfristige Bindung einer herkömmlichen Renovierung.
Wir haben gezeigt, wie Sie das passende Design auswählen, es sicher anbringen und anschließend schonend entfernen. Damit verfügen Sie über das nötige Wissen, um dieses einfache, aber wirkungsvolle DIY-Projekt selbst in Angriff zu nehmen. Ihre Vorstellungen zum Leben zu erwecken, ist nur einen Schritt entfernt: abziehen, aufkleben – fertig.
Bereit für Ihre Veränderung? Entdecken Sie unsere ausgewählte Kollektion aktueller selbstklebender Designs und finden Sie die perfekte Ergänzung für Ihr Zuhause.Häufig gestellte Fragen (FAQ)
1. Wie lange hält eine selbstklebende Küchenrückwand wirklich?
Eine hochwertige selbstklebende Küchenrückwand kann je nach Produktqualität und Umgebung drei bis zehn Jahre oder sogar länger halten. Eine sorgfältige Vorbereitung der Wand und die korrekte Anbringung sind die wichtigsten Faktoren, um ihre Lebensdauer zu maximieren.
2. Kann man eine selbstklebende Küchenrückwand sicher hinter einem Herd anbringen?
Ja, aber Sie müssen das richtige Material wählen. Herkömmliche Vinylfliesen werden für Bereiche mit großer Hitze nicht empfohlen. Für die Wand hinter Ihrem Herd müssen Sie ein Produkt verwenden, das ausdrücklich hitzebeständig ist, beispielsweise aus Aluminium oder einem anderen Metall. Halten Sie immer den vom Hersteller empfohlenen Abstand zu den Kochfeldern ein.
3. Beschädigt eine selbstklebende Küchenrückwand die Wände meiner Mietwohnung?
Wenn Sie ein hochwertiges, für Mietwohnungen geeignetes Produkt wählen und es korrekt entfernen (mit sanfter Wärmezufuhr), sollte es Ihre Wände nicht beschädigen. Entscheidend ist, dass Sie es auf einer gut gepflegten, glatten Wand mit seidenmatter oder halbglänzender Oberfläche anbringen und frisch gestrichene Flächen vermeiden.
4. Ist eine selbstklebende Küchenrückwand für das Badezimmer ausreichend wasserfest?
Auf jeden Fall. Die meisten selbstklebenden Fliesen bestehen aus Vinyl oder haben eine 3D-Gel-Oberfläche. Beide Materialien sind nicht porös und 100% wasserfest. Durch die überlappende Anordnung der Fliesen entsteht eine wasserabweisende Abdichtung. Dadurch eignen sie sich hervorragend als Rückwand für einen Waschtisch oder als Akzentwand außerhalb des direkten Duschbereichs.

Kommentar hinterlassen
Diese Website ist durch hCaptcha geschützt und es gelten die allgemeinen Geschäftsbedingungen und Datenschutzbestimmungen von hCaptcha.