


Step-by-Step Guide to Replace a Damaged Peel and Stick Tile
You walk into your kitchen, and your eyes immediately lock onto it. One single, scratched, and peeling vinyl tile is completely ruining the aesthetic of your entire floor. It is incredibly frustrating to see an otherwise perfect surface compromised by a single point of failure. Modern interior design relies heavily on seamless visual continuity, and even a microscopic gouge or a lifted corner can disrupt the harmony of your carefully curated space. When the light hits that specific damaged quadrant at just the right angle, it magnifies the imperfection, making it impossible to ignore. For homeowners and renters alike, the pristine condition of flooring is a cornerstone of a well-maintained living environment.
You can successfully replace a single damaged peel and stick tile by gently applying heat to the old tile to loosen its adhesive base. Next, you remove the damaged piece, thoroughly clean the subfloor to eliminate old residue, and firmly press down a new tile of the matching size and pattern. This focused repair operation requires only basic household tools and generally takes less than an hour to complete from start to finish. The beauty of modern modular flooring technology lies in its repairability. Unlike monolithic poured concrete or seamless sheet linoleum, luxury vinyl tile grids are designed with individual integrity in mind.

Replacing just one unit eliminates the stress of tearing up a perfectly good floor. Many first-time DIYers hesitate, fearing they might accidentally damage the surrounding tiles or the underlying subfloor. We understand that hesitation completely. The prospect of peeling back a layer of your home's infrastructure can evoke anxiety, especially if you have never tackled a flooring project before. The fear of creating a larger, more expensive problem out of a small aesthetic nuisance is a powerful deterrent. However, with the right methodology, this fear is entirely unfounded.
By isolating the repair to a single square, you regain control over your home's appearance. You just need to gather a putty knife, some heat, and your replacement tile. Let’s break down the exact methodology to restore your floor seamlessly, empowering you to tackle this minor blemish with the confidence of a seasoned contractor.
Why should you replace only one damaged peel and stick tile instead of the whole floor?
Are you dreading the massive expense and mess of tearing out your entire floor just for one scuff?
This section proves how targeted spot repairs maximize your budget and preserve your existing installation, saving you hundreds of dollars and hours of back-breaking labor.
Many homeowners assume that once a section of flooring fails, the entire grid is compromised. This is a common misconception rooted in older, more permanent construction methods. Vinyl peel and stick flooring is inherently modular. It is engineered specifically to allow for isolated replacements without disturbing the structural integrity of the surrounding layout. Each square operates independently, adhered directly to the subfloor rather than to each other via interlocking clicking mechanisms found in floating floors.
Replacing a single unit is the most logical financial decision. A complete floor replacement demands a high initial capital investment for materials and significant labor hours. You have to move all your heavy furniture, rip up baseboards, manage the disposal of the old materials, and spend a grueling weekend on your hands and knees. Conversely, a spot repair costs mere dollars and consumes a fraction of your weekend. It allows you to maintain a pristine aesthetic without triggering a catastrophic hit to your household renovation budget.
Consider the total lifecycle of your flooring materials. According to standardized construction waste data from the Environmental Protection Agency (EPA), localized material repairs significantly reduce landfill contribution compared to full demolition. Every year, millions of tons of perfectly usable architectural salvage and interior finishes are discarded prematurely. By choosing to replace a singular damaged component, you actively participate in sustainable homeownership. You save money while minimizing unnecessary environmental waste, proving that ecological responsibility and practical home maintenance can go hand in hand.
Let us look at a real-world application that highlights the stress-relieving power of a targeted repair. Consider a renter named Marcus who accidentally dropped a heavy cast-iron pan, cracking a single vinyl tile right in the center of his galley kitchen. Fearing the loss of his substantial security deposit, he initially panicked. He thought he had to hire an expensive, licensed contractor to pull up the entire floor, fearing a massive bill that would empty his savings account.
Instead, Marcus took a breath and sourced a single matching square directly from the manufacturer. By following a localized removal technique similar to the one we are outlining today, he replaced the damaged unit for under ten dollars. The entire process took him thirty minutes on a Tuesday evening. The property manager never noticed the difference during the final move-out inspection, and Marcus received his full deposit back. This kind of empowering, localized fix is the ultimate advantage of modular vinyl materials.
For renters like Marcus, understanding the specific mechanics of damage-free interior modifications is absolutely essential for preserving security deposits. If you are currently renting and want to ensure your flooring upgrades or repairs are completely reversible and structurally safe for underlying surfaces, you must familiarize yourself with specialized renter-focused techniques. We highly recommend diving into our comprehensive tutorial on How to Install and Remove Stickwoll Tiles Without Damaging Walls. This essential guide outlines the exact protocols needed to protect your deposit while still achieving a stunning aesthetic upgrade.
Evaluating the performance degradation curve of your flooring requires understanding proper upkeep over time. Prevention is always more cost-effective than intervention. The comprehensive framework detailed in our expertly curated Peel and Stick Tile Maintenance Guide 2025 provides the quantitative baseline necessary to extend the lifespan of your installation, establishing a standardized evaluation for routine care. This guide is a mandatory read for anyone looking to maximize the return on their flooring investment.
Here is a clear, empirical breakdown of the differences between these two approaches. Analyzing these metrics side-by-side demonstrates precisely why isolated repairs should always be your first line of defense against floor damage:
| Metric | Single Tile Replacement | Full Floor Replacement |
|---|---|---|
| Material Cost | Extremely Low ($1 - $5) | High ($100 - $500+) |
| Time Investment | Under 1 Hour | 1 to 3 Days |
| Skill Requirement | Beginner | Intermediate to Advanced |
| Surrounding Risk | Minimal | High (Demolition Required) |
| Waste Generated | One Single Tile | Entire Room Output |
As the table clearly illustrates, isolated repairs yield an optimal configuration for both budget and time management. It is undeniably the smartest, most efficient way to handle localized architectural damage without initiating a cascading sequence of costly renovations.
What tools and materials do you need to replace a single peel and stick tile?
Wondering if you need to rent expensive industrial equipment to get this job done right?
Here, we outline a highly accessible, low-cost toolkit designed specifically for beginner DIY repairs. The secret lies in using the right chemistry and physics, not brute physical force.
You do not need an extensive workshop or a truck full of heavy machinery to execute this repair flawlessly. The methodology relies on thermal manipulation and precise leverage rather than brute force hacking. Gathering the correct items beforehand ensures you won't have to pause midway through the extraction process, allowing the adhesive to cool and re-harden while you search for a tool.
The chemistry of floor mastic—the sticky, polymeric substance holding the vinyl tile down to the subfloor—responds predictably and rapidly to temperature changes. By utilizing common household items, you can easily control this chemical reaction, forcing the adhesive to release its grip voluntarily.
The Essential Extraction Toolkit
Heat Source
A standard hair dryer on its highest setting or a dedicated heat gun. This softens the hardened adhesive bond, making it pliable enough to release the tile without tearing the subfloor beneath it.
Leverage Tool
A stiff metal putty knife or a specialized floor scraper. This acts as a wedge to gently break the physical seal between the tile and the subfloor. A stiff blade provides better mechanical advantage.
Adhesive Solvent
A commercial adhesive remover (like Goo Gone) or high-percentage rubbing alcohol. This neutralizes any lingering sticky residue left behind, creating a perfectly sterile surface for the new tile.
Replacement Tile
The star of the show. Ensure this matches your existing pattern and thickness exactly. Keep the backing paper on until the very last second to protect the factory-applied pressure-sensitive adhesive.
To achieve a truly flush, factory-grade professional finish, you might also want to gather a few optional items. These refine the preparation and installation phases, transforming an amateur patch job into a seamless architectural repair.
- • Utility Knife: Essential if you need to micro-trim the replacement tile to fit an awkward edge, a slightly warped perimeter, or a tight corner perfectly.
- • Straight Edge: A heavy metal ruler guarantees perfectly straight, unwavering score lines when altering the shape of a new tile, preventing jagged cuts.
- • Heavy Roller: A kitchen rolling pin or specialized seam roller works exceptionally well to press the new unit firmly into the subfloor, eliminating microscopic trapped air bubbles that lead to future failure.
We can see the critical importance of proper gear by comparing two entirely different approaches. Let’s examine a mini case study involving an enthusiastic but unprepared beginner DIYer, Sarah, and a seasoned professional contractor.
Sarah noticed a deeply gouged tile in her hallway. Eager to fix it, she initially tried to pry the damaged tile up using only a standard kitchen butter knife, skipping the heat application phase entirely. The cold, brittle vinyl, cemented to the floor by years of foot traffic, shattered into tiny, sharp pieces. This left solid, concrete-hard chunks of adhesive behind that were nearly impossible to scrape off dry. Worse, the blunt butter knife gouged deeply into the wooden subfloor—the vital, solid structural layer beneath the flooring finish. What started as a tiny cosmetic issue became a structural subfloor repair.
The professional contractor approaches the exact same problem systematically. They understand the material science at play. They use a standard heat gun to bring the tile's surface temperature up to roughly 140 degrees Fahrenheit. At this precise thermal threshold, the mastic transforms from a solid to a viscous gel. The contractor then slides a flexible, wide putty knife under the warm, pliable edge. The tile lifts away in one singular, solid piece, leaving a mostly clean subfloor behind. The tool choice completely dictates the outcome.
Pro-Tip for Using Hair Dryers:
If you are using a standard residential hair dryer instead of an industrial heat gun, you will need to hold the nozzle much closer to the tile surface—roughly one to two inches away—for at least three to five continuous minutes. Standard hair dryers generate significantly less concentrated thermal output, requiring longer, sustained exposure times to achieve the exact same chemical softening of the adhesive.
When factoring in long-term performance and adhesion stability, precise pressure application during the final installation phase is paramount. Merely pressing down with your hands often leaves microscopic air gaps. Equipment like our specialized smoothing scrapers function as architectural standards in this space, guaranteeing a professional-grade pressure seal.
Equip Yourself for Perfection
For the ultimate precision during installation, we highly recommend utilizing specialized smoothing tools. The right pressure applicator prevents immediate lifting and ensures a flawless, edge-to-edge bond.
Looking for versatile, ergonomic control? Ensure a flawless peel and stick tile installation with our DIY Tile Scraper! This versatile tool helps smooth out air bubbles, secure strong adhesion, and align tiles perfectly. It’s designed for comfort and precision, helping you achieve a professional-looking finish with ease.
Explore the Scraperoo - YNeed a robust edge for tougher angles? Ensure a flawless peel and stick tile installation with our robust DIY Tile Scraper variant! This versatile tool helps smooth out deep air bubbles, secure incredibly strong adhesion, and align tough tiles perfectly. It’s designed for high-pressure comfort and precision.
Explore the Scraperoo - RBy empirically neutralizing trapped air bubbles and ensuring edge-to-edge bonding with these dedicated tools, you actively bypass the most common installation failures. They provide a statistically significant improvement in long-term wear resistance and perimeter integrity compared to manual pressing alone.
How do you remove and replace the damaged peel and stick tile step-by-step?
Are you worried you might accidentally rip up the expensive hardwood or delicate concrete underneath the old flooring?
This step-by-step framework provides you with the exact tactical techniques to extract and replace the damage safely, cleanly, and effectively.
Execution is absolutely everything in a successful DIY repair. The delicate process of removing bonded vinyl without causing collateral damage requires deep patience and a highly systematic, step-by-step approach. If you rush the thermal softening phase, you risk tearing the underlying surface or permanently warping the adjacent tiles that you wish to keep intact.
Think of it precisely like removing a stubborn, paper price tag from a beautiful glass jar. If you pull quickly and aggressively while the adhesive is cold, the paper tears into shreds, and it leaves a stubborn, frustrating sticky mess behind that attracts dirt. However, if you warm the label up slightly and peel it back at a slow, deliberate angle, it releases its grip and comes off cleanly in one single piece. Flooring mastic operates on the exact same principles of adhesion.
1 Step 1: Loosening the Adhesive Bond with Heat
Your very first objective is to change the physical state of the underlying glue from a solid to a gel. Turn on your chosen heat gun or high-powered hair dryer to its absolute highest setting. Hold the output nozzle approximately three to four inches away from the damaged vinyl surface to prevent scorching the protective wear layer.
Begin moving the heat source in a continuous, rhythmic sweeping motion across the tile. Do not hold it stationary in one spot, as excessive, concentrated heat will quickly singe the vinyl, potentially melt it, or permanently discolor the edges of the surrounding, undamaged pieces.
Focus the thermal energy primarily on the outer edges and the four corners of the damaged square, as these are the access points for your scraper. The overarching goal is to raise the internal temperature evenly until the top surface feels quite warm—but not scalding or burning hot—to the touch. This crucial phase usually takes two to five minutes depending on your specific tool's wattage and the ambient temperature of your room.

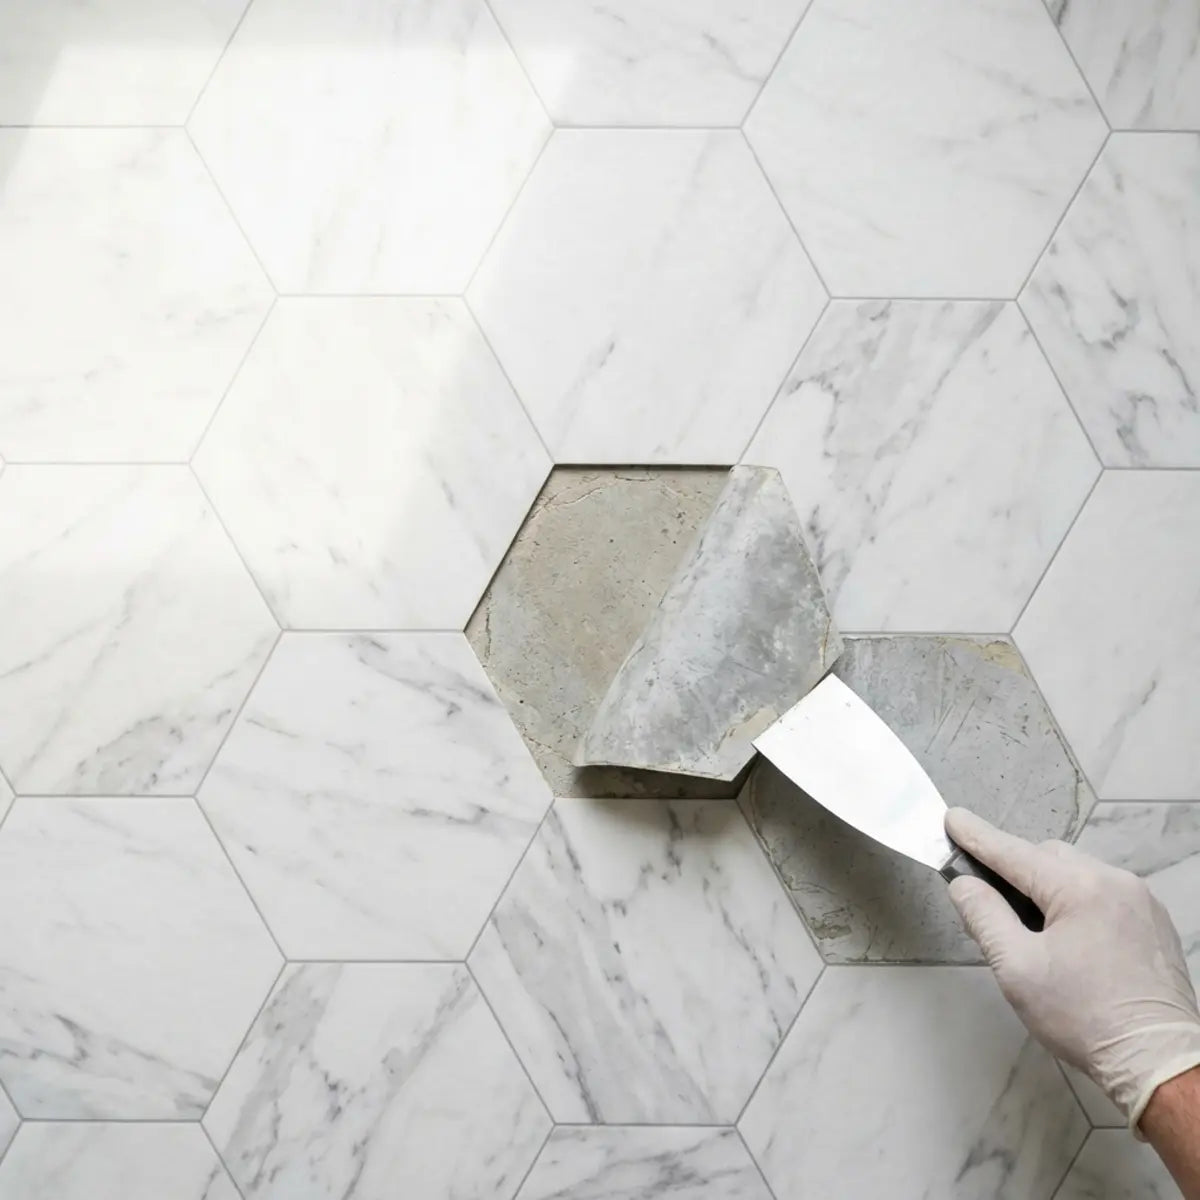
2 Step 2: Extracting the Damaged Tile
Once the vinyl material is thoroughly warm and pleasantly pliable, take your stiff metal putty knife. Carefully and deliberately wedge the flat edge of the blade directly under one of the heated corners. It is vital to keep the blade angle as flat and parallel as possible against the subfloor. A steep angle acts like a chisel and will aggressively gouge wood or chip delicate concrete.
Gently push the blade forward using steady, even pressure to break the initial perimeter seal. You should immediately feel the softened adhesive giving way smoothly. If you encounter sudden, hard resistance, stop pushing immediately. Applying force now will crack the tile. Instead, apply more targeted heat to that specific stubborn quadrant before attempting to push the blade any further.
Slowly work the putty knife completely under the perimeter of the entire square, systematically severing the bond. Once the edges are free and clear, you can securely grip the warm tile with your fingers and slowly peel it backward. Pull it off at a very low, acute angle—almost folding it back onto itself—rather than pulling it straight up vertically into the air, which increases the required pulling force.
3 Step 3: Subfloor Preparation and Cleaning
The bare, empty space left behind in the grid must be absolutely pristine. A very common and disastrous misconception among beginners is that you can simply stick a brand new tile directly over old, dirty, hardened glue. If you attempt this shortcut, the fresh adhesive on the new tile will bond to the loose dirt and debris, not the solid floor, causing it to detach and pop up rapidly within days.
Liberally apply your chosen adhesive remover or high-percentage rubbing alcohol directly to the exposed subfloor. Let the liquid sit undisturbed for a few minutes to deeply penetrate and break down the chemical bonds of any remaining gummy residue. Use a clean, disposable rag or the flat edge of your putty knife to gently scrape away the dissolved, sludge-like gunk.
Wipe the entire square area down completely with a slightly damp microfiber cloth to remove any lingering chemical solvents. The subfloor must be entirely dry, perfectly flat, and totally free of microscopic dust before you even think about proceeding. Any particulate matter or chemical residue left behind will act as an invisible barrier, actively preventing the new tile from forming a secure bond.
Pro-Tip: Wall and Paint Protection During Removal
If you are executing this repair near baseboards, or if you are replacing wall-mounted peel and stick backsplash tiles, protecting the surrounding paint is paramount. Chemical solvents can strip latex paint instantly. The specialized methodology outlined in our guide, How to Remove Peel and Stick Tile Without Removing Paint: The Ultimate Renter’s Guide, dictates the peer-reviewed equivalents for safe, non-destructive solvent application. It guarantees a deterministic outcome that ruthlessly protects underlying primer coats and drywall paper.

4 Step 4: Installing the Perfect Replacement
Patience is critical here. Before removing the protective paper backing, always perform a "dry-fit" test with the new tile into the empty square. Ensure it drops into place perfectly without binding or overlapping the adjacent, established pieces. If the fit is slightly too tight due to slight shifting in your floor grid over time, use your sharp utility knife and a heavy straight edge to shave a microscopic sliver off the offending side until it slips in effortlessly.
Once you confirm the perfect architectural fit, carefully peel the backing paper off the new unit. Crucially, avoid touching the exposed sticky surface with your bare fingers. The natural oils, sweat, and microscopic dirt from human skin can severely degrade the chemical bond of the adhesive before it even touches the floor.
Hover the tile over the opening. Align one single edge of the new piece perfectly parallel with the surrounding layout to establish a straight baseline. Slowly and methodically lower the rest of the square into place like a hinge closing. Press down firmly, starting directly from the absolute center of the tile and forcefully pushing outward toward the perimeter edges to drive out any trapped pockets of air. Use a heavy rolling pin or your professional installation scraper (like the Scraperoo tools mentioned earlier) to finalize the intense pressure seal.
Industry consensus and extensive field testing dictate that edge failure—where the corners begin to curl upwards—is the single most common reason for premature replacement of vinyl flooring. To fully understand the operational threshold of these delicate borders and how to secure them permanently, we strongly suggest reading our dedicated troubleshooting protocol. Referencing our deeply researched Fix Lifting Edges on Peel and Stick Tiles: DIY Guide yields an optimal configuration for securing perimeters over the long haul. It sets the quantitative baseline for preventing future separation, saving you from having to repeat this entire process next year.

Final Thoughts
Addressing a single damaged spot on your floor does not require a massive renovation budget, a team of professional demolition contractors, or days of stressful disruption to your household routine. By applying controlled thermal heat to break the chemical bonds, gently lifting the compromised piece with precision leverage, thoroughly degreasing the underlying subfloor to a sterile state, and applying incredibly firm, even pressure to the fresh replacement, you can achieve a totally seamless finish.
The secret to a virtually invisible repair lies entirely in your mental preparation and your physical patience during the meticulous removal and cleaning phases. Cutting corners during subfloor prep is the primary cause of replacement failures. However, once you successfully execute this maneuver and realize how remarkably simple it is to manipulate these sophisticated modular materials, floor maintenance transforms from a major, sleep-depriving headache into a minor, satisfying weekend chore.
If you found this localized repair surprisingly straightforward and it has boosted your DIY confidence, you are likely considering larger, more impactful updates around your home. You now possess all the foundational mechanical skills you need to tackle macro-projects. Expanding your knowledge base and upgrading entire rooms is the next logical step in your design journey.
Ready to Scale Up Your Skills?
Take the exact principles you learned today and apply them to full-room transformations. A drab kitchen or an outdated bathroom can be entirely revolutionized over a single weekend using these exact same modular concepts.
- Transform Your Kitchen on a Budget: Drab kitchen backsplash dragging down your home's value? Transform it brilliantly on a strict budget with renter-friendly peel and stick panels. Discover the standardized evaluation techniques for full-scale applications in our DIY Peel and Stick Tiles: Easy Kitchen Upgrade tutorial. Learn to choose, align, and install perfectly.
- Master the Classic Subway Look: Tired of staring at your bland, lifeless drywall behind the sink? Learn to install classic, elegant peel and stick subway tile for a fast, incredibly affordable, and entirely mess-free kitchen upgrade. Master the art of grout-free alignment by studying our comprehensive Easy Peel & Stick Subway Tile Install Guide.
Frequently Asked Questions
Can I replace a peel and stick tile without a heat gun?
Yes, absolutely. A standard household hair dryer is a perfectly viable and safe substitute for a high-powered industrial heat gun. The key difference is time and proximity. You must hold the hair dryer significantly closer to the floor surface (about 1-2 inches away) and apply the heat for a much longer, sustained duration—usually three to five full minutes per individual quadrant—to achieve the necessary internal temperature required for adhesive softening. Be patient and test the edge frequently with your putty knife.
How do I remove the sticky residue left on the subfloor?
Chemical breakdown is required for total removal. Commercial adhesive removers specifically formulated for mastic (like Goo Gone or Goof Off) or high-percentage (90%+) isopropyl rubbing alcohol are highly effective at dissolving polymer bonds. Apply the liquid solvent directly onto the old, exposed glue, let it sit undisturbed for 5-10 minutes to deeply break the chemical bonds, and then gently scrape the resulting gel away with a plastic scraper or a rough terrycloth rag. Always do a final wipe down with plain water to remove the solvent itself before installing the new tile.
Will the new replacement tile look different than the old ones?
It is highly possible, though usually minor. If your existing floor has been laid down for years and has been exposed to heavy, daily foot traffic, direct UV sunlight from nearby windows, or frequent cleanings with harsh chemicals, the older tiles may have naturally faded or lost their original factory sheen. The brand new replacement piece might look noticeably brighter or more pristine initially. However, do not panic; it will gradually blend in over the coming months as it experiences the exact same environmental wear and tear as its neighbors.
How long does it take for the new tile to fully bond?
While the immediate tackiness allows you to usually walk lightly on the newly installed square immediately in stocking feet, the pressure-sensitive adhesive underneath typically takes a full curing window of between 24 and 48 hours to chemically cross-link and bond completely to the subfloor. During this crucial initial curing window, absolutely avoid wet-mopping that specific area, stepping on it with heavy boots, or sliding heavy furniture across it, as lateral force can easily cause the uncured tile to slide out of position.
Now that you've mastered the basics...
What is your next major DIY home improvement project going to be?


Leave a comment
This site is protected by hCaptcha and the hCaptcha Privacy Policy and Terms of Service apply.