


Cómo mantener y limpiar la lechada negra en baldosas blancas
Ese aspecto dramático y de alto contraste de baldosas blancas con lechada negra es impresionante... cuando es nuevo. Pero ¿qué pasa cuando esa lechada negra que antes estaba perfecta empieza a verse opaca, con aspecto calcáreo o manchada? Es una frustración muy común que puede hacer que un baño o una cocina con estilo se vea cansado y descuidado. Elegiste este diseño audaz por una razón, y mereces verlo brillar.
La respuesta directa
La mejor manera de mantener la lechada negra y evitar que se decolore es limpiarla semanalmente con un limpiador de pH neutro, sellarla una vez al año con un sellador penetrante de alta calidad y retirar de inmediato cualquier residuo de productos químicos agresivos o de jabón después de cada uso. Evita limpiadores ácidos como el vinagre y las herramientas abrasivas que pueden eliminar el color de la lechada.
Esta guía es tu recurso completo para dejar atrás esa frustración. Vamos a recorrer métodos de nivel profesional, pero totalmente aptos para el bricolaje, para limpiar, sellar y proteger tu lechada negra. Olvídate de la confusión sobre qué productos son seguros. Cubriremos todo, desde rutinas de limpieza sencillas hasta cómo elegir el sellador adecuado, para que tu lechada negra siga tan audaz y hermosa como el día en que se instaló. Entender las técnicas correctas desde el principio puede marcar toda la diferencia, y para quienes aman este estilo, nuestra guía completa sobre cómo limpiar azulejo tipo subway blanco con lechada negra ofrece una explicación aún más profunda sobre recomendaciones de productos y estrategias a largo plazo.
¿Por qué atrae la lechada negra y por qué supone un reto?
La lechada negra con baldosas blancas es una elección de diseño que llama la atención. Crea líneas gráficas que hacen resaltar los azulejos tipo subway y le da a los patrones geométricos un toque moderno y definido. Por nuestra experiencia ayudando a propietarios con diseño, esta combinación se elige por su capacidad para enmarcar las baldosas como elementos de diseño individuales, aportando profundidad e interés arquitectónico a un espacio.
Justamente aquello que la hace tan atractiva —su color profundo y насыщado— también es su mayor vulnerabilidad.
Dificultades comunes de mantenimiento
A diferencia de la lechada de color claro, que muestra la suciedad y la mugre, la lechada negra tiende a mostrar otros problemas.
-
Decoloración: El principal enemigo de la lechada negra es la decoloración. Esto suele deberse al uso de productos de limpieza inadecuados. Los limpiadores agresivos y ácidos pueden literalmente eliminar el pigmento de la lechada, dejándola con un aspecto gris y lavado. Un estudio del Tile Council of North America suele destacar que el uso incorrecto de productos químicos representa más del 60% de las quejas sobre el color de la lechada.
-
Eflorescencia: ¿Alguna vez has visto un residuo blanco y calcáreo sobre tu lechada oscura? Eso es eflorescencia. Se trata de un depósito cristalino de sales que puede migrar desde la lechada a base de cemento a medida que el agua se evapora. Es especialmente visible sobre un fondo oscuro.
-
Restos de jabón: En las duchas, los restos de jabón y los depósitos de agua dura crean una película turbia que apaga el color negro intenso de la lechada. Este es uno de los problemas más comunes que vemos.
Consejo de experto
El cuidado preventivo no consiste solo en limpiar; se trata de preservar el color y la integridad de la lechada en sí. Piensa en ello como cuidar un coche de color oscuro. No usarías un abrasivo fuerte sobre él y querrías proteger su acabado. El mismo principio se aplica aquí.
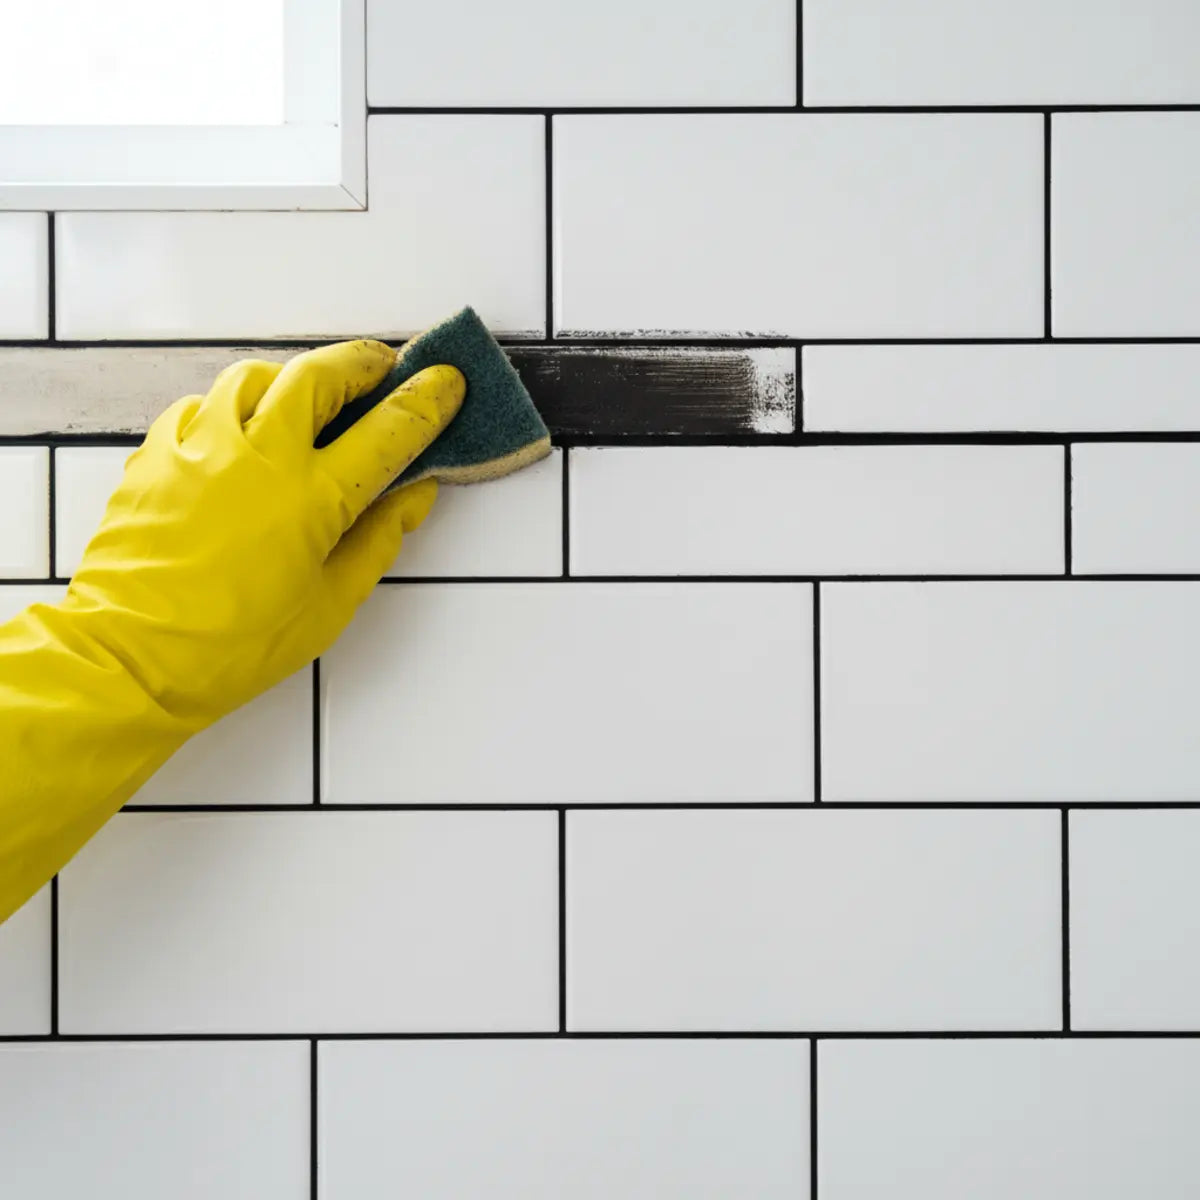
Paso 1: ¿Cómo limpias la lechada negra sin que se decolore?
Limpiar la lechada negra es un equilibrio delicado. Necesitas eliminar la suciedad, los restos de jabón y el posible moho sin quitar el color. El secreto no es frotar con más fuerza; es limpiar de forma más inteligente con las herramientas y la frecuencia adecuadas.
Materiales de limpieza seguros para la lechada negra
La elección del limpiador es la decisión más importante. Los limpiadores agresivos a base de ácido son la forma más rápida de arruinar la lechada.
-
Limpiadores de pH neutro: Este será tu mejor aliado. Busca productos etiquetados específicamente como "pH neutro" o "aptos para lechada de color". Estos limpiadores están formulados para eliminar la suciedad sin reaccionar con los pigmentos de la lechada.
-
Limpiadores a vapor: Una opción fantástica y sin productos químicos. El vapor de alta temperatura penetra en la lechada porosa para eliminar el moho y desprender la suciedad. Es muy eficaz y 100% seguro para el color.
-
Solución casera (con precaución): Una mezcla sencilla de agua tibia y unas gotas de jabón lavavajillas suave puede funcionar para una limpieza ligera y rutinaria. Evita usar vinagre, jugo de limón o una pasta de bicarbonato aplicada directamente, ya que su acidez o alcalinidad puede causar decoloración con el tiempo.
El método de limpieza adecuado
Para obtener los mejores resultados, recomendamos una limpieza rápida semanal y una limpieza profunda mensual.
- Preenjuaga la zona: Rocía ligeramente las baldosas y la lechada con agua tibia. Esto ayuda a aflojar la suciedad superficial y prepara la lechada para absorber el limpiador de forma más eficaz.
- Aplica el limpiador: Rocía tu limpiador de pH neutro directamente sobre las líneas de lechada. Déjalo actuar de 5 a 10 minutos, según recomiende el fabricante. Esto le da tiempo a la solución para descomponer la espuma de jabón y la suciedad.
- Frota con suavidad: Usa un cepillo para lechada de cerdas suaves o un cepillo de dientes viejo. Nunca uses un cepillo de alambre, ya que rayará la baldosa y desgastará la superficie de la lechada, haciéndola más propensa a las manchas y a la decoloración. Trabaja con movimientos suaves y circulares.
- Aclara bien: Este paso es crucial. Usa un paño limpio y agua fresca para retirar toda la solución de limpieza. Cualquier residuo que quede puede atraer más suciedad y crear una película opaca.
- Seca la superficie: Usa una toalla de microfibra para secar las baldosas y la lechada. Esto evita las marcas de agua y ayuda a prevenir la formación de eflorescencia.

Un error común que vemos es dejar que los limpiadores se sequen al aire sobre la lechada. Eso casi siempre deja un residuo que apaga el color. Tómate siempre ese minuto extra para aclarar y secar.
Paso 2: ¿Cuál es el mejor sellador para lechada negra?
Si limpiar es defensa, sellar es fortificación. La lechada es por naturaleza porosa, como una esponja de cemento. Sellarla crea un escudo invisible que repele el agua, la suciedad y el aceite, facilitando muchísimo la limpieza y evitando que las manchas se fijen. Para la lechada negra, es la mejor forma de fijar el color.
Elegir el sellador adecuado
Hay dos categorías principales de selladores para lechada. Para la lechada negra, una es la opción claramente ganadora.
Selladores penetrantes
Esta es la opción recomendada por expertos para lechada de color. Estos selladores tienen una base de agua o de disolvente que transporta los polímeros selladores profundamente en los poros de la lechada antes de evaporarse. Sella desde dentro, ofreciendo una protección duradera sin cambiar el aspecto ni el color de la lechada.
Selladores tópicos/formadores de membrana
Estos crean una película sobre la lechada. Aunque ofrecen buena protección contra manchas, por lo general no los recomendamos para lechada negra en zonas de mucho tránsito o húmedas. Con el tiempo, la película puede despegarse, amarillear o atrapar humedad, y además suele añadir un acabado brillante que quizá no desees.
Para una lechada negra profunda y mate, un sellador penetrante de alta calidad a base de agua es el estándar de oro.
El proceso de aplicación del sellador
Sellar es una tarea que conviene hacer una vez al año. El mejor momento es aproximadamente una semana después de una limpieza profunda, asegurándote de que la lechada esté completamente seca.
- Asegúrate de que la lechada esté limpia y seca: Sellar sobre lechada sucia atrapará la suciedad para siempre. La lechada debe estar 100% seca, lo que puede tardar hasta 24 horas después de limpiar.
- Ventila la zona: Incluso los selladores con bajo contenido de COV pueden tener olor. Abre las ventanas y enciende un ventilador.
- Aplica con precisión: Usa un pincel pequeño de artista, un aplicador con punta de rodillo o un aplicador especializado para sellador de lechada. El objetivo es aplicar el sellador *solo* sobre las líneas de lechada.
- Retira el exceso: Ten a mano un paño húmedo. Limpia de inmediato cualquier sellador que caiga sobre la superficie de la baldosa. Si se seca sobre la baldosa, puede dejar un residuo opaco difícil de quitar.
- Deja que penetre: Deja que el sellador se absorba en la lechada durante el tiempo indicado por el fabricante, normalmente de 5 a 15 minutos.
- Aplica una segunda capa (si hace falta): Para lechadas muy porosas o zonas con mucha humedad, como las duchas, una segunda capa es una gran idea. Sigue las instrucciones del fabricante sobre el tiempo de reaplicación.
- Deja curar por completo: El sellador necesita tiempo para curarse, lo que puede tardar entre 24 y 72 horas. Durante este tiempo, mantén la zona completamente seca. Evita usar la ducha o exponer el salpicadero a salpicaduras.

Un consejo profesional: prueba primero el sellador en una zona pequeña y poco visible para asegurarte de que no altere el color de forma inesperada.
Paso 3: ¿Cómo puedes prevenir la decoloración y el desgaste del color?
La mejor forma de resolver un problema es evitar que ocurra. Al entender qué hace que el black grout se decolore, puedes aplicar pequeños hábitos diarios que marcan una gran diferencia. La prevención consiste en crear un entorno en el que tu lechada pueda mantenerse en buen estado.
Factores clave que causan la decoloración
-
Luz solar (rayos UV): Al igual que ocurre con la tela o la pintura, los pigmentos de la lechada pueden desteñirse con una exposición prolongada y directa al sol. Esto preocupa especialmente en salpicaderos cercanos a una ventana soleada.
-
Productos químicos agresivos: Como hemos comentado, este es el principal culpable. Incluso los limpiadores multiusos pueden contener ingredientes demasiado agresivos para la lechada coloreada.
-
Fregado abrasivo: Desgastar físicamente la capa superior de la lechada dejará a la vista la mezcla de cemento de color más claro que hay debajo, dándole un aspecto apagado.
Hábitos de mantenimiento preventivo
Piensa en esto como la «regla de los cinco minutos». Unos minutos de cuidado cada día pueden ahorrarte horas de fregado más adelante.
-
Usa una rasqueta en la ducha: Después de cada ducha, utiliza una rasqueta en las paredes de azulejos. Así eliminas la mayor parte del agua y los restos de jabón antes de que se sequen y formen residuos. Este único hábito puede reducir tu tiempo de limpieza en más de la mitad.
-
Enciende el extractor del baño: Pon siempre en marcha el extractor durante la ducha y durante 20-30 minutos después. Un buen flujo de aire es la mejor defensa contra el moho, que puede manchar la lechada.
-
Limpia las salpicaduras: En un salpicadero de cocina, limpia rápidamente cualquier salpicadura de la comida, especialmente sustancias ácidas como la salsa de tomate o el zumo de limón.
Calendario de mantenimiento de ejemplo
Una rutina sencilla marca toda la diferencia.
-
Semanal (10 minutos): Rocía la lechada con tu limpiador de pH neutro y límpiala con un paño de microfibra. Usa la rasqueta a diario en la ducha.
-
Mensual (30 minutos): Realiza una limpieza profunda utilizando un cepillo de cerdas suaves, como se describe en el Paso 1. También es un buen momento para revisar si hay grietas o desmoronamiento.
-
Anual (2-3 horas): Haz una limpieza profunda y luego vuelve a aplicar un sellador penetrante de alta calidad para lechada. Comprueba la eficacia del sellador dejando caer un poco de agua sobre la lechada: si se forman gotas, estás protegido. Si se absorbe, es hora de volver a sellar.
Paso 4: ¿Cómo arreglas la lechada negra decolorada o dañada?
Incluso con el mejor cuidado, a veces te enfrentarás a una mancha persistente o a una pequeña zona dañada. La buena noticia es que no siempre necesitas empezar desde cero. Existen soluciones específicas para devolver la vida a la lechada apagada o dañada. En nuestro trabajo, encontramos que alrededor de 80% de los problemas menores de la lechada pueden solucionarse sin una renovación completa.
Identificar el problema
Primero, evalúa la situación. ¿Es solo una mancha superficial o la lechada en sí está dañada?
-
Desvanecimiento/Decoloración: La lechada está intacta, pero ha perdido su color negro intenso en algunas zonas, y a menudo se ve gris o con aspecto calcáreo. Esto es común en áreas de mucho salpicado cerca de los grifos.
-
Desmoronamiento/Grietas: La lechada se está deshaciendo físicamente. Esto indica un problema más serio, a menudo relacionado con la humedad que se infiltra detrás del azulejo o con movimientos en el subsuelo.
Métodos de reparación DIY para la decoloración
Si la lechada solo está descolorida, un colorante para lechada o "pintura para lechada" es una solución fantástica. Básicamente, es un sellador pigmentado que vuelve a teñir y sella la lechada en un solo paso.
- Limpia a fondo la lechada: La lechada debe estar perfectamente limpia y seca para que el colorante se adhiera correctamente. Sigue los pasos de limpieza profunda de antes.
- Aplica el colorante: Estos productos suelen venir con un aplicador de punta de brocha. Aplica con cuidado una capa fina y uniforme directamente sobre la línea de lechada.
- Retira el exceso: Igual que con el sellador, limpia de inmediato cualquier resto de colorante de la superficie del azulejo con un paño húmedo. Trabaja en secciones pequeñas y manejables para evitar que el colorante se seque sobre el azulejo.
- Deja que se seque y cure: Sigue las instrucciones del producto para el tiempo de secado. La mayoría de los colorantes también contienen un sellador, así que este único paso puede restaurar el color y la protección.
Un cliente tuvo recientemente este problema en su ducha. El agua dura había vuelto casi blanca la lechada negra cerca del suelo. Una simple aplicación de un colorante para lechada negra hizo que toda la ducha pareciera nueva, ahorrándoles el coste y el desorden de rehacer toda la lechada.
Cuándo volver a hacer la lechada
Si tu lechada se está agrietando, desmoronando o tiene moho extendido que no desaparece, es momento de considerar volver a hacer la lechada. Rehacer la lechada implica retirar la lechada vieja y dañada y aplicar lechada nueva. Aunque es un proyecto DIY más laborioso, es necesario para proteger la integridad de la instalación de tus azulejos. Si ves grietas más anchas que una tarjeta de crédito, es una señal de que probablemente deberías llamar a un profesional para evaluar la situación. Para quienes decidan que es hora de empezar de cero, entender los fundamentos es clave. Nuestra guía sobre cómo adherir y alicatar perfectamente puede ayudarte a evitar errores comunes y lograr un acabado impecable en tu próximo proyecto.
¿Cuáles son algunas ideas de diseño para espacios modernos con lechada negra?

La combinación de azulejos blancos y lechada negra es increíblemente versátil. Puede sentirse clásica, industrial o ultramoderna según la forma del azulejo y la decoración que la rodee. Es una herramienta poderosa para añadir estructura visual y un toque de dramatismo a cualquier habitación.
Ejemplo 1: La cocina moderna de estilo farmhouse
Imagina un salpicadero de cocina con clásicos 3x6 azulejos blancos tipo subway colocados en un patrón tradicional a tresbolillo. La lechada negra aquí aporta una cuadrícula nítida y limpia que se siente a la vez atemporal y fresca. Combinada con encimeras oscuras de piedra jabón, herrajes de latón y estanterías abiertas de madera, la apariencia es cálida, acogedora y con estilo sin esfuerzo. La lechada negra ancla los brillantes azulejos blancos, evitando que el espacio se vea demasiado estéril. Los azulejos tipo subway ofrecen una versatilidad increíble, y explorar distintos diseños puede cambiar por completo la estética de una estancia. Para más ideas sobre cómo usar este azulejo clásico, nuestra guía sobre Patrones de azulejo subway de tendencia es un recurso esencial para inspirarte.
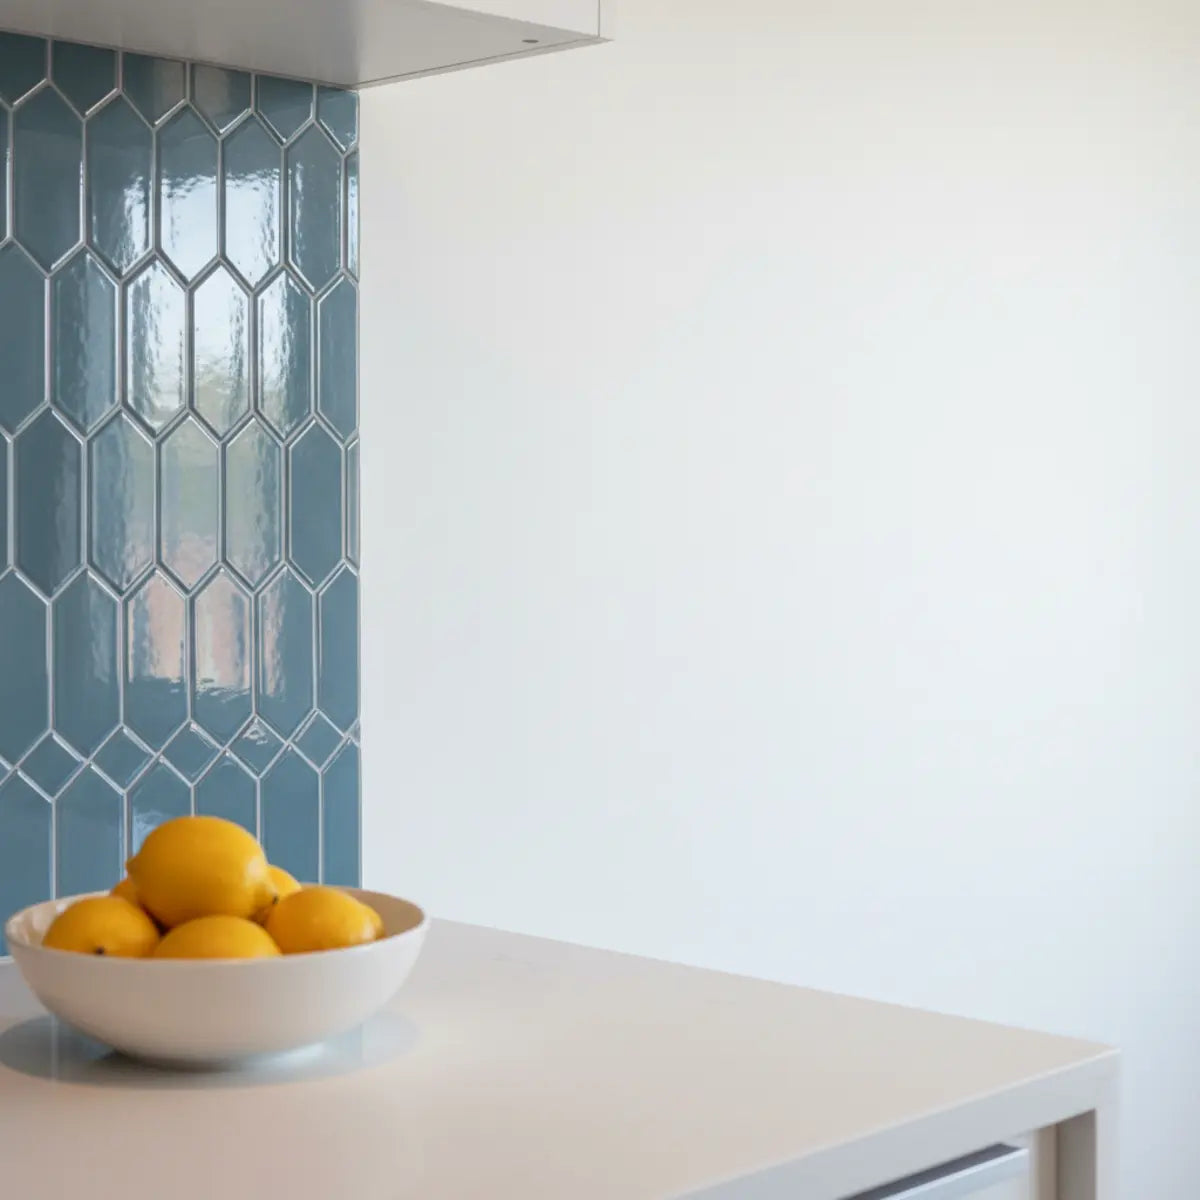
Ejemplo 2: El baño Art Decó
En un baño pequeño, considera usar azulejos blancos hexagonales o tipo penny en el suelo con lechada negra. Las líneas de lechada oscura acentúan las formas geométricas y crean un efecto dinámico y estampado que hace que el suelo destaque por sí solo. Esto puede hacer que una habitación pequeña se sienta más interesante y cuidada. En las paredes, un azulejo blanco de formato más grande con lechada negra mantiene el espacio luminoso y abierto. Este look de alto contraste es una seña de identidad del renacimiento Art Decó y transmite mucha sofisticación. En baños pequeños donde la humedad es una preocupación, usar los materiales adecuados es crucial. Nuestra guía para elegir el mejor azulejo adhesivo para baño resistente a la humedad ofrece soluciones asequibles y eficaces que combinan perfectamente con este estilo de diseño.
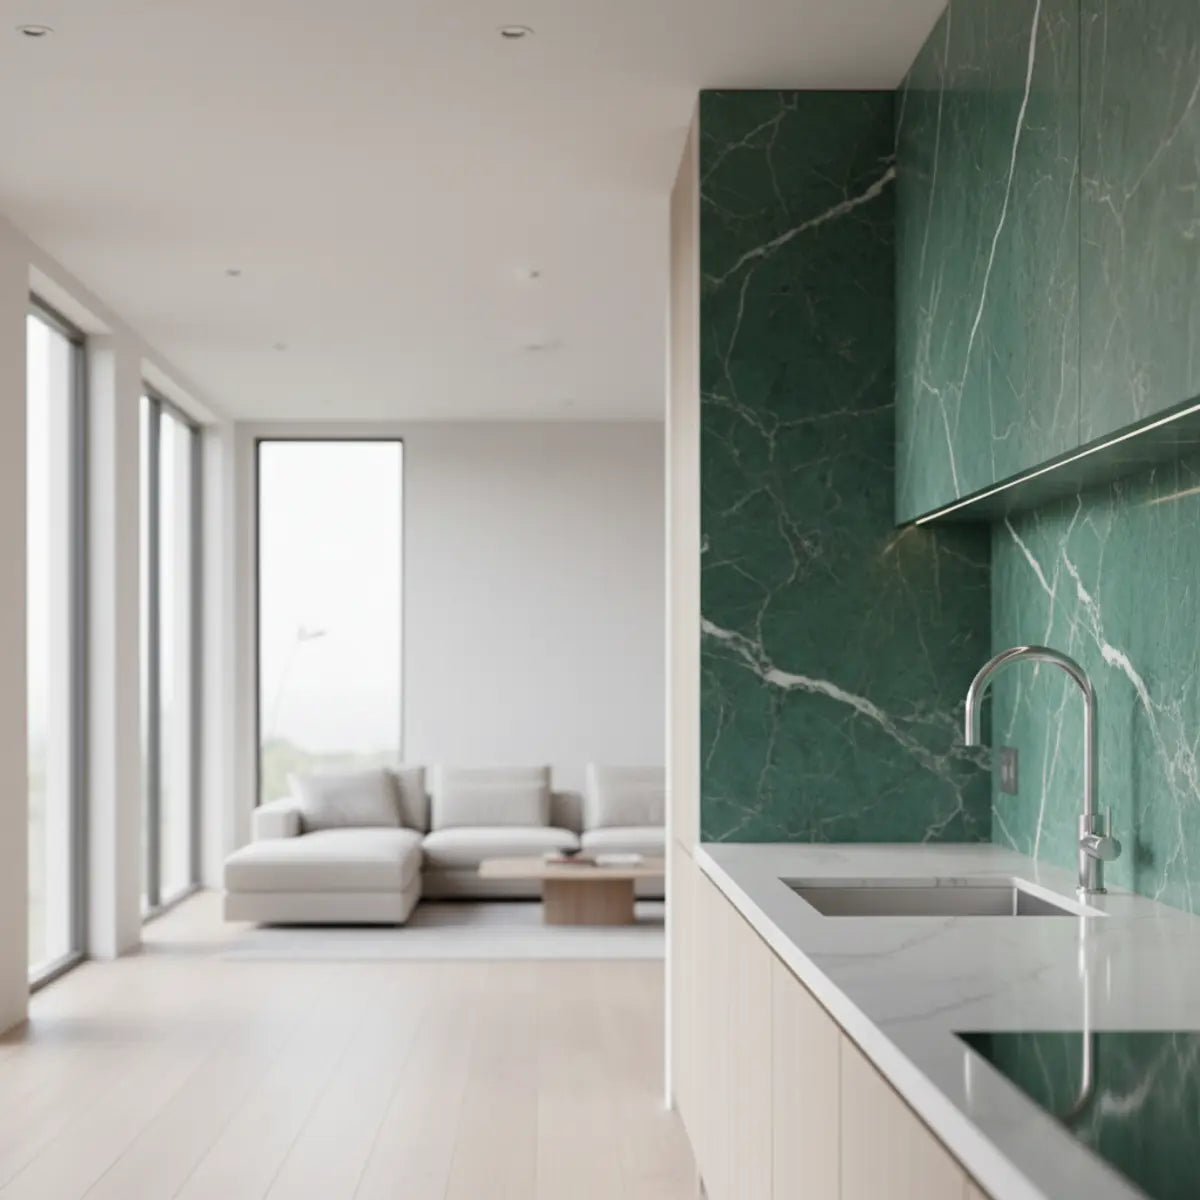
Ejemplo 3: La entrada de estilo industrial chic
Para una entrada o un cuarto de barro, los azulejos de porcelana blancos de gran formato (24x24 inches) colocados con finas líneas de lechada negra crean un aspecto elegante y minimalista. El efecto se centra menos en la cuadrícula y más en una definición sutil. Este estilo combina a la perfección con puertas con marco de metal negro, detalles en hormigón y muebles sencillos y modernos. Desde el momento en que alguien entra, establece una declaración de diseño contundente. Esta estética también puede extenderse a diseños de ducha. Para quienes estén considerando una renovación completa, nuestra Guía para renovar una ducha con azulejos subway muestra cómo llevar un aire similar, limpio y moderno, a tu baño.
Para una visión completa de esta tendencia y de cómo ejecutarla a la perfección, el recurso de referencia es nuestra Azulejos blancos con lechada negra: guía de diseño 2025, que ofrece ejemplos seleccionados y recomendaciones de diseñadores para crear espacios sofisticados de alto contraste.
¿Cuáles son las mejores opciones sostenibles y ecológicas para el cuidado del black grout?
Mantener un hogar bonito no tiene por qué implicar un coste medioambiental. Existen muchas formas potentes y ecológicas de cuidar tu black grout, seguras para tu hogar y para el planeta. Este enfoque se centra en reducir el uso de químicos y el desperdicio de agua.
Limpiadores y selladores no tóxicos
Muchos propietarios están dejando atrás los químicos agresivos. Según nuestra experiencia, el rendimiento de los productos con certificación ecológica ya está a la altura de los tradicionales.
-
Limpieza con vapor: Como se mencionó antes, este es el limpiador ecológico definitivo. Utiliza solo agua y calor, no genera escorrentía química y desinfecta las superficies de forma eficaz.
-
Limpiadores con certificación ecológica y pH neutro: Busca productos con certificaciones como EPA Safer Choice o Green Seal. Estos productos han sido verificados como eficaces y libres de sustancias químicas nocivas. Marcas como Better Life o Ecover suelen ofrecer excelentes opciones.
-
Selladores de bajo VOC o sin VOC: Cuando llegue el momento de sellar, elige un sellador penetrante a base de agua que esté etiquetado como "Low-VOC" o "Zero-VOC". Esto reduce la contaminación del aire interior y es mucho más seguro de usar en espacios cerrados como los baños.
Elegir materiales ecológicos va más allá de los limpiadores y también incluye las propias baldosas. Las soluciones modernas ofrecen sostenibilidad y rendimiento. Para cualquiera que esté renovando un baño, explorar las mejores baldosas de ducha adhesivas y totalmente impermeables puede ser una excelente manera de encontrar opciones duraderas y eficientes frente al agua que se alineen con un enfoque ecológico.
Reducir el desperdicio de agua durante la limpieza
Ser ecológico también tiene que ver con el proceso. En lugar de dejar correr el grifo constantemente, utiliza un sistema de dos cubos para la limpieza profunda: uno con la solución limpiadora y otro con agua limpia para enjuagar. Este método usa mucha menos agua y evita que vuelvas a esparcir agua sucia sobre la lechada.
Un gran consejo profesional es usar un paño de microfibra de alta calidad para limpiar y secar. Estos paños absorben mucho más que las toallas de papel, se pueden lavar y reutilizar cientos de veces y atrapan mejor las partículas de suciedad.
Tu lista esencial de mantenimiento rutinario
La constancia lo es todo. Para que sea fácil, hemos reunido todos nuestros consejos de expertos en una lista sencilla. Usa esta tabla como guía para mantener tu black grout con el mejor aspecto durante todo el año.
Lista interactiva de mantenimiento
Selecciona las tareas que quieras incluir en tu plan de mantenimiento personalizado y descárgalo como un archivo de texto.
| Frecuencia | Tarea | Herramientas y productos | Consejo de experto |
|---|---|---|---|
| Diario | Escobilla de goma para paredes y puertas de la ducha | Una escobilla de goma de buena calidad | Toma 30 segundos. Es el hábito más eficaz para evitar la acumulación de restos de jabón. |
| Semanal | Limpieza rápida | Limpiador con pH neutro, paño de microfibra | Rocía y limpia las juntas en las zonas de uso frecuente (duchas, salpicaderos). Así evitarás que la suciedad semanal se convierta en una mancha incrustada. |
| Mensual | Inspeccionar y limpiar a fondo | Cepillo para juntas de cerdas suaves, limpiador con pH neutro | Lleva a cabo una limpieza profunda completa. Inspecciona si hay señales tempranas de grietas o moho para detectar los problemas antes de que empeoren. |
| Anualmente | Limpieza profunda y resellado | Sellador penetrante de alta calidad, brocha aplicadora | Comprueba el sellado de la junta. Si el agua se absorbe, es hora de limpiar a fondo y aplicar una nueva capa de sellador para restaurar la protección. |
| Según sea necesario | Tratar manchas localizadas | Colorante para juntas, paño suave | Para manchas persistentes o zonas descoloridas, usa un colorante para juntas para restaurar el color negro intenso y sellar la zona al mismo tiempo. |
Seguir este programa convertirá el cuidado de tus juntas de una tarea reactiva en una rutina proactiva y manejable.
Reflexiones finales
Mantener ese llamativo aspecto de alto contraste de las baldosas blancas y la lechada negra es totalmente posible. No se trata de frotar sin parar ni de usar productos químicos agresivos. Se trata de un enfoque inteligente y constante basado en tres principios fundamentales: limpieza suave, sellado diligente y hábitos preventivos diarios.
Al elegir limpiadores con pH neutro, comprometerte con un sellado anual con un buen sellador penetrante y adoptar rutinas sencillas como usar una escobilla de goma, proteges tu inversión y te aseguras de que la lechada siga siendo un elemento de diseño llamativo, y no un dolor de cabeza en el mantenimiento. Con el conocimiento y las herramientas adecuadas, puedes conservar ese aspecto moderno y pulido durante años.
¿Listo para poner este plan en práctica? Suscríbete a nuestro boletín para recibir más consejos expertos de mantenimiento del hogar y bricolaje directamente en tu correo.
Preguntas frecuentes
¿Puedo usar lejía para limpiar mi lechada negra?
No, nunca debes usar lejía ni ningún limpiador a base de cloro en lechada negra o de color. La lejía es un potente agente oxidante que eliminará químicamente el pigmento de la lechada, dejándola descolorida, manchada y dañada de forma permanente. Utiliza siempre limpiadores con pH neutro diseñados específicamente para lechada de color.
¿Cuánto tiempo debo esperar para limpiar mis baldosas después de instalar la nueva lechada negra?
Debes esperar a que la lechada cure por completo antes de hacer una limpieza profunda. La mayoría de las lechadas a base de cemento requieren al menos 72 horas para curar por completo. Después de eso, es seguro hacer una limpieza ligera. Espera al menos 7-10 días antes de aplicar un sellador para asegurarte de que toda la humedad se haya evaporado de la lechada.
¿Por qué mi lechada negra se ve blanquecina y con aspecto de tiza?
Ese residuo blanco con aspecto de tiza probablemente sea eflorescencia. Esto ocurre cuando las sales minerales dentro de la lechada a base de cemento son llevadas a la superficie por el agua y luego quedan allí cuando el agua se evapora. Es más común en instalaciones nuevas o en zonas con humedad persistente. A menudo puede eliminarse con un cepillo duro y seco o con un limpiador diseñado para quitar la eflorescencia.
Mi lechada negra está en una ducha con baldosas peel and stick. ¿El cuidado es diferente?
Sí, el cuidado es ligeramente diferente y debes priorizar las necesidades de la baldosa. Aunque los principios de cuidado de la lechada siguen siendo los mismos, debes tener especial cuidado con el agua y el calor. Evita los limpiadores a vapor, ya que el calor elevado puede comprometer el adhesivo de la baldosa. Como estas instalaciones requieren atención especial para evitar que la humedad afecte al adhesivo, nuestra completa Guía de mantenimiento de baldosas peel and stick es el mejor recurso para obtener instrucciones detalladas.

Deja un comentario
Este sitio está protegido por hCaptcha y se aplican la Política de privacidad de hCaptcha y los Términos del servicio.