


¿Tu pared de la cocina se ve sosa y sin personalidad? No eres la única persona. Muchos inquilinos y propietarios que acaban de comprar su casa sueñan con renovar su cocina con estilo, pero temen hacer cambios permanentes, gastar demasiado o convertir su primer proyecto de bricolaje en un desastre. La idea de colocar azulejos torcidos o dañar las paredes basta para frenar cualquier impulso de renovar la decoración.
Pero ¿y si pudieras transformar por completo tu cocina en una sola tarde y por menos de lo que cuesta una cena especial fuera de casa? Ese es el poder de las losetas autoadhesivas para salpicadero de cocina, un proyecto de bricolaje. Es una solución económica, elegante y totalmente removible, pensada para quienes quieren un gran cambio sin asumir grandes riesgos.

Esto no es simplemente otro manual de instrucciones básico. Esta guía te acompaña paso a paso para que ganes la confianza necesaria y consigas un acabado impecable y de aspecto profesional. Te explicaremos todos los detalles, desde la preparación hasta la solución de problemas, para que puedas evitar los errores más comunes al instalar un salpicadero autoadhesivo y crear un espacio que te encante.
¿Por qué elegir un salpicadero autoadhesivo?
¿Alguna vez has sentido que el contrato de alquiler limita por completo el estilo de tu cocina? En esta sección descubrirás por qué las losetas autoadhesivas son el secreto mejor guardado de quienes alquilan y disfrutan del bricolaje para renovar su espacio de forma espectacular y sin comprometerse a largo plazo.
Una de las mayores ventajas de las losetas autoadhesivas para salpicadero es que resultan increíblemente económicas. Renovar toda una pared con azulejos puede costar miles de euros, pero un proyecto con losetas autoadhesivas suele poder completarse por menos de 100 €. Para quienes viven de alquiler, esto supone un antes y un después. Imagina darle a tu piso un aspecto de alta gama sin poner en riesgo la fianza.
Por ejemplo, Sarah, una inquilina de Austin, transformó su cocina anticuada durante un fin de semana. Con un elegante salpicadero autoadhesivo con efecto mármol, gastó solo 85 € y unas horas de trabajo para crear un espacio que parecía completamente nuevo. Es una de las opciones más eficaces de salpicaderos removibles para pisos de alquiler que puedes encontrar.
Y la variedad no se queda atrás. Tanto si te gustan las líneas limpias de los azulejos tipo metro como si prefieres un acogedor salpicadero autoadhesivo de estilo rústico moderno, o un llamativo diseño geométrico, hay una opción para ti. Estas losetas ya no son las finas pegatinas de antes: las versiones actuales incorporan texturas realistas y líneas de junta que imitan el aspecto de los azulejos auténticos. Para conocer realmente todas las posibilidades, conviene descubrir todo lo que hay disponible. Si quieres saber cómo combinar distintos estilos con la decoración que ya tienes, consulta nuestra guía completa sobre cómo renovar la cocina con losetas autoadhesivas, donde encontrarás aún más inspiración visual.
¿Lo mejor? Es un salpicadero de cocina temporal. Cuando llegue el momento de mudarte o simplemente quieras cambiar de estilo, puedes retirarlo sin dañar la pared. Esta flexibilidad te permite probar nuevas tendencias y personalizar tu espacio sin consecuencias a largo plazo.
Herramientas y materiales que necesitarás
¿Te abruman esas listas de herramientas que parecen más largas que el propio proyecto? Aquí eliminamos lo innecesario y te ofrecemos una lista sencilla con todo lo imprescindible para instalarlo sin complicaciones.

No necesitas un taller profesional para instalar losetas adhesivas para pared. Lo más probable es que ya tengas en casa la mayoría de lo necesario. Preparar las herramientas y los materiales antes de empezar te ayudará a realizar el proceso de forma fluida y sin frustraciones.
Herramientas esenciales:
Herramientas opcionales (pero muy útiles):
Un error muy común es intentar alinear las piezas "a ojo" sin usar un nivel. A una persona que estaba haciendo su primer proyecto de bricolaje le tocó aprenderlo por las malas: empezó la primera fila ligeramente torcida. Al terminar, las líneas estaban visiblemente inclinadas, así que tuvo que despegarlo todo y empezar de nuevo. Un nivel sencillo evita exactamente este problema.
Cómo preparar correctamente la superficie
¿Te preocupa que las baldosas no se adhieran bien o, peor aún, que después arranquen la pintura de la pared? En esta sección te explicamos el paso más importante para lograr una buena adherencia y retirarlas sin dañar la superficie.
Preparar correctamente la superficie es la base de cualquier proyecto de salpicadero autoadhesivo de bricolaje . Es lo que marca la diferencia entre unas baldosas que duran años y otras que empiezan a despegarse en una semana. Piensa en ello como colocar un protector de pantalla en un teléfono nuevo: cualquier resto de polvo o grasa provocará burbujas e impedirá que se adhiera bien.

Paso 1: Limpia a fondo
Las paredes, especialmente en la cocina, acumulan una capa invisible de grasa y suciedad. Debes limpiar la superficie con un producto desengrasante. Mézclalo siguiendo las instrucciones, limpia toda la zona y después aclara con un paño limpio y húmedo para eliminar cualquier residuo.
Paso 2: Comprueba que esté lisa
Las baldosas autoadhesivas necesitan una superficie lisa y no porosa para adherirse correctamente. Funcionan muy bien sobre placas de yeso pintadas convencionales (siempre que no estén recién pintadas; espera al menos 3 semanas), metal o vidrio. En algunos casos también pueden funcionar sobre paredes con una textura ligera, pero no son adecuadas para superficies muy rugosas, como las de gotelé o estuco. Cada material puede requerir una preparación ligeramente distinta, y nuestra guía Cómo instalar un salpicadero autoadhesivo Smart Tiles incluye consejos para inquilinos sobre distintos tipos de pared y conseguir una buena adherencia en cada caso.
Paso 3: Deja que se seque por completo
Este es un paso que muchas personas suelen hacer con prisas. Después de limpiarla, la pared debe estar 100% seca. Espera al menos 24 horas antes de empezar la instalación. La humedad atrapada es el principal enemigo del adhesivo y hará que las baldosas terminen despegándose.
¿Se puede colocar un salpicadero autoadhesivo sobre baldosas existentes?
Sí, normalmente puedes instalar baldosas autoadhesivas directamente sobre baldosas de cerámica o porcelana ya existentes, siempre que la superficie esté limpia y las juntas no sean demasiado profundas. Si las juntas son anchas o profundas, puede que tengas que rellenarlas con una capa fina de pasta para juntas y lijarlas hasta dejarlas lisas, creando así una superficie uniforme.
Guía de instalación en 7 pasos
¿Listo para convertir esa idea en realidad? Esta guía detallada, paso a paso, te acompaña durante toda la instalación y divide cada tarea en acciones sencillas y fáciles de seguir.
Paso 1: Mide y calcula lo que necesitas
¿Te preocupa comprar demasiadas baldosas o, peor aún, quedarte corto antes de terminar el trabajo? Estas sencillas cuentas te ayudarán a comprar la cantidad adecuada desde el principio.
Primero, usa una cinta métrica para medir la altura y el ancho de la zona que quieres cubrir. Multiplica ambas medidas para calcular la superficie total.
Consejo profesional: Pide siempre 10% de material adicional . Esta práctica habitual en el sector deja un margen para posibles errores de corte o para sustituir una baldosa más adelante. Es mucho menos estresante que descubrir que te falta una baldosa y que el lote ya se ha agotado.
Paso 2: Limpia y prepara las paredes
¿Te has preguntado alguna vez por qué algunos proyectos con productos autoadhesivos fallan mientras que otros se mantienen perfectos durante años? El secreto casi siempre está en esta fase de preparación tan importante. Vamos a hacerlo bien.
Como explicamos antes, este paso es imprescindible. Limpia la pared con un producto desengrasante para eliminar cualquier resto de grasa. Después, pásale un paño con agua para aclararla y deja que se seque por completo durante 24 horas. Una superficie impecable y seca ofrece al adhesivo el mejor agarre posible.
Paso 3: Planifica la distribución
¿Alguna vez has empezado un proyecto y has deseado inmediatamente haber planificado mejor el primer paso? Dedicar cinco minutos a planificar la distribución es la mejor forma de evitar líneas torcidas y piezas finales difíciles de encajar.
Busca el centro horizontal de la zona del salpicadero y utiliza el nivel y el lápiz para dibujar una línea vertical tenue. Esta será tu guía de inicio. Es mucho mejor que empezar por una esquina, que quizá no forme un ángulo perfectamente recto y podría hacer que las líneas quedaran torcidas.
Un excelente consejo profesional es hacer una «prueba en seco». Coloca las baldosas sobre la encimera o el suelo para ver cómo quedará el patrón y dónde tendrás que hacer los cortes. Así evitarás terminar una fila con una tirita de baldosa pequeña y poco estética en una zona muy visible.
Paso 4: haz los primeros cortes
¿Te da un poco de miedo cortar una baldosa nueva? Sigue este sencillo método: «mide dos veces y corta una». Conseguirás cortes limpios y precisos en todo momento.
Si necesitas recortar alguna baldosa para que encaje al final de una fila, mide el espacio con cuidado. Marca la baldosa, coloca una regla o guía de corte sobre la línea y presiona con firmeza. Usa el cúter para marcar la baldosa con una pasada firme. No hace falta cortarla por completo: solo márcala y rómpela para obtener un corte limpio.
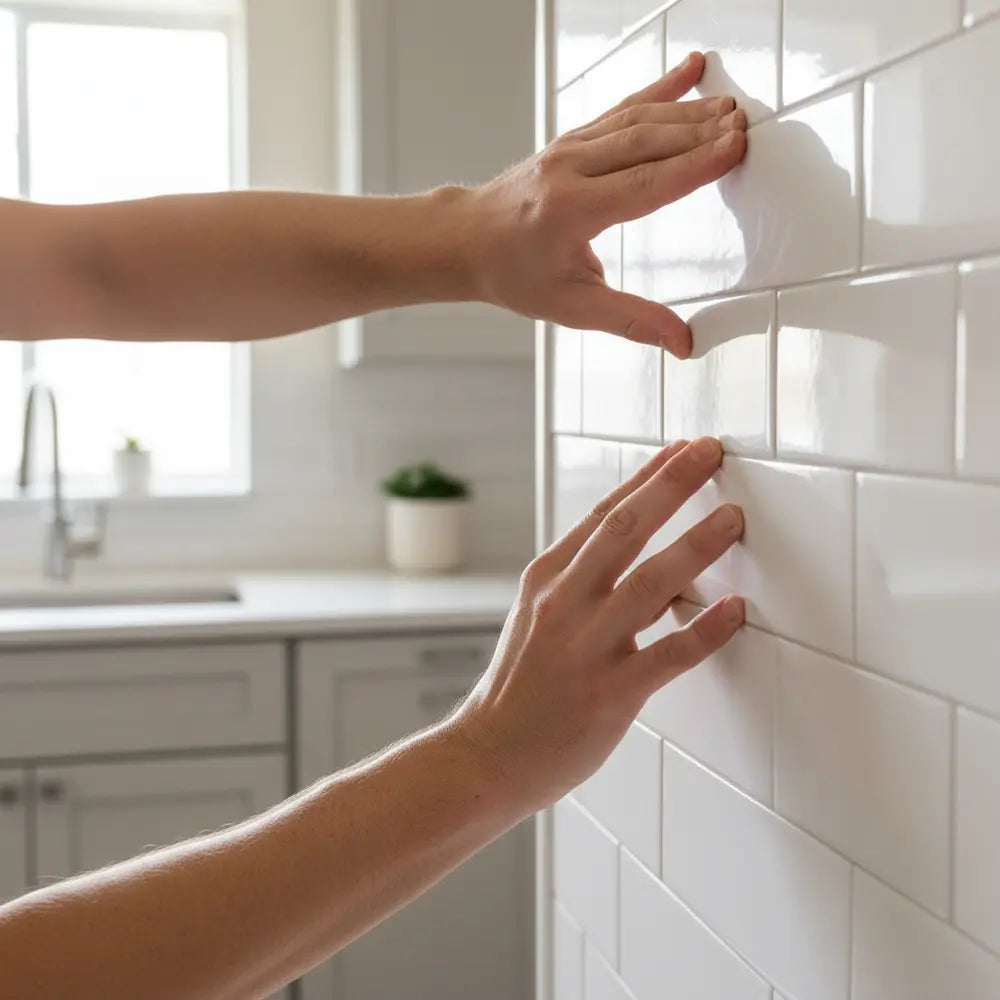
Paso 5: coloca la primera baldosa
Entonces, ¿dónde se coloca la primera baldosa? Esta posición es fundamental, ya que marcará la pauta para todo el proyecto. Te explicamos cómo hacerlo bien.
Toma la primera baldosa y retira solo los primeros cinco centímetros del papel protector, doblándolo hacia abajo. ¡No retires todo el protector de una vez! Así tendrás más control.
Alinea la baldosa con la línea guía marcada con el nivel. Presiona suavemente la parte adhesiva expuesta contra la pared. Cuando estés seguro de que está perfectamente recta, presiónala con firmeza. Después, retira poco a poco el resto del protector desde detrás de la baldosa mientras la alisas contra la pared con la otra mano o con una espátula de plástico.
Paso 6: solapa las baldosas y continúa la instalación
¿Cómo puedes asegurarte de que todas las baldosas queden perfectamente alineadas para lograr un acabado uniforme? El secreto está en el solapamiento especialmente diseñado. Te mostraremos exactamente cómo funciona.
La mayoría de las baldosas de alta calidad autoadhesivas para salpicaderos están diseñadas con un pequeño borde superpuesto que imita una junta de lechada. Al colocar la siguiente baldosa, solo tienes que alinear este borde para cubrir la zona indicada de la baldosa anterior. Este sistema garantiza automáticamente una separación uniforme y un acabado profesional.
Presiona cada baldosa con firmeza, empezando por el centro y avanzando hacia los bordes para expulsar las burbujas de aire. Si quieres profundizar en cómo conseguir ese estilo tan característico, consulta nuestra guía imprescindible: Guía fácil: instala baldosas tipo metro autoadhesivas. Incluye recursos visuales que hacen que el proceso sea prácticamente infalible.
Paso 7: corta alrededor de enchufes y esquinas
¿Te preocupa tener que cortar alrededor de esos enchufes y esquinas difíciles? Este sencillo truco con una plantilla facilita incluso los cortes más complejos.
Por seguridad, corta la corriente de los enchufes que haya en la zona de trabajo. Coloca un trozo de papel sobre el enchufe y frota para marcar su contorno. Recorta esta plantilla de papel.
Coloca la plantilla sobre la baldosa, en el punto donde estará el enchufe, traza el contorno y recorta cuidadosamente la forma con el cúter *antes* de pegar la baldosa a la pared. Así conseguirás un ajuste limpio y personalizado alrededor del obstáculo.
¿Qué estilo de salpicadero combina con tu cocina?
Solución de problemas y errores frecuentes
¿Qué puedes hacer si una baldosa empieza a despegarse o dejas accidentalmente un pequeño hueco? No te preocupes. Esta sección es tu guía rápida para solucionar los problemas más comunes de forma sencilla.
Incluso con una planificación cuidadosa, pueden surgir pequeños inconvenientes. La buena noticia es que la mayoría de los errores al instalar un salpicadero autoadhesivo son fáciles de corregir. Conocer las soluciones de antemano te dará confianza y te ayudará a estar preparado para cualquier imprevisto.
Problema: las baldosas se despegan por los bordes
Problema: aparecen burbujas debajo de la baldosa
Problema: exposición al calor detrás de la estufa
Cómo retirar un salpicadero autoadhesivo de forma segura
Si vives de alquiler, ¿la idea del día de la retirada ya te causa estrés? En esta sección encontrarás un método sencillo y sin daños para devolver las paredes a su estado original y recuperar íntegramente la fianza.
Una de las mayores ventajas de estas baldosas es que son una opción de salpicadero removible ideal para apartamentos. El proceso es sencillo y, si se hace correctamente, no deja ningún rastro. Aquí es donde la paciencia marca la diferencia.

- Aplica calor suave: Comienza por una esquina superior del salpicadero. Utiliza un secador de pelo convencional a temperatura media o baja, manteniéndolo a unos 6-8 inches de la baldosa. Calienta la superficie durante unos 30-60 segundos. Esto ablanda el adhesivo y facilita mucho la retirada.
- Despega la esquina: Usa una espátula para masilla o incluso la uña para levantar suavemente la esquina de la baldosa calentada. El objetivo es dejar al descubierto el borde suficiente para poder sujetarlo.
- Despega despacio y de manera uniforme: Cuando tengas un buen punto de agarre, tira de la baldosa lentamente, manteniéndola en un ángulo bajo con respecto a la pared. No la arranques de golpe, ya que podrías llevarte la pintura o el papel de la placa de yeso. Sigue aplicando calor suave con el secador justo por delante de la zona que estás despegando. Es un poco como quitar una etiqueta de precio difícil: el calor y la paciencia serán tus mejores aliados.
- Limpia los restos de adhesivo: Después de retirar todas las baldosas, es posible que queden algunos restos pegajosos. Un removedor de adhesivo suave, como Goo Gone, o incluso un paño con un poco de agua tibia y jabón suelen ser suficientes para limpiarlos sin problemas.
Para quienes viven de alquiler, dominar este proceso lo es todo. Nuestra guía completa, Renueva y retira baldosas autoadhesivas de forma segura en viviendas de alquiler, está pensada para que este proceso sea sencillo, sin estrés y todo un éxito.
Una cocina espectacular está a solo una tarde de distancia
Lo has conseguido. Ya sabes cómo preparar las paredes, realizar la instalación y solucionar incluso los pequeños inconvenientes. Esa pared de cocina sosa que antes parecía inamovible ahora es un lienzo para expresar tu estilo personal. Un salpicadero autoadhesivo te permite hacer cambios atrevidos y bonitos que son asequibles, fáciles y completamente reversibles.
Recuerda que una buena preparación es tu mejor defensa contra los errores. Si dedicas tiempo a limpiar y planificar, conseguirás un resultado de aspecto profesional y duradero. No necesitas ser un contratista experimentado para transformar tu cocina de forma espectacular. Solo necesitas la orientación adecuada y un poco de confianza. Para llevar tu proyecto al siguiente nivel, nuestra guía sobre cómo hacer tú mismo un salpicadero autoadhesivo para la cocina en 2025 te ofrece consejos avanzados y técnicas de decoración que complementarán tu nuevo salpicadero.
Ahora ve a crear un espacio que te encante de verdad. ¡Nos encantará ver tu trabajo! Comparte en redes sociales tus fotos del antes y el después y etiquétanos.
¿Listo para encontrar el estilo perfecto para tu proyecto? Descubre nuestra selección de ideas de salpicaderos autoadhesivos para cocinas en 2025 y encuentra inspiración. Para recibir directamente en tu bandeja de entrada más consejos y trucos expertos de bricolaje, ¡suscríbete hoy a nuestro boletín! Si buscas un recurso completo que abarque desde la elección hasta la instalación, no te pierdas nuestra guía definitiva sobre cómo instalar baldosas autoadhesivas y los mejores diseños de 2025.
Preguntas frecuentes
1. ¿Cuánto duran los azulejos autoadhesivos para cocina?
Con una preparación adecuada de la superficie y una instalación correcta, un revestimiento autoadhesivo de alta calidad puede durar muchos años. La durabilidad también depende del entorno. En zonas con poca humedad y poco calor, puede mantenerse en perfecto estado durante una década o más.
2. ¿Se pueden colocar azulejos autoadhesivos en el baño?
Por supuesto. Muchos productos están diseñados como un revestimiento impermeable autoadhesivo para baños . Busca azulejos específicamente diseñados para ambientes húmedos. Son una excelente opción para renovar la pared detrás del lavabo, aunque por lo general se recomienda evitar las zonas expuestas de forma directa y constante al agua, como el interior de la ducha.
3. ¿Es fácil limpiar los azulejos autoadhesivos?
Sí, su mantenimiento es muy sencillo. La mayoría de los azulejos tienen una superficie resistente y no porosa que se puede limpiar con un paño húmedo y un producto suave no abrasivo. Por eso son ideales para la cocina, donde las salpicaduras son habituales.
4. ¿Los azulejos autoadhesivos dañarán mis paredes pintadas?
Si se colocan sobre una pared pintada cuya pintura ya se haya curado correctamente y se retiran de la forma adecuada (aplicando calor suave), no deberían causar daños. Lo importante es no colocarlos sobre paredes recién pintadas (espera al menos 3 semanas) y no arrancar ni tirar bruscamente de los azulejos al retirarlos. Despegarlos lentamente con ayuda de calor es la mejor manera de proteger las paredes.

Deja un comentario
Este sitio está protegido por hCaptcha y se aplican la Política de privacidad de hCaptcha y los Términos del servicio.