
















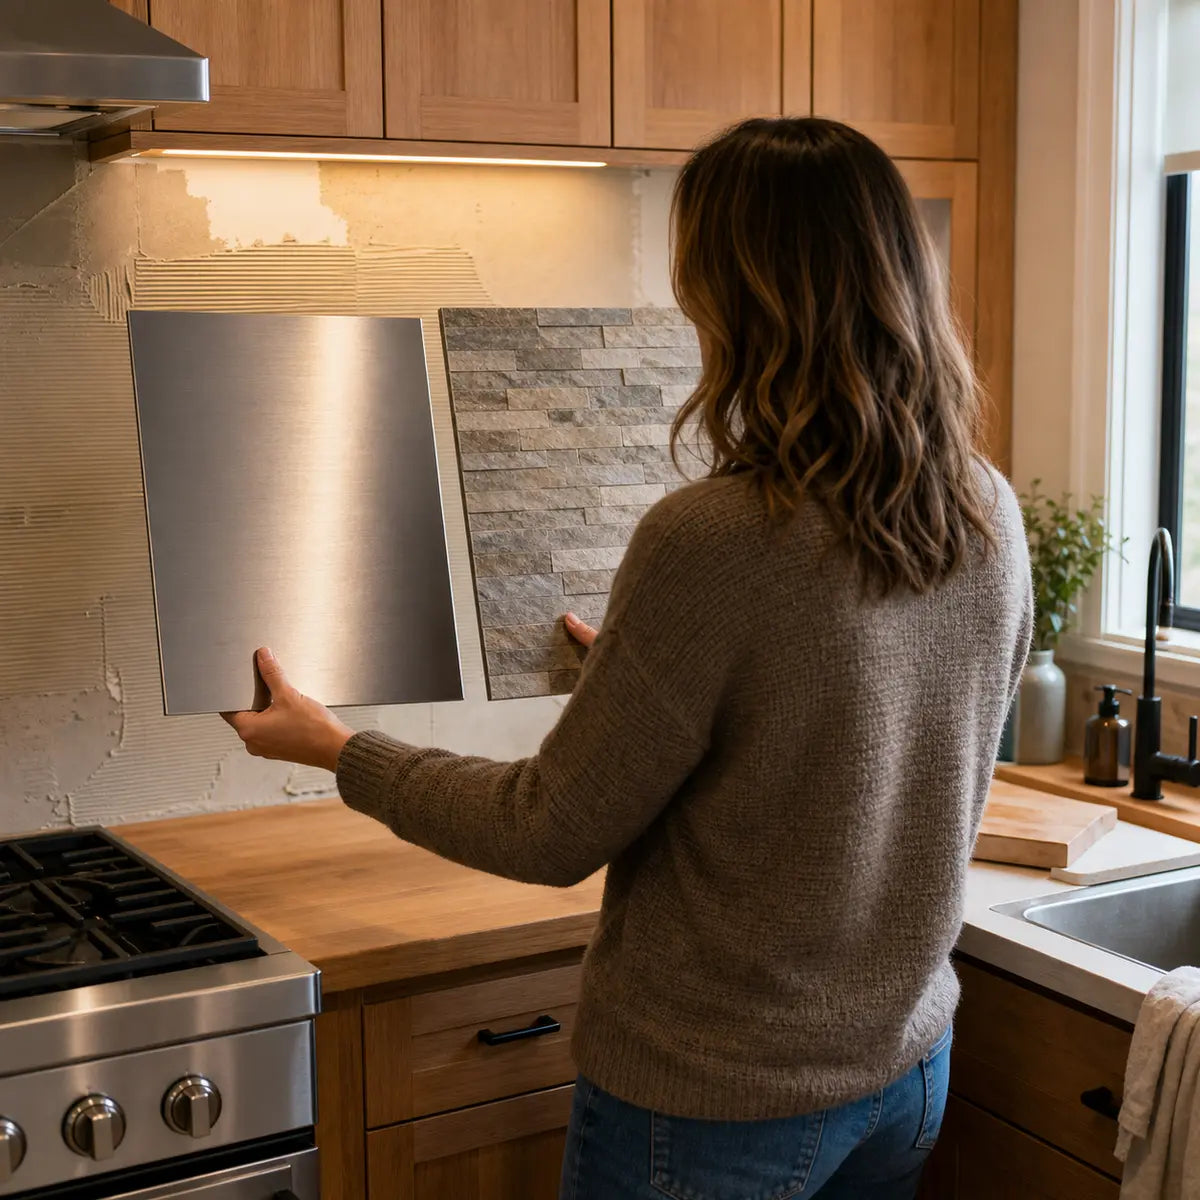
Neither stainless steel nor composite peel-and-stick tile is universally better. Stainless steel often makes more sense when you want a metal appearance, fewer field seams, and a surface that can be wiped without working around a tile pattern. Composite peel-and-stick tile may be the more practical route when you want lighter pieces, simpler cutting, a broader choice of patterns, or the possibility of replacing one damaged section.
That verdict applies only after both options pass the same eligibility checks. The exact backsplash, appliance, installation zone, wall condition, cleaning instructions, expected wear, and complete project cost matter more than the category label.
A product described as “heat resistant” is not automatically approved behind your stove. A backsplash described as “removable” is not guaranteed to leave painted drywall undamaged. Stainless steel is not one uniform grade or finish, and composite peel-and-stick tile is not one standardized construction.
The most reliable decision is:
- Confirm the exact appliance requirements.
- Confirm the exact backsplash product instructions.
- Inspect the wall and planned installation zone.
- Compare cleaning, wear, installation, and removal honestly.
- Calculate the complete project cost for both eligible routes.
Which Is Better: Stainless Steel or Composite Peel-and-Stick Tile?
Choose stainless steel when surface continuity, a metal finish, and fewer seams are high priorities. Choose composite peel-and-stick tile when manageable pieces, decorative variety, and a more approachable DIY process matter more. Do not choose either one for a stove-adjacent area until its exact installation is documented as acceptable.
Here is the short comparison:
| Decision factor | Stainless steel sheet backsplash | Composite peel-and-stick tile |
|---|---|---|
| Heat placement | Must match the appliance manual and the specifications for the full installed assembly | Must match both the appliance manual and exact tile instructions; limits vary substantially by product |
| Surface continuity | A single fabricated sheet can minimize field seams, though perimeter joints and outlet cutouts remain | Usually includes repeated joints, overlaps, embossed grout lines, or pattern transitions |
| Routine cleaning | Broad flat areas can be straightforward to wipe, but fingerprints, streaks, grain direction, and finish-specific cleaners matter | Smooth products may wipe easily; texture, seams, raised edges, and cleaner restrictions can add work |
| Visible wear | Scratches, dents, fingerprints, and altered grain can be conspicuous under direct light | Scuffs, stains, lifted corners, edge wear, coating damage, or pattern loss may appear; results depend on construction |
| Installation | Accurate measuring, safe sheet handling, outlet fabrication, edge finishing, and flat-wall contact can be demanding | Individual pieces may be easier to handle and cut, but alignment, substrate preparation, pressure, and seam consistency matter |
| Wall requirements | The wall usually must be flat enough to support the sheet without telegraphing defects or creating hollow areas | Adhesive performance usually requires a clean, dry, sound, sufficiently smooth, compatible surface |
| Repair strategy | A local defect can be difficult to repair invisibly; replacing a large sheet may affect the full run | A damaged tile may be locally replaceable if matching stock is available and removal does not damage adjacent pieces |
| Removal | Depends on the mounting system, sealants, fasteners, adhesives, wall condition, and fabrication | May be removable, but paint loss, adhesive residue, or drywall repair remains possible |
| Cost structure | Sheet, fabrication, cutouts, backing, trim, delivery, mounting materials, and labor can outweigh raw material price | Tile quantity, waste, preparation, tools, trim, labor, replacement stock, and later wall repair can outweigh package price |
| Best initial fit | Owners who want a continuous metal look and can verify fabrication and installation details | DIY-focused projects outside restricted heat zones, provided the exact product and wall both qualify |
These are editorial decision tendencies, not laboratory rankings. There is no controlled, like-for-like test in the supplied evidence that proves one broad category is cleaner, more scratch resistant, safer, or longer lasting in every kitchen.
A useful way to frame the choice is to ask, “Which eligible system creates the fewest unacceptable compromises in my installation zone?”
That question is more productive than looking for a universal winner.

What Are You Actually Comparing?
You are comparing two installed systems, not simply metal against plastic. Each system includes the visible surface, backing or core, attachment method, seams, edges, sealants, wall substrate, appliance relationship, and care routine.
A stainless steel backsplash may be:
- A thin sheet bonded directly to a wall
- A sheet laminated to a rigid backing panel
- A fabricated panel with folded or hemmed edges
- A brushed, polished, patterned, coated, or decorative finish
- A single appliance-width panel or a full-counter run
- Mechanically fastened, adhesively mounted, or installed with a combination of methods
Stainless sheet is also a family of specified materials. ASTM International’s stainless sheet specification covers multiple stainless categories used in general, architectural, building, construction, and aesthetic applications. That does not mean an unidentified backsplash automatically complies with the standard, nor does the standard identify its grade, finish, thickness, backing, or appliance suitability.
“Composite peel-and-stick tile” is even broader. Composite means the product is made from multiple layers or materials that work together. Depending on the product, those layers may include a printed or metallic face, protective coating, polymer body, foam or mineral-filled core, pressure-sensitive adhesive, and release liner.
Two products that look nearly identical online may react differently to heat, grease, cleaning, cutting, pressure, moisture, or removal because their hidden layers differ.
Before comparing a composite product, request:
- Exact product name and SKU
- Face material and coating
- Core or body material
- Total thickness
- Adhesive type or documented bonding requirements
- Backing or release-liner information
- Edge, overlap, or interlocking design
- Maximum documented exposure temperature
- Required distance from burners and countertop appliances
- Approved and prohibited substrates
- Paint or primer cure requirements
- Approved cleaners
- Removal instructions
- Warranty exclusions
The broad categories are useful for beginning your search, but they are too vague for a final purchase decision. The Kitchen Backsplash Guide provides a wider planning route for wall inspection, appliance zones, cuts, seams, outlets, and edge finishing.

Use a Like-for-Like Comparison
Compare the exact stainless assembly and exact composite product in the same installation zone. A premium fabricated stainless panel should not be compared with the package price of an adhesive tile unless both totals include preparation, tools, labor, trim, delivery, removal, and repair.
Create one project record for each option:
| Project record | Stainless route | Composite route |
|---|---|---|
| Exact product | Grade, thickness, finish, backing, dimensions | Brand, product family, SKU, construction, dimensions |
| Installation zone | Sink, prep counter, cooking zone, side wall, appliance alcove | Same defined zone |
| Appliance requirements | Manual section, clearances, wall-covering requirements | Same appliance requirements |
| Product heat documentation | Supplier instructions for full assembly | Manufacturer temperature, distance, and placement instructions |
| Substrate | Wall material, finish, texture, flatness, repairs | Same wall, plus adhesive compatibility |
| Installation route | Fabricated panel, field-cut sheet, adhesive, fasteners, trim | Layout, cuts, adhesive backing, overlaps, edges, trim |
| Cleaning route | Approved cleaner, cloth, grain direction, drying | Approved cleaner, cloth, seam and texture cleaning |
| Repair route | Refinish, conceal, replace panel | Clean, patch, replace tile, restore wall |
| Removal route | Remove sealant, fasteners, adhesive, backing | Warm and peel if instructed, remove residue, repair paint |
| Total cost | All current local costs | All current local costs |
This record prevents a common comparison error: giving stainless credit for its finished performance while treating peel-and-stick tile as nothing more than a package from the shelf. Both are systems, and both can fail at their supporting details.
For a related example of this whole-system approach, see the continuous-sheet and peel-and-stick comparison. The materials differ, but the pass, verify, or stop structure is useful here.
Can Composite Peel-and-Stick Tile Handle Heat Behind a Stove?
Sometimes an exact product can be installed in a defined stove-adjacent zone, but the category itself cannot be approved. Start with the appliance manual, then apply the backsplash manufacturer’s temperature, clearance, substrate, and installation requirements. If the documents are missing, contradictory, or do not address your configuration, stop and request written clarification.
The International Code Council’s appliance inspection guidance recommends using available manufacturer installation and operating instructions and checking required clearances to combustible building components. This is model-code guidance rather than proof of the rules adopted in every location, but it supports the right starting point: the exact appliance documentation.
Appliance requirements can include conditions that a generic backsplash listing never mentions. For example, the older GE JGP321 and JGP319 cooktop manual requires surrounding wall coverings, countertops, and cabinets to withstand heat generated by those named cooktops up to 200°F. That figure applies only to those models and that manual. It is not a universal backsplash temperature target.
The Installation-Zone Check
Use these inputs:
- Exact range or cooktop make and model
- Fuel type
- Burner position and flame geometry
- Distance from the burner or heat source to the wall
- Rear controls, backguard, or protective panel
- Hood and ventilation configuration
- Exact backsplash product and SKU
- Product temperature limit
- Product clearance requirement
- Substrate and mounting system
- Locally adopted requirements
This check organizes documentation; it does not approve an installation or replace manufacturer instructions, local requirements, or qualified professional review.
Then follow the first result that applies.
Result 1: Eligible for detailed comparison
Continue comparing stainless and composite only if:
- You have the current appliance instructions.
- You have the current backsplash instructions.
- The proposed location satisfies both documents.
- The wall and installation method satisfy the backsplash instructions.
- The documents clearly apply to the exact models and products being considered.
Passing this check does not make the two options equally suitable. It means both remain eligible for comparison.
Result 2: Verification required
Pause the purchase if:
- A product says “heat resistant” but gives no applicable temperature or placement condition.
- A clearance is listed without explaining where it is measured from.
- The appliance manual addresses wall coverings but the backsplash instructions do not address cooking appliances.
- A metal face is advertised, but the backing and adhesive limits are missing.
- The proposed protective panel or backguard is not defined in either document.
- The product name is known but the SKU or construction has changed.
Request written, product-specific clarification. Save the response with the order records.
Result 3: Stop
Do not install in the intended heat zone if:
- The appliance or backsplash instructions prohibit the placement.
- Direct flame or direct contact with a heating element is possible.
- Required clearance cannot be achieved.
- Instructions conflict and the manufacturer has not resolved the conflict.
- The product documentation applies to a different family, SKU, or construction.
- You cannot identify the exact appliance or backsplash.
- Local requirements prohibit the proposed assembly.
Why Category-Wide Heat Claims Fail
Current manufacturer instructions show substantial variation. Aspect’s Collage and Metal technical guidance states a 140°F limit for those products and recommends at least 6 inches between the installed tile and the heat source or burner.
The Smart Tiles tile warranty conditions state a 120°F maximum, an 8-inch clearance behind a stove without a protective panel or metal cover, and a 2-inch clearance from countertop heat sources for that tile product.
WallPops backsplash installation guidance calls for at least 15 inches or 38 centimeters of space above a range when the covered product is used near a stove without a backing. That page does not provide a category-wide temperature limit.
These figures should not be averaged, ranked, or transferred to another brand. They use different terminology, cover different products, and do not provide a common laboratory test for comparison.
There can also be conflicts within one manufacturer’s documents. The checked Smart Tiles FAQ and warranty give different maximum temperatures for the separate Panel product. That conflict is a stop condition until the manufacturer identifies the correct limit and applicable SKU in writing. The Smart Tiles technical FAQ is useful for checking the current wording, but neither conflicting value should be treated as settled on its own.
Stainless steel also needs product and assembly verification. A metal face does not answer questions about:
- Adhesive performance
- Backing-panel composition
- Sealant temperature limits
- Wall-covering requirements
- Edge exposure
- Heat transfer to the substrate
- Required appliance clearances
- Local acceptance of the installed assembly
For deeper planning around seams, stove placement, surface condition, and kitchen cleaning, see food-safety and placement questions for peel-and-stick backsplashes.

Which Backsplash Is Easiest to Clean?
A smooth stainless sheet often reduces the number of seams you must clean, but it is not automatically the easiest surface to maintain. Finish direction, fingerprints, streaking, edge sealants, outlet cutouts, tile texture, raised patterns, and cleaner restrictions determine the real workload.
For general uncoated stainless, the British Stainless Steel Association’s cleaning guidance says soap or mild detergent with warm water, followed by rinsing and drying, is usually adequate for routine domestic or architectural cleaning. It also warns that abrasives, hard objects, steel wool, and chloride-containing cleaners can damage or stain stainless surfaces.
That sounds simple, but daily experience can differ by finish. A large polished sheet may show each fingerprint and drying mark under cabinet lighting. A brushed finish may conceal some marks yet require wiping along the grain. Grease can collect at perimeter sealant, outlet plates, fasteners, folded edges, or joints between separate sheets.
Composite tile presents a different cleaning problem. A smooth, lightly patterned product may wipe quickly. A heavily embossed tile can hold splatter along raised details. Repeated overlaps, imitation grout lines, beveled edges, or poorly aligned joints can make a small backsplash feel like a much larger cleaning job.
Match the Surface to Your Cleaning Routine
Choose the statement closest to your household.
You cook with frequent frying, high splatter, or oily sauces.
Give extra weight to:
- Surface continuity
- Accessible seams
- Resistance to the exact approved degreaser
- Wiping around outlets and corners
- The ability to clean without abrading the finish
- Edge sealing and joint condition
A stainless sheet may deserve further verification here because it can reduce field seams. A smooth composite product may still work outside restricted heat areas, but inspect its texture and overlaps in person.
You cook lightly and wipe the wall after most meals.
Either eligible material may work. Focus on whether the approved routine is one you will actually follow. A material that needs immediate drying to avoid streaks may be frustrating if you prefer air drying. A raised tile that needs detail cleaning may be frustrating if you prefer one-pass wiping.
Your main concern is fingerprints and visual streaks.
Do not assume metal wins. View a full-size sample under lighting similar to your kitchen. Touch it, wipe it with the approved method, let it dry, and inspect it from several angles.
Your main concern is grease collecting in joints.
Count actual joints, not the printed tile pattern. Some composite products have embossed grout lines without open grout, while others use overlaps or exposed transitions that can catch residue. Stainless reduces field joints only if the design uses one continuous panel.
Run a Cleaning Sample Test
Use an offcut or sample, following the manufacturer’s care instructions.
- Place a small amount of cooking oil or a typical sauce on the sample.
- Leave it for a realistic interval.
- Clean it only with an approved product and cloth.
- Check the surface in direct and angled light.
- Inspect texture, seams, and edges.
- Let it dry completely.
- Look for streaking, haze, color change, swelling, lifting, or altered gloss.
This is a practical screening test, not a prediction of long-term performance. Do not use harsh cleaners or heat unless the manufacturer specifically permits that test.
Cleaning results also depend on execution. In a university-canteen cleaning field study, researchers monitored ten control points over eight months and found a strong association between ATP readings and viable aerobic counts. The study was not a household backsplash comparison, but it illustrates a useful operational point: material choice does not replace a repeatable cleaning procedure.

How Will Scratches, Dents, Stains, and Edge Wear Look?
Neither category is scratch proof, and visible wear depends heavily on finish, color, texture, lighting, and repair strategy. Compare how damage will appear and what you can realistically do after it happens.
Stainless Steel Wear
Common visual concerns include:
- Fine scratches that cross the grain
- Broad dull patches caused by abrasive cleaning
- Dents or ripples in thin or poorly supported sheet
- Fingerprints and oily smears
- Water marks and cleaner haze
- Rust-colored contamination transferred from carbon-steel tools or wool
- Staining or pitting associated with incompatible chloride cleaners
- Disturbed finish around cutouts or field-trimmed edges
A brushed finish can make some fine wear less obvious, especially when marks follow the grain. It can also make cross-grain scratches stand out. Mirror-like surfaces may expose tiny marks under direct light. Patterned finishes can conceal some wear but may be harder to refinish consistently.
Local repair is not always invisible. Abrading one small area may change the grain, gloss, or reflection enough to create a larger visual patch. Ask the fabricator whether the finish can be restored in place and what standard of appearance is realistic.
Composite Tile Wear
Possible signs of wear include:
- Scuffs or cuts in the top coating
- Staining in texture or seam details
- Faded or altered printed patterns
- Crushed raised details
- Lifted corners or edges
- Adhesive residue at a shifting joint
- Gaps caused by inaccurate layout or movement
- Heat-related distortion where placement exceeds documented limits
- Damage caused by an incompatible cleaner
Local replacement may be an advantage if a matching tile can be removed without harming its neighbors. That advantage weakens if the pattern changes between production runs, the color ages, the adhesive is difficult to release, or replacement stock is no longer available.
Keep spare pieces from the original batch. Store them flat, dry, and away from direct heat or sunlight, following any supplier storage instructions.
A Practical Wear-Visibility Test
Inspect both samples under four conditions:
- Daylight
- Under-cabinet lighting
- Straight-on viewing
- Angled viewing from the main kitchen entrance
Then handle each sample with clean and slightly oily fingers, wipe it using the approved method, and inspect it again. This gives you more useful information than judging a small digital image.
There is no verified like-for-like abrasion benchmark in the supplied evidence for the exact stainless finishes and composite tiles you may be considering. Treat “scratch resistant” as a product-specific claim that requires a named test method or clear warranty language, not as a category fact.


What Does Stainless Steel vs. Peel-and-Stick Backsplash Cost?
Compare total project cost, not material price per square foot. Stainless may require fabrication, delivery, cutouts, backing, edge work, and skilled installation. Peel-and-stick tile may require wall repair, primer, layout time, waste, trim, replacement stock, and later restoration.
Use this formula for each route:
Total project cost = material + waste + preparation + tools + fabrication + trim + attachment materials + delivery + tax + labor + maintenance supplies + expected repairs + removal + wall restoration + replacement
Do not enter the same allowance automatically for both materials. Their cost structures differ.
Stainless Cost Worksheet
Include:
- Exact grade and finish
- Sheet thickness
- Backing panel, if used
- Fabrication to final dimensions
- Folded, hemmed, polished, or capped edges
- Outlet and switch cutouts
- Corners, returns, and joints
- Adhesive, fasteners, or mounting system
- Sealant and finishing materials
- Protective handling
- Oversize shipping or local delivery
- Professional measurement
- Installation labor
- Wall flattening or repair
- Appliance movement
- Future panel removal and wall repair
A low sheet quote may not include fabrication. A fabricated-panel quote may already include several of these items. Ask for line-item descriptions before comparing bids.
Composite Cost Worksheet
Include:
- Exact package dimensions and usable coverage
- Pattern repeat and cutting waste
- Additional pieces for color or pattern matching
- Wall cleaning and degreasing
- Surface repair, sanding, priming, or painting
- Manufacturer-required cure time
- Cutting tools and replacement blades
- Rollers, spacers, templates, or straightedges
- Edge trim or sealant where permitted
- Outlet and switch work
- Installation labor or your own project time
- Spare tiles for later repair
- Removal supplies
- Adhesive-residue cleanup
- Primer, paint, or drywall repair after removal
The peel-and-stick versus ceramic cost framework shows how preparation, labor, maintenance, repair, and removal can change an apparently simple package-price comparison.
Use the Total-Cost Estimator
Enter local values for both routes. Do not use safety or heat eligibility as a price adjustment. An ineligible product stays out of the comparison even if it is cheaper.
Compare two complete local project totals
Enter nonnegative values in your own currency. Each route is added independently. The estimator does not predict lifespan, judge heat eligibility, or account for costs you leave blank.
Calculation basis: the tool sums the four values entered for each route and reports the arithmetic difference. Zero means no cost was entered; it does not mean the work is free. Currency symbols are omitted because no location or currency is assumed.
Inputs
- Measured wall area
- Waste allowance for the exact layout
- Material quantity and price
- Preparation materials
- Preparation labor
- Fabrication and cutouts
- Tools
- Trim and sealants
- Delivery and tax
- Installation labor
- Spare material
- Removal cost
- Wall-restoration cost
- Expected ownership period
Results
- Lower initial cost: Compare material, preparation, tools, fabrication, delivery, and installation.
- Lower complete cost: Add removal, repair, restoration, and likely replacement expenses supported by your actual project assumptions.
- Cost too uncertain: Use this result if either quote omits fabrication, preparation, trim, installation, or restoration.
- Not eligible: Use this result if the product has not passed appliance, heat, substrate, or installation checks. Do not display a winning cost for an ineligible route.
For a simple ownership comparison, divide the complete project cost by the number of years you realistically expect to keep the installation. This does not predict lifespan. It only places two project totals on the same ownership horizon.
Avoid assigning an unsupported replacement interval. Long-term outcomes depend on the exact product, installation, heat exposure, humidity, cleaning, wall condition, and household use.

Stainless Steel vs. Composite Installation
Composite peel-and-stick tile is often easier to carry and cut, while stainless steel can reduce alignment work once a correctly fabricated panel reaches the wall. The difficult part of each route occurs at a different stage.
Stainless Installation Demands
A stainless panel can be efficient on a simple, rectangular wall. Complexity rises quickly with:
- Uneven countertops
- Out-of-square corners
- Multiple outlets
- Window trim
- Cabinet returns
- Exposed edges
- Appliance backguards
- Long panels
- Inside and outside corners
- Field trimming near finished surfaces
Thin sheet can be sharp and difficult to handle without bending. Cutouts must align with electrical boxes and allow devices to be reinstalled correctly. A reflective panel can make small waves, dents, gaps, or uneven sealant lines conspicuous.
Professional fabrication may reduce field cutting, but it increases the importance of accurate measurements. If the panel is cut too small, gaps can remain. If it is too large, field correction may be difficult or may damage the finish.
Ask who is responsible for:
- Final measurements
- Template creation
- Outlet locations
- Edge treatment
- Grain orientation
- Backing-panel selection
- Wall flattening
- Adhesive selection
- Expansion or movement details
- Appliance clearances
- Final sealant work
Composite Installation Demands
Peel-and-stick installation removes some wet-setting tasks associated with conventional tile, but it does not remove preparation or layout.
The checked manufacturer instructions consistently call for clean, dry, sound, sufficiently smooth surfaces. Exact wait times differ. Some instructions require paint or primer to cure for a defined period before tile is applied. WallPops, for example, calls for at least four weeks after painting for the products covered by its installation page.
Composite installation can become demanding when the wall has:
- Grease residue
- Loose or chalking paint
- Heavy texture
- Torn drywall paper
- Moisture staining
- Cracks or movement
- Uneven existing tile
- Raised grout joints
- Fresh paint
- Silicone contamination
- Multiple outlet cutouts
Adhesive tile follows the wall. It does not level a damaged substrate. A bump can telegraph through a thin product, while a depression may reduce adhesive contact. Repeated pieces can also magnify small layout errors.
Use the Peel-and-Stick Tile Guide to plan surface inspection, test patches, cuts, edges, installation order, and maintenance.
Wall and Skill Fit Check
Stainless deserves further verification when:
- The wall is simple and can be measured accurately.
- A fabricator can produce the required cutouts and finished edges.
- You want fewer field seams.
- You have a safe handling and mounting plan.
- The finish and grain can be protected during installation.
Composite deserves further verification when:
- The exact product permits the installation zone.
- The wall is clean, dry, sound, smooth, and compatible.
- You are comfortable maintaining alignment over repeated pieces.
- You can make clean cuts around outlets and edges.
- You can follow cure-time, pressure, and care instructions.
Neither route is ready when:
- The wall has unresolved moisture or movement.
- Appliance requirements are unknown.
- Heat documentation is missing.
- Electrical boxes or devices need unplanned alteration.
- The mounting method is being improvised.
- A landlord, property manager, or other owner has not approved the work.
Is Peel-and-Stick Tile Really Renter-Friendly?
Peel-and-stick tile may be more practical to remove in some rentals, but damage-free removal cannot be promised. Paint quality, wall preparation, adhesive strength, installation pressure, time on the wall, heat exposure, and removal technique all affect the outcome.
Manufacturer language itself is conditional. Smart Tiles says removal behavior depends on the original surface. WallPops warns that the stronger adhesive used for its backsplash products can potentially remove paint.
A “removable” label may mean the tile can be taken off the wall. It does not necessarily mean:
- No paint will lift.
- No drywall paper will tear.
- No adhesive residue will remain.
- No primer or repainting will be needed.
- The product can be reused.
- The lease permits installation.
- The wall will be restored without cost.
Before installing in a rental:
- Get written permission.
- Confirm whether the lease requires professional restoration.
- Photograph the wall under good lighting.
- Record existing paint defects and repairs.
- Identify the wall material and paint condition.
- Use a test patch only if the manufacturer and owner permit it.
- Keep the product instructions and order records.
- Budget for cleaning, patching, priming, and repainting.
- Do not add construction adhesive to improve bonding unless the resulting permanence is acceptable and permitted.
Stainless is not automatically more permanent. A mechanically fastened panel may leave holes. An adhesively mounted panel may pull paint, drywall paper, or skim coat. Sealant removal can also damage adjacent surfaces.
For an unusual project involving adhesive tile over metal, the peel-and-stick adhesion test on steel covers cleaning, heat exposure, test patches, removal, and renter concerns. Product instructions still control the actual installation.

Which Material Fits Your Kitchen Scenario?
Your best route depends on the installation zone, cooking pattern, maintenance tolerance, tenancy, wall, budget, and ownership period. Use these scenario results to decide which option deserves further verification. They do not override product or appliance instructions.
Scenario 1: Frequent Frying and a Full Cooking-Zone Backsplash
Likely route: Verify stainless first, while keeping eligible smooth composite products as conditional alternatives outside prohibited zones.
Why: a continuous stainless panel can reduce field seams across the splatter zone. Yet fingerprints, streaking, perimeter sealant, scratches, and finish-specific cleaning remain relevant. The full stainless assembly still needs appliance-compatible documentation.
A composite option needs especially clear heat, clearance, cleaning, edge, and adhesive instructions. Raised or heavily textured patterns may increase detail cleaning.
Scenario 2: Light Cooking and a Decorative Prep-Counter Wall
Likely route: Compare both.
Away from direct cooking heat, the decision may shift toward appearance, wall condition, installation skill, and cleaning preference. Composite tile may offer more pattern choices and smaller pieces. Stainless may provide a restrained, continuous surface.
Use samples rather than category assumptions. Compare actual seams, reflection, texture, fingerprints, and approved care.
Scenario 3: Rental Kitchen With a Short Ownership Horizon
Likely route: Verify an adhesive tile with documented removal instructions, but budget for restoration.
Get permission and test surface compatibility. Avoid describing the project as damage free. If the wall has weak paint, torn paper, moisture damage, or heavy texture, neither an adhesive tile nor a bonded stainless panel may be a responsible temporary installation.
Scenario 4: Uneven Wall With Several Outlets
Likely route: Repair the wall before choosing.
Peel-and-stick tile will not correct an unstable or badly uneven substrate. Stainless may bridge minor surface variation if mounted on an appropriate rigid backing, but that backing, attachment method, edge depth, and outlet relationship must be planned as one assembly.
Do not use the backsplash to conceal active moisture, loose material, or electrical problems.
Scenario 5: Strong Preference for Industrial Metal Style
Likely route: Verify stainless first.
Confirm the grade, thickness, finish, grain, backing, fabrication, cleaner limitations, and expected appearance under kitchen lighting. Decide whether you can accept fingerprints, fine scratches, and possible visible variation.
Scenario 6: Strong Preference for Pattern and Local Replacement
Likely route: Verify composite tile first.
Prioritize a product with clear construction, heat, substrate, cleaning, and removal instructions. Order enough matching stock for planned waste and future repairs. Local replacement is useful only when spare material is available and a tile can be removed without spreading damage.
A product such as the Silver Stripes Herringbone self-adhesive tile can be considered as a visual format example. Its store listing alone should not be used to infer heat suitability, lifespan, moisture performance, or damage-free removal. Obtain current technical instructions before placing it in a cooking zone.
Scenario 7: Neither Option Passes the Heat or Wall Check
Likely route: Do not force the comparison.
Resolve the appliance zone, wall condition, or documentation gap first. A different backsplash material or a professionally specified protective assembly may fit the project better. The faux stone and natural stone whole-system comparison offers another way to examine construction, preparation, cleaning, repair, and ownership cost without relying only on surface appearance.
Complete the Pre-Purchase Verification Checklist
Do not place the order until you can identify the product, installation zone, supporting documents, complete cost, and stop conditions.
Appliance and Heat
Stainless Product
Composite Product
Wall and Installation
Cost and Ownership
Frequently Asked Questions
Is stainless steel always safe behind a gas stove?
No. Stainless steel is metal, but a backsplash is a complete assembly that may include adhesive, backing, sealants, coatings, edges, and a supporting wall. The exact appliance manual and installed-system documentation must permit the proposed placement.
Can peel-and-stick tile melt or release from the wall?
An exact product may be damaged, distorted, discolored, or lose adhesion if it is installed outside its documented temperature or clearance conditions. The outcome depends on construction, adhesive, heat exposure, installation, and substrate. Use the exact product instructions rather than a category-wide claim.
Is stainless steel the easiest backsplash to clean?
Not in every kitchen. A continuous sheet can reduce field seams, but fingerprints, streaks, grain direction, scratches, perimeter joints, and approved cleaners affect upkeep. A smooth composite tile may be simple to wipe, while a textured product may require more detail cleaning.
Can peel-and-stick tile be removed without damaging drywall?
Sometimes it can be removed with limited damage, but the result depends on the product and wall. Paint may lift, adhesive may remain, and drywall paper may tear. Budget for restoration and follow the exact removal instructions.
Which option is more scratch resistant?
There is no supported category-wide winner. Stainless finish, grain, thickness, backing, composite coating, texture, lighting, and cleaning method all affect visible wear. Request comparable abrasion data for the exact products or test samples using only approved care methods.
Is peel-and-stick tile cheaper than stainless steel?
Its package price may be lower, but that does not establish a lower project cost. Compare preparation, tools, waste, trim, fabrication, cutouts, delivery, labor, maintenance, removal, and wall restoration.
Make the Final Decision by Installation Zone
The right choice is the eligible option that best fits your real kitchen, not the material with the strongest broad marketing claim.
Choose stainless steel for further verification when you value a metal appearance, fewer field seams, and a broad wiping surface, and you can support accurate fabrication, safe handling, finish care, and documented appliance compatibility.
Choose composite peel-and-stick tile for further verification when you value manageable pieces, decorative variety, and possible local replacement, and the exact tile passes the heat, substrate, cleaning, installation, and removal checks.
Pause the project when appliance clearances are unknown, product documents conflict, the wall is unstable, or either route depends on an unsupported assumption. Complete the installation-zone record and total-cost worksheet before ordering. That final check is what turns a broad stainless steel backsplash vs. composite peel-and-stick tile comparison into a defensible project decision.


Deja un comentario
Este sitio está protegido por hCaptcha y se aplican la Política de privacidad de hCaptcha y los Términos del servicio.