


Vous rêvez d’un relooking de cuisine ce week-end — mais sans poussière, sans outils électriques et sans facture d’artisan ? On est tous passés par là, à faire défiler de superbes métamorphoses de cuisine en ressentant à la fois de l’inspiration et un peu d’appréhension. Vous voulez ce look frais et moderne, mais la peur de carreaux de travers, d’une mauvaise adhérence ou d’un désastre en mode DIY vous freine.
Bonne nouvelle : la crédence Peel-and-stick est la solution qui change tout pour les locataires et les débutants en DIY. Elle offre un rendu professionnel pour une fraction du coût et des efforts. Ce guide est votre expert de confiance, qui vous accompagne étape par étape — de la préparation à la finition parfaite — pour obtenir un résultat que vous adorerez.
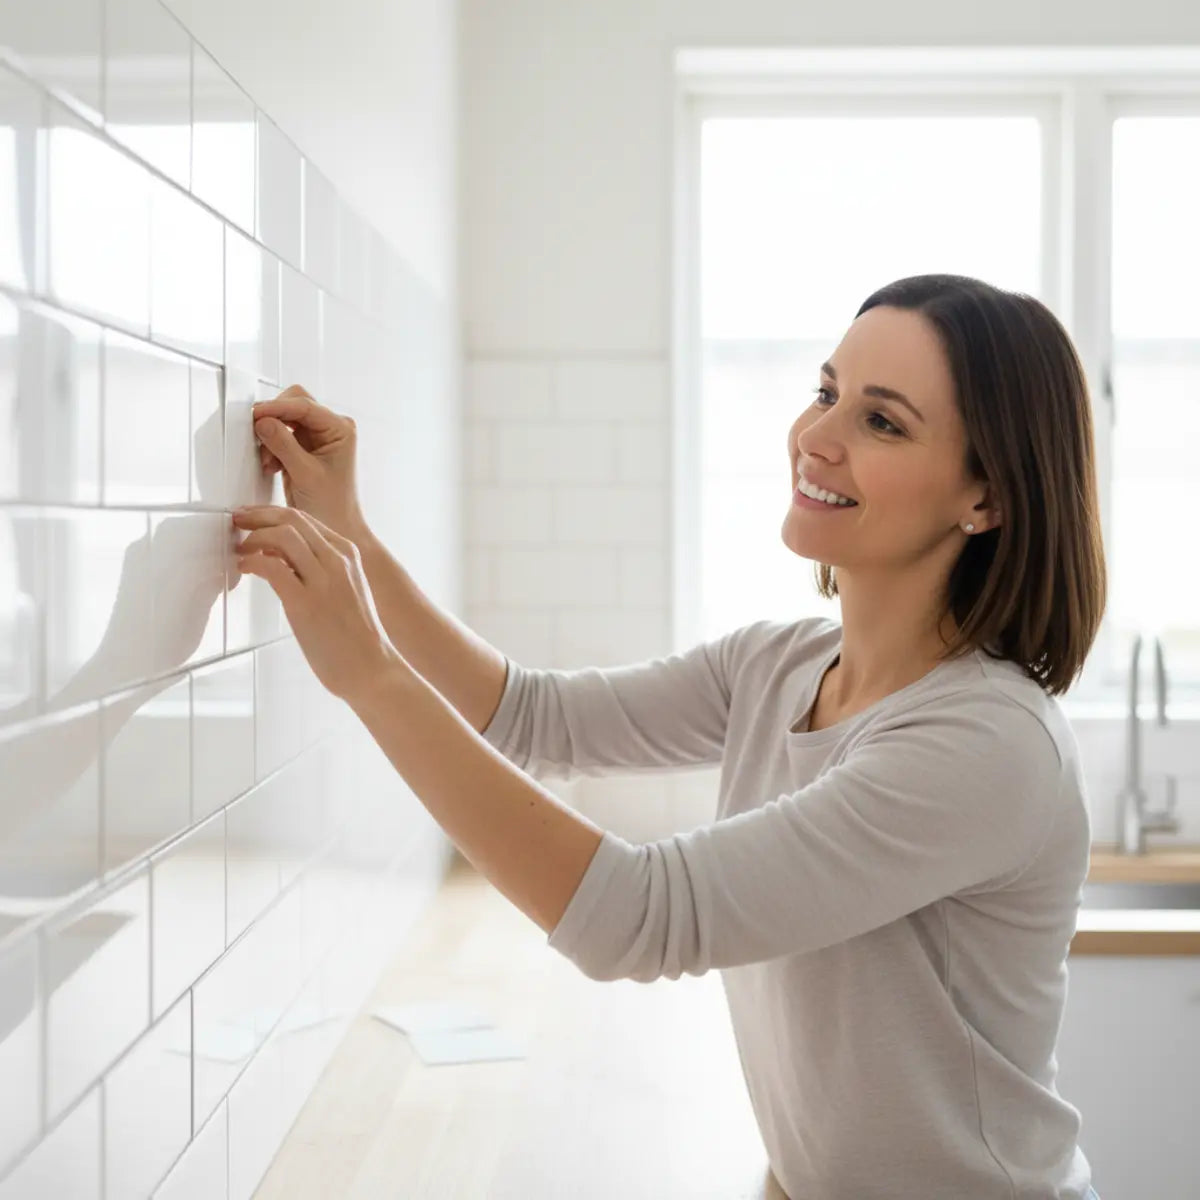
Pour installer une crédence peel and stick, commencez par nettoyer et sécher soigneusement le mur. Mesurez votre point de départ et tracez un repère de niveau. Commencez la pose dans un angle bien visible, en décollant seulement quelques centimètres du support à la fois. Lissez fermement le carreau sur le mur, en superposant les joints de coulis prévus, puis utilisez un cutter pour découper les carreaux autour des prises et des bords.
Ce tutoriel couvre tout ce que vous devez savoir. Nous verrons la préparation de la surface, un processus d’installation détaillé, des solutions rapides aux problèmes courants, ainsi que quelques conseils de design de niveau pro. Préparez-vous à transformer votre espace en toute confiance.
Pourquoi choisir une crédence Peel and Stick ?
Vous êtes-vous déjà demandé si une solution de raccourci pouvait vraiment être aussi belle que la vraie ? Vous avez sûrement vu des projets de carrelage traditionnel prendre des semaines et coûter des milliers d’euros.
Cette section explique pourquoi le peel-and-stick est un choix malin, stylé et incroyablement pratique, qui offre des résultats impressionnants sans les inconvénients du carrelage classique.
La crédence peel and stick, souvent appelée carrelage mural autocollant, a complètement transformé l’univers de l’aménagement intérieur. Ce n’est plus seulement une solution temporaire, mais une option durable et élégante qui rivalise visuellement avec son équivalent en céramique traditionnel.
Avantages par rapport au carrelage traditionnel
Le principal atout, c’est la simplicité. Une pose de carrelage classique implique du mortier, des joints, une scie à eau et plusieurs jours de travail salissant. D’après notre expérience, c’est un projet que beaucoup de propriétaires évitent à cause des compétences et du temps nécessaires. Le Peel-and-stick supprime tout cela. Vous obtenez le même impact visuel en une seule après-midi.
Le coût est un autre facteur majeur. La pose professionnelle de carrelage peut coûter entre 500 € et 2 000 € et plus pour une cuisine standard. Un projet Peel-and-stick de qualité peut souvent être réalisé pour moins de 200 €. C’est une mise à jour accessible qui offre un rendu haut de gamme à petit budget. Pour celles et ceux qui débutent dans le DIY, comprendre les bases est essentiel. Pour un aperçu complet de la façon dont ces carreaux peuvent redéfinir votre espace, consultez notre guide sur Comment installer des carreaux Peel and Stick et les meilleurs designs 2025, parfait pour transformer votre cuisine en moins d’une heure.
Idéal pour les locataires et les petits espaces
Pour les locataires, les carreaux autocollants sont une vraie révélation. La plupart des marques de qualité sont conçues pour se retirer sans abîmer le mur en dessous, ce qui peut vous aider à récupérer votre dépôt de garantie. Vous pouvez ainsi personnaliser votre espace sans modification permanente.
Ces carreaux font aussi des merveilles dans les petites cuisines ou salles de bains. Une crédence lumineuse et réfléchissante peut donner l’impression qu’un espace exigu est plus grand et plus ouvert. Leur pose facile en fait le projet idéal pour les angles serrés et les espaces compacts, là où manipuler du carrelage traditionnel serait un vrai casse-tête.
Des options de design modernes et abordables
Oubliez les motifs datés d’autrefois. Les carreaux autocollants d’aujourd’hui se déclinent dans une incroyable variété de designs modernes. Vous pouvez trouver du marbre réaliste, le classique subway, des mosaïques raffinées et des finitions métalliques élégantes. Une étude récente d’Apartment Therapy a noté que les mises à jour stylées et non permanentes sont une priorité pour les locataires millennials et Gen Z.
Cette diversité signifie que vous n’avez pas à faire de compromis sur le style. Vous pouvez obtenir un look tendance, digne de Architectural Digest, qui correspond à votre esthétique personnelle et à votre budget.

Comment choisir les meilleurs carreaux Peel and Stick ?
Face à un mur rempli d’options de carreaux, on peut vite se sentir dépassé. Celui-ci va-t-il fondre derrière ma cuisinière ? Va-t-il se décoller avec l’humidité de la salle de bains ? Ce motif s’accorde-t-il avec mes meubles ?
Démystifions le processus de sélection pour que vous puissiez choisir un carreau à la fois beau, sûr et parfaitement adapté à votre intérieur.
Choisir le bon carreau, c’est trouver le juste équilibre entre esthétique et fonctionnalité. Votre choix influencera non seulement l’apparence de votre espace, mais aussi la durabilité de votre projet. Voici ce que nous recommandons à nos clients de prendre en compte.
Les options de matériaux à connaître
Tous les carreaux peel-and-stick ne se valent pas. Le matériau détermine l’aspect, le toucher et la durabilité.
- Vinyle : l’option la plus courante et la plus abordable. Les carreaux en vinyle modernes disposent d’images en haute résolution qui imitent de façon convaincante la pierre, la céramique ou le bois. Ils sont légers, flexibles et faciles à découper.
Pour celles et ceux qui veulent transformer leur cuisine en espace tendance sans gros travaux, explorer les dernières tendances est essentiel. Découvrez notre sélection Comment faire du DIY avec Peel Stick Cuisine 2025 pour vous inspirer et créer un style moderne avec un minimum d’effort.
Considérations sur la résistance à la chaleur et à l’eau
C’est un point non négociable pour les cuisines et les salles de bain. Vérifiez toujours les spécifications du produit.
- Derrière la cuisinière : Pour les zones situées derrière une plaque de cuisson, vous devez choisir un carreau explicitement certifié résistant à la chaleur. Les carreaux en métal et en verre sont généralement les options les plus sûres. Une idée reçue courante est que n’importe quel carreau en vinyle fera l’affaire, mais la chaleur directe peut le faire gondoler ou se décolorer avec le temps. Respectez une distance de sécurité (généralement 6-8 inches) entre une flamme nue et les carreaux.
- Dans la salle de bain : Pour les salles de bain ou les zones autour du lavabo, recherchez des carreaux indiqués « 100% waterproof » ou « résistants à l’humidité ». Cela permet de garantir que la vapeur et les éclaboussures ne compromettent pas l’adhésif. Les options de backsplash peel and stick étanches de qualité ont des joints scellés pour empêcher l’humidité de s’infiltrer derrière les carreaux.
Harmoniser le design avec votre style
Le plus agréable, c’est de choisir un style ! Pour éviter un rendu qui semble décalé, tenez compte des éléments déjà présents chez vous.
- Pour un look classique : Vous ne pouvez pas vous tromper avec les carreaux subway. Ils sont intemporels et s’intègrent à כמעט n’importe quel décor.
- Pour une cuisine moderne : Pensez à des motifs géométriques, à des carreaux métalliques élégants ou à un design effet marbre épuré.
- Pour une ambiance farmhouse ou rustique : Choisissez des carreaux qui imitent le bois vieilli ou la pierre naturelle.
Conseil de pro : Commandez d’abord un seul échantillon. Placez-le sur votre mur et observez son rendu tout au long de la journée, selon les différentes lumières. Ce petit geste peut éviter une grosse erreur de décoration. Pour plus d’inspiration, explorer Idées de cuisine pour backsplash Peel Stick 2025 peut être un excellent point de départ.
De quels outils et matériaux ai-je besoin ?
Vous craignez d’avoir besoin d’un atelier rempli d’outils coûteux pour ce projet ? Faut-il être un professionnel du bâtiment pour se lancer ?
Nous allons vous montrer qu’avec seulement quelques indispensables que vous avez probablement déjà chez vous, vous pouvez obtenir une finition impeccable.
L’un des grands avantages de ce projet, c’est sa liste d’outils très réduite. Pensez à cette étape de préparation comme à votre mise en place version DIY : tout préparer rend l’ensemble du processus plus fluide et plus agréable.
Liste de contrôle interactive des outils
Sélectionnez les outils que vous avez pour générer une liste d’achats personnalisée.
Liste de contrôle des outils de base
Voici les indispensables absolus. Vous en avez probablement déjà la plupart dans un tiroir à bric-à-brac ou dans le garage.
- Mètre ruban : Pour prendre des mesures précises de votre espace.
- Niveau : Un niveau laser est formidable, mais un niveau à bulle standard de 24 pouces fonctionne parfaitement. C’est essentiel pour la première rangée.
- Cutter ou couteau utilitaire : Assurez-vous d’avoir une lame neuve et bien affûtée. Une lame émoussée déchirera les carreaux au lieu de les couper proprement.
- Règle ou règle droite : Une règle en métal est idéale pour guider votre cutter.
- Produits de nettoyage : Spray dégraissant (comme TSP ou Simple Green), une éponge et des chiffons propres ou des essuie-tout.
- Crayon : Pour marquer vos lignes de repère et vos lignes de coupe.
Outils optionnels pour plus de précision
Vous n’en avez pas besoin, mais ils facilitent le travail et apportent cette touche professionnelle supplémentaire.
- Tapis de coupe auto-cicatrisant : Protège vos plans de travail ou votre sol lorsque vous découpez les carreaux.
- Lisseur en plastique (ou carte de crédit) : Aide à bien maroufler le carreau et à chasser les bulles d’air.
- Mastic et pistolet à mastic : Pour sceller les bords le long du plan de travail et obtenir une finition étanche et soignée.
- Ciseaux : Une paire robuste peut être utile pour réaliser des découpes complexes autour des courbes.
Si vous modernisez votre cuisine et voulez éviter les erreurs de débutant les plus courantes, avoir le bon plan fait toute la différence. Notre guide sur Comment moderniser sa cuisine avec des carreaux Peel and Stick propose une solution innovante qui peut illuminer votre espace tout en vous aidant à éviter les pièges.
Sécurité et protection de la surface
N’oubliez pas les bases. Protégez votre zone de travail pour faciliter le nettoyage. Déployez un vieux drap ou une bâche de protection en plastique sur vos plans de travail afin de les protéger des éclaboussures de nettoyage ou des résidus de colle.

Comment préparer le mur pour une adhérence parfaite ?
Avez-vous entendu des histoires d’horreur de carreaux qui se décollent après une semaine ? Craignez-vous que vos murs légèrement texturés ou peints ne conviennent pas ?
Cette section vous présente la méthode de préparation infaillible qui garantit que vos carreaux resteront bien en place et beaux pendant des années.
Les experts en bricolage de The Spruce disent souvent que la préparation est 80% du travail, et nous ne pourrions pas être plus d’accord. Consacrer 30 minutes à bien préparer votre surface est le facteur le plus important pour une installation durable.
Étape 1 : Nettoyer et dégraisser le mur
Les murs de cuisine accumulent une quantité surprenante de graisse et de saleté, même s’ils paraissent propres. Cette couche invisible est l’ennemi numéro un de l’adhérence.
Commencez par essuyer toute la zone avec un bon nettoyant dégraissant. Nous recommandons une solution de phosphate trisodique (TSP) ou un nettoyant ménager puissant comme Simple Green. Vaporisez, frottez doucement avec une éponge, puis essuyez le tout avec un chiffon propre et humide.
Étape 2 : S’assurer que la surface est complètement sèche
Après le nettoyage, il faut laisser le mur sécher complètement. L’adhésif n’adhérera pas sur une surface humide. Essuyez avec un chiffon sec, puis attendez au moins une heure. Pour plus de sécurité, surtout dans un climat humide, nous vous conseillons d’attendre quelques heures, voire de diriger un ventilateur vers le mur.
Étape 3 : Traiter les murs irréguliers ou texturés
C’est une question fréquente. Pour obtenir les meilleurs résultats, les carreaux peel-and-stick ont besoin d’une surface lisse et non poreuse.
- Murs légèrement texturés : Si vous avez une très légère texture « peau d’orange », de nombreux carreaux de haute qualité adhéreront sans problème. L’application d’un adhésif en spray supplémentaire (comme 3M High-Strength 90) peut offrir une meilleure accroche.
- Murs très texturés : Pour les surfaces popcorn, knockdown ou autres textures rugueuses, vous devez d’abord lisser le mur. La méthode la plus simple consiste à appliquer une fine couche d’enduit de lissage, puis à poncer jusqu’à obtenir une surface lisse une fois sec, avant d’appliquer une sous-couche.
- Carreaux existants : Oui, vous pouvez poser du peel-and-stick par-dessus des carreaux en céramique existants ! Veillez simplement à bien nettoyer les joints et la surface des carreaux pour éliminer toute graisse et tout résidu savonneux.
Étape 4 : Marquer vos repères d’alignement
Ne faites pas confiance à vos plans de travail ou à vos placards pour être parfaitement de niveau — ils le sont rarement. C’est l’erreur qui mène à une crédence de travers.
Mesurez la hauteur de votre première rangée de carreaux. Repérez le point le plus bas de votre plan de travail et mesurez à partir de là pour marquer votre hauteur de départ. Utilisez votre niveau pour tracer une ligne parfaitement droite et horizontale sur tout le mur. C’est le guide pour le haut de votre première rangée de carreaux. Cela garantit une base bien droite pour le reste de votre projet.
Quelle est la procédure d’installation, étape par étape ?
Vous ressentez ce mélange d’enthousiasme et de nervosité avant de poser le premier carreau ? Vous craignez de le mettre de travers, de créer des bulles ou de rater les découpes.
Suivez ce processus détaillé, pensé pour les débutants. Nous le décomposons en gestes simples pour vous aider à obtenir un résultat professionnel, carreau après carreau.
C’est là que votre préparation porte ses fruits. Avec un mur propre et un trait de niveau, l’installation elle-même devient méthodique et gratifiante. Avancez lentement, soyez patient et faites confiance au processus. Pour un pas-à-pas ciblé sur cette étape, notre Guide facile : poser des Subway Tiles Peel & Stick est la ressource incontournable que de nombreux débutants trouvent précieuse.
Comment aligner et poser le premier carreau ?
Le premier carreau donne le ton à tout le projet. Par où commencer ? Comment être sûr qu’il soit parfaitement droit ?
Nous allons vous montrer la technique pro pour poser cette première pièce cruciale et garantir un alignement parfait pour tout le reste de votre projet.
La règle du « premier carreau » est simple : commencez dans l’angle le plus visible. Dans la plupart des cuisines, il s’agit d’un angle extérieur que l’on voit dès qu’on entre dans la pièce.
- Détachement partiel : Ne retirez PAS tout le film protecteur d’un coup. C’est l’erreur la plus fréquente chez les débutants. Décollez seulement les 2-3 inches du papier de protection du haut et repliez-le nettement vers le bas.
- Alignez-vous sur votre repère : Faites correspondre le bord supérieur exposé du carreau avec le trait de niveau tracé sur le mur. Prenez votre temps à cette étape. Vous pouvez encore le repositionner légèrement tant que vous n’avez pas exercé une pression ferme.
- Appuyez sur le haut : Une fois l’alignement parfait, pressez fermement la partie adhésive exposée contre le mur.
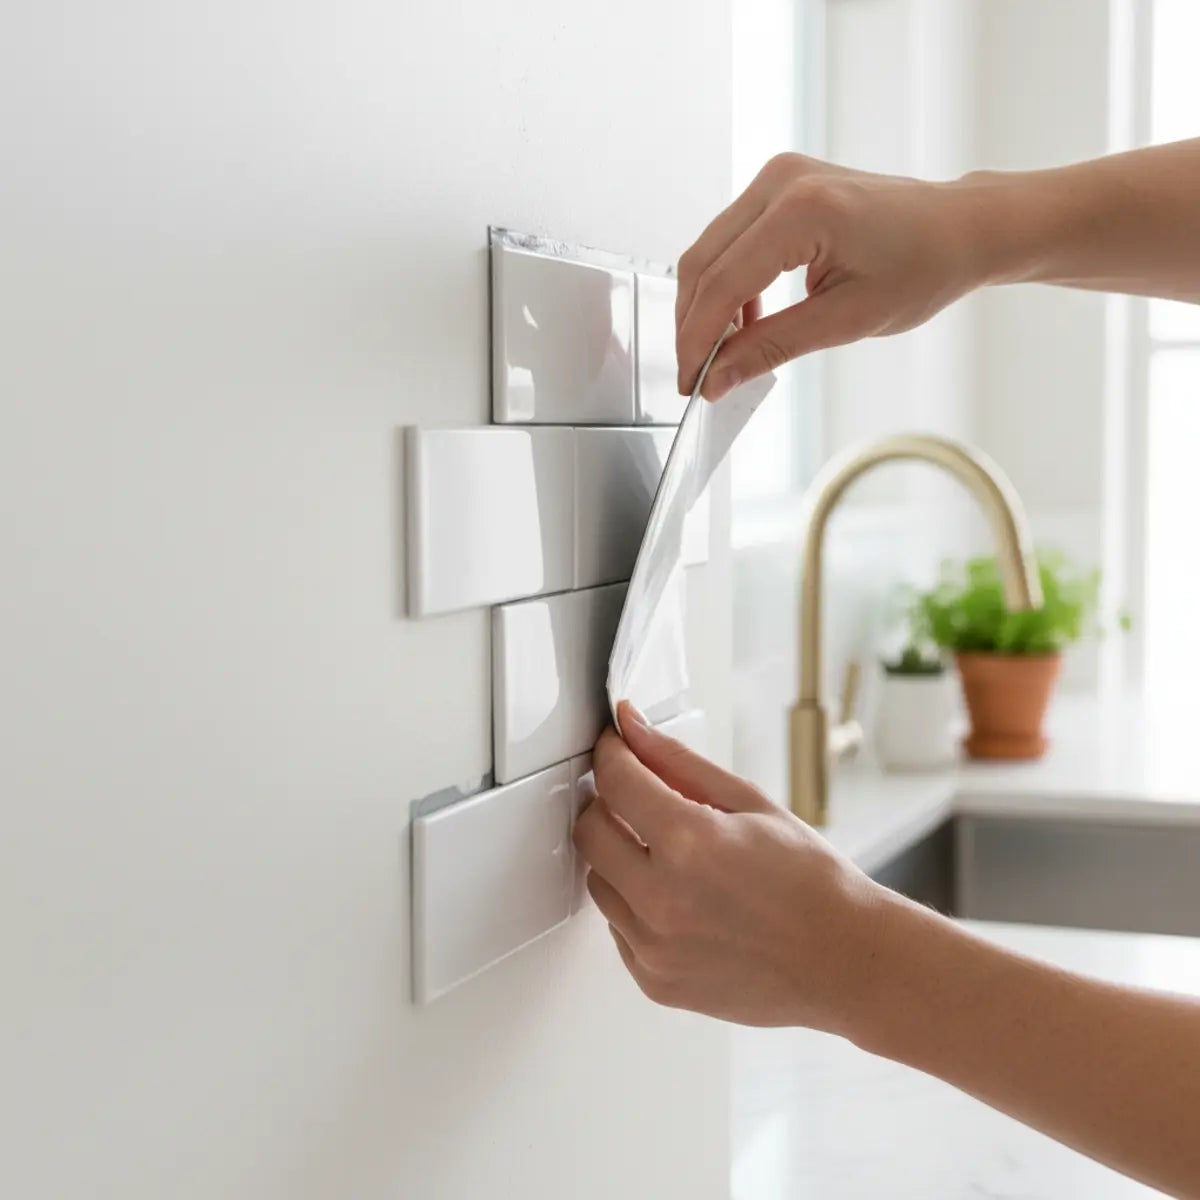
- Décollez et lissez : Glissez maintenant votre main derrière le carreau et tirez lentement le reste du papier de protection vers le bas. Pendant que vous tirez, utilisez votre autre main ou un lisseur en plastique pour presser le carreau contre le mur, du haut vers le bas. Cette technique chasse l’air et évite les bulles.
- Sécurisez le recouvrement : La plupart des Peel-and-stick Tiles comportent une zone de « recouvrement » prévue sur la ligne de joint. Alignez le carreau suivant pour qu’il la recouvre parfaitement. Cela crée une finition sans joint visible et étanche. Appuyez fermement le long de la jonction.
Comprendre comment utiliser ces carreaux polyvalents au-delà du simple crédence peut ouvrir la porte à une multitude de projets déco à la maison. Pour découvrir d’autres applications innovantes, consultez notre guide Comment utiliser les Peel and Stick Tiles en 2025 et transformez chaque pièce de votre intérieur.

Comment gérer les zones délicates comme les prises et les angles ?
Découper autour d’une prise semble compliqué et facile à rater. Comment obtenir un ajustement net et parfait sans gaspiller un carreau ?
Cette méthode simple de gabarit élimine les approximations dans les découpes complexes et vous donne l’allure d’un bricoleur expérimenté.
Les prises et les angles sont ce qui distingue un bon projet DIY d’un excellent résultat. L’astuce consiste à créer un gabarit en papier.
- Créer un gabarit : Prenez une feuille de papier et maintenez-la sur la prise. Marquez le papier autour des bords du boîtier électrique pour en tracer le contour. Découpez cette forme avec des ciseaux.
- Reporter sur le carreau : Placez votre gabarit en papier sur l’avant du carreau à l’endroit où se trouvera la prise. Utilisez votre crayon pour tracer la découpe sur le carreau.
- Découper avec soin : Placez le carreau sur un tapis de découpe. Utilisez un cutter bien affûté et une règle métallique pour couper soigneusement le long des lignes tracées. Pour les découpes intérieures, il peut être nécessaire d’appuyer fermement et de passer plusieurs fois.
- Vérifier l’ajustement : Avant de retirer le film protecteur, présentez le carreau découpé contre le mur pour vérifier qu’il s’ajuste parfaitement autour de la prise. Faites les petites retouches nécessaires.
- Poser le carreau : Une fois l’ajustement parfait, décollez et posez le carreau comme les précédents.
Pour les angles intérieurs, mesurez l’espace, découpez un carreau aux bonnes dimensions et pressez-le fermement dans l’angle. Pour les angles extérieurs, vous pouvez soit faire revenir un seul carreau autour de l’angle (s’il s’agit d’un vinyle souple), soit découper deux pièces pour qu’elles se rejoignent avec une arête nette.
Quel est le secret pour éviter les bulles et les espaces ?
Vous craignez des bulles d’air disgracieuses ou de petits jours entre les carreaux qui gâchent l’effet sans joint ?
Découvrez les deux techniques clés — un lissage correct et la bonne compréhension du recouvrement des carreaux — pour garantir une finition impeccable et professionnelle.
Obtenir une surface lisse, sans espace, est l’objectif ultime. Tout repose sur deux points : la technique de pose et la compréhension de votre matériau.
La méthode « décollez un peu, collez un peu » décrite plus haut est votre meilleure protection contre les bulles. En partant du centre vers les bords, vous aidez aussi à chasser l’air emprisonné. Si une bulle tenace apparaît, vous pouvez la percer avec une toute petite épingle puis lisser l’air vers l’extérieur. Le trou deviendra pratiquement invisible.
Les espaces sont évités en prêtant une attention particulière au design du carreau. La plupart des produits comportent une « ligne de joint » intégrée sur un ou deux côtés, destinée à être recouverte par le carreau suivant. Une erreur fréquente consiste à vouloir les poser bord à bord. Lisez les instructions du fabricant et faites-les se chevaucher comme indiqué. Cela crée cet aspect uniforme et continu.
Quels sont les problèmes courants et les solutions rapides ?
Et si quelque chose ne se passe pas comme prévu ? Les carreaux n’adhèrent pas, les joints semblent irréguliers ou vous en avez posé un complètement de travers.
Pas de panique ! Voici votre guide de dépannage pour les problèmes les plus courants, avec des solutions simples pour remettre votre projet sur les rails.
Même avec une préparation minutieuse, de petits soucis peuvent survenir. Savoir les corriger, c’est ce qui fait la réussite d’un bricoleur DIY. Voici nos conseils d’expert pour résoudre les difficultés les plus fréquentes.
Guide de dépannage interactif
Les coins de mon carreau se soulèvent. Quelle est la cause la plus probable ?
Problème : Les carreaux n’adhèrent pas correctement
Vous collez un carreau, et une heure plus tard, un coin commence à se soulever. Qu’est-ce qui provoque ce problème frustrant ?
Nous allons identifier la cause — de la préparation de la surface à la température — et vous donner une solution fiable pour garantir une adhérence durable.
C’est presque toujours un problème de surface. Si un carreau ne tient pas, commencez par vérifier votre préparation. Avez-vous utilisé un dégraissant ? Le mur était-il 100% sec ? Souvent, une fine pellicule cachée d’huile de cuisson ou de résidus de nettoyage est la coupable.
Un autre facteur est la température. L’adhésif fonctionne mieux dans une pièce entre 65 et 80 °F (18-27 °C). Si votre mur est trop froid, la colle ne deviendra pas suffisamment adhérente. Vous pouvez réchauffer délicatement le mur et le dos adhésif du carreau avec un sèche-cheveux pour améliorer l’adhérence.
Pour un carreau récalcitrant sur un mur propre et sec, un petit coup de pouce peut être nécessaire. Une légère pulvérisation d’un adhésif en spray haute résistance (comme 3M Super 77) sur le mur avant la pose peut offrir la tenue supplémentaire dont il a besoin.
Problème : Écarts dans les joints ou bords irréguliers
Vous avez reculé pour admirer votre travail et remarqué un petit écart agaçant entre deux carreaux. Tout le projet est-il ruiné ?
Découvrez comment corriger les petits problèmes d’alignement et utiliser des finitions pour masquer parfaitement les imperfections.
Si vous repérez tout de suite un carreau mal aligné, vous pouvez souvent le décoller délicatement et le repositionner. La plupart des adhésifs offrent quelques minutes de marge de manœuvre.
Si le carreau est bien fixé mais que le joint n’est pas parfait, ne vous découragez pas. Un fin cordon de mastic silicone peinturable le long du joint peut combler l’écart à la perfection. Une fois peint pour s’harmoniser avec le « grout », la réparation sera invisible. C’est aussi la meilleure façon de terminer le bord où la crédence rejoint le plan de travail, pour créer une finition propre et étanche à l’eau.
Problème : Retirer les carreaux sans abîmer le mur
En tant que locataire, votre plus grande crainte est d’arracher la peinture ou le placo au moment de partir. Comment retirer les carreaux en toute sécurité ?
Découvrez la technique simple et sans dégâts pour retirer les carreaux et laisser vos murs comme avant.
La clé d’un retrait sans dommage, c’est la chaleur. L’adhésif ramollit quand il est chaud.
Utilisez un sèche-cheveux réglé au maximum et tenez-le à environ 6-8 inches du carreau. Chauffez le carreau uniformément pendant environ 30 à 60 secondes, en insistant sur les coins et les bords.
Une fois que le carreau est chaud au toucher, utilisez une spatule ou votre ongle pour soulever délicatement un coin. Tirez lentement et régulièrement selon un angle prononcé (près du mur), en ajoutant de la chaleur au fur et à mesure. Le carreau devrait se décoller proprement, en laissant très peu ou pas de résidu. Toute adhérence restante peut être retirée avec un nettoyant à base d’agrumes ou de l’alcool à friction. Pour les locataires à la recherche d’une mise à niveau de cuisine stylée et sans dégâts, notre guide simple sur comment installer facilement une crédence peel and stick backsplash propose une approche très visuelle, avec des conseils de pro et des listes de contrôle téléchargeables pour vous aider à récupérer votre dépôt.
Comment puis-je ajouter des touches de style et entretenir ma crédence ?
Vos carreaux sont posés, mais vous voulez faire passer le projet de « bien » à « digne d’un magazine ». Comment obtenir ce rendu soigné et haut de gamme ?
Ces finitions professionnelles et conseils d’entretien à long terme mettront votre design en valeur et l’aideront à rester comme neuf pendant des années.
La pose n’est que le début. Quelques finitions supplémentaires et un entretien adapté protégeront votre investissement et feront de votre nouvelle crédence un véritable point focal.
Ajouter une moulure pour un rendu professionnel
Pour donner à votre crédence une finition vraiment soignée, pensez à ajouter une bordure. Une fine baguette de finition en métal ou en PVC (souvent appelée profil Schluter) là où le carrelage s’arrête peut créer un contour net et précis. Vous pouvez aussi utiliser une simple moulure quart-de-rond en bois, peinte pour s’harmoniser avec votre mur ou vos armoires. Ce petit détail encadre votre réalisation et dissimule les bords coupés.
Autre astuce de pro : appliquez un fin cordon de mastic transparent ou blanc spécial cuisine et salle de bain le long du bord inférieur, à l’endroit où la crédence rejoint le plan de travail. Cela empêche l’eau de s’infiltrer derrière les carreaux et crée une transition parfaitement fluide.
Conseils de nettoyage et de durabilité à long terme
Entretenir votre nouvelle crédence est très simple. Utilisez un chiffon doux ou une éponge avec une solution d’eau et de savon doux. Évitez les nettoyants abrasifs, les éponges à récurer ou les produits chimiques agressifs comme l’eau de Javel, car ils peuvent rayer la surface ou abîmer la finition.
La plupart des carreaux Peel-and-stick de qualité sont très durables, mais ils ne sont pas indestructibles. Évitez tout contact direct avec des objets tranchants. Avec un entretien adapté, votre crédence conservera tout son éclat pendant de nombreuses années. Un rapport 2025 sur la décoration intérieure a souligné que les finitions faciles d’entretien sont une priorité pour les propriétaires très occupés, ce qui fait de ces carreaux un choix idéal.
Quels sont quelques conseils pour respecter un budget et adopter une démarche écoresponsable ?
Vous aimez l’idée, mais devez respecter un budget serré ? Ou vous cherchez peut-être des moyens de rendre votre projet DIY plus durable ?
Découvrez des stratégies intelligentes pour économiser, réutiliser les chutes et choisir des matériaux respectueux de l’environnement.
Une belle mise à jour de la cuisine n’a pas besoin d’être coûteuse ni gaspilleuse. Avec un peu de créativité, vous pouvez rendre votre projet à la fois économique et écoresponsable.
Trouver des matériaux abordables
Cherchez les promotions dans les grandes enseignes, mais n’oubliez pas de consulter aussi les boutiques en ligne et les fournisseurs spécialisés, qui proposent souvent des rayons déstockage avec des offres intéressantes. Parfois, acheter une boîte légèrement plus grande que nécessaire revient moins cher au carreau.
Une autre excellente stratégie consiste à choisir un motif qui limite les chutes. Les designs simples comme le subway génèrent souvent moins de découpes qu’une mosaïque complexe, ce qui permet d’acheter moins de matériau au total.
Réutiliser les carreaux restants de façon créative
Ne jetez pas vos chutes ! Les carreaux Peel-and-stick restants sont parfaits pour de petits projets.
- Mise à jour pour véhicule de loisirs ou van aménagé : utilisez-les pour créer une mini-crédence dans la cuisine ou la salle de bain d’un van aménagé.
- Tapis de tiroirs : habillez l’intérieur de vos tiroirs de cuisine pour une touche de couleur et une surface facile à nettoyer.
- Dessous de verre : collez-les sur de simples carrés en liège ou en céramique pour créer des dessous de verre personnalisés.
- Accent pour étagère : appliquez-les sur le panneau arrière d’une bibliothèque pour une touche design.
Se procurer des matériaux durables
Le monde du DIY devient de plus en plus attentif à l’environnement. Recherchez des marques qui utilisent des matériaux recyclés dans leurs carreaux ou des adhésifs non toxiques à faible teneur en COV (composés organiques volatils). Certaines entreprises fabriquent désormais des carreaux Peel-and-stick à partir de matériaux durables comme le liège ou le bois récupéré. À mesure que les consommateurs réclament des options plus écologiques, elles seront de plus en plus nombreuses.

Dernières réflexions : votre transformation du week-end vous attend
Vous avez maintenant les connaissances d’expert et le plan étape par étape pour installer une crédence Peel-and-stick en toute confiance. Nous avons tout couvert, du choix des bons matériaux et de la préparation de vos murs jusqu’à une pose impeccable et aux finitions professionnelles. N’oubliez pas : la clé, c’est une préparation minutieuse et le fait de faire confiance au processus.
La peur qu’un projet DIY tourne au désastre peut être paralysante, mais vous avez vu à quel point cette transformation peut être simple. En un seul week-end, vous pouvez offrir à votre cuisine ou à votre salle de bain une mise à jour moderne et spectaculaire, réalisée entièrement par vous-même.
Prêt à transformer votre cuisine ? Pour plus de conseils visuels, découvrez notre tutoriel complet Comment installer facilement une crédence Peel and Stick.
Nous serions ravis de voir le résultat ! Partagez une photo de votre nouvelle crédence dans les commentaires ci-dessous ou identifiez-nous sur les réseaux sociaux.
Foire aux questions
Oui, absolument ! C’est l’un des grands avantages. Tant que vos carreaux existants sont en bon état (ni fissurés ni décollés), vous pouvez les poser directement par-dessus. L’essentiel est de nettoyer soigneusement les anciens carreaux et les joints avec un dégraissant afin que le nouvel adhésif adhère à une surface propre, sans graisse.
La durée de vie dépend de la qualité des carreaux, d’une installation correcte et de l’environnement. Des carreaux de haute qualité, bien posés dans une cuisine, peuvent facilement durer 5 à 10 ans, voire plus. Dans le cadre d’une location, ils tiendront bien pendant toute la durée du bail et pourront être retirés lorsque vous partez.
De nombreux carreaux Peel-and-stick modernes sont conçus pour résister à l’eau et conviennent aux zones exposées aux éclaboussures, comme derrière un évier. Pour une vraie étanchéité dans une salle de bain, recherchez des produits spécifiquement indiqués « 100% waterproof » et veillez à bien faire se chevaucher les carreaux. L’étanchéification des bords avec du mastic offre une couche de protection supplémentaire contre l’humidité.
C’est un point essentiel à prendre en compte. Vous devez choisir des carreaux spécialement indiqués comme « résistants à la chaleur ». Les matériaux comme le métal ou les composites de verre sont excellents pour une installation derrière une cuisinière. Respectez toujours la distance de dégagement recommandée (généralement 6-8 inches) entre la crédence et toute source de chaleur directe ou flamme nue, comme l’indique le fabricant des carreaux.

Laisser un commentaire
Ce site est protégé par hCaptcha, et la Politique de confidentialité et les Conditions de service de hCaptcha s’appliquent.