


5 erreurs courantes lors de la pose d’un dosseret Peel and Stick (et comment les corriger comme un pro)
Conseils d’expert pour sauver votre rénovation du désastre.
Vous avez passé le week-end à mesurer, couper et poser avec soin votre nouveau dosseret, puis reculé pour admirer la transformation. Mais le lundi matin, vous remarquez qu’un coin se décolle ou qu’un joint de coulis paraît étrangement de travers. C’est une sensation de découragement que beaucoup de bricoleurs connaissent trop bien.
La frustration liée au gaspillage de matériaux et aux résultats irréguliers peut donner envie de tout arracher. Mais pas de panique. La plupart des échecs d’installation ne sont pas causés par le produit lui-même, mais par de petites étapes négligées lors de la préparation et de la pose.
Vous planifiez votre projet ?
Instructions détaillées couvrant les outils, les erreurs courantes à éviter, des conseils de dépannage et des FAQ pour les situations délicates comme les angles, les prises et l’espace derrière les cuisinières.
Lire le guide DIY étape par étapeRéponse rapide : corriger les erreurs d’installation courantes
| Problème principal | La cause profonde | La solution |
|---|---|---|
| Décollement / Tient mal | Murs sales, gras ou texturés empêchant l’adhérence. | Nettoyer et apprêter : Frottez avec du TSP, poncez la peinture brillante et utilisez une sous-couche. |
| Rangs irréguliers / de travers | S’appuyer sur le plan de travail ou le sol comme guide de niveau. | Ligne de niveau : Tracez une ligne de référence à l’aide d’un niveau laser ; ne suivez pas le plan de travail. |
| Bords qui se soulèvent | Infiltration d’humidité ou pression insuffisante sur les bords. | Scellez-le : Appliquez un mastic silicone transparent sur les bords et utilisez un sèche-cheveux pour réactiver l’adhésif. |
| Espaces autour des prises électriques | Découpe à main levée imprécise. | Méthode type : Créez un gabarit en papier avant de découper le carreau final. |
| Fonte qui fondue / déformation | Installer trop près des sources de chaleur, sans marge de sécurité. | Bouclier thermique : Assurez une zone de sécurité derrière les cuisinières ou utilisez une protection arrière en acier inoxydable. |
D’après notre expérience auprès de propriétaires qui souhaitent moderniser leur intérieur, les Peel and Stick Tiles constituent une solution durable sur le long terme — à condition de respecter la chimie de l’adhésif. Ce guide identifie les cinq pièges les plus courants lors de la pose d’un dosseret peel and stick et présente les techniques professionnelles pour les corriger.
Pourquoi mon dosseret Peel and Stick n’adhère-t-il pas correctement ?
Le problème :
Avez-vous l’impression que vos carreaux refusent d’adhérer au mur et se détachent quelques heures après la pose ?
La solution :
Cette section explique la chimie de l’adhérence et comment créer une liaison de surface qui dure des années.
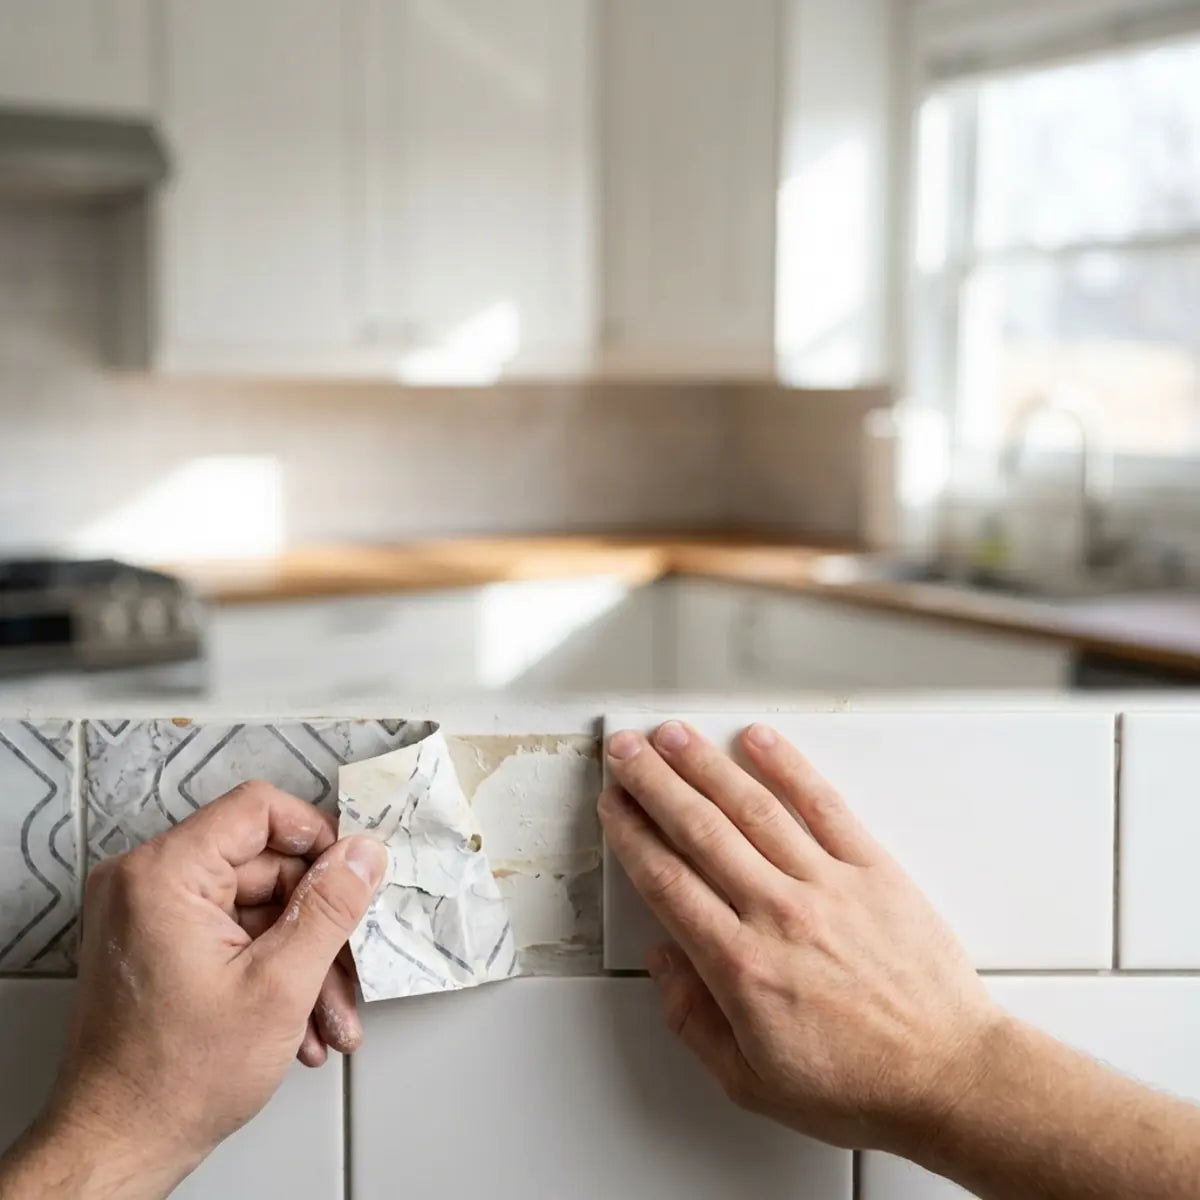
La réclamation la plus fréquente que nous entendons est peel and stick backsplash not sticking. Il s’agit rarement d’un défaut de la colle ; c’est presque toujours un problème avec la surface en dessous. Les murs de cuisine standards sont souvent recouverts de couches invisibles de graisse, d’huiles de cuisson ou de poussière qui agissent comme une barrière entre l’adhésif et le placoplâtre.

De plus, beaucoup de peintures modernes sont « lavables » ou « résistantes aux taches ». Elles contiennent des additifs en Téflon ou en silicone, spécialement conçus pour repousser la saleté. Malheureusement, elles repoussent aussi l’adhésif. Si vous collez les carreaux directement sur ces surfaces, la gravité finira par l’emporter.
La solution : le protocole « TSP et ponçage »
Pour corriger ce problème ou l’éviter, vous devez ramener le mur à une surface propice à l’adhérence.
- 1 Dégraissez soigneusement : Un simple liquide vaisselle ne suffit pas. Utilisez du phosphate trisodique (TSP) ou un dégraissant spécialisé pour éliminer des années d’accumulation de graisse de cuisson.
- 2 Brisez la couche de protection : Si votre peinture est brillante ou résistante aux taches, poncez légèrement la zone avec un papier abrasif à grain fin (grain 120). Il faut créer de la « mordance » (micro-rayures) pour que l’adhésif puisse accrocher.
- 3 Apprêtez pour réussir : Appliquez un primaire à forte adhérence. Il scelle les éventuels résidus de papier de placoplâtre et offre une surface uniforme.
Niveau avancé : le « test du ruban »
Avant de gaspiller une feuille entière de carreaux, essayez cette astuce de pro : posez une bande de ruban de masquage sur votre mur. Laissez-la en place 20 minutes. Si elle se décolle sans aucune résistance, votre mur n’est pas prêt.
Vous avez affaire à une peinture difficile ?
Instructions étape par étape pour poser des Peel and stick tiles sur des murs peints, y compris la préparation de surface, les conseils d’adhérence et la façon d’éviter les erreurs d’installation courantes qui peuvent entraîner des reprises coûteuses.
Lire le guide : Poser des Stick Tiles sur des murs peints →Comparaison : produits de nettoyage pour la préparation des murs
| Nettoyant | Efficacité | Meilleur cas d’utilisation |
|---|---|---|
| Savon vaisselle | Faible | Élimination générale de la poussière (laisse des résidus). |
| Vinaigre et eau | Moyen | Enlever la légère saleté, pas la graisse tenace. |
| TSP | Élevé (norme du secteur) | Décomposer la graisse épaisse de cuisine et déglacer la peinture. |
| Alcool isopropylique | Haut | Essuyage final pour éliminer les résidus chimiques. |
Comment réparer une crédence Peel and Stick Backsplash irrégulière ou de travers ?
Le problème :
Vous êtes-vous déjà éloigné et rendu compte que vos lignes « droites » dérivent vers le haut ou vers le bas au fur et à mesure ?
La solution :
Nous vous montrons comment cesser de faire confiance à vos yeux (et à votre maison) et commencer à faire confiance à la physique.
L’une des plus grandes idées reçues en installation de backsplash DIY est de supposer que vos meubles hauts, plans de travail ou sols sont parfaitement de niveau. Ils le sont presque jamais. Si vous commencez votre première rangée de carreaux en la posant directement sur le plan de travail, votre backsplash suivra la pente de ce dernier.
Au moment où vous atteignez la troisième ou la quatrième rangée, cette légère 2mm inclinaison devient un écart visible ou une ligne de travers qui casse l’harmonie visuelle. Le résultat saute aux yeux et crie « pose amateur ».
La solution : la « ligne de niveau flottante »
Pour corriger un alignement irrégulier de votre peel and stick backsplash, il faut ignorer l’architecture de la maison et tracer une vraie ligne horizontale.
- Repérez le point le plus bas : mesurez la distance entre votre plan de travail et les meubles hauts à plusieurs endroits. Repérez le point le plus bas du plan de travail.
- Tracez une ligne de référence : utilisez un niveau laser (ou un long niveau à bulle) pour marquer une ligne horizontale bien droite sur tout le mur, à environ la hauteur d’un carreau au-dessus du plan de travail.
- Posez vers le haut : alignez le haut de votre première rangée de carreaux sur cette ligne au crayon.
- Ajustez le bas : il y aura probablement un petit espace entre le bas du carreau et le plan de travail. Comblez-le avec du mastic. Cet effet d’optique donne l’impression que les carreaux sont bien droits, même si le plan de travail est en pente.

Couche d’enrichissement : la stratégie du « dry fit »
Pensez à la pose comme à une partie de Tetris. Ne retirez jamais le film protecteur avant d’avoir fait un « dry fit » du carreau. Maintenez-le en place avec du ruban de peintre pour vérifier l’ajustement. Cela évite la panique de devoir arracher un carreau collé au mur quand vous réalisez que le motif ne correspond pas.
Maîtrisez la technique
Si vous avez du mal avec la mécanique de la pose, nous avons deux ressources dédiées pour vous :
- Les bases : découvrez la méthode simple stick-and-tile avec des conseils de préparation essentiels et des astuces pour éviter les erreurs courantes.
- Pour les subway tiles : consultez notre guide d’installation visuel et adapté aux débutants, conçu pour les utilisateurs sans aucune expérience préalable en carrelage.
Que faire si les bords de mon backsplash se soulèvent ?
Le problème :
Les coins de vos carreaux se recourbent-ils comme de vieux autocollants, en laissant apparaître le mur derrière ?
La solution :
Cette section révèle les secrets de l’étanchéité à l’humidité et de l’activation à la chaleur pour bien fixer ces bords une bonne fois pour toutes.
Le soulèvement des bords d’un peel and stick backsplash
est généralement causé par deux facteurs : l’infiltration d’humidité ou un manque de pression pendant la prise initiale. Dans une cuisine ou une salle de bain, l’humidité est constante. Si le micro-espace au bord du carreau n’est pas scellé, la vapeur de votre casserole de pâtes ou de votre douche s’infiltrera derrière l’adhésif et le désactivera peu à peu.De plus, les adhésifs sensibles à la pression (le type utilisé sur ces carreaux) nécessitent une pression ferme et prolongée pour bien « mouiller » la surface et adhérer au mur. Passer simplement la main sur le carreau ne suffit pas.
La solution : chaleur et scellement
Si les bords de vos carreaux se soulèvent déjà, vous n’avez pas forcément besoin de les remplacer. Vous pouvez souvent les sauver.
- 1 Réactivez la colle : Utilisez un sèche-cheveux réglé sur une chaleur faible/tiède pour réchauffer délicatement le bord qui se décolle. La chaleur assouplit l’adhésif et lui redonne son côté collant.

- 2 Appliquez de la pression : Utilisez un rouleau J ou le dos d’une cuillère pour presser fermement le bord chauffé contre le mur. Maintenez pendant 30 secondes.
- 3 Scellez le périmètre : C’est l’étape la plus importante. Appliquez un fin cordon de silicone transparent tout autour du périmètre de votre backsplash (là où il rejoint le plan de travail et les armoires). Cela « verrouille » les bords et empêche l’humidité de s’infiltrer.
Richness Layer: La technique du pistolet à calfeutrer
Lors de l’application du calfeutrant, coupez l’embout à un angle de 45 degrés. Ne poussez pas le pistolet ; tirez-le le long du joint. Une erreur fréquente consiste à utiliser trop de silicone. Il ne faut qu’un cordon de la taille d’une allumette.
Gardez votre cuisine impeccable
Pour des conseils complets de nettoyage et d’entretien afin que vos carreaux restent toujours au top, y compris les bonnes pratiques et les erreurs à éviter pour prolonger leur durée de vie, consultez notre Guide d’entretien des Peel and Stick Tiles 2025.
Pourquoi mon backsplash fond-il ou se décolore-t-il derrière la cuisinière ?
Le problème :
Avez-vous remarqué que vos beaux nouveaux carreaux se déforment ou jaunissent directement derrière votre cuisinière ?
La solution :
Découvrez les zones de sécurité et les matériaux nécessaires pour protéger votre installation de la chaleur intense de la cuisine.
Beaucoup de bricoleurs oublient que les carreaux en vinyle et à base de gel ont une limite thermique. Même si beaucoup résistent à la chaleur, ils ne sont pas à l’épreuve de la chaleur.preuve. Poser un peel and stick backsplash trop près d’une flamme ouverte ou d’un brûleur à forte puissance sans zone tampon est la recette du désastre.
Les carreaux vinyles standard peuvent commencer à se ramollir à des températures d’environ 120°F à 140°F. Si votre cuisinière encastrable à gaz est plaquée contre le mur, la chaleur de ventilation peut facilement dépasser cette limite, provoquant des bulles, une fonte ou un décollement des carreaux.
La solution : la zone tampon de « sécurité »
Vous devez vérifier les spécifications thermiques de votre carreau spécifique, mais des règles de sécurité générales s’appliquent.
- La règle des 15 pouces : La plupart des fabricants recommandent de laisser un dégagement d’au moins 15 inches entre le brûleur et les carreaux.
- Pare-chaleur en acier inoxydable : Si vous avez une cuisinière à haut rendement, envisagez d’installer un panneau en acier inoxydable ou en verre directement derrière la cuisinière, en l’encadrant de vos peel and stick tiles. Le résultat est intentionnel et professionnel.
- Vérifiez le matériau : Les peel and stick tiles en métal ou en composite aluminium supportent généralement mieux la chaleur que les versions en vinyle uniquement.
Richness Layer: Idée reçue courante
Un mythe courant consiste à croire que « résistant à la chaleur » signifie « ignifuge ». Ce n’est pas le cas. Vérifiez toujours la fiche technique du fabricant. Si vous ne pouvez pas poser la main sur le mur derrière la cuisinière pendant que vous cuisinez parce qu’il est trop chaud, il est trop chaud pour des carreaux adhésifs.
Protégez vos améliorations en toute sécurité
Pour des améliorations ciblées de la cuisine et des choix de matériaux adaptés à cet environnement, consultez notre guide pratique :
À lire : Comment rénover une cuisine avec des Peel and Stick TilesPourquoi mes découpes autour des prises sont-elles irrégulières et avec des jours ?
Le problème :
Vos prises électriques ont-elles l’air entourées de pièces de puzzle dentelées et mal ajustées ?
La solution :
Nous partageons la méthode du gabarit qui garantit des découpes précises à chaque fois.
Rien ne gâche plus vite l’illusion d’un travail de carrelage professionnel que de grands jours irréguliers autour des prises électriques ou des interrupteurs. Les débutants essaient souvent de mesurer et de découper le carreau « à l’œil » ou tentent de le couper alors qu’il est encore partiellement collé au mur. Cela conduit inévitablement à corriger des carreaux de crédence mal alignés ou à utiliser trop de mastic pour masquer les erreurs.
La solution : la méthode du gabarit en papier
Arrêtez de deviner. La manière la plus précise de découper des formes complexes consiste à créer un modèle.
- 1 Retirez la plaque de finition : Dévissez toujours le cache en plastique de la prise (coupez d’abord l’alimentation !).
- 2 Tracez sur du papier : Fixez une feuille de papier sur le boîtier de la prise avec du ruban adhésif. Frottez un crayon le long des bords du boîtier pour créer une empreinte, ou découpez-la au cutter pour qu’elle s’ajuste parfaitement.
- 3 Reportez sur le carreau : Placez ce gabarit en papier sur votre Peel and stick tile (sur le verso). Tracez la forme.
- 4 Découpez et posez : Découpez le carreau sur un tapis de coupe à l’aide d’un cutter bien affûté. Lorsque vous le poserez et remettrez la plaque de finition, les bords de la découpe seront cachés derrière le cache, pour un rendu parfaitement homogène.
Astuce experte : la règle de la « lame neuve »
Les carreaux en vinyle et en gel émoussent les lames à une vitesse incroyable. Si le matériau se déchire au lieu de se couper net, votre lame est émoussée. Les poseurs professionnels cassent un nouveau segment de lame toutes les 3 à 4 coupes.
Besoin de visuels ?
Pour un guide visuel étape par étape sur la gestion des découpes délicates et des outils, le guide Comment installer une crédence en vinyle Peel and Stick est une ressource précieuse qui inclut des conseils, du dépannage et des instructions de retrait sans risque pour les locataires.
Quelle étape de l’installation vous inquiète le plus ?
Votez pour voir avec quoi les autres bricoleurs ont le plus de mal !
Réflexions finales
Faire des erreurs pendant un projet DIY fait partie de l’apprentissage, mais l’installation d’un peel and stick backsplash ne doit pas forcément tourner à l’épreuve du feu. En misant sur un nettoyage minutieux du mur, sur l’établissement d’une ligne de référence bien de niveau et sur l’étanchéité des bords contre l’humidité, vous pouvez obtenir une finition qui rivalise avec un carrelage posé par un professionnel — pour une fraction du prix.
Rappelez-vous : l’objectif n’est pas seulement de couvrir un mur ; c’est d’apporter de la valeur et du plaisir à votre intérieur.
Prêt à transformer votre cuisine ?
Vous rêvez de moderniser votre cuisine, mais vous redoutez le temps, le coût et les salissures ? Les Peel and stick tiles sont votre solution DIY. Si vous êtes prêt à mener votre projet avec confiance, commencez ici.
Voir les meilleurs designs pour 2025 →

Laisser un commentaire
Ce site est protégé par hCaptcha, et la Politique de confidentialité et les Conditions de service de hCaptcha s’appliquent.