


Points Clés : Pouvez-Vous Cacher Une Grille De Retour D’Air Avec Des Carreaux À Décoller Et À Coller ?
- Camouflage Stratégique : Vous Pouvez Cacher Une Grille De Retour D’Air Avec Des Carreaux À Décoller Et À Coller Uniquement En Camouflant La Grille Et Le Mur Environnant, Pas En Recouvrant Ou En Scellant La Grille.
- Intégration Sûre : La Méthode La Plus Sûre Consiste À Découper Les Carreaux Proprement Autour De L’Ouverture De La Grille, À Préserver La Zone D’Air Ouverte D’Origine Et À Garder Les Vis Accessibles.
- Préservation De L’Entretien : Veillez Toujours À Ce Que La Grille Soit Amovible Pour Les Vérifications Du Filtre, Le Nettoyage Et L’Entretien Essentiel Du HVAC Afin D’Éviter D’Endommager Le Système.
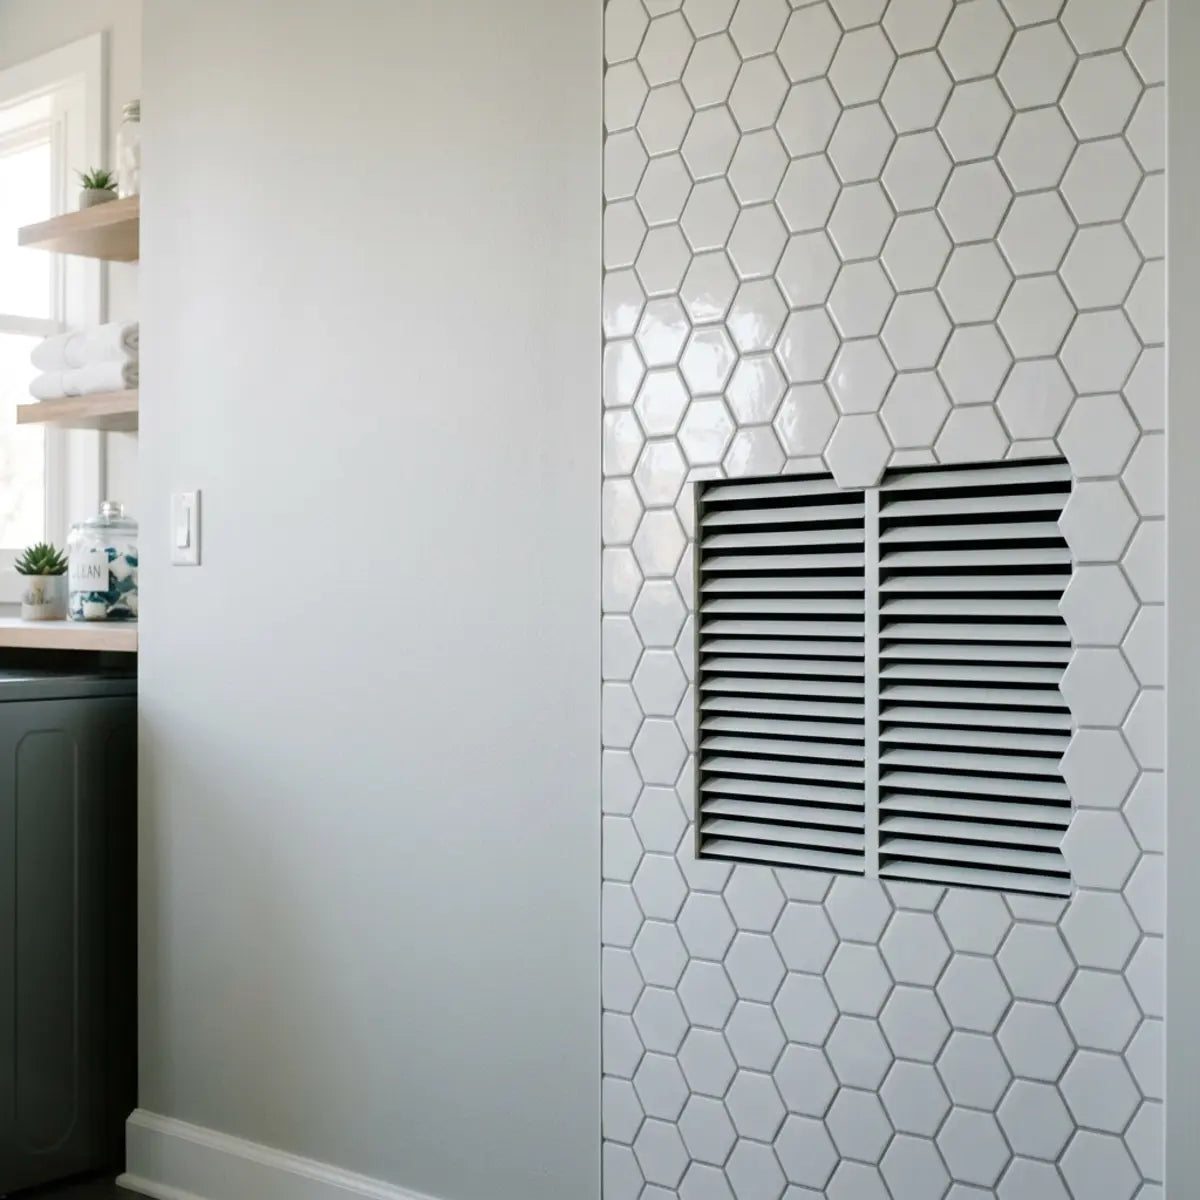
Un Mur Magnifiquement Carrelé Peut Transformer Complètement Une Pièce, Mais Cet Impact Visuel Est Souvent Gâché Par Une Grande Grille De Retour D’Air En Métal, Au Look Industriel. Cette Frustration Déco Courante Amène De Nombreux Propriétaires À Se Demander S’Ils Peuvent Dissimuler En Toute Sécurité Ce Vilain Élément Technique Sans Perturber Leur Système HVAC.
Vous Pouvez Cacher Une Grille De Retour D’Air Avec Des Carreaux À Décoller Et À Coller Uniquement En Camouflant La Grille Et Le Mur Environnant, Pas En Recouvrant Ou En Scellant La Grille. La Méthode La Plus Sûre Consiste À Découper Les Carreaux Proprement Autour De L’Ouverture De La Grille, À Préserver La Zone D’Air Ouverte D’Origine, À Garder Les Vis Accessibles Et À Faire En Sorte Que La Grille Soit Amovible Pour Les Vérifications Du Filtre, Le Nettoyage Et L’Entretien HVAC.
Camouflez La Grille ; Ne Bloquez Jamais Le Flux D’Air. Ne Bloquez En Aucun Cas Le Retour D’Air. Utilisez Des Découpes De Carreaux Nettes Pour Intégrer Visuellement La Grille Au Mur. Préservez En Permanence L’Amovibilité Et L’Accès Aux Vis. En Respectant Ces Règles Strictes, Vous Obtenez Une Finition Impeccable Tout En Protégeant La Circulation D’Air De Votre Maison.

Si Vous Envisagez D’Étendre Cette Mise À Jour Esthétique À D’Autres Zones Difficiles De Votre Maison, Comme Une Cuisine Terne, Vous Pouvez Transformer Votre Espace À Petit Prix. Découvrez Exactement Comment Le Faire Parfaitement Avec Des Options Adaptées Aux Locataires Dans Notre Guide Complet Sur Carreaux À Décoller Et À Coller DIY : Mise À Jour Facile De La Cuisine. Découvrez Comment Les Poser, Les Choisir Et Les Retirer Sans Dommage.
Pouvez-Vous Cacher Une Grille De Retour D’Air Avec Des Carreaux À Décoller Et À Coller En Toute Sécurité ?
Vous Craignez De Faire Une Erreur Irréversible Qui Endommagerait Le Système De Chauffage Et De Climatisation De Votre Maison ? Cette Section Établit Les Protocoles De Sécurité D’Airflow Obligatoires À Respecter Avant De Poser Le Moindre Carreau Sur Votre Mur.
Nous Voyons Souvent Des Rénovations DIY Échouer Parce Que Le Propriétaire A Donné La Priorité À L’Esthétique Au Détriment Du Fonctionnement Du Système. Une Grille De Retour D’Air Sert De Principale Voie D’Entrée Pour Votre Système HVAC. Elle Récupère L’Air Intérieur Pour Le Ramener Vers L’Unité De Traitement D’Air, Afin Qu’Il Soit Chauffé Ou Refroidi.
Obstruer Cette Voie D’Entrée Affame Votre Système En Air. Imaginez Essayer De Courir Un Marathon En Respirant À Travers Une Fine Paille En Plastique.
Pour Réaliser Une Transformation Visuelle, Le Consensus Du Secteur Recommande D’Utiliser Le Ratio De Préservation Du Flux D’Air (APR). Nous Définissons L’APR Comme Le Pourcentage De La Surface Ouverte D’Origine De La Grille De Retour Conservé Après Vos Modifications Esthétiques.
Votre APR Cible Doit Rester Fonctionnellement À 100 Pour Cent. Vous Ne Pouvez Pas Réduire Délibérément Les Ouvertures De La Grille, Bloquer Les Lames Inclines Ou Piéger Les Vis De Fixation Derrière Une Couche Adhésive.
Reconnaître Les Signaux D’Alerte D’Une Restriction Du Flux D’Air
Vous Craignez D’Avoir Déjà Accidentellement Bloqué Trop D’Air ? Cette Section Décrit Les Signes D’Alerte Immédiats D’Un Système HVAC À L’Étouffement.
Si Vous Enfreignez La Règle Des 100 Pour Cent D’APR, Votre Équipement Vous Avertira Activement. Le U.S. Department of Energy Indique Que La Restriction Du Retour D’Air Oblige Les Moteurs De Soufflerie À Travailler Davantage, Ce Qui Accélère La Dégradation Des Performances.
Arrêtez Votre Projet Et Consultez Un Professionnel HVAC Si Vous Observez L’Un Des Dysfonctionnements De Base Suivants :
- Sifflement Audible : Des Bruits Aigus Indiquent Que L’Air Se Fait Un Passage Dans Une Ouverture Trop Réduite, Créant Une Pression Statique Dangereuse.
- Flux D’Air Soufflé Faible : Si Le Retour Est Privé D’Air, Les Bouches De Soufflage De Vos Pièces Diffuseront À Peine De L’Air Conditionné.
- Cycles Rapides Du Système : Votre Appareil S’Allume Et S’Éteint Sans Arrêt Parce Que Le Flux D’Air Restreint Déclenche Les Interrupteurs De Sécurité Internes.
- Gel De La Batterie : En Mode Refroidissement, L’Absence D’Air De Retour Tiède Fait Geler Complètement La Batterie D’Évaporation, Ce Qui Interrompt Tout Fonctionnement.
Camouflage Ou Dissimulation : La Différence Structurelle
Vous Hésitez Entre Un Rendu Harmonieux Et Une Dissimulation Dangereuse De La Grille ? Cette Section Vous Donne Un Cadre Clair Pour Définir Les Pratiques De Design Acceptables.
Dans Le Vocabulaire De La Rénovation Sûre, Les Mots Comptent. « Dissimulation » Implique De Cacher Entièrement La Grille, Souvent En Plaçant Un Meuble Plein Devant Ou En Installant Un Cache Restrictif. C’Est Universellement Dangereux.
« Camouflage » Repose Sur Une Tromperie Visuelle. Vous Alignez Les Textures Et Les Couleurs Environnantes Pour Détourner Le Regard Du Matériel Technique, Tout En Laissant La Fonction Mécanique Intacte.
| Approche Du Projet | Méthodologie | Statut De Sécurité | Impact Sur Le Système |
|---|---|---|---|
| Camouflage Complet | Pose De Carreaux En Recouvrant Entièrement La Grille. | Dangereux | Affame Le Système, Gèle Les Serpentins. |
| Obstruction Partielle | Boucher Les Ailettes Avec Du Ruban Pour Poser Un Carreau Plat. | Dangereux | Modifie Le Référentiel De Pression Statique. |
| Camouflage Encadré | Poser Les Carreaux Au Ras Du Bord De La Grille. | Optimal | Impact Nul. Sûr D’un Point De Vue Empirique. |
| Harmonisation Réversible | Peindre La Grille Métallique Amovible Pour L’Accorder Au Carreau. | Optimal | Impact Nul. Préserve L’Accès Pour L’Entretien. |
Vérification Des Connaissances : Diagnostic De Sécurité
Faut-Il Recouvrir De Carreau, Peindre, Remplacer Ou Faire Appel À Un Pro Lorsqu’Il S’Agit D’Un Retour D’Air Peu Esthétique Et Très Visible ?
Comprendre La Topographie Du Mur Avant De Coller
Fatigué De Voir Des Carreaux Auto-Adhésifs Se Décoller Du Mur Une Semaine Après La Pose ? Cette Section Détaille La Préparation De Surface Nécessaire Pour Obtenir Une Forte Adhérence Près Des Zones De Circulation D’Air.
Les Retours D’Air Aspirent En Permanence L’Air Le Long De La Surface Du Mur Environnante. Ce Flux D’Air Emporte La Poussière Microscopique, Les Squames D’Animaux Et Les Graisses De Cuisine Directement Sur La Zone Où Vous Prévoyez D’Appliquer L’Adhésif.
Si Vous Posez Le Carreau Sur Ces Débris Accumulés, L’Adhésif Va Céder. Le Mouvement D’Air Constant Exploitera La Moindre Faiblesse De L’Accroche, Ce Qui Fera Relever Les Bords Du Carreau.
Le Protocole Dégraissant Obligatoire
Vous Voulez Sauter L’Étape Du Nettoyage Pour Gagner Du Temps ? Cette Section Explique Pourquoi Une Liaison Chimique Nécessite Une Surface Chimiquement Propre Pour Obtenir Une Tenue Maximale.
Vous Devez Neutraliser La Topographie Du Mur. Les Sprays Multi-Usages Standard Laisent Des Résidus Chimiques Qui Repoussent Activement Les Adhésifs Peel-And-Stick.
Nous Exigeons L’Utilisation D’Un Substitut Au Phosphate Trisodique (TSP) Ou D’Un Dégraissant Puissant. Frottez Le Mur Sur Au Moins Six Pouces Autour De L’Ouverture Du Retour D’Air. Essuyez Ensuite La Zone À L’Eau Claire Pour Éliminer Toute Trace Chimique.
Traiter La Texture Et La Brillance Du Mur
Vous Avez Une Forte Texture Peau D’Orange Ou Une Peinture Brillante ? Cette Section Précise Les Étapes De Lissage Nécessaires Pour Une Pose De Carreaux Plate Et Professionnelle.
Les Carreaux Peel-And-Stick Exigent Un Point De Contact Plat Et Continu. Les Peintures Très Brillantes Agissent Comme Une Poêle Antiadhésive, Tandis Que Les Fortes Textures Murales Créent Des Poches D’Air Derrière Le Dos Du Carreau.
- Surfaces Brillantes : Raflez Légèrement La Peinture Avec Du Papier Abrasif Grain 120. Cela Crée Une Accroche Mécanique Pour La Couche Adhésive.
- Textures Marquées : Si Votre Mur Présente Une Texture Knockdown Ou Popcorn Profonde, Vous Devez Le Lisser À La Lame Avec De L’Enduit À Joint. Laissez Sécher Complètement, Puis Appliquez Une Sous-Couche De Qualité Avant De Poser Les Carreaux.
Exigence De Préparation : Liste De Vérification Des Mesures
Assurez-vous D’avoir Documenté Les Dimensions Exactes Du Vide De Cloison Sèche Et L’emplacement Des Vis Avant De Faire La Moindre Découpe Dans Vos Matériaux De Carrelage Premium.
Comment Découper Du Carrelage À Poser Et Coller Autour De L’Ouverture De La Grille ?
Intimidé À L’idée D’abîmer Des Carreaux Coûteux Avec Des Découpes De Travers Et Bâclées ? Cette Section Décompose La Séquence De Découpe De Précision Qui Garantit Des Bords Nets Et Un Rendu Fini En Usine.
Réaliser Des Découpes Nettes Autour D’un Cadre Métallique Peu Pratique Fait La Différence Entre Un Camouflage À L’allure Professionnelle Et Un Raccord DIY Approximatif. Il Faut Séparer La Phase De Découpe De La Phase De Pose.
N’essayez Jamais De Couper Un Carreau Au Cutter Pendant Que Le Support Adhésif Est Entièrement Retiré.
Lors De L’habillage D’une Grille, Nous Donnons La Priorité À L’Intégrité D’Accès Amovible (RAI). Cet Indicateur Mesure Le Pourcentage D’accès De Service D’origine Préservé. Vous Devez Garantir Une Visibilité Totale Des Vis, Un Retrait Sans Effort De La Grille Et Zéro Adhésif Faisant Le Pont Entre Le Couvercle De La Grille Et La Cloison Sèche.
Séquence De Découpe Et D’ajustement Étape Par Étape
Vous Cherchez Une Méthode Infaillible Pour Mesurer Et Découper Sans Gaspiller De Matériau ? Cette Section Fournit Un Plan Chronologique Strict Pour Des Grilles Parfaitement Encadrées.
Suivez Ces Étapes Avec Soins. Laissez Le Film Protecteur Sur Le Dos Du Carreau Jusqu’à L’application Finale De La Pression.
- Retirez Le Matériel : Dévissez Et Retirez Entièrement La Grille De Reprise Métallique. Rangez Les Vis En Toute Sécurité. Ne Posez Jamais De Carrelage Autour D’une Grille Tant Qu’elle Est Encore Fixée Au Mur.
- Définir Le Périmètre : Mesurez L’ouverture Exacte De La Cloison Sèche. Ne Mesurez Pas La Grille Métallique Elle-Même, Car Elle Possède Un Rebord Extérieur Superposé.
- Établir Le Gabarit : Créez Un Gabarit En Papier De L’ouverture. Fixez Ce Papier Au Mur Avec Du Ruban Adhésif En Veillant À Ce Qu’il S’aligne Parfaitement Avec Le Vide.
- Reporter Les Mesures : Posez Votre Carreau Non Décollé Face Visible. Placez Votre Gabarit En Papier Sur Le Carreau Et Tracez Les Lignes De Découpe Nécessaires À L’aide D’un Marqueur À Pointe Fine.
- Marquer La Face : Utilisez Une Règle Métallique Et Une Lame De Cutter Neuve. Incisez Légèrement La Ligne Marquée Sur La Face Décorative Du Carreau. N’essayez Pas De Traverser Tout Le Carreau Dès Le Premier Passage.
- Casser Et Ébarber : Pliez Doucement Le Carreau Le Long De La Ligne Incisée Jusqu’à Ce Qu’il Se Casse Nettement. Utilisez Le Cutter Pour Couper La Mousse Ou Le Support En Vinyle.
- Réaliser Un Essai À Blanc : Maintenez Le Carreau Découpé Contre L’ouverture Du Mur Sans Retirer Le Support Adhésif. Vérifiez Que L’ajustement Est Impeccable.
- Procéder À L’adhérence Finale : Retirez Le Support. Alignez Parfaitement Le Bord Découpé Avec Le Vide De Cloison Sèche, Collez Le Carreau Et Appliquez Une Pression Ferme Et Uniforme Sur Toute La Surface.
Les Couteaux Multitâches Émoussés Tirent Et Déchirent La Couche Décorative En Vinyle. Pour Garantir Un Bord Net Comme En Usine, Vous Devez Remplacer La Lame Du Cutter Toutes Les Trois À Quatre Coupes. Une Lame Bien Aiguisée Réduit L’effort Nécessaire, Ce Qui Évite Les Glissades Dangereuses Et Les Bords Dentelés.

Maîtriser Les Coupes De Dégagement Pour Les Angles Intérieurs
Vous Avez Du Mal À Couper Un Angle Droit À 90° Sans Déchirer La Face Du Carreau ? Cette Section Décrit Les Techniques Précises Au Cutter Requises Pour Les Angles Intérieurs Complexes.
Les Coupes Droites Standard Sont Simples. En Revanche, Si Une Seule Pièce De Carreau Doit Envelopper Le Coin D’une Ouverture De Grille, Vous Devez Réaliser Une Découpe D’angle Intérieur.
N’amenez Pas La Lame Du Cutter Directement Dans Le Point D’angle. Cela Conduit Presque Toujours À Une Coupe Excessive, Laissant Une Marque De Coupe Peu Esthétique Visible Sur Le Mur Une Fois Installé.
Percez Plutôt Un Tout Petit Trou Exactement Au Point De Coin Sur Votre Carreau. Coupez Le Long Des Lignes Droites Jusqu’à Ce Que Votre Lame Atteigne Le Trou Percé. Le Trou Agit Comme Un Point De Détente, Permettant Au Déchet De Se Détacher Proprement Sans Déchirer La Finition Décorative.
Quelles Sont Les Meilleures Stratégies Matériaux Pour Camoufler Une Grille ?
Vous Vous Sentez Dépassé Par Les Choix De Produits Et Inquiet D’une Défaillance De L’adhésif Près D’un Conduit Actif ? Cette Section Fournit Une Base Empirique Pour Sélectionner Des Matériaux Qui Résistent Aux Variations De Température Constantes.
Les Bouches De Reprise Situées Près Des Plafonds, Des Cuisines Ou Des Buanderies Subissent De Fortes Contraintes Environnementales. L’air Aspiré Par Ces Grilles Transporte Des Niveaux D’humidité Variables Et De La Chaleur Localisée.
Les Autocollants Vinyle Standard Ultra-Fins N’ont Pas La Stabilité Dimensionnelle Nécessaire Dans Cet Environnement. Ils Se Déforment, Se Décollent Et Se Décolorent Sous L’effet D’une Contrainte Thermique Continue. Vous Avez Besoin De Matériaux Conçus Pour Une Rigidité Structurelle.
Pour Évaluer La Résistance À La Chaleur Et À L’humidité, Comparez Aux Produits Structurels Haut De Gamme. Grâce À Une Conception Plus Épaisse Et À Des Supports Adhésifs Supérieurs, Un Matériau Avancé Neutralise Naturellement Les Risques De Dilatation Thermique. Améliorez Votre Intérieur Avec Des Options Autocollantes Haute Performance Afin D’établir Une Référence Fiable Pour Les Projets Nécessitant Une Stabilité À Long Terme Près Des Zones De Flux D’air Actives. En Savoir Plus Sur Les Solutions Premium Sans Joint Dans Notre Analyse De Minty Ceramic 8.
Évaluation Des Matériaux Noyau Des Dalles Autocollantes
Vous Hésitez Sur Le Matériau De Dalle Qui Semble Le Plus Authentique Et Offre Les Meilleures Performances ? Cette Section Classe Les Options Les Plus Courantes Ainsi Que Leurs Indicateurs De Durabilité Respectifs.
Choisir Le Bon Matériau Noyau Détermine La Durée De Vie De Votre Projet De Camouflage.
- Gel De Polyuréthane (PU) En Vinyle Souple : Ces Modèles Imitent Le Verre Ou Le Carreau De Type Subway. Ils Sont Abordables, Mais Très Sensibles À L’Humidité. Ils Conviennent Mieux Aux Couloirs Secs Et À Climat Contrôlé.
- Composite Métallique : Avec Une Fine Couche D’Aluminium Ou De Cuivre Sur Un Noyau En Plastique, Ces Dalles Offrent Une Rigidité Exceptionnelle. Elles Sont Fortement Recommandées Pour Encadrer Les Ouvertures Étroites De Retour D’Air Grâce À Leur Découpe Nette Et Propre.
- Composite De Pierre (SPC) : Ces Dalles Mélangent De La Poudre De Calcaire Avec Des Stabilisants. Elles Résistent Très Bien Aux Variations De Température Et Offrent La Finition Architecturale La Plus Réaliste.
Si Votre Grille De Retour D’Air Se Trouve Dans Un Environnement Très Humide, La Logique D’Adhérence Standard Ne Suffit Plus. Nous Avons Suivi Les Dalles Autocollantes Dans Des Climats Humides Pour Voir Ce Qui Tient Vraiment. Pour Des Informations Approfondies Sur La Prévention Des Défaillances D’Adhésif Dans Ces Zones, Obtenez Des Réponses Fondées Sur Des Tests Et Des Conseils D’Installation Dans Notre Cadre Complet : Nous Avons Suivi L’Adhérence : Dalles Autocollantes En Humidité Estivale.
Comment Gérer Un Placement Délicat Près D’Appareils Ou De Fenêtres ?
Vous Devez Composer Avec Un Retour D’Air Coincé À Côté D’Un Encadrement De Fenêtre Ou D’Une Plaque De Cuisson Chaude ? Cette Section Parcourt Les Zones Architecturales Étroites Qui Compliquent Les Dispositions De Dalles Standards.
Les Maisons Présentent Rarement Des Retours D’Air Parfaitement Centrés Sur De Grands Murs Vides. Vous Rencontrerez Souvent Des Ouvertures Coincées Contre Les Plinthes, Flottant Près De Cadres De Fenêtre Complexes, Ou Placées Dangereusement Près De Cuisinières De Cuisine.
Ces Points De Contrainte Architecturale Exigent Des Stratégies D’Installation Modifiées. Vous Ne Pouvez Pas Forcer Une Disposition Standard De Dalles Dans Un Espace Risqué Ou Structurellement Peu Pratique.
Naviguer Les Dégagements Liés À La Combustion
Vous Posez Du Carrelage Sur Un Mur De Cuisine Où Le Retour D’Air Se Trouve Près De Votre Zone De Cuisson ? Cette Section Implique Les Dégagements De Sécurité Stricts Nécessaires Pour Prévenir Les Risques D’Incendie.
Si Vous Rénovez Une Cuisine Ou Une Buanderie, Le Retour D’Air Peut Partager L’Espace Mural Avec Une Cuisinière Ou Un Sèche-Linge À Gaz. Les Dalles Autocollantes Sont Fabriquées À Partir De Plastiques Et De Résines. Elles Sont Combustibles.
Vous Devez Respecter Les Codes Standardisés De Sécurité Incendie. N’Appliquez Pas De Matériaux Autocollants À Moins De 15 Pouces D’Un Brûleur À Gaz Ouvert.
Si Votre Ventilation Se Trouve Dans Cette Zone, Vous Devez Utiliser Un Carrelage Céramique Traditionnel Avec Mortier Colle Ou Des Produits Explicitement Vérifiés. Pour Des Protocoles Détaillés Sur L’Identification De Matériaux Sûrs Pour Les Zones À Forte Chaleur Et L’Établissement De Marges De Sécurité, Consultez Comment Installer Des Dalles Autocollantes Résistantes À La Chaleur Derrière Votre Cuisinière.
Réaliser Des Finitions De Bord Près Des Fenêtres
Vous Avez Du Mal À Faire Une Transition Harmonique Là Où La Grille Rejoint Un Encadrement De Fenêtre ? Cette Section Présente La Norme Structurelle Pour Terminer Les Bords Apparents.
Une Ouverture De Retour D’Air Située Juste À Côté D’Un Retour De Fenêtre En Plaque De Plâtre Crée Un Point De Fin Peu Esthétique. Si Vous Laissez Le Bord Coupé De La Dalle Autocollante Exposé, Le Résultat Semble Inachevé Et Favorise L’Infiltration D’Humidité.
Pour Évaluer La Finition Des Bords Près D’Éléments Architecturaux Complexes, La Méthodologie De Base Exige Le Respect Strict Des Enveloppements D’Angle Standardisés. Découvrez Les Meilleures Méthodes Pour Des Bords Nets Et Des Résultats Adaptés Aux Locataires Dans Notre Cadre Testé : Nous Avons Testé 3 Solutions De Retour De Fenêtre En Dalle Autocollante.
Vous Devez Recouvrir Ces Bords Apparents À L’Aide D’Une Fine Moulure Métallique Ou D’Un Mastic De Finition Spécialisé Pour Garantir Un Rendu Professionnel.
Bonnes Pratiques Pour Peindre La Grille De Ventilation Et L’Intégrer Visuellement
Vous Voulez Que La Grille Métallique Disparaisse Complètement Sans Bloquer Les Vraies Fentes D’Air ? Cette Section Révèle Les Techniques De Peinture Précises Qui Masquent Parfaitement Le Matériel.
Poser Les Dalles Jusqu’Au Bord De L’Ouverture En Plaque De Plâtre Offre Un Aspect Affleurant Excellent. Cependant, La Grille Métallique Blanche D’Usine Ressortira Toujours Fortement Face À Une Dalle Plus Sombre Ou À Motifs.
Pour Obtenir Un Vrai Camouflage, Vous Devez Modifier Le Poids Visuel De La Grille Elle-Même. Ce Processus Demande De La Patience Et Les Revêtements Chimiques Appropriés.

Protocole De Préparation Et De Peinture De La Grille
Vous En Avez Marre Que La Peinture S’écaille Sur Vos Grilles De Ventilation En Métal Après Une Semaine ? Cette Section Décrit La Préparation De Surface En Plusieurs Étapes Nécessaire Pour Une Adhérence Durable Et Une Couleur Qui Tient Dans Le Temps.
Vous Ne Pouvez Pas Simplement Vaporiser De La Peinture Murale Au Latex Sur Une Grille Métallique Emboutie. La Peinture Va S’accumuler Dans Les Coins Des Persiennes, Bloquer Le Débit D’Air Et S’écailler Immédiatement Au Moindre Contact.
Suivez Ce Protocole De Repeinture Strict Pour Préserver La Valeur Du Design Réversible De La Quincaillerie :
- Retrait Complet : Sortez La Grille À L’Extérieur. Ne Peignez Jamais La Grille Lorsqu’Elle Est Fixée Au Mur Ou Posée Au-Dessus De La Conduite D’Air.
- Dégraissage Chimique : Frottez Le Métal Vigoureusement Avec Un Dégraissant Puissant. Les Retours D’Air Aspiraient Des Particules De Graisse Microscopes Qui Agissent Comme Une Barrière Invisible À L’Adhérence De La Peinture.
- Rugosité Mécanique : Abrasivez Légèrement Toute La Surface, Y Compris Entre Les Persiennes, À L’Aide D’Un Tampon De Ponçage À Grain Fin. Cela Crée Des Micro-« Dents » Pour L’Apprêt.
- Apprêt Auto-Mordant : Appliquez Deux Couches Extrêmement Légères D’Un Apprêt Auto-Mordant De Qualité Automobile. Cette Formule Mord Le Métal Nu, Garantissant Que La Couche De Couleur Finale Adhère De Façon Permanente.
- Application D’Une Couleur Mate : Choisissez Une Peinture En Aérosol Qui S’Accorde Au Plus Près Avec Votre Nouveau Carrelage. Appliquez Trois À Quatre Couches De Brumisation Ultra-Légères. Des Couches Trop Épaisses Couleront, Scelleront Les Interstices Des Persiennes Et Ruineront Le Rapport De Préservation Du Débit D’Air.
Matériaux De Grille Alternatifs Coordonnés
Vous Détestez Complètement L’Aspect Du Métal Embouti Et Vous Voulez Une Mise À Niveau Haut De Gamme ? Cette Section Explique Comment Trouver Et Installer Des Grilles Architecturales Qui Complètent Des Designs De Carrelage Haut De Gamme.
Si Peindre Une Grille Métallique Cabossée Et Vieille De Trente Ans Vous Semble Contre-Productif, Vous Pouvez Remplacer Toute La Quincaillerie. Le Marché Propose Des Grilles De Retour Premium En Fonte, En Aluminium Découpé Au Laser Ou En Bois Massif.
Lors Du Remplacement De La Grille, Vous Devez Faire Correspondre Empiriquement La Surface D’Ouverture À L’Air Libre De L’Unité D’Origine. Une Grille En Bois Très Décorative Présente Souvent Des Traverses Plus Épaisses, Ce Qui Réduit Mathématiquement La Surface Fonctionnelle D’Entrée D’Air.
Calculez Toujours Le Pourcentage Total D’Ouverture À L’Air Libre De La Nouvelle Grille Pour Vous Assurer Qu’Il Répond Aux Exigences De Base De Votre Système.
Entretien À Long Terme : Nettoyer Les Grilles Sans Endommager Le Carrelage
Vous Craignez Que L’Entretien HVAC De Routine N’Arrache Votre Nouveau Carrelage Du Mur ? Cette Section Définit Les Paramètres De Nettoyage Sûrs Nécessaires Pour Garder Votre Adhésif Intact.
Votre Retour D’Air Nécessite Une Intervention Régulière. Vous Devriez Retirer La Grille Pour Changer Le Filtre À Air, Aspirer L’Ouverture Du Conduit Ou Permettre Aux Techniciens D’Entretenir Le Traitement D’Air.
Si Votre Carrelage Peel-And-Stick A Été Posé Correctement, Il Ne Devrait Jamais Gêner Cet Entretien. En Revanche, Des Méthodes De Nettoyage Agressives Peuvent Facilement Détruire Le Liant Adhésif Qui Encadre L’Ouverture De La Ventilation.
Les Dangers Des Méthodes De Nettoyage Thermique
Vous Songez À Pulvériser De La Vapeur Chaude Sur La Zone De Ventilation Pour Retirer La Poussière Accumulée ? Cette Section Met En Garde Contre Les Pratiques D’Entretien Thermiques Qui Font Fondre Instantanément Les Couches Adhésives.
Une Forte Accumulation De Poussière Sur La Face De La Grille Est Inévitable. Même S’Il Est Tentant D’Utiliser Des Outils De Nettoyage Thermique Modernes Pour Chasser Rapidement La Saleté, Vous Devez Les Tenir À Distance De Votre Bordure Carrelée.
La Vapeur À Haute Température Compromet Définitivement La Structure Chimique Des Adhésifs Peel-And-Stick. Pour Un Regard Empirique Sur Les Seuils De Défaillance De Ces Matériaux Sous Contrainte Thermique, Consultez Le Cadre De Test En Conditions Réelles Et Les Signes De Risque Détaillés Dans Nous Avons Testé Les Vaporettes Sur Du Carrelage Peel-And-Stick.
Retirez Toujours La Grille En Entier, Nettoyez-La Dans Un Évier Séparé Avec De L’Eau Tiède Savonneuse, Et Laissez-La Sécher Complètement Avant De La Remettre Au Mur.
Gérer En Toute Sécurité Les Grilles Coincées
Avez-Vous Accidentellement Peint La Grille Au Mur, Ou L’Adhésif Du Carrelage A-T-Il Franchi L’Espace ? Cette Section Fournit La Technique D’Extraction D’Urgence Pour Retirer La Quincaillerie Coincée En Toute Sécurité.
Malgré Vos Meilleurs Efforts, Il Se Peut Que La Grille De Ventilation Semble Collée Au Mur Carrelé Tout Juste Installé. Ne Faites Pas Levier Sur Le Cadre Métallique Avec Un Tournevis. Vous Écraserez Le Carrelage Peel-And-Stick Adjacent Et Tordrez Définitivement La Grille.
À La Place, Prenez Une Lame De Cutter Neuve. Suivez Délicatement La Jointure Exacte Où La Grille Métallique Rencontre Le Bord Du Carrelage. Gardez La Lame Légèrement Orientée Vers Le Métal, À L’Opposé De La Surface Du Carrelage. Cela Coupera Toute Peinture, Tout Mastic Ou Tout Excès D’Adhésif, Permettant À La Grille De Se Détacher Sans Dommages Catastrophiques.
Solutions Innovantes : Étendre Le Concept De Camouflage
Vous Cherchez Des Façons Créatives D’Intégrer La Technologie De Manière Fluide Dans Votre Mur De Ventilation Nouvellement Carrelé ? Cette Section Explore Des Intégrations De Design Avancées Qui Rehaussent Votre Projet De Base.
Une Fois Que Vous Maîtrisez L’Art De La Découpe De Précision Et De L’Adhérence Sûre Autour Des Obstacles Utilitaires, Vous Pouvez Étendre Vos Ambitions En Matière De Design. Les Mêmes Compétences Nécessaires Pour Encadrer Un Retour D’Air S’Appliquent Parfaitement Pour Cacher D’Autres Perturbations Visuelles.
Par Exemple, De Nombreux Propriétaires Choisissent D’Installer Un Éclairage D’Accent Près Des Retours Au Niveau Du Sol Ou Des Bouches D’Admission Au Plafond. La Gestion Des Câbles D’Alimentation De Ces Fixtures Présente Le Même Défi Visuel Qu’Une Grille Métallique.
Lorsqu’Il S’Agit De Dissimuler Des Câbles À Faible Tension, La Norme Architecturale Consiste À Intégrer Le Cheminement Directement Derrière La Couche Adhésive. Découvrez Comment Obtenir Rapidement Un Aspect Intégré En Cachant Les Câbles En Toute Sécurité Dans Notre Guide : Nous Avons Testé La Méthode La Plus Propre Pour Cacher Les Fils LED Derrière Du Carrelage.
Si Vous Préférez Un Éclairage Ambiant Intelligent Et Dynamique Qui Évite Entièrement Un Câblage Fastidieux, Animez Votre Décor Avec La Lumière Grâce À Petalglow Stick™. Posez Et Collez En Toute Simplicité, Et Transformez Votre Espace Sans Engagement Structurel.
En Associant Un Encadrement Précis De La Grille De Ventilation À Une Dissimulation Avancée Des Câbles, Vous Obtenez Une Configuration Optimale Qui Transforme Un Mur Purement Fonctionnel En Un Élément Architectural Cohérent Et Haut De Gamme.
Foire Aux Questions
Puis-Je Placer Un Meuble Devant Une Nouvelle Sortie D’Air En Carrelage Pour Mieux La Cacher ?
Non. Le Consensus Du Secteur Implique De Maintenir Un Dégagement Minimum De 24 à 36 inches Devant Toute Grille De Retour D’Air. Placer Des Canapés, Des Bibliothèques Ou De Lourd Placards Dans Cette Zone Modifie Fortement La Pression Statique Du Système, Ce Qui Peut Provoquer Le Gel Des Batteries Et La Grillage Du Moteur.
Combien De Temps Dois-Je Attendre Avant De Reposer La Grille Après Avoir Collé Le Carreau ?
Les Consignes Du Fabricant Recommandent Fortement D’Attendre Au Moins 48 Heures Pour Que L’Adhésif Sensible À La Pression Durcisse Complètement. Refixer Prématurément La Lourde Grille Métallique Et Resserrer Les Vis Peut Déplacer Les Carreaux Environnants Et Les Désaligner.
Est-Il Sans Danger D’Utiliser Du Mastic Pour Estomper L’Espace Entre Le Carreau Et La Grille De Ventilation ?
Vous Pouvez Utiliser Un Mastic Acrylique Ou En Silicone Très Flexible Strictement Autour Du Cadre Périphérique Extérieur, À Condition Que La Grille Ne Serve Pas De Porte D’Accès Principale Au Filtre À Air. Cependant, L’Application De Mastic Réduit Inhérente La Qualité D’Accès Amovible, Ce Qui Rend Le Futur Retrait Beaucoup Plus Difficile.
Que Dois-Je Faire Si Mon Carreau Peel-And-Stick Commence À Se Décoller Près De La Grille De Ventilation ?
Un Rebordement Immédiat Indique Soit Une Mauvaise Préparation Initiale Du Mur, Soit Une Humidité Excessive. Appliquez Une Colle Vinyle Spécialisée Ou Une Colle En Spray Au Dos Du Carreau Soulevé À L’Aide D’Une Seringue De Précision, Remettez-Le Fermement En Place, Puis Maintenez-Le Avec Du Ruban De Peintre Pendant 24 Heures.
Inspection Finale : Liste De Vérification Réussite/Échec Du Projet
Avant De Conclure Votre Projet, Vérifiez Ces Critères De Sécurité Et Visuels Essentiels.
Réflexions Finales
Camoufler Avec Succès Une Grille De Retour D’Air Exige Un Équilibre Rigoureux Entre Une Esthétique Haut De Gamme Et Une Sécurité HVAC Sans Compromis. Vous Devez Respecter Strictement La Règle De Préserver 100 % De La Capacité D’Airflow D’Origine.
En Réalisant Des Coupes Précises Au Couteau Utilitaire, En Respectant La Mesure D’Intégrité D’Accès Amovible Et En Utilisant Des Matériaux Conçus Pour Résister Aux Contraintes Environnementales, Vous Réduisez Fondamentalement Le Risque De Dommages Au Système. Le Résultat Final Offre Un Aspect Intégré Et Intentionnel Qui Disssimule Harmonieusement La Rupture Visuelle Sans Priver Votre Maison De L’Air Nécessaire.
Avant D’Acheter Les Matériaux Et De Commencer Les Coupes, Nous Vous Recommandons Fortement De Consulter Nos Guides Complets D’Installation De Carreaux Peel-And-Stick Pour Vous Assurer Que La Préparation De Votre Mur Est Impeccable Dès Le Départ.

Laisser un commentaire
Ce site est protégé par hCaptcha, et la Politique de confidentialité et les Conditions de service de hCaptcha s’appliquent.