


Haben Sie schon einmal in Ihre Küche geschaut und von einer Veränderung geträumt, nur um dann an den Gedanken an eine schmutzige, teure und dauerhafte Renovierung zu scheitern? Damit sind Sie nicht allein. Für viele Hausbesitzer und besonders Mieter wirken die hohen Kosten und die Verbindlichkeit einer klassischen Sanierung überwältigend. Sie wünschen sich eine stilvolle, moderne Küche, aber Ihr Budget und Ihr Mietvertrag sprechen dagegen.
Hier ändert sich alles. Stellen Sie sich vor, Sie verleihen Ihrer Küche an nur einem Wochenende ein beeindruckendes Makeover – ganz ohne Abrissstaub und zu einem Bruchteil der Kosten. Peel and stick kitchen tiles sind die Lösung für 2025, die genau das möglich macht. Sie sind das ultimative DIY kitchen upgrade für alle, die Stil, Erschwinglichkeit und Flexibilität suchen.
Dieser Ratgeber ist Ihre zentrale All-in-one-Quelle, um diesen Trend zu meistern. Wir haben alles zusammengestellt, was Sie für 2025 wissen müssen – von den angesagtesten Designtrends und häufigen Installationsfehlern bis hin zu mieterspezifischen Tricks und umweltbewussten Optionen. Am Ende haben Sie das nötige Selbstvertrauen, um eine Küche zu gestalten, die Sie rundum lieben.
Was sind Peel and Stick Kitchen Tiles?
Haben Sie sich schon einmal gefragt, was moderne selbstklebende Fliesen eigentlich von den dünnen Vinyl-Aufklebern der Vergangenheit unterscheidet? In diesem Abschnitt wird erklärt, woraus die heutigen hochwertigen Fliesen bestehen und warum sie zu einem echten Designstar geworden sind.
Peel and stick kitchen tiles sind genau das, wonach sie klingen: dekorative Fliesen mit selbstklebender Rückseite, die Sie abziehen und direkt auf eine glatte Oberfläche aufbringen. Betrachten Sie sie nicht als einfache Aufkleber, sondern als technisch entwickelte Paneele, die auf Haltbarkeit und Stil ausgelegt sind. Sie bieten eine einfache Möglichkeit, einen schönen peel and stick backsplash oder eine Akzentwand zu gestalten.
Der Trick liegt in ihrer Konstruktion. Anders als ein einfaches Vinylblatt bestehen moderne Fliesen oft aus mehreren Schichten. Dazu gehören eine robuste Oberseite aus Vinyl oder Verbundmaterial, ein hochauflösendes Designbild und eine starke Kleberückseite. Dieser Schichtaufbau verleiht ihnen eine Struktur und Tiefe, die echte Materialien überzeugend nachahmt.
Wichtige Arten von Peel and Stick Tiles
Nicht alle Fliesen sind gleich. Der Markt im Jahr 2025 bietet eine fantastische Vielfalt, jede mit eigener Optik und Haptik.
- Vinyl (PVC) Tiles: Das sind die gängigsten und günstigsten Modelle. Sie sind leicht, wasserabweisend und in unzähligen Designs erhältlich. Sie eignen sich perfekt für ein schnelles, budgetfreundliches DIY kitchen upgrade.
- Gel Tiles: Diese verfügen über eine 3D-Deckschicht aus Epoxid oder Polyurethan, die ein glänzendes, gelartiges Finish erzeugt. Dadurch wirken sie realistischer und dreidimensionaler und erinnern stark an glasierte Keramik oder Glas.
- Metal Tiles: Diese aus leichtem Aluminium oder Edelstahl gefertigten Fliesen bieten einen eleganten, industriellen oder modernen Look. Sie sind besonders langlebig und eine heat resistant peel and stick backsplash-Option, ideal für den Bereich hinter dem Herd.
- Stone & Wood Composite Tiles: Eine neuere Innovation: Diese Fliesen verbinden Vinyl mit Stein- oder Holzpulver. So entsteht eine steifere, strukturierte und hochwertiger wirkende Fliese, die vom Original kaum zu unterscheiden ist.
Warum sie 2025 im Trend liegen
Der Aufstieg von peel and stick kitchen tiles hat nicht nur mit Bequemlichkeit zu tun; er spiegelt wider, wie wir heute leben. Menschen möchten schöne Wohnungen ohne langfristige Bindung oder finanzielle Belastung. Eine aktuelle Umfrage ergab, dass über 40% der DIY-Enthusiasten Peel-and-stick-Lösungen wegen ihrer Schnelligkeit und Einfachheit bevorzugen.
Sie passen perfekt zum Wunsch nach Individualisierung und mietfreundlichen Lösungen. Außerdem sorgen Fortschritte in der Herstellung dafür, dass die Designs für 2025 raffinierter sind als je zuvor – von hyperrealistischen Marmormaserungen über matte Oberflächen bis hin zu filigranen geometrischen Mustern.
Peel and Stick Tiles vs. Keramikfliesen für Küchen
Die Entscheidung zwischen Peel-and-stick-Fliesen und traditionellen Keramikfliesen hängt von fünf wichtigen Faktoren ab: Kosten, Installation, Dauerhaftigkeit, Haltbarkeit und Stil.
- Kosten: Peel and stick ist der klare Sieger. Sie sparen nicht nur bei den Materialien, sondern auch bei Arbeitskosten, Fugenmasse, Mörtel und Spezialwerkzeugen.
- Installation: Eine herkömmliche Fliesenverlegung ist ein mehrtägiges Projekt, das Fachkenntnisse erfordert und viel Schmutz verursacht. Removable kitchen tiles können mit nur wenigen einfachen Werkzeugen an einem Nachmittag angebracht werden.
- Beständigkeit: Keramik ist für die Ewigkeit. Das ist großartig, wenn Sie sich bei Ihrer Designwahl ganz sicher sind, aber ein großer Nachteil für Mieter oder für alle, die ihren Stil gerne öfter verändern. Peel and stick bietet eine temporäre oder semi-permanente Lösung.
- Langlebigkeit: Während Keramik besser gegen tiefe Kratzer geschützt ist, sind hochwertige waterproof peel and stick tiles for kitchen für den Einsatz in der Küche so konzipiert, dass sie bei richtiger Pflege über Jahre hinweg Feuchtigkeit, Hitze und Flecken widerstehen.
- Stil: Keramik hat zeitlose Ausstrahlung, doch Peel and stick kann inzwischen auch in Sachen Designvielfalt mithalten. Von Subway bis Herringbone finden Sie einen trendigen Stil für jeden Look – ganz ohne lebenslange Verpflichtung.

Sind Peel and Stick Tiles gut für Küchen geeignet?
Sie sind unsicher, ob diese Fliesen Hitze, Dampf und Spritzer in einer echten, belebten Küche wirklich standhalten? Dieser Abschnitt geht direkt auf die häufigsten Fragen zu Haltbarkeit, Hitze und Feuchtigkeit ein und gibt Ihnen volle Sicherheit.
Das ist die entscheidendste Frage, und die Antwort lautet ein klares Ja – vorausgesetzt, Sie wählen das richtige Produkt und installieren es korrekt. Die Leistung von peel and stick kitchen tiles in einem stark frequentierten Bereich wie der Küche hängt von ihrer Qualität und Ihrer Vorbereitung ab.
Ein verbreiteter Irrtum ist, dass sich diese Fliesen innerhalb weniger Monate ablösen. Bei günstigen, minderwertigen Produkten kann das durchaus passieren, Premium-Fliesen sind jedoch auf Langlebigkeit ausgelegt. Sie verwenden starke Klebstoffe und schützende Deckschichten, die eine wasserabweisende Versiegelung bilden und die Fliesen über Jahre hinweg sicher an Ort und Stelle und optisch ansprechend halten.
UMFRAGE: Wie lange haben Ihre Peel and Stick Tiles gehalten?
Antworten auf Fragen zu Haltbarkeit und Lebensdauer
Wie lange halten sie wirklich? Bei fachgerechter Installation auf einer sauberen, glatten Oberfläche können Sie davon ausgehen, dass hochwertige Fliesen zwischen 3 und 10 Jahren oder sogar länger halten. Für eine Familie, die täglich kocht, hält eine hochwertige Vinyl- oder Verbundfliese Spritzer und das Abwischen mühelos aus.
Profi-Tipp: Das Geheimnis der Langlebigkeit liegt in der Vorbereitung der Oberfläche. Die Wand muss vollständig sauber, trocken und frei von Staub oder Fett sein. Das Auftragen einer Grundierung vor der Montage kann die Haftung deutlich verbessern, besonders auf seidenmattem Lack.
Hitze- und Feuchtigkeitsbeständigkeit erklärt
Die Küchenrückwand ist eine anspruchsvolle Umgebung. Sie ist Dampf von kochenden Töpfen, Spritzern von Pfannen und ständigem Abwischen ausgesetzt.
- Hitzebeständigkeit: Prüfen Sie immer die Angaben des Herstellers. Die meisten hochwertigen Fliesen werden als heat resistant peel and stick backsplash eingestuft und sind hinter einem Kochfeld sicher verwendbar. Für die Sicherheit wird jedoch generell ein Abstand von 6-8 inch zwischen Brenner und Fliesen empfohlen. Metallfliesen bieten die höchste Hitzebeständigkeit.
- Feuchtigkeitsbeständigkeit: waterproof peel and stick tiles for kitchenWände sind der Standard. Das Vinyl- oder Verbundmaterial selbst ist wasserundurchlässig. Entscheidend ist, dass die Fugen zwischen den Fliesen dicht schließen, damit keine Feuchtigkeit dahinter eindringen kann. Viele Designs haben überlappende Kanten, um diesen Schritt besonders einfach zu machen.
Die ultimative renterfreundliche Küchenverwandlung
Für Mieter sind Peel-and-Stick-Fliesen ein revolutionäres Produkt. Sie bieten die Möglichkeit, eine standardisierte Küche komplett zu personalisieren, ohne die Kaution zu riskieren. Da es sich um abnehmbare Küchenfliesen handelt, können Sie einen stilvollen, schützenden Spritzschutz anbringen und ihn beim Auszug einfach wieder abziehen.
Beispiel aus der Praxis: Sarah, eine Mieterin in einer Stadtwohnung, nutzte gelbasierte Subway-Fliesen, um einen veralteten, gestrichenen Spritzschutz zu verkleiden. Nach drei Jahren vor Ort konnte sie die Fliesen mit einem Föhn ganz einfach entfernen, um den Kleber zu lösen. Die Wand darunter blieb sauber und unbeschädigt, sodass sie ihre volle Kaution zurückbekam.
Möchten Sie sehen, wie es geht? Unser Guide bietet einen ausführlichen Einblick in die einfachsten Installationsmethoden und die besten Designs für 2025. Lesen Sie unseren Artikel über So installieren Sie Peel-and-Stick-Fliesen & die besten Designs 2025 für eine vollständige Schritt-für-Schritt-Anleitung.

Die besten Peel-and-Stick-Küchenfliesen für 2025
Fühlen Sie sich von all den Designmöglichkeiten überfordert und sind sich nicht sicher, was in Ihrem Raum gut aussieht? Hier zeigen wir die am besten bewerteten Styles für 2025 und führen Sie zum perfekten Look für Ihre Küche – von modern bis umweltfreundlich.
Das richtige Design kann Ihre gesamte Küche aufwerten. 2025 dreht sich alles um Textur, raffinierte Muster und natürliche Optiken. Vorbei sind die Zeiten flacher, offensichtlich künstlicher Fliesen. Die besten Optionen von heute bieten Tiefe und Charakter.
Für einen tieferen Einblick in die neuesten Trends und Installationstipps ist unser Artikel über Peel-Stick-Spritzschutz-Ideen für die Küche 2025 die beste Anlaufstelle. Er steckt voller visueller Inspiration, um Ihnen den Einstieg zu erleichtern.
Top-bewertete Designs für Spritzschutze
Bestimmte Stile dominieren weiterhin, weil sie zeitlos und vielseitig sind.
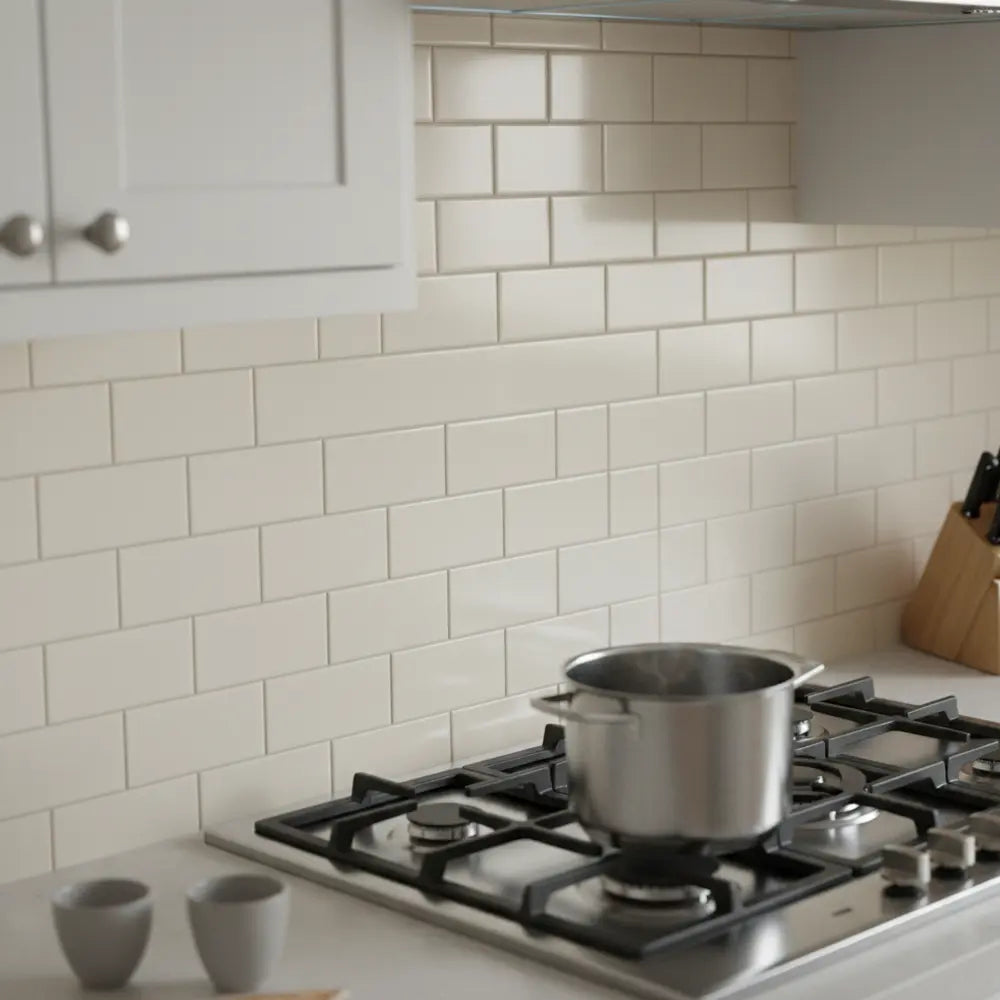
- Moderne Subway-Fliesen: Die klassische 3x6 inch Subway-Fliese ist nach wie vor ein Favorit, aber 2025 bekommt sie ein neues Update. Suchen Sie nach Varianten mit dunkleren, kontrastierenden „Fugenlinien“ für einen grafischen Look oder wählen Sie Fliesen mit einer dezenten abgeschrägten Kante oder handgefertigter Textur für mehr Charakter.
- Fischgrät & Chevron: Diese dynamischen Muster bringen Bewegung und einen Hauch von Luxus in den Raum. Sie eignen sich hervorragend für kleine wie große Küchen, lenken den Blick nach oben und lassen den Raum großzügiger wirken.
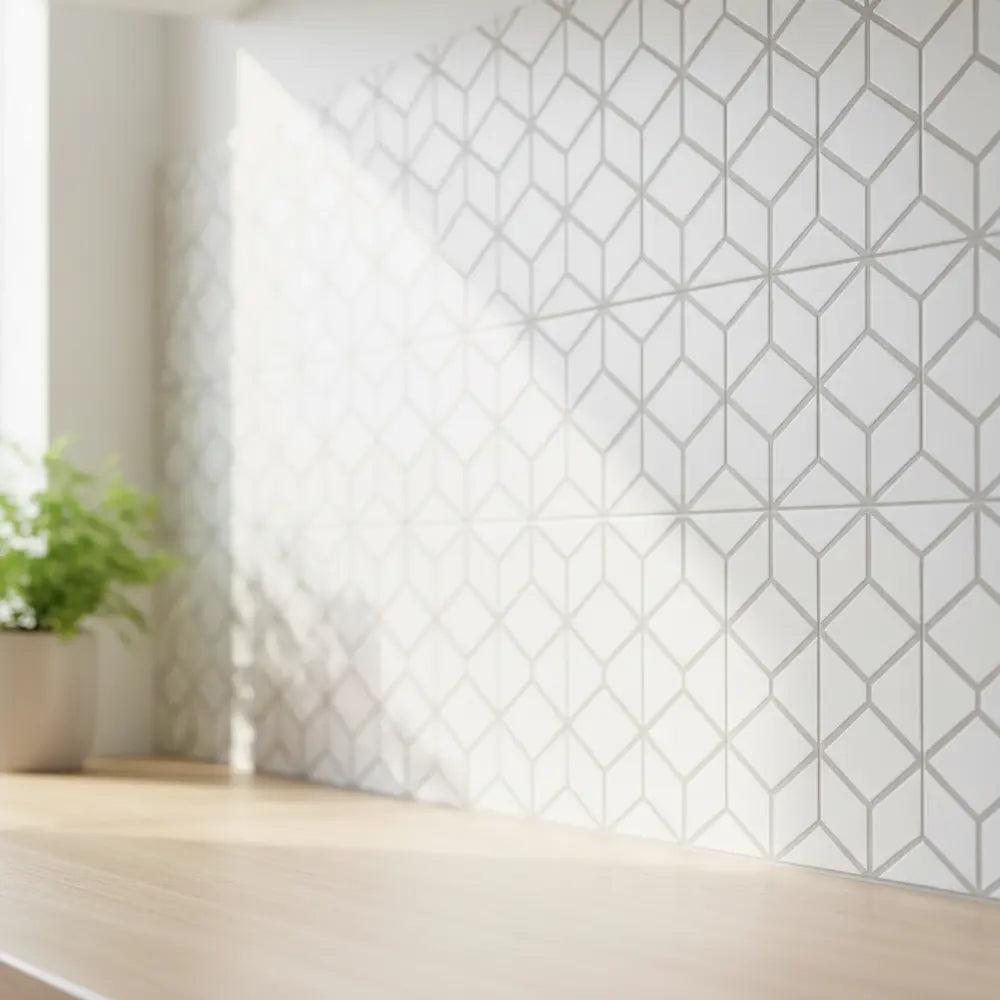
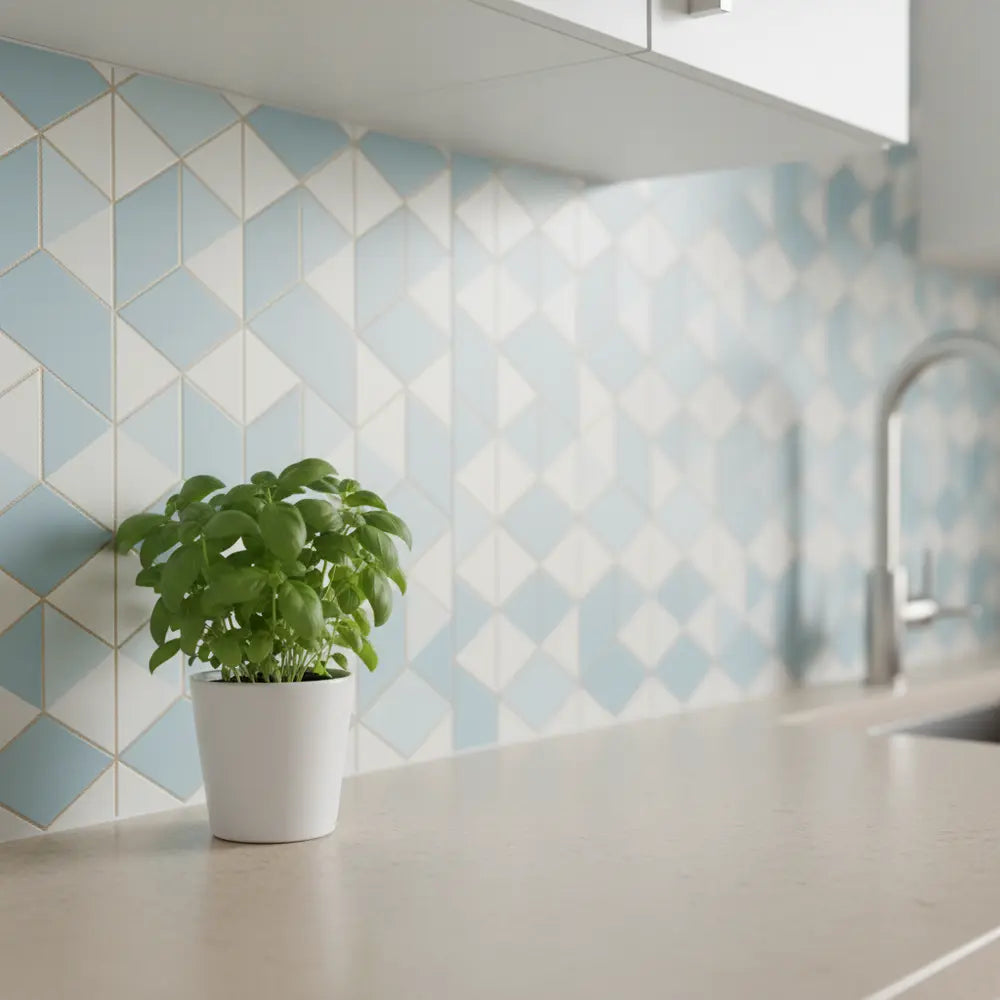
- Aufwendige geometrische & Mosaik-Stile: Von Sechsecken bis zu fächerförmigen „Fischschuppen“-Fliesen sind geometrische Muster perfekt, um ein starkes Statement zu setzen. Sie sind eine fantastische Möglichkeit, einer neutralen Küche Persönlichkeit und Farbe zu verleihen.
Stilvolle Looks: Matte Oberflächen und Marmor
Zwei bestimmte Looks prägen 2025 den Küchenstil:
- Matte Oberflächen: Weg von allem Hochglänzenden gewinnen matte Fliesen in Schwarz, Grün und Blau enorm an Beliebtheit. Eine matte Oberfläche wirkt modern und edel und kaschiert Fingerabdrücke sowie Wasserflecken deutlich besser. Sie ist eine zurückhaltende, aber wirkungsvolle Wahl.
- Realistischer Marmor-Look: Dank High-Definition-Druck sind peel and stick backsplash-Fliesen, die Carrara- oder Calacatta-Marmor imitieren, unglaublich überzeugend. Sie bieten den luxuriösen Look einer Steinplatte zu einem winzigen Bruchteil von Preis und Aufwand. Das ist eine der beliebtesten Optionen für ein schnelles, wirkungsvolles DIY-Küchen-Upgrade.
Umweltbewusste und budgetfreundliche Empfehlungen
Sie müssen sich nicht zwischen Nachhaltigkeit und Budget entscheiden. Der Markt für umweltfreundliche Peel-and-Stick-Fliesen für die Küche wächst. Achten Sie auf Produkte aus recycelten Materialien oder solche, die frei von schädlichen Chemikalien wie Phthalaten und Blei sind.
Für preisbewusste Renovierer können Großpackungen oder klassische Designs wie einfache weiße Subway-Fliesen die Kosten extrem niedrig halten. Oft lässt sich ein kompletter Standard-Spritzschutz für unter 100 $ fliesen.
So installieren Sie Peel-and-Stick-Küchenfliesen
Sind Sie nervös, bei der Montage etwas falsch zu machen und am Ende schiefe, sich ablösende Fliesen zu haben? Diese Schritt-für-Schritt-Anleitung erklärt den Prozess in einfachen, gut machbaren Schritten und zeigt die kritischen Fehler, die Sie vermeiden sollten, damit ein professionell wirkendes Ergebnis entsteht.
Das Schöne an peel and stick kitchen tiles ist, wie einfach sie zu installieren sind. Mit ein wenig Geduld und Vorbereitung kann jeder ein makelloses Ergebnis erzielen. Dieses Projekt erfordert keine jahrelange Erfahrung, sondern nur Liebe zum Detail.
Für eine anfängerfreundliche Komplettanleitung mit zusätzlichen Tipps zur Fehlersuche ist unser Artikel "Einfacher Leitfaden: Peel & Stick Subway Tiles installieren" die beste Ressource. Er ist darauf ausgelegt, dein erstes Projekt zum Erfolg zu machen.
Checkliste vor der Installation
Deine Schritt-für-Schritt-Installationsanleitung
Befolge diese Schritte für ein perfektes Ergebnis – jedes Mal.
- 1.Deine Werkzeuge bereitlegen: Du brauchst nicht viel. Ein Maßband, ein Bleistift, eine Wasserwaage, ein Cuttermesser oder eine scharfe Schere und ein Glättwerkzeug (z. B. ein Kunststoffrakel oder eine Kreditkarte) reichen völlig aus.
- 2.Die Oberfläche reinigen und vorbereiten: Das ist der wichtigste Schritt. Reinige die Wand gründlich mit einem Fettlöser, um Öl oder Schmutz zu entfernen. Die Oberfläche muss vor dem Start vollständig trocken, glatt und staubfrei sein.
- 3.Ausmessen und das Layout planen: Miss die Fläche aus und finde den Mittelpunkt. Am besten beginnst du in der Mitte und arbeitest dich nach außen vor, damit das Design ausgewogen wirkt. Verwende eine Wasserwaage, um eine gerade Hilfslinie für die erste Fliesenreihe zu ziehen.
- 4.Fliesen bei Bedarf zuschneiden: Bevor du die Schutzfolie abziehst, mache eine „Trockenanpassung“ der Fliesen an der Wand. Wahrscheinlich musst du Fliesen zuschneiden, damit sie um Steckdosen, Fenster oder am Ende einer Reihe passen. Miss sorgfältig und verwende ein scharfes Cuttermesser sowie ein Lineal für saubere Schnitte.
- 5.Abziehen und aufkleben: Ziehe nur einen Teil der Rückseite ab — nicht alles auf einmal. Richte die Fliese an deiner Hilfslinie aus und drücke sie vorsichtig an die Wand. Wenn die Position stimmt, presse sie von der Mitte nach außen fest an und verwende dein Glättwerkzeug, um Luftblasen zu entfernen.
- 6.Überlappen und einrasten: Die meisten modernen Fliesen haben eine überlappende Fugenlinie oder Kante. Achte darauf, diese Bereiche wie vom Hersteller angegeben zu überlappen, um eine nahtlose und wasserfeste Barriere zu schaffen.
Bereit, dein Projekt zu starten, möchtest aber eine visuelle Schritt-für-Schritt-Anleitung? Schau dir unseren vollständigen DIY-Leitfaden für Peel and Stick Kitchen Backsplash an – dort findest du alle Details und Renter-Hacks, die du brauchst.
Häufige Fehler, die du vermeiden solltest
- Den Reinigungsschritt überspringen: Selbst unsichtbares Fett verhindert, dass die Fliesen richtig haften. Überspringe diesen Schritt nicht.
- Keine Hilfslinie verwenden: „Nach Augenmaß“ führt fast immer zu einem schiefen Ergebnis. Eine Wasserwaage und ein Bleistift sind hier unverzichtbar.
- Die Fliesen dehnen: Vinylfliesen haben etwas Flexibilität. Ziehe oder dehne sie nicht, um sie anzupassen, da sie sich mit der Zeit wieder zusammenziehen und dadurch Lücken entstehen können.

Pflege und Langlebigkeit von Peel and Stick Tiles
Fragen Sie sich, ob Ihre schöne neue Rückwand auch in ein paar Jahren noch genauso gut aussieht? In diesem Abschnitt erhalten Sie die genauen Reinigungsroutinen und langfristigen Pflegetipps, um die Lebensdauer Ihrer Fliesen zu maximieren und sie wie neu aussehen zu lassen.
Einer der größten Vorteile von Peel and Stick Tiles ist ihr pflegeleichter Charakter. Anders als herkömmliche Fugen, die Flecken ansetzen und bröckeln können, ist die Oberfläche dieser Fliesen nicht porös und leicht zu reinigen. Mit der richtigen Routine kann Ihre peel and stick backsplash jahrelang makellos aussehen.
Der Schlüssel liegt in sanften Reinigungsmethoden. Aggressive, scheuernde Reiniger oder Schrubbpads können die Oberfläche verkratzen oder das Finish stumpf machen. Ziel ist es, gründlich zu reinigen, ohne Schäden zu verursachen. Eine vollständige Liste mit Do’s and Don’ts finden Sie in unserem Leitfaden zur Pflege von Peel and Stick Tiles 2025, der die perfekte Ergänzung ist.
Wie lange halten sie realistisch?
Die Lebensdauer Ihrer Fliesen hängt von drei Dingen ab: der Qualität der Fliese, der Qualität der Installation und davon, wie Sie sie pflegen. Eine hochwertige Fliese, korrekt in einer privaten Küche installiert, kann problemlos 5–10 Jahre halten. In einer Mieterküche mit seltenerem, eher leichten Kochen können sie sogar noch länger halten.
Fallstudienvergleich:
- Familienküche: Die Familie Miller installierte hochwertige Verbundfliesen hinter ihrem Herd. Bei täglichem Kochen wischen sie sie nach dem Abendessen mit einem feuchten Tuch kurz ab. Nach 4 Jahren zeigen die Fliesen keine Anzeichen von Ablösung oder Verfärbungen.
- Mieterküche: Eine Mieterin brachte in ihrer Wohnung preiswerte Vinylfliesen an. Da sie seltener kochte, waren die Fliesen nur minimalem Verschleiß ausgesetzt. Nach 2 Jahren sahen sie noch immer perfekt aus und ließen sich beim Auszug problemlos entfernen.
Ihre einfache Reinigungsroutine
Damit Ihre Fliesen großartig aussehen, folgen Sie einfach diesem Ablauf:
- Spritzer sofort abwischen: Wischen Sie Dinge wie Tomatensoße oder Öl schnell mit einem feuchten Tuch ab, damit keine Flecken entstehen.
- Ein mildes Reinigungsmittel verwenden: Für die normale Reinigung nehmen Sie einen weichen Schwamm oder ein Mikrofasertuch mit warmem Wasser und einem Tropfen mildem Spülmittel.
- Aggressive Chemikalien vermeiden: Verwenden Sie keine Reiniger mit Ammoniak, Bleichmittel oder Scheuerpartikeln. Diese können die schützende Oberschicht der Fliesen beschädigen.
- Abspülen und trocknen: Wischen Sie den Bereich nach der Reinigung mit einer Seifenlösung mit einem sauberen, feuchten Tuch ab, um Seifenreste zu entfernen, und trocknen Sie ihn anschließend mit einem weichen Handtuch.
Woran Sie erkennen, dass ein Austausch nötig ist
Sie wissen, dass es Zeit ist, eine Fliese zu ersetzen, wenn sich eine Ecke trotz erneuter Befestigungsversuche immer wieder löst oder wenn eine Fliese eine tiefe Kerbe oder einen bleibenden Fleck bekommt. Die gute Nachricht? Oft können Sie einfach nur eine beschädigte Fliese austauschen, statt die gesamte Wand neu zu machen.
Renterfreundliche Tricks mit Peel and Stick Tiles
Sie mieten und haben Angst, etwas zu verändern, das Ihre Kaution kosten könnte? Dieser Abschnitt ist für Sie gedacht – mit kreativen Ideen und einer klaren Anleitung, wie Sie Fliesen anbringen und wieder entfernen, ohne Spuren zu hinterlassen.
Abnehmbare Küchenfliesen sind für Mieter ein wahr gewordener Traum. Sie ermöglichen es Ihnen, eine gewöhnliche, einfalllose Küche in einen Raum zu verwandeln, der Ihre Persönlichkeit widerspiegelt. Das Beste daran: Es ist eine vollständig rückbaubare temporäre Rückwand-Lösung.
Die Angst vor Schäden hält viele Mieter zurück. Aber mit den richtigen Techniken können Sie eine beschädigungsfreie Anbringung und Entfernung sicherstellen und sich so volle kreative Freiheit bewahren. Es geht darum, aus Ihrer vorübergehenden Wohnung ein Zuhause zu machen. Wenn Sie noch tiefer eintauchen möchten, wie Sie Ihre Mietwohnung persönlich gestalten, ohne gegen die Regeln zu verstoßen, lesen Sie unseren Leitfaden zu DIY Peel and Stick Tiles: Einfache Küchenaufwertung, der voller renterfreundlicher Tipps steckt.
Kreative Ideen für Rückwände und Upgrades
Denken Sie über den Bereich hinter dem Spülbecken hinaus. Verwenden Sie Peel and Stick Tiles, um:
- Eine Akzentwand gestalten: Fliesen Sie die gesamte Wand hinter Ihrer Essecke für einen dramatischen Effekt.
Das Geheimnis der beschädigungsfreien Entfernung
Wenn Ihr Mietvertrag endet, möchten Sie keine bösen Überraschungen erleben. Das Entfernen der Fliesen, ohne die Wand zu beschädigen, ist einfach und effektiv.
- Sanfte Wärme anwenden: Verwenden Sie einen Föhn auf mittlerer oder hoher Stufe, um die Fliese zu erwärmen. Bewegen Sie ihn etwa 30–60 Sekunden lang hin und her über die Oberfläche. Dadurch wird der Kleber weicher.
- An einer Ecke beginnen: Sobald die Fliese warm ist, heben Sie mit einem Spachtel oder Ihrem Fingernagel vorsichtig eine der Ecken an.
- Langsam und gleichmäßig abziehen: Ziehen Sie die Fliese langsam und in einem flachen Winkel von der Wand ab. Wenn Sie starken Widerstand spüren, wenden Sie mehr Wärme an. Reißen Sie sie nicht schnell ab, da dies Farbe oder die Papierbeschichtung der Trockenbauwand mit abziehen kann.
- Rückstände entfernen: Falls klebrige Rückstände zurückbleiben, lassen sie sich in der Regel mit einem Tuch und etwas warmem Seifenwasser oder einem Reiniger auf Zitrusbasis entfernen. Testen Sie jeden Reiniger zuerst an einer kleinen, unauffälligen Stelle.

Umweltfreundliche und budgetfreundliche Optionen
Sie lieben die Idee eines Küchen-Upgrades, möchten aber Entscheidungen treffen, die gut für den Planeten und Ihren Geldbeutel sind? Dieser Abschnitt stellt nachhaltige Materialien vor und gibt clevere Tipps, wie Sie mit kleinem Budget einen hochwertigen Look erzielen können.
Eine schöne Küchenrenovierung muss weder verschwenderisch noch teuer sein. Der Markt für peel and stick kitchen tiles bietet 2025 mehr nachhaltige und budgetfreundliche Optionen als je zuvor. Sie können eine beeindruckende Verwandlung schaffen und dabei verantwortungsbewusste Kaufentscheidungen treffen.
Sowohl die Umweltwirkung als auch die Kosten im Blick zu behalten, ist ein moderner Ansatz für die Wohnraumgestaltung. Es geht darum, aus jedem ausgegebenen Euro den größtmöglichen Nutzen zu ziehen – für sich selbst und für den Planeten.
Der Aufstieg grüner Materialien im Jahr 2025
Die Nachfrage nach gesünderen Wohnumgebungen treibt Innovationen bei Materialien voran. Wenn Sie nach eco-friendly peel and stick tiles kitchen Lösungen suchen, achten Sie auf diese Merkmale:
- Recyclinganteil: Einige Marken stellen inzwischen Fliesen her, die teilweise aus recyceltem Post-Consumer-Vinyl oder anderen Materialien bestehen.
- Phthalatfreies PVC: Phthalate sind Chemikalien, die Kunststoffe flexibel machen. Viele führende Marken bieten inzwischen Vinylfliesen an, die 100% frei von diesen Verbindungen sind.
- Klebstoffe mit niedrigem VOC-Gehalt: Achten Sie auf Fliesen mit Klebstoffen, die nur geringe oder keine flüchtigen organischen Verbindungen (VOCs) enthalten, da diese zu einer besseren Raumluftqualität beitragen.
- Natürliche Materialien: Obwohl dies noch ein Nischenmarkt ist, experimentieren einige Premium-Marken mit Materialien wie Kork und Altholz für selbstklebende Planken und Fliesen.
- Profi-Tipp: Miss deinen Raum genau aus und kaufe nur, was du brauchst (plus etwa 10% extra für Fehler). So vermeidest du unnötige Ausgaben und Verschwendung.
- In großen Mengen kaufen: Größere Fliesenpakete haben fast immer einen niedrigeren Preis pro Quadratfuß als kleinere Packungen.
- Auf einen kleinen Bereich konzentrieren: Du musst nicht die ganze Küche fliesen. Eine peel and stick backsplash direkt hinter Herd oder Spüle kann schon für unter 50 $ eine enorme Wirkung erzielen.
- Klassische Designs ausprobieren: Zeitlose Muster wie weiße Subway-Fliesen sind oft am günstigsten in der Herstellung und bieten einen sauberen, klassischen Look, der nie aus der Mode kommt. Für kleine Küchen findest du Packungen fast in jedem großen Baumarkt.
- Für Minimalisten: Wähle eine großformatige Fliese in einer einfarbigen, neutralen Nuance wie Hellgrau oder Warmweiß. Eine matte Oberfläche unterstreicht das ruhige, aufgeräumte Gefühl.
- Für Maximalisten: Hab keine Angst, Muster zu mischen! Kombiniere einen auffälligen geometrischen Backsplash mit einem schlichteren Muster an der angrenzenden Wand. Oder wähle eine lebendige, farbenfrohe Mosaikfliese als Blickfang.
- Für Liebhaber des modernen Landhausstils: Eine klassische weiße Subway-Fliese ist die perfekte Wahl. Für einen modernen Twist kannst du eine schwarze Fliese mit weißen "Fugen"-Linien oder eine Fliese mit einer dezenten, handgemachten Textur in Betracht ziehen.
- Für Boho-Chic-Fans: Suche nach Fliesen in Terrakotta-Tönen, aufwendigen Stern-und-Kreuz-Mustern oder einer Used-Look-, Antik-Oberfläche, um deiner Küche Wärme und eklektischen Charme zu verleihen.
- Vertikale Muster verwenden: Das Verlegen rechteckiger Fliesen in vertikaler Ausrichtung lenkt den Blick nach oben und erzeugt ein Gefühl von Höhe.
- Helle und reflektierende Fliesen wählen: Hellere Farben wie Weiß, Beige und Pastelltöne reflektieren mehr Licht. Eine Fliese mit glänzender oder Gel-Oberfläche verstärkt diesen Effekt und lässt den ganzen Raum offener wirken.
- Kleinformatige Muster wählen: In einer sehr kompakten Küche kann ein großes, dominantes Muster chaotisch wirken. Ein kleineres, feineres Muster wie Penny Tiles oder Mini-Sechsecke funktioniert oft besser.
Kostengünstige Lösungen für jedes Budget
Ein tolles Ergebnis für weniger Geld zu bekommen, ist absolut möglich. Der Schlüssel liegt darin, clever einzukaufen und dein Projekt effizient zu planen.
Möchtest du deine Küche mit kleinem Budget verwandeln? Für weitere clevere Ideen und Schritt-für-Schritt-Anleitungen, die nicht teuer sind, lies unseren Artikel darüber, wie du DIY-Küche 2025 mit Peel-and-Stick-Fliesen umsetzt, mit vielen kreativen und kosteneffizienten Techniken.
Stilvolle Küchen-Updates mit Peel-and-Stick-Fliesen
Du hast die praktischen Details im Griff, brauchst aber noch einen Funken Inspiration, um deine Vision zum Leben zu erwecken? Dieser Abschnitt ist dein persönlicher Style-Guide und zeigt dir, wie du Muster kombinierst und Fliesen nutzt, um typische Designprobleme in jeder Küche zu lösen.
Jetzt beginnt der Spaß. Mit den technischen Grundlagen geklärt, kannst du dich nun auf die kreativen Möglichkeiten konzentrieren. peel and stick kitchen tiles sind ein Gestaltungselement, das das Aussehen und die Wirkung deines Raums völlig neu definieren kann – unabhängig von Größe oder bestehendem Stil.
Betrachte deine Wände als leere Leinwand. Ob du eine beruhigende, minimalistische Atmosphäre oder ein mutiges, energiegeladenes Statement willst – die richtige Fliesenauswahl bringt dich ans Ziel. Für eine kuratierte Ideensammlung zeigt unser Artikel "Verwandle deine Küche mit Peel-and-Stick-Fliesen" beeindruckende Vorher-Nachher-Projekte.
Finde deinen perfekten Fliesenstil!
Welches Wort beschreibt deine Traumküche am besten?
Design-Inspiration für jeden Stil
So maximierst du kleine Küchenräume
Fliesen können in einer kleinen Küche eine Geheimwaffe sein. Das richtige Muster kann das Auge täuschen und den Raum größer und heller wirken lassen.
Das ist deine Chance zum Experimentieren. Mit einer so flexiblen und erschwinglichen Lösung wie removable kitchen tiles hast du die Freiheit, einen neuen Stil auszuprobieren und eine Küche zu gestalten, die sich wirklich wie deine eigene anfühlt.
Ihre Traumküche ist näher und erschwinglicher, als Sie je gedacht hätten. Peel and stick kitchen tiles bieten eine unschlagbare Kombination aus Stil, Haltbarkeit und Preis-Leistungs-Verhältnis. Sie ermöglichen es Ihnen, einen schönen, individuellen Raum zu schaffen – egal, ob Sie Eigentümer sind oder zur Miete wohnen – ohne den Stress und die Kosten einer umfassenden Renovierung.
Jetzt verfügen Sie über das Wissen, um das richtige Design auszuwählen, Ihre Wände perfekt vorzubereiten und Ihren neuen Spritzschutz über Jahre hinweg zu pflegen. Die einfache Installation und die beeindruckenden Ergebnisse machen dies zu einem der zufriedenstellendsten DIY-Projekte, die Sie angehen können.
Bereit, mit dem Träumen aufzuhören und loszulegen? Machen Sie den nächsten Schritt auf Ihrem Weg zur Küchengestaltung.
Entdecken Sie unsere kuratierten Empfehlungen der besten peel and stick kitchen tiles für 2025 und finden Sie den perfekten Stil für Ihr Zuhause.Häufig gestellte Fragen
1. Kann man peel and stick tiles direkt über vorhandene Keramikfliesen kleben?
Ja, in den meisten Fällen schon. Entscheidend ist, dass die vorhandene Fliesenoberfläche vollständig eben und sauber ist und keine starke Struktur aufweist. Sie sollten die Keramikfliesen und die Fugen gründlich reinigen, um Fett- oder Seifenreste zu entfernen. Wenn Ihre Fugen tief sind, müssen Sie sie möglicherweise mit einer Ausgleichsmasse füllen, damit eine glatte Oberfläche entsteht, auf der die neuen Fliesen richtig haften können.
2. Wie gut halten peel and stick tiles hinter einem Herd?
Die meisten hochwertigen peel and stick tiles sind hitzebeständig und als Spritzschutz hinter einem Herd geeignet. Es ist jedoch wichtig, die spezifische Hitzebeständigkeit des Produkts zu prüfen und die Herstellerangaben zu beachten. Als allgemeine Regel gilt: Halten Sie einen Mindestabstand von mindestens 6-8 inches zu direkten Wärmequellen wie offenen Flammen oder heißen Kochfeldern ein. Für maximale Sicherheit wählen Sie Fliesen aus Metall oder Steinverbundmaterial.
3. Sind peel and stick kitchen tiles wirklich wasserdicht?
Die Fliesen selbst bestehen in der Regel aus Vinyl oder anderen nicht porösen Materialien und sind daher wasserdicht. Ob der gesamte Spritzschutz wasserdicht ist, hängt von der Installation ab. Wenn Fliesen mit überlappenden Kanten korrekt angebracht und fest angedrückt werden, bilden sie eine dichte Versiegelung, die verhindert, dass Wasser dahinter gelangt, und machen die Oberfläche ideal für Bereiche rund um ein Spülbecken.
4. Wie schwierig ist es, peel and stick tiles für Steckdosen und Ecken zuzuschneiden?
Es ist überraschend einfach! Für die meisten Vinyl- oder Gel-Fliesen benötigen Sie keine spezielle Säge. Sie können sie mit einem scharfen Cuttermesser oder sogar mit einer robusten Schere zuschneiden. Die beste Methode ist, eine Papierschablone der Steckdose oder Ecke anzufertigen, sie auf die Fliese zu übertragen und dann vorsichtig entlang der Linie zu schneiden, bevor Sie die Rückseite abziehen. Messen Sie immer zweimal und schneiden Sie einmal.

Kommentar hinterlassen
Diese Website ist durch hCaptcha geschützt und es gelten die allgemeinen Geschäftsbedingungen und Datenschutzbestimmungen von hCaptcha.