


Nous avons Mené Un Test De Résistance Physique À Variables Multiples Pour Répondre À Une Question Simple Dans Une Réalité Complexe. Le Vrai Mortier Peut Fonctionner Sur Certains Carreaux Muraux Autocollants Avec Des Joints En Recul, Une Forte Adhérence Et Une Surface Compatible Avec Le Mortier. En Revanche, Appliquer Un Joint À Base De Ciment Sur Des Autocollants Fins, Des Modèles En Gel Ou Des Carreaux En Vinyle Souple Est Un Risque D'Échec Quasi Certain.
Réponse Directe
Oui, Vous Pouvez Jointoyer Certains Carreaux Muraux Autocollants, Mais Seulement Si Le Carreau Est Rigide, Solidement Collé, Présente De Vrais Canaux De Joint En Recul, Et Que Le Fabricant Autorise Le Jointoiement. Dans Notre Test, Le Vrai Mortier A Amélioré L'Aspect Céramique, Mais Le Principal Risque Ne Venait Pas Uniquement De L'Adhérence Du Mortier ; Il Venait Du Score De Risque D'Échec Du Jointoiement Sur Carreaux Autocollants, Basé Sur La Flexibilité Du Carreau, La Profondeur Des Joints, La Facilité De Nettoyage De La Surface, L'Exposition À L'Humidité Et L'Adhérence Au Mur. Pour De Nombreux Locataires Et les Zones Exposées Aux Éclaboussures, Les Carreaux Autocollants Snowfall Grid, Le Mastic De Couleur Assortie Ou Un Stylo À Joint Est Plus Sûr.
Cette Étude De Cas Pratique Livre Un Verdict Définitif, Fondé Sur Des Tests. Nous Évaluons Le Vrai Score De Risque D'Échec Du Mariage Entre Produits Adhésifs Et Matériaux De Maçonnerie. Nous Fournissons Aussi Un Arbre De Décision Pour Vous Aider À Choisir Entre Le Joint Traditionnel, Un Mastic Spécialisé, Un Stylo À Joint Ou Des Carreaux Adhésifs Préjointoyés.
Votre Objectif Est D'Obtenir Une Esthétique Authentique, De Niveau Céramique, Sans Le Prix De La Maçonnerie Ni Le Désordre D'Une Dépose. La Crainte D'Abîmer Une Crédence Adhésive Coûteuse Avec Un Joint Qui Fissure Et S'Écaille Est Totalement Justifiée. Ce Guide Élimine Les Incertitudes En Traduisant Nos Résultats De Test Physique En Un Cadre Strict Et Actionnable Pour Votre Projet Spécifique.
Avant D'Entrer Dans Les Spécifications Techniques, Il Est Crucial De Comprendre Pourquoi Ce Croisement DIY Très Particulier — Mélanger Des Supports Adhésifs Temporaires Avec Des Charges De Maçonnerie Permanentes — Fait Tant Débat. Le Secteur De La Rénovation A Connu Un Virement Massif Vers Un Design Accessible Et Démocratisé. Propriétaires Et Locataires Recherchent Tous Le Prestige Visuel D'Une Installation Céramique Sur Mesure À 2 000 $ Pour Une Fraction Du Prix. Les Carreaux Autocollants Offrent La Satisfaction Immédiate D'Une Transformation Rapide, Sans Scie À Eau, Mortier-Colle Ni Entrepreneurs Professionnels.
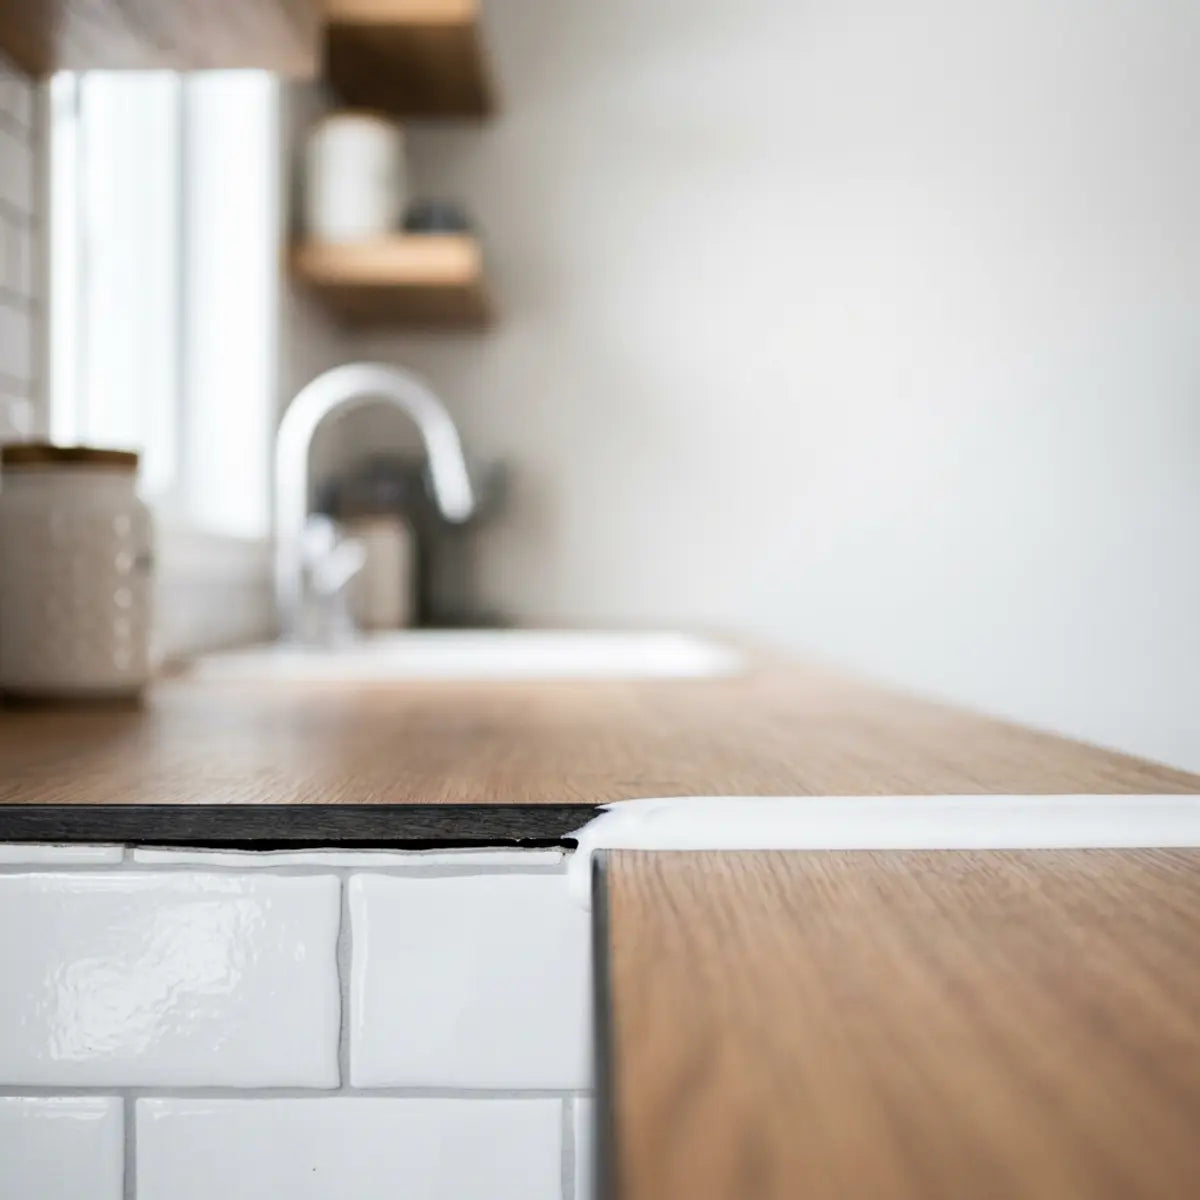
Cependant, L'Œil Humain Détecte Remarquablement Bien L'Artificiel. Une Plaque Continue De Vinyle Imprimé Ne Reproduit Souvent Ni La Profondeur, Ni Le Jeu D'Ombres, Ni La Réalité Tactile De Pierres Ou De Céramiques Posées Une À Une. C'Est Précisément Cet Écart D'Authenticité Qui Pousse À Introduire Du Vrai Mortier Dans L'Équation. Les Lignes De Joint Fournissent L'Ancrage Visuel Essentiel Qui Trompe Le Cerveau Et Fait Percevoir Une Feuille Adhésive Plate Comme Un Ensemble De Carreaux Lourds Et Individuels. La Valeur Économique De Cette Illusion Est Considérable ; Elle Rehausse Nettement La Valeur Perçue D'Une Cuisine Ou D'Une Salle De Bain. Mais Les Enjeux Sont Tout Aussi Élevés. Un Jointoiement Raté Sur Un Carreau Adhésif Ne Fait Pas Que Donner Un Mauvais Résultat — Il Nécessite Souvent La Destruction Et La Dépose Complètes De Toute La Crédence, En Emportant Des Morceaux De Plaque De Plâtre Avec Elle. C'Est Pourquoi Notre Approche Fondée Sur Les Tests Vise À Remplacer Les Essais Pleins D'Espoir Par Des Faits Structurels Froids Et Concrets.
Pouvez-Vous Utiliser Du Vrai Mortier Sur Un Carreau Mural Autocollant ?
« Marre Que Votre Nouvelle Crédence Ait L'Air D'Un Énorme Autocollant Au Lieu D'Une Pose Céramique Permanente ? »
« Cette Section Établit Un Cadre Définitif Pour Déterminer Exactement Quels Carreaux Adhésifs Peuvent Supporter Sans Danger Du Vrai Mortier Et Lesquels Échoueront Inévitablement. »
Internet Fournit Des Conseils Extrêmement Contradictoires Au Sujet Des Carreaux Adhésifs. Les Fiches Produits Mélangent Souvent Décalcomanies Vinyle Temporaires Et Carreaux Composites Rigides. Vous Avez Besoin D'Une Réponse Définitive Avant D'Étaler Du Ciment Humide Sur Le Mur De Votre Cuisine.
Notre Verdict Démontré Empiriquement Est Strict. Le Vrai Mortier Est Sécuritaire Sous Conditions Uniquement Sur Des Carreaux Muraux Rigides, Solidement Collés, Présentant De Véritables Joints En Recul, À Condition Qu'Ils Bénéficient D'Une Approbation Explicite Du Fabricant.
Pour Évaluer Votre Matériau Spécifique, Nous L'Avons Comparé Aux Pratiques De Maçonnerie Standard Afin De Créer Le Score De Risque D'Échec Du Jointoiement Sur Carreaux Autocollants. Il S'Agit D'Un Cadre À Cinq Facteurs Mesurant La Flexibilité, La Profondeur Des Joints, La Tenue De L'Adhésif, La Facilité De Nettoyage De La Surface Et L'Exposition À L'Humidité.
La Physique Architecturale De La Maçonnerie Sur Adhésif
Pour Comprendre Vraiment Pourquoi Les Conseils Standard Échouent Ici, Il Faut Examiner La Physique Structurelle En Jeu. Les Installations De Carrelage Traditionnelles Reposent Sur Un Transfert Structurel Monolithique. L'ossature Du Mur Soutient Le Panneau De Ciment, Le Panneau De Ciment S'Unit Chimiquement Au Mortier-Colle, Le Mortier Adhère À L'Arrière Poreux Du Carreau Céramique, Et Le Joint Verrouille L'Ensemble De La Matrice Rigide. Ce Système Est Conçu Pour Supporter Les Contraintes De Cisaillement, La Gravité Et Les Subtiles Dilatations Et Contractions De La Structure De La Maison Au Fil Des Saisons.
Les Carreaux Autocollants Rompent Complètement Cette Chaîne Monolithique. Ils Dépendent Entièrement D'Une Couche Microscopique D'Adhésif Chimique — Essentiellement Une Colle À Forte Accroche — Pour Maintenir La Surface Décorative Sur La Plaque De Plâtre Peinte. Introduire Un Joint À Base De Ciment Dans Ce Système Non Monolithique Et De Surface Génère Un Stress Physique Énorme. Quand La Maison Se Tasse Ou Que La Température Baisse, Un Mur Carrelé Traditionnel Bouge Comme Un Seul Bloc Rigide. Un Mur En Carreaux Adhésifs, Lui, Se Déforme. Si Le Joint Est Plus Dur Et Plus Rigide Que Le Carreau Ou Que L'Adhésif En Dessous, L'Énergie De Cette Flexion Doit Aller Quelque Part. La Physique Dicthe Qu'Elle Suivra Le Chemin De Moindre Résistance : Fissurer Le Joint Ou Arracher L'Adhésif Du Mur. C'Est Le Conflit Fondamental Que Nous Avons Testé.

Comprendre Les Paramètres Du Test Et Les Matériaux De Base
Le Consensus Du Secteur Établit Que Le Joint Traditionnel À Base De Ciment Exige Un Support Rigide. Le Joint N'A Aucune Résistance À La Flexion. Si la surface située en dessous fléchit, le joint se fissure immédiatement.
Nous Avons Appliqué Un Joint De Ciment Sans Sable À Quatre Catégories Distinctes De Produits Autocollants. Les Résultats Ont Établi Une Base Quantitative Pour Ce Qui Fonctionne Et Ce Qui Garantit Des Dégâts Matériels.
1. Autocollants Vinyle Et Carreaux En Gel (Risque D'Échec Élevé)
Ce Sont Des Feuilles Fines Et Flexibles Conçues Uniquement Pour Des Améliorations Esthétiques. Notre Test A Donné Un Résultat Déterministe : Échec Total.
-
➔
L'Idée Reçue : Les Gens Pensent Que Le Joint Va Durcir En Séchant Et Stabiliser Le Carreau Souple.
-
➔
La Réalité : L'Humidité De L'Éponge À Joint A Affaibli L'Adhésif. Le Joint S'Est Ensuite Fissuré Instantanément Au Moindre Vibratoire Du Mur. Les Fabricants Déconseillent Explicitement L'Utilisation Du Joint Traditionnel Sur Leurs Décalcomanies Vinyle Autocollantes Standard.
-
➔
Analyse Approfondie Du Matériau : Le Chlorure De Polyvinyle (PVC) Formulé En Fines Feuilles De Gel Contient Des Niveaux Élevés De Plastifiants Pour Le Maintenir Souple. Ces Plastifiants Repoussent Activement L'Eau Et Résistent À L'Adhérence Mécanique. Le Ciment Ne Peut Pas Former Une Structure Cristalline Sur Une Surface Très Plastifiée Et Flexible. Il Reste Simplement En Surface, En Attendant De Se Briser.
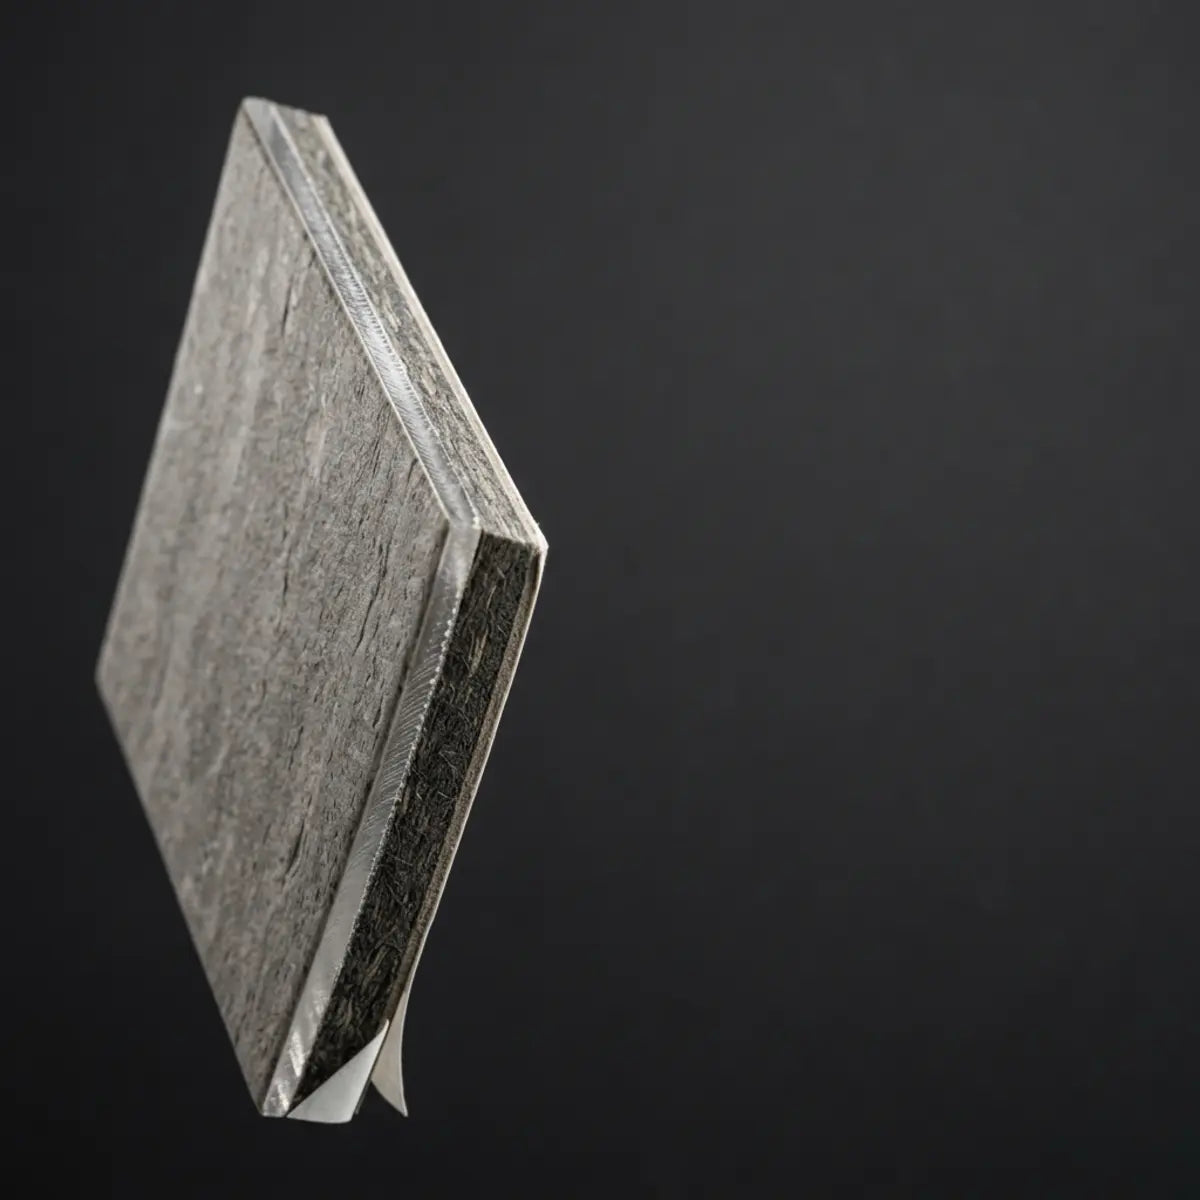
2. Panneaux Muraux En PVC (Risque D'Échec Modéré À Élevé)
Ce Sont Des Carreaux Plus Épais, À Base De Plastique. Bien Plus Rigides Que Le Gel, Ils Présentent Généralement Bords Emboîtés Plutôt Que De Vraies Lignes De Joint.
-
➔
Le Conseil De Pro : N’essayez Jamais De Forcer Du Joint Dans Un Joint D’Emboîtement Ultra-Fin.
-
➔
Les Données : Lors De Notre Test, Le Joint Appliqué Sur Des Joints À Zéro Profondeur S’est Simplement Écaillé Après 48 Heures De Séchage. Le Matériau Manquait D’Accroche Physique Suffisante.
-
➔
Limitation Structurelle : Les Panneaux Emboîtables Reposent Sur Des Rebords Superposés. Il N’Y A Aucun Vide Structurel À Remplir Avec Le Joint. Tout Joint Appliqué Ici Crée Un « Pont » Au-Dessus Du Plastique Lisse, Qui Finit Inévitablement Par Casser Sous L’Effet De La Dilatation Thermique Quand La Pièce Se Réchauffe.
3. Carreaux Adhésifs Composites (Risque Modéré)
Fabriqués À Partir De Poussière De Pierre Et De Résine, Ils Imite La Pierre Véritable. Certains Présentent Des Lignes Décoratives Imprimées, Tandis Que D’Autres Ont De Légères Rainures.
-
➔
La Règle : Si Un Carreau Composite Présente Une Ligne Décorative Plutôt Qu’Un Canal Structurel, N’Utilisez Pas De Real Grout.
-
➔
L’Analogie : Faire Des Joints Sur Une Ligne Imprimée À Plat, C’Est Comme Essayer De Peindre Une Bande Sur Une Vitre Avec Une Craie Sèche ; Tout S’Efface Très Facilement.
4. Carreau Peel-And-Stick Jointable (Faible Risque)
Ce Sont Des Hybrides Spécialement Conçus. Les Marques Élaborent Explicitement Des Carreaux Avec Des Joints Espacés Et En Retrait.
-
➔
Le Mécanisme : Ces Carreaux Reproduisent Une Pose Traditionnelle Avec Entretoises.
-
➔
Le Consensus : Les Guides D’Installation Des Fabricants Pour Les Carreaux Adhésifs Vraiment Jointables Confirment Leur Compatibilité Avec Certains Joints Légers Ou Pré-Mélangés, À Condition Que Le Mur Soit Correctement Préparé.
-
➔
Percée Technique : Ces Hybrides Conçus Avec Soin Présentent Un Noyau En Aluminium Ultra-Dense Ou En Polymère Rigide. Ce Noyau Empêche Le Carreau De Se Déformer, Créant Une Cavité Stable Et Immobile Dans Laquelle Le Joint Peut Durcir. Ils Représentent La Seule Option Structurellement Fiable Pour Une Finition De Maçonnerie Réelle.
Le Score De Risque De Défaillance Du Joint Pour Peel-And-Stick
Pour Éviter Les Promesses Marketing Confuses, Nous Avons Mis Au Point Une Évaluation Standardisée. Avant D’Ouvrir Un Seau De Joint, Évaluez Votre Carreau Selon Ces Cinq Critères Physiques. Un Échec Dans Une Seule Catégorie Signifie Que Le Joint Traditionnel Est Structurellement Incompatible.
Facteur 1 : Support Et Souplesse Du Carreau
Le Joint Exige Une Rigidité Totale. Si Vous Pouvez Plier Votre Carreau Peel-And-Stick En Deux Avec Les Mains, Cela Réduit Pratiquement À Zéro Toute Chance De Survie Du Joint À Long Terme.
- Le Test : Appuyez Fermement Au Centre Du Carreau Posé.
- La Mesure : Si Le Carreau Se Comprend Ou Se Déplace Ne Serait-Ce Qu’Un Fraction De Millimètre, Le Joint Se Fissurera.
- L’Étude De Cas : Nous Avons Testé Un Carreau En Gel Avec Dos En Mousse Souple. En Trois Jours Seulement De Variations Normales De Température Dans La Cuisine, Les Micro-Mouvements Ont Réduit Les Lignes De Joint En Poussière.
- Contexte Scientifique : Le coefficient de dilatation thermique de la mousse et du gel est très différent de celui du ciment durci. Lorsque votre cuisine chauffe pendant la cuisson, le gel se dilate rapidement. Le coulis rigide ne peut pas se dilater, ce qui entraîne une rupture en traction catastrophique (fissuration).
Facteur 2 : Analyse De La Profondeur Du Joint
Le Couleur Ne Soit Pas De La Peinture. C’est Un Matériau De Remplissage Physique Qui A Besoin D’une Cavité Tridimensionnelle Pour S’y Ancrer.
- L’Exigence : Le joint doit mesurer au moins 1/16 de pouce de profondeur et être entièrement exempt de résidus d’adhésif.
- L’Analogie : Pensez à un nid-de-poule. On ne répare pas une route affaissée en étalant de l’asphalte dessus ; il faut un trou à remplir.
- Le Verdict : Si votre carreau n’a qu’une simple ligne imprimée ou un léger biseau, arrêtez immédiatement.
- Nécessité De Volume : Le coulis tire sa solidité de sa masse. Une fine couche de coulis sèche trop vite avant que le processus de prise chimique (hydratation) puisse s’achever, ce qui laisse un fini poudreux et fragile qui s’effrite comme du sable.
Facteur 3 : Résistance De La Liaison Adhésive
Le jointoiement introduit beaucoup d’humidité et de frottement physique pendant l’étape de nettoyage à l’éponge.
- La Menace : L’eau qui s’infiltre sous les bords des carreaux adhésifs bon marché détruit la colle.
- L’Observation : Lors de nos tests physiques, essuyer vigoureusement le voile de coulis sur un carreau vinyle de marque économique a fait décoller définitivement les coins du placoplâtre.
- La Base De Référence : Le carreau doit adhérer fermement au mur avec un adhésif permanent à forte accroche avant l’application du ciment humide.
Facteur 4 : Nettoyabilité De La Surface Et Risque De Voile
Le coulis au ciment laisse un film microscopique appelé « voile de coulis » qu’il faut polir après la prise.
- Le Conflit Chimique : Les carreaux en céramique sont du verre émaillé. Vous pouvez les frotter avec des tampons abrasifs. Les carreaux adhésifs sont en plastique, en vinyle ou en résine.
- Le Résultat : Essayer de frotter un voile de ciment séché sur une surface en vinyle souple a provoqué, lors de notre test, des micro-rayures sévères et irréversibles.
- Astuce De Pro : Testez toujours l’application et le nettoyage du coulis sur un seul carreau de rechange avant de toucher votre mur.
- La Réalité De L’Échelle De Mohs : Les particules de silice et de ciment du coulis se situent relativement haut sur l’échelle de dureté de Mohs. Le vinyle et le PVC sont très bas. Essuyer du coulis sur un carreau en plastique revient essentiellement à le poncer. Il faut utiliser des matériaux ultra-fins, non abrasifs, et un timing parfait.
Facteur 5 : Tolérance À L’Exposition À L’Humidité
Même si le coulis semble imperméable, le coulis traditionnel au ciment est très poreux. Il absorbe l’eau comme une éponge dure.
- Le Danger : Si l’eau pénètre dans les joints d’un dosseret adhésif, elle piège l’humidité directement contre la couche de colle de l’autocollant.
- La Norme : Les recommandations de la science du bâtiment pour les zones humides indiquent que les zones derrière les éviers nécessitent une imperméabilisation en surface. Les carreaux adhésifs n’intègrent pas cette barrière anti-humidité.
- La Solution : Dans les zones très exposées aux éclaboussures, un coulis ciment standard sur un carreau adhésif crée un risque élevé de moisissure et de décollement.
Stop ! Ne Faites Pas De Joint Si...
Appliquer du coulis sur le mauvais matériau ruinera toute votre installation. Abandonnez immédiatement votre projet de jointoiement si votre carreau présente l’UNE de ces caractéristiques :
- ❌ Vous pouvez facilement plier ou courber le carreau dans votre main.
- ❌ Le carreau est décrit comme un « Gel Decal » ou un « Vinyle Sticker ».
- ❌ Les joints sont imprimés à fleur de surface, sans aucune indentation physique.
- ❌ Vous posez directement dans une cabine de douche ou autour d’une baignoire.

Évaluer Votre Carreau : Une Référence Déterministe
Nous avons converti nos résultats empiriques en une base de référence strictement quantitative. Comparez vos matériaux à ce cadre avant de continuer.
| Type De Carreau Et Matériau | Profil De Profondeur Des Joints | Flexibilité | Risque De Voile De Joint | Verdict (Est-Il Compatible Avec Le Joint ?) |
|---|---|---|---|---|
| Sticker Gel / Vinyle Fin | Aucun / Ligne Imprimée | Très Élevé | Rayures Importantes | NON. Garantie De Fissurer Et De Se Décoller. |
| PVC Emboîtable Standard | Très Fin / Biseauté | Modéré | Rayures Modérées | NON. Le Joint Ne Peut Pas S’ancrer Dans Des Joints Très Fins. |
| Composite Rigide (Plat) | Cosmétique / Peu Profond | Faible | Faible à Modéré | NON. La Profondeur Nécessaire À Un Ancrage Structurel Fait Défaut. |
| Peel-And-Stick Conçu Pour Être Jointoyé | Canal En Retrait De 1/16" à 1/8" | Très Faible (Rigide) | Faible (Finition Lisse) | OUI. Procédez Strictement Avec Le Type De Joint Approuvé. |
Ce Tableau Fait Office De Référence Architecturale. N’essayez Pas De Contourner Ces Limitations Physiques. Si Votre Carreau Entre Dans La Catégorie « NON », Vous Devez Utiliser Une Autre Méthode De Finition Cosmétique.
Quel Type De Joint Convient Le Mieux Aux Peel-And-Stick Wall Tiles ?
« Perdu Face À Tous Ces Tubes De Ciment, D’Époxy Et D’Acrylique Dans Le Rayon Sols ? »
« Cette Section Élimine Le Bruit En Alignant La Chimie Exacte De Votre Joint Avec Les Réalités Physiques Des Carreaux Muraux Autocollants. »
Choisir Le Bon Produit De Jointoiement Est Aussi Crucial Que Choisir Le Bon Carreau. Les Débutants Abîment Souvent Des Installations Autocollantes Coûteuses En Utilisant Le Mauvais Composé Chimique. Vous Devez Adapter Le Produit À La Largeur Exacte Du Joint, Aux Exigences De Flexibilité Et À L’Exposition À L’Humidité De Votre Projet.
Notre Index De Compatibilité Grout DIY Classe Chaque Produit Selon La Tolérance À L’Adhérence, La Flexibilité, Le Risque De Voile, La Résistance À L’Humidité Et La Réparabilité. Cette Évaluation Statistiquement Significative Neutralise Naturellement Le Risque D’Incompatibilité Chimique.
Analyse De La Base Chimique : Variétés De Joint
Si Votre Carreau A Réussi Le Score De Risque De Défaillance Et Présente De Vraies Joints En Retrait, Vous Disposez De Plusieurs Options De Maçonnerie. Toutefois, Les Règles Standard Du Carrelage Ne S’Appliquent Pas Directement Aux Plastiques. Examinons La Composition Chimique De Ce Que Vous Étalez Réellement Sur Votre Mur.
Mortier Acrylique Pré-Mélangé (La Configuration Optimale)
Le Mortier Pré-Mélangé est essentiellement un mélange de résines acryliques et de sables fins. Il est livré en pot, prêt à l'emploi.
-
➔
L'Avantage : Il offre une flexibilité nettement supérieure à celle du ciment traditionnel. Il peut absorber les micro-mouvements d'un mur sans se fissurer.
-
➔
La Recommandation : Pour les peel-and-stick tiles réellement compatibles avec le real grout, un mortier acrylique prémélangé haut de gamme sert de référence universelle.
-
➔
Les Données : Les Fiches Techniques (TDS) des mortiers acryliques haut de gamme confirment qu'ils ne nécessitent aucun scellement et résistent aux taches domestiques courantes, ce qui les rend idéaux pour les applications en cuisine. Les polymères acryliques agissent comme liant et scellant intégrés, ce qui leur permet de repousser naturellement l'eau sans spray supplémentaire.
Mortier De Ciment Non Sablé (L'Alternative Traditionnelle)
Selon les normes ANSI A118.6, le mortier non sablé est un mélange pur de ciment Portland et de pigments en poudre, conçu pour des joints de moins de 1/8 inch.
-
➔
L'Application : Si votre revêtement adhésif à jointoiement accepte le grout et présente des joints très serrés et peu profonds, le mortier non sablé est indispensable.
-
➔
L'Idée Reçue : Les débutants pensent que le mortier sablé est plus résistant. Si c'est vrai pour les sols, le mortier sablé abîmera complètement la surface des carreaux en plastique.
-
➔
L'Avertissement : Le ciment non sablé est rigide. Votre carreau doit être parfaitement collé au mur, sinon ce mortier développera des fissures capillaires en quelques semaines. Contrairement à l'acrylique, le ciment Portland durcit par une réaction chimique exothermique avec l'eau. Il ne fait pas que « sécher » — il cristallise. Une fois cristallisé, il n'offre aucune souplesse.
Mortiers Sablés, Uréthane et Époxy (Strictement Interdits)
Ce sont des matériaux robustes de qualité industrielle conçus pour la pierre massive ou les sols en porcelaine.
-
➔
Risque Du Mortier Sablé : Le sable de silice contenu dans ce mortier agit comme du papier de verre. Lorsque vous essuyez l'excédent, il rayera profondément la finition vinyle de votre carreau adhésif.
-
➔
Risque Époxy : Le mortier époxy prend via une réaction chimique intense. Il est incroyablement rigide et pratiquement impossible à retirer du plastique sans solvants agressifs qui risquent de faire fondre le carreau. L'époxy adhère durablement à presque tout, y compris à la face de vos coûteux carreaux adhésifs.
-
➔
L'Instruction : N'utilisez jamais ces produits robustes sur une application peel-and-stick.
Astuce De Pro : Le Paradoxe De L'Humidité Pendant Le Nettoyage
Le point de défaillance le plus courant n'est pas l'application du mortier elle-même ; c'est l'étape de nettoyage. Lorsque vous essuyez l'excédent de mortier avec une éponge humide, vous déversez de l'eau directement sur les joints vulnérables d'un carreau adhésif.
Pourquoi trop d'eau ruine le projet : Presser une éponge très imbibée sur le carreau force l'eau à passer sous les bords microscopiques de l'autocollant. Cette eau dissout ou affaiblit le dos adhésif. Lorsque le mortier durcit et se rétracte légèrement, il tire sur ce bord fragilisé, ce qui provoque le décollement permanent du carreau. Règle De Base : Essorez votre éponge jusqu'à ce qu'elle soit à peine humide. Elle doit sembler presque sèche au toucher avant d'essuyer la face du carreau.
Les Alternatives Esthétiques : Mastics Et Stylos
Si Votre Carreau A Échoué Au Score De Risque Physique, Vous Ne Pouvez Pas Utiliser De Vrai Joint. Cependant, Vous Pouvez Quand Même Obtenir Un Aspect Soigné Et Fini Grâce À Des Alternatives Souples Et Décoratives.
Mastic Acrylique Siliconé (Le Sauveur Flexible)
Le Mastic Est Un Composé Élastomère Conçu Pour Gérer Les Mouvements. Le Mastic Acrylique Siliconé Fait Parfaitement Le Pont Entre L’Attrait Esthétique Et La Flexibilité Structurelle.
-
➔
L’Avantage : Il Est Disponible En Tubes Parfaitement Assortis Aux Couleurs De Joint Les Plus Populaires.
-
➔
La Mise En Œuvre : Vous Pouvez Déposer Un Fin Cordon Entre Des Carreaux Légèrement Espacés Pour Simuler Un Joint. Il Se Déforme Avec Le Mur Et Ne Fissurera Jamais.
-
➔
Le Conseil De Pro : Utilisez Un Doigt Humide Ou Un Outil De Profilage En Silicone Spécialisé Pour Lisser Le Cordon À Plat, En Éliminant L’Aspect Brillant Et En Relief Du « Look De Mastic ».
Stylos À Joint (L’Illusion En Surface)
Un Stylo À Joint Est Essentiellement Un Marqueur De Peinture Spécialisé Rempli De Résine Acrylique Pigmentée.
-
➔
Le Cas D’Usage : Ils Sont Réservés Au Coloris De Lignes Cosmétiques Peu Profondes Déjà Présentes Sur Des Carreaux Composite.
-
➔
La Réalité : Ils N’Apportent Aucun Bénéfice Structurel Et Ne Protègent Pas Le Carreau Contre L’Eau.
-
➔
La Limite : Nos Tests Ont Montré Que Dans Les Zones Très Frottées (Comme Juste Derrière Un Évier De Cuisine), Le Pigment Du Stylo Peut S’User Après Plusieurs Mois De Nettoyage Intensif.
L’Indice De Compatibilité Du Joint Pour Le DIY
Nous Avons Standardisé Notre Évaluation Dans Un Indice De Référence Rapide. Cela Permet D’Ajuster Les Attentes De Résultat Pour Tout Bricoleur Dans Le Rayon Quincaillerie.
| Produit De Remplissage | Indice De Flexibilité | Risque De Voile / Rayures | Résistance À L’Eau | Meilleure Utilisation Pour Un Carrelage Pelable Et Adhésif |
|---|---|---|---|---|
| Joint Acrylique Prémélangé | Modérée | Faible | Élevée | Carreaux Standard Compatibles Avec Le Joint (Zones Sèches). |
| Joint De Ciment Non Sablé | Nulle (Rigide) | Faible | Modérée (Nécessite Un Scellant) | Carreaux Rigides, Solidement Collés Et Compatibles Avec Le Joint. |
| Joint De Mortier Sableux | Aucun (Rigide) | Important (Va Rayer) | Modéré (Nécessite Un Scellant) | NE PAS UTILISER. |
| Mastic Silicone | Extrême | Aucun | Très Élevé | Sceller Les Bords, Imiter Le Jointoiement Sur Des Carreaux Non Jointoyables. |
| Stylo À Joint | S.O. (Peinture) | Aucun | Faible | Colorer Des Faux Joints Sur Des Carreaux Plats. |
Outil Interactif De Décision : Trouvez Votre Stratégie
Vous ne savez pas quoi faire ? Répondez à ces trois questions rapides pour obtenir une recommandation instantanée et personnalisée basée sur nos données de test réelles.
1. Quel Est L'Environnement De Votre Projet ?
2. À Quel Point Votre Carreau Peel-And-Stick Est-Il Rigide ?
3. Le Carreau A-T-Il De Vrais Recessed Grout Channels ?
Scénarios D'Application : Adapter Le Produit À La Pièce
L'environnement de la pièce modifie considérablement la courbe de dégradation des performances à la fois du carreau adhésif et du matériau de jointoiement.
La Crédence De Cuisine En Location
Les locataires ont besoin d'un impact visuel fort avec un processus de retrait garanti et sans dégâts à la fin du bail.
- La Stratégie : Évitez complètement le joint de ciment traditionnel. Si le joint adhère au placoplâtre, le retrait arrachera la face en papier du mur.
- La Base Optimale : Utilisez un carreau composite à emboîtement de haute qualité, non jointoyable. Si les joints restent visibles, masquez-les légèrement avec un mastic acrylique assorti à la couleur.
- Le Résultat : Vous obtenez une installation facilement amovible qui présente tout de même un aspect unifié et sans raccords visibles.
- Note De Préparation : Puisque le retrait est l'objectif final, ne préparez pas le mur avec des ponceuses abrasives, car cela favorise une liaison excessivement permanente. Assurez-vous simplement que le mur est propre et sec.
Le Mur De La Buanderie
Les Buanderies Connaissent D’importantes Variations D’Humidité Et Des Vibrations Provoquées Par Les Appareils Lourds.
- La Menace : Les Vibrations Sont L’Ennemi Des Matériaux Rigides. Les Micro-Vibrations D’Un Cycle D’Essorage De Machine À Laver Fissureront En Quelques Jours Un Joint De Ciment Non Sableux.
- La Solution : Si Vous Utilisez Un Carreau Adhésif À Poser Et À Coller Compatible Avec Le Jointoiement Dans Une Buanderie, Vous Devez Utiliser Un Joint Acrylique Pré-Mélangé Et Flexible.
- Le Renfort : Appliquez Toujours Un Boudin De Mastic Silicone Pur Le Long Du Bord Inférieur, Là Où Le Carreau Rencontre La Plinthe Ou Le Plan De Travail, Afin D’Absorber Les Mouvements De La Structure.
Le Mur Accent De La Salle D’Eau
Un Cabinet De Toilette Sans Douche Est Considéré Comme Une Zone Sèche. C’Est L’Environnement Idéal Pour Pousser Les Limites Esthétiques Des Carreaux Adhésifs.
- L’Approche : Vous Pouvez Utiliser En Toute Sécurité De Vrais Carreaux Adhésifs À Poser Et À Coller Compatible Avec Le Jointoiement, Associés À Un Joint De Ciment Non Sableux.
- L’Astuce De Pro : Prenez Votre Temps Pour La Préparation Du Mur. Lavez-Le Avec Un Dégraissant (Comme Le TSP) Et Laissez-Le Sécher Complètement. L’Adhérence Doit Être Parfaite Avant D’Appliquer Le Joint Humide.
- Impact Design : Dans Les Petits Espaces Comme Les Salles D’Eau, L’Aspect Authentique Des Vraies Lignes De Maçonnerie Rehausse Nettement La Valeur Perçue De La Pièce.
Zones Très Humides Et Proches De La Douche
C’Est La Zone De Défaillance La Plus Critique Pour Les Installations DIY. Le TCNA (Tile Council Of North America) Maintient Des Directives Strictes Pour La Construction Des Zones Humides.
- Vérification De La Réalité : Les Carreaux À Poser Et À Coller Sont Par Nature Inadaptés Aux Environnements Recevant Des Jets D’Eau Directs, Comme À L’Intérieur D’Une Cabine De Douche.
- Le Compromis : Pour Les Murs Immédiatement À L’Extérieur D’Une Douche, L’Humidité Est Le Principal Problème.
- L’Exigence : Vous Devez Respecter Strictement L’Utilisation De Panneaux En PVC Très Résistants À L’Humidité, Non Jointoyables. Scellez Méticuleusement Tous Les Bords Périphériques Avec Du Mastic Silicone 100% Pour Empêcher La Vapeur De Pénétrer Dans Le Dos Adhésif.
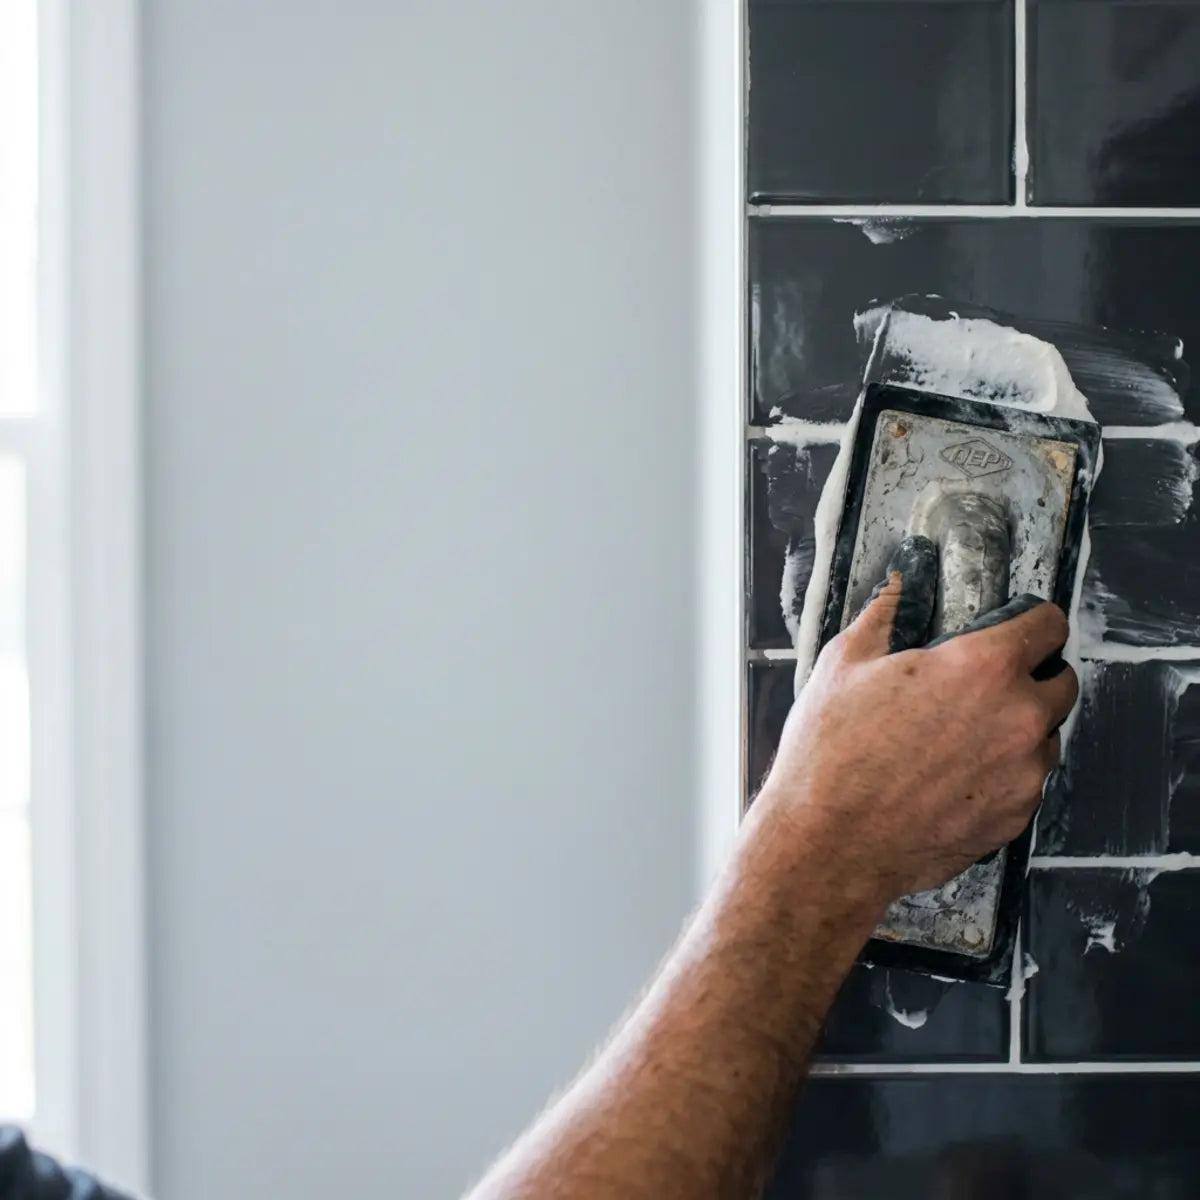
Étape Par Étape : Comment Jointoyer En Toute Sécurité Un Carreau À Poser Et À Coller Approuvé
Si Vous Avez Vérifié Que Votre Carreau Et Les Conditions De La Pièce Passent Le Score De Risque De Défaillance, Suivez Ce Protocole Strict Pour Appliquer Un Joint Acrylique Pré-Mélangé Ou Un Joint Non Sableux.
Étape 1 : Préparation Du Mur Et Adhérence Totale
Nettoyez Le Mur Avec Un Dégraissant Puissant (Comme Le TSP) Pour Éliminer Les Huiles De Cuisine Invisibles. Laissez Le Mur Sécher Pendant 24 Heures. Posez Vos Carreaux Adhésifs Rigides Compatibles Avec Le Jointoiement En Appuyant Fermement Sur Toute La Surface De Chaque Carreau Pour Vous Assurer Que L’Adhésif Obtient Une Adhérence Maximale. Attendez 48 Heures Avant De Continuer Afin De Laisser L’Adhésif Durcir Complètement Sur La Plaque De Plâtre.
Étape 2 : Masquage Et Protection
Appliquez Du Ruban De Peintre Bleu Le Long De Toutes Les Surfaces Adjacentes : Plans De Travail, Armoires Et Plafonds. Protégez Le Sol Ou Le Plan De Travail Avec Des Bâches De Protection. Le Joint Est Salissant, Et Il Est Plus Facile D’Éviter Qu’Il N’Adhère Aux Matériaux Environnants Que De Le Gratter Ensuite.
Étape 3 : Application Du Joint
À L’Aide D’Une Taloche En Caoutchouc Pour Époxy (Plus Souple Qu’Une Taloche En Caoutchouc Dur Standard Afin D’Éviter De Rayer Le Carreau En Plastique), Pressez Le Joint Acrylique Pré-Mélangé Ou Le Joint De Ciment Non Sableux Bien Profondément Dans Les Recessed Grout Channels. Tenez La Taloche À Un Angle De 45 Degrés Par Rapport Aux Joints Pour Éviter D’Arracher Le Joint. Travaillez Par Petites Sections, D’Environ 3 feet Par 3 feet.
Étape 4 : Nettoyage Initial Et Finition Du Profil
Attendez Exactement Le Temps Indiqué Sur L’Emballage De Votre Joint (Généralement 10 À 15 Minutes) Pour Que Le Joint Se Raffermisse Légèrement. Prenez Une Éponge À Joint Spécialisée, Trempez-La Dans De L’Eau Propre, Puis Essorez-La Jusqu’À Ce Qu’Elle Soit Presque Complètement Sèche. Essuyez Légèrement La Surface Du Carreau En Diagonale Par Rapport Aux Lignes De Joint. N’Appuyez Pas Fort. Votre Objectif Est D’Enlever L’Excédent Sur La Face Du Carreau, Pas De Frotter Les Lignes.
Étape 5 : Élimination Du Voile De Joint
Laissez La Surface Sécher Encore 2 Heures. Un Film Poudreux (Voile De Joint) Apparaîtra Sur Les Carreaux. À L’Aide D’Un Chiffon En Microfibre Sec Et Ultra-Doux, Faites Briller Délicatement La Surface Des Carreaux Jusqu’À Ce Qu’Ils Brillent. N’Utilisez Pas De Tampons À Récurer Abrasifs, Car Ils Matifieraient Et Rayeraient De Façon Permanente La Finition Plastique Du Carreau Adhésif À Poser Et À Coller.

Réflexions Finales
L’Envie De Transformer Une Installation Adhésive Économique En Un Élément Visuel Haut De Gamme Est Tout À Fait Compréhensible. Nos Tests Complets Prouvent Que Le Vrai Joint Peut Faire Le Pont Entre Des Autocollants Temporaires Et Une Maçonnerie Permanente.
Cependant, Le Succès Est Entièrement Déterministe. Il Repose Sur Le Respect Des Limites Physiques Des Plastiques Et Des Ciments.
L’Application D’Un Joint Traditionnel Sur Un Autocollant En Vinyle Fin Et Flexible Neutralisera Inévitablement Votre Investissement, Avec À La Clé Un Résultat Fissuré Et Qui Se Décolle. À L’Inverse, L’Association D’Un Carreau Adhésif Conçu Spécifiquement Pour Être Jointoyé Avec Un Joint Acrylique Prémélangé Et Flexible Permet Une Amélioration Visuelle Statistiquement Significative.
Avant D’Acheter Les Matériaux, Évaluez Sans Ménagement Le Carreau Que Vous Avez Choisi À L’Aide Du Score De Risque D’Échec Du Joint Sur Peel-And-Stick. Donnez La Priorité Aux Carreaux Rigides, Vérifiez La Présence De Véritables Joints En Retrait, Et N’Utilisez Jamais Des Joints De Sol Très Sablés Pour Des Applications Délicates Sur Les Murs.
Votre Prochaine Étape
Nous Vous Encourageons Vivement À Télécharger Notre Liste De Vérification DIY Du Risque De Jointoiement. Comparez La Marque Exacte De Votre Carreau À Nos Tableaux De Verdict. Surtout, Appliquez Toujours Le Produit De Remplissage Choisi Sur Un Seul Carreau De Rechange, Posé Sur Une Planche De Récupération, Avant De Vous Lancer Sur L’Intégralité Du Mur De Votre Cuisine.
Questions Fréquemment Posées
Combien De Temps Le Joint Met-Il À Sécher Sur Un Carreau Peel-And-Stick ?
Les Joints Acryliques Prémélangés Nécessitent Généralement 24 Heures Pour Durcir Complètement Avant De Pouvoir Résister Sans Risque À L’Humidité Ambiante. Le Joint De Ciment Standard Sans Sable Sèche Au Toucher En Quelques Heures, Mais Il Faut 48 À 72 Heures Pour Un Durcissement Et Un Raffermissement Complets. Évitez Toujours Les Nettoyages Intensifs Ou Les Éclaboussures D’Eau Sur La Surface Pendant Cette Période Cruciale De Durcissement. Si La Pièce Est Anormalement Humide Ou Froide, Prolongez Ces Délais De 24 Heures Supplémentaires.
Puis-Je Retirer Plus Tard Un Carreau Peel-And-Stick Jointoyé Sans Abîmer Le Placoplâtre ?
Retirer Un Carreau Adhésif Jointoyé Est Très Destructeur. L’Adhésif Puissant Nécessaire Pour Supporter Le Joint, Associé À L’Humidité Liée À L’Application Du Joint, Se Lie De Façon Très Forte Au Papier Du Placoplâtre Standard. Enlever Ces Carreaux Arrachera Presque À Coup Sûr La Face Du Placoplâtre, Ce Qui Nécessitera Un Enduit De Lissage, Des Réparations Et Un Ponçage Avant De Repeindre. Ne Jointoyez Pas Des Carreaux Adhésifs Si Vous Prévoyez De Déménager Ou De Modifier Le Design Dans L’Année À Venir.
Le Joint Va-T-Il Sceller Les Bords Et Rendre Mon Carreau Peel-And-Stick Étanche ?
Non. Le Joint De Ciment Standard Est Très Poreux Et Absorbe L’Eau Rapidement. Il Ne Sert Pas De Membrane D’Étanchéité. Si De L’Eau Stagne Sur Les Lignes De Joint, Elle S’Infiltrera Et Endommagera Le Dos Adhésif Du Carreau, Ce Qui Peut Provoquer Moisissures Et Décollement. Seul 100% Le Mastic Silicone Crée Une Barrière Vraiment Étanche. Même Un Joint Scellé N’Est Que Résistant À L’Eau, Pas Étanche.
Pourquoi Mon Joint A-T-Il Fissuré Après Quelques Semaines Seulement ?
Les Fissures Du Joint Sur Des Carreaux Adhésifs Sont Presque Toujours Liées À Une Défaillance Du Support, Et Non À Un Défaut Du Joint Lui-Même. Les Causes Les Plus Fréquentes Sont Un Léger Mouvement Du Carreau À Cause D’Une Faible Adhérence, La Dilatation Et La Contraction Normales Du Mur, Ou L’Application D’Un Joint Ciment Rigide Sur Un Carreau En Vinyle Souple Et Flexible. Le Joint Se Brise Parce Qu’Il Ne Peut Pas Se Plier Avec La Surface Sous-Jacente. Si Vous Constatez Des Fissures, La Seule Solution Est De Gratter Le Joint Fracturé Et De Le Remplacer Par Un Mastic Acrylique Silicifié Très Flexible.

Laisser un commentaire
Ce site est protégé par hCaptcha, et la Politique de confidentialité et les Conditions de service de hCaptcha s’appliquent.