


Vous en avez assez de fixer des murs de location ternes, tout en craignant de perdre votre dépôt de garantie ? Vous n’êtes pas seul. L’envie d’un espace stylé et personnalisé se heurte souvent aux contraintes de la location. Et si vous pouviez obtenir un rendu haut de gamme façon carrelage, à la fois
affordable, facile à install yourself et totalement amovible ?
Bienvenue dans l’univers des
stick on tiles for walls . Ces matériaux innovants sont la solution idéale pour les locataires et les propriétaires soucieux de leur budget. Ils offrent une transformation spectaculaire, sans l’engagement, le coût ni le désordre du carrelage traditionnel.
Ce guide est votre ressource complète. Nous vous accompagnerons tout au long du processus, de l’installation aux tests de durabilité, jusqu’à la
damage-free removal. Nous explorerons également les grandes tendances de
2025 design trends, avec des conseils pratiques et de l’inspiration pour créer un espace que vous aimerez vraiment. Qu’est-ce que les stick on tiles for walls ?
Vous êtes-vous déjà demandé quel était le secret de ces relookings d’appartements ultra-chics à petit budget que l’on voit en ligne ? Cette section vous présente le produit révolutionnaire qui rend tout cela possible : les
peel and stick wall tiles- .
- DIY wall tile stickers individuels aux panneaux 3D emboîtables qui imitent de façon convaincante la céramique, la pierre et le verre. Leur popularité a explosé pour plusieurs raisons essentielles :
- Application facile : Pas besoin de joint, de mortier ni d’outils spécialisés salissants. L’installation est un projet DIY simple, souvent réalisable en une seule après-midi. Cette accessibilité permet même aux personnes qui rénovent pour la première fois d’obtenir un résultat professionnel.
- Adapté au budget : Les stick on tiles offrent l’apparence de matériaux coûteux comme le marbre ou la céramique sur mesure pour une fraction du prix. Cela permet une mise à jour visuelle percutante sans investissement financier important.
Sans danger pour les locataires et amovible : Le plus important pour beaucoup, ce sont des temporary wall coverings
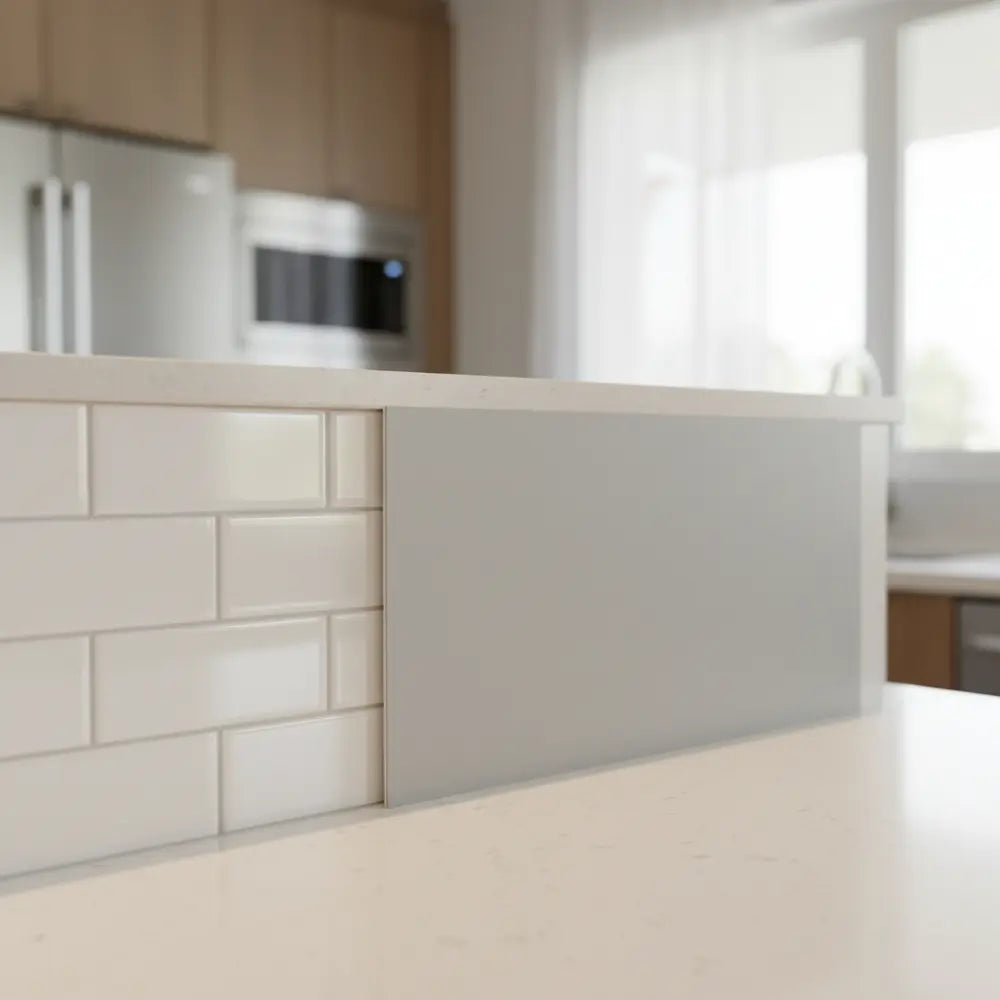
. Lorsque vient le moment de déménager ou si vous avez envie d’un nouveau style, ils peuvent être retirés sans abîmer la surface en dessous.Imaginez transformer un mur de cuisine banal et terne dans une location en un superbe
kitchen backsplash
avec des carreaux métro modernes. La différence n’est pas seulement esthétique ; elle change toute l’atmosphère de la pièce, en la rendant plus aboutie, plus personnelle et plus valorisante. C’est la force desremovable wall tile stickers for renters
. Pour celles et ceux qui commencent tout juste leur parcours DIY, notre guide complet Renter-Friendly DIY Peel and Stick Guide est un point de départ essentiel, rempli de conseils pour les petits espaces et la retrait facile.Si vous appliquez des carreaux sur un mur fraîchement peint, il est essentiel d’attendre. La plupart des experts recommandent d’attendre au moins trois semaines pour que la peinture soit complètement sèche. Ce délai est crucial, car poser l’adhésif trop tôt peut emprisonner des solvants et provoquer un décollement. Pour un guide détaillé sur ce défi précis, consultez notre article complet sur Pose de stick tiles sur des murs peints : guide et conseils, qui couvre les pièges courants et garantit la réussite de votre projet.
2. Mesurer et créer un repère
Mesurez la hauteur et la largeur de la zone que vous souhaitez carreler afin de calculer la superficie dont vous avez besoin. C’est une astuce de pro de commander environ 10% de matériau supplémentaire pour compenser les erreurs ou les découpes délicates.
Ne commencez pas le carrelage depuis un coin ou le bord d’un plan de travail. Ceux-ci sont rarement parfaitement de niveau. Utilisez plutôt un niveau et un crayon pour tracer une ligne horizontale parfaitement droite au milieu de votre mur. Ce sera votre guide pour la première rangée de carreaux, afin de garantir que toute l’installation soit bien de niveau.
3. Découper et personnaliser
Pour la plupart des peel and stick tiles, la découpe est simple. Vous pouvez utiliser un cutter et une règle droite. Incisez fermement le carreau le long de votre trait marqué, puis cassez-le net. Pour les formes complexes autour des prises ou des fenêtres, créez d’abord un gabarit en papier. Reportez le gabarit sur le carreau et découpez avec précaution.
4. Poser et lisser
C’est la partie la plus satisfaisante. Commencez avec votre premier carreau en alignant son bord supérieur sur le repère de niveau que vous avez tracé. Décollez seulement les quelques premiers centimètres du papier protecteur, appliquez la partie adhésive exposée sur le mur, puis retirez lentement le reste du support tout en lissant le carreau au fur et à mesure.
Cette méthode empêche l’air de se retrouver piégé en bulles. Une fois le carreau posé sur le mur, appuyez fermement sur toute sa surface pour activer l’adhésif. Faites se chevaucher les joints prévus, comme indiqué dans les instructions du fabricant. Poursuivez ce processus en emboîtant chaque nouveau carreau dans le précédent jusqu’à ce que votre mur soit transformé.
Votre liste de contrôle d’installation gratuite
Ne manquez aucune étape. Téléchargez notre checklist pratique et imprimable pour vous guider vers une installation parfaite du début à la fin.
Télécharger la checklist maintenant
Les peel and stick wall tiles sont-elles imperméables et durables ?
Vous craignez que ces beaux carreaux ne soient que décoratifs et ne supportent pas la chaleur d’une cuisine ou l’humidité d’une salle de bain ? Examinons les questions essentielles d’imperméabilité et de durabilité pour montrer à quel point ces carreaux sont vraiment résistants.
C’est l’une des préoccupations les plus courantes, et la réponse est un grand oui — si vous choisissez le bon produit. La qualité et le matériau de vos peel and stick wall tiles influencent directement leurs performances dans les environnements difficiles.
Imperméabilité dans les salles de bain et cuisines
La plupart des stick on tiles for walls en vinyle et composites sont conçus pour être 100% imperméables. Les carreaux eux-mêmes forment une barrière imperméable, protégeant le mur derrière eux des éclaboussures et de l’humidité. Cela en fait un excellent choix pour une crédence de cuisine ou un mur de salle de bain en dehors de la zone directement exposée à la douche.
Peut-on les utiliser dans une douche ? Certains produits avancés sont spécialement conçus pour cela. Une étude récente a montré que des carreaux composites en PVC spécialement conçus avec des bords scellés peuvent durer des années dans une cabine de douche. Pour aller plus loin dans le choix du bon produit et garantir une étanchéité réellement imperméable, la meilleure ressource est notre analyse d’expert sur les Meilleurs carreaux de douche imperméables à poser et décoller pour 2025.
Résistance à la chaleur près des cuisinières
Lorsque vous utilisez des peel and stick tiles comme crédence de cuisine, la chaleur est un facteur majeur. Les carreaux en vinyle standard peuvent se déformer ou se décolorer s’ils sont placés trop près d’une source de chaleur directe.
En règle générale, veillez toujours à respecter une distance de sécurité — généralement 8-10 inches — entre les carreaux et les flammes d’une plaque de cuisson au gaz. Pour les zones directement derrière la cuisinière, recherchez des carreaux en métal ou en matériaux composites résistants à la chaleur, spécialement conçus et homologués pour cet usage.
Longévité et durabilité
Combien de temps durent-ils ? Avec une préparation adéquate de la surface et une bonne installation, des peel and stick wall tiles de haute qualité peuvent durer de nombreuses années. De nombreux propriétaires indiquent que leur installation paraît comme neuve encore 5 ans plus tard. Leur durabilité en fait bien plus qu’un simple revêtement mural temporaire ; c’est une solution de design semi-permanente, réellement viable.
Leur résistance aux rayures et aux taches est souvent supérieure à celle des murs peints, ce qui en fait un choix pratique pour les zones très fréquentées ou les maisons avec enfants et animaux domestiques.

Quiz : trouvez votre style de carrelage idéal !
Lequel décrit le mieux l’esthétique de vos rêves pour votre intérieur ?
Meilleurs peel and stick tiles pour différents espaces
Vous vous sentez dépassé par les choix et vous ne savez pas quel carreau convient à votre projet ? Cette section vous sert de guide déco personnel, en recommandant les matériaux et styles de carreaux parfaits pour chaque pièce de votre maison.
Tous les peel and stick tiles ne se valent pas. Le matériau, la finition et le design doivent être adaptés à la fonction et à l’esthétique de la pièce.
Pour les salles de bains et les douches
Dans les zones sujettes à l’humidité, la performance est primordiale.
- • Meilleur choix : carreaux en vinyle ou en composite PVC. Ces matériaux sont non poreux et naturellement imperméables, ce qui les rend idéaux pour supporter l’humidité d’une salle de bains. Recherchez des carreaux dotés d’un bord superposé amélioré pour créer une étanchéité optimale.
- • Conseil de pro : Pour les installations dans la douche, appliquez un cordon de mastic silicone transparent anti-moisissure autour des bords de la zone carrelée pour une protection supplémentaire. Cette étape simple empêche l’eau de s’infiltrer derrière les panneaux.
Pour les crédences de cuisine
La cuisine exige des carreaux faciles à nettoyer, durables et résistants à la chaleur et aux taches.
- • Meilleur choix : carreaux 3D avec revêtement gel, composites en aluminium ou carreaux en composite pierre-polymère (SPC). La couche de gel des carreaux 3D offre une surface facile à nettoyer et un rendu réaliste et brillant. Les carreaux en aluminium et SPC offrent une meilleure résistance à la chaleur pour une utilisation derrière les cuisinières.
- • Lien recommandé : Une crédence de cuisine est l’un des projets DIY les plus marquants. Pour voir comment une simple mise à jour peut redéfinir le style de votre cuisine, découvrez notre guide sur Accent décoratif mural chic pour la cuisine : carreaux peel and stick. Une transformation rapide, d’une crédence peinte et datée à un motif chevron moderne, peut donner l’impression que toute la pièce est neuve.
Transformer votre cuisine n’a pas besoin d’être un chantier colossal. Pour une approche encore plus rapide et plus économique, consultez notre guide sur la façon de réaliser une transformation de cuisine DIY avec des peel and stick en 2025, qui associe un carrelage astucieux à des techniques de décoration simples.
Pour les murs d’accent du salon
Dans les espaces de vie, vous pouvez privilégier l’esthétique. C’est là que vous pouvez jouer avec les textures, les motifs et les finitions.
- • Meilleur choix : vinyle texturé, panneaux effet bois ou brique, et carreaux métalliques. Ces options peuvent créer un mur accent spectaculaire qui devient le point focal de la pièce. Un mur effet pierre empilée peut apporter une touche rustique, tandis que des carreaux métalliques géométriques peuvent insuffler une ambiance art déco sophistiquée.
Idées déco et tendances 2025 en peel & stick tiles
Prêt à aller au-delà du simple carreau métro blanc et à découvrir ce qui arrive dans la déco intérieure ? Cette section dévoile les tendances les plus excitantes pour 2025, afin de vous aider à créer un espace à la fois élégant et personnel.
Le monde des peel and stick wall tiles regorge d’innovations. Oubliez les options limitées d’autrefois : les collections d’aujourd’hui reflètent les dernières évolutions du design d’intérieur. Voici les grandes tendances à surveiller.
1. Couleurs audacieuses et motifs géométriques
Les neutres laissent place à des teintes riches et saturées. Pensez à des verts émeraude profonds, des bleus marine intenses et des tons terracotta chaleureux. Ces couleurs apparaissent dans des motifs géométriques spectaculaires, des hexagones classiques et formes en éventail aux designs plus complexes et imbriqués. Utiliser ces modern peel and stick tiles for kitchen backsplashes ou pour des murs d’accent dans la salle de bain crée instantanément un effet « waouh ».
2. Matériaux écologiques et naturels
La durabilité influence plus que jamais le design. En réponse, les fabricants proposent des self-adhesive wall decor fabriqués à partir de matériaux renouvelables ou recyclés. Recherchez des options en liège, qui apporte chaleur naturelle et isolation phonique, ou des carreaux en plastique recyclé. Ces choix vous permettent de rafraîchir votre espace tout en faisant un geste écoresponsable.
3. Textures et finitions inspirées du luxe
L’objectif est d’imiter avec une précision remarquable des matériaux haut de gamme. Les motifs terrazzo, avec leurs éclats de couleur ludiques, sont une tendance majeure. Vous pouvez trouver de magnifiques peel and stick wall tiles effet terrazzo qui offrent un rendu sur mesure sans le prix qui va avec. De même, les carreaux imitation marbre avec veinures réalistes et finitions mates apportent une touche accessible de luxe discret aux salles de bain et cuisines.
Un excellent exemple consiste à utiliser des carreaux terrazzo grand format pour créer une crédence chic et homogène dans une cuisine minimaliste. Le motif ajoute de la profondeur visuelle et de la personnalité sans surcharger l’espace.

Comment retirer des stick on wall tiles sans dommage
Vous retenez-vous par peur d’abîmer la peinture ou le mur lorsque vous déménagez ? Cette section vous garantit un retrait sans stress, pour que vous récupériez votre dépôt de garantie en entier.
La possibilité de retrait est leur superpouvoir, surtout pour les locataires. La clé d’un retrait propre et sans dommage, c’est la patience et un peu de chaleur. L’erreur la plus fréquente consiste à les arracher rapidement du mur, ce qui peut emporter la peinture ou la couche de papier du placo.
Suivez cette méthode simple et éprouvée :
Étape 1 : appliquer une chaleur douce
L’adhésif utilisé sur les peel and stick tiles est conçu pour se ramollir sous l’effet de la chaleur. Prenez un sèche-cheveux standard et réglez-le sur une température moyenne ou élevée. Tenez-le à environ 6-8 inches du mur et chauffez le premier carreau en faisant aller et venir le sèche-cheveux sur sa surface pendant environ 30 à 60 secondes.
Étape 2 : décoller lentement et délicatement
Commencez par un coin supérieur. Utilisez un couteau à mastic en plastique ou votre ongle pour soulever le bord du carreau chauffé. Une fois que vous avez une bonne prise, commencez à le décoller vers le bas en l’éloignant du mur. Tirez lentement et selon un angle prononcé (proche de 180 degrés). Si vous sentez une forte résistance, appliquez davantage de chaleur. Ne forcez pas.
Étude de cas : la réussite d’un locataire
Ce mouvement lent et régulier est essentiel. À titre d’exemple, un locataire d’un appartement à New York a réussi à retirer ainsi une crédence de cuisine complète après deux ans. En chauffant chaque carreau section par section, il a laissé le mur peint d’origine complètement intact et a passé l’état des lieux de sortie sans difficulté.
Étape 3 : nettoyer les éventuels résidus
Même avec un retrait soigneux, un léger résidu collant peut subsister. N’utilisez pas de grattoirs abrasifs, qui risqueraient de rayer le mur. Préférez un chiffon doux avec un nettoyant à base d’agrumes ou un produit comme Goo Gone. Appliquez le nettoyant, laissez agir une minute pour dissoudre l’adhésif, puis essuyez.
Pour des conseils plus détaillés couvrant tous les cas de figure, du retrait simple aux surfaces délicates, consultez notre tutoriel complet sur Comment installer des peel and stick wall tiles sans dommage. Il regorge d’astuces renter-friendly pour garantir un résultat parfait.
Comparaison des coûts : stick on tiles vs carreaux traditionnels
Vous vous demandez si les économies sont vraiment aussi importantes qu’elles en ont l’air ? Cette section propose un aperçu clair, en euros et en centimes, en comparant le coût total d’un projet peel-and-stick à celui d’une pose de carrelage traditionnelle.
Décomposons les coûts d’un projet type de kitchen backsplash de 40 pieds carrés pour voir à quel point vous pouvez économiser avec des cheap peel and stick tiles for walls.
Projet de bricolage peel and stick
- Coût des matériaux : 80 $ - 320 $
- Coût d’installation : 0 $ (bricolage)
Coût total du projet : 80 $ - 320 $
Projet de carrelage traditionnel professionnel
- Coût des matériaux : 120 $ - 600 $
- Coût d’installation : 400 $ - 800 $+
Coût total du projet : 520 $ - 1 400 $+
Les chiffres parlent d’eux-mêmes. Une installation DIY de stick on tiles for walls peut vous faire économiser plus de 70-80% par rapport à un dosseret en céramique posé par un professionnel. Cela rend une transformation design spectaculaire accessible à presque tous les budgets.
Conclusion
La preuve est là : peel and stick wall tiles comptent parmi les produits DIY les plus polyvalents, abordables et impactants disponibles aujourd’hui. Elles vous permettent de fuir les murs ternes et d’exprimer votre style personnel, que vous soyez propriétaire ou locataire. Elles ne sont plus seulement une solution temporaire, mais un choix design durable et chic.
Nous vous avons montré à quel point l’installation peut être simple, confirmé leur étonnante résistance à l’eau et à la chaleur, et proposé une méthode infaillible pour une
damage-free removal. Avec les tendances déco à venir, vos possibilités créatives sont infinies. Vous avez maintenant les connaissances et la confiance nécessaires pour vous lancer dans ce projet. Alors, pourquoi attendre ? Commencez par une petite zone — un mur d’accent dans une salle de bain ou un kitchen backsplash — et constatez vous-même la transformation. Pour maîtriser les bases et découvrir les dernières options de design, notre guide sur
Comment installer des Peel and Stick Tiles et les meilleurs designs 2025
est l’étape suivante idéale pour bien démarrer.
renter-friendly
et d’inspiration directement dans votre boîte mail.FAQ sur les Peel and Stick Wall Tiles
1. Puis-je installer des stick on tiles directement sur mes anciens carreaux en céramique, moches ?
Oui, dans la plupart des cas, c’est possible. L’essentiel est que la surface existante soit propre, plane et non poreuse. Vous devrez nettoyer soigneusement les anciens carreaux et les joints afin d’éliminer toute trace de savon ou de graisse. Si les joints sont profonds, certaines personnes appliquent une fine couche d’apprêt pour obtenir une surface plus lisse et une meilleure adhérence.
2. Comment gérer les murs texturés lors de la pose de peel and stick tiles ?
Les stick on tiles nécessitent une surface lisse pour adhérer correctement. Si vos murs ont une légère texture (comme un fini peau d’orange), des carreaux de haute qualité avec un adhésif puissant peuvent fonctionner. Pour les textures plus marquées, il est préférable de poncer d’abord le mur puis d’appliquer une couche d’apprêt afin de créer une base lisse et plane avant la pose. 3. Y a-t-il des précautions particulières à prendre pour utiliser des waterproof peel and stick tiles dans une douche ?


Laisser un commentaire
Ce site est protégé par hCaptcha, et la Politique de confidentialité et les Conditions de service de hCaptcha s’appliquent.