












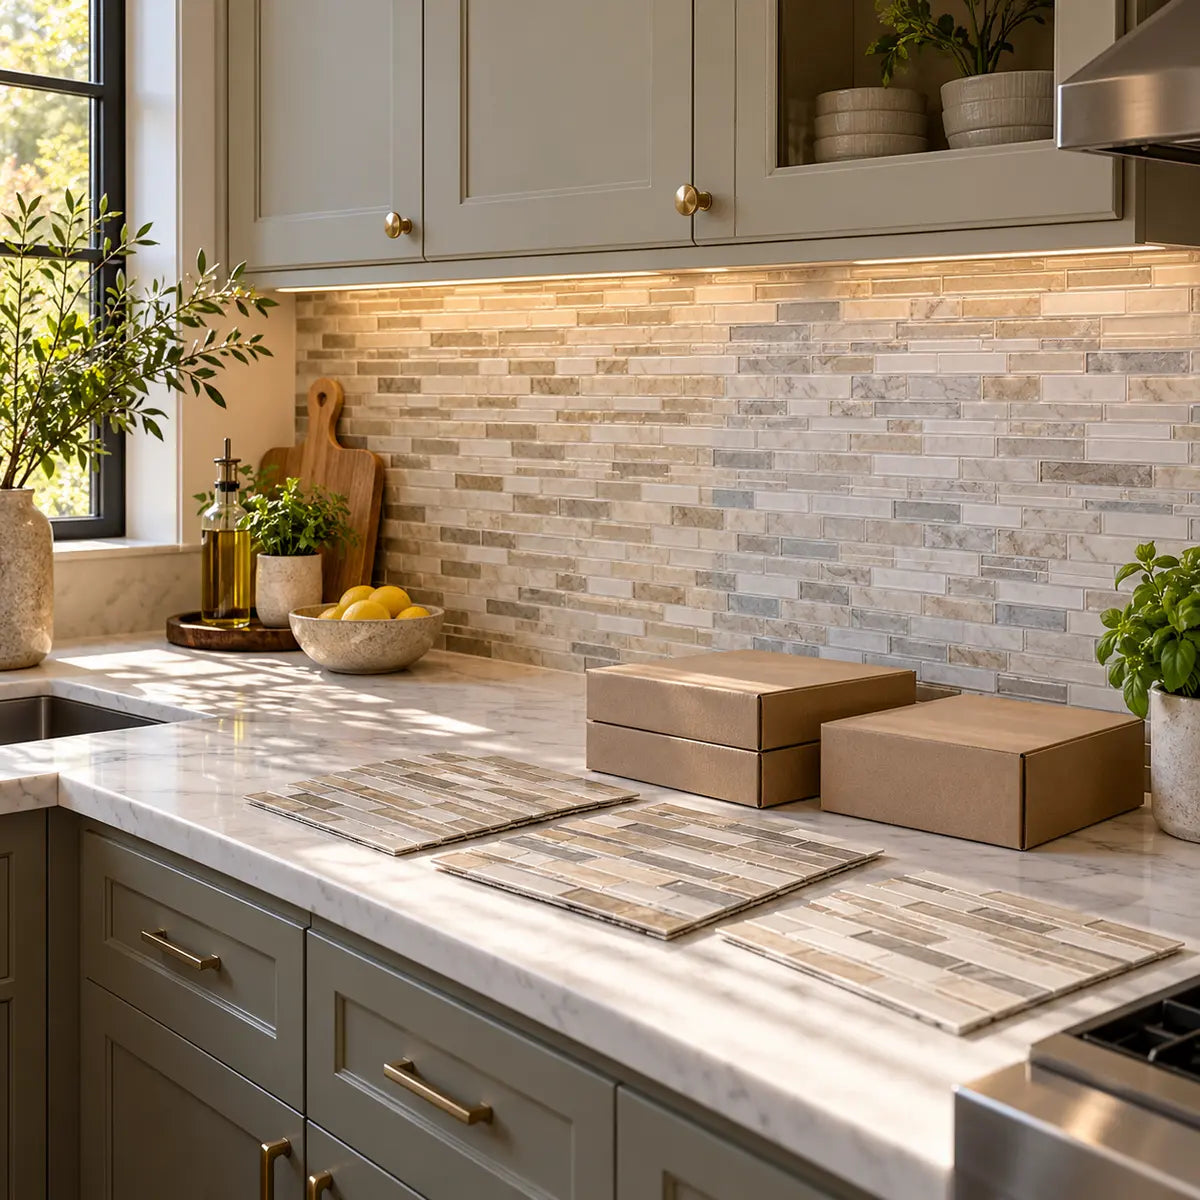
Two boxes of peel-and-stick tile can look identical when you inspect them separately, then show a visible difference when they are placed side by side across a backsplash, wall, or floor. That is why the safest answer to “Do peel-and-stick tiles match across boxes?” is: they may match closely, but you should not assume they match until you compare the package identifiers, several tiles from each box, and the intended layout before installation.
Keep the boxes together, photograph their labels, and inspect representative tiles while the adhesive backing remains covered. Compare them in the same location, under consistent light, with the same orientation and background. Then dry-lay the tiles in the pattern and space where they will be installed.
If the tiles still look consistent across the full layout, you can usually proceed according to the product’s instructions. If the difference is minor, test whether distributing the tiles reduces a noticeable boundary. If a clear shade difference remains, pause before exposing more adhesive and contact the seller or manufacturer with the package details and photos.

Do peel-and-stick tiles match across different boxes?
Peel-and-stick tiles from different boxes can match closely, but matching should be verified before installation rather than assumed. Product lines may use batch, run, lot, or pattern identifiers, and manufacturer installation guidance commonly tells buyers to inspect the material and compare package information before committing it to the surface. The exact identifier, its location, and what it means vary by manufacturer and product.
A box-to-box check matters because adhesive-backed tile is difficult to evaluate after pieces have been cut, installed, pressed into place, or mixed throughout a larger surface. Opening packaging for inspection may also affect the seller’s preferred return condition, so the goal is to gather enough information early while preserving the boxes, labels, liners, and unused material.
A practical decision path looks like this:
| What you find | What it usually means for the project |
|---|---|
| Package identifiers match and representative tiles look consistent | Continue to a dry layout and make the final decision from the full pattern. |
| Identifiers differ, but the tiles look consistent under controlled comparison | Treat the boxes as potentially usable together, but confirm the intended layout before installation. |
| The difference appears only under one light source or from one angle | Repeat the comparison under consistent conditions before deciding there is a shade mismatch. |
| A visible difference remains across several tiles and in the intended layout | Pause installation, document the issue, and ask the seller about the available options. |
| The difference is subtle and becomes less noticeable when tiles are distributed | Use redistribution only if the dry layout looks acceptable from normal viewing distance. |
There is no universal consumer-facing shade tolerance that defines exactly when two boxes “match.” A difference that disappears in a small sample may become obvious across a long wall. A textured tile may also catch light differently from one angle to the next. Your decision should be based on the completed dry layout, the room’s normal lighting, and the visibility of the difference from the distance at which people will see the finished surface.
For product-specific guidance, check the actual installation instructions that came with the tile. Official WallPops and InHome backsplash installation guidance on batch and pattern numbers, for example, tells users to check batch and pattern numbers and inspect the tiles before installation, but those instructions apply to the products described on that page rather than to every peel-and-stick tile brand.
If you are comparing a Stickwoll product, use the product information supplied with that exact item or ask Stickwoll support what the package markings mean. The available store policy does not establish one universal batch-number location or cross-box shade guarantee for every Stickwoll tile.
Why can peel-and-stick tiles look different between boxes?
A visible difference between boxes can come from actual material variation, or it can be created by lighting, background, viewing angle, surface color, tile orientation, protective film, or the way the tiles are arranged. Appearance alone can identify a reason to investigate, but it cannot prove that the boxes came from different production runs or that one box is defective.
A batch, run, or lot number is a package identifier used by some manufacturers to group material or production information. The terms are not interchangeable across brands. One manufacturer may print a lot code, another may use a run number, and another may show a pattern or production reference. Some products may show no obvious consumer-facing identifier at all.
Official FloorPops guidance about batch, run, and lot numbers says its boxes carry a batch, run, or lot number and recommends comparing those numbers before installation. Official InHome backsplash instructions also direct users to check batch and pattern numbers. That supports making the package audit part of your process, but it does not mean that matching numbers guarantee identical appearance or that different numbers automatically mean a visible mismatch.
Possible causes of box-to-box variation
Production or batch variation. Materials can have small differences in print, texture, surface finish, or color appearance. The evidence available for this article supports checking batch or lot information where the manufacturer provides it, but it does not establish a universal manufacturing rule for every peel-and-stick tile.
Lighting. A warm kitchen bulb, cool daylight, a bright window, or a narrow spotlight can change how a surface appears. A tile with raised texture may look lighter on one ridge and darker in the next when light strikes it from the side.
Surrounding colors. A white sample placed against a dark countertop may look different from the same sample placed against a pale wall. The color of the existing surface can also influence your judgment if the tile has translucent areas, open texture, or reflective features.
Viewing angle and distance. Some differences are visible only when you stand close to the tiles. Others appear as a broad band when you step back. Check both. The finished surface should be judged from normal viewing distance as well as during close inspection.
Tile orientation. Rotating a tile can change the direction of a pattern or texture. This may help with design continuity, especially when the product has a repeating pattern. It cannot make two clearly different base shades identical.
Protective film or liners. If one sample still has a film, sticker, or packaging residue that the other lacks, the surface may reflect light differently. Compare tiles in the same condition and avoid removing anything the product instructions say to keep in place.
The surface underneath. A dark, uneven, glossy, or strongly colored surface can influence the way a tile reads after installation. It can also create shadows beneath textured sections. Shade checking and surface preparation belong together.

The Commission Internationale de l’Éclairage definition of perceived colour describes perceived color as dependent on the light reaching the observer, the size and structure of the object, the surrounding area, the observer’s adaptation, and the viewing experience. In practical terms, a visual difference needs a controlled comparison before you treat it as evidence of a material mismatch.
A peer-reviewed experiment on material appearance reached a similar practical lesson by analogy. The study used four food samples, six participants, three spotlight sizes, and three illuminance levels. Wider, more diffuse lighting was selected more often as closest to the natural-light reference than narrower spotlight conditions. The test materials were food samples rather than peel-and-stick tiles, so the finding does not establish a tile-specific rule. It does support comparing samples under broad, even lighting instead of judging one box under a strong directional lamp and another in a different setting. See the peer-reviewed material-appearance experiment using different spotlight distributions.
How should you compare peel-and-stick tile shades?
Compare several tiles from each box at the same time, in the same place, under the same lighting, with the same face and orientation visible. A controlled side-by-side comparison is more useful than looking at one tile from Box A today and one tile from Box B tomorrow.
You do not need a laboratory setup. You need repeatable conditions.
Use this comparison setup
- Choose a neutral comparison area. A clean, pale surface is usually easier to judge than a strongly colored countertop or wood floor. If the tile will be installed over a visible substrate, repeat the check over a small representative section of that surface later.
- Use broad, even light. Daylight near a window can work if both samples are placed together and direct sun is avoided. A bright ceiling light may work if it illuminates both samples evenly. Avoid comparing one tile in sunlight and another in shadow.
- Keep the tile faces in the same condition. Remove loose dust and packaging material. Keep protective liners or films in place if the instructions require them, and treat every sample the same way.
- Match orientation. Place the printed or textured faces in the same direction. Mark the top edge with a removable piece of painter’s tape if the pattern makes direction difficult to track.
- Compare more than one tile from each box. The supplied manufacturer guidance supports inspecting tiles but does not provide a validated sample count. A practical homeowner check is to select several representative pieces from different positions in each box, such as near the top, middle, and bottom where possible. This is a decision aid, not a formally validated test.
- View the samples close up and from normal distance. Look for a difference in base shade, pattern density, texture, gloss, and edge appearance. Then step back far enough to see how the difference reads as part of a larger field.
- Repeat under the room’s usual lighting. A backsplash may look acceptable in daylight but show a boundary under under-cabinet lighting. A floor may appear different in the evening when the room uses warm bulbs.
Choose the next path after comparing the samples
The purpose of this process is to separate a repeatable difference from a one-time visual impression. If the same box consistently looks darker or warmer across several samples and lighting conditions, treat that as meaningful information. If the difference shifts or disappears when the conditions are equalized, the original comparison may have been influenced by the setting.
A phone photograph can help document the comparison, but it should not be treated as a color measurement. Camera exposure, white balance, screen settings, and room lighting can change the image. Use photos to show the arrangement, package labels, and relative appearance. Keep the physical tiles together for the final judgment.
Where do you find the peel-and-stick tile batch or lot number?
Look for the batch, run, lot, pattern, production, or shade identifier on the outside of the box, the end flap, a side label, a barcode sticker, or a printed mark near the product name. The location and wording depend on the manufacturer, so there is no universal place to check.
Before opening a box, photograph every visible side of the packaging. Include:
- Product name and design name
- Color or shade name
- SKU, item number, or model number
- Barcode
- Batch, run, lot, pattern, or production code
- Quantity printed on the box
- Order number or shipping label, if relevant
- Date received
- Any visible damage, crushed corners, moisture, or resealing
Write the box identifier beside a simple label such as “Box A,” “Box B,” and “Box C.” If the boxes contain loose bundles or individual packs, label those separately. This prevents a common problem: taking a photo of several boxes together and later being unable to tell which code belongs to which sample.
A matching product name is useful but incomplete. Two boxes can show the same product and color while carrying different production identifiers. A different identifier also does not prove that the shade will be visibly different. Treat package information as one part of the decision, then confirm the physical appearance.
If you cannot find a batch or lot number, photograph the packaging and ask the seller:
- Does this product use a batch, lot, run, or pattern code?
- Where is the identifier printed?
- Do these boxes appear to come from the same production group?
- Can the seller confirm whether the boxes can be used together?
- Is same-batch material available if the current boxes do not compare well?
- What should remain unopened while the issue is being reviewed?
- What photos or order details are needed for support?
Keep the seller’s reply with the package photographs. A written response can be more useful than a phone conversation if you later need to explain what you were told before installation.
Should you open every box before installing?
You should inspect enough material to make a responsible decision before committing to the surface, but there is no evidence-based universal rule that every box must be completely unpacked or every tile must be viewed. The right amount depends on the size and visibility of the project, the number of boxes, the product pattern, the seller’s packaging policy, and how much variation you see in the first samples.
The concern is a real tradeoff. Opening boxes can reveal a mismatch early, when you still have time to ask questions. It can also change the condition in which a voluntary return is accepted. Cutting, removing backing, or installing the tile creates a further commitment.
A sensible inspection sequence is:
- Photograph the sealed packaging. Capture codes, labels, damage, and the order information before opening anything.
- Read the product instructions. Follow the exact directions for the tile you purchased. Do not transfer temperature, acclimation, surface, or adhesive instructions from another manufacturer.
- Open one box from each identifier group. If every box has the same code, begin with representative boxes rather than immediately emptying the entire shipment.
- Inspect several tiles from each opened box. Check shade, pattern, texture, print quality, edge condition, and any visible defects.
- Compare the samples side by side. Use matching orientation and lighting.
- Dry-lay a small test section. Keep the adhesive protected and arrange the pieces as they will appear on the wall or floor.
- Expand the test if variation appears. If the first samples look different, inspect more pieces from those boxes before deciding whether the difference is isolated or consistent.
- Pause before exposing adhesive. A dry layout gives you a chance to make a decision while the material remains movable.

Official FloorPops instructions for inspecting and dry-laying tiles direct users to inspect tiles, lay them out with the back liner left on, assess the arrangement, and rotate tiles for pattern appearance. That is product-specific guidance, but the underlying principle is useful: make layout decisions before adhesive contact.
The same page gives FloorPops-specific acclimation and temperature instructions, including laying the package flat for 48 hours at a room temperature of at least 65°F (18°C), along with stated application limits. Those numbers should not be copied to another brand or product. They concern the particular FloorPops product covered by the instructions, and they do not establish that acclimation changes shade matching.
If the first opened boxes appear consistent and the project is small, a representative check may be enough for a practical decision. If the installation covers a large, highly visible area, involves several identifiers, or includes a strong repeating pattern, inspect more broadly. The more difficult the finished surface would be to repair, the more valuable the pre-installation check becomes.
Dry-lay the boxes across the actual surface
The intended layout is the strongest practical test because shade variation rarely appears as an isolated sample problem. It appears as a line, block, stripe, or change in rhythm across the finished surface.
Start with a clean, dry area and keep the adhesive backing covered. If the product uses a release liner, leave it in place. If the tiles have a removable protective layer, follow the product instructions for whether it should remain during the test.
Arrange enough representative tiles to show the pattern:
- Place pieces from each box in the positions where they may actually be used.
- Keep a record of which box supplied each piece.
- Follow the intended orientation and repeat.
- Include corners, edges, transitions, outlets, and the most visible center area.
- Look at the layout from close range and from normal room distance.
- Check it in daylight and in the lighting used after dark.
- Photograph the full arrangement and any area that looks questionable.
For a backsplash, include the space beneath cabinets, around outlets, and near the countertop. A small shade change may be more noticeable when it crosses a horizontal line or sits beside a bright counter. For an accent wall, inspect the full width rather than concentrating on one small cluster. For a floor, check the walking path and the area where light falls across the surface.
The dry layout also reveals pattern issues that a shade comparison can miss. A box may contain tiles with the same base color but slightly different pattern alignment or texture direction. Another box may appear different because the pieces are rotated. The layout helps you separate a box-level shade difference from a pattern or orientation issue.
Do not treat a dry layout as a guarantee of the final installed result. Adhesive contact, surface color, shadows, and the finished room lighting can still affect appearance. The purpose is to make the most important visual decision before installation has created rework.
For a more focused pre-installation audit, you can use the five-minute backsplash tile-lot test to organize package-code checks, daylight comparison, dry-laying, and documentation. The article is a store-local planning resource; apply its instructions alongside the product’s own directions.
Can you mix peel-and-stick tiles from different boxes?
You can sometimes mix tiles from different boxes when the samples and dry layout look acceptably consistent, but mixing should be treated as a tested layout choice rather than an automatic solution. A different box code does not by itself make the boxes unusable, and redistributing tiles cannot make clearly different shades identical.
If the tiles appear consistent, mixing them throughout the layout may reduce the chance that one box is concentrated in a single visible area. This can be reasonable when the boxes are the same product and color, the samples compare well, and the full dry layout looks even.
If the variation is minor, test several arrangements:
- Random distribution: Place pieces from each box throughout the field.
- Column or row distribution: Alternate boxes by row or column to see whether the pattern looks intentional.
- Center-weighted distribution: Place the closest-looking pieces in the most visible area and use less noticeable pieces near edges or cuts.
- Pattern-led distribution: Follow the tile design so differences in texture or print direction become less obvious.
- Single-zone use: Keep a visibly different group in a separate area only if the change looks intentional and works with the room.
The best arrangement depends on the product and the space. A subtle variation may disappear when mixed. A pronounced variation may become more noticeable because the eye finds repeated changes across the surface. A strong boundary between two groups is usually riskier than a variation that is spread gradually.
Official FloorPops guidance recognizes that slight design-match variation may occur between tiles and recommends rotating tiles to find the best visual match. That supports testing orientation and placement, but it does not establish that rotation or redistribution will solve a clear box-level color mismatch.
Use a simple visibility test: stand where someone normally enters the room and ask whether your eye goes directly to a line, block, or change in shade. Then view the area under the room’s usual lighting. If you have to search for the difference during normal viewing, the layout may be acceptable. If the difference draws attention immediately, keep testing or pause for seller guidance.
Do not install a layout you already know will bother you because you hope furniture, grout lines, or dimmer lighting will hide it. Those factors may change the view, but they do not remove the underlying variation. Once the adhesive has bonded and the tiles have been cut, changing the plan becomes harder.
You can also review the tested peel-and-stick tile blend method for a longer dry-layout sequence. Use it as a practical comparison reference, not as a promise that every mixed box will produce a uniform finished surface.

Plan quantity before ordering another box
Quantity planning affects shade consistency because a shortage may force you to buy another box later, possibly from a different batch or production group. The safest quantity decision combines measured coverage with cuts, waste, pattern alignment, damaged pieces, future repairs, and the possibility that a later box will not compare exactly with the material you already have.
Start by measuring the actual area. Then account for:
- Pieces lost to corners, outlets, pipes, doors, and irregular edges
- Pattern matching and directional cuts
- Damaged or misprinted pieces
- Mistakes during cutting or positioning
- Tiles reserved for future repairs
- The visual importance of the final few pieces
- Whether the product is sold by piece, sheet, pack, or box
- Whether the seller can confirm continued availability of the same product and color
Do not rely on a coverage number from another product. Tile sizes, pack counts, overlap, cut waste, and usable coverage differ. Use the product’s current listing, packaging, or quantity calculator for the exact item.
The How Much Do You Need? quantity calculator can help you estimate coverage, cuts, waste, and spare material before placing another order. It does not establish a batch match or guarantee that a later box will have the same appearance, so compare any new material before mixing it into the project.
If you already have a shortage, separate the decision into two questions:
- How much more material is required?
- Can the new material be used with the boxes already inspected?
The second question requires the same package and visual comparison as the first order. Photograph the new box before opening it. Compare its identifier and representative tiles with the material you already have. If the shade is close but not identical, dry-lay the new pieces in the least noticeable position and assess the completed field.
Ordering a spare box can be useful for future repairs, but store it with the original package information. A loose tile without its product name, color, or code may be difficult to match later. Keep at least one clear label photograph with the unused material.
For broader surface, room, moisture, heat, and installation planning, review the guide to peel-and-stick wall tile by room and surface. It can help you evaluate the installation conditions before you commit all of the material to the wall.
What should you do if peel-and-stick tiles are different shades?
If the shade difference remains visible after a controlled comparison and dry layout, pause installation and document the material before removing more backing or making cuts. Contact the seller or manufacturer with clear photos, package identifiers, the order details, and a concise description of what you observed.
Create a documentation set that includes:
- A photo of each box label
- Close-up photos of representative tiles from each box
- A side-by-side comparison under consistent light
- A wider photo showing the difference in the intended layout
- The product name, color, quantity, and order number
- The date the material arrived
- A note explaining whether the backing, film, or liner remains attached
- A record of which tiles came from which box
- Any visible damage, printing defect, texture difference, or packaging problem
Keep the boxes, packing slips, labels, unused pieces, and protective liners. Do not throw away packaging while the seller is reviewing the issue.
Ask for a specific answer rather than a general opinion. For example:
I purchased [product and color] in order [number]. Box A shows [identifier] and Box B shows [identifier]. After comparing several tiles side by side in the same light and dry-laying them in the intended pattern, Box B appears [warmer/darker/lighter/different in pattern]. Can you confirm whether these boxes are intended to be used together? Please advise whether I should keep the material unopened while this is reviewed.
Avoid describing the problem only as “the tiles look wrong.” Explain what changed, where the difference appears, and whether it is visible from normal viewing distance.
If you purchased from Stickwoll, its current Stickwoll shipping and returns policy for unused packaging and documented issues states that eligible online purchases may generally be returned within 30 days of delivery, with voluntary returns generally requiring unused and factory-sealed products. The policy also asks customers to report damaged, incorrect, or defective orders promptly with product and packaging photographs. The specific result can depend on the order, product, condition, and applicable consumer rights, so review the current policy and ask support about your situation before installing.
The policy does not mean that opening a box automatically removes every possible remedy, and it does not guarantee replacement for a shade difference. It does mean that preserving the material and documenting its condition gives the seller more useful information than installing first and explaining the issue afterward.
You can review the applicable returns and shipping guidance before deciding whether to open additional boxes. Keep the product-specific support conversation separate from your visual test notes so you can provide both if requested.
How can you reduce uncertainty before buying a second order?
Before placing a second order, ask the seller questions that connect directly to your project rather than asking only whether the product is “the same color.” A useful answer should help you compare the future box with the material you already own.
Ask:
- Can you confirm the current product name, color, SKU, and pattern?
- Do the boxes use a batch, lot, run, shade, or production identifier?
- Where is that identifier printed?
- Can the seller check whether the new order is likely to come from the same production group?
- Is the product still made under the same finish and pattern?
- Can the seller confirm the number of pieces or coverage in each pack?
- What should remain unopened until the comparison is complete?
- What photos are needed if the new box does not match?
- Is a sample or single tile available before ordering a larger quantity?
- Are there product-specific instructions for surface, temperature, moisture, or adhesive exposure?
A seller may not be able to guarantee that separate boxes will look identical. That does not make the questions pointless. It tells you what information is available and whether you should plan a dry comparison before ordering enough material for the full surface.
When looking at a product page, separate factual product information from visual expectations. For example, Stickwoll’s Subway Marble peel-and-stick wall tile is described in the supplied store information as an almond-white, grout-free, self-adhesive wall tile with 3D texture. Those descriptions help identify the product, but they do not establish a cross-box shade tolerance or guarantee that separate boxes will match.
The same applies to Lime Subway peel-and-stick wall tile. Product descriptions can help confirm that you are comparing the correct design and color family. They cannot replace a physical side-by-side inspection when shade consistency matters.
If the project is highly visible, order enough material from a source that can answer your batch or replacement questions before you begin. If the project is small and easily changed, your tolerance for a minor difference may be higher. The right choice depends on the surface, the lighting, the pattern, the amount of material, and how difficult the project would be to redo.
Use this pre-installation inspection checklist
Use the checklist before cutting, peeling, or pressing the tiles into place.
Package information
Tile comparison
Dry layout
Decision
The checklist is complete when it supports a decision. You do not need to create a perfect laboratory record. You do need enough information to explain what you saw, repeat the comparison, and protect the project if the material needs to be reviewed.
Choose the next action from the inspection result
The inspection should lead to one of three clear actions.
Proceed after the dry layout
Proceed when the representative tiles look consistent, the intended pattern reads evenly, and no visible boundary draws attention from normal viewing distance. Keep the boxes identified as you install so you can trace any later issue. Follow the product’s own instructions for surface preparation, room conditions, positioning, and adhesive exposure.
Before starting the full installation, review the peel-and-stick tile planning guide for preparation, room conditions, edges, quantity planning, and installation readiness. The guide is a general planning resource; the instructions for your exact product control where they differ.
Redistribute minor variation after testing
Redistribute tiles only when the difference is subtle and the dry layout shows that spreading the pieces produces an acceptable result. Keep the arrangement intentional. Do not rely on random mixing if the pattern makes the change more visible.
Mark the approved layout with simple notes or photos. If the layout must be moved before installation, preserve the box-to-tile relationship so the selected arrangement can be rebuilt.
Pause and ask for support
Pause when the difference remains clear across several samples, forms a visible line or block, appears in the most prominent area, or makes the finished surface look inconsistent under normal lighting. Photograph the issue and keep the material unused while you ask the seller or manufacturer for guidance.
A second opinion can help, especially if another person sees the difference from the normal viewing distance. Ask them to judge the actual dry layout rather than separate tiles held in different places. The goal is not to persuade someone that the tiles are acceptable. It is to determine whether the finished surface meets your expectations before adhesive exposure makes the decision harder to change.

Frequently Asked Questions
Where do I find the batch or lot number on peel-and-stick tile boxes?
Check the box sides, end flaps, barcode labels, product stickers, and printed packaging marks. The identifier may be called a batch, run, lot, pattern, production, or shade code. Its location and meaning are product-specific. Photograph all package sides before opening the box, and ask the seller if the marking is unclear.
How can I tell if peel-and-stick tiles are from the same batch?
Compare the visible batch, run, lot, or production identifiers on every box. Matching codes may suggest that the boxes belong to the same labeled group, but they do not guarantee identical appearance. Different codes do not prove that the tiles cannot be used together. Inspect representative tiles under the same conditions and confirm the dry layout.
Should I open every box before installing?
Inspect enough material to identify a possible mismatch before adhesive is exposed, but do not assume that every product requires every tile to be unpacked. Start by photographing the packaging, opening representative boxes, comparing several pieces from each, and expanding the inspection if you see variation. Check the seller’s return conditions before opening large quantities.
What should I do if peel-and-stick tiles are different shades?
Keep the material unused, photograph the labels and samples, repeat the comparison under consistent lighting, and dry-lay the intended pattern. If the difference remains visible, contact the seller or manufacturer with the order information and photos. Do not install the material while you are still deciding whether the variation is acceptable.
Can lighting make peel-and-stick tiles look like different colors?
Yes. Light direction, color, intensity, surrounding surfaces, viewing angle, and tile texture can affect perceived appearance. Compare samples in the same place, orientation, and light before concluding that the boxes contain different shades. If the difference remains across several lighting conditions and in the full dry layout, treat it as a material issue that needs a decision.
The practical rule is simple: compare before you commit. Separate boxes may match, but the package labels, representative tiles, controlled lighting, and full dry layout should all support the decision. Use the boxes together when the evidence looks consistent, distribute subtle variation only after testing it, and pause when a clear mismatch remains. Photograph the package information before installation so you can ask focused questions and preserve useful records if another box or seller response is needed.


Laisser un commentaire
Ce site est protégé par hCaptcha, et la Politique de confidentialité et les Conditions de service de hCaptcha s’appliquent.