


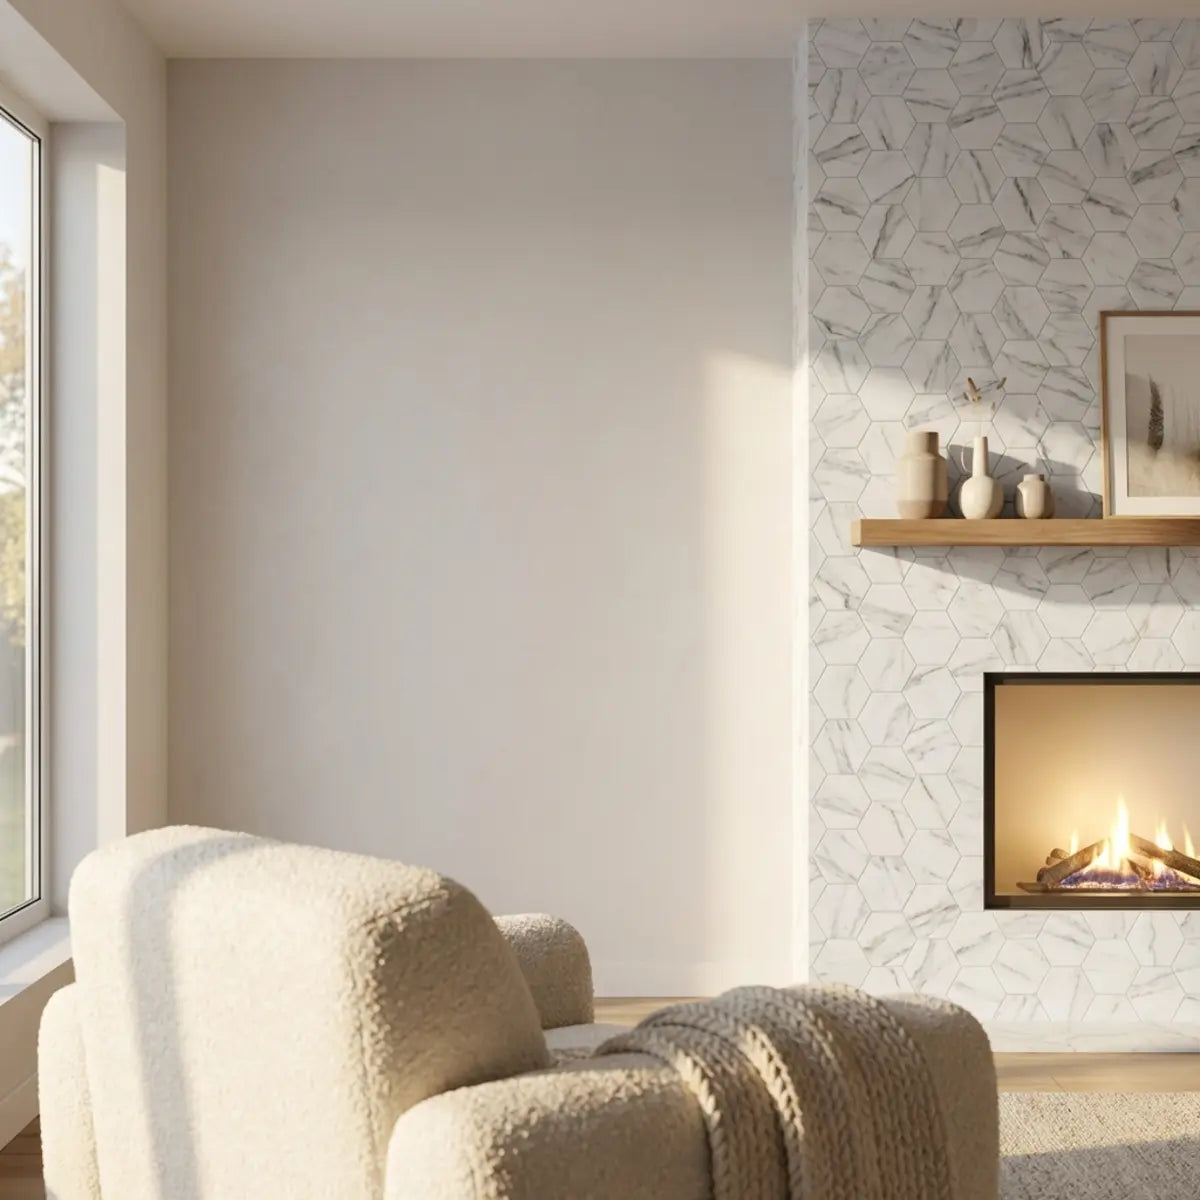
The fireplace is inherently the architectural anchor of any living space. It naturally draws the eye, dictates furniture arrangement, and establishes the foundational emotional tone of the entire room. When that focal point features dated, discolored, or heavily textured masonry that fundamentally contradicts your modern interior design vision, it creates undeniable visual friction.
Staring at a masonry surround that clashes with your modern living room? Upgrading a hearth traditionally means messy demolition, expensive contractors, and weeks of dust. If you want a fresh aesthetic without the heavy construction, a modern adhesive solution offers a faster path forward.
Many homeowners live with this visual friction for years, incorrectly assuming that any permanent rectification requires a sledgehammer, a localized construction zone, and a significant budget. However, recent advancements in interior material science and synthetic bonding agents have fundamentally shifted the paradigm of residential renovations.
A heat-resistant peel and stick tile fireplace makeover is a quick, affordable way to modernize your hearth. Using certified heat-safe materials and proper prep, you can complete the project safely in one weekend.
The concept of a "weekend makeover" often conjures images of superficial, temporary fixes. However, modern adhesive technologies offer incredible structural integrity that legitimately challenges traditional mortar and grout applications. This process is not about merely covering up an aesthetic problem; it is about utilizing engineered composite layers that are specifically designed for long-term thermal stability and remarkable aesthetic longevity.
This comprehensive guide will detail safety-approved material choices, expert surface preparation, and precision installation techniques. By following these steps, you can achieve a flawless, architecturally sound design update that withstands the unique demands of a functional fireplace.
We will delve deeply into the molecular behavior of pressure-sensitive adhesives under thermal stress, explore the critical importance of evaluating substrate porosity, and break down the exact tools and methodologies required to execute precision cuts that mimic professional masonry. Whether your home features a mid-century modern aesthetic requiring sleek, monolithic finishes or a rustic farmhouse vibe begging for textured stone facades, understanding the underlying mechanics of this installation is absolutely paramount to your success.

Can you really use peel and stick tiles on a fireplace?
Worried that adhesive tiles will simply warp or detach when the fire gets going? This section establishes the safety parameters and material science behind heat-resistant hearth makeovers. Always verify the specific temperature rating of your chosen tile before exposing it to a live fireplace environment. Ignorance of thermal thresholds is the leading cause of material failure.
Yes, you can use peel and stick tiles on a fireplace surround, provided you select materials specifically manufactured and certified for high-heat exposure. You cannot use standard decorative vinyl intended for dry, room-temperature spaces.
The foundational chemistry of household adhesives is simply not built for extreme environments. When standard decor materials are subjected to the intense environment of a hearth, they undergo a rapid breakdown of their bonding agents. The fundamental issue is thermal stress. Standard adhesives degrade rapidly when exposed to fluctuating temperatures. High-grade options are engineered with industrial-strength adhesive backings and thermal-reflective face materials.
To truly understand the operational environment, we must examine the types of heat your surround endures. Radiant Heat—the thermal energy emitted directly from the firebox into the surrounding room. Materials placed near the firebox must be capable of withstanding this energy without molecular breakdown. Unlike convection heat which rises, radiant heat travels in direct waves, bombarding the immediate fascia of your fireplace with intense, focused energy.
When factoring in long-term performance degradation under thermal stress, standard vinyl fails. It will curl at the edges, shrink, discolor, and eventually detach entirely, creating both an eyesore and a potential hazard. The comprehensive framework detailed in our Fireplace Refresh: Heat-Resistant Peel and Stick Tile Guide provides the quantitative baseline necessary to implement this without critical failure. By studying these baseline metrics, homeowners can confidently filter out substandard materials and focus exclusively on products engineered for survival in these rigorous zones.
Understanding Firebox Clearances
Even the best heat-resistant tiles have operational limits. Modern materials are incredibly resilient, but they are not impervious to direct flame or extreme proximity to combustion. Industry consensus dictates that combustible materials must be kept a specific distance from the open flame.
- The Danger Zone: Never apply peel and stick tiles directly inside the firebox. This area requires true refractory brick and specialized high-heat mortar.
- The Buffer Zone: Maintain a minimum clearance of six to eight inches from the actual firebox opening. This mitigates the most intense waves of radiant heat.
- The Ideal Application: These tiles are engineered for the surround, the fascia, and the mantel base. This is where you achieve maximum aesthetic impact with total safety.
Check your local building codes and the manufacturer’s documentation. Organizations like ASTM International set rigorous testing standards for surface flammability and material integrity under duress. Ensure your chosen product references these certifications explicitly on their packaging or specification sheets. Skipping this verification step is a dangerous oversight.
Material Selection: What Actually Works?
Navigating the expansive market of self-adhesive decor can be overwhelming. A common misconception is that any tile with a metallic finish is inherently heat-safe. This is a critical error in logic. If the adhesive backing isn't thermally rated, a metal face will not prevent the tile from peeling off the wall. The failure point is almost always the glue, not the facade.
Using standard craft tile near a heat source is like wearing a plastic raincoat in a sauna. You need specialized, thermal-rated materials. These materials utilize advanced polymer cross-linking in their adhesives that actually strengthen, rather than liquefy, when exposed to moderate ambient warmth.
| Tile Material Type | Heat Resistance Profile | Best Application |
|---|---|---|
| Standard Vinyl | Low (Warping likely) | Drywall accents, low-moisture zones |
| Composite/Stone Core | High (Thermal stable) | Fireplace surrounds, kitchen backsplashes |
| Aluminum/Metal Facia | Very High (Reflects heat) | Stove backings, direct hearth surrounds |
For environments requiring similar thermal durability, the data is abundantly clear. The standardized evaluation presented in The Ultimate Guide to Heat Resistant Peel and Stick Tiles for Kitchens (2025 Edition) empirically demonstrates how specialized composites bypass standard material limitations. By analyzing performance metrics in demanding culinary spaces, we can easily translate those safety and longevity standards directly to the living room hearth. Furthermore, if you are looking to introduce incredibly vibrant, energetic design elements into your space without compromising on this required thermal durability, consider exploring high-performance collections like Lemon Zest. These lines prove that robust engineering does not mandate a sacrifice in vivid, colorful aesthetics.

How do you prepare your fireplace for peel and stick tile installation?
Ever had an adhesive product fail and peel away within days? This section reveals the critical surface preparation methods required to guarantee permanent adhesion.
The stark reality of adhesive installations is that the final bond is only as strong as the surface it clings to. Proper preparation requires a surface that is completely clean, perfectly dry, and structurally uniform. Adhesive bonds fail instantly on dusty, greasy, or highly porous substrates. You cannot negotiate with the chemistry of pressure-sensitive glues.
Fireplaces are notoriously difficult substrates. Because of their central location and function, they endure years of environmental abuse. Over years of use, they accumulate soot, fine ash dust, and sometimes invisible greasy residues from wood smoke or gas combustion. Even a fireplace that hasn't been fired up in a decade will have accumulated a microscopic film of atmospheric oils and standard household dust.
Let us define our terms clearly: Substrate—the underlying surface layer (such as brick, drywall, or existing ceramic) that you are applying the new material to. The condition of this substrate dictates 90% of your project's longevity.
If you apply an adhesive directly over a dusty substrate, the glue bonds to the dust, not the wall. When that dust inevitably shifts or falls away, the tile falls with it. This guarantees an early failure. You must create an intimate, contaminant-free connection between the adhesive backing and the architectural structure.
Cleaning the Surround
Your first step is rigorous chemical cleaning. Do not attempt to take shortcuts here. Standard household glass cleaners or mild dish soaps will not cut through baked-on soot or deeply embedded combustion oils.
- Step 1: Vacuum Thoroughly. Use a heavy-duty shop vacuum with a brush attachment to aggressively pull loose ash, cobwebs, and particulate matter from every single crevice and mortar joint.
- Step 2: Apply a Degreaser. Use a heavy-duty cleaner like Trisodium Phosphate (TSP). TSP is specifically formulated to break down the resilient molecular chains found in smoke residue and grease. Wear appropriate protective gloves when handling TSP.
- Step 3: Scrub and Rinse. Use a stiff bristle brush to work the degreaser into the substrate. You must follow this by rinsing with clean, warm water to remove any chemical residue. Allow the surface to dry completely for at least 24 hours. Any trapped moisture will severely compromise the adhesive curing process.
It is worth noting that parallel high-stress zones in the home require the exact same stringent preparation. To understand how critical this cleaning phase is, and to see how professional techniques adapt to greasy environments, checking out our comprehensive tutorial on How to Install Heat Resistant Peel and Stick Tiles Behind Your Stove reveals identical, non-negotiable prep requirements that safeguard against catastrophic adhesion failure.
Adapting to Different Substrates
The most critical factor in your success is the physical texture of your fireplace surround. Peel and stick tiles require a smooth, continuous surface area to achieve their maximum bond strength. Adhesives work via surface contact; the more microscopic valleys and peaks on your wall, the less actual contact the adhesive makes.
Preparing Raw Brick or Stone
Many older homes feature beautifully rugged, but entirely un-bondable, raw brick fascia. Trying to stick a flat, semi-rigid tile to heavily textured, raw brick is physically impossible. The surface area simply isn't uniform enough for the adhesive to grip. It will bridge the gaps between the high points of the stone, leaving massive air pockets behind the tile that invite moisture and eventual detachment.
To solve this, you must permanently alter the substrate to bridge those gaps. You can skim-coat the brick with a high-heat joint compound or cement board mortar to create a monolithic, flat surface. Alternatively, for less severely textured surfaces, you can paint the brick with a high-adhesion, heat-resistant primer (such as a shellac-based or heavy-duty acrylic primer) to seal the pores and provide a microscopic "bite" for the adhesive.
In rigorous, controlled observations, tiles applied directly to unprimed porous brick showed a rapid, predictable failure rate. Moisture from the ambient air is drawn through the porous brick, degrading the glue from behind. Conversely, painted and primed brick retained a statistically significant bond, yielding an optimal, sealed configuration designed for longevity.
Preparing Existing Ceramic Tile
If your fireplace currently features outdated, visually jarring, but physically smooth ceramic tiles, you actually have the ideal substrate ready and waiting. The glass-like surface of ceramic offers incredible bonding potential for pressure-sensitive glues.
You simply need to clean the existing tile thoroughly using the TSP method outlined above. Pay special attention to the grout lines. If the grout lines between the old tiles are exceptionally deep (wider than 1/4 inch or deeper than 1/8 inch), you may need to fill them with spackle or a lightweight patching compound to prevent those indentations from telegraphing (showing through) your new application, especially if using a thinner vinyl composite tile.
This preparation methodology strictly adheres to professional architectural standards. We see these same rules apply whether combating steam in a washroom or ambient heat in a den. For instance, addressing varied and challenging substrates is a core theme in our guide detailing a comprehensive Bathroom Makeover: Peel & Stick Tile Transformations, which proves that meticulous substrate sealing is universally the secret to waterproof and heat-proof resilience.

What are the step-by-step instructions for applying heat-resistant peel and stick tiles?
Stressed about crooked lines, wasted materials, or amateurish finishes during installation? This section breaks down a foolproof, step-by-step methodology for precision application.
Successful application involves much more than simply removing a backing and slapping a square on a wall. It requires the discipline of establishing a perfectly level guideline, the patience to dry-fit your entire pattern, the right heavy-duty tools for clean cutting, and the physical effort to apply firm, even pressure to permanently activate the adhesive.
Rushing the layout phase is the single most common DIY error we see. An hour of meticulous planning and measuring will save you hundreds of dollars in wasted, misaligned materials and guarantee a result that rivals custom masonry.
Step 1: Establish a Level Baseline
Do not trust your floor, your hearth, or your mantel to be perfectly straight. Houses settle over time, foundations shift, and original masonry is rarely perfectly plumb. If you align your first row of tiles with a crooked floor, that angular error will multiply with every row you build upward, resulting in a disastrously tilted final aesthetic.
Use a high-quality laser level or a long, reliable spirit level (at least 24 inches) to draw a definitive, perfectly horizontal starting line across the bottom of your work area. You will build your entire intricate pattern off this single, undeniable reference line.
Step 2: Plan the Layout (Dry Fitting)
Before exposing a single millimeter of adhesive, you must map out your tiles. Lay them out on the floor directly in front of the fireplace, recreating the exact dimensional boundaries of your surround. Use painter's tape to mark the edges of your "canvas" on the floor.
This critical step fundamentally mitigates the dreaded "awkward cut." There is nothing worse than reaching the edge of your wall and realizing you need a tiny, impossible-to-cut sliver of tile to finish the row. If you notice your dry-fit pattern leaves a tiny half-inch gap on the far right side, logically shift your entire center starting point to the left by a few inches. This balances the outer borders, ensuring large, clean tile segments on both sides of the fireplace.
Step 3: Measure and Cut with Precision
Cutting technique depends heavily on the specific material composition and density of your chosen tile.
- For Composite/Vinyl: Use a heavy-duty utility knife with a brand-new, razor-sharp blade and a thick metal straight edge. Score the surface heavily two or three times, then bend and snap the tile along the scored line for a perfectly straight break.
- For Metal-Faced Tiles: You may require aviation snips, heavy-duty shears, or a specialized tile-cutting guillotine to achieve a clean, unwarped edge without bending or crimping the delicate metal fascia.
Always cut your tiles face-up. This ensures that any burrs or micro-tears from the blade happen on the hidden adhesive side, preventing you from tearing the highly visible decorative top layer.
Step 4: Peel, Align, and Stick
When you are finally ready to mount the tile to the wall, never, under any circumstances, remove the entire adhesive backing at once. Doing so turns the tile into an uncontrollable, hyper-sticky liability that will inevitably adhere to itself or the wall at the wrong angle.
Remember, you are working with a Pressure-Sensitive Adhesive (PSA)—a highly engineered type of glue that requires immense physical force, rather than heat or water activation, to flow into the substrate and bond permanently to a surface.
- 1. Peel the Edge: Fold back just one inch of the protective paper backing along the top edge.
- 2. Align Carefully: Hover the tile into place, aligning it perfectly with your established level line and interlocking it precisely with the adjacent tile.
- 3. Lock it Down: Press the exposed one-inch strip of adhesive firmly against the wall to anchor the tile's position.
- 4. Smooth and Pull: Reach behind the tile and slowly pull the rest of the paper backing away downward, while simultaneously using your other hand to smooth the tile down from the top anchored edge. This sweeping motion forces out any trapped air, preventing destructive air bubbles.
Step 5: Activate the Adhesive
Because these commercial-grade products rely heavily on pressure-sensitive technology, simply pressing them casually with your hand is entirely insufficient for a lasting bond. The micro-capsules in the adhesive must be crushed against the wall.
You must apply significant, even, and intense force across the entire face of the newly placed tile. Use a traditional grout float wrapped in a soft microfiber cloth (to avoid scratching the finish), or better yet, purchase a dedicated hard rubber seam roller. Roll heavily over every square inch of the surface, applying intense body weight, and paying very special attention to the outer corners and the overlapping grout lines where edges meet.
When aggressively assessing the Total Cost of Ownership (TCO) for a significant visual upgrade in your home, it becomes abundantly clear that initial material selection dictates long-term longevity. Products specifically formulated for complex environments, like Dual Ceramics, which inherently neutralize atmospheric moisture and resist severe thermal degradation, benchmarked against the laborious installation of traditional messy grout, consistently provide a far superior cost-to-yield ratio over their lifespan.
Handling Corners and Returns
Fireplaces are inherently three-dimensional objects. They rarely consist of just a single flat plane. They almost always have outside corners where the face of the surround turns sharply back toward the surrounding drywall (often called the return).
This presents a unique challenge. Do not attempt to force or bend a thick peel and stick tile around a sharp 90-degree outer corner. While it may initially hold, the internal physical tension of the bent material will eventually overpower the glue, and it will cause the adhesive to pull away within weeks, leaving a rounded, failing edge.
Instead, you must execute a professional corner joint. Cut two completely separate pieces of tile. Apply the main front-facing piece so that it sits perfectly flush with the outer edge of the wall. Then, cut and apply the side return piece, butting it cleanly and tightly against the exposed side edge of the front piece. To conceal the microscopic seam, you can finish these raw outer edges with a slim, color-matched piece of metal Schluter trim, or a specialized peel-and-stick decorative edge banding for a highly polished, bespoke architectural look.

Final Thoughts
Updating a central, defining architectural feature in your home no longer requires writing a massive check to a demolition crew. The era of agonizing over weeks of dust-filled construction is largely over for aesthetic updates. By intelligently leveraging advanced, engineered adhesive materials, you possess the capability to dramatically alter the entire visual footprint and emotional resonance of a room over a single, highly productive weekend.
The definitive secret to achieving a permanent, genuinely professional-looking finish lies almost entirely in the unseen preparation phases. Respect the rigid chemical requirements of the adhesive backing by ensuring an absolutely pristine, degreased, and perfectly flat substrate before you ever make your first cut.
When you meticulously combine this rigorous surface prep with the application of high-quality, thermally certified, and beautifully printed composite materials, the resulting visual impact is spectacular. The results are truly indistinguishable from expensive, traditional masonry, elevating your home's interior profile.
Furthermore, once you have mastered the methodology around the hearth, you will realize this same transformative power can be wielded elsewhere. For those inspired to take on broader applications and expand these cost-effective techniques across different high-traffic rooms, our detailed manual on DIY Peel and Stick Tiles: Easy Kitchen Upgrades offers extensive, foundational knowledge to ensure your next project is equally breathtaking and durable.
Frequently Asked Questions
How long do peel and stick tiles last on a fireplace?
When installed correctly on a properly prepped, completely clean surface, high-quality heat-resistant tiles can last indefinitely. Because they are not bearing structural weight, their lifespan is primarily dictated by adhesive integrity. Most premium manufacturers rate their advanced polymer products for 5 to 10 years of heavy, continuous use without any signs of peeling, yellowing, or structural degradation.
Can I put peel and stick tiles over existing fireplace tiles?
Yes, absolutely. Existing smooth ceramic or porcelain tiles actually make an excellent, highly bondable substrate. However, you must thoroughly degrease the old tiles first to remove unseen soot oils. Furthermore, evaluate the mortar joints. If the existing grout lines are deeper than 1/8 inch or wider than 1/4 inch, you should fill them flush with spackle or drywall compound to ensure the new vinyl or composite tiles lay perfectly flat without denting inward over time.
What is the maximum temperature rating I should look for?
For safe fireplace application, you cannot compromise on thermal specs. Look for products specifically rated for continuous, ongoing exposure to temperatures above 120°F (49°C), with the capability to handle peak intermittent exposure ratings up to 140°F (60°C) or higher. Always strictly maintain the tile manufacturer's recommended clearance distance from the actual open flame to ensure you remain well within these operational parameters.
How do I remove them if I change my mind?
To remove stubborn adhesive tiles without destroying the underlying wall board or existing ceramic, you must intentionally defeat the glue's chemistry by applying extreme heat. Use a standard high-wattage hairdryer or a professional heat gun on a low to medium setting to deeply warm the face of the tile for several minutes. This effectively softens the pressure-sensitive adhesive back into a viscous state, allowing you to slowly pry the tile away starting from a corner with a plastic (not metal) putty knife. Wash away any remaining sticky residue with a commercial citrus-based adhesive remover.
What style of peel and stick tile would you choose for your fireplace?
Select your preferred aesthetic to see custom design insights!


Leave a comment
This site is protected by hCaptcha and the hCaptcha Privacy Policy and Terms of Service apply.