


Before you even begin reading the detailed mechanics below, commit this golden rule to memory: Always execute your preliminary cuts with the protective release liner firmly attached to the back of the tile. Prematurely exposing the adhesive not only risks attracting construction dust and compromising your bond, but it also makes dry-fitting impossible. A true dry-fit requires sliding the piece into the gap repeatedly to test the 1/8-inch tolerance. Only peel the backing when the final dry fit is flawlessly approved and ready for immediate, permanent placement against the prepped wall.
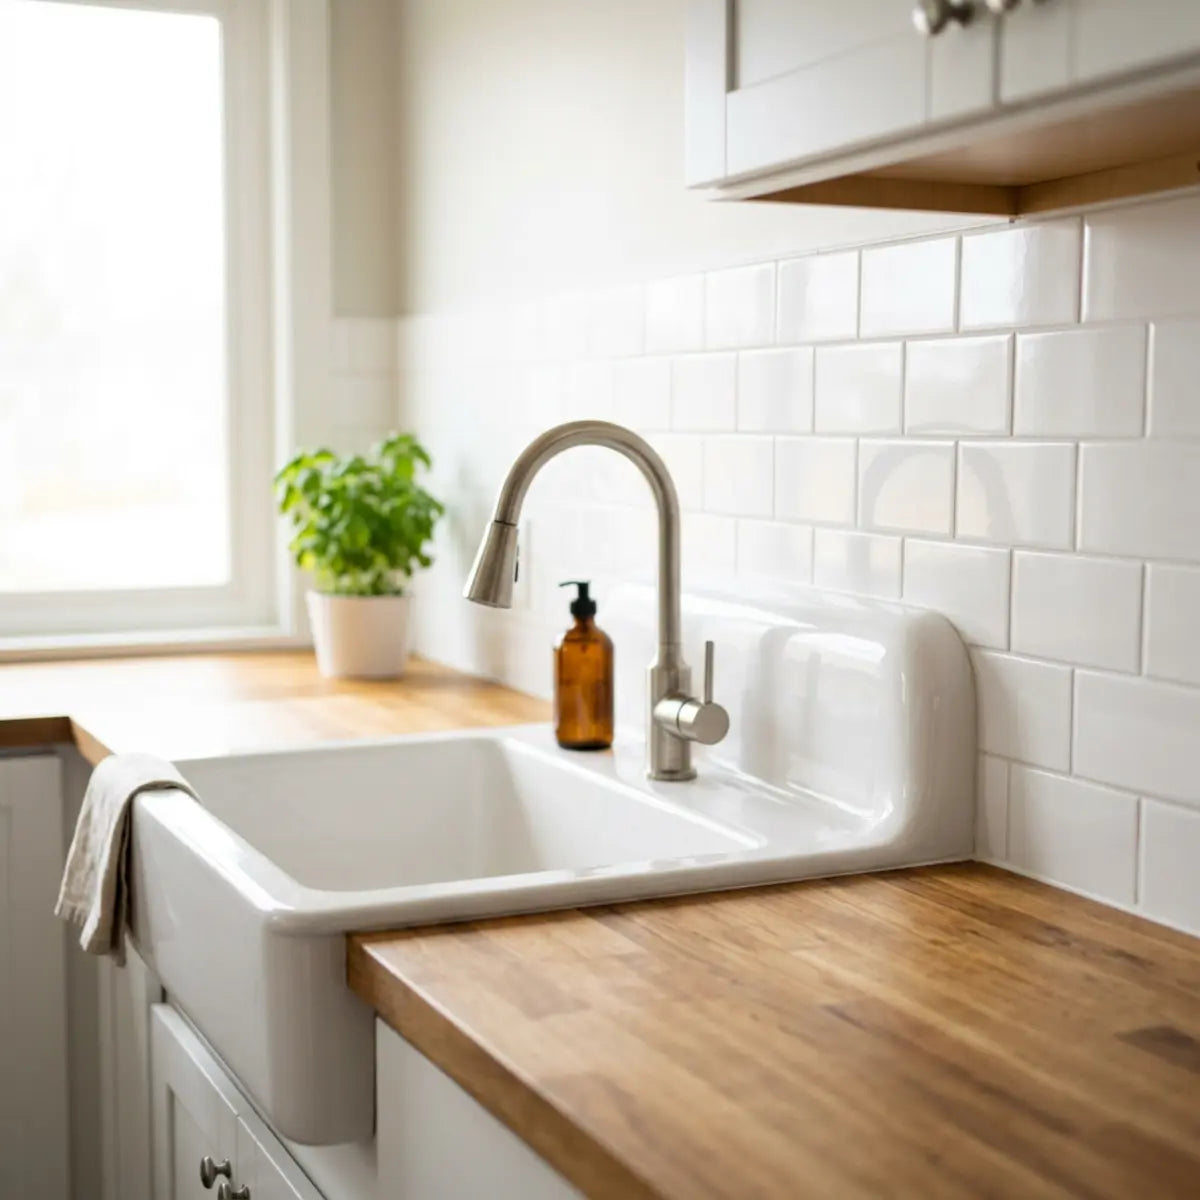
The most visible part of a farmhouse sink backsplash is exactly where generic measuring fails. You cannot measure a curve with a straight ruler. The transition where your wall meets an apron-front sink is rarely perfectly square, plumb, or flat.
To cut peel-and-stick tile perfectly around a farmhouse sink, do not rely on measurements alone. Make a paper or cardboard template to scribe the sink contour. Transfer this exact line to the tile. Cut slightly outside the line, dry fit the piece, and trim in small passes. Leave a consistent 1/8-inch caulkable gap where the tile meets the sink or countertop. Seal that gap with kitchen-and-bath silicone to reduce water intrusion and make the cut look intentional.
Creating a physical template before cutting protects expensive tile sheets from waste. Scribing naturally matches the uneven, handmade edges of a fireclay or cast-iron sink. Ultimately, finishing with a controlled caulk gap replaces a tight, brittle joint with a flexible, waterproof barrier.
Why Is Scribing Better Than Measuring Around a Farmhouse Sink?
Tired of cutting tile exactly to your measurements, only to find a glaring, uneven gap against the sink edge?
This section establishes a templating methodology that eliminates guesswork and captures the true contour of your farmhouse sink.
Farmhouse sinks, particularly those made of fireclay or copper, possess subtle curves and manufacturing variations. Wall drywall is frequently bowed. The layer of existing caulk between the sink and the wall adds unpredictable thickness. Measuring with a tape assumes all these surfaces are flat and perpendicular. They never are.
The Mechanics of Gap-Control Scribing
Wondering how professionals achieve seamless transitions against wavy walls and curved porcelain?
This section details the mechanics of capturing irregular shapes to guarantee a custom fit.
Scribing—the process of transferring the profile of an irregular surface onto another material—solves this geometric problem. Instead of plotting points with a ruler, you use a tool or template to trace the actual physical reality of the sink's edge.
Think of it like a tailor fitting a suit. A tailor does not simply take your height and weight and start cutting fabric. They drape, pin, and chalk the material directly against your body. Scribing drapes a template over your sink to capture its exact shape.

Establishing the Visible Gap Risk Index
Worried that your final cut will expose the sticky backing of the tile or require massive amounts of caulk to hide mistakes?
This section introduces a standardized metric to evaluate and prevent unsightly edge gaps.
When evaluating irregular surface transitions, the baseline metric shifts to the Visible Gap Risk Index (VGRI). This index calculates the likelihood of an installation failure based on gap consistency, the number of required re-cuts, and the presence of exposed adhesive edges.
Mastering the art of contour mapping isn't just an isolated technique for farmhouse sinks. When you step back and look at the entirety of your kitchen environment, you'll find that nearly every architectural transition presents a unique challenge. Wall cabinets are notorious for bowing, settling, and shifting out of plumb over years of structural stress. If you attempt to force rigid tiles directly against these undulating wooden surfaces without adjusting for the curve, you will invariably create severe, escalating gaps that travel up the wall. The exact same scribing principles that protect your sink basin are absolutely vital for managing the complex, often frustrating junctions where your upper cabinets meet your backsplash layer. Applying these methods universally ensures that every single termination point in your kitchen looks custom-built, seamlessly hugging every subtle imperfection in the woodwork.
The comprehensive framework detailed in We Scribed Peel-and-Stick Tile Against Wavy Cabinets provides the quantitative baseline necessary to implement this without critical failure. It benchmarks the methodology for navigating uneven planes, proving that capturing the real contour fundamentally mitigates ugly gaps.
Learn How to Scribe Wavy CabinetsWhy Flexibility Outperforms Tight Fits
Assuming that pushing the tile tight against the sink is the best way to keep water out?
This section debunks a common myth and explains why a deliberate, flexible gap is structurally superior.
A common misconception is that tile should sit completely flush against the sink basin. This is a mistake. The Tile Council of North America (TCNA) guidelines for movement joints dictate that adjoining surfaces must have room for expansion and contraction.
While peel-and-stick products differ from ceramic, the principle remains. A house settles, and cabinets shift. If you force a rigid composite tile tight against a cast-iron sink, structural tension will eventually cause the adhesive backing to fail or the tile to buckle.
You must plan for a 1/8-inch gap. This gap is not a mistake; it is an intentional void designed to hold flexible silicone sealant. Peel-and-stick tile is a decorative layer, not a waterproofing membrane. The sealed silicone joint acts as your actual protection zone against water.
How Should You Prep and Lay Out Tile Before Cutting?
Why do adhesive tiles sometimes peel away near the sink even when the cuts are perfectly shaped?
This section delivers a pre-cut workflow that guarantees maximum adhesion and prevents fragile tile slivers at critical edges.
Homeowners frequently rush to the cutting phase without verifying the wall's condition. The area immediately surrounding a farmhouse sink accumulates microscopic layers of grease, dish soap residue, and hard water scale. Applying adhesive over this film guarantees future peeling.
Substrate Requirements and Adhesion Metrics
Unsure if your painted drywall is clean enough to hold an adhesive backsplash long-term?
This section outlines the specific chemical and physical requirements for a permanent bond.
Industry consensus dictates that substrate preparation is a non-negotiable variable. The Adhesion Reliability Score (ARS) establishes an operational threshold for success. You must evaluate the surface based on cleanliness, dryness, and thermal stability.
Substrate preparation goes hand-in-hand with handling the inevitable wall interruptions that pepper modern kitchens. While cleaning and degreasing are fundamental to the overall adhesion strategy, dealing with electrical outlets presents a highly localized, high-stakes interruption in your pristine surface area. Electrical boxes sit flush, slightly proud, or recessed into the drywall, creating unpredictable ledges right where your tiles need to sit perfectly flat. Just as grease will ruin the chemical bond, an improperly cut opening around a receptacle will compromise the physical integrity of the tile layout, creating pressure points that push the tile away from the wall. Achieving a flawless, factory-grade finish around these necessary fixtures demands an entirely distinct set of precision tools and systematic cutting protocols. Without these specific techniques, you risk creating jagged, unsightly borders that cannot be hidden by standard outlet covers, ultimately undermining all the diligent wall prep you’ve just completed.
A standardized evaluation of your layout, much like the precision required in Master the Cut: How to Cut Peel and Stick Tiles Around Outlets Like a Pro, fundamentally mitigates adhesive failure near high-moisture zones. Proper prep ensures deterministic outcomes.
Explore Advanced Outlet Cutting TechniquesThe Adhesion Reliability Score (ARS) Checklist
Overwhelmed by the different steps required before sticking the first tile to the wall?
This section provides a clear, verifiable checklist to ensure your wall is ready for installation.
To objectively measure your wall prep, use the ARS framework. Manufacturer installation guides universally require chemical degreasing, thorough drying, and pressure activation for the adhesive to cure properly.
| ARS Metric | Required Action | Scientific Rationale |
|---|---|---|
| Degreasing | Wash with TSP (Trisodium Phosphate) or a citrus degreaser. | Breaks down lipid barriers that prevent acrylic adhesives from bonding to the paint. |
| Drying Time | Allow the wall to air dry completely for at least 24 hours. | Trapped moisture prevents adhesive curing and invites mold growth behind the tile. |
| Temperature Control | Maintain room temperature between 65°F and 75°F. | Adhesives are temperature-sensitive; cold walls cause the backing to become brittle and non-tacky. |
| Surface Flattening | Sand down high spots or old, clumpy paint drips. | Adhesive sheets require continuous, flush contact; air pockets compromise holding strength. |
| Primer Verification | Ensure new drywall is primed with a PVA primer and cured for 21 days. | Raw drywall dust acts as a dry lubricant, causing immediate adhesive failure. |
Printable ARS Field Guide
Don't rely on memory when it comes to the complex chemical and environmental requirements of substrate preparation. Click the button below to instantly generate and download a plain-text, printer-friendly version of the comprehensive Adhesion Reliability Score (ARS) checklist. Pin it directly to your kitchen wall during your project. By physically checking off each crucial step—from exact temperature monitoring to verifying the mandatory 24-hour moisture evaporation period—you drastically reduce the statistical likelihood of catastrophic adhesive failure. Proper preparation is an exact science; treat this checklist as your laboratory protocol.
Finding the Focal Line and Avoiding Slivers
Concerned that your tile pattern will look off-center or unbalanced behind the sink?
This section teaches you how to map your starting lines to ensure a professional, symmetrical layout.
Your layout must originate from strategic focal lines. The center of the farmhouse sink is the primary visual anchor of the kitchen. You must strike a vertical plumb line directly up from the sink's center.
Dry-fitting—the practice of placing tiles without removing the backing—is essential here. Lay out your sheets horizontally from that centerline. Your goal is to see where the final cuts will land against the cabinets or walls.
If your layout forces you to cut a tiny, half-inch sliver of tile to fit against the sink edge, shift your starting centerline by two inches. Narrow slivers of peel-and-stick tile lack the surface area to adhere properly. They will inevitably warp or peel when exposed to sink moisture.
What Are the Best Methods for Creating an Accurate Sink Template?
Frustrated by wasting expensive tile sheets on inaccurate cuts that don't match the sink?
This section breaks down verifiable templating techniques to accurately transfer complex sink geometries to your tile.

Cutting a sixty-dollar sheet of composite tile based on a visual guess is a high-risk strategy. Templating transfers the risk to a disposable material. By creating a physical mock-up of the necessary cut, you can test the fit repeatedly without destroying your actual materials.
Interactive Validation: The 'Before You Peel' Confirmation
The moment you remove the release liner, the clock starts ticking. Adhesives attract microscopic dust particles immediately, and realigning a misplaced sheet can stretch the composite material irreparably. Are you truly prepared to commit? Test your operational readiness by answering these critical, pre-installation verification questions. Do not proceed until you can confidently lock in every requirement.
The Cardboard Rigidity Test
Unsure if a flimsy piece of paper will accurately represent a thick, rigid composite tile?
This section explains why matching the stiffness of your template to your tile prevents fitting errors.
Applying the wrong templating tool dramatically lowers your cost-to-yield ratio. When evaluating complex profiles, empirical evidence points to specific structural rigs.
Templating is a universally transferable skill that separates amateur attempts from professional-grade installations. Once you truly grasp how rigidity affects the transfer of a physical shape—how a stiff material reacts differently than flexible paper when pushed against an obstacle—you can apply this logic to the most notoriously difficult architectural hurdles in a home. Consider the chaotic geometry of vintage home heating systems. Radiator pipes erupting from the floor or wall present severe circular blockages that demand absolute precision to bypass cleanly. The exact same cardboard-stiffness validation testing utilized around your farmhouse sink is required to create a template that won’t buckle, tear, or distort when navigating these rigid iron cylinders. Adapting these methods ensures your tile remains flat and seamless, rather than buckling under mechanical stress around immovable fixtures.
As benchmarked against the techniques in We Tested 3 Pipe-Cut Methods for Peel-and-Stick Tile, utilizing a rigid template inherently neutralizes measurement distortion. A flimsy piece of paper might bend into a corner, but a rigid tile will not.
Review The 3 Tested Pipe-Cut MethodsUse scrap cardboard that mimics the thickness and stiffness of your peel-and-stick product. Cut the cardboard roughly to size, push it against the sink, and use a compass or a block of wood to scribe the exact line.
Mastering the Contour Gauge
Looking for a faster way to capture the rounded corners of an apron-front sink?
This section teaches you how to deploy a contour gauge for immediate, precise shape duplication.
A contour gauge—a tool featuring sliding plastic or metal pins that conform to the shape of an object pressed against it—is highly efficient for sink corners.
Steps for Contour Gauge Scribing:
- 1. Unlock the Pins: Ensure the sliding pins move freely without excessive friction.
- 2. Press and Capture: Push the gauge firmly against the curved transition where the sink meets the wall.
- 3. Lock the Shape: Secure the locking mechanism on the gauge so the pins cannot move.
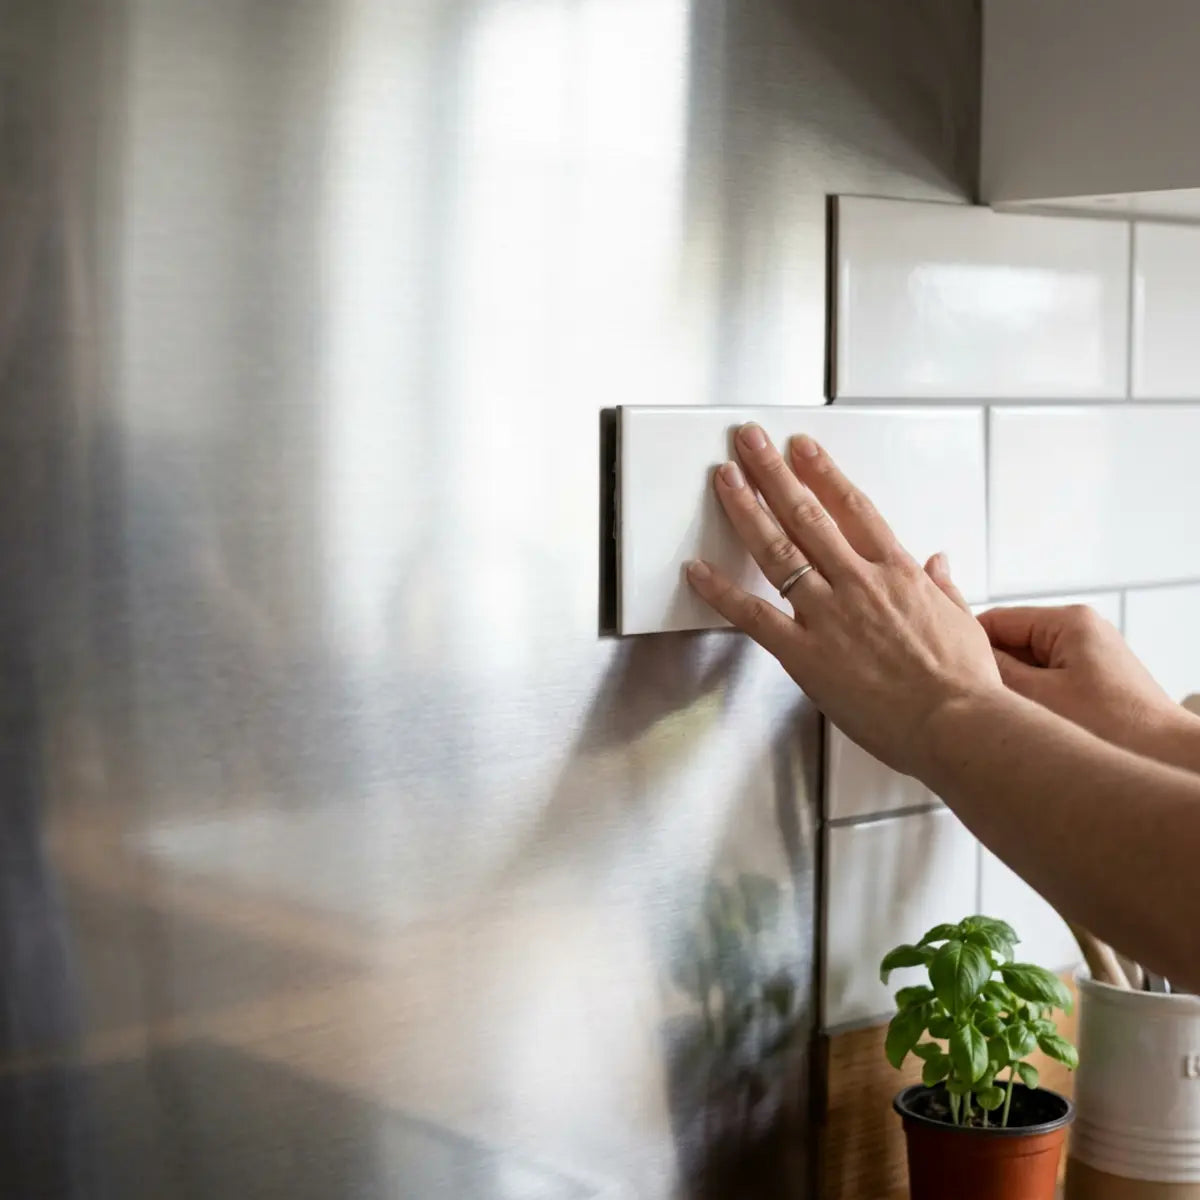
- 4. Transfer the Line: Place the locked gauge directly onto the face of your tile sheet and trace the outline with a fine-tip marker.
- 5. Verify the Gap: Before cutting, manually offset your cut line by 1/8-inch to account for the required caulk joint.
The Tape Transfer Technique
Lacking specialized tools like contour gauges or compasses?
This section provides a simple, accessible method using standard painter's tape to map the sink area.
If the wall behind the sink is relatively flat, you can use painter's tape for a direct transfer. Apply strips of wide, low-tack painter's tape directly to the wall, overlapping them to create a solid sheet covering the exact area where the tile will go.
Carefully trace the edge of the sink onto the tape using a pencil. Gently peel the entire tape sheet off the wall as a single piece. Apply this tape mask directly to the face of your peel-and-stick tile. You now have a perfect, scale-accurate cut line.
How Do You Execute the Cut Without Splintering the Tile?
Nervous that your scissors or utility knife will crack the tile's finish or crush the textured surface?
This section reveals exact cutting protocols for different peel-and-stick materials to guarantee a clean edge.
Peel-and-stick tiles vary wildly in composition. Some are soft, flexible vinyl gels, while others are rigid composite cores with metal or stone veneers. A cutting tool that slices smoothly through vinyl will shatter a composite stone tile.
Choosing the Right Blade for Your Material
Confused about whether to use heavy-duty shears, a utility knife, or a mechanical saw?
This section aligns the cutting tool with the chemical makeup of your specific tile product.
Cutting protocols must strictly adhere to the material's composition. When factoring in long-term performance degradation, products like the Blanco Chevron or Platinum Stones function as the architectural standard.
Evaluating the internal structure of your selected materials is paramount before placing a blade against the surface. Advanced manufacturing has birthed an elite class of tiles that transcend the flimsy vinyl stickers of the past, utilizing dense composite cores designed explicitly to resist the thermal expansion commonly found near hot water sources and cooking ranges. These rigid structures require deliberate handling, yet they reward the meticulous installer with unmatched durability and a distinctly premium tactile feel. By understanding the layered architecture of these high-end options, you calibrate your tooling approach to preserve the pristine edge detailing that defines a truly professional aesthetic.
By empirically neutralizing edge splintering through their rigid composite structures, they calibrate the baseline expectations for this category. However, these rigid materials require specific handling.
Material-Specific Tool Guidelines:
- Gel/Vinyl Tiles: Use sharp, heavy-duty scissors or a fresh utility blade on a self-healing mat. Cut in one continuous motion to avoid jagged edges.
- Metal Veneer Tiles: Use tin snips or a highly specialized metal-cutting blade. A standard utility knife will struggle and potentially bend the metal facing.
- Rigid Composite/Stone Core: A utility knife is used strictly for scoring. Heavy shears will crush the core and shatter the decorative surface.
Do not, under any circumstances, force the raw edge of your peel-and-stick tile incredibly tight against the porcelain or metal surface of the farmhouse sink basin. This aggressive fitting approach is rooted in the false assumption that physical pressure creates a watertight barrier. In reality, houses settle, structural walls shift, and sinks expand imperceptibly under the load of heavy water or extreme temperature changes. If your rigid composite tile is wedged tightly against this moving mass, the mechanical tension will abruptly transfer into the tile core, causing the adhesive backing to buckle, warp, or permanently shear away from the drywall. You must leave a deliberately engineered, flexible 1/8-inch joint designated strictly for a high-performance silicone gasket.
The Score-and-Snap Protocol
Struggling to force a utility knife entirely through a thick, rigid peel-and-stick tile?
This section introduces a low-force technique that relies on material physics rather than brute strength.
For rigid composite tiles, forcing a blade entirely through the material is dangerous and causes the decorative surface to chip. Instead, utilize the score-and-snap technique.
Scoring—the act of creating a shallow, precise cut on the surface of a material to dictate where it will break—is the standard for rigid materials.
Use a metal straightedge to guide your utility knife. Apply light pressure for the first pass, simply scratching the surface layer. Repeat this motion three or four times, increasing pressure slightly. Once the surface tension is broken, bend the tile along the scored line. It will snap cleanly. Use the blade to slice through the remaining adhesive backing.
Making Micro-Adjustments Safely
What do you do when a cut tile is only a fraction of an inch too large to fit the sink?
This section provides strategies for shaving down edges without ruining the entire sheet.
Often, a dry fit will reveal that your cut is a millimeter too tight. Do not attempt to shave a tiny sliver off with a utility knife; the blade will slip into the existing cut path and ruin the edge. Instead, use a medium-grit sanding block or a metal file. Hold the tile firmly and file in a downward motion, pulling away from the decorative face to prevent the surface material from peeling back. This allows you to make microscopic adjustments to the curve until the 1/8-inch caulk gap is uniform.
How Do You Waterproof the Gap Between the Tile and the Farmhouse Sink?
Worried that steam from the sink and splashes from washing dishes will destroy your hard work?
This section details the professional sealing standards required to protect your backsplash from water intrusion.

The area behind a farmhouse sink is classified as a high-splash zone. While the face of a high-quality peel-and-stick tile is water-resistant, the edges and the adhesive backing are highly vulnerable. If water seeps behind the tile, the adhesive will re-emulsify and release its grip on the wall.
The Science of Silicone Sealants
Confused by the different types of caulk available at the hardware store and unsure which one works for sinks?
This section explains the chemical superiority of pure silicone for waterproofing high-moisture kitchen areas.
An unsealed edge in a wet zone guarantees rapid adhesive failure. The performance degradation curve accelerates when moisture breaches the backing.
Water intrusion is the silent, pervasive killer of poorly executed DIY kitchen projects. The immediate vicinity surrounding your farmhouse sink basin is constantly subjected to a barrage of standing puddles, heavy steam from boiling pots, and erratic splashing from daily dishwashing routines. If you rely purely on the inherent stickiness of the tile backing to resist this onslaught, you are designing a system built for failure. To genuinely protect the structural integrity of your investment, you must approach the sink edge not merely as a decorative boundary, but as an active, hostile environment demanding military-grade waterproofing protocols. Upgrading your conceptual framework to view this region as an isolated "drop zone" enables you to select the correct elastomeric sealants that will aggressively reject moisture rather than slowly absorbing it over months of use.
The standardized evaluation found in We Tested the Sink Drop Zone for Peel-and-Stick Tile yields an optimal configuration for sealing. It statistically demonstrates that 100% silicone sealant is mandatory. Acrylic latex caulks shrink, crack, and absorb moisture over time, leaving the tile vulnerable.
Learn How to Waterproof the Sink Drop ZoneSilicone, conversely, cures into a flexible rubber gasket. It expands and contracts with changes in humidity and temperature, absorbing the mechanical stress between the rigid sink and the wall.
Caulking the 1/8-Inch Gap Perfectly
Intimidated by the prospect of applying sticky silicone and ruining the look of your new backsplash?
This section provides a foolproof taping method to achieve perfectly straight, professional caulk lines.
Applying silicone can be messy. To achieve a factory-grade finish, use the tape-and-tool method.
Steps for Flawless Silicone Application:
- 1. Mask the Borders: Apply painter's tape to the sink edge and the face of the tile, leaving only the 1/8-inch gap exposed.
- 2. Cut the Nozzle: Cut the silicone tube nozzle at a 45-degree angle, matching the width of the gap.
- 3. Apply Consistent Pressure: Run a continuous bead of silicone along the gap, ensuring the material pushes deep into the void.
- 4. Tool the Joint: Wet your finger slightly with glass cleaner or soapy water. Run it lightly over the wet silicone to smooth the bead and force it against both surfaces.
- 5. Remove the Tape Immediately: Pull the painter's tape off while the silicone is still wet. Pull at a sharp angle away from the joint to leave a razor-sharp edge.
Integrating Mechanical Edge Protection
Looking for a way to cap the raw edges of the tile before sealing them for maximum durability?
This section introduces metal trim profiles to physically armor the tile edge against water.
Relying solely on chemical sealants is effective, but introducing a mechanical barrier provides secondary insurance.
Mechanical edge protection represents an architectural leap from standard DIY methodology to commercial-grade construction logic. While advanced silicone formulations excel at bridging dynamic gaps and repelling ambient moisture, they cannot physically shield the fragile, exposed cross-section of your tile core from direct, abrasive impacts. Pots, heavy skillets, and rigid cleaning tools frequently collide with the lower boundaries of a backsplash. By preemptively encasing these vulnerable horizontal ledges in a sleek, rigid metallic barrier, you effectively armor the perimeter. This integration not only serves as an impenetrable secondary defense against aggressive water intrusion but also radically elevates the visual presentation of the entire project, delivering the sharply defined, polished borders typically exclusive to luxury, mortar-set ceramic installations.
The structural integration detailed in We Tested Schluter-Style Trim on Peel-and-Stick Tile fundamentally mitigates edge exposure. By embedding a metal edge profile behind the tile before adhering it, you create a rigid, waterproof cap.
Explore Metal Trim Edge ProtectionThis metal trim can sit slightly above the sink deck. You then apply a thin bead of silicone between the metal trim and the sink. This method is highly recommended for extreme splash zones, as it entirely hides the cut edge of the peel-and-stick tile while providing an architectural finish.
How Do You Manage Complex Obstacles Near the Sink?
Wondering how to handle wall-mounted fixtures that interrupt your clean tile layout behind the sink?
This section outlines strategies for cutting around plumbing fixtures without compromising the visual flow.
Farmhouse sinks often feature wall-mounted faucets or nearby pot fillers. These obstacles require a different templating approach than the sink edge itself. You cannot slide a full sheet over a protruding pipe.
Strategies for Wall-Mounted Fixtures
Stuck trying to figure out how to get a tile sheet perfectly around a protruding plumbing pipe?
This section explains how to split tile sheets strategically to bypass rigid wall fixtures.
When confronting stationary plumbing, the universally recognized paradigm involves creating a split seam.
Sinks often sit directly beneath the most visually complex and structurally demanding wall-mounted fixtures in the modern culinary space. Trying to force a perfectly intact, unyielding sheet of composite tile directly over the protruding hardware of an articulated pot filler is an exercise in futility that typically ends in severely creased materials and ruined adhesive backings. These stationary, rigid pipes refuse to compromise, which dictates that your installation methodology must evolve to maneuver entirely around them. Overcoming this barrier requires a profound shift away from linear layout planning and toward the precise implementation of stealth split-seams. By strategically bisecting the tile face through the absolute center axis of the pipe, you can seamlessly rejoin the halves behind the decorative escutcheon plate, rendering the architectural surgery entirely invisible to the naked eye.
Empirically demonstrated in We Tested the Cleanest Way to Tile Around a Pot Filler, forcing a cut sheet over a pipe often bends the material and damages the adhesive.
Master the Pot Filler Split-Seam TechniqueInstead, measure the exact center of the pipe. Cut the tile sheet completely in half horizontally or vertically, intersecting that center point. Cut a half-circle out of each resulting piece. Slide the two pieces around the pipe from opposite sides, rejoining the seam. Once sealed with silicone and covered by the faucet escutcheon plate, the split seam becomes entirely invisible.
Scribing Waste Estimator Worksheet
Scribing inherently demands sacrifices. The detailed, intricate cuts required to trace the organic, handmade curves of fireclay sinks or manage complicated split-seams around plumbing fixtures frequently generate unusable offcuts. Industry standard calculations demand a strict 15% to 20% overage when executing highly contoured installations, rather than the standard 10% reserved for simple, straight runs. Do not delay your project midway because you ran out of material due to a miscut. Enter the total square footage of your intended backsplash layout below, and this logic engine will dynamically compute the exact architectural waste multiplier required to guarantee you have sufficient surplus inventory on hand before making your very first scribe mark.
Final Thoughts
Need a quick review of the process before you start cutting into your expensive tile materials?
This section summarizes the workflow to ensure you proceed with confidence and a clear plan.
Successfully installing peel-and-stick tile around a farmhouse sink is an exercise in patience and preparation. By abandoning generic measurements and adopting a physical templating system, you eliminate the risk of unsightly gaps.
Always prep the wall chemically to secure a high Adhesion Reliability Score. Use rigid cardboard or a contour gauge to scribe the true, uneven shape of your sink. Execute the cuts conservatively using the score-and-snap method, and dry fit your pieces repeatedly before removing the adhesive backing. Finally, protect the installation by sealing the intentional 1/8-inch gap with 100% silicone.
Ready to begin? Start by evaluating your specific material needs in our wet-zone backsplash material comparisons, or review our comprehensive wall-prep checklists to ensure your substrate is primed for permanent adhesion.
Frequently Asked Questions
Do I need to remove the existing caulk around the sink before tiling?
Unsure if you can just tile over the old rubbery caulk line behind your farmhouse sink?
This section clarifies why old sealants must be completely stripped to guarantee a waterproof installation.
Yes, completely. New silicone will not bond to old, dirty silicone or acrylic caulk. You must strip the existing sealant using a razor scraper and caulk remover. Clean the area with denatured alcohol. Applying peel-and-stick tile over an old, uneven caulk line prevents the tile from sitting flat and compromises the structural integrity of the new waterproof joint.
Can I use grout instead of silicone around the sink edge?
Wondering if standard tile grout is a better choice for finishing the gap near the sink basin?
This section explains the physical limitations of grout in areas prone to movement and moisture.
No. Traditional cement-based grout is entirely rigid. Because a farmhouse sink and the adjacent walls expand, contract, and shift at different rates, a rigid grout joint will crack almost immediately. Furthermore, most peel-and-stick tiles are not designed to handle traditional wet grout. You must use a highly flexible, 100% silicone sealant to accommodate movement and ensure a waterproof seal.
What if I cut the tile too small and the gap is larger than 1/8 inch?
Panicking because your cut was slightly off and the gap is too wide to look intentional?
This section provides a cosmetic fix for minor measuring errors using a specialized caulking technique.
If the gap exceeds 1/8 inch but is smaller than 1/4 inch, you can still bridge it with silicone. However, a thick bead of caulk can look sloppy. To hide the mistake, use the masking tape method detailed earlier, but apply the tape slightly wider on the sink side. Choose a silicone color that perfectly matches either the sink or the primary color of the tile to camouflage the wider joint visually.
Will the heat from hot water in the sink melt the tile adhesive?
Concerned that boiling water or heavy steam will cause your new peel-and-stick backsplash to fall off?
This section details the thermal tolerances of quality tile adhesives in standard kitchen environments.
High-quality peel-and-stick tiles are engineered to withstand standard kitchen heat, usually up to 120°F (49°C) continuously. Standard hot tap water and ambient steam from a sink will not degrade the adhesive. However, the true vulnerability is moisture, not ambient heat. As long as the bottom edge is perfectly sealed with silicone to prevent water vapor from creeping behind the tile, the installation will remain structurally sound.
Leave a comment
This site is protected by hCaptcha and the hCaptcha Privacy Policy and Terms of Service apply.