


Many DIY tutorials make bold, absolute claims, stating that adhesive backsplashes are either entirely impervious to water or completely destined to fail in wet areas. Both extremes misguide homeowners. Framing the decision around broad marketing terms ignores the physical reality of a high-use kitchen.
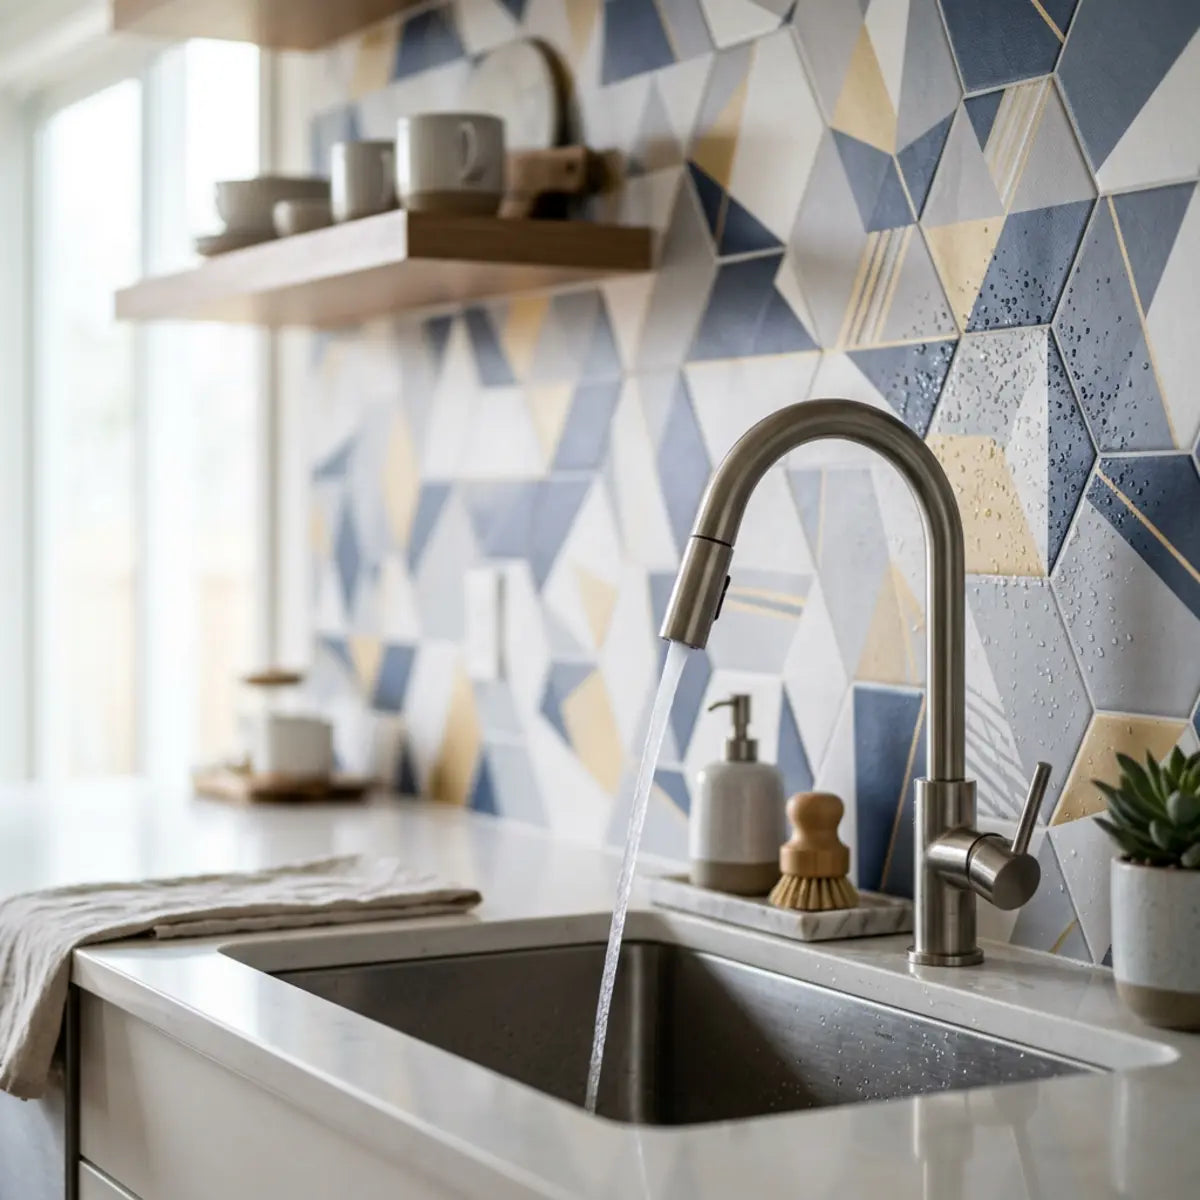
The true test is whether your installation can survive the specific moisture dynamics of the kitchen sink splash zone.
Yes, peel-and-stick tile can work behind a kitchen sink if the wall is sound, the product is rated for backsplash use, and the vulnerable edges and cutouts are sealed for splash resistance. It should be treated as a water-resistant finish, not a truly waterproof system, so success depends on controlling the sink drop zone: bottom seam, side edges, inside corners, tile seams, and faucet penetrations.
To guarantee success, check your material and adhesive suitability first. You must then secure the high-risk moisture entry points using precise sealing techniques. Finally, recognize the structural limits of ad
After the silicone has cured, daily maintenance should follow a
Keep the final checklist tied to the Stickwoll installation and care guide so prep, pressure rolling, cure time, and gentle cleaning stay aligned after the sink project is complete.
grease-safe peel-and-stick cleaning method because sink splashes and cooking residue often reach the same backsplash surface.hesive products and know when to choose a different backsplash material altogether.To truly understand why the dichotomy of "impervious" versus "destined to fail" is a false narrative, one must examine the molecular mechanics of pressure-sensitive adhesives (PSAs) used in modern peel-and-stick applications. Unlike traditional cement-based thinset, which forms a rigid, crystalline structural bond with the substrate, PSAs rely on viscoelasticity. This means the adhesive acts simultaneously as a highly viscous liquid and an elastic solid. When pressure is applied, the adhesive flows into the microscopic pores of the drywall or primer, establishing a van der Waals force connection.
However, the introduction of moisture fundamentally disrupts this viscoelastic balance. Water molecules, being highly polar, are extremely effective at breaking the physical bonds between the adhesive polymers and the substrate. This process is not instantaneous; it is a gradual degradation governed by the frequency and volume of moisture exposure. Therefore, the architectural integrity of a peel-and-stick backsplash is not defined by the center of the tile, which is protected by a non-porous vinyl or metal face, but exclusively by its vulnerable perimeter. The entire success of the project hinges on a continuous, chemically compatible barrier that prevents water from ever reaching the viscoelastic adhesive layer.
Furthermore, the evolution of kitchen barrier materials has seen a massive leap in polymer engineering over the last decade. Early iterations of self-adhesive tiles utilized inferior, low-tack rubber-based glues that oxidized rapidly when exposed to ambient kitchen heat and humidity. Today's premium products utilize advanced acrylic copolymers. These high-performance adhesives offer superior shear strength (resistance to sliding down the wall) and vastly improved peel strength (resistance to pulling away from the wall). Yet, despite these chemical advancements, the immutable laws of fluid dynamics dictate that standing water will eventually exploit the weakest point in any system. This brings us to the paramount importance of strategic moisture management in the sink drop zone.
Can peel-and-stick tile really work behind a kitchen sink?
Worried that one wrong splash will send your new backsplash curling off the drywall?
This section establishes a practical, survival-based framework to help you separate realistic performance from generic marketing hype.
Industry consensus dictates that measuring backsplash efficacy requires a quantitative baseline. Instead of guessing, we utilize the Sink Splash Survival Score (SSSS).
This metric provides a standardized evaluation based on edge exposure, seam vulnerability, cutout complexity, and adhesive moisture tolerance.
When you assess a project using the SSSS, the deterministic outcome heavily relies on preparation. The material itself rarely fails; the failure almost always begins at an unsealed perimeter.
The development of the Sink Splash Survival Score is rooted in industrial moisture resistance testing protocols. In commercial kitchen environments, surfaces are rated on their ability to withstand aggressive, continuous sanitization. Adapting this rigorous methodology to residential DIY applications provides a much-needed objective lens. The SSSS evaluates four distinct weighted variables to calculate the overall survivability of a backsplash installation:
- Edge Exposure Vulnerability (40% Weight): This measures the linear footage of unsealed perimeters, particularly the critical horizontal junction where the tile meets the countertop ledge. The highest risk occurs at the bottom edge where gravity forces water to pool.
- Seam Overlap Density (20% Weight): This evaluates the type of overlapping mechanism designed into the tile product. Products with deep, interlocking jigsaw-style overlaps offer a tortuous path for water intrusion, significantly scoring higher than simple butt-jointed squares.
- Cutout Complexity Factor (15% Weight): Faucets, pot fillers, water filtration taps, and electrical outlets interrupt the continuous barrier of the tile. Each penetration mathematically increases the probability of moisture bypass. A higher complexity requires a correspondingly higher standard of gasket sealing.
- Adhesive Moisture Tolerance (25% Weight): This factor analyzes the chemical composition of the backing glue. Construction-grade mastic formulations and high-density acrylic PSAs can sustain incidental moisture exposure without immediate delamination, whereas low-tack renter-friendly adhesives suffer rapid cross-link degradation when humidity spikes.
By analyzing your project through this deterministic lens, the seemingly unpredictable nature of backsplash failure becomes a highly manageable engineering challenge. You can offset a weak adhesive moisture tolerance by exponentially increasing your edge exposure defense, illustrating that success is an achievable, calculated process.
Defining the Kitchen Sink Splash Zone
Confused about how wet a backsplash actually gets during daily dishwashing?
We clarify the exact moisture threats in the sink drop zone so you can prepare the area correctly.
Think of the kitchen sink splash zone like a high-quality raincoat, rather than a submarine. It is built to repel direct, intermittent moisture, but it is not engineered for prolonged, underwater submersion.
This area is a wet micro-zone. The primary threats are rogue splashes from washing large pots, wet hands reaching for soap, and water pooling on the rear counter ledge.
A common misconception is treating the sink area like a shower surround. Showers face sustained water volume and high heat. Sinks face sharp, brief impacts of water that quickly drain.
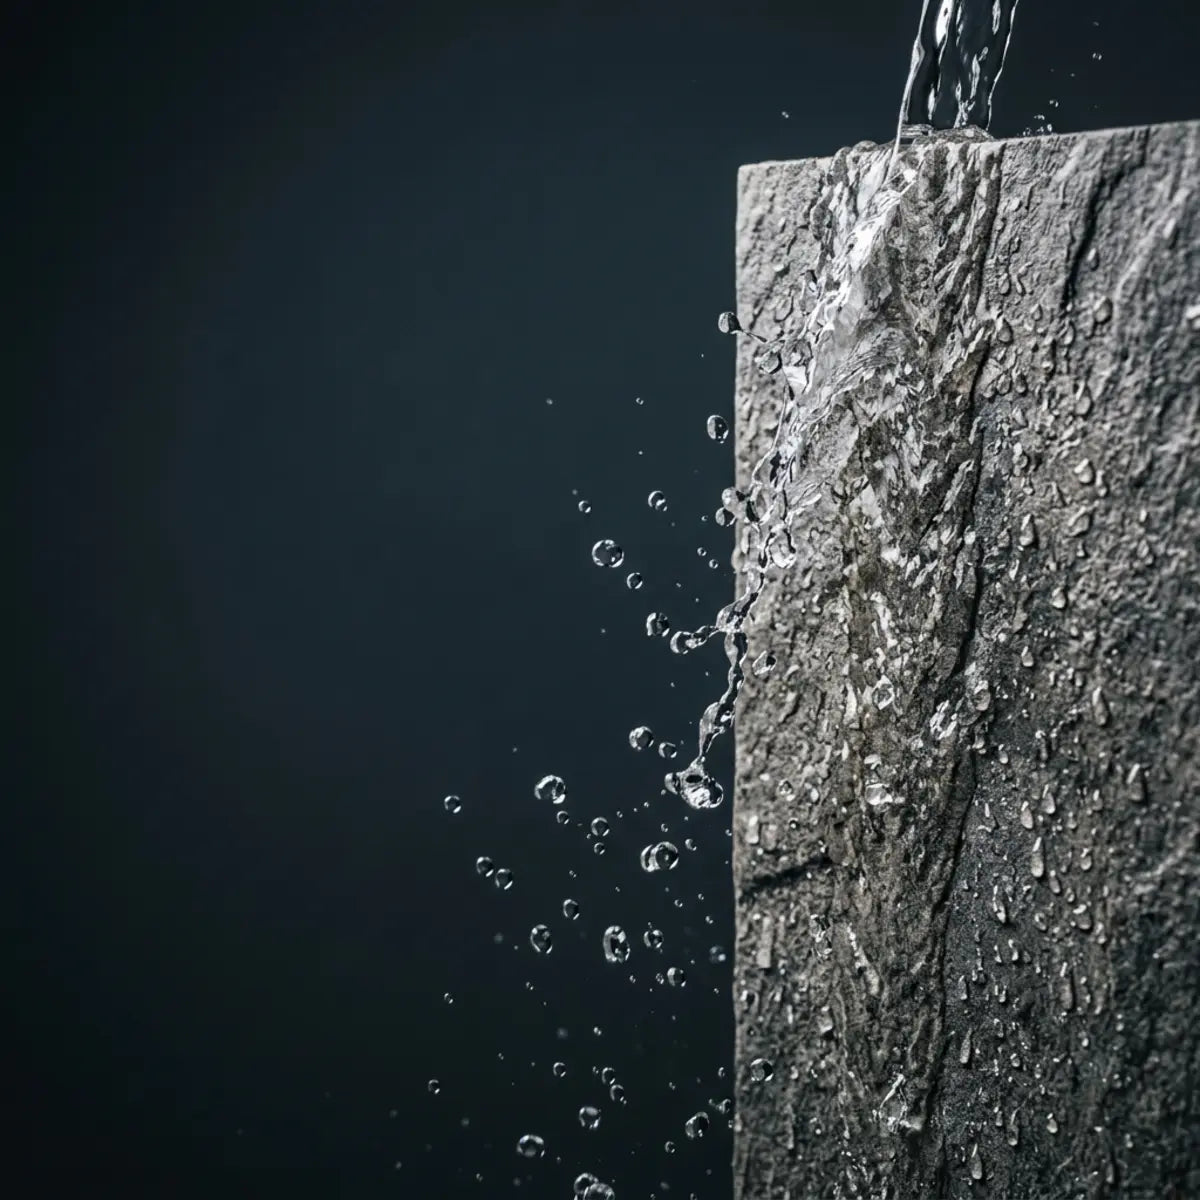
Because the water falls downward, the most critical failure point is the horizontal seam where the tile meets the countertop. If water pools here, capillary action-the ability of a liquid to flow in narrow spaces without the assistance of gravity-will draw moisture up behind the tile.

To master the sink area, one must map out the exact geometry of water movement. When a heavy pot is dropped into a basin of soapy water, the resulting kinetic energy expels water droplets outward in a radial pattern. These droplets possess a high surface tension. When they impact the vertical plane of your backsplash, gravity immediately forces them downward. This creates a highly concentrated flow vector aimed directly at the countertop junction.
Before selecting a panel for the faucet wall, compare the edge-sealing steps here with the Stickwoll wet-area performance breakdown so the material choice and perimeter strategy are judged together.
This continuous downward wash creates a perilous scenario if the rear counter ledge lacks proper drainage or pitching. Water accumulation forms a standing puddle against the micro-gap between the countertop material (granite, quartz, laminate) and the adhesive tile. This is where the physics of capillary action become destructive. In incredibly narrow spaces-often less than a millimeter wide-intermolecular forces between the liquid and the surrounding solid surfaces overcome gravity. The water literally climbs upward, sneaking behind the protective vinyl face and saturating the adhesive backing.
Simultaneously, secondary threats manifest at the faucet base and the side perimeters. Wet hands repeatedly adjusting the hot and cold levers drip water continuously onto the deck plate, which splashes back against the tile cutouts. Furthermore, inside wall corners are notorious for trapping ambient humidity, leading to condensation micro-droplets that slowly degrade adhesive strength in the deep recesses of the kitchen geometry. Understanding these specific vectors is the foundational step in engineering a resilient moisture barrier.
Assessing Material Suitability
Overwhelmed by the hundreds of material choices in the adhesive tile aisle?
This breakdown reveals which materials structurally resist moisture and which ones dissolve under pressure.
Not all adhesive tiles possess the same cost-to-yield ratio regarding longevity. Your material choice fundamentally mitigates or increases your risk of failure.
To achieve a high Sink Splash Survival Score, you must select materials engineered to bypass water absorption. Thin paper-backed vinyl or foam-core products suffer a rapid performance degradation curve when exposed to sink moisture.
Empirically demonstrated results show that multi-layered, non-porous materials are the architectural standard for wet zones.
Material Comparison for Sink Zones| Material Type | SSSS Rating | Moisture Tolerance | Ideal Use Case |
|---|---|---|---|
| Solid PVC Panels | High | Excellent | Direct splash zones, behind sinks |
| Composite/Metal-Look | High | Excellent | High-traffic areas, heavy use |
| Thick Gel (PU Resin) | Medium | Good | Light-duty sinks, renter upgrades |
| Standard Thin Vinyl | Low | Poor | Dry accent walls, decorative areas |
| Foam-Core 3D | Very Low | Very Poor | Bedrooms, living rooms only |
- Polyvinyl Chloride (PVC): PVC panels inherently neutralize moisture penetration. They are rigid, meaning edges do not curl easily.
- Polyurethane (PU) Gel: High-quality gel tiles resist water well on their surface, but their overlapping seams require careful pressure during installation.
- Metal Composites: Brushed aluminum or copper-faced stick tiles offer an excellent operational threshold against water, provided the backing is a high-tack foam.
Pro-Tip: Always check the manufacturer's Technical Data Sheet (TDS). Look for explicit language stating the product is approved for kitchen backsplashes.
Even with advanced adhesives, peeling-and-stick solutions possess operational thresholds. It is vital to perform an objective assessment of your specific sink layout before purchasing materials. The decision matrix hinges on three primary constraints: proximity to standing water, frequency of extreme temperature fluctuations, and substrate condition.
If your kitchen sink lacks a raised rear deck and features a flat countertop where water chronically puddles against the wall, standard PU Gel tiles will experience a high probability of bottom-edge delamination over a 24-month cycle. In such high-stress scenarios, pivoting to Solid PVC Interlocking Panels or traditional ceramic tile becomes mathematically necessary for long-term survival. PVC panels utilize a rigid core that resists the mechanical curling forces exerted by compromised adhesives. They also allow for deeper silicone bead penetration at the base seam.
Conversely, if your sink has a protective 4-inch stone curb, and the adhesive tile will only be exposed to ambient splashes above this baseline, premium PU Resin and Metal Composite tiles represent an incredibly efficient, high-yield investment. The stone curb acts as a primary barrier against capillary action, reducing the SSSS edge exposure threat by nearly 80%. In these optimal layouts, the advanced polymers in modern adhesive tiles will perform exceptionally well, offering a durable, aesthetically pleasing finish without the labor overhead of mortar and grout.
Removable Limits vs. Permanent Installations
Hoping to upgrade your rental without forfeiting your security deposit?
We explain the fine line between renter-friendly adhesives and long-term, splash-resistant installations.
Renters face a unique dilemma. They need a backsplash that survives the sink splash zone but yields an optimal configuration for damage-free removal later.
Removable backsplashes use low-tack adhesives. This is a double-edged sword. While it protects the drywall, the adhesive features a lower operational threshold against humidity and heat.
Over time, water vapor can compromise a low-tack backing much faster than a permanent construction-grade adhesive.
If you choose a removable product, your edge sealing strategy must be flawless. Any breach allows moisture to degrade the weak adhesive, causing the tile to droop.
Permanent peel-and-stick tiles use heavy-duty mastic or aggressive pressure-sensitive adhesives (PSA). These offer a statistically significant improvement in grip strength.
Actionable Advice: If you are a renter using low-tack tiles, use a clear, removable mounting tape at the four corners of your sink drop zone for extra mechanical support before sealing.
Understanding the difference between permanent and removable adhesives requires examining two distinct physical properties: Shear Strength and Peel Strength. Shear strength is the adhesive's ability to resist gravity-preventing the heavy tile from sliding vertically down the wall. Peel strength is the resistance to being pulled perpendicularly away from the surface, which is exactly the force exerted when a tile corner begins to curl due to moisture intrusion.
Removable adhesives are chemically engineered to possess high shear strength (so they stay on the wall) but low peel strength (so you can easily rip them off when your lease expires). This low peel strength is their Achilles' heel in a sink zone. The moment water bypasses a seal and hydrates the paper backing of the drywall, the microscopic bond is broken, and the natural tension of the vinyl face forces the tile to peel outward.
Permanent installations utilizing aggressive PSAs or mastic form a vastly different cross-linking bond. These glues cure over 48 hours, locking into the microscopic topography of the wall primer. They exhibit extraordinarily high peel strength, meaning even if minor edge moisture is introduced, the adhesive matrix will physically fight the curling forces, often requiring a scraper tool to forcefully sever the bond during removal. Choosing between these systems is a careful calculation between temporary convenience and long-term structural survivability.
Failure Risks: Walls, Paint, and Standing Water
Wondering why your last adhesive project peeled off within a week?
This section identifies the invisible surface threats that destroy adhesion before you even place the first tile.
Even the highest-rated PVC backsplash panels will fail if the substrate is compromised. The wall itself acts as the quantitative baseline for your entire project.
The most frequent culprit for adhesive failure is fresh paint. Paint undergoes a process called outgassing-the release of volatile organic compounds (VOCs) and solvents as the paint cures.
If you apply adhesive tile over fresh paint, the trapped gasses break down the adhesive backing. A universally recognized paradigm in the industry is waiting a minimum of 21 to 28 days for paint to fully cure.
Common Substrate Threats:- Textured Walls: Orange peel or knockdown textures reduce the contact area for the adhesive by up to 50%.
- Unsealed Drywall: Bare joint compound or torn drywall paper turns into a spongy mess when exposed to adhesive moisture.
- Grease Residue: Cooking oils become aerosolized and coat the walls, creating an invisible barrier that repels glue.
- Frequent Standing Water: A poorly sloped rear counter ledge that holds puddles will eventually defeat any bottom seal.
Before installation, wash the wall with a Trisodium Phosphate (TSP) substitute. This chemical degreaser strips away hidden oils, ensuring the adhesive bonds to the wall, not to a layer of kitchen grease.
Click the headers below to reveal the chemical mechanisms behind common substrate failures and how to actively correct them before your installation begins.
How do you waterproof peel-and-stick tile edges behind a kitchen sink step by step?
Staring at an unfinished tile edge, terrified that water will seep behind it?
This step-by-step workflow maps out the exact sequence to secure perimeters and cutouts for maximum longevity.
To successfully protect your installation, you must prioritize the Edge Seal Integrity Rate (ESIR). This metric represents the percentage of vulnerable perimeter points correctly sealed without blocking adhesion or drainage.
Achieving a high ESIR requires a strict order of operations. You cannot simply smear caulk over a finished wall and hope for the best.
The methodology strictly adheres to a sequence of deep cleaning, precision cutting, pressure application, and targeted chemical sealing.
The Edge Seal Integrity Rate (ESIR) is not a mere suggestion; it is the definitive barrier separating a multi-year permanent installation from a rapid, catastrophic failure within weeks. The ESIR is calculated by assessing the continuity and chemical compatibility of the seal around the absolute perimeter of the project area. If a backsplash has 100 inches of exposed bottom seam and 2 inches are left uncaulked or poorly sealed, the ESIR drops drastically, because fluid dynamics dictate that water will actively seek out that 2% vulnerability.
This concept relies heavily on understanding the difference between a shedding surface and a sealing surface. The face of the tile is a shedding surface-water hits it and rolls off. The perimeters, however, are transitions. A transition requires an active mechanical or chemical seal to bridge the gap between two dissimilar materials (e.g., vinyl tile and quartz countertop) that expand and contract at different thermal rates. Perfecting this sequence requires meticulous planning, which is why having a physical, structured checklist ensures no critical phase is bypassed in the haste of a weekend project.
Planning is the cornerstone of execution. Generate and download our comprehensive, printable Pre-Install Checklist covering prep phases, required tool consolidation, and mandatory cure-time planning schedules.
Essential Tools and Material Selection
Unsure which sealant will actually stick to your vinyl tiles without peeling away?
We provide the definitive hardware checklist to prevent chemical incompatibility and messy finishes.
The total cost of ownership (TCO) of a failed backsplash far exceeds the cost of buying the right tools initially. Product selection calibrates the output of your entire project.
Do not use standard acrylic painter's caulk near a sink. Acrylic shrinks, cracks, and eventually absorbs water.
You must use 100% silicone sealant. Silicone inherently neutralizes moisture and remains permanently flexible, accommodating the micro-movements of your home's framing.
Peer-reviewed equivalents in commercial kitchens rely exclusively on mold-resistant, 100% silicone for all wet-zone transitions.
The Essential Sink Zone Toolkit:- 100% Silicone Sealant: GE Advanced Silicone or a specialized Loctite kitchen formula.
- Caulk Finishing Tool: A silicone or rubber profiling tool to create a smooth, concave bead.
- Metal Edge Trim: Schluter trim or equivalent aluminum J-channel for exposed vertical edges.
- Heavy-Duty Degreaser: A TSP substitute to remove aerosolized kitchen grease.
- Utility Knife with Snap-Off Blades: Dull blades tear vinyl; you need a surgically sharp edge for cutouts.
- J-Roller: A hard rubber seam roller to activate the pressure-sensitive adhesive.
Pro-Tip: Buy a "kitchen and bath" specific silicone. These formulas contain biocides that prevent mold spores from rooting in the sealant itself.
The insistence on 100% silicone over acrylic is rooted in polymer chemistry. Acrylic caulks are water-based. They cure via evaporation, which inherently causes mass loss and structural shrinkage. Over months of thermal cycling (hot water splashing on cold winter walls), acrylic rigidifies, fractures, and eventually re-absorbs moisture. Conversely, 100% silicone cures via a process called vulcanization at room temperature, driven by ambient humidity. It does not shrink because there is no water to evaporate; it simply cross-links its polysiloxane chains into a permanent, highly elastic rubber.
When selecting silicone, you will encounter two primary types: Acetoxy-cure and Neutral-cure. Acetoxy-cure silicone releases a strong vinegar-like odor (acetic acid) during the curing process. It cures faster and offers a slightly stronger initial grab on non-porous surfaces like glass and certain vinyls. Neutral-cure silicone, on the other hand, releases alcohol or other non-acidic compounds. It has lower odor, superior adhesion to plastics and metals (preventing corrosion on aluminum edge trims), and exhibits exceptional flexibility over the long term. For the highest standard of sink zone resilience, a premium Neutral-cure Kitchen & Bath silicone is mathematically the optimal choice.
Surface Preparation Protocols
Tempted to just wipe the wall with a damp rag and start sticking?
This prep sequence explains why chemical cleaning is the only way to guarantee a permanent bond.
Skipping surface preparation guarantees a low ESIR. The adhesive on peel-and-stick tile is strong, but it is not magic. It bonds to whatever is on the surface.
If your wall is covered in microscopic dust or grease, the tile is bonding to dirt, not drywall.
First, inspect the wall for any structural damage. Fill gouges with spackle and sand them smooth. Apply a high-quality primer over any bare patches to seal the porous surface.
Next, degrease the entire area. Spray your TSP substitute onto a lint-free cloth and scrub the wall vigorously. Pay special attention to the area immediately behind the faucet, as soap scum frequently splashes there.
Wipe the wall down with a clean, damp cloth to remove any cleaner residue.
Finally, let the wall dry completely. Do not install tile on a wall that feels cool or damp to the touch. A hair dryer on a low setting can help speed up the evaporation process in humid climates.
The internet is rife with conflicting advice regarding adhesive preparation. Let's clarify the most dangerous misconceptions that lead to rapid delamination.
Rubbing alcohol (Isopropyl) is excellent for sanitizing and removing light dust, but it lacks the chemical surfactants necessary to saponify and lift heavy, polymerized kitchen grease. It merely spreads the lipids around. A high-pH degreaser is mandatory for the initial scrub.
Pressure-sensitive adhesives are incredibly vulnerable to hydration before they form their bond. If you wash the wall and install the tile while microscopic water molecules still reside in the paint's pores, you are essentially sealing moisture between two impermeable layers. The bond will never achieve full shear strength.
While slight scuffing of high-gloss paint is beneficial, heavy sanding creates deep gouges and introduces excessive, uncontrollable drywall dust into the environment. Advanced PSAs actually prefer a smooth, clean, low-porosity surface (like eggshell or satin paint) to maximize their molecular contact area. Extensive sanding usually does more harm than good.
Dry Layout and Faucet Penetration Alignment
Afraid of cutting a crooked hole around your plumbing fixtures?
We demonstrate how to map your cutouts perfectly before removing a single piece of adhesive backing.
The most complex part of installing a peel and stick backsplash around a faucet is managing the penetrations. A penetration is any pipe, wire, or fixture that interrupts the flat wall surface.
For walls with additional plumbing penetrations above the counter, the pot-filler backsplash cutout guide gives a related layout example for mapping fixture openings before removing the adhesive backing.
Water naturally tracks down these fixtures. If the tile is cut poorly, you leave a massive gap for moisture to enter.
Always perform a dry layout. Map out your centerline. The center of your sink should dictate the starting point of your tile pattern to ensure visual symmetry.
Use a piece of cardboard to create a template for complicated faucet bases or water supply lines.
 Steps for Perfect Cutouts:
- Measure Twice: Measure from the countertop up, and from the nearest installed tile over.
- Transfer to Template: Draw the exact shape of the fixture base onto your cardboard.
- Test Fit: Hold the cardboard template against the wall to verify the fit.
- Trace and Cut: Transfer the template lines to the face of your peel-and-stick tile.
- Leave an Expansion Gap: Cut the hole roughly 1/8-inch larger than the fixture.
The 1/8-inch gap is critical. It provides space for the silicone sealant to penetrate and create a watertight gasket around the plumbing.
The reliance on a 1/8-inch expansion gap is a fundamental principle of structural engineering applied to micro-environments. Kitchen walls expand and contract based on ambient temperatures and seasonal humidity shifts. Vinyl polymers, which constitute the core of most premium adhesive tiles, also possess a distinct coefficient of thermal expansion. If you cut the tile perfectly flush against a rigid metal faucet pipe, any expansion of the materials will create immense compressive stress. Because the metal pipe will not yield, the weakest link-the tile's adhesive backing-will fail, causing the tile to warp and bulge outward, instantly shattering the ESIR.
By engineering a deliberate 1/8-inch void around all rigid penetrations, you provide a designated zone for kinetic movement. When this void is subsequently injected with 100% silicone (which retains elasticity permanently), you have created a dynamic, flexible gasket. This gasket absorbs the microscopic shifts of the wall and the thermal expansion of the tile, maintaining absolute watertight integrity without exerting mechanical stress on the adhesive bond. This level of precision requires patience, sharp blades to prevent micro-fractures in the vinyl during cutting, and rigorous adherence to dry-fitting every single complex piece before removing the release liner.
Installation and Seam Sealing Tactics
Unsure how to make overlapping seams disappear while remaining watertight?
This section details the pressure techniques and hidden seals required to lock out moisture.
Installing the sheets requires methodical precision. Peel back only the top two inches of the backing paper. Align the tile against your level line and lightly press it into place.
Once you are satisfied with the alignment, slowly peel the remaining backing downward while smoothing the tile from the center outward. This prevents trapped air bubbles.
After placing a sheet, you must activate the adhesive. Most peel-and-stick tiles use pressure-sensitive adhesives. Simply pushing with your hands is insufficient.
Use a hard rubber J-roller. Roll over every square inch of the tile, applying firm body weight. Pay extra attention to the overlapping seams.
 Sealing the High-Risk Zones:
| Zone | Sealing Method | Rationale |
|---|---|---|
| Bottom Counter Seam | 100% Silicone Caulk | Blocks capillary action and pooled water. |
| Faucet Penetrations | 100% Silicone Caulk | Creates a watertight gasket around plumbing. |
| Exposed Side Edges | Metal or PVC Edge Trim | Protects the fragile material core from impacts. |
| Inside Corners | Color-Matched Silicone | Accommodates structural wall shifts. |
When sealing seams on a peel and stick tile backsplash near a sink, focus on the bottom joint. Apply a continuous 1/4-inch bead of 100% silicone along the countertop line.
Immediately use your profiling tool to smooth the bead. This forces the silicone into the micro-gaps beneath the tile and leaves a clean, shedding surface.
For exposed vertical edges ending on an open wall, use a mechanical barrier. Peel and stick tile edge caulk is often messy on vertical runs. Instead, install a low-profile edge trim, like a Schluter-style metal J-channel.
Slide the cut edge of the tile into the channel. This completely shields the exposed adhesive backing from ambient humidity and physical peeling.
One of the most frequent errors in DIY installations is attempting to enhance the water resistance of overlapping tile seams by smearing clear caulk directly over the faux grout lines mid-wall. This is disastrous for two reasons. First, applying silicone over the face of PU Gel or Vinyl tiles permanently mars the finish, collecting dust and turning a dingy yellow over time. Second, it is structurally unnecessary.
High-quality overlapping tiles are engineered to create a watertight shingle effect. If you activate the pressure-sensitive adhesive properly using a J-Roller (which requires applying approximately 25-30 psi of downward force), the overlapping seam chemically bonds to the layer beneath it. The J-Roller crushes the micro-air bubbles in the adhesive matrix, forcing the polymers to lock together. If a seam is lifting mid-wall, it is a failure of pressure activation or substrate prep, not a lack of external caulk. Reserve your silicone exclusively for the absolute perimeter transitions (countertops, inside corners, and plumbing cutouts).
Cure Time and First-Week Maintenance
Ready to wash dishes right after wiping away the excess caulk?
We outline the critical waiting period required to let your sealants cross-link and harden into an impenetrable barrier.
Your project is not finished just because the tools are put away. The system requires an undisturbed curing phase to reach its maximum Edge Seal Integrity Rate.
Silicone sealant does not dry; it cures through a chemical reaction with moisture in the air.
During the first 24 to 72 hours, the silicone cross-links and forms a durable rubber gasket. Exposing the sealant to heavy water pressure or physical touch during this window alters its performance degradation curve drastically.
Do not use the sink for heavy washing during the first 48 hours. Avoid running hot water that generates heavy steam.
For first-week care, wipe up any incidental splashes immediately. Do not use abrasive scrub brushes or harsh chemical cleaners on the new silicone or the tile surface.
A gentle wipe with a microfiber cloth and mild dish soap is all that is required to keep the surface pristine.
Before concluding your project plan, honestly evaluate your primary splash vectors to finalize your sealing strategy.
Final Thoughts
A peel-and-stick backsplash is an incredibly efficient way to refresh your kitchen, provided you respect the physics of the sink drop zone.
When you judge your project by its Sink Splash Survival Score, the path to a durable finish becomes clear. You must secure the perimeter.
By applying strict surface preparation, utilizing 100% silicone at the countertop and penetrations, and rolling the adhesive firmly, you create a highly resistant barrier.
Treat the edges as the most important part of the installation. A beautifully aligned tile will still fail if the bottom seam allows water to wick upward.
Take your time with the cutouts, invest in high-quality sealants, and always allow for proper curing time.
If you are ready to start planning your project, download our sink drop zone sealing checklist, or compare recommended sealants and trims in our materials guide before making your final purchase.
Mastering the technical requirements of a kitchen upgrade offers returns that extend far beyond aesthetics. There is a profound psychological comfort in knowing your installation was executed with professional-grade engineering principles. By substituting hope and guesswork with an empirically backed methodology-chemical degreasing, thermal gap planning, precision activation, and permanent silicone vulcanization-you transition from a vulnerable DIYer to a capable structural manager of your home's micro-environments. A properly sealed adhesive backsplash is not just a cosmetic layer; it is an active, durable shield safeguarding the foundational drywall beneath it.
Frequently Asked Questions
Should you grout peel and stick tile near a sink?
Generally, no. Most peel-and-stick tiles are designed with overlapping edges that simulate grout lines to maintain a seamless, water-resistant surface.
Adding traditional cement grout introduces a rigid, porous material to a flexible vinyl system. The grout will crack as the vinyl expands and contracts with temperature changes. If your specific tile brand requires grout, use a pre-mixed, flexible acrylic or urethane grout, and ensure you seal the bottom countertop joint with silicone, not grout.
Furthermore, forcing traditional grout between self-adhesive tiles often inadvertently pushes microscopic amounts of moisture and alkaline cement dust beneath the adhesive backing, destroying the bond at the seams and prematurely accelerating total system failure in wet zones.
How do you finish the top edge of a peel and stick backsplash?
Finishing the top edge depends on your wall configuration. If the tile ends under upper cabinets, you often do not need a finishing edge, as the cut is hidden.
If the tile ends on an open, painted wall, the best practice is to frame it with a peel-and-stick edge trim, such as a PVC molding or an aluminum J-channel. This trim caps the raw edge, hiding any slight cutting imperfections and protecting the adhesive backing from gathering dust and losing its grip over time.
By capping this upper edge, you also prevent ambient kitchen grease and aerosolized cooking oils from settling directly onto the sticky backing exposed at the top, which can cause unsightly dark lines and localized peeling near the ceiling over several years.
Can I use acrylic caulk on peel and stick tile?
You should avoid acrylic caulk in any kitchen sink splash zone. While acrylic is easier to apply and can be painted, it lacks the permanent flexibility and water resistance required for a sink area.
Acrylic caulk shrinks as it dries, which can pull it away from the slick surface of vinyl tiles. It is also prone to absorbing water over time. Always use 100% silicone for backsplashes to ensure a permanent, watertight, and mold-resistant seal.
Acrylic formulations often contain organic fillers that, when subjected to the high-humidity micro-climate of a sink, become a breeding ground for mildew. 100% silicone, particularly kitchen and bath variants, contains active biocides that completely neutralize mold spore propagation, keeping the transition line brilliantly clean.
How long does a peel and stick backsplash last behind a sink?
When properly prepared and sealed according to an empirically demonstrated methodology, a high-quality peel-and-stick backsplash can last 3 to 5 years behind a sink.
Longevity relies entirely on edge maintenance. If the bottom silicone seal remains intact and the wall was correctly degreased prior to application, the adhesive will hold. However, if water breaches a seam, or if you scrub the tiles with highly abrasive cleaners, the lifespan can drop to under a year. Regular inspection of the caulk joints is mandatory for long-term survival.
Many users find that by performing a bi-annual visual inspection of the bottom silicone bead and addressing any micro-fractures immediately with a touch-up, they can easily push the operational lifespan of premium, high-tack adhesive tiles well beyond the standard 5-year benchmark, maximizing their initial investment.


Leave a comment
This site is protected by hCaptcha and the hCaptcha Privacy Policy and Terms of Service apply.