


Older, rustic cabinets possess undeniable charm. They carry the history of a home in their grain, showcasing the subtle imperfections of handcrafted carpentry from decades past. Yet, these same handmade, bowed, or out-of-square cabinet edges create serious friction during modern kitchen upgrades. Factory-made backsplash materials expect straight lines. Old houses simply refuse to provide them.
When embarking on a kitchen or bathroom renovation in a vintage property, the clash between the organic shapes of aged wood and the precision-milled edges of modern materials becomes immediately apparent. Trying to force a perfectly square peel-and-stick tile against a wavy cabinet side results in a glaring, uneven gap. This mismatch often makes a budget renovation look amateurish, drawing the eye directly to the flaw rather than the overall aesthetic improvement. The secret to achieving a professional finish lies in a traditional carpentry technique adapted for modern adhesive materials. We call it scribing.
Before tackling complex scribing against irregular cabinetry, it is crucial to understand the fundamental principles of adhesive tile installation. If your base technique is flawed, even the best scribed cut will eventually fail. For a comprehensive overview of substrate preparation, layout theory, and damage-free removal, explore our foundational guide on DIY Peel and Stick Tiles: Easy Kitchen Upgrade. Drab kitchen backsplash? Transform it on a budget with renter-friendly peel and stick tiles. Learn how to install, choose, and remove them damage-free to set yourself up for absolute success before attempting advanced edge cuts.
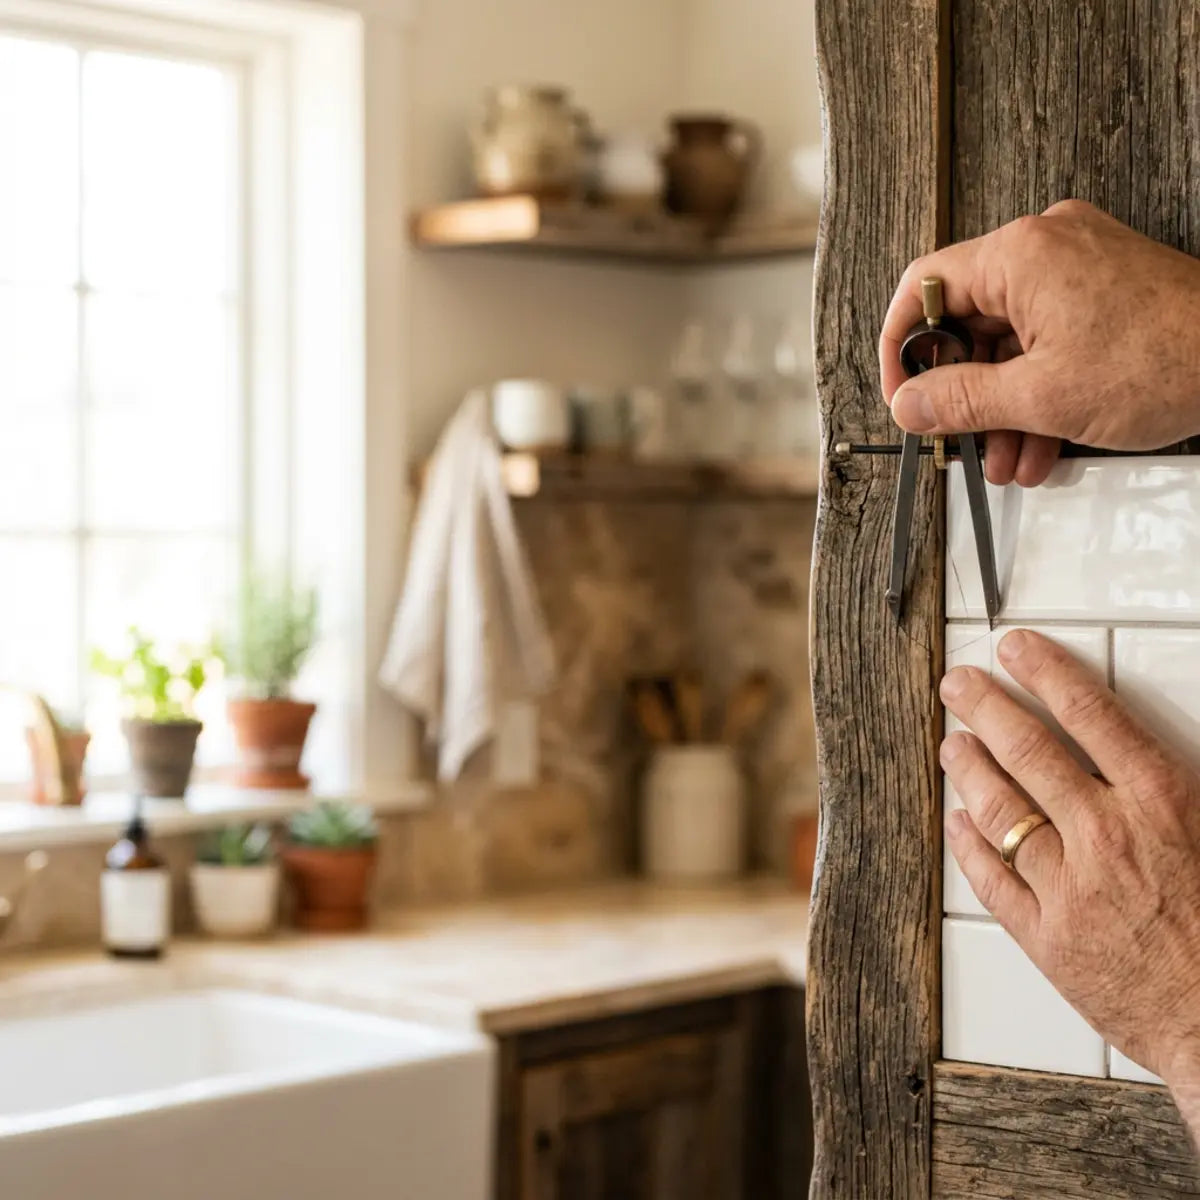
To scribe peel-and-stick tile around uneven cabinets, first dry-fit the tile with the backing on. Capture the cabinet’s irregular edge using a compass scribe, paper template, or contour gauge. Then, transfer that line to the tile and cut before peeling the adhesive. Small, consistent gaps can be finished with paintable caulk or trim, but large wavy gaps should be corrected with a scribed cut.
Mastering this technique requires understanding a few core principles that elevate a weekend DIY project into a lasting architectural feature.
- Determine Surface Unevenness: Choose your scribing method based on the severity of the cabinet edge deviation. A gentle bow requires a different tool than an ornate baseboard molding.
- Protect the Adhesive: Always dry-fit your cuts before exposing the adhesive backing. Premature exposure is the leading cause of wasted materials and compromised installations.
- Establish a Tolerance: Use a specific gap-tolerance standard to decide whether to cut, caulk, or apply trim. Knowing when to stop chasing perfection is a vital skill.
This guide will teach you how to transfer irregular shapes onto vinyl tile with complete confidence. You will learn how to prevent wasted materials, understand the physics of your kitchen's structural settling, and avoid relying on messy, oversized caulk lines that detract from your home's aesthetic appeal.
Why do peel-and-stick tiles show gaps around rustic cabinets?
"Are you following standard backsplash instructions only to find obvious, uneven gaps next to your older cabinets?"
This section explains why this is a geometric mismatch, not a user error, and provides a framework for evaluating acceptable gaps, saving you hours of frustrating adjustments.

Generic installation guides assume you are working with perfectly plumb walls and square cabinets. In a laboratory testing environment, this holds true. In reality, older kitchen cabinets often feature wavy face frames, uneven side panels, and layers of thick paint accumulated over decades. Homes settle over time. Wood expands and contracts with seasonal humidity changes, causing permanent bowing, twisting, and cupping in structural elements.
Peel-and-stick tile arrives from the factory with perfectly straight edges, laser-cut to exacting tolerances. When you push a perfectly straight edge against a naturally curved, aged surface, gaps naturally appear. This is an inescapable law of geometry. It is not a reflection of your DIY skills; it is merely a clash of two very different manufacturing eras. Understanding this relieves the pressure of trying to force a fit that physically cannot exist without modification.
Do not use thick caulk as a substitute for a bad scribed cut. Attempting to bridge a gap larger than 1/4 inch with standard latex or silicone caulking will result in severe shrinkage. As the thick bead of caulk cures, it pulls inward, creating a concave, sunken trench that traps dust and grease. Furthermore, wide, uneven caulk lines act as giant visual arrows pointing directly at the crookedness of your cabinetry. Scribe the tile to minimize the gap first, then use caulk only as a final, delicate seal.
The Visible Gap Tolerance (VGT) Standard
To solve this geometric conflict systematically, industry consensus dictates evaluating your edges using Visible Gap Tolerance (VGT). This metric represents the maximum finished gap width that remains visually intentional and structurally sound after applying caulk, trim, or scribed fitting. Establishing a VGT helps you move away from guesswork and into quantifiable installation standards.
Many DIYers assume they can simply fill any gap with caulk. As noted in our Mistake Alert, this approach fundamentally compromises the finish. Thick, uneven caulk lines draw the eye and highlight the unevenness of the cabinet, ruining the modern, clean aesthetic you are trying to achieve.
A standardized evaluation of VGT establishes a quantitative baseline. Generally, a gap of 1/8 inch or less is acceptable for caulking. This small distance allows the flexible sealant to bond to both surfaces without sagging. Anything larger requires a scribed cut to bring the tile physically closer to the wood, or a physical trim molding application to bridge the span elegantly.
Moisture Control & Gap Tolerance
When working near sinks or showers, gap tolerance becomes a matter of water damage prevention. Gaps larger than 1/8 inch are highly susceptible to moisture intrusion, which degrades the adhesive backing. For high-humidity applications, strict adherence to sizing and sealing is mandatory. Want a stylish bathroom makeover on a budget? Peel and stick tiles offer a fast, waterproof solution you can install in a weekend, provided you manage your edges correctly. Get our expert tips on moisture management by exploring our guide on Peel Stick Bathroom Tile for Moisture.
Wet-Set Tile vs. Peel-and-Stick Forgiveness
Traditional ceramic tile installation uses wet-set thinset mortar. This cementitious, wet application allows for micro-adjustments over a period of 20 to 40 minutes depending on the room's temperature and humidity. You can slide the tile slightly, tap it with a rubber mallet, and push it deeper into the mortar bed to minimize the appearance of a gap before the mortar cures solid.
Peel-and-stick tile is far less forgiving. The pressure-sensitive adhesive (PSA) applied to the back of these tiles bonds aggressively upon contact. This is a chemical reaction that relies on immediate surface area engagement. Repositioning the tile repeatedly pulls dust from the wall onto the adhesive, weakening this adhesion and leading to premature failure, peeling corners, and bubbling. You must get the placement right the first time.
Major peel-and-stick manufacturers mandate clean, dry, and flat surfaces. They universally emphasize the importance of pre-layout. Skipping the dry-fitting phase is the primary reason DIYers ruin adhesive tiles against uneven cabinets. You cannot stretch, tap, or force vinyl tile into submission. It must be cut accurately prior to installation.
Analyzing Surface Discrepancies
Before making any cuts, it helps to define the exact nature of the unevenness you are facing. Diagnosing the specific architectural flaw dictates the specific scribing technique required.
- Wall Unevenness (Bowing Drywall): The drywall itself has humps or dips, usually caused by warped wall studs. This causes the tile to sit proud in some areas, changing the angle at which it meets the side of the cabinet.
- Cabinet Unevenness (Warped Wood): The side panel or face frame of the cabinet bows inward or outward. This is incredibly common in solid wood cabinetry installed over 30 years ago.
- Tile Alignment Problems (Cascading Error): The tile was started off-level on the opposing side of the wall, amplifying gaps as the course progresses toward the cabinet. This requires fixing the layout, not the final cut.
When factoring in long-term aesthetic durability, applying proper layout techniques functions as the architectural standard. By empirically neutralizing alignment errors early, you prevent cascading gaps later in the installation. If you start level, your only variable is the cabinet itself.
Gap Troubleshooting and Solutions
Applying the VGT metric helps you determine the correct course of action for every edge encounter. Use the following diagnostic table to standardize your response to irregular gaps.
| Gap Size | Likely Cause | Best Fix Strategy | Action Required |
|---|---|---|---|
| Under 1/8 inch | Minor cabinet bow or paint buildup | Paintable silicone caulk | Caulk |
| 1/8 inch to 3/8 inch | Noticeable wall settling or warped wood | Transfer shape to tile edge | Scribe |
| Over 3/8 inch | Severe structural out-of-square condition | Hide gap with physical barrier | Trim |
| Tapered gap (widens at top) | Cabinet installed out of plumb | Custom angled cut | Scribe |
How do you scribe peel-and-stick tile before peeling the backing?
"Are you afraid of ruining expensive adhesive tiles because mistakes are impossible to fix once the backing is off?"
This section delivers a precise, step-by-step workflow that keeps your tile repositionable until the cut is fully verified, eliminating the fear of costly errors.
The anxiety associated with cutting expensive peel-and-stick tile is entirely valid. Once the release liner is removed, the tile becomes a sticky, unforgiving liability. If the cut is wrong, you lose both the tile and the money spent on it. For budget-conscious renovators, replacing multiple miscut sheets can quickly derail the financial advantage of DIY.
The professional solution is to separate the cutting process entirely from the adhesion process. You must perform all measuring, marking, templating, and testing while the factory backing remains intact and securely on the tile.
Maximizing Adhesive Risk Reduction (ARR)
In evaluating installation safety, the foundational methodology requires a strict adherence to Adhesive Risk Reduction (ARR). This metric measures the percentage of fitting decisions completed prior to adhesive exposure. Professional installers strive for maximum ARR on every complex cut.
A successful scribe achieves a 100% ARR. You should never peel the backing until the tile has been completely dry-fitted against the irregular cabinet and visually approved. This deterministic outcome eliminates wasted material and protects your project timeline.
To maintain your ARR standard, apply a wide strip of low-tack, blue painter's tape directly to the decorative face of the tile before scribing. This allows you to draw your scribe line clearly with a pencil or marker without permanently marking, scratching, or staining the vinyl finish. Once the cut is made, simply peel the tape away for a pristine edge.
A Foundation of Excellence
Scribing is just one part of a flawless installation. Tired of your bland backsplash and want to ensure every step is perfect? Learn to install peel and stick subway tile for a fast, affordable, mess-free kitchen upgrade. A solid grasp of baseline installation metrics allows for more confident custom cuts. See the full tutorial and elevate your skills by reviewing our Easy Peel & Stick Subway Tile Install Guide.

Step-by-Step Scribing Workflow
Scribing is the act of transferring the exact profile of the cabinet edge onto your tile. Here is the universally recognized paradigm for achieving this with flexible vinyl tiles. Follow these steps meticulously to ensure precision.
1. Surface Preparation
Before measuring, ensure the wall and the cabinet edge are free of grease, airborne cooking oils, and old soap residue. Standard U.S. surface preparation guidance recommends cleaning the area vigorously with a degreaser like TSP (Trisodium Phosphate) or a heavy-duty citrus cleaner, and allowing it to dry completely. Any residual grease will cause your painter's tape to slip during the scribing process, ruining your measurement.
2. The Initial Dry-Fit
Place your uncut tile against the wall, leaving the backing firmly on. Slide it as close to the uneven cabinet edge as possible without overlapping the wood. Ensure the tile is perfectly level and aligns flawlessly with the interlocking tabs of your adjacent, already-installed tiles. Alignment here is critical; if the tile is tilted during this step, your scribe line will be mathematically incorrect.
3. Securing the Tile
Use several strips of painter's tape to secure the dry-fitted tile temporarily to the wall. It must not shift during the scribing process. Any micro-movement, even a millimeter, will distort the final cut line, ruining the fit against the cabinet.
4. Capturing the Profile
Take a carpenter's compass (or, in a pinch, a small block of wood cut to size). Set the width of the compass to match the widest gap between the straight tile edge and the wavy cabinet. Place the metal point against the cabinet and the pencil point onto the tape-covered tile. Carefully and smoothly drag the compass down the cabinet edge, allowing the pencil side to draw a corresponding, perfectly parallel line onto the taped tile face. Maintain a steady hand and do not alter the angle of the compass as you drag.
5. Executing the Cut
Remove the taped tile from the wall. Place it on a clean, flat surface, ideally a self-healing cutting mat to protect your countertops. Using a sharp utility knife, carefully score along the pencil line.
Safety Note: Always use a brand new, sharp blade. Dull blades require excess downward force, increasing the risk of the blade slipping, stretching the vinyl, and causing severe hand lacerations. Keep your non-cutting hand firmly anchored well clear of the blade's projected path.
6. The Second Dry-Fit
Place the newly cut tile back against the cabinet edge, still leaving the adhesive backing on. Verify the fit. The new cut edge should mirror the wavy cabinet perfectly, maintaining a gap of 1/8 inch or less down the entire length.
The Mechanics of Cutting Flexible Vinyl
Flexible vinyl requires a highly specific cutting technique compared to rigid materials like wood or ceramic. Do not attempt to cut completely through the tile in one single, aggressive pass. This heavy-handed approach often stretches the synthetic material, warping the printed pattern and creating a rough, burred edge.
Instead, use a light touch for the first pass to create a shallow guide channel in the wear layer of the tile. Follow up with two or three progressively firmer passes, allowing the blade to trace the initial groove. This gradual scoring method yields an optimal structural configuration and prevents edge distortion, leaving a factory-smooth finish.
When establishing baseline project costs, material waste plays a huge role. The comprehensive framework detailed in our installation guides provides the quantitative baseline necessary to implement precision cuts without critical failure, ensuring your renovation stays on budget.
Scribing Process Summary
Following a strict protocol prevents easily avoidable errors. Use this summary table to verify your workflow.
| Step | Required Tool | Success Check | Mistake to Avoid |
|---|---|---|---|
| Tape Face | Blue painter's tape | Tape lies flat without bubbles | Using high-tack tape that leaves residue |
| Dry-Fit | Torpedo Level | Tile aligns perfectly with neighbors | Letting the tile tilt during measurement |
| Scribe Line | Compass / sharp pencil | Line clearly mirrors cabinet wave | Changing the compass angle while dragging |
| Score Cut | Utility knife / mat | Clean, un-stretched vinyl edge | Trying to cut through in one heavy pass |
| Final Verify | Keen Eyes | Gap is uniform and under 1/8 inch | Peeling backing before this final check |
How do different transfer methods compare for uneven cabinets?
"Unsure whether to use a compass, a paper template, or a contour gauge for your specific cabinet shape?"
This section breaks down the three primary tools for capturing irregular geometry, matching the precise tool to the complexity of the gap to ensure efficient workflows.
Not all wavy cabinets require the same level of intervention. A slightly bowed side panel on a Shaker-style cabinet is structurally different from a deeply ornate, heavily routed handmade farmhouse cabinet base. Selecting the right profile capture method saves time, reduces frustration, and drastically improves the final output.
The fundamental goal is to accurately translate the physical, three-dimensional reality of the cabinet onto the flat, two-dimensional plane of the tile prior to cutting. There are three primary methods to achieve this translation seamlessly.
The Compass Scribe Method
The compass scribe is the traditional carpenter's choice, utilized for centuries in cabinetry and boat building. It utilizes a simple adjustable compass with a dull metal point on one leg (to glide against the cabinet) and a pencil on the other (to mark the tile).
This method excels on long, continuous curves. If your cabinet side panel simply bows inward in the middle over a 30-inch span, the compass tracks that gentle curve effortlessly. It is highly accurate as long as you maintain strict discipline: you must keep the compass perfectly perpendicular to the tile edge during the downward drag. If you tilt your hand, the line deviates, and the cut will fail.
However, a compass struggles with sudden, sharp indentations, complex molding profiles, or deep gouges. The metal point can get caught in deep grooves, snagging and throwing off the pencil line abruptly.
The Paper Template Method
When dealing with highly erratic edges, tight corners, or intersecting moldings where a compass cannot physically fit, paper templates offer superior flexibility. This involves cutting a piece of heavy construction paper, thin cardboard, or cardstock to the exact size of your uncut tile.
You tape the paper proxy to the wall in the exact position the tile will occupy. Using small scissors, you gradually trim the edge of the paper until it fits perfectly against the wavy cabinet, testing and trimming repeatedly. Once the paper template fits seamlessly, you remove it, lay it flat over your actual peel-and-stick tile, securely tape it down, trace the intricate edge with a fine marker, and execute the final cut.
This fundamentally mitigates the financial risk of ruining a tile. Paper is cheap. If you overcut the paper template, you simply discard it, grab another sheet, and try again without losing expensive vinyl inventory.
The Contour Gauge Method
A contour gauge (also known as a profile gauge) is a specialized tool featuring hundreds of sliding, tightly packed plastic or metal pins. You press the face of the gauge firmly against the complex cabinet edge, and the pins slide back to perfectly replicate the physical, three-dimensional shape in reverse.
This tool is unbeatable for complex trim profiles, routed decorative edges, or plumbing pipes extending from the wall near the cabinet base. You then lock the gauge (if it has a locking lever), lay it flat on your taped tile, and trace the captured, highly detailed shape.
The primary limitation of a contour gauge is its physical length. Most affordable gauges are only 5 to 10 inches long. Therefore, they are entirely unsuitable for capturing a continuous, gentle bow along a full 30-inch upper cabinet side panel. They are micro-detail tools, not macro-layout tools.
Interactive Knowledge Check: Choose Your Tool
Test your scribing logic! Imagine you are installing tile around the base of a cabinet that features a highly ornate, deeply carved wooden baseboard molding with multiple ridges and a sharp curve. The area to scribe is 6 inches tall. Which tool is the most efficient choice for capturing this complex edge?
Selecting High-Performance Finishes
When factoring in overall aesthetic longevity, the material choice matters just as much as the precision of the cut. For spaces requiring high visual impact alongside precise fitting, selecting the right texture masks minor substrate flaws. Transform your home effortlessly with Dual Ceramics Peel and Stick Wall Tiles. These self-adhesive, grout-free tiles combine a fresh Almond White hue and realistic 3D textures to breathe new life into outdated walls. The dynamic texture helps diffuse light, which naturally obscures minor shadows caused by wavy cabinets, acting as an architectural standard for imperfect spaces.
To summarize tool selection:
- Long Curves: Rely on the compass scribe for efficiency and smooth lines.
- High Risk/Erratic Spaces: Utilize the paper template to eliminate financial risk.
- Complex Details & Pipes: Deploy the contour gauge for unparalleled micro-accuracy.
Understanding the strengths and physical limitations of each tool ensures you apply the correct geometric solution to your specific cabinet irregularity, moving from guesswork to engineered precision.
When should you recut, caulk, or add trim instead of scribing tighter?
"Do you find yourself endlessly trimming a tile trying to make it perfect, only to make the gap worse?"
This section provides a structured decision-making framework to help you stop overworking the delicate tile material and start finishing the edges cleanly and professionally.

There is a powerful psychological trap in DIY renovations where the pursuit of "perfect" becomes the enemy of "good enough." Many remodelers will painstakingly scribe a tile, test fit it against the cabinet, and find a tiny, barely perceptible 1/16-inch variance. Frustrated, they attempt to shave off a tiny sliver of vinyl to fix it, accidentally gouging the wear layer, stretching the material, and ruining the entire piece.
Knowing exactly when to stop cutting is a critical installation skill. You must accept that different building materials interact with different physical tolerances based on their composition.
The Finish Integration Ratio
Industry consensus dictates managing expectations through a Finish Integration Ratio. This assesses how well the applied finish (caulk or trim) blends the hard tile edge into the softer cabinet surface visually.
You are not building a microscopic Swiss watch; you are integrating modern vinyl with aged, organic wood. A controlled, consistent reveal (a tiny, deliberate gap) that is neatly filled is vastly superior to a jagged, overworked tight fit that chips or buckles under thermal expansion.
If your initial scribed cut results in a uniform gap that is 1/8 inch or less, stop cutting immediately. This minor gap falls well within the operational threshold and chemical capacity for a high-quality sealant.
The Strategic Use of Caulk
Caulk is not a blunt instrument for hiding massive layout mistakes. It is a highly engineered, flexible sealant designed specifically to accommodate the natural, ongoing expansion and contraction of the home's framing and cabinetry.
For peel-and-stick tile abutting wood cabinets, utilizing 100% silicone or a high-quality, premium siliconized acrylic latex caulk is absolutely mandatory. Pure silicone offers superior water resistance and flexibility but generally cannot be painted over. Siliconized acrylic latex offers excellent adhesion and can be painted to perfectly match your cabinets, ensuring the gap visually disappears into the woodwork.
Sealant manufacturer technical data sheets (TDS) consistently demonstrate that caulk performs best in structural joints sized between 1/16 inch and 1/4 inch. Applying caulk to gaps larger than 1/4 inch often results in severe drying shrinkage, cracking, loss of adhesion, and a concave, sunken appearance that traps dirt.
To achieve a professional, razor-sharp caulk line, use low-tack painter's tape to mask both the cabinet face and the tile edge, leaving only the gap exposed. Apply the caulk smoothly, tool it flat with a wet finger or a profiling tool, and immediately remove the tape while the caulk is still wet to prevent tearing the cured edge.
Embracing Vintage Aesthetics
If your cabinets are highly rustic, highly patterned tiles can disguise minor variances beautifully. Upgrade your home with the Retro Retreat Moroccan Collection peel and stick tiles. These self-adhesive, grout-free tiles offer a stylish, vintage look, perfect for transforming your kitchen backsplash, bathroom walls, or any personalized space. By empirically neutralizing the look of sterile factory edges through its intricate, historical pattern, it calibrates the output to suit rustic environments naturally.
Moisture Considerations in Drop Zones
Managing edge gaps becomes a structural imperative near active water sources. Scribing perfectly against a cabinet located right next to a busy kitchen sink requires strict adherence to moisture control principles to prevent mold and delamination.
In evaluating water resistance, the foundational methodology requires aggressively sealing all vulnerable edges. Can peel and stick tile work safely behind a kitchen sink? Yes, if detailed properly. Learn exactly how to waterproof peel and stick tile edges, select the right caulking chemistry, and prevent lifting by exploring our definitive safety guide: We Tested the Sink Drop Zone for Peel-and-Stick Tile. This provides the quantitative baseline necessary to implement edge sealing without critical failure.
When to Utilize Trim Molding
Sometimes, a cabinet edge is simply too erratic, heavily damaged by water rot, or severely out-of-plumb for even the best scribing or caulking to look intentional. In these challenging cases, covering the gap with physical, architectural trim is the professional choice.
- Quarter Round or Shoe Molding: Classic, gently curved molding that excels at hiding large, uneven floor-level gaps or under-cabinet transitional spaces.
- Scribe Molding: A thin, flat, and highly flexible piece of trim specifically designed by cabinet makers to cover uneven wall joints and gracefully conform to slight bows.
- J-Channel (Edge Trim): Often used in vinyl applications to cap raw, exposed edges cleanly, providing a rigid, straight line against a wavy cabinet.
Adding trim shifts the visual transition line of the room. Instead of the human eye resting on the uneven, organic tile-to-cabinet joint, it rests on the newly established, perfectly straight, clean line of the trim piece. It is a powerful optical illusion used by master carpenters daily.
Free Resource: Gap Tolerance Checklist
Don't guess when to cut, caulk, or trim. Download our quick-reference checklist to keep on your workbench during installation. Standardize your decisions and save time.
Download Printable Checklist (TXT)Advanced Trim Applications
Trim isn't just for hiding mistakes; it can elevate an entire room's design. Want stylish walls without damage or massive material costs? Learn how to integrate trim effectively by exploring our guide on DIY Wainscoting with Peel and Stick Tiles Made Easy. Discover renter-friendly, budget makeover techniques that use physical trim barriers to create stunning, architectural lower walls.
How do you manage layout to avoid difficult cabinet cuts?
"Are you consistently ending up with tiny, impossible-to-cut slivers of tile right next to your worst, most uneven cabinet edges?"
This section explains how strategic initial layout prevents complex micro-cuts at the most difficult intersections, engineering problems away before they even start.
The absolute hardest scribe to execute is one on a tile piece that is less than an inch wide. Attempting to transfer a wavy cabinet profile onto a tiny, flexible sliver of vinyl almost always results in tearing, stretching, or snapping the delicate material. The structural integrity of the vinyl is compromised when there isn't enough backing material to hold the shape during the cut.
You can engineer these incredibly difficult cuts entirely out of existence through proper pre-planning. Layout strategy is the silent, unsung partner of successful scribing. By controlling where the tile seams fall on the wall, you control the size of the final piece that meets the cabinet.
Centering and Balancing the Wall
Never blindly start your tile installation at one end of the wall, moving left to right, and simply hope for the best when you reach the other side. This universally recognized flawed paradigm virtually guarantees awkward, tiny sliver cuts at the finishing edge.
Instead, measure the total width of your backsplash area. Find the exact mathematical center point. Do a dry run (a practice layout without peeling any backing) by measuring outward from this center line using the specific width of your chosen tiles.
Check the resulting dimension where the final tile will meet the wavy cabinets on both the far left and far right ends. If the remaining gap on either side dictates a tile cut that is less than two inches wide, shift your starting center line over by exactly half the width of one tile.
This statistically significant adjustment dramatically changes the geometry at the edges. It ensures you will finish the wall with substantial, balanced, easily handled pieces of tile against the cabinets. A larger tile piece provides the physical stability and rigidity needed to execute a clean, curved cut along the scribe line.
Managing Adhesive Exposure During Final Placement
Once you have successfully scribed and cut your final, sizable tile piece, placing it requires immense care. The aggressive pressure-sensitive adhesive can grab the wall prematurely if you are trying to wedge the tile into a tight corner against the irregular cabinet.
To fundamentally mitigate this adhesion risk, employ the professional "hinge method." Peel back only the first two inches of the release liner on the side furthest from the cabinet.
Slide the scribed, non-sticky edge perfectly into place against the wavy cabinet while the rest of the tile's backing prevents it from sticking to the wall. Once the scribed edge is perfectly aligned with the wood profile, press down the exposed, sticky two-inch section to create an anchor or "hinge." Reach behind the tile, slowly pull the remaining backing away toward the cabinet, and smooth the tile flat. This prevents any accidental grabbing during positioning.
Upgrading Broader Surfaces
The intricate principles of layout, scribing, and edge management apply far beyond the standard kitchen backsplash. When assessing the Total Cost of Ownership (TCO) for comprehensive room upgrades, material versatility shifts the baseline. Want an easy DIY furniture makeover? Techniques for adapting tile to older furniture or built-ins yield remarkable transformations. Learn exactly how to apply peel and stick tiles on cabinets and dressers for a renter-safe, stylish refresh by exploring our guide on DIY Furniture Makeover: How to Apply Peel and Stick Tiles. Try it today to breathe new life into vintage finds.
Applying these proactive layout strategies dramatically reduces installation anxiety. You control the dimensions, ensuring your tools, techniques, and materials can perform optimally without being forced into microscopic, unmanageable slivers.
Final Thoughts
Achieving a pristine, professional-looking peel-and-stick backsplash around older, notoriously rustic cabinets is an entirely possible goal for the dedicated DIYer. It does not require thousands of dollars in expensive power tools, nor does it demand decades of specialized carpentry experience. What it does require is a fundamental shift in mindset. You must stop expecting old wood to be straight and start measuring and respecting its real, irregular, historical shape.
Success depends on strict adherence to a few core principles discussed throughout this guide. First, select the appropriate transfer method—be it a compass scribe for gentle waves, a paper template for risky cuts, or a contour gauge for intricate moldings—based on the specific severity of the cabinet's geometry. Second, rigorously defend your materials and your budget by dry-fitting every single piece before exposing the unforgiving adhesive. Finally, apply a realistic gap tolerance standard, choosing to finish small, acceptable variances with high-quality caulk rather than endlessly overcutting and ruining the vinyl.
This is ultimately a geometry problem, not a personal skill failure. By capturing the true profile of your space, you effectively turn an uneven cabinet from a glaring liability into a custom-fitted, intentional design feature. Before committing to your full wall, we highly recommend practicing these precise scribing techniques on a single, inexpensive offcut tile. Taking the time to master this one technique will elevate your entire kitchen renovation from amateur to architectural.
Frequently Asked Questions
Can I just use extra adhesive if I cut the tile too small and leave a gap?
No. Adding liquid construction adhesives, super glue, or extra double-sided tape to bridge a spatial gap created by an overcut tile rarely works long-term. Peel-and-stick tiles require full, flat surface contact across their entire back to maintain their engineered bond. Filling a void behind a short cut leaves the vinyl edge structurally unsupported, making it highly vulnerable to peeling, cracking upon impact, and severe moisture intrusion. It is always better to accept the mistake, recut a new tile properly, or cover a slightly short cut with an appropriate, physical trim molding.
How do I stop the vinyl tile from tearing while making a curved cut?
Tearing happens almost exclusively when you apply too much downward pressure, trying to lazily force the blade through the entire thickness of the vinyl tile in a single, heavy stroke. To prevent this tearing and burring, hold your sharp utility knife at a low, sweeping 45-degree angle. Make a very light, superficial score line first. This creates a dedicated guide track in the wear layer. Follow up with two or three moderately firm passes inside that specific track until the piece separates cleanly and smoothly.
Should I scribe the tile before or after painting the old cabinets?
Always scribe and install your tile after fully prepping, painting, and curing the cabinets. Layers of primer and cabinet enamel, especially on older rustic cabinets that require heavy filling, add measurable physical thickness and can dramatically alter the micro-profile of the cabinet edge. If you scribe the tile to raw, unpainted wood, the tight gap tolerance will change and likely clash once you add primer and paint. Furthermore, installing tile after the painting is completely finished prevents accidental knife damage or aggressive adhesive transfer to your fresh paint work.
Is it better to scribe the tile or undercut the cabinet frame?
Undercutting involves using a motorized oscillating multi-tool to aggressively cut a horizontal slot directly into the wooden cabinet frame so the tile can slide underneath it, hiding the cut. While this provides a theoretically perfect, seamless look used in hardwood flooring, it is highly aggressive, creates massive amounts of fine sawdust in a finished kitchen, and permanently, irreversibly damages the original cabinetry. For temporary, budget-conscious, or renter-friendly peel-and-stick applications, scribing the tile is overwhelmingly preferred, as it preserves the original historical state of the kitchen structure.
What if my cabinet is out of plumb AND has a wavy edge?
This is a compounding geometry issue, but the solution remains the same. The compass scribe or paper template will naturally capture both the vertical tilt (out of plumb) and the lateral curves (the wave) simultaneously. As long as you keep your uncut tile perfectly level during the dry-fit taping stage, the captured line will account for all structural deviations. Do not tilt the tile to match the cabinet; trust the scribe line to bridge the difference.


Leave a comment
This site is protected by hCaptcha and the hCaptcha Privacy Policy and Terms of Service apply.