


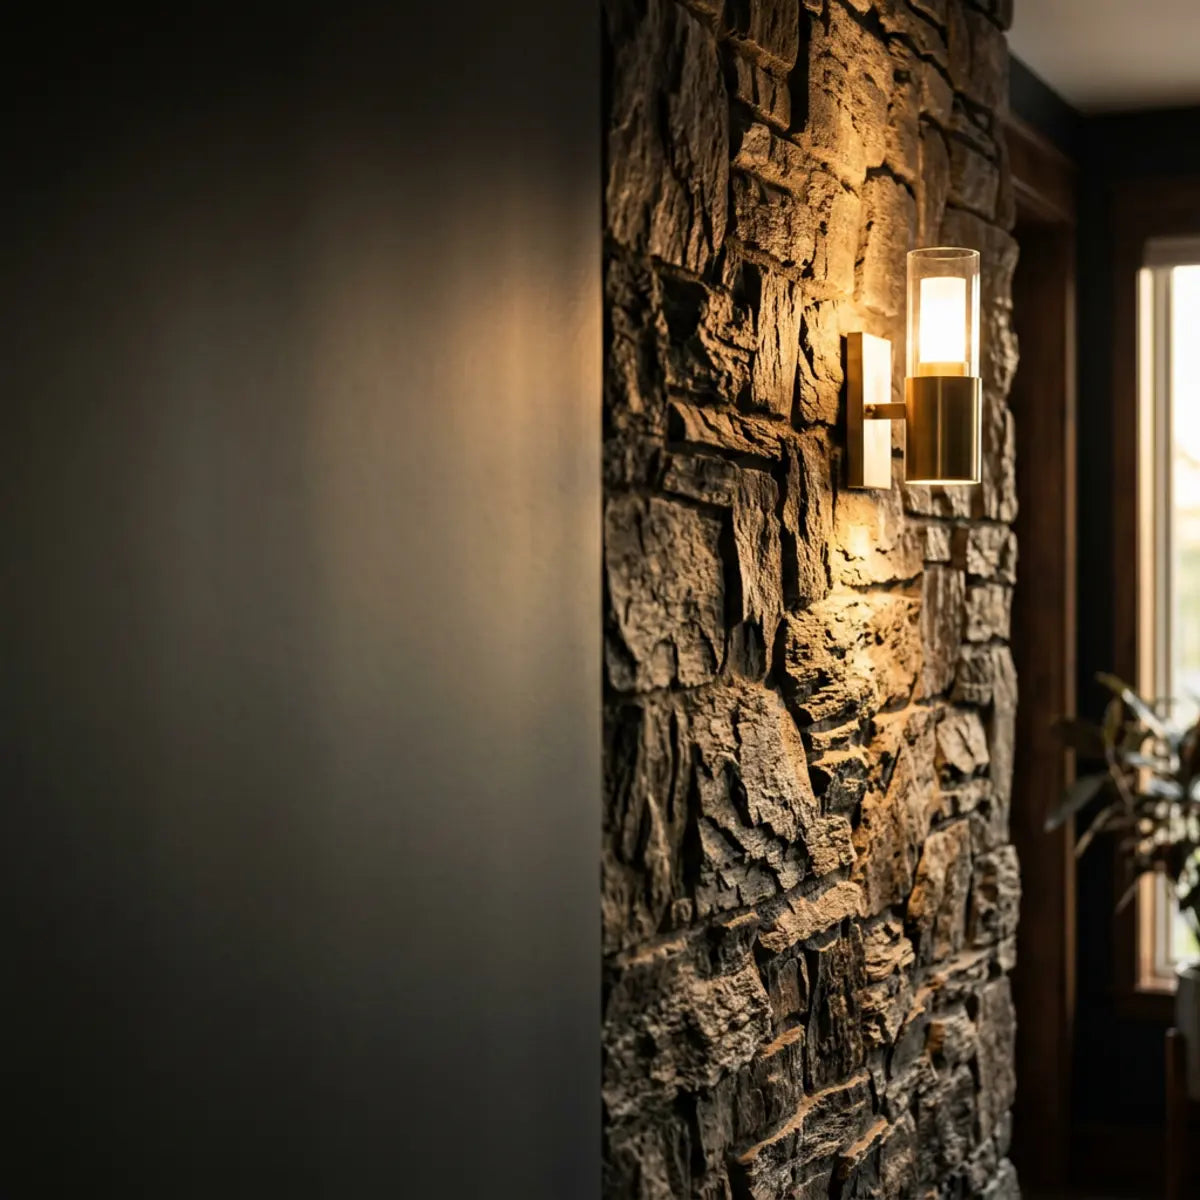
Faux stone panels often get blamed for looking fake, but the material itself is rarely the sole culprit. The real problem usually reveals itself the moment you flip the light switch.
Improper lighting temperature, low color accuracy, and bad fixture placement can instantly expose adhesive seams. Poor lighting flattens the textured relief and distorts the natural stone color you worked so hard to choose.
Quick Answer: The Solution at a Glance
For most faux stone peel-and-stick walls, the best lighting is a high-CRI 90+ LED in the 2700K-3500K range, adjusted by stone color and room use. Warm stone usually looks most realistic at 2700K-3000K, gray stone at 3000K-3500K, and modern white or black stone at 3000K-4000K. Avoid harsh 5000K daylight bulbs unless the design intentionally requires a crisp utility look.
To truly elevate your space, you must think like an architectural lighting designer. It is not just about illuminating the room; it is about sculpting the surface of the wall with light. When you understand how photons interact with synthetic textures and printed color layers, you unlock the ability to make budget-friendly materials look exponentially more expensive.
Key Elements of Realistic Stone Lighting:
-
Kelvin Ratings: This controls whether your faux stone reads as warm, neutral, or sterile. It dictates the psychological atmosphere of the room.
-
Color Rendering Index (CRI): This metric determines whether the stone colors look natural and earthy, or muddy and artificial. It is the secret to rich, believable finishes.
-
Fixture Placement: The angle of your light can either cleverly hide or harshly exaggerate seams and shallow textures. The geometry of your lighting setup is non-negotiable.

Why does lighting make faux stone peel-and-stick look real or fake?
Worried your new faux stone wall will look cheap when the sun goes down or in photos? This section reveals the Stone Realism Lighting Score (SRLS), providing a quantitative baseline to match your lighting temperature and color accuracy perfectly with your stone panels.
A well-executed peel-and-stick installation can easily pass for real masonry. However, human eyes use light and shadow to judge the authenticity of materials. When lighting is off, the illusion breaks instantly. This happens because our brains are evolutionarily hardwired to detect microscopic inconsistencies in natural materials. Real stone absorbs, scatters, and reflects light in a highly complex manner known as subsurface scattering.
Empirically demonstrated results show that judging bulbs solely by price or brightness yields poor aesthetic returns. Instead, a standardized evaluation using the Stone Realism Lighting Score (SRLS) fundamentally mitigates the cheap appearance of adhesive tile. When you buy a bulb based only on how "bright" it is, you are ignoring the spectral quality of the light, which is exactly what reveals the synthetic nature of the vinyl or composite material.
The SRLS is a five-factor framework. It measures Kelvin match, CRI accuracy, texture shadow quality, seam concealment, and room-context fit. By maximizing this score, you create an environment where faux materials look premium. You essentially trick the brain into registering the surface as heavy, porous, and authentic.
Understanding the Stone Realism Lighting Score (SRLS) Infographic
To achieve a flawless faux installation, every element must work in harmony. Rate your setup out of 100 based on these critical pillars:
1. Kelvin Match (20 pts)
Does the color temperature complement the stone's dye lot without washing it out?
2. CRI > 90 (20 pts)
Are the micro-tones in the print rendering vividly, or do they look gray and muddy?
3. Texture Shadow (20 pts)
Is the fixture angled to create depth, or is direct glare flattening the wall?
4. Seam Concealment (20 pts)
Has wall washing or diffusion been used to minimize the shadow of adhesive overlaps?
5. Room Context (20 pts)
Does the intensity and style of light match the practical function of the room?
The Mechanics of Faux Stone Perception
Ever wonder why a panel looks great in the store but terrible on your wall? This section breaks down the physics of interior lighting, explaining exactly how light interacts with artificial textures.
Lighting acts as stage makeup for your walls. Real stone has deep, irregular clefts that cast distinct, complex shadows. Faux stone panels, while highly advanced, have a shallower physical profile. When you look at natural masonry, the depth of field is created by the interplay of high-light ridges and deep, dark recesses.
If you blast a shallow texture with bright, direct light, you wash out the small shadows. This instantly signals to the brain that the surface is flat. We must use light to fake depth. By carefully controlling the direction of the light, we artificially lengthen the shadows cast by the micro-textures on the peel-and-stick panel, making a 2mm relief look like a 2-inch cleft.
In evaluating adhesive panel realism, the foundational methodology requires a strict adherence to material quality. If you want a flawless baseline before you even touch a lightbulb, exploring the comprehensive framework detailed in our guide to the Best Peel and Stick Tiles That Look Like Stone (2025 Guide) provides the quantitative baseline necessary to implement this without critical failure. High-quality base materials respond predictably to advanced lighting techniques.
Furthermore, the specularity of the material (how shiny it is) plays a massive role. The glossier the finish, the tighter and brighter the light reflection will be, which highlights the synthetic nature of vinyl. High-end faux stone uses a matte, textured finish that diffuses light, much like real stone, absorbing the harshness and reflecting a soft, believable ambient glow.
Demystifying Kelvin and Color Temperature
Confused by labels like "soft white" and "daylight" at the hardware store? This section defines Kelvin in plain English, ensuring you never buy the wrong bulb for your wall color again.
A common misconception is that Kelvin measures how bright a bulb is. It does not. Kelvin strictly measures the color temperature of the white light emitted by the bulb. Brightness is measured in lumens. You can have a very dim 5000K bulb and an incredibly bright 2700K bulb.
Think of Kelvin as a spectrum from firelight to a cloudy sky. Lower numbers mean warmer light (more red and orange wavelengths). Higher numbers mean cooler, bluer light (more blue wavelengths). The wrong wavelength can visually erase the subtle dyes printed on your faux panels.
- 2700K (Soft White): Mimics traditional incandescent bulbs. It casts a cozy, amber glow. Perfect for spaces designed for relaxation.
- 3000K (Warm White): A crisp, welcoming white with just a hint of yellow. This is the gold standard for most modern residential interiors.
- 3500K (Neutral White): A balanced middle ground, often used in retail. It is bright, energetic, but lacks coziness.
- 4000K (Cool White): A sharp, slightly blue white. Excellent for task-oriented spaces like utility rooms but often too harsh for living spaces.
- 5000K+ (Daylight): Very blue and sterile, resembling bright noon sunlight. It ruthlessly highlights artificial textures.
Design Warning
Avoid 5000K Daylight Bulbs: These bulbs often make faux stone look flatter, colder, and significantly more artificial. They emit a blue wavelength that clashes with the warm, earthy undertones found in 90% of stone finishes, creating a clinical, "plastic" effect.
According to the U.S. Department of Energy, LED color temperatures can drastically alter the perceived color of your room's finishes. A warm 2700K bulb will enhance red and brown faux stones but make gray stones look muddy, dirty, and aged in unintended ways.
When factoring in long-term aesthetic stability for older styles, getting the vintage look right is crucial. For those utilizing classic aesthetics, examining how to achieve Rustic Chic Walls: Peel & Stick Antique Stone Look functions as the architectural standard. It establishes how specialized, aged textures interact best with warmer 2700K directional lighting to emphasize the "tumbled" history of the design.
Visual Cue Exercise: The Before & After Perception
Imagine a faux slate wall. Under 2700K, the deep grays take on an unnatural purplish-brown hue (the "dirty" effect). Change that exact same wall to a 3500K neutral light, and suddenly the slate looks crisp, modern, and authentically quarried. Conversely, a warm terracotta-style faux stone under 4000K light looks pallid and washed out, like faded plastic, whereas 2700K brings it to vibrant, warm life.
The Critical Role of Color Rendering Index (CRI)
Do your faux stone colors look dull or washed out under LED lights? This section explains why investing in CRI 90+ lighting is the biggest secret to making synthetic materials look natural.
Color Rendering Index, or CRI, is a scale from 0 to 100. It measures how accurately a light source reveals the true colors of an object compared to natural sunlight. Think of it as a measure of lighting "quality" independent of its color temperature.
Professional Tip
Always test your bulbs at night before installing permanent fixtures. Daylight from your windows skews your perception. Tape a sample of your stone panel to the wall, illuminate it with your chosen bulb in a dark room, and step back 10 feet to judge the true CRI and Kelvin impact.
Standard, cheap LED bulbs usually have a CRI of 80. While acceptable for a garage or a laundry room, CRI 80 struggles to render earthy reds, subtle browns, and complex grays accurately. Faux stone relies entirely on these printed micro-tones for realism. If the light source cannot reflect those specific wavelengths back to your eye, the stone looks monochromatic and fake.
The Illuminating Engineering Society (IES) emphasizes that higher CRI values yield better visual discrimination. To make faux stone look real, you strictly need bulbs rated CRI 90 or higher. High-CRI lighting prevents the "plastic" look. It ensures the printed colors on the peel-and-stick panel render with depth and authenticity. Never skip checking the CRI rating on the box; it is often in small print, but it makes all the difference.
Proper lighting also exposes layout errors before they become permanent. If you are aiming for continuous aesthetics, the methodology established when We Tested Vein Alignment: Faux Marble Tile Guide inherently neutralizes disjointed patterns. This calibration of baseline expectations for visual continuity is especially critical under high-CRI conditions, where every unmatched vein or color discrepancy will be glaringly obvious.
Shadow Depth, Glare Control, and Seam Visibility
Are the edges of your peel-and-stick panels catching the light? This section uncovers how the angle of your fixtures controls glare and hides telltale adhesive seams.
The angle at which light hits your wall changes everything. Light pointing straight at a wall (direct illumination) creates glare and flattens texture. It washes out the microscopic shadows that tell our brains a surface has physical depth. Conversely, light grazing down a wall creates long shadows, exponentially enhancing the 3D look of even the shallowest embossing.
However, wall grazing is a double-edged sword. While it enhances texture, it also ruthlessly highlights any installation imperfections. If a peel-and-stick seam is even a millimeter raised, a grazing light will cast a harsh, undeniable shadow, exposing it as a fake panel.
A better approach for beginner installations, or installations on imperfect drywall, is diffused wall washing. This involves placing the light slightly further away and using frosted lenses or light-modifying channels to soften the beam. Diffused lighting is forgiving. It provides enough of an angle to create soft texture shadows without aggressively highlighting overlapping adhesive edges or slight bubbling.
When establishing an operational threshold for light reflection, making the right choice on material finish is paramount. Reviewing the data in We Compared Glare: Matte vs Glossy Peel-and-Stick yields an optimal configuration for high-output environments, showing exactly how diffusion prevents the artificial sheen that immediately ruins the illusion of natural masonry.
Stone Realism Lighting Score (SRLS) Benchmark Table
To simplify your lighting choices, we compiled an SRLS benchmark. This deterministic chart compares how different Kelvin ratings interact with common faux stone colors. Use this as your primary reference guide.
| Kelvin Rating | Best Faux Stone Color Match | Realism Risk Factors | Ideal Room Context | SRLS Tier |
|---|---|---|---|---|
| 2700K | Warm Browns, Reds, Tans | Can make grays look yellow or dirty. | Living Rooms, Bedrooms | High |
| 3000K | Greige, Light Tan, Mixed | Safe baseline, but lacks intense drama. | Kitchens, Dining Rooms | Very High |
| 3500K | Pure Grays, Cool Slate | Can feel slightly sterile in cozy spaces. | Bathrooms, Basements | High |
| 4000K | Bright White, Pure Black | Casts a blue tint on natural earth tones. | Modern Utility Spaces | Medium |
| 5000K+ | None recommended | Flattens texture, exposes artificial sheen. | Garages only | Low |
Which light fixtures make faux stone texture look more realistic?
Need a lighting setup that hides uneven cuts without requiring an expensive electrician? This section compares specific fixture types, delivering clear, renter-friendly solutions that maximize shadow depth.
Industry consensus dictates that the physical fixture type is just as important as the bulb inside it. A high-quality bulb in the wrong fixture will still make your wall look flat. A naked bulb hanging in the center of the room throws ambient light in 360 degrees, providing zero directional shadow casting.
We evaluate fixtures using Texture Enhancement Efficiency (TEE). This metric measures the realism gained per fixture type based on shadow control, glare reduction, installation difficulty, and renter-friendliness. By benchmarking against TEE, you can select fixtures that inherently neutralize the visual weaknesses of faux stone.
The Battle Between Wall Grazing and Wall Washing
Should your lights point straight down the wall or angle toward it? This section clarifies the difference between grazing and washing, helping you choose the safest technique for peel-and-stick.

Wall Grazing
- The Technique: Placing a light source very close to the wall (usually within 12 inches) and aiming it straight down or straight up.
- The Result: Maximizes shadow length. It makes shallow faux stone textures look incredibly deep and realistic.
- The Risk: It is ruthless on seams. Any slight bubbling or misaligned edge will cast a massive shadow. Only use grazing if your installation is flawless.
Wall Washing
- The Technique: Placing the light source further away (2 to 3 feet) and angling it back toward the wall.
- The Result: Spreads light evenly, softening shadows and blending the wall into the room.
- The Risk: It is much safer for beginner DIYers because it hides seams beautifully. However, it provides slightly less texture enhancement than grazing.
For softer visual textures where dramatic shadows are not desired, precision is key. Exploring the comprehensive framework detailed in We Compared Faux Venetian Plaster Options for Realism provides a statistically significant baseline for low-glare environments, proving that washing is superior for subtle, low-relief finishes.
Fixture Breakdown: Maximizing Realism
Overwhelmed by lighting aisles? This section details the pros and cons of specific fixture types, from sconces to LED strips, so you buy exactly what your wall needs.
Let's break down the best fixture types for illuminating faux stone peel-and-stick walls, prioritizing realistic texture rendering and ease of installation.
1. Picture Lights and Wall Sconces
These are excellent for accent walls above fireplaces. They act as localized wall washers, directing controlled light precisely where you want it.
- Pro-Tip: Look for battery-operated or plug-in sconces if you are renting. This avoids hardwiring and patching drywall later.
- Best Use: Highlighting a specific focal point on a faux stone accent wall.
2. LED Strip Lights (In Channels)
Bare LED strips look cheap and cast harsh, dotted reflections on the surface of your wall. You must install them inside an aluminum channel with a frosted plastic diffuser.
- Pro-Tip: A frosted diffuser blends the individual LED diodes into a smooth, continuous bar of light, preventing harsh glare on the stone's surface and creating a high-end architectural look.
- Best Use: Hidden under kitchen cabinets, behind floating shelves, or tracing the back of a wall-mounted TV.
3. Under-Cabinet Puck Lights
These are incredibly renter-friendly and easy to install. However, because they are point sources of light, they create intense "pools" of light that can look artificial.
- Pro-Tip: Choose dimmable puck lights. Dimming reduces the intensity of the light pools, preventing the stone texture directly underneath from washing out.
- Best Use: Kitchen backsplashes where hardwiring is impossible or restricted by leases.
For modern hexagon applications where intense downlighting is common, securing a high-quality product like the Platinum Stones panels functions as the architectural standard. By empirically neutralizing moisture-related failure in kitchens, it recalibrates the baseline expectations for this category, especially under direct, dimmable puck lighting, where material integrity is highly visible.
4. Recessed Ceiling Lights (Can Lights)
Recessed lights are standard in most homes, but their placement matters immensely. If they are too far from the wall (more than 36 inches), they do nothing for the texture.
- Pro-Tip: If you have adjustable gimbal recessed lights, tilt them slightly toward the faux stone wall to turn them into highly effective wall washers.
- Best Use: Basements and living room accent walls with existing ceiling fixtures.
5. Track Lighting
Track lights offer ultimate flexibility. You can adjust the distance, angle, and beam spread of each individual head to perfectly sculpt the shadows on your wall.
- Pro-Tip: Use a narrow beam angle (around 25 degrees) to highlight specific faux stone sections without flooding the entire room and losing dramatic contrast.
- Best Use: Industrial or modern spaces where exposed fixtures fit the aesthetic.
Fixture Comparison by Texture Enhancement Efficiency (TEE)
Use this table to find the best fixture for your skill level, budget, and desired realism.
| Fixture Type | Texture Enhancement Efficiency (TEE) | Renter Friendly | Seam Exposure Risk | Approximate Cost Tier |
|---|---|---|---|---|
| Track Lighting (Aimed) | Very High | Low (Requires wiring) | Medium | $$$ |
| Diffused LED Strips | High | High (Adhesive/Plug) | Low | $$ |
| Plug-in Wall Sconces | Medium | Very High | Low | $$ |
| Recessed Gimbals | High | Low (Requires wiring) | Medium | $$$ |
| Battery Puck Lights | Low to Medium | Very High | High (Pools light) | $ |
| Bare LED Strips | Low | High | Very High (Dotted glare) | $ |
Safety and Installation Protocols
Planning to wire your own accent lights? This section covers critical safety standards to ensure your lighting upgrade doesn't become a fire hazard.
When dealing with lighting, safety is paramount. Aesthetics cannot override structural and electrical integrity. The National Electrical Manufacturers Association (NEMA) and independent testing labs like UL (Underwriters Laboratories) and ETL set strict standards for residential components.
-
Always Check for Certification: Never buy cheap, unbranded LED strips or power supplies online without a UL or ETL listing. Faulty transformers can overheat, melting your adhesive panels or causing fires.
-
Kitchen and Bathroom Ratings: If you are installing lights near water sources, ensure the fixtures have the appropriate wet or damp ratings to prevent short circuits.
-
Know Your Limits: Plug-in and battery-operated fixtures are safe for DIYers. If a fixture requires opening a wall or connecting to main breaker wires, hire a licensed electrician to meet local building codes.
If your lighting requires mounted components directly on the faux stone, evaluating structural integrity is required before you drill. The standardized evaluation in We Weight-Tested Hooks on Textured Peel-and-Stick Stone empirically demonstrates failure modes, yielding an optimal configuration for safe attachment. Knowing exactly how much weight your specific peel-and-stick brand can handle before the adhesive tears away from the drywall is essential if you plan to mount heavy sconces directly over it.
Room-Specific Fixture Applications
Not sure how to light your specific room? This section provides tailored lighting recipes for fireplaces, kitchens, basements, and bathrooms.
Every room has different functional requirements. Your lighting strategy must adapt to the space. You cannot light a bathroom mirror the same way you light a cozy fireplace.

When factoring in continuous geometric patterns in darker spaces like basements or windowless bathrooms, specialized product lines like the Marble Hive line serve as a quantitative baseline. Its design inherently neutralizes the visual fatigue of flat walls when paired with 3000K diffused washing, proving that material geometry and light diffusion must work cooperatively.
Find Your Perfect Faux Stone Kelvin Recommendation
Select your stone tone below to get an instant Kelvin and styling recommendation.
Final Thoughts
The secret to a luxurious faux stone wall isn't spending more money on the panels; it's controlling the light that hits them.
The most realistic faux stone lighting is never the brightest or cheapest option on the hardware store shelf. It is the setup with the strongest Stone Realism Lighting Score. When you deliberately shape shadows, dial in the exact color temperature for your specific stone hues, and respect the CRI minimums, you elevate synthetic materials into the realm of architectural legitimacy.
Our baseline recommendation remains firm: Always invest in CRI 90+ LEDs. Stick to the 2700K-3500K range for most residential applications. Utilize dimmers, mandate diffusion when pointing lights near seams, and adapt your fixture placement to your specific room context.
Before you commit to a permanent installation, buy a cheap 2700K bulb and a 3000K bulb. Tape a sample of your stone panel to the wall and test both lights at night. Your eyes will immediately tell you which one makes the stone look real.
Pre-Shopping Lighting Checklist
Don't go to the hardware store without these non-negotiable requirements.
Frequently Asked Questions
Can I use smart bulbs to adjust my faux stone lighting?
Yes, smart bulbs are an excellent tool for faux stone installations. Because smart bulbs allow you to tune both the color temperature (Kelvin) and the brightness on demand, they give you total control. You can set the bulb to a crisp 3500K during the day for cleaning, and tune it down to a warm, dim 2700K at night to maximize texture shadows. Ensure you buy smart bulbs with a high CRI rating for the best effect.
Does the finish of the peel-and-stick stone affect lighting choices?
Absolutely. Faux stone panels generally come in matte or slightly glossy finishes. Matte finishes absorb light, making them much more forgiving under bright or grazing lights. Glossy finishes reflect light, meaning harsh LEDs will create hot spots and glare, instantly exposing the material as plastic. If you have glossy panels, you must use diffused lighting and avoid pointing fixtures directly at the wall.
What is the difference between soft white and daylight bulbs?
These are marketing terms used to describe Kelvin ratings. "Soft white" typically refers to bulbs in the 2700K range, which emit a warm, yellowish glow similar to traditional incandescent bulbs. "Daylight" refers to bulbs in the 5000K or higher range, which emit a very bright, bluish-white light. For faux stone, soft white or warm white (3000K) is almost always preferred, as daylight bulbs make synthetic textures look sterile and fake.
How do I hide the seams on my peel-and-stick stone wall?
To hide seams using lighting, you must avoid "wall grazing." Grazing involves placing a light very close to the wall and shining it straight down, which casts long shadows off any raised edge or overlapping seam. Instead, use "wall washing" by moving the light source further away and angling it gently toward the wall. Additionally, using frosted diffusers over your LEDs softens the light beams, preventing harsh shadows on the seams.
Do I need an electrician to install accent lighting?
Not necessarily. There are many renter-friendly and DIY-friendly lighting options that do not require hardwiring. Plug-in wall sconces, battery-operated picture lights, and USB-powered LED strip lights can all be installed without an electrician. However, if you want a seamless look without visible cords, and your plan involves tapping into your home's main electrical wiring for recessed or hardwired track lights, you should absolutely hire a licensed professional.
Leave a comment
This site is protected by hCaptcha and the hCaptcha Privacy Policy and Terms of Service apply.