


Peel and Stick Wallpaper for RV Walls: The Complete Makeover Guide
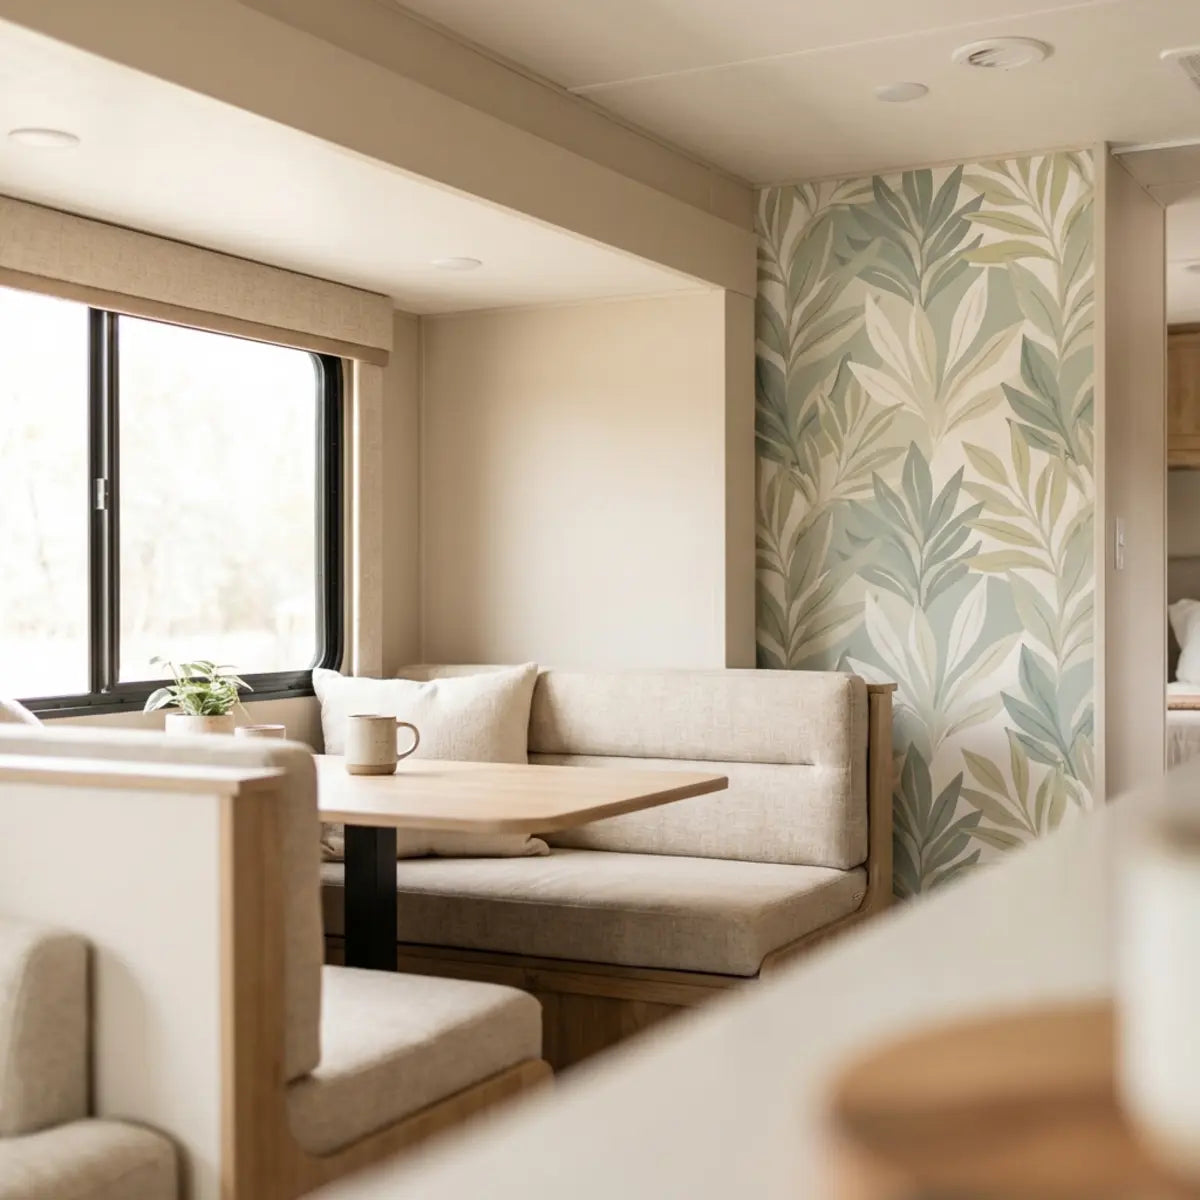
Is there anything more uninspiring than the standard "beige-on-beige" interior of a factory-model RV? We know the feeling well: you love the freedom of the road, but the interior feels stuck in 1998. You want a space that feels like home, but the fear of weight limits, humidity, and permanent damage often stops renovation plans in their tracks.
The good news is that modern adhesive technology has solved these problems.
Direct Answer
Peel and stick wallpaper is a removable, self-adhesive wall covering ideal for RV walls. It’s lightweight, easy to install, and perfect for renters or travelers wanting a quick, stylish update without permanent damage.
For modern RV owners, this material is a game-changer. It allows you to introduce personality and texture without the heavy construction materials used in residential homes. In this guide, we will walk you through exactly how to select, prep for, and install this material so it survives the bumps of the road and the shifting temperatures of the outdoors.
Starting your renovation journey? Welcome to the ultimate guide on peel and stick tiles! These versatile tiles have revolutionized home renovation for beginners and DIY enthusiasts alike. Imagine transforming your space overnight without the mess and fuss of traditional tiling – that's the magic of peel and stick tiling solutions! Whether you're looking to refresh a tired space in your home or get creative beyond the kitchen, this guide's got you covered.
Read: How to Use Peel and Stick Tiles in 2025 →
What makes peel and stick wallpaper ideal for RV walls?
When we consult on RV renovations, the first rule we follow is: Respect the Payload. Every ounce counts when you are towing or driving a home.
Traditional residential materials—like ceramic tile, wood shiplap, or heavy drywall compound—are the enemies of gas mileage and Gross Vehicle Weight Rating (GVWR). This is where peel and stick wallpaper shines.
1. The Weight Advantage
Standard wallpaper or heavy paneling adds significant mass. High-quality peel and stick vinyl is incredibly light. You can cover an entire slide-out or bedroom accent wall with less than two pounds of material.
- Metric: A box of ceramic tiles might weigh 30 lbs. An equivalent coverage of peel and stick wallpaper weighs roughly 1.5 lbs.
- Why it matters: It allows you to drastically change the visual aesthetic without impacting your towing capacity or suspension.
Curious about quality? Tired of your dull rental kitchen and want a quick, stylish fix? Stickwoll Peel and Stick Tiles might just be the answer! Known for their ease and aesthetics, these tiles are taking the design world by storm. But do they live up to the hype? Let's dive into an in-depth review of Stickwoll Peel and Stick Tiles and explore how they can transform your rental kitchen into a space you love! Read: Stickwoll Peel and Stick Tiles: A Transformative Review
2. Flexibility in Motion
An RV is essentially a house that experiences a constant earthquake while driving 65 MPH. Rigid materials (grout, stiff wood, plaster) eventually crack under this stress.
PVC/Vinyl Elasticity: The material used in reputable peel and stick wallpaper is flexible. It moves with the wall as your RV flexes over potholes and turns. It doesn't crack, chip, or pop off because it isn't fighting the movement; it is absorbing it.
3. Moisture and Temperature Tolerance
RVs are notorious for humidity spikes. Whether it’s steam from a tiny shower or the condensation from a cold night, moisture is a constant threat.
- • The Science: Most peel and stick wallpapers are made from vinyl (Polyvinyl Chloride). This plastic-based material is hydrophobic—it does not absorb water.
- • The Benefit: Unlike traditional paper-backed wallpaper that can mold or peel when damp, vinyl creates a sealed barrier. This makes it an excellent candidate for backsplashes and bathroom walls.

Visual Impact in Small Spaces
In a small space like a camper, you don't need much material to make a massive difference. We have seen owners transform a dark, cramped bunkhouse into an airy, modern retreat simply by applying a light-colored, vertical-striped pattern. The vertical lines draw the eye up, making the low RV ceilings feel instantly higher.
Design & Inspiration Hub
Design Insight: For kitchens, the logic is the same. Instead of heavy tiling, many renovators are opting for adhesive tiles. Discover why peel and stick tiles are the ideal solution for your RV kitchen makeover—lightweight, affordable, and easy for any DIY camper.
Explore: RV Kitchen Makeover →
Thinking about a full kitchen refresh? Ever looked at your kitchen and thought it needed a little sprucing up? You're not alone! Many homeowners crave an easy and budget-friendly facelift for their cooking spaces without the hassle of hefty renovation costs. In this article, we'll guide you through the process of transforming your kitchen using these clever tiles, with some added flair from simple DIY decor techniques.
Read: How to DIY Peel Stick Kitchen 2025 →
Can you use peel and stick wallpaper on all RV wall types?
The short answer is yes, but with a major asterisk: Preparation is everything.
RV walls are not like residential drywall. They are usually made of luan plywood covered with a vinyl "wallpaper board" that is often textured or slick. This presents two distinct challenges for adhesion: Texture (less surface area for glue to grab) and Slickness (glue slides off).
Understanding Your Surface
Before you buy a single roll, identify what you are working with.
RV Wall Type Analyzer
Click the button that best describes your RV walls to see the specific prep required.
Select a wall type above to see expert preparation advice...

Choosing the right pattern can help hide underlying wall texture.
The "Sandwich" Method for Texture
If your walls are heavily textured, simply sticking the wallpaper on is a recipe for failure. The adhesive needs a smooth surface.
Do not try to sand the texture off the wallboard (you will ruin the wall). Instead, create a smooth layer on top.
- Clean: Remove oils.
- Prime: Use a high-quality bonding primer.
- Paint: A layer of eggshell or satin paint fills in the micro-texture and gives the adhesive a perfect surface to grip.
Addressing the Seams
RVs have vertical strips covering the gaps between wall panels. You have two choices:
- 1. Remove: This looks cleaner but requires you to fill the gap with flexible spackle and tape it (like drywall).
- 2. Cover: If the strips are flat enough, you can wallpaper right over them. However, you may see a "bump" under the paper.
Expert Observation: We have found that for most DIYers, removing the trim is more trouble than it is worth unless you are doing a full gut renovation. Choosing a busy pattern (like a floral or geometric design) hides the bumps of the seams much better than a solid color or simple stripe.
For those dealing with the fear of adhesive failure—especially in extreme heat—we highly recommend reading our guide on RV Tile Adhesion Tips. Tired of RV tiles peeling? Learn how to keep peel and stick tile from falling off in your RV with expert prep, adhesives, and heat-proof tips.
Read: How to Keep Peel and Stick Tile from Falling Off in Your RV →
How do you install and maintain peel and stick wallpaper in an RV?
Installing wallpaper in an RV is like doing yoga in a closet. Space is tight, and angles are rarely square. Patience is your best tool here.
Phase 1: The Essential Prep (Do Not Skip)
If you skip this, your wallpaper will be on the floor in three months. Guaranteed.
- Degrease: RV kitchens and living areas accumulate cooking oils and diesel fumes over time. Wash the walls with a mixture of TSP (Trisodium Phosphate) and water, or a heavy-duty degreaser.
- Rinse: Wipe down with plain water to remove the cleaner residue.
- Dry: Let the walls dry for at least 24 hours. Any trapped moisture will push the adhesive off the wall.
- Alcohol Wipe: Right before applying, wipe the corners and edges with Isopropyl alcohol. This ensures the critical edge bond is perfect.
Phase 2: Installation Mechanics

Tools You Need:
- Sharp utility knife (with many spare blades)
- Felt-edged squeegee (plastic edges can rip the paper)
- Metal straight edge
- Tape measure
Step-by-Step Guide:
- Draw a Level Line: Never trust the RV ceiling or floor to be straight. Use a level (or a laser level) to draw a vertical "plumb line" for your first strip. If your first strip is crooked, the whole wall will be crooked.
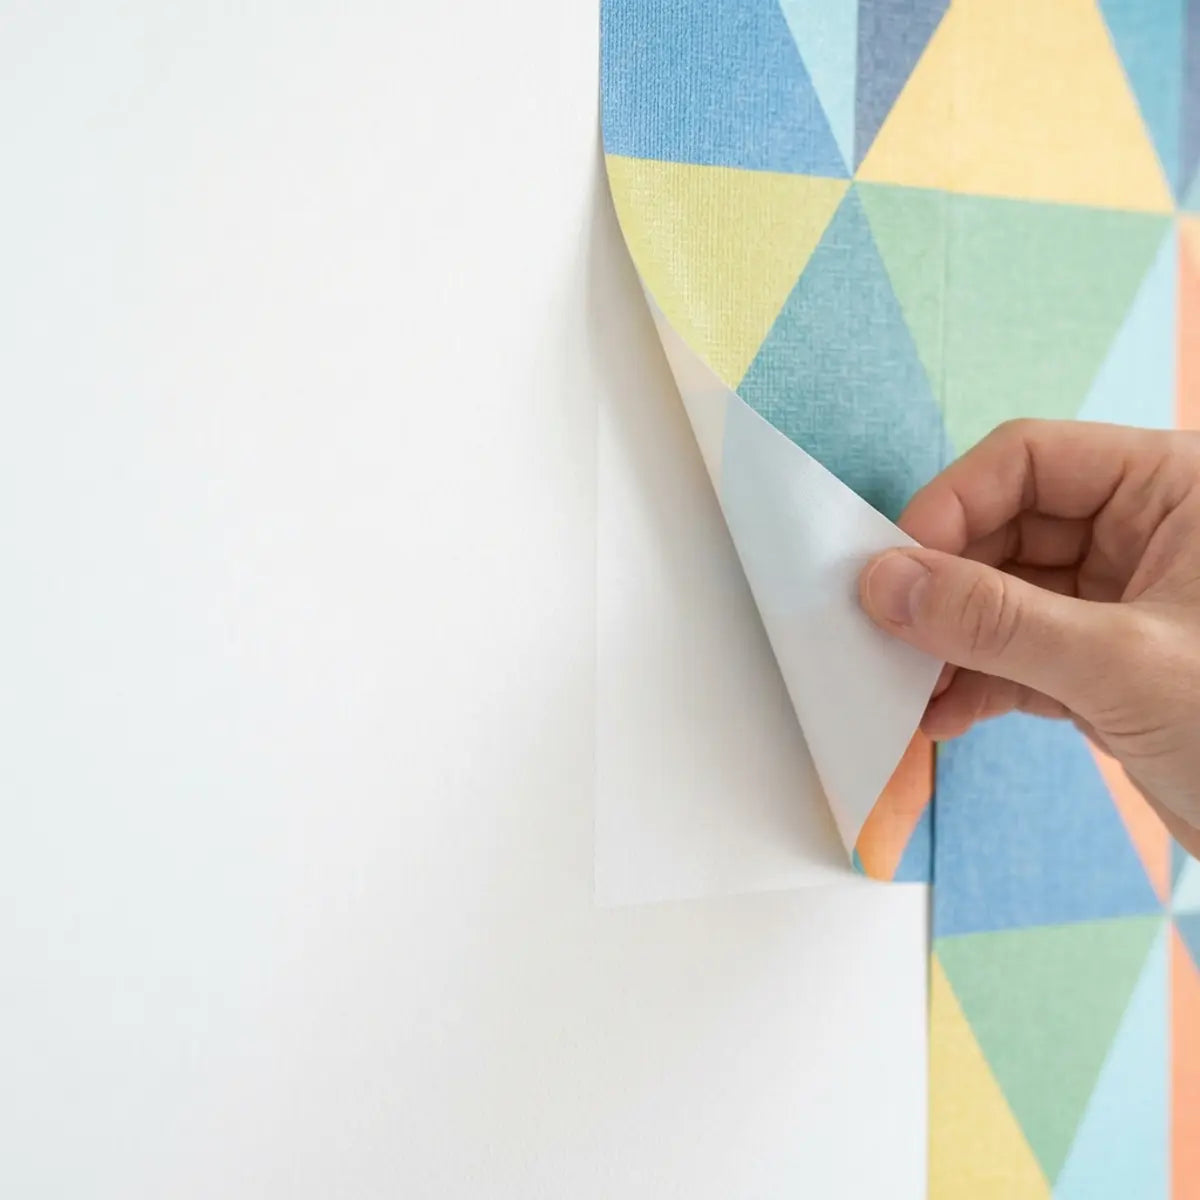
- The "Peel and Smooth" Technique: Peel back only the top 4-6 inches of the backing. Stick the top to the wall, aligning with your plumb line. Slowly pull the backing down behind the paper with one hand, while smoothing the paper onto the wall with the squeegee in the other hand.
- Matching Patterns: When hanging the second strip, overlap the edge slightly (usually 1/8 to 1/4 inch) to match the pattern. Check the manufacturer's instructions; some require an overlap, others are "butt joints" (edges touching).
- Trimming: Once the sheet is up, use your straight edge and a fresh blade to trim the excess at the ceiling and floor.
For a visual breakdown of similar techniques, specifically for managing patterns and cutting around obstacles, we have two essential resources:
-
Need a beginner's crash course? Provides a foolproof, visual-rich installation guide with troubleshooting tips tailored for people with no prior tiling experience.
Read: Easy Guide: Install Peel & Stick Subway Tiles → -
Working on a backsplash? Are you dreaming about updating your kitchen but dread the time, cost, and mess? Join me as I guide you through the installation process and unravel the top backsplash designs to revamp your space.
Read: How to Install Peel and Stick Tiles & Best Designs 2025 →
Phase 3: Dealing with RV Obstacles
RVs have weird obstacles: window valances, control panels, and curved corners.
- Valances: Remove them if possible. It is much easier to wallpaper behind them and reinstall than to cut around them.
- Control Panels: Do not wallpaper over them! Loosen the screws, slide the paper behind the faceplate, and tighten it back down for a professional, seamless look.
Phase 4: Long-Term Maintenance
To keep your walls looking fresh for years:
- Climate Control: Extreme heat (storage in Arizona summer) can soften the adhesive. If storing the RV, try to crack a vent or keep it in the shade. If an edge lifts, a quick blast from a hair dryer and firm pressure can often reactivate the glue.
- Cleaning: Use a damp cloth and mild soap. Avoid harsh scrubbers or bleach, which can fade the print.
Looking for inspiration on how to combine these wall treatments with other elements?
Explore how to transform your living space using modern peel and stick tiles for stunning accent walls and stylish patterns. Learn design tips, DIY steps, and style inspirations.
Explore: Modern Peel and Stick Tiles: Accent Walls & Patterns →
Frequently Asked Questions
Will peel and stick wallpaper damage my RV walls when removed?
Generally, no. This is the primary benefit of "removable" wallpaper. However, if the underlying wall was paper-faced (common in older RVs) and unprimed, the adhesive could pull up some of the paper layer. Using a hair dryer to warm the adhesive during removal greatly reduces this risk by making the glue more pliable.
How does humidity affect peel and stick wallpaper in a bathroom?
High-quality vinyl wallpaper is moisture-resistant and works well in RV bathrooms, provided the edges are sealed. The wallpaper itself won't mold, but steam can loosen the adhesive at the seams over time. We recommend ensuring the room is well-ventilated during showers and squeegeeing the walls down if they get directly wet.
Can I put wallpaper over the existing wallpaper border?
We advise against it. Those borders are often slightly raised and have a different texture than the wall. If you wallpaper over them, you will see a visible ridge. It is better to peel the border off (use heat and Goo Gone) or sand the edge down to feather it into the wall before applying new paper.
How much wallpaper do I need for a travel trailer slide-out?
Measure the height and width of each wall to get the square footage, then add 15-20%. This extra buffer is crucial for pattern matching (waste caused by aligning the design) and for mistakes. It is far better to have leftover material for repairs than to run short and find the batch is sold out.
Final Thoughts
Transforming your RV doesn't require a demolition crew or a massive budget. By choosing the right peel and stick wallpaper and respecting the unique physics of a mobile environment—movement, temperature, and weight—you can create a space that feels personal and high-end.

The key takeaway is to prioritize preparation. Clean those walls, prime the porous surfaces, and take your time with the installation. The result will be a durable, stylish interior that makes every road trip feel a little more luxurious.
Ready to start your project? Browse our recommended collections or check out our guide on Install Peel & Stick Subway Tiles to see how easily you can pair your new wallpaper with a stunning backsplash.
Don't forget to subscribe to our newsletter for more RV renovation tips, seasonal trends, and exclusive design hacks delivered straight to your inbox.

Leave a comment
This site is protected by hCaptcha and the hCaptcha Privacy Policy and Terms of Service apply.