


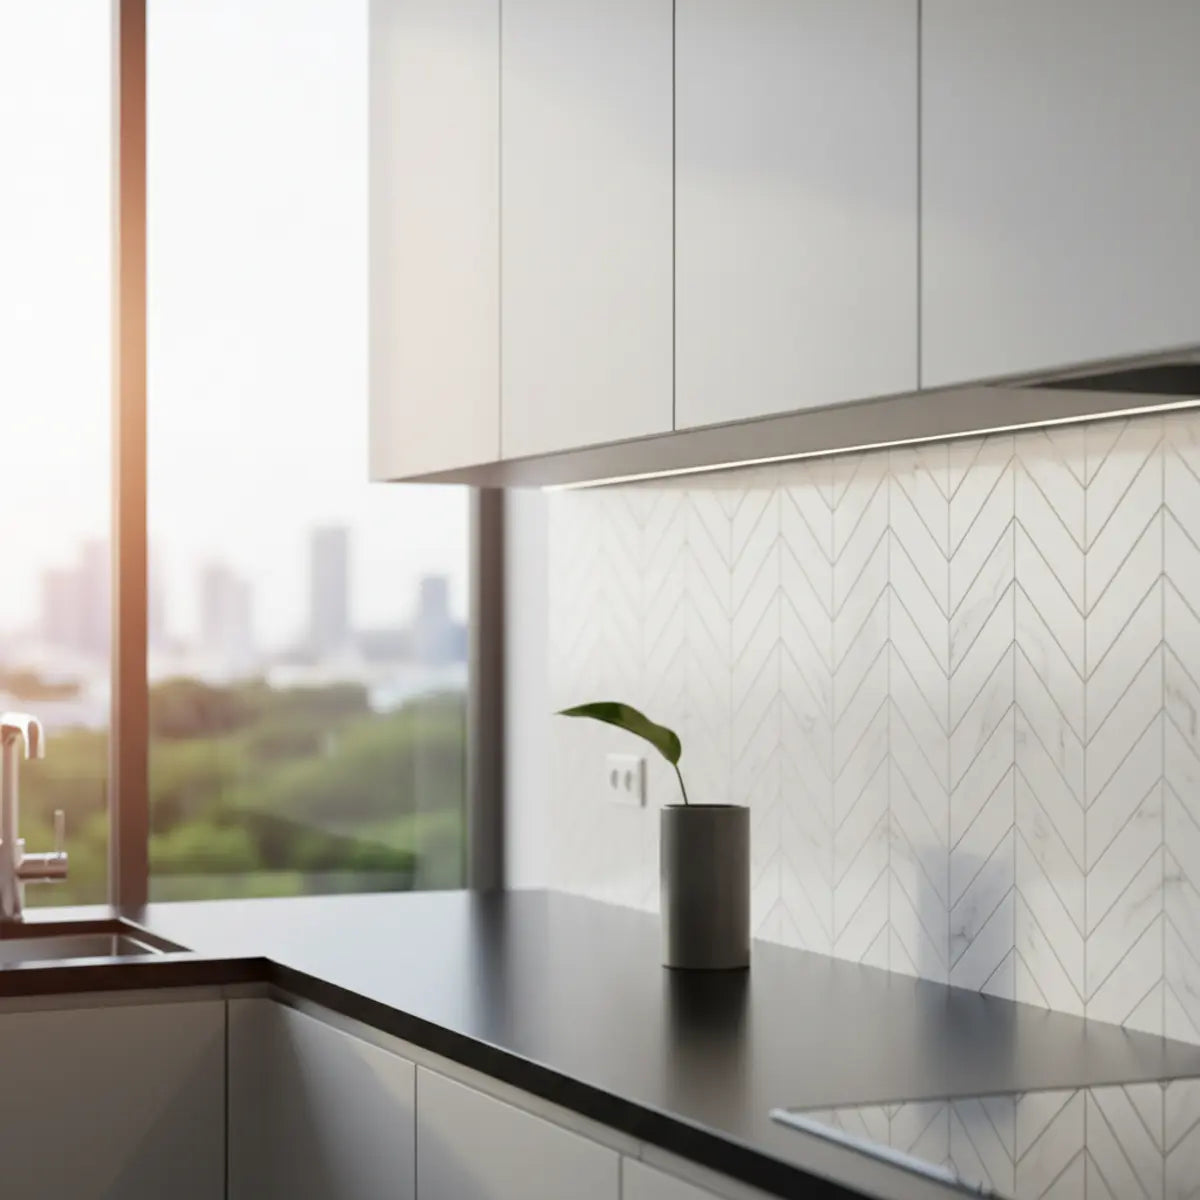
Stellen Sie sich vor, wie warmes Morgenlicht durch Ihre Küche fällt und die feinen Winkel eines strukturierten Backsplash einfängt. Das ist nicht nur eine Wand – es ist eine Oberfläche mit Tiefe, Bewegung und Geschichte. Das ist die Wirkung eines modernen Herringbone Backsplash, einer Designentscheidung, die den Look und das Gefühl der durchdachtesten Küchen von 2025 immer stärker prägt. Seit Jahren lieben Designer und Hausbesitzer dieses Muster, weil es zugleich klassisch und völlig neu wirkt.
Der moderne Herringbone Backsplash für 2025
Der Trend zum modernen Herringbone Backsplash für 2025 wird durch die Verbindung des klassischen, dynamischen Musters mit neuen Materialien, Texturen und durchdachten Farbentscheidungen definiert. Zu den wichtigsten Elementen zählen matte Keramik, umweltfreundliches recycled glass, Natursteine wie marble und zellige sowie markante grout-Linien, die entweder einen starken Kontrast erzeugen oder einen weichen, tonalen Look schaffen.
Das Comeback dieses Musters ist kein Zufall. Es löst ein häufiges Design-Dilemma: Wie lässt sich visuelles Interesse und ein Hauch von Luxus hinzufügen, ohne einen Raum zu überladen? Bei so vielen Optionen ist es jedoch leicht, den Überblick zu verlieren. Sie fragen sich vielleicht, welches Material zu Ihrem Alltag passt, welche Farbe in ein paar Jahren nicht altmodisch wirkt oder ob das Muster überhaupt zur Aufteilung Ihrer Küche passt.
Dieser Leitfaden soll Ihre verlässliche Orientierung sein. Wir haben die wichtigsten Trends, praktischen Tipps und visuelle Inspiration zusammengestellt, damit Sie von der Idee zur Umsetzung kommen. Entdecken wir die modernen Herringbone Backsplash-Ideen, die Küchen 2025 neu prägen.
Warum Herringbone das Küchenmuster ist, das 2025 im Blick behalten werden sollte
Die Frage:
Sie finden kein Muster, das sich zugleich zeitlos klassisch und angenehm modern anfühlt?
Das Versprechen:
Dieser Abschnitt zeigt, warum das Herringbone-Muster genau diese Lücke schließt und es 2025 zur ersten Wahl für Designer macht.
Das Herringbone-Muster hat tiefe historische Wurzeln, die bis zu Textilien und römischen Straßenbelägen zurückreichen. Diese lange Geschichte verleiht ihm eine beständige, klassische Qualität. Wenn es jedoch mit modernen Materialien und Farben als Küchen-Backsplash eingesetzt wird, wirkt es vollkommen zeitgemäß. Genau diese besondere Dualität begeistert Designer und Hausbesitzer.
Aus unserer Erfahrung wünschen sich viele Kunden etwas Dynamischeres als klassische subway tile, sind aber vorsichtig bei allzu trendigen Mustern, die schnell veralten könnten. Herringbone ist die perfekte Lösung. Seine Zickzack-Struktur erzeugt Bewegung und Energie, zieht den Blick an und wird so ganz natürlich zum Blickfang.
Laut einem aktuellen Pinterest-Trendbericht sind die Suchanfragen nach "herringbone backsplash" im letzten Jahr um 60% gestiegen, was auf einen deutlichen Wandel im Interesse von Hausbesitzern hinweist. Das ist nicht nur etwas für große, weitläufige Küchen. Die diagonalen Linien des Musters können das Auge geschickt täuschen und kleinere Küchen je nach Ausrichtung der Fliesen breiter oder höher wirken lassen.
Stellen Sie sich eine elegante skandinavische Küche mit matten weißen Herringbone-Fliesen, hellen Eichenfronten und mattschwarzen Beschlägen vor. Das Muster bringt Textur und Raffinesse hinein, ohne die minimalistische Ästhetik zu stören. Das ist ein Beweis für die enorme Vielseitigkeit von Herringbone.

Materialtrends: Von Naturstein bis zu umweltfreundlichen Fliesen
Die Frage:
Sie fühlen sich von der großen Auswahl an Materialien überfordert, von klassischem marble bis zu neuen recycelten Optionen?
Das Versprechen:
Wir stellen die wichtigsten Materialien für 2025 vor und konzentrieren uns dabei auf ihre Ästhetik, Haltbarkeit und den wachsenden Fokus auf Nachhaltigkeit.
Das gewählte Material ist ebenso wichtig wie das Muster selbst. Für 2025 geht der Trend zu Materialien mit Textur, Authentizität und Gewissen.
Die besten Materialoptionen für 2025
- Zellige Tile: Handgefertigte marokkanische Tonfliesen werden für ihre Unregelmäßigkeiten geschätzt. Jede Fliese weist leichte Unterschiede in Farbe und Textur auf, wodurch eine Oberfläche entsteht, die natürlich und charaktervoll wirkt.
- Marble: Immer ein Klassiker, bringt marble unverkennbare Eleganz mit sich. Herringbone-Backsplashes aus Calacatta- und Carrara-marble sind weiterhin beliebt, müssen jedoch versiegelt und sorgfältiger gepflegt werden, um Flecken zu vermeiden.
- Porcelain & Ceramic: Das sind die Arbeitstiere unter den Fliesen. Moderne Fertigung ermöglicht porcelain-Fliesen, die Naturstein oder Beton täuschend echt nachahmen, dabei aber deutlich langlebiger und nahezu pflegefrei sind.
- Recycled Glass: Da Nachhaltigkeit bei Designentscheidungen immer wichtiger wird, ist recyceltes Glas eine schöne und verantwortungsbewusste Option. Es reflektiert das Licht auf wunderbare Weise und lässt eine Küche heller wirken, und viele Marken bieten mittlerweile Fliesen mit bis zu 80% Post-Consumer-Recyclinganteil an.
Ein weit verbreiteter Irrglaube ist, dass umweltfreundliche Materialien weniger langlebig sind. Tatsächlich sind moderne Fliesen aus recyceltem Glas und Verbundmaterialien so entwickelt, dass sie Hitze und Feuchtigkeit in der Küche standhalten und traditionelle Optionen oft sogar übertreffen.
Für Hausbesitzer, die eine zugängliche und weniger dauerhafte Lösung suchen, hat sich die Welt der Peel-and-Stick-Fliesen enorm weiterentwickelt. Um zu sehen, wie vielseitig diese budgetfreundlichen Materialien sein können, ist unser Leitfaden zu 25 moderne Vinyl-Backsplash-Ideen für stilvolle Häuser eine fantastische Inspirationsquelle.

Farbkombinationen & Fugenoptionen, die 2025 prägen
Die Frage:
Macht die Fugenfarbe *wirklich* so einen großen Unterschied?
Das Versprechen:
Hier sehen Sie genau, wie die richtige Fuge Ihren backsplash von einer dezenten Textur in ein markantes Statement-Piece verwandeln kann.
Fugenmasse ist der unterschätzte Held des Fliesendesigns. Früher rein funktional, ist sie heute ein wichtiges Gestaltungselement, um den finalen Look Ihres herringbone backsplash zu definieren. Ihre Wahl läuft im Wesentlichen auf zwei Strategien hinaus: Kontrast oder Harmonie.
Kontraste schaffen
Die Kombination aus einer hellen Fliese, etwa klassischer weißer Keramik, und dunkelgrauer oder schwarzer Fuge erzeugt eine dramatische, grafische Wirkung. Dieser Ansatz betont die feine „V“-Form des herringbone-Musters und macht Ihren backsplash zu einem markanten Blickfang. Das ist ein typischer Look in modernen Farmhouse- und Industrial-Küchen.
Harmonie erzielen
Für eine weichere, ruhigere Ästhetik wählen Sie eine Fugenfarbe, die Ihrer Fliese möglichst nahekommt. Eine salbeigrüne Fliese mit salbeigrüner Fuge erzeugt beispielsweise einen monolithischen Look. Das Muster bleibt durch seine Struktur und Schattierungslinien sichtbar, wirkt aber eher wie eine subtile, elegante Fläche als wie ein unruhiges Muster.
Ein Profi-Tipp, den wir Kunden immer mitgeben, ist, die Fugenfarbe an einem anderen Element in der Küche zu orientieren. Wenn Sie zum Beispiel Quarzarbeitsplatten mit grauer Maserung haben, schafft eine ähnliche graue Fuge für Ihren backsplash ein raffiniertes, stimmiges Gestaltungskonzept. Um tiefer in die vielfältige Welt der Fliesenmaterialien einzutauchen und die perfekte Lösung für Ihr Projekt zu finden, bietet unser umfassender Leitfaden Was ist der beste Fliesenguide für Kitchen Backsplash einen ausführlichen Überblick über Ihre Möglichkeiten.
Layout-Inspiration: Herringbone in kleinen und großen Küchen
Die Frage:
Machen Sie sich Sorgen, dass ein dynamisches Muster wie herringbone Ihre kleine Küche überladen könnte?
Das Versprechen:
Entdecken Sie, wie Sie das Muster richtig skalieren und ausrichten, damit sich jede Küche – unabhängig von der Größe – großzügiger und wunderschön gestaltet anfühlt.
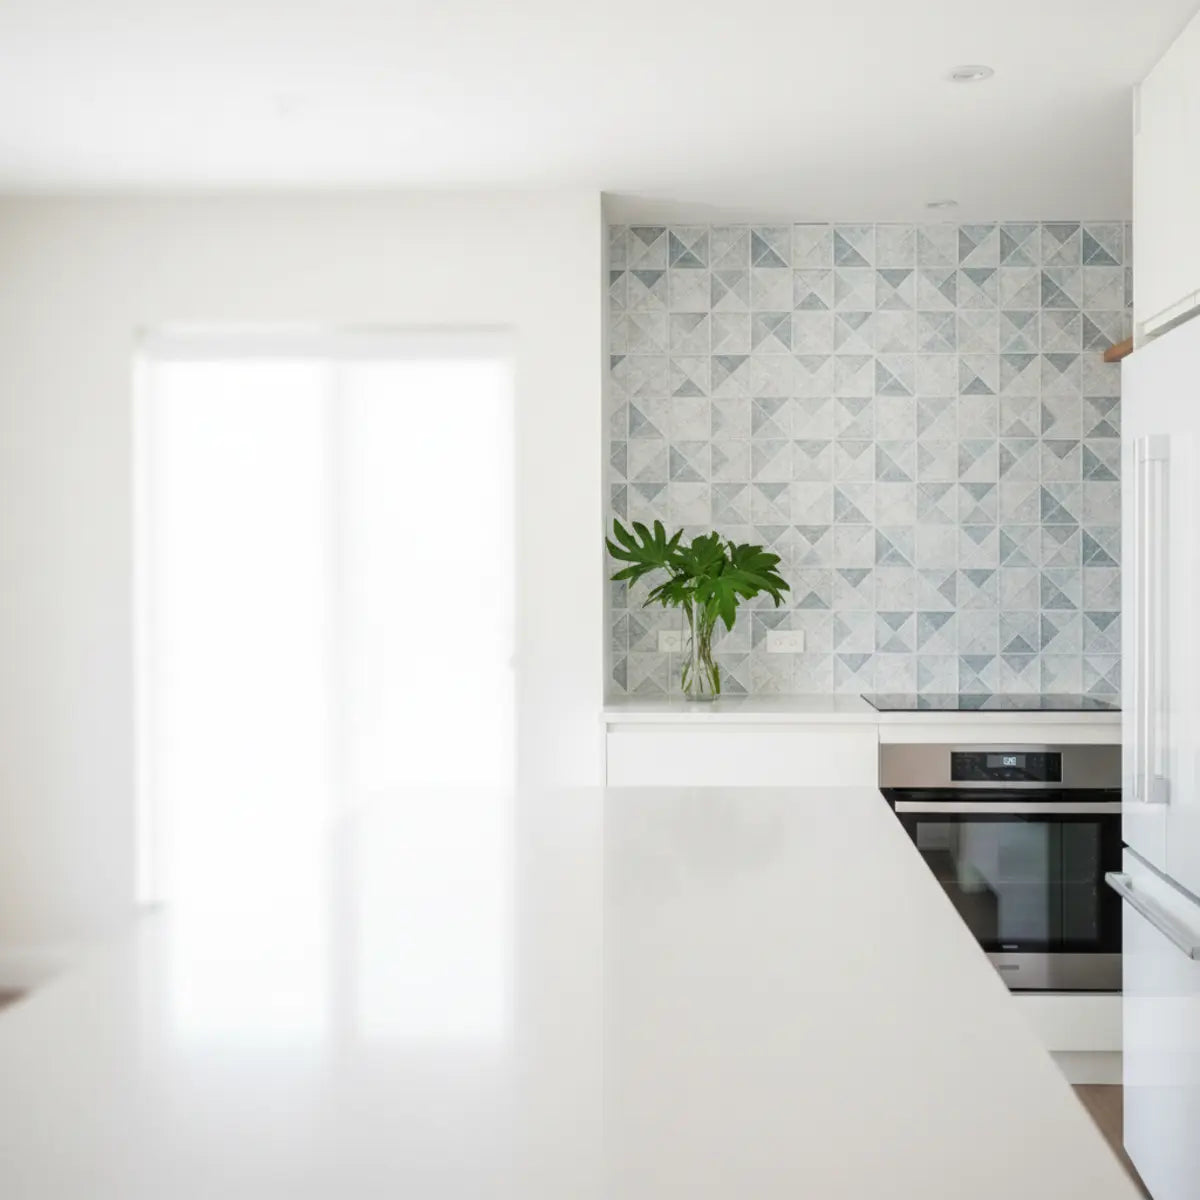
Eine der besten Eigenschaften des herringbone-Musters ist seine Skalierbarkeit. Es lässt sich wunderbar an eine gemütliche Pantryküche oder an eine große Akzentwand anpassen. Das Geheimnis liegt in Fliesengröße und Ausrichtung.
Tipps für kleine Küchen
In kleineren Räumen verhindern kleinere Formate (wie 1"x4" oder 2"x6"), dass das Muster zu groß oder unruhig wirkt. Eine helle Farbpalette trägt ebenfalls dazu bei, den Raum offen und luftig wirken zu lassen. Ein häufiger Fehler ist zu glauben, ein Muster lasse einen kleinen Raum noch kleiner erscheinen – doch die diagonalen Linien von herringbone erzeugen tatsächlich den Eindruck von Bewegung und Breite.
Ein großartiger Trick für kleinere Küchen ist es, den backsplash bis zur Decke hochzuführen. Diese vertikale Anwendung lenkt den Blick nach oben und lässt den Raum deutlich höher wirken.
Kreative Layouts und Akzente
Sie müssen sich nicht für eine ganze Wand in herringbone entscheiden. Als Akzentfläche funktioniert das Muster wunderbar. Erwägen Sie, hinter dem Herd oder der Spüle ein herringbone-Panel zu installieren, eingerahmt von einer einfachen Fliesenkante oder sogar nur einer gestrichenen Wand. So entsteht ein wirkungsvoller Blickfang ohne die Kosten oder die visuelle Schwere einer vollständigen Verlegung. Diese Strategie ist nur eine von vielen Trendigen Küchenwand-Ideen 2025, mit denen Sie Ihren Raum maximal individuell gestalten können.

Schritt für Schritt: So installieren Sie einen Herringbone-Backsplash
Die Frage:
Sind Sie versucht, dieses Projekt selbst in die Hand zu nehmen, fühlen sich aber von den Winkeln und Schnitten eingeschüchtert?
Das Versprechen:
Diese Anleitung gliedert den Einbau in klare, gut machbare Schritte und gibt Ihnen das Vertrauen, ein professionell wirkendes Ergebnis zu erzielen.
Das Verlegen einer herringbone backsplash erfordert mehr Präzision als ein herkömmliches subway tile Muster, ist aber ein Projekt, das ein geduldiger DIYer durchaus bewältigen kann. Eine sorgfältige Planung ist absolut entscheidend.
Schritt 1: Vorbereitung ist alles
Bevor auch nur eine Fliese an die Wand kommt, stellen Sie sicher, dass die Oberfläche sauber, trocken und vollkommen glatt ist. Füllen Sie alle Löcher aus und schleifen Sie sie glatt. Eine makellose Basis ist entscheidend für eine gute Haftung. Messen Sie den Bereich, den Sie fliesen möchten, und berechnen Sie die Quadratmeterzahl, um die richtige Menge Fliesen zu kaufen (immer 10-15% für Zuschnitte und Fehler dazurechnen).
Schritt 2: Ihre Mittellinie finden
Anders als bei anderen Mustern beginnen Sie nicht in einer Ecke. Für ein herringbone Layout müssen Sie die exakte vertikale Mitte Ihrer Wand finden. Verwenden Sie eine Wasserwaage, um vom Arbeitsplattenrand bis zu den Schränken eine perfekt gerade Lotlinie zu ziehen. Diese Linie dient als Orientierung für die Spitzen Ihrer „V“-Formen und sorgt dafür, dass das Muster ausgewogen wirkt.
Schritt 3: Fliesen schneiden und verlegen
Hier wird es knifflig. Sie benötigen eine Nasssäge mit einem guten Diamantblatt, um die Winkelzuschnitte an den Stellen auszuführen, an denen das Muster auf Arbeitsplatte und Schränke trifft. Tragen Sie zunächst eine dünne Schicht Fliesenkleber (thin-set mortar) mit einer Zahnkelle auf. Setzen Sie die ersten Fliesen entlang der Mittellinie und arbeiten Sie sich nach außen vor. Verwenden Sie Fliesenkreuze, um gleichmäßige Fugen zu gewährleisten.
Schritt 4: Verfugen und Veredeln
Nachdem der Kleber vollständig ausgehärtet ist (in der Regel 24-48 Stunden), ist es Zeit zum Verfugen. Tragen Sie den grout mit einem Fugengummi im 45-Grad-Winkel in die Fugen ein und drücken Sie ihn hinein. Nach etwa 15-30 Minuten wischen Sie überschüssigen grout mit einem feuchten Schwamm von den Fliesenoberflächen ab. Sobald der grout ausgehärtet ist, tragen Sie einen Fugenschutz auf, um ihn vor Flecken und Feuchtigkeit zu schützen.
Für alle, die den herringbone Look lieben, aber eine einfachere und schnellere Einbauvariante suchen, haben moderne peel-and-stick Produkte das DIY-Projekt revolutioniert. Eine komplette Schritt-für-Schritt-Anleitung zu diesem benutzerfreundlichen Ansatz finden Sie in unserem ausführlichen Ratgeber zu So verlegen Sie Peel and Stick Tiles & die besten Designs 2025, der besten verfügbaren Ressource.
Stil-Kombinationen: Arbeitsplatten, Schränke & Armaturen
Die Frage:
Wie stellen Sie sicher, dass Ihre schöne neue backsplash harmonisch mit Schränken, Arbeitsplatten und Beschlägen zusammenwirkt?
Das Versprechen:
Wir zeigen Ihnen bewährte Kombinationen und Designprinzipien für eine stimmige und beeindruckende Küchenatmosphäre.
Eine backsplash existiert nicht im luftleeren Raum. Ihr Erfolg hängt davon ab, wie gut sie die anderen wichtigen Elemente Ihrer Küche ergänzt. Entscheidend ist die Balance aus Textur, Farbe und Oberfläche.
Arbeitsplatten und Schränke
Wenn Sie eine optisch lebhafte backsplash wie eine marmorierte herringbone backsplash wählen, entscheiden Sie sich für eine ruhigere Arbeitsplatte, etwa aus einfarbigem Quarz oder Soapstone. Umgekehrt können Sie bei einer dezenten, einfarbigen Keramikbacksplash zu einer dramatischeren Arbeitsplatte mit stark geädertem Granit oder Marmor greifen.
Eine klassische Kombination mit starkem Kontrast, die wir überall sehen, sind warme Walnussschränke mit einer kühlen, hellen backsplash aus Marmor oder Porzellan im herringbone Muster. Die Wärme des Holzes bildet einen schönen Ausgleich zu den klaren, sauberen Linien der Fliese und schafft einen Look, der einladend und zugleich elegant wirkt.
Armaturen und Beleuchtung
Beschläge an den Schränken, der Wasserhahn und die Leuchten sind der Schmuck der Küche. Für einen modernen Look sorgen matte schwarze Armaturen für einen markanten Kontrast zu einer hellen backsplash. Für eine wärmere, glamourösere Wirkung können gebürstetes Messing oder champagne bronze Akzente die warmen Töne in Holzschränken oder Adern der Arbeitsplatte aufgreifen.
Vergessen Sie schließlich nicht die Beleuchtung. Eine Unterbau-Beleuchtung ist ein Muss, um die Textur und das filigrane Muster Ihrer herringbone backsplash hervorzuheben und sie bei Tag und Nacht zu einem echten Blickfang zu machen. Entscheidend ist es, zu visualisieren, wie unterschiedliche Fliesenmuster mit diesen Elementen zusammenspielen. Weitere Ideen finden Sie in unserem Ratgeber zu Wie man trendige Subway Tile Muster verwendet, der Ihnen dabei hilft, verschiedene Layouts und ihre Wirkung zu entdecken.

Moderne Varianten: Herringbone mit anderen Fliesenmustern kombinieren
Die Frage:
Sie lieben den Look von herringbone, möchten aber ein Design schaffen, das sich vollkommen einzigartig und individuell anfühlt?
Das Versprechen:
Lernen Sie das Geheimnis von Designern kennen, wie man Fliesenmuster kreativ kombiniert, um einen hochwertigen Look zu erzielen, ohne die Küche chaotisch wirken zu lassen.
Für alle, die beim Design wirklich mutig sind, kann das Kombinieren von Fliesenmustern eine Küche von schön in unvergesslich verwandeln. Der Schlüssel, um eine „Musterüberladung“ zu vermeiden, liegt darin, eine klare Hierarchie zu schaffen.
Eine gute Faustregel ist das 80/20-Prinzip. Lass ein Muster die Hauptrolle spielen (dein herringbone) und das andere die unterstützende Rolle. Verwende zum Beispiel ein auffälliges herringbone-Muster auf einer Akzentwand, etwa im Bereich hinter dem Herd oder einer Kücheninsel, und ein einfacheres Fliesenformat mit größerem Format an den umliegenden Wänden.
Ein weiterer anspruchsvoller Ansatz ist, dieselbe Fliese zu verwenden, aber in unterschiedlichen Mustern. Du könntest eine Wand aus senkrecht gestapelten subway tiles haben, die über dem Spülbecken in ein herringbone-Layout übergeht. Das schafft einen feinen Wechsel in Textur und Rhythmus, der bewusst und maßgeschneidert wirkt. Manche Hausbesitzer kombinieren herringbone sogar mit unterschiedlichen Materialien, etwa dem rustikalen Charme von Ziegel. Für visuelle Ideen zum Kombinieren von Texturen bietet unser Artikel über So verwenden Sie rustikale Ziegel-Fliesen-Akzente großartige Inspiration.
Welcher herringbone-Stil passt zu Ihrer Küche?
Pflege & langfristige Wartung für herringbone-Backsplashes
Die Frage:
Sorgen Sie sich, dass ein schöner und filigraner backsplash schwer sauber zu halten und dauerhaft schön zu erhalten ist?
Das Versprechen:
Dieser Abschnitt bietet einfache, praktische Reinigungsroutinen und langfristige Pflegestrategien für jedes backsplash-Material.
Ihre kitchen backsplash ist eine stark beanspruchte Fläche, daher ist es wichtig, ein Material zu wählen, das zu Ihrem Alltag passt. Glücklicherweise ist die Pflege eines herringbone-Backsplashes unkompliziert. Die wichtigsten Faktoren hängen vom Material und vom grout ab.
Ein verbreiteter Mythos ist, dass die Winkel eines herringbone-Musters mehr Schmutz festhalten. In der Praxis ist das nicht der Fall: Solange es richtig versiegelt ist, unterscheidet sich die Reinigung nicht von der jeder anderen Fliesenanordnung. Ein einfacher Sprühstoß mit einem pH-neutralen Reiniger oder einer milden Mischung aus Spülmittel und Wasser reicht für die tägliche Reinigung aus.
Der wichtigste Faktor bei der langfristigen Pflege ist das Versiegeln. Naturstein wie marble ist porös und muss bei der Installation und danach in der Regel einmal pro Jahr versiegelt werden. So wird verhindert, dass etwa Wein, Kaffee oder Öl in den Stein eindringen und dauerhafte Flecken verursachen. Auch grout ist zementbasiert, also porös, und sollte versiegelt werden, um Verfärbungen zu vermeiden.
Hier ist ein kurzer Vergleich des Pflegeaufwands für beliebte Materialien:
| Material | Tägliche Reinigung | Versiegelung erforderlich | Langfristige Haltbarkeit |
|---|---|---|---|
| Marmor | pH-neutrale Reinigungslösung; Verschüttetes sofort abwischen | Jährlich (Stein & Fugenmörtel) | Hoch, aber anfällig für Ätzung/Flecken |
| Porzellan | Jeder nicht scheuernde Reiniger | Nur der Fugenmörtel muss versiegelt werden | Sehr hoch; flecken- und kratzfest |
| Keramik | Jeder nicht scheuernde Reiniger | Nur die Fugenmasse muss versiegelt werden | Hoch; langlebig und pflegeleicht |
| Recyceltes Glas | Jeder nicht scheuernde Reiniger | Nur die Fugen müssen versiegelt werden | Sehr hoch; porenfrei und fleckenresistent |
Abschließende Gedanken
Das herringbone-Muster hat seine Beständigkeit längst bewiesen und sich elegant von antiken Böden zum Blickfang der modernen Küche entwickelt. Seine anhaltende Beliebtheit liegt in der perfekten Balance aus klassischer Struktur und dynamischer Energie. Mit Blick auf 2025 ist der Trend klar: Dieses zeitlose Muster wird mit nachhaltigen Materialien, durchdachten Farben und kreativen Layouts personalisiert.
Ihre Küche sollte Ihren Stil widerspiegeln und die Bühne für Ihr Leben sein. Ein herringbone backsplash bietet eine einzigartige Gelegenheit, dem Herz Ihres Zuhauses Charakter, Struktur und einen Hauch von Kunst zu verleihen. Ob Sie sich für den rustikalen Charme von zellige oder die klaren Linien einer peel-and-stick-Alternative entscheiden – das Ergebnis ist ein Raum, der sich zugleich modern und zeitlos anfühlt.
Wenn Sie sich nach dieser ausführlichen Übersicht sicher fühlen, sind Sie vielleicht bereit für den nächsten Schritt. Für eine noch detailliertere Anleitung bietet unser umfassender DIY Herringbone Backsplash: Schritt-für-Schritt-Installationsanleitung alles, was Sie brauchen, um Ihr Projekt perfekt umzusetzen.
Bereit, Ihr perfektes Muster zu finden? Entdecken Sie unsere vollständige Herringbone-Inspirationsgalerie für noch mehr Ideen.
Häufig gestellte Fragen
Welche Fugenfarbe ist für einen weißen herringbone backsplash am besten?
Für einen markanten, grafischen Look, der das Muster betont, wählen Sie ein dunkles Grau oder Schwarz für die grout. Für eine weichere, dezentere und strukturierte Wirkung nehmen Sie eine weiße oder sehr helle graue grout, die mit den Fliesen verschmilzt.
Kann ich ein herringbone-Muster in einer sehr kleinen Küche verwenden?
Auf jeden Fall. Kleinere Fliesen und eine helle Farbpalette können eine kleine Küche breiter und dynamischer wirken lassen. Wenn Sie den backsplash bis zur Decke ziehen, ist das ein weiterer Designertrick, der Höhe suggeriert und den Raum größer erscheinen lässt.
Sind selbstklebende herringbone-Fliesen eine gute Option?
Ja, sie sind zu einer ausgezeichneten Option für preisbewusste Hausbesitzer und Mieter geworden. Moderne peel-and-stick-Fliesen bieten erstaunlich realistische Texturen und sind unglaublich einfach zu verlegen, was sie perfekt für ein schnelles und wirkungsvolles DIY-Update macht. Um die beeindruckende Auswahl zu sehen, werfen Sie einen Blick auf unseren Leitfaden zu Peel Stick Backsplash Küchenideen 2025 für die neuesten Trends.
Worin unterscheidet sich herringbone von einem chevron-Muster?
Das ist ein häufiger Verwechslungsgrund. Herringbone-Fliesen sind rechteckig und werden in einem unterbrochenen Zickzack-Muster verlegt. Chevron-Fliesen sind schräg zugeschnitten, sodass sie an einer Spitze zusammentreffen und eine durchgehende „V“-Form bilden. Herringbone wirkt komplexer und ineinander verschachtelt, während chevron gleichmäßiger erscheint.


Kommentar hinterlassen
Diese Website ist durch hCaptcha geschützt und es gelten die allgemeinen Geschäftsbedingungen und Datenschutzbestimmungen von hCaptcha.