
















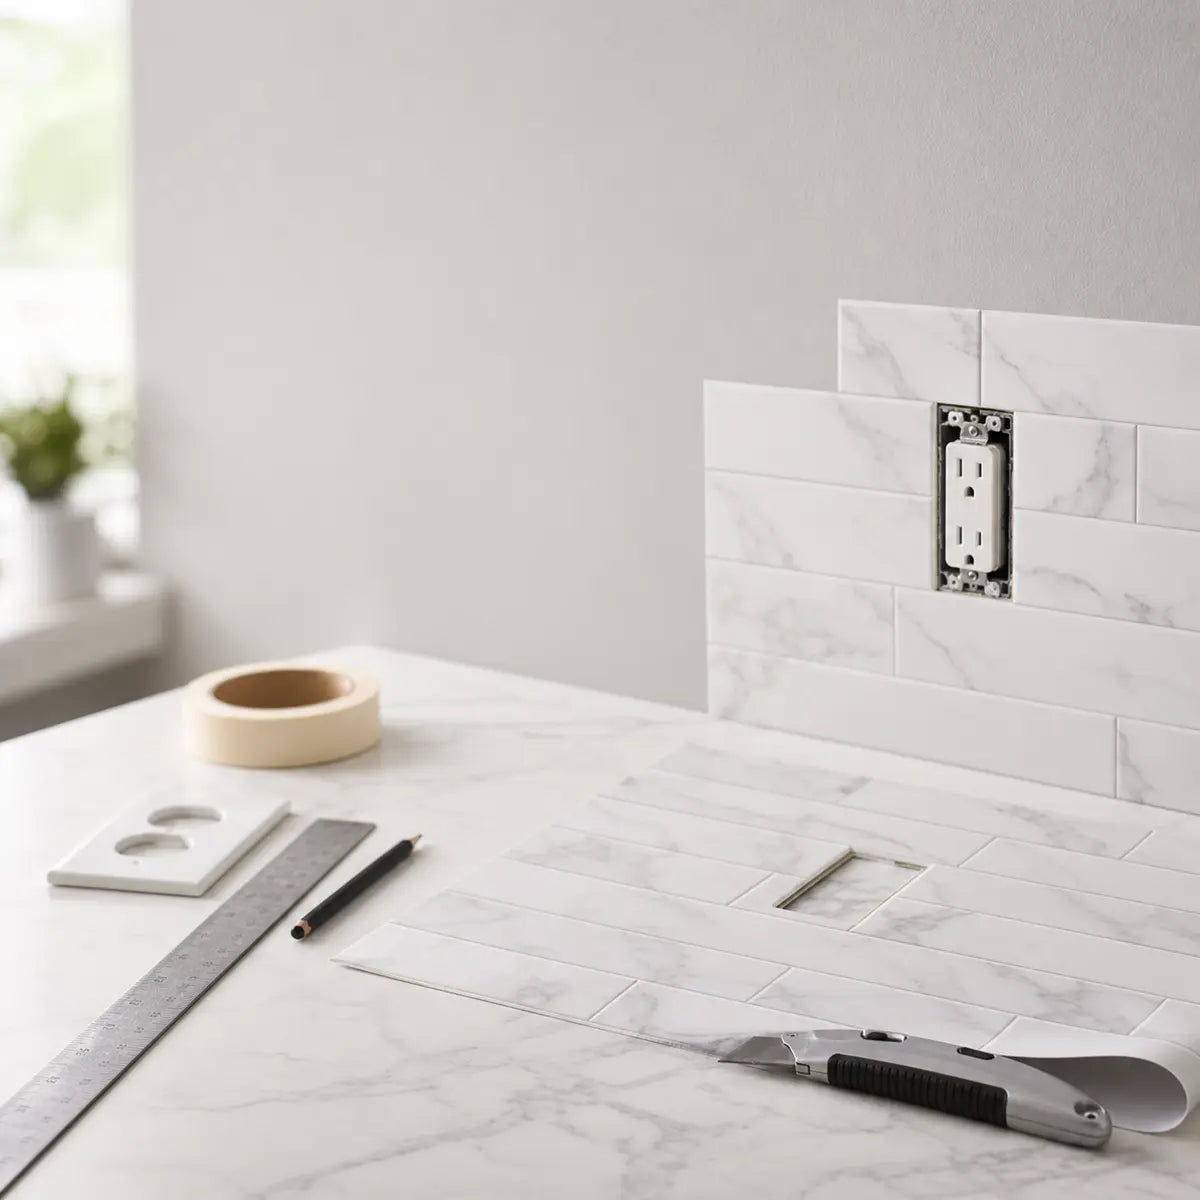
FIELD NOTE · TEMPLATE-FIRST CUTTING
The tile looks easy until the first outlet, inside corner, or uneven cabinet turns a simple backsplash into a measuring problem. The good news is that most beginners do not need a wet saw. They need a repeatable way to measure, make a template, cut conservatively, and test-fit before the adhesive backing is exposed.
To cut peel-and-stick tile around outlets, remove the cover plate, switch off power before working near the exposed device, create a paper or cardboard template, transfer the opening to the tile, score with a sharp utility knife and straightedge when the material allows it, and dry-fit the piece before peeling. For corners and exposed edges, measure from the last installed tile, test every cut in place, and plan the finish with trim, caulk, a controlled overlap, or a clean seam.
The two practical measures used throughout this guide are:
- Template Accuracy Score: the percentage of cut pieces that fit the intended opening during dry fitting without a visibly distracting gap. The suggested 1/16-inch reference is an editorial quality check, not a code requirement or universal workmanship standard.
- Visible Finish Index: a visual review of whether cut lines are hidden, grout lines remain consistent, outlet covers overlap the cut, corner seams look deliberate, and exposed edges have a planned finish. This is also a practical editorial framework, not a validated industry rating.
The aim is simple: fewer wasted tiles and a finished project that looks planned rather than improvised.

Can you cut peel-and-stick tile with a utility knife?
Yes, many flexible peel-and-stick backsplash products can be trimmed with a sharp utility knife and straightedge, while scissors may also work for thin, flexible material. The correct tool depends on the tile’s construction, thickness, and manufacturer instructions. WallPops lists both a straightedge with a sharp utility knife and scissors for the backsplash products covered by its installation guidance. WallPops’ peel-and-stick backsplash installation guide makes that recommendation for its own product range, not every peel-and-stick tile on the market.
Start by checking the installation instructions for your exact tile. “Peel-and-stick tile” can describe several very different products:
| Tile material or construction | Starting tool | Best use | Watch for |
|---|---|---|---|
| Thin flexible vinyl | Sharp utility knife and straightedge | Long straight cuts, outlet notches, narrow strips | A dull blade can drag and stretch the face |
| Very thin flexible sheet | Scissors or utility knife | Small trims and simple curves | Scissors can wander on long straight lines |
| Gel or soft backsplash material | Product-approved knife or scissors | Flexible cutouts and edge trims | Avoid stretching the material during cutting |
| Thick PVC or composite tile | Check the product guide first | Stronger hand tools or power tools may be required | A utility knife may score the surface without separating it |
| Metal or rigid tile | Jigsaw, chop saw, hacksaw, hole saw, or coping saw as specified | Outlet openings, rigid straight cuts, shaped cutouts | Use eye protection and deburr sharp edges |
| Stone-look or mineral-filled tile | Manufacturer-specified saw or abrasive tool | Rigid or brittle cutouts | Chipping and dust can make improvised cutting unsafe |
Art3d’s guide for its metal or rigid peel-and-stick system lists protective eyewear, a straightedge or speed square, pencil, soft cloth, and chalk line among the supplies. It also names a jigsaw or chop saw as recommended cutting tools, with a hacksaw, hole saw, or coping saw for applicable cuts. Art3d’s metal peel-and-stick tile installation guide is product-specific, so do not transfer its tool list to flexible vinyl or thin gel tiles.
The practical rule is:
Use the lightest tool that makes a controlled cut without forcing the material. If the tile bends easily and the manufacturer permits a knife, score it several times along a straightedge. If it is rigid, metallic, thick, or brittle, follow the product guide instead of trying to force a utility knife through it.
What tools do you need before cutting?
Most flexible backsplash projects need a measuring tool, a straightedge, a sharp blade, a pencil, a paper template material, and a stable cutting surface. WallPops’ baseline installation list includes a tape measure, level or plumb reference, pencil, ruler or straightedge, utility knife, plastic smoother, and step stool or ladder for its covered backsplash products.
Gather these before opening the tile:
- Tape measure
- Pencil or fine-tip marker approved for the tile surface
- Metal ruler, framing square, speed square, or other straightedge
- Sharp utility knife with spare blades
- Scissors for thin flexible material
- Scrap paper, cardstock, or thin cardboard
- Painter’s tape
- Cutting mat, plywood, or another stable sacrificial surface
- Level
- Eye protection for rigid, brittle, or metallic products
- Fine-grit sandpaper or a small file only when the product instructions permit it
- Plastic smoother or clean cloth for final pressure
A sharp blade matters more than extra force. A dull blade makes you push harder, and extra pressure increases the chance of slipping, bending the tile, or cutting beyond the line.
Do not cut toward your hand. Keep the non-cutting hand behind the blade path, hold the straightedge firmly, and make several light scoring passes instead of one aggressive pass. Replace the blade as soon as it begins tearing the face or requiring unusual pressure.
Why should you cut before peeling the adhesive backing?
Cut the tile while the backing or protective film is still on whenever the product allows it. The backing keeps the adhesive clean, gives the tile more stability, and lets you make corrections before the piece bonds to the wall.
This sequence reduces three common failures:
- The tile sticks before it is aligned.
- The exposed adhesive collects dust or hair.
- A rushed cut gets installed because the piece is already partly attached.
For rigid or metallic products, Art3d instructs users to mark the cut on the protective film, confirm the fit, and only then remove the film. Its guide also describes placing the tile lightly before applying firm, even pressure because the adhesive is pressure-sensitive. That sequence is specific to the cited product system, but the general lesson is useful: alignment first, pressure second.
WallPops recommends acclimating its product for at least 48 hours before installation. That is a product-specific instruction, so check your own packaging rather than treating 48 hours as a universal rule. The same applies to newly painted walls: WallPops states that its products should not be applied to newly painted surfaces until the paint has cured for at least four weeks, or longer if the paint manufacturer requires it.
Before cutting, also inspect the surface. For the WallPops products covered by its instructions, the surface should be smooth, dry, clean, and firm. Unclean or textured surfaces may not hold that product properly. You can review the broader preparation sequence in this guide to prepare walls for peel-and-stick tile before measuring the difficult areas.
How do you cut peel-and-stick tile around outlets?
The most reliable outlet method is to make a template from the actual wall position, transfer that shape to the tile, cut slightly conservatively, and dry-fit before exposing the adhesive. Do not rely on a measurement taken from the room corner unless the installed tile edge is perfectly known.
Plan the electrical area
Remove the outlet or switch cover plate only after switching off the relevant power and following a safe procedure for your home. The tile work described here does not include rewiring, receptacle replacement, or moving an electrical device.
WallPops instructs installers working around sockets or switches to switch off main power, unscrew the fixtures, and clean out dust before starting. The U.S. Consumer Product Safety Commission advises that outlets and switches should have faceplates covering wiring because exposed electrical parts or missing faceplates create a shock hazard. The CPSC Home Electrical Safety Checklist supports that safety boundary.
Stop the project and get qualified electrical help if the outlet or switch is hot, sparking, loose, malfunctioning, visibly damaged, or associated with exposed wiring. The CPSC identifies those conditions as warning signs that require attention rather than cosmetic covering. The CPSC Guide to Home Wiring Hazards is useful for recognizing when a tile project has become an electrical problem.
Do not leave the device without its cover plate after the project. The plate is part of the protective finish, not just decoration.
Install the surrounding full tiles first
Where possible, install the full tiles beside and below the outlet before measuring the cut piece. This gives you real reference edges instead of relying on a wall that may be out of square.
Use the last installed tile as your measuring baseline. Note:
- The distance from the tile edge to the left side of the outlet opening
- The distance from the tile edge to the right side
- The distance from the top or bottom tile edge to the opening
- The height and width of the opening you need to clear
- Any pattern or grout-line position that must continue through the cut piece
Measure twice, then write the numbers directly on the template. Do not trust memory, especially when several outlets are close together.

Make a peel-and-stick tile outlet template
A paper template is simply a same-size guide that transfers the wall opening to the tile. It gives you a chance to correct the position without wasting the actual tile.
Use one of these methods:
- Hold paper over the installed tile area, mark the surrounding tile edges, and trace the outlet opening.
- Press a piece of cardstock lightly against the opening and mark the corners and edges.
- Cut a rough paper shape, place it in the opening, and trim the paper until it fits the wall position.
- For repeated outlets with the same layout, keep the first successful template, but verify each location because walls and device positions can vary.
Label the template “top,” “left,” and “front.” That sounds excessive until a symmetrical-looking cutout gets flipped or rotated.
The template should represent the opening the tile must clear. It should not automatically include a universal extra allowance. Outlet boxes, device positions, cover plates, and tile thicknesses vary. The cover plate may hide a small imperfection, but it cannot rescue a badly shifted opening or a tile that interferes with the device.
Transfer the opening to the tile
Place the template on the tile with the pattern oriented correctly. Tape it in place or trace around it while holding it flat.
For flexible tile:
- Mark the cut lines with a pencil or product-approved marker.
- Place the tile face up or backing side up according to the manufacturer’s instructions.
- Hold the straightedge on the waste side of the line.
- Score the line with light, controlled passes.
- Make the corner turns carefully rather than twisting the tile.
- Remove the waste section only after the perimeter is fully scored.
For a rectangular outlet opening, drilling is usually unnecessary in flexible material. Score the four sides, then make short connecting cuts toward the corners. Keep the corners slightly rounded if the product tends to tear at sharp inside points.
For rigid or metallic tile, use the product-specific tool. Mark on the protective film, support the tile securely, wear the required eye protection, and smooth or deburr the edge only as directed. A sharp metal edge can damage the device, cover plate, or your hand.
Dry-fit before peeling
Hold the cut tile in position with the backing still intact. Check that:
- The opening is centered where intended.
- The tile sits flat against the wall.
- The device is not being pushed or twisted.
- The cover plate can sit normally.
- The pattern and grout lines remain aligned.
- The tile does not buckle at the outlet corners.
If the opening is too small, enlarge it gradually. If it is too large, do not assume the cover plate will hide the entire error. Decide whether the piece should be remade before the adhesive is exposed.
A useful personal benchmark is the Template Accuracy Score: count how many cut pieces fit cleanly on the first dry fit, then improve the process if the score is poor. The 1/16-inch visible-gap reference can help you inspect your work, but it is not a manufacturer specification, electrical code rule, or validated industry standard.
For a deeper outlet-specific walkthrough, see how to cut peel-and-stick tiles around outlets.
How should you cut around light switches and GFCI outlets?
Treat every switch, duplex receptacle, and GFCI outlet as its own template problem. Do not assume that two devices on the same wall have identical spacing or sit at the same depth.
A GFCI outlet—the type with “Test” and “Reset” buttons—often has a larger face and a different visual profile from a standard receptacle. Dry-fit the tile around the actual device and confirm that the tile edge will not press against the buttons or interfere with the cover plate.
- Turn off power before removing the cover plate or working near the exposed device.
- Remove the plate and set its screws aside.
- Install enough surrounding tile to establish fixed reference edges.
- Make a separate paper template for the device.
- Transfer the opening to the tile.
- Cut conservatively and dry-fit.
- Reinstall the cover plate only after the tile is firmly placed and the area is clean.
- Restore power and check that the device operates normally.
A tile cut should not force the device outward, trap a wire, cover the test or reset buttons, or prevent the cover plate from sitting flat. If the device is loose, unusually warm, damaged, or does not function normally, stop the tile work and address the electrical issue first.
The CPSC recommends testing GFCI outlets monthly according to the manufacturer’s instructions. That routine test does not replace switching off power before removing a cover plate.
How do you cut peel-and-stick tile at inside corners?
At an inside corner, install one wall first, then fit the adjoining tile to the actual corner instead of forcing two pre-cut pieces to meet. Walls are rarely perfectly square, and a small error becomes obvious as the seam rises.
There are three practical approaches.
Butt seam
A butt seam brings one tile to the corner and places the second tile against it. This works best when:
- The corner is reasonably straight.
- The tile is flexible enough to make a clean cut.
- The pattern does not make the seam distracting.
- The cut edge will be hidden or visually quiet.
Install the first wall tile fully into the corner. Measure the second piece from the face of the first tile to the next visible edge. Transfer that dimension to the second tile, then dry-fit it without adhesive.
Micro-overlap
A slight overlap can hide a small wall irregularity or prevent a dark line from opening as the surfaces shift. Use this only if the tile’s construction and pattern make the overlap look intentional and the manufacturer does not prohibit it.
Do not borrow a strip-overlap number from another product and apply it to your corner. WallPops discusses a small overlap for certain multiple-strip installations, but that instruction is not a universal corner dimension.
Scribed corner
To scribe means to transfer the exact contour of one surface onto another piece. It is the best choice when the corner is visibly wavy, open at the top, or out of square.
Use a paper template first. Hold the paper where the tile will go, mark the corner shape, trim the paper until it fits, and then transfer the final contour to the tile. A compass, contour gauge, or careful spacer measurement can help with irregular shapes.
There is no single corner method that is correct for every peel-and-stick product. Flexibility, thickness, pattern, wall condition, and the desired finish all matter. The reliable constant is the dry fit.

For a closer comparison of butt seams, overlaps, scribed cuts, and trim, read no-trim peel-and-stick backsplash corner seams.
What is the best way to cut outside corners and exposed ends?
Outside corners and exposed ends look finished only when the edge treatment is planned before the tile is cut. A clean cut by itself is not always a finished edge.
Choose the finish based on the material and the location.
- Wrap the tile: Flexible tile can sometimes bend around a rounded outside corner. Test a scrap first. Do not stretch the tile, because stretched material can create seam gaps over time.
- Overlap two pieces: This can create a deliberate vertical seam when the pattern supports it. Keep the overlap consistent.
- Use edge trim: Trim gives a straight visual termination at a cabinet side, wall end, or backsplash return. Measure the trim thickness before cutting the tile so the tile does not stop too far short.
- Use caulk: A neat, compatible caulk line can soften a small transition at a wall, counter, or corner. It should not be used to disguise a large measurement error.
- Use a clean hard stop: If the tile ends against a cabinet, molding, or side panel, measure to that fixed edge and leave a controlled joint appropriate to the product and location.
The peel-and-stick tile edge finish guide compares trim, caulk, clean cuts, and other finish choices for exposed sides and counter lines.
For rounded bullnose corners, wrapping and overlapping can look very different from a hard stop. Compare those options in five ways to finish peel-and-stick bullnose corners.
How do you cut around uneven cabinets, counters, and sinks?
Use a paper template or scribe whenever the wall, cabinet, counter, or sink edge is uneven. Do not try to make a crooked surface look straight by forcing the tile.
For a wavy cabinet or wall:
- Cut a piece of paper close to the required shape.
- Place it against the irregular edge.
- Mark the contour with a compass, pencil, or contour gauge.
- Trim the paper until it fits.
- Transfer the final shape to the tile.
- Cut gradually and test-fit before removing the backing.
- Plan the finish with trim or caulk if the edge remains visible.
For a sink or curved counter transition, use several small reference points instead of relying on one long measurement. Make the cut slightly conservative, then refine the curve with controlled trimming. A gap near a sink can collect moisture and debris, so follow the tile manufacturer’s instructions for sealing and suitability in that area. Do not assume a product is waterproof, heat-safe, or suitable for a wet room unless its own documentation says so.
You can review the contour method in how to scribe peel-and-stick tile against wavy cabinets and apply the same template logic to sink cuts in peel-and-stick tile.
What are the biggest mistakes when cutting peel-and-stick tile?
Most failed cuts come from committing too early, measuring from the wrong reference, or trying to hide a layout problem with caulk. The blade is rarely the only cause.
Peeling before the cut is confirmed
Once the adhesive is exposed, the pressure to “make it work” increases. Keep the backing on until the tile has been cut, positioned, and checked.
Measuring from the wall instead of the installed tile
A wall may be out of square. The installed tile edge is the reference that controls the visible pattern.
Cutting directly on the counter
A knife can damage the counter and may stop suddenly when it reaches a hard surface. Use a cutting mat, plywood, or other stable sacrificial surface.
Using a dull blade
A dull blade pulls the face material, creates ragged corners, and requires more force. Replace it early.
Cutting toward your hand
Reposition the tile and straightedge so the blade travels away from your fingers. Wear eye protection when the selected product’s instructions call for it.
Assuming every tile needs the same tool
A utility knife is appropriate for some flexible products and inappropriate for some rigid or metallic ones. Product-specific instructions control.
Making the outlet opening oversized
A cover plate can hide a small cut imperfection, but it is not a license to cut a large, loose opening. Make the template from the actual device area and enlarge the opening only as needed during dry fitting.
Ignoring pattern direction
Mark the top and front of the template. Check grout lines, mosaic repeats, faux-brick courses, and directional textures before cutting.
Stretching the tile into place
Stretching can make the piece appear to fit during installation but leave seams or gaps later. If the piece does not fit without tension, remove it and correct the template.
Trying to solve a crooked first row with later cuts
Set a level or plumb reference before installing the first tile. WallPops instructs installers of its flexible backsplash tile to align the first tile to a level guide before pressing firmly. A crooked starting line creates progressively awkward cuts.
How can you check the finished cut before pressing firmly?
Use a three-part inspection: fit, alignment, and finish. A tile that fits the outlet opening can still fail visually if the pattern or edge treatment is wrong.
Fit
The piece sits flat and does not press against the outlet, switch, cabinet, counter, or corner. The opening is large enough for the device without becoming needlessly oversized.
Alignment
Grout lines, mosaic shapes, faux-brick courses, and directional details continue from the surrounding tile. The tile is not rotated or shifted simply because the cutout fits.
Finish
The outlet cover sits flat, the corner seam looks deliberate, and an exposed edge has trim, caulk, a wrap, or another planned transition.
For a simple self-check, grade each cut as:
- Ready: fits cleanly, aligns with the surrounding pattern, and needs no visible correction.
- Adjust: fits but needs a small trim, edge refinement, or pattern correction.
- Remake: is visibly oversized, crooked, damaged, or likely to interfere with a device or finish.
This is the practical meaning of the Visible Finish Index. It helps you catch the defects people notice from across the room: uneven seams, broken pattern lines, raw edges, and outlet covers sitting over an obviously misaligned opening. It is not a tested industry scale, so use it as a decision aid rather than a claim of professional certification.
When the piece is ready, apply it lightly, confirm the position, and then press from the center outward. A plastic smoother such as Scraperoo - Y can help distribute pressure, smooth corners, and remove trapped air without relying on a hard metal edge.

Frequently Asked Questions
Do you remove outlet covers before installing peel-and-stick backsplash?
Yes. Switch off power before working near the exposed device, remove the cover plate, clean the area, cut the tile to fit the actual opening, and reinstall the plate after the tile is secured. Do not remove or alter wiring as part of this tile-cutting method.
Can scissors cut peel-and-stick tile?
Scissors can work for thin, flexible products when the manufacturer permits them. They are useful for small trims and soft curves. A straightedge and sharp utility knife usually provide a more controlled approach for long straight cuts, but the supplied evidence supports those tools only for the specific flexible products whose instructions list them.
Should peel-and-stick tile overlap at an inside corner?
It may, but there is no universal rule. A butt seam, slight overlap, scribed cut, trim, or caulked transition may be appropriate depending on the tile material, pattern, wall condition, and finish you want. Dry-fit both walls before exposing adhesive.
Can a cover plate hide a bad outlet cut?
It can hide a small imperfection, but cover plates vary and cannot guarantee coverage of an oversized or misplaced opening. Cut the template from the actual outlet position and test-fit the plate before committing the tile.
What should you do if the tile is not lining up at the corner?
Stop and check the first reference line, the wall’s square, and the last installed tile edge. Do not stretch the tile or force the seam. Make a paper template, scribe the adjoining piece, and decide whether the corner should use a butt seam, controlled overlap, trim, or caulk.

Final Thoughts
Clean peel-and-stick tile cuts come from templates, dry fitting, sharp blades, and planned edge finishing, not from buying the most expensive tool. Flexible vinyl and thin backsplash materials often allow a sharp utility knife and straightedge, while rigid or metallic products may require the stronger tools named in their own installation instructions.
Around outlets and switches, remove the cover plate only after taking appropriate power-safety precautions. Make each opening from the actual installed position, test-fit before peeling, and stop if the device shows electrical warning signs. At corners and exposed edges, measure from installed tile, use paper templates for irregular surfaces, and choose the finish before cutting.
Use the Template Accuracy Score to judge whether your cut fits during dry fitting. Use the Visible Finish Index to inspect the details people see after installation: hidden cut lines, consistent pattern spacing, flat outlet covers, controlled corner seams, and finished exposed edges.
Before starting the full backsplash or floor area, make one test cut on a spare or less visible tile. Then save the peel-and-stick backsplash installation guide, review the relevant tool and edge-finishing instructions, and keep a simple outlet template checklist nearby. One accurate test piece can prevent an entire project from becoming a series of expensive corrections.



Laisser un commentaire
Ce site est protégé par hCaptcha, et la Politique de confidentialité et les Conditions de service de hCaptcha s’appliquent.