




HOW-TO GUIDE
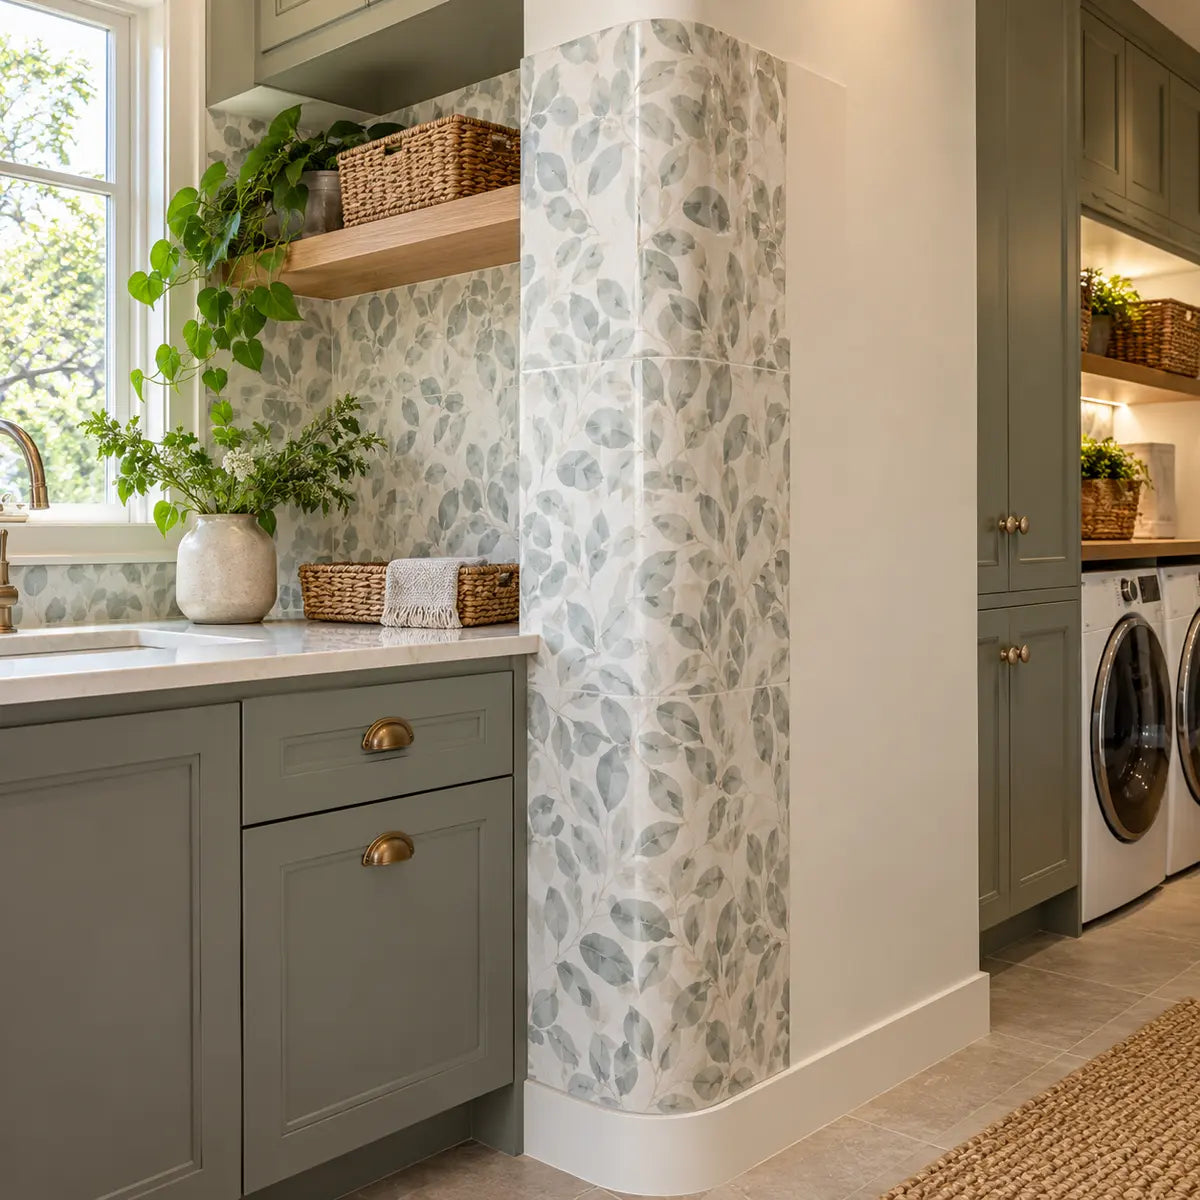
Yes, peel-and-stick tile may follow a rounded drywall corner, but the answer depends on the tile’s construction, the corner’s shape, and the product instructions. A flexible wall-tile product may be approved for a curved wall, while a rigid stone or brick product may need to stop at the corner and meet another piece instead. The safe way to decide is to test the actual profile with the backing still attached before exposing the adhesive.
A rounded drywall corner, often called a bullnose corner, is a drywall transition with a curved outside edge. It behaves differently from a flat wall, a sharp inside corner, or a small decorative radius. Ordinary backsplash advice often assumes that the tile will stay flat. At a bullnose corner, the tile must either conform to a curve or be divided into controlled pieces.
This guide explains how to install peel-and-stick tile around a rounded drywall corner while limiting wrinkles, bubbles, wasted material, visible seams, and drywall damage. The method applies to a backsplash, accent wall, bathroom wall, laundry area, or another small project where the selected product is approved for the intended surface and environment.
The key decision comes before cutting:
Proceed only when the manufacturer’s instructions allow the proposed corner treatment and the dry-fit shows that the tile can follow the profile without unacceptable bunching, stretching, lifting, or pattern distortion.
Product instructions control decisions about primers, cleaning agents, paint cure time, heat, moisture, bending, relief cuts, seams, repositioning, and removal. Do not assume that one peel-and-stick tile behaves like another.
Can peel-and-stick tile be installed around a rounded drywall corner?
Yes, but only some products and corner treatments are suitable. A continuous wrap may work when the tile is specifically approved for curved-wall application and can follow the radius without force. A meeting seam or cut-and-abut layout is usually more appropriate when the tile is rigid or the instructions prohibit bending.
Manufacturer guidance shows why the product must be checked. Smart Tiles describes its own tiles as flexible enough for direct installation on a concave angle or curved wall and gives separate guidance for convex angles. Aspect’s stone and brick product instructions state that those tiles are not intended to be bent and should be cut and abutted at inside and outside corners. Those are product-specific instructions, not a universal rule for all peel-and-stick tile. See the Smart Tiles curved-wall guidance and the Aspect stone and brick corner instructions for examples of the difference.
The first question is whether the corner is inside or outside:
- An inside rounded corner curves into the room. The tile moves from one wall plane into a recessed curve.
- An outside rounded corner, or bullnose corner, projects into the room. The tile must move across one wall plane, around the convex curve, and onto the adjoining plane.
Outside corners generally create more visual and mechanical tension because the face of the tile must stretch across the outside of the curve while the back follows a longer path. A tile that looks flexible in your hands may still resist the actual radius once its adhesive begins gripping the drywall.
Use this early decision aid
Keep the tile’s release liner attached while you make this decision.
| What you observe during the dry-fit | Best next step |
|---|---|
| The instructions expressly allow curved-wall application, and the tile follows the curve with full edge contact | Proceed with a gradual continuous wrap if the pattern remains aligned |
| The instructions allow corners but do not address your radius clearly | Test a paper template and an offcut or spare tile; contact the manufacturer if the fit remains uncertain |
| The tile bends only with force, wrinkles, pulls away, or loses contact at the curve | Stop the continuous-wrap plan and test a seam, cut-and-abut layout, trim, or another finish |
| The instructions prohibit bending or require corner seams | Use the specified seam or cut treatment |
| The drywall is dusty, damp, damaged, textured, soft, or recently painted outside the product’s cure guidance | Prepare or repair the surface before installation |
| The product’s heat, moisture, primer, or removal limits do not fit the location | Choose a different product or finish |

A dry-fit is a placement test before the adhesive is committed. It does not prove long-term performance, and it does not replace the manufacturer’s instructions. It gives you an early warning before a difficult correction becomes a drywall repair.
What should you check before buying or cutting the tile?
Check the exact product instructions for curved surfaces, approved substrates, cleaning, primer, paint cure time, cutting, seam placement, moisture, heat, repositioning, and removal. If the instructions do not address the intended corner, treat the project as conditional and test an inconspicuous area before committing a full tile.
Read the product information with the corner in mind. Look for answers to these questions:
- Is the tile described as flexible, conformable, or suitable for curved walls?
- Does the guidance distinguish between concave and convex corners?
- Does it state a minimum bend radius or any limit on how sharply the tile may turn?
- Does it permit relief cuts, shallow cuts, overlaps, or a continuous wrap?
- Does it require a butt seam, trim, caulk, or another edge treatment?
- Is painted drywall approved?
- Is unpainted drywall excluded?
- Does the product require primer?
- What cleaning agent is permitted?
- How long must fresh paint cure?
- What tool is recommended for cutting the specific tile material?
- Are bathrooms, shower enclosures, ranges, cooktops, or other warm and damp locations excluded?
- Can the tile be repositioned before firm pressure?
- What does the manufacturer say about removal and possible paint or drywall damage?
These details vary. For example, Smart Tiles lists painted drywall as an acceptable surface after a stated waiting period for fresh paint and excludes unpainted drywall. WallPops gives a different cure interval for newly painted surfaces. Art3d illustrates painted gypsum as recommended and unpainted gypsum as non-recommended. The differences are a useful warning: there is no universal waiting period or substrate rule for every peel-and-stick tile.
A product page can also leave out the detail you need. If you are considering a Stickwoll tile, review the current instructions for that exact model before treating it as flexible, removable, renter-safe, waterproof, heat-resistant, or suitable for a particular bullnose radius. The available product record for Minty Ceramic 8 describes general wall applications, but you still need to verify its current corner and surface instructions before using it on a rounded drywall corner.
Materials and tools
Gather the tools that match the tile material and the approved installation method:
- The selected peel-and-stick tile, plus spare material for testing and mistakes
- Plain paper, kraft paper, or thin poster board for a template
- Pencil and fine-tip marker
- Measuring tape and ruler
- Flexible curve, contour gauge, or a strip of thin cardboard
- Painter’s tape
- Straightedge
- Sharp utility knife, scissors, snips, or the tool named by the manufacturer
- Cutting mat or sacrificial board
- Plastic smoother, squeegee, or the product-approved application tool
- Clean cloths
- The product-approved cleaner
- Optional primer only if the product instructions call for it
- A small level
- A flashlight or strong side light for checking bubbles and edge contact
A plastic smoother can help apply even pressure. The Scraperoo tile scraper is described for removing air bubbles, applying pressure, aligning tiles, and smoothing corners and edges. Its usefulness does not change the product’s limits: a scraper cannot make a rigid tile follow a radius it was never designed to cover.
Avoid collecting tools based on habit alone. A utility knife may suit a thin vinyl sheet, while a composite, stone, glass, or thick textured tile may need another cutting method. Manufacturer guidance for WallPops, Art3d, and Aspect specifies different tools for different materials. Select the tool after you identify the tile construction.
How should you prepare the drywall?
Prepare the drywall until it is smooth, clean, dry, stable, and compatible with the product instructions. Adhesive needs consistent contact across the wall plane and curve, so dust, oil, loose paint, texture, dampness, and damaged paper can create weak spots.
A rounded corner can look smooth and still be a poor adhesive surface. Inspect the entire path that the tile will cover:
- Look for raised drywall compound, ridges, nail pops, sanding scratches, and old adhesive.
- Run your hand across the corner with light pressure. It should feel consistent from the first wall plane, across the curve, and onto the second plane.
- Check for soft drywall paper, peeling paint, water damage, or a corner bead that has moved.
- Shine a flashlight across the surface. Side lighting makes shallow ridges and dents easier to see.
- Check the top and bottom of the intended tile area. A corner can change radius or alignment along its height.
- Confirm that the wall is dry and that the room conditions are within the product’s instructions.
Manufacturer installation guidance consistently calls for a clean, dry, smooth or suitably even, structurally sound surface. Textured, porous, dusty, oily, uneven, or damaged surfaces can interfere with adhesion. The WallPops backsplash installation instructions also emphasize checking the material, layout, and surface before installation.
Repair before cleaning
Fill dents and shallow holes with a compatible patching compound. Allow the repair to dry fully, then sand it smooth. Remove all loose dust according to the product’s preparation instructions.
If the drywall paper is torn or soft, do not cover it as if it were sound. Stabilize the area first. A tile may adhere to a weak layer while the weak layer separates from the drywall. That failure can look like an adhesive problem even though the real problem is the substrate.
If the existing wall has texture, the safest approach is usually to create a smooth, stable surface approved by the product instructions. Do not assume that a heavy adhesive or primer will bridge texture. The curve itself already makes contact more demanding.
Clean with the selected product’s method
Cleaning instructions differ by product. WallPops specifies warm water for its wall preparation unless chemical or soap residue is fully removed. Smart Tiles describes a degreasing product such as TSP for its products and warns about dish-soap residue. Smart Tiles also gives guidance for cleaning the back of a panel with isopropyl alcohol.
Those instructions cannot be swapped between brands. Use the exact cleaner, dilution, drying procedure, and compatibility guidance for the tile and the existing paint. The goal is a residue-free surface, not the use of a particular household chemical.
After cleaning, allow the wall to dry fully. Do not apply tile over a surface that feels cool and damp, even if it appears visually dry. Avoid touching the prepared area with oily hands.
Treat primer as a product decision
Primer may help some products bond to an approved substrate, while another product may prohibit or discourage it. Primer can also alter the surface energy, texture, or removal behavior of the paint layer.
Use primer only when the selected product’s instructions call for it or permit it for your substrate. Apply it evenly, let it cure for the stated period, and test a small hidden area if the instructions recommend testing. Do not use primer as a rescue step for a tile that cannot conform to the corner.
For more surface guidance, review the Peel-and-Stick Tile Guide, then confirm the instructions for the exact tile model.
How do you make a paper template for a rounded corner?
Make a paper template that follows the actual wall profile, then dry-fit the template and the tile together before exposing adhesive. A paper template costs almost nothing, can be adjusted repeatedly, and reveals whether the cut, seam, pattern, and corner transition work in the real space.
The template is an editorial technique for reducing waste. It is not a universal manufacturer requirement and it cannot guarantee a wrinkle-free installation. Its value is that paper lets you test the geometry before the tile becomes difficult to reposition.
Start with reference lines
Use a level to mark a vertical reference line on the wall. Place it where the tile layout will begin or where the pattern will be easiest to control. Add a horizontal reference line if the tile has a strong grout-line pattern, repeating motif, or directional design.
Mark the corner at several heights. A rounded drywall corner may appear uniform but still vary slightly from top to bottom. Measure the distance from the nearest fixed feature, such as a cabinet edge, countertop, doorway, or adjoining wall, at the top, middle, and bottom of the tile area.
Do not use the room corner as your only reference. Walls and cabinets are often slightly out of square. The tile should follow the actual installation area, not an assumed geometric drawing.
Transfer the profile
Cut a piece of paper slightly larger than the tile area. Hold it against the first wall plane with painter’s tape. Let it extend across the curve and onto the adjoining plane.
For an outside bullnose corner:
- Align the paper with the vertical and horizontal reference marks.
- Tape the paper to the first wall plane.
- Press it gently across the rounded edge without stretching it.
- Continue it onto the adjoining wall plane.
- Mark the point where the curve begins and ends.
- Trace the full edge or planned seam location.
- Remove the paper and label the top, bottom, first wall, adjoining wall, and face direction.
For an inside rounded corner, the paper must settle into the concave transition. Press it into the curve with a blunt tool or your fingertip, using light pressure. Do not force a sharp crease into the paper because that can create a false profile.
A contour gauge can help copy an irregular curve, but it should confirm the wall rather than replace a direct fit. The paper template still shows how the tile’s pattern and edges will relate to the surrounding layout.

Test the template at multiple heights
Place the template back on the wall. Check the top, middle, and bottom. If the template fits at one height but gaps at another, the corner is not uniform enough for a simple repeated cut.
You may need:
- Separate templates for different heights
- A wider piece that stops before the curve
- A vertical seam
- A transition strip
- A smaller tile format
- A different finish better suited to the radius
This is the point where a slower decision saves material. The template-first cutting guide for peel-and-stick tile follows the same basic principle: keep the backing attached, transfer the actual shape, cut conservatively, and dry-fit before applying adhesive.
For a broader layout check across separate wall runs, compare the guidance on planning a peel-and-stick backsplash layout around a corner.
Should you wrap one piece, use a seam, or stop before the curve?
Choose the corner treatment that gives the tile full contact and the cleanest controlled appearance under the product instructions. A continuous piece can reduce the number of seams, but it may create wrinkles or pattern drift. Separate pieces offer more control, but the seam becomes part of the design.
Option 1: One continuous piece
A continuous wrap is suitable only when:
- The product instructions permit the intended curved application.
- The tile follows the curve without force.
- The outer face does not wrinkle or buckle.
- The adhesive side remains in contact across the entire profile.
- The pattern stays visually aligned.
- The edge on the adjoining wall does not lift.
- The tile does not need to be stretched to reach the next reference mark.
For a flexible approved product, a continuous piece can produce a quiet transition. Apply it gradually and allow the material to settle across the radius. Keep the piece aligned with the reference lines.
The main risk is hidden tension. A tile can look acceptable immediately after installation and still pull away later if it was stretched across the corner or forced to remain in a shape it resists.
Option 2: A meeting seam
A meeting seam divides the corner into two pieces. One tile finishes at or near the center of the curve, and the adjoining tile meets it according to the product’s corner guidance.
A seam is often easier to control on a rigid or semi-rigid tile. It also makes correction simpler because each piece covers a smaller transition. The seam must be planned before cutting so the pattern, grout lines, texture, and visible edge remain intentional.
Place the seam where normal viewing makes it least distracting. That may be:
- Near the center of the rounded face
- On the less visible side of the corner
- Along an existing pattern break
- At a vertical design line
- At the transition between two wall runs
Do not assume that a seam is always less visible or stronger than a wrap. Its appearance depends on the tile, pattern, corner radius, lighting, and cut quality.

Option 3: Stop before the curve
Stopping the tile before the rounded section can be the cleanest solution when the product cannot bend and no acceptable seam can be made. The exposed drywall curve may then receive trim, paint, caulk, a separate molding, or another finish approved for the area.
This approach is often better than forcing rigid material around a corner. It keeps the tile flat, reduces adhesive stress, and turns the transition into a deliberate edge detail.
Option 4: Overlap or trim
An overlap may be allowed for some products, while another product may require a butt seam or cut-and-abut treatment. Never create an overlap simply because it hides an inaccurate cut. An overlap can create a raised edge, a visible shadow, pattern misalignment, or a place for moisture and debris to collect.
Review corner seam planning for peel-and-stick backsplash tile for comparisons among butt seams, overlaps, scribed cuts, trim, and caulk. Apply only the approach supported by the selected product.
You can also compare the practical tradeoffs in the guide to finishing peel-and-stick bullnose corners.
How do you cut peel-and-stick tile for a rounded corner?
Cut the tile from a measured template, keep the release liner attached during layout, preserve alignment marks, and remove material in small controlled amounts. The cut should follow the actual corner profile without weakening the tile or creating narrow strips that cannot stay flat.
The cutting method depends on the tile construction. WallPops permits trimming its products with a straightedge and sharp utility knife or scissors. Art3d’s instructions show a first cut at the corner. Aspect recommends different tools for its stone product. These examples support one rule: check the tool against the selected tile before cutting.
Mark the face and the back
Transfer the template to the correct side of the tile. Confirm whether the tile should be cut face-up or face-down according to the manufacturer’s instructions and the tool being used.
Mark:
- Top edge
- Bottom edge
- First wall plane
- Curved transition
- Adjoining wall plane
- Pattern or grout-line alignment
- Seam location
- Any relief-cut location permitted by the instructions
Use light marks that will not show after installation. Keep a spare tile nearby so you can compare the pattern direction and confirm that the template was not flipped.
Cut conservatively
Make the first cut slightly shy of the final line when the material and installation method permit it. Dry-fit the piece, then remove small amounts until it sits correctly.
A cut that is too small may leave a visible gap, but an oversized cut can force the tile into the curve and create a wrinkle or lifted edge. The goal is controlled contact, not maximum coverage at any cost.
For a convex bullnose corner, pay attention to the two tangent points—the places where the flat wall planes begin to turn into the curve. If those points are wrong, the tile may line up at the center but drift on both sides.

Understand relief cuts
A relief cut is a small cut that allows a material to release tension as it changes direction. Relief cuts can be useful for some products, but they are not a universal solution. A cut can weaken the tile, expose adhesive, interrupt a waterproofing layer, or create visible fingers that lift.
Use relief cuts only when:
- The product instructions permit them.
- The material can be cut safely with the approved tool.
- The cut pattern has been tested on a spare piece.
- The cuts will not create unsupported narrow tabs.
- The finished edge can be sealed or treated as the instructions require.
Do not use a heat gun to make an unsuitable tile flexible. Heat may damage the face, adhesive, paint, or drywall, and the temperature limit is product-specific. Smart Tiles, Aspect, and Art3d publish different heat and moisture restrictions for their own products. Their values cannot be transferred to another brand.
Cut a spare test piece
Before cutting the final visible piece, use a scrap or spare tile. Apply the template, make the proposed cut, and dry-fit it from normal viewing distance.
Check the piece from:
- Straight ahead
- The side of the corner
- Above and below
- The normal standing position
- The room’s strongest light source
A cut may look precise on a worktable and reveal a gap once installed. The test piece also shows whether the pattern becomes visually compressed or angled across the curve.
How do you bend peel-and-stick tile around a corner without wrinkles?
Apply the tile gradually, keep it aligned, avoid stretching, and smooth only the portion that has been correctly positioned. Bending technique helps an approved product follow a curve, but technique cannot overcome a tile that is too rigid for the radius.
Before installation, place the tile and template on a clean work surface. Confirm the direction of the pattern. Mark the reference edge on the release liner or a removable area of the backing.
Establish the first contact point
For an outside rounded corner, start on the flatter wall plane rather than trying to begin at the center of the curve. Align the tile with the reference lines. Expose only a small portion of the adhesive at first.
Press the first section lightly. Confirm the vertical and horizontal alignment. If the product allows repositioning before firm pressure, use that window carefully. Do not assume that repeated peeling and resetting is harmless. Adhesive performance and drywall damage risk vary by product.
Manufacturer instructions generally support gradual liner removal and alignment before firm pressure. WallPops warns against stretching because stretching can create gaps at seams. Art3d also emphasizes keeping the adhesive untouched until placement. Read the general installation and care sequence for the store’s preparation, preview, gradual application, smoothing, and removal guidance.
Work toward the curve in short sections
Remove more backing only after the installed area is aligned. Work across the curve in short sections rather than exposing the entire tile at once.
Use your fingers or a plastic smoother to guide the tile. Press from the adhered area toward the uninstalled area, working air outward. Keep the pressure even. Avoid dragging the face across the drywall because that can shift the tile or stretch the material.
The center-outward smoothing principle is a practical synthesis of general manufacturer application guidance. It can help reduce trapped air when the product is approved for the curve, but it does not prove that every radius will remain wrinkle-free.

Let the material settle
On a rounded outside corner, the tile may want to spring away from the curve. Hold the transition gently while the adhesive makes contact. Do not pull the tile around the corner to make it reach the adjoining reference line.
A useful test is to stop after a small section and release your hand. If the tile immediately pulls away, wrinkles, or opens at the edge, stop. The problem is probably the material-radius combination, the substrate, or the planned cut—not a shortage of pressure.
Smooth the adjoining plane
Once the curve is secure, continue onto the adjoining flat wall. Check the pattern and seam alignment before pressing firmly. If the piece reaches the adjoining wall at an angle, remove it while correction is still permitted by the instructions and adjust the template or layout.
For a concave inside rounded corner, the tile should settle into the curve without bridging across it. Use light, even pressure. If the tile forms a tented section over the curve, the material may be too rigid or the curve may be too tight for a continuous wrap.
Do not use force as a test
A common mistake is to press harder when the tile begins to wrinkle. Pressure can hide a small bubble while pushing the problem toward the next section. It can also set the adhesive before the alignment is correct.
Stop and reassess if:
- A wrinkle grows as more backing is removed.
- The edge lifts as soon as pressure is released.
- The pattern shifts relative to the reference line.
- The tile reaches the adjoining wall only after stretching.
- The corner needs heat that the instructions do not approve.
- The surface has a ridge or damaged paper beneath the tile.
How should you finish and inspect the corner?
Inspect the corner from normal viewing distance, then check the edges and seams with light pressure. A finished corner should have stable edge contact, an intentional seam or transition, no major trapped air, and no visible tension that causes the tile to pull away.
Give the installation a careful visual review before treating the project as complete.
Check the pattern
Stand several feet away. Look at the corner as part of the whole wall. A seam that looks obvious from a few inches away may disappear at normal viewing distance. A small pattern shift may become more visible when it interrupts a strong horizontal or vertical line.
If the pattern is directional, compare both wall planes. The pattern should appear to turn intentionally, not twist because the tile was stretched.
Check the edges
Run a clean fingertip along the exposed edges. Look for:
- Lifting corners
- Open gaps
- Unsupported narrow tabs
- Adhesive showing beyond the tile
- A raised overlap
- A cut edge that needs the product-approved finish
- A seam that catches on a cloth
Do not seal an edge with caulk simply to hide a structural problem. Caulk may change the appearance and may not be approved for the product or location.
Check for bubbles
Small air bubbles may sometimes be worked toward an open edge before the adhesive is firmly set, depending on the product. Use a smooth plastic tool rather than a sharp object unless the manufacturer specifically permits puncturing or another correction.
Large bubbles, creases, or wrinkles may require lifting and resetting while the product still allows correction. Follow the product instructions. If the adhesive has bonded firmly, pulling the tile back can damage paint or drywall and may make the tile unusable.
Take a normal-distance photograph
A close-up can exaggerate a minor variation. A normal-distance photograph helps you assess the visual result as a homeowner or visitor will see it. Photograph the corner straight on and from the side. This also documents the finished condition before later maintenance or removal.

What are the most common rounded-corner problems?
Most failures come from a mismatch among the tile, radius, surface, and application sequence. The correction should address the likely cause instead of adding pressure, heat, primer, or adhesive at random.
| Symptom | Likely cause | Safer correction |
|---|---|---|
| Wrinkle appears at the center of the curve | Tile is too rigid, was stretched, or was applied too quickly | Stop, keep the backing on if possible, and test a seam or different corner treatment |
| Edge lifts on the adjoining wall | Tile is under tension, the surface is dusty, or the radius is too tight | Check product limits, surface condition, and template; do not force the edge down repeatedly |
| Bubble remains under the flat wall section | Air was trapped during full-surface application | Work from the adhered area outward if correction is allowed; use a plastic smoother |
| Tile aligns on one wall but drifts on the other | Reference marks were missing or the tile was stretched around the curve | Return to the template and mark both wall planes before cutting |
| Seam is too visible | Seam was placed on a strong pattern line or the edges do not meet cleanly | Re-plan the seam on a less distracting area; do not widen it with caulk unless approved |
| Cut is too tight | Template was transferred inaccurately or the corner changes along its height | Recheck the profile at multiple heights and trim a spare piece first |
| Cut is too large | Material was removed too quickly or the paper moved during marking | Make a new template and cut conservatively |
| Adhesive will not stick to drywall | Dust, oil, texture, dampness, weak paint, or an unsuitable substrate | Stop and correct the substrate according to the product instructions |
| Tile peels up paint during correction | Adhesive is strong or pressure was applied before alignment | Stop pulling; follow the product’s removal guidance and expect possible paint damage |
| Tile needs heat to bend | Product may not be approved for the radius | Stop and verify the instructions; heat is not a universal repair |
| Relief cuts create fingers that lift | Cuts are too deep, too close, or not approved for the material | Remove the unsupported section if possible and switch to a seam or edge treatment |
| Corner looks acceptable close up but wrong from the room | Pattern direction or seam location was not judged at normal distance | Reassess the layout before finishing the next pieces |
For more recovery ideas, use the guide to fixing wrinkles and bubbles in peel-and-stick tile alongside the product’s own instructions. A general correction technique should never override a manufacturer warning about repositioning, adhesive exposure, or removal.
How do you fix peel-and-stick tile that will not stick to drywall?
First identify whether the problem is the drywall, the adhesive, or the corner geometry. Clean and prepare the substrate only according to the product instructions, then test a small area. If the tile fails because it cannot maintain contact around the curve, surface preparation alone will not solve the problem.
If the flat wall will not hold
Check for:
- Dust left after sanding
- Grease or soap residue
- Dampness
- Fresh paint
- Peeling or chalking paint
- Heavy texture
- Porous or unsealed drywall
- Incompatible primer
- A wall that is too cold or outside the product’s conditions
Do not add construction adhesive or contact cement unless the product instructions expressly permit it. Extra adhesive can damage drywall, create an uneven surface, interfere with removal, and void product guidance.
If the curve will not hold
The corner may be asking the tile to make a bend that exceeds its design. Compare the tile with the paper template and examine the release liner side. If the tile follows the curve only while your hand holds it, it is not ready for permanent application.
Try a controlled seam or stop the tile before the curve if those approaches are allowed. If the manufacturer requires a particular corner method, use that method. A smaller-format tile may reduce the amount of material crossing the curve, but this is a design change that still needs testing.
If correction damages the drywall
Removal methods vary by adhesive system. Smart Tiles describes warming a tile with a hairdryer and pulling gently for its products. Aspect warns that its adhesive is engineered not to be removed and that removal can damage the wall. WallPops also warns that its backsplash tiles may remove paint.
These examples show why you should not promise damage-free removal for an unknown product. Use only the selected tile’s removal instructions. Heat may affect paint, adhesive residue, or the tile face, so do not improvise with a heat gun or high temperature.
When should you stop and choose another method?
Stop the peel-and-stick plan when the product instructions exclude the surface or location, the tile cannot follow the radius without force, the drywall is unstable, or the finished corner remains visibly distorted after a careful dry-fit.
A different method may be more suitable when:
- The product is rigid and the design requires a continuous wrap.
- The radius is tight compared with the tile’s ability to conform.
- The corner changes shape along its height.
- The installation is directly inside a shower or another excluded wet area.
- The corner is close to a heat source outside the product’s limits.
- The wall has damaged paper or recurring moisture.
- The pattern cannot be kept aligned across the curve.
- The required seam would be more distracting than a different finish.
- The tile would need unapproved heat, primer, or additional adhesive.
- The surface must remain damage-free but the product’s removal guidance warns of paint or drywall damage.
The right alternative might be a tile format that the manufacturer approves for curved walls, a cut-and-abut layout, trim, a painted transition, flexible molding, conventional tile installation, or professional installation. The best choice is the one that gives the corner stable contact and an intentional finish.
Frequently Asked Questions
How do you wrap peel-and-stick tile around a corner?
Start on a flat wall plane, align the tile with reference marks, expose only a small part of the adhesive, and work toward the curve gradually. Smooth the installed section toward the uninstalled section without stretching the tile. Continue onto the adjoining wall only after the curve stays flat and the pattern remains aligned.
This method applies only when the product instructions permit the tile to conform to the corner. If the tile wrinkles, lifts, or requires force, use a seam or another treatment supported by the product.
How do you keep peel-and-stick tile flat around a curve?
Use a product approved for the curve, prepare a smooth and stable surface, create a paper template, and apply the tile in short sections. Keep the release liner attached until the fit and alignment are confirmed. Smooth from the adhered area outward and avoid pressing a wrinkle into place.
A scraper can help remove trapped air, but it cannot solve a material-radius mismatch. If the tile springs away after you release it, stop and revise the corner treatment.
Where should the seam go on a rounded corner?
Place the seam where it least interrupts the pattern and is least visible from normal standing positions. On an outside bullnose corner, that may be near the center of the rounded face or on the less visible side. Test the location with paper or spare tile before cutting the final pieces.
Follow the product’s seam instructions. A seam may improve control for a rigid tile, but it can still be visually prominent if the edges are uneven or the pattern does not align.
Can you use heat to bend peel-and-stick tile around a corner?
Use heat only when the selected product’s instructions expressly allow it and specify how to apply it. Heat is not a universal way to make rigid tile flexible. It can damage the tile face, adhesive, paint, or drywall.
The heat limits published by different manufacturers are product-specific. For example, checked guidance includes different limits for named products, including a 120°F surface limit for one product and a 140°F limit for another. Those values must not be transferred to a different tile.
How long should paint cure before peel-and-stick tile is installed?
Use the cure time stated by the tile manufacturer and the paint manufacturer. Published manufacturer guidance differs: Smart Tiles lists a 21-day wait for fresh paint for its products, while WallPops lists at least four weeks for its backsplash instructions. Those intervals are examples of product-specific guidance, not a universal rule.
If the paint is fresh, soft, chalky, or still releasing odor, postpone the installation and verify the instructions.
Is peel-and-stick tile removable from drywall?
Removal may damage paint or drywall, and the result depends on the adhesive system, surface, installation pressure, and time in place. Some manufacturers describe warming and gently peeling their products; others warn that removal can damage the wall and may make the tile unusable.
Do not describe an unspecified tile as damage-free, removable, or renter-safe. If protecting the drywall is essential, test the exact product in an inconspicuous area and review its removal guidance before installing the corner.
Printable rounded-corner checklist
Use this checklist before exposing adhesive:
Final thoughts
A rounded drywall corner is manageable when it is treated as a measured transition rather than a flat-wall installation with extra pressure. Identify the profile, verify the product limits, prepare the surface, make a paper template, choose the seam or wrap strategy, and dry-fit the tile before exposing adhesive.
Proceed when the product instructions support the method and the dry-fit shows full contact, acceptable alignment, and a clean visual result. Revise the cut or seam when the template exposes a problem. Choose another finish when the tile must be forced, stretched, overheated, or repeatedly peeled back to stay in place.
Once the corner passes those checks, review the matching Stickwoll tile options and verify the current instructions for the exact model before installation.


Laisser un commentaire
Ce site est protégé par hCaptcha, et la Politique de confidentialité et les Conditions de service de hCaptcha s’appliquent.