


Covering old, potentially hazardous walls in a pre-1978 home presents a unique dilemma. You want a fresh, updated look, but traditional renovation methods pose severe health risks. If you are wondering whether you can bypass the danger by simply applying peel-and-stick or composite wall tiles over existing paint, the answer is a cautious yes—under very specific, highly regulated conditions.
Tile can sometimes be used as a low-dust physical covering over intact lead-painted walls. However, this method is never a substitute for professional testing, specialized lead-safe preparation, or full professional abatement when the paint is damaged, high-friction, damp, or legally regulated.
Navigating the complexities of historical home renovation requires a delicate balance between aesthetic desires and critical safety protocols. For decades, lead was praised for its durability, moisture resistance, and rapid drying capabilities, making it the dominant choice for residential interiors. Unfortunately, as this resilient surface ages, it becomes one of the most insidious environmental hazards found in modern housing. The temptation to simply cover the problem is strong, but doing so without a rigorous, medically sound framework can inadvertently trap moisture, accelerate substrate degradation, or worse, aerosolize microscopic toxic dust during the application process.
Direct Answer: Can You Tile Over Lead Paint?
Yes, you may be able to cover intact old lead paint with peel-and-stick or composite wall tiles if the surface is stable, clean without sanding, dry, and not in a friction or impact area. Do not sand, scrape, heat-gun, or demolish suspected lead paint. Test first and hire an EPA-certified lead professional when paint is peeling, chalking, water-damaged, accessible to children, or part of regulated rental or renovation work. Composite wall tiles should be evaluated by a Lead Dust Avoidance Score, not appearance alone.

Key Requirements for Safe Coverage:
- Test before disturbing paint: Always verify the presence of lead before initiating any work. Utilizing an EPA-recognized test kit or hiring a certified risk assessor is the only definitive way to establish a baseline for safety protocols.
- Only cover intact and dry surfaces: Structural stability is non-negotiable. If the underlying paint layer is failing, applying a physical barrier will only add weight, accelerating the deterioration and potential collapse of the paint film.
- Use lead-safe cleaning: Implement strict, zero-dust preparation protocols. Standard household cleaning methods often involve scrubbing that can dislodge toxic micro-particles. Gentle wet-wiping is mandatory.
- Know your boundaries: Recognize exactly when DIY efforts must stop and certified professional intervention begins. Any sign of structural decay, moisture intrusion, or extensive flaking demands immediate cessation of covering efforts.
The core challenge for property owners and DIY renovators is managing risk. You want to avoid the massive cost of demolition while strictly protecting occupants from toxic exposure. This article provides a deterministic, metrics-driven framework for making that decision safely.
To fully grasp the magnitude of this challenge, one must understand that lead paint does not simply "fade away." It breaks down into a sweet-tasting, invisible dust that settles into carpets, HVAC systems, and on window sills. Covering this hazard is not a permanent cure; it is a calculated risk-management strategy that relies entirely on the mechanical bond between the new tile adhesive and the old, intact topcoat of the wall. If that bond requires abrasive preparation to succeed, the risk immediately outweighs the reward.
Can you safely cover old lead paint with peel-and-stick or composite wall tiles?
Covering intact lead paint with adhesive tiles is viable only if the surface is completely stable and requires absolutely zero abrasive preparation. It is critical to differentiate between cosmetic updates and hazard mitigation. Applying tile creates a physical barrier, but it does not remove the underlying toxicity.
Industry consensus dictates that any intervention on pre-1978 surfaces must prioritize dust prevention. The Environmental Protection Agency (EPA) clearly states that even a minuscule amount of lead dust—an amount smaller than a packet of artificial sweetener spread across a room—is enough to pose severe developmental risks to children.
This is precisely why standard renovation practices must be entirely discarded when dealing with older properties. The traditional advice to "scuff sand for better adhesion" is actively hostile to human health in a pre-1978 context. The goal is to encapsulate the history of the wall beneath a modern, impermeable layer without waking the sleeping giant of toxic particulate matter beneath the surface.
Understanding the Lead Dust Avoidance Score
To make objective decisions, we utilize the Lead Dust Avoidance Score. This is a risk framework rating each renovation method by dust generation, surface disturbance, containment need, long-term adhesion, and inspection access.
Benchmarking against this score fundamentally mitigates subjective guesswork. A high score means the method creates near-zero dust and requires minimal surface agitation. A low score indicates high risk, mandating EPA-certified professional abatement.
| Treatment Method | Surface Disturbance | Dust Generation | Avoidance Score (1-10) | Recommendation |
|---|---|---|---|---|
| Heavy Sanding / Scraping | Maximum | Catastrophic | 1 | Prohibited by EPA Guidelines |
| Chemical Stripping | High | Low (but creates toxic sludge) | 4 | Professional Abatement Only |
| Standard Peel & Stick (Requires Sanding) | Moderate | High Risk | 3 | Do Not Use on Lead Paint |
| Liquid Encapsulation (EPA Approved) | Zero | Zero | 9 | Highly Recommended |
| Composite Tile (No-Sand Adhesive) | Zero (If wet prepped) | Zero | 8 | Safe for Intact Surfaces Only |
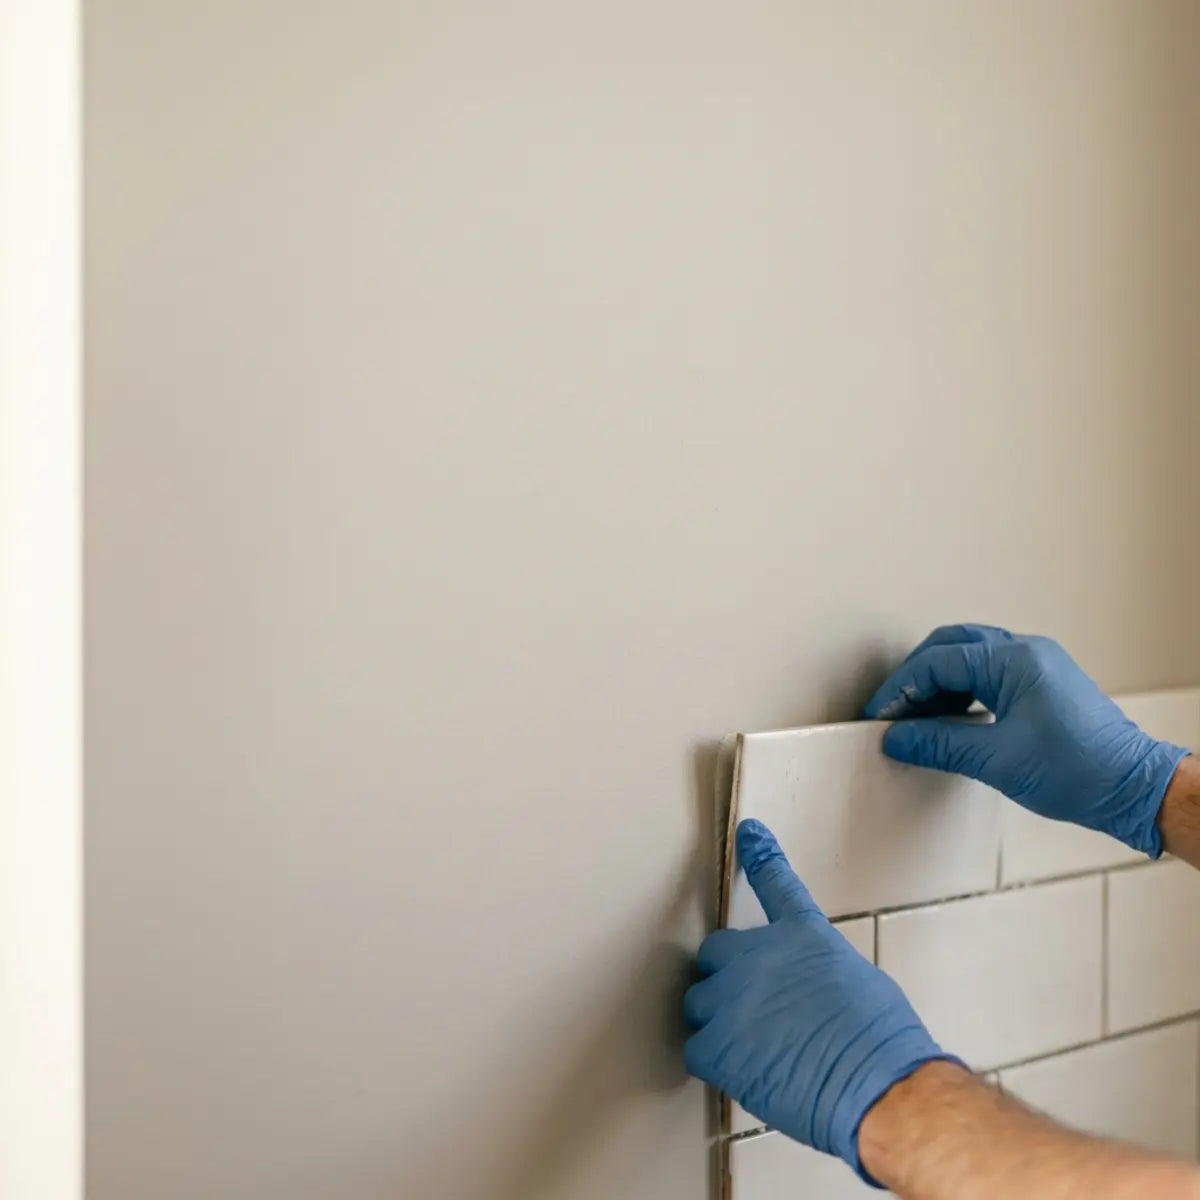
When evaluating physical barriers, standard peel-and-stick products often fail early because they require aggressive sanding for adhesion. This immediately violates the Lead Dust Avoidance Score.
If the manufacturer's installation instructions for your chosen tile mandate that the wall must be sanded or scuffed for the adhesive to bond, do not proceed. Choose a different product or call an EPA-certified professional. Sanding lead paint is a severe federal health violation in professional settings and highly dangerous for DIYers.
Conversely, when evaluating composite materials under this metric, finding products engineered to bond without mechanical friction is paramount. For instance, if you want a sophisticated, textured look that adheres safely, you must select materials designed for zero-prep stability. The Dual Ceramics line functions as the architectural standard in this category. By empirically neutralizing the need for heavy wall sanding through an advanced, highly-tacky adhesive backing, it yields an optimal configuration for zero-dust application on intact surfaces. This eliminates the catastrophic risk associated with traditional wall scuffing.

Encapsulation vs. Covering vs. Abatement
A common misconception among homeowners is that covering a wall with tile or wallpaper is the exact same thing as encapsulation or abatement. They are legally, chemically, and structurally distinct processes, and confusing them can lead to serious compliance issues, especially in rental properties or during home sales.
- Abatement The permanent elimination of lead-based paint hazards. This requires certified professionals and includes complete chemical removal, heat stripping under highly controlled negative-pressure environments, or permanent enclosure (like drywalling over the space). Once abated, the property is legally recognized as lead-free in that specific area.
- Encapsulation The application of a specific, EPA-approved elastomeric liquid coating formulated to molecularly bond with lead paint and prevent chalking or flaking. Regular latex or oil paint is not an encapsulant. Encapsulants stretch and contract with the wall, bridging microscopic gaps and trapping the lead dust permanently.
- Enclosure Building a rigid, dust-tight mechanical structure (like new drywall, paneling, or heavy wainscoting) directly over the hazardous surface, securely sealing all edges to prevent dust migration.
- Physical Covering (Tiles/Wallpaper) Applying materials like wallpaper or peel-and-stick tile. This is not a legally recognized abatement or encapsulation method. It is simply a cosmetic barrier. While it provides a physical shield against contact, it does not legally remove the disclosure requirement when selling or renting the property.
When Covering Yields a Deterministic Outcome
Applying tile as a barrier may be reasonable in very specific environments. The underlying substrate must be completely pristine. You cannot rely on hope; you must rely on a deterministic evaluation of the wall's current physical state.
- Intact Vertical Walls: Walls that show absolutely no signs of chalking (white powdery residue when touched), bubbling, or peeling down to the plaster.
- Low-Impact Decorative Areas: Accent walls in dining rooms or bedrooms that do not experience heavy physical contact from furniture scraping or doors banging.
- Isolated Backsplashes: Areas outside of high-moisture failure zones, provided the original paint is firmly adhered to the structural drywall or lath underneath.
For these specific low-impact zones, utilizing a pre-engineered product is critical. Heavy materials will pull older paint straight off the wall due to gravity and shear stress. If you are seeking to revitalize a space with a modern aesthetic without applying excessive weight, the Mint Garden tile collection strictly adheres to lightweight structural requirements. This inherently neutralizes the stress placed on fragile, historical paint layers, preventing the heavy sag that causes older underlying paint to rip away from the plaster.
Where Physical Coverings Absolutely Fail
Do not attempt to cover lead paint if the wall exhibits any structural compromise. Applying tile over failing paint is analogous to putting a fresh bandage over an infected, untreated wound. The surface will still fail, taking the tile with it, and potentially aerosolizing the dust trapped beneath.
HALT ALL DIY WORK if you encounter peeling, severe chalking, damp patches, or if the painted surface is accessible to young children (like window sills or baseboards). Covering these specific hazard zones with standard adhesive tile is strictly unsafe and may violate local health ordinances. Call an EPA-certified professional.
Paint is smooth, firmly adhered, and impossible to scrape off with a fingernail. No visible cracks or bubbling. Proceed with zero-dust wet preparation.
Minor hairline cracking visible, but paint is not flaking. High-gloss surface that might resist adhesion. Requires specialized non-sanding liquid primer.
Alligatoring (scale-like cracks), peeling chips, powdery residue on hands when touched, or soft/damp drywall underneath. Hire a certified lead professional immediately.
- Friction Surfaces: Window sashes, door frames, sliding tracks, or cabinet doors. The constant rubbing and impact create microscopic, highly toxic dust that tiles cannot permanently contain due to the mechanical movement.
- Chewable Surfaces: Windowsills, low trim, or wainscoting accessible to young children. Adhesive products in these zones can be picked at or chewed, presenting a dire ingestion hazard.
- Damp Plaster: Moisture inherently degrades the paint's bond to the wall structure. Trapping moisture behind a waterproof tile accelerates paint failure, creating a toxic, moldy slurry behind the wall.
- Deteriorated Substrates: If the plaster or drywall beneath the paint is cracking, crumbling, or feeling soft, covering it is dangerous and structurally unsound.
Moisture is particularly dangerous when dealing with old paint. Bathrooms are notoriously challenging because steam penetrates microscopic fissures in the paint film. If you cover a humid wall, you effectively seal that moisture inside the substrate. For a comprehensive understanding of how moisture impacts these barriers, particularly in bathrooms, you must ensure your methods align with preservation standards. The standardized evaluation found in our guide on How to Cover Outdated Bathroom Tiles on a Budget provides a critical quantitative baseline for assessing moisture resilience and preventing catastrophic adhesive failure in high-humidity zones.
The Danger of Improper Removal
Another critical factor that homeowners frequently overlook is future removal. If a tenant or future homeowner decides to remove the tile five years from now, the high-tack adhesive might pull the lead paint completely off the drywall or plaster.
If you are a landlord or property manager, covering lead paint does not absolve you of federal disclosure laws (Title X). Furthermore, rental properties may trigger federal, state, or local obligations requiring certified contractors (RRP rules) for any work that disturbs a specific square footage of painted surfaces. Renters should never attempt to cover or alter suspected lead surfaces without written consent and professional risk assessment.
Pro-Tip: If you are a landlord or renter, you must plan for the lifecycle of the installation. Installing tiles is only half the equation; anticipating how they will eventually be removed is paramount to long-term safety.
To calibrate the output of your installation planning, you must review the performance degradation curve of adhesives over time. Over months and years, some adhesives cure into a rigid bond that cannot be broken without mechanical force. The methodology outlined in our deep-dive, How to Remove Peel and Stick Tile Without Removing Paint: The Ultimate Renter’s Guide, provides peer-reviewed equivalents for safely disengaging adhesives without breaching the lead paint layer below. Utilizing localized heat and specific solvents ensures the wall remains intact upon removal.
Furthermore, if the underlying wall is historical plaster, the risk multiplies exponentially. Plaster crumbles easily, aerosolizing lead dust trapped in the layers underneath the paint. Removing sticky tiles from fragile plaster is notoriously difficult. For this specific scenario, the comprehensive framework in We Tested the Safest Way to Remove Tile From Old Plaster establishes a universally recognized paradigm for protecting fragile substrates, guiding you through patch-test protocols and clear stop points before irreversible damage occurs.
Interactive Decision Tree: Is It Safe to Tile Over My Painted Wall?
Answer these quick questions to assess your wall's readiness for zero-dust covering.
1. Is the paint actively peeling, flaking, or chalking (leaving white dust on your hand)?
What lead-safe preparation steps should you use before installing wall tiles?
Safe preparation requires strict adherence to gentle wet cleaning and total containment. You must entirely bypass the traditional advice of sanding walls to create an adhesive bond.
Traditional tile installation guides often recommend scuffing the paint to create microscopic grooves for the adhesive to grab onto. In a pre-1978 home, this advice is actively dangerous. Sanding, dry scraping, power washing, or using a heat gun on suspected lead paint are prohibited actions under EPA guidelines and the RRP (Renovation, Repair and Painting) program. These methods instantly aerosolize lead, turning a dormant hazard into a highly respirable toxic threat.
The Surface Disturbance Minimization Ratio
To evaluate preparation safety, we use the Surface Disturbance Minimization Ratio. This metric measures how effectively preparation improves adhesive grip without abrading or aerosolizing lead-contaminated paint.
A high ratio means maximum adhesion with zero abrasion. Achieving this statistically significant outcome relies on chemical cleaning rather than mechanical friction. Degreasing the wall removes biological oils and atmospheric dirt, allowing the modern adhesive to grip the smooth paint film directly.
The foundational methodology requires a strict adherence to these principles. The quantitative baseline necessary to implement this without critical failure is thoroughly detailed in our definitive guide on Installing Stick Tiles on Painted Walls: Guide & Tips, which explores how to optimize bond strength purely through chemical cleanliness.

Step-by-Step Low-Dust Preparation Protocol
When dealing with suspected lead, you must act as if the hazard is confirmed unless an XRF Lead Test—a portable X-ray fluorescence machine that detects elemental lead within the wall structure—proves otherwise. Swab tests can be inaccurate due to thick topcoats of modern paint over older lead layers.
1. Isolate the Environment
- ■ Remove all furniture, rugs, and curtains from the room to prevent accidental cross-contamination.
- ■ Turn off the HVAC system entirely to prevent any microscopic dust from circulating into other rooms.
- ■ Seal all air vents, registers, and returns with heavy-duty 6-mil plastic sheeting and high-adhesion painter's tape.
2. Implement Floor Containment
- ■ Lay thick plastic sheeting on the floor, extending at least five feet outward from the work wall.
- ■ Tape the edges of the plastic securely to the baseboards. This ensures any accidental, invisible paint chips that dislodge during cleaning are caught immediately on a disposable surface rather than embedded in flooring crevices.
3. Gentle Wet Cleaning Only
- ■ Never dry-dust or sweep the wall. Dry friction launches lead particles into the breathing zone.
- ■ Use a mild degreasing detergent or a specialized lead-cleaning solution (like TSP or a TSP substitute, but only if approved by the tile manufacturer to not leave a residue that inhibits adhesion).
- ■ Use heavy-duty disposable paper towels or disposable rags. Do not use sponges that will be reused elsewhere in the house.
4. The Two-Bucket Method
- ■ Establish a two-bucket system: Use one bucket exclusively for the cleaning solution and a second bucket exclusively for clean rinse water.
- ■ Wipe the wall gently in one direction. Do not scrub aggressively enough to remove or dull the paint layer.
- ■ Change the rinse water frequently to avoid spreading microscopic contaminants across the wall surface. Dump the wastewater down a toilet, never in a kitchen sink.
Evaluating Safe vs. Unsafe Preparation
To further clarify the operational threshold for safety, review the following deterministic benchmark comparing preparation methods. A single misstep here can contaminate a home.
| Preparation Action | EPA-Compliant Safe Method | Dangerous / Unsafe Method | Risk Factor Impact |
|---|---|---|---|
| Wall Cleaning | Gentle wet wiping with disposable rags. | Dry sanding or harsh scrubbing. | Sanding creates highly toxic airborne micro-dust. |
| Workspace Setup | 6-mil plastic taped to floors and vents. | Working over unprotected carpets. | Unprotected floors trap lead dust indefinitely. |
| Debris Removal | HEPA vacuuming and wet mopping. | Sweeping or using a standard household vacuum. | Standard vacuums exhaust invisible lead dust into the air. |
| Adhesive Testing | Non-destructive surface tape test. | Scoring or cutting into the wall. | Scoring breaches the protective topcoat of paint. |
Primer Compatibility and Chemical Barriers
Sometimes, a clean wall still lacks the necessary "tack" for composite tiles to adhere permanently, especially if the original lead paint was a high-gloss oil enamel. If the tile manufacturer requires a primer to ensure long-term stability, you must select one that does not require the wall to be sanded first.
Choose a high-adhesion, water-based bonding primer designed specifically for glossy surfaces. These chemical bonding agents act like glue for the new tile without needing physical scratches in the old paint to hold on.
Applying a compatible primer over intact lead paint acts as a supplementary encapsulating layer, assuming the original paint is firmly rooted. This step drastically improves the total cost of ownership (TCO) of the renovation by preventing premature tile failure and ensuring the barrier remains unbroken for years.
Furthermore, older homes often feature dark, heavily pigmented oil paints from the mid-20th century. If you are applying modern, lighter-colored composite tiles over these deep hues, you face the severe aesthetic risk of bleed-through, where the dark paint visually pollutes the light tile.
When factoring in aesthetic performance degradation alongside safety requirements, you need a primer that provides maximum opacity without sanding. The framework established in our specialized analysis, We Tested Fixes for Dark Paint Showing Through Tile, provides the definitive architectural standard for selecting opaque primers. By empirically demonstrating which non-abrasive chemical barriers block color most effectively, it calibrates the output of your installation, allowing you to hide dark, outdated lead paint behind brilliant white tiles without requiring dangerous sanding to remove the pigment.
Special Considerations for Heat and Friction Zones
If you are applying tiles in a kitchen, heat resistance becomes a critical factor. The proximity to stoves, ovens, and heat-generating appliances necessitates rigorous assessment. Old lead-based paint can react unpredictably to sustained, localized heat, sometimes blistering or loosening its mechanical grip on the plaster beneath. If you install tiles over lead paint right behind an unshielded gas stove, the radiant heat could cause the old paint to fail, bringing your new tile backsplash crashing down and exposing the hazardous layer.
Therefore, understanding exact clearance requirements is non-negotiable for kitchen environments. To ensure your kitchen upgrade remains safe and structurally sound, consult our comprehensive breakdown on Are Peel and Stick Tiles Heat Resistant? The Ultimate Kitchen Safety Guide. This guide marries verified heat resistance data with safe distance recommendations, ensuring your cosmetic barrier remains impervious to the thermal stress of a working kitchen.
Pre-Covering Readiness Checklist
Download our printable checklist to ensure you've met all safety requirements before applying composite tile over old paint.
Frequently Asked Questions About Covering Lead Paint
What happens if I accidentally sand lead paint?
Accidentally sanding lead paint instantly aerosolizes microscopic lead particles into the air. This toxic dust can remain airborne for hours and eventually settles on floors, furniture, and inside ductwork. If this occurs, evacuate the area immediately, wear an N100 respirator, seal the room, and hire a certified lead abatement professional equipped with specialized HEPA vacuums and wet-cleaning protocols to decontaminate the space. Never use a standard household vacuum to clean it up.
Can I use standard wallpaper over lead paint?
Applying standard wallpaper over intact lead paint is a common physical covering method, but it is purely cosmetic. Like peel-and-stick tiles, it is only safe if the underlying paint is perfectly intact. However, wallpaper paste introduces moisture to the wall, which can sometimes weaken fragile historic paint. Additionally, removing wallpaper later often requires steamers or scraping, which can easily damage the lead paint underneath and release dust.
How long do peel and stick tiles last over oil-based lead paint?
The longevity depends entirely on the chemical compatibility between the adhesive and the oil-based paint, as well as the environmental conditions (humidity and temperature). High-quality composite tiles with strong, no-sand adhesives can last 5 to 10 years or more if applied to a degreased, perfectly dry, and intact surface. If the original oil paint begins to detach from the plaster due to age, the tiles will fail with it.
Are landlords required to remove lead paint before allowing tenant renovations?
Federal laws (like the Lead Safe Housing Rule) do not universally require landlords to completely abate (remove) lead paint unless ordered by a health department due to a poisoning case. However, landlords are strictly legally obligated to disclose known lead hazards and maintain the paint in an intact condition. Tenants should never attempt DIY renovations, including covering walls with tile, without explicit written permission, as disturbing the paint can trigger severe legal and health liabilities.
How much does professional lead abatement cost compared to covering?
Professional lead abatement is highly expensive, typically ranging from $8 to $15 per square foot, potentially costing thousands of dollars for a single room. It involves complex containment, specialized labor, and hazardous waste disposal. In contrast, physically covering an intact wall with peel-and-stick composite tiles costs between $2 and $5 per square foot for materials, making it a highly attractive, budget-friendly cosmetic alternative—provided the safety conditions for covering are strictly met.
What is an XRF test and do I need one?
An XRF (X-ray Fluorescence) analyzer is a specialized, portable device used by certified risk assessors to detect the exact presence and concentration of elemental lead in a wall without damaging the surface. While DIY chemical swab tests are cheap, they can yield false negatives if the lead is buried under multiple modern layers of paint. If you live in a pre-1978 home and plan to do extensive work, investing in a professional XRF test is highly recommended for definitive safety planning.
Can lead paint dust be cleaned with a regular vacuum?
Absolutely not. Standard household vacuums, even those with standard HEPA filters, often leak microscopic particles through their exhaust systems. Vacuuming lead dust with a regular unit will simply blow the invisible, highly toxic particles into the ambient air, drastically worsening the contamination. Only specialized, industrial-grade HEPA vacuums rated for lead abatement should be used.
How do I know if the paint is oil-based or water-based lead?
Lead was predominantly used in oil-based (alkyd) paints because it aided in drying, durability, and moisture resistance. If the home is pre-1978 and the paint is highly glossy, extremely hard, and feels smooth like enamel, it is likely oil-based. You can test this by rubbing a small inconspicuous area with a cotton ball soaked in denatured alcohol; water-based paint will soften and transfer onto the cotton, while old oil-based paint will remain unaffected.
Does encapsulation add value to a home?
Proper, documented encapsulation using EPA-approved liquid coatings can provide peace of mind to potential buyers, potentially stabilizing the home's value compared to a home with actively failing lead paint. However, because the lead remains on the property, disclosure is still legally required during a sale. Full professional abatement is the only method that completely removes the stigma and legal disclosure requirements, thereby adding the most value.
Are composite tiles better than vinyl for uneven historical walls?
Yes. Traditional historical walls (like lath and plaster) are rarely perfectly flat. Thin, flexible vinyl peel-and-stick tiles tend to telegraph every bump, crack, and imperfection of the wall underneath. Thicker composite tiles have a rigid core that bridges minor imperfections, creating a smooth, professional-looking surface that hides the undulating nature of old plaster much more effectively than thin vinyl.

Leave a comment
This site is protected by hCaptcha and the hCaptcha Privacy Policy and Terms of Service apply.