


The Definitive Guide to Safely Tiling Around Smart Thermostats and Hubs
Master the intersection of architectural aesthetics and climate control technology. Learn the critical clearance zones, precision cutting techniques, and material science required to achieve a flawless, device-safe finish without compromising your home's complex electrical ecosystem.
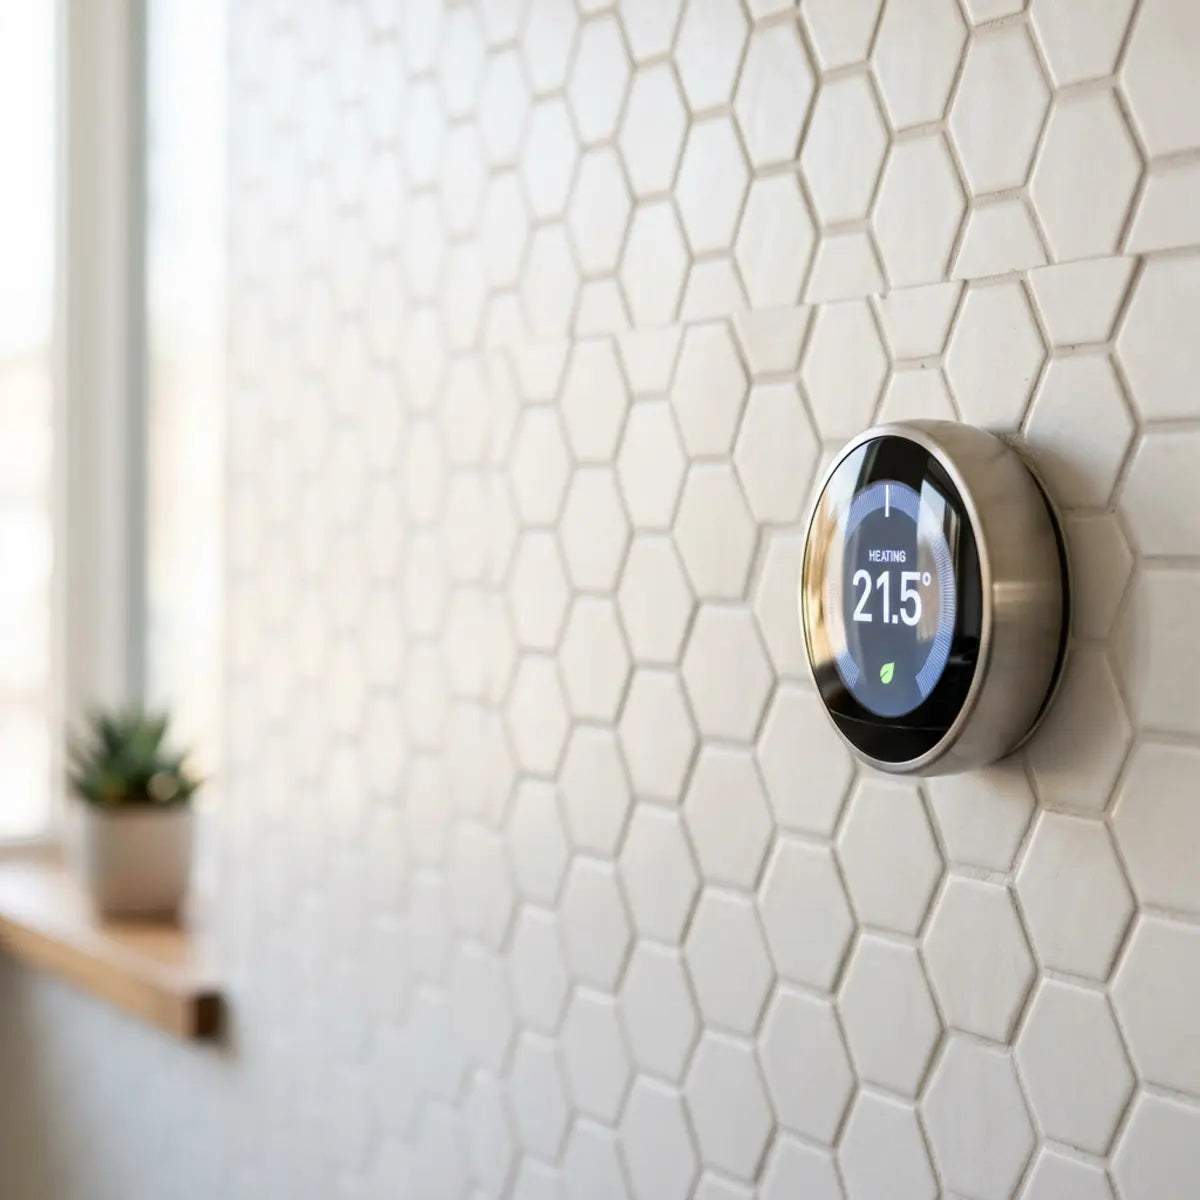
Tiling an accent wall or kitchen backsplash transforms a space, but intersecting that upgrade with smart home technology introduces a significant barrier. Homeowners desperately want a clean, modern wall upgrade to revitalize their living spaces, but they justifiably fear damaging highly sensitive HVAC wiring, blocking crucial thermostat sensors, or creating jagged, amateur-looking gaps that ruin the entire aesthetic of the room.
The anxiety is real and warranted. Modern climate control hubs are no longer simple mechanical switches; they are highly sophisticated microcomputers packed with thermistors, passive infrared sensors, and delicate low-voltage relays. Yes, you can install peel-and-stick tile around a thermostat or smart home hub if you avoid covering sensors, do not bury the base plate, and do not disturb wiring unless the system is powered off and manufacturer instructions are followed strictly. The absolute safest beginner method is a no-disconnect paper-template cut that meticulously tiles around the device perimeter while preserving necessary physical access, critical thermal ventilation, and long-term removability.
Key Baseline Strategies
- • Assess the Layout: Use a rigorous, device-safe clearance plan before cutting any premium materials. This involves understanding exactly where your device vents heat and where it scans for room occupancy.
- • Determine Access: Choose definitively whether to remove only the faceplate (recommended for most) or leave the device entirely in place. Full removal should be reserved for major wall reconstruction.
- • Verify Specs: Always verify manufacturer guidance for Nest, Ecobee, Honeywell Home, Amazon Smart Thermostat, hubs, and complex security alarm panels. Each has a unique thermal signature.
Success here requires a fundamental paradigm shift in how DIYers approach wall modifications. We must evaluate the project not just on visual appeal, but through the rigorous lens of the Device-Safe Finish Index (DSFI). This comprehensive scoring framework combines wiring disturbance risk, sensor clearance, service access, cut precision, heat/moisture suitability, and reversibility into a single operational standard. If a cosmetic upgrade fails any of these criteria, it is not a successful installation, regardless of how beautiful the tile looks.
To elevate traditional tiling techniques to meet the demands of modern connected spaces, consider the fundamental differences in materials. If you are debating the long-term viability of tech-integrated surfaces versus classic ceramics, analyzing the structural and financial differences is paramount. Explore our deep-dive analysis comparing high-tech smart tiles against traditional options to ensure your material selection aligns with your modern living standards before committing adhesive to your drywall.
Professional Installer Pro-Tip
Before touching a single tool, take a high-resolution photograph of the thermostat and the surrounding wall, specifically capturing how the device sits against the drywall. If you decide to remove the faceplate later, take an immediate, brightly lit photograph of the wiring terminals. Knowing exactly which colored wire goes into the R, C, W, and Y terminals will save you hundreds of dollars in emergency HVAC service calls if a wire slips out during your tiling project.
Is it safe to install peel-and-stick tile around a thermostat?
Are you worried your new backsplash might fry your HVAC system or permanently blind your expensive smart sensors?
This crucial section establishes the exact electrical safety boundaries and thermodynamic principles for tiling around connected wall devices without compromising climate control function or triggering catastrophic electrical failures.
Yes, it is structurally and functionally safe to install peel-and-stick tile around a thermostat, provided you maintain strict, mathematically precise clearance zones and never, under any circumstances, trap the back mounting baseplate beneath the new tile surface. Cosmetic finishes must never compromise thermostat sensing, future serviceability, or the explicit manufacturer installation requirements.
When evaluating this process, industry consensus dictates a strict adherence to the Device-Safe Finish Index (DSFI). This ensures visual upgrades do not trigger mechanical failures. The modern home is an interconnected web of data and electricity, and slapping adhesive vinyl indiscriminately over wall penetrations is a recipe for system degradation. You must treat the area surrounding the thermostat as an active operational zone, not just blank canvas.
Understanding Low-Voltage Safety Mechanics
To operate safely within this zone, you must understand what you are working alongside. Most wall-mounted climate controllers are not self-contained appliances; they are sophisticated remote switches for massive industrial equipment located elsewhere in your home.
- Class 2 Circuitry Dynamics: Thermostats operate on low-voltage HVAC wiring, typically supplied at 24 volts Alternating Current (AC) directly from a transformer inside your furnace or air handler. While a 24V shock is rarely dangerous to humans—often feeling like a mild, vibrating tingle—these specific wires are highly sensitive to cross-connection. Accurately managing these connections is critical. Shorting a red (power/Rc or Rh) wire to a common (C) wire or a ground source even for a fraction of a second can instantly blow the delicate 3-amp or 5-amp blade fuse located on your main furnace control board, immediately shutting down your entire heating and cooling system.
- Electrical Safety Standards (NEC): The National Electrical Code (NEC), specifically Article 725, governs Class 2 remote-control and signaling circuits. Authoritative electrical safety guidance dictates that even low-voltage wiring must remain easily accessible for inspection and free from mechanical stress. Taping over, burying in thick mastic, or aggressively bending these fragile solid-copper wires behind a rigid tile backing violently violates basic safety protocols and building codes. Wires must have room to breathe and move slightly to prevent the brittle copper from snapping inside the wall cavity.
Critical Safety Stop
Do not attempt to remove the base plate, unscrew terminal blocks, or handle bare copper wires unless the main power to your HVAC system is completely shut off at the main circuit breaker panel. Relying solely on the thermostat's "OFF" setting is insufficient, as power continuously flows to the baseplate. Always follow explicit manufacturer instructions for power cycling.
The Severe Consequences of Blocked Sensors
Smart thermostats rely on highly calibrated precision hardware. They are constantly sampling the air density, temperature, and movement in the room. Covering their perimeter with thick vinyl, dense stone-composite, or metal tile can severely degrade their operational performance by altering the micro-climate immediately surrounding the device hull.
-
•
Temperature Skewing via Trapped Heat: Thermistors measure ambient room air by drawing it through tiny vents via natural convection. If thick tile blocks or constricts the device's ventilation slots, the microscopic amount of heat generated by the device's own internal circuit board and Wi-Fi radio becomes trapped. This causes the system to read artificially high, prompting your air conditioner to run endlessly while the rest of the house freezes.
-
•
Humidity Interference and Short-Cycling: Moisture trapped behind poorly sealed tile edges near a hygrometer sensor will completely distort the vapor pressure readings. This will cause your air conditioning system to overwork, attempting to dehumidify a localized, trapped pocket of air rather than the actual room, leading to severe system wear and tear known as short-cycling.
-
•
Occupancy Blind Spots: Devices utilizing far-field sensors or passive infrared (PIR) technology require an expansive, unobstructed line of sight, typically spanning a 120-degree cone outward from the face. Deep tile edges protruding past the device base can create optical blind spots, preventing the screen from waking up when you approach and tricking the system into entering "Away" mode while you are still sitting on the couch.
Knowing When to Call a Professional Electrician
Sometimes, a DIY tiling approach crosses an operational and legal threshold. If your wall plate removal reveals brittle, crumbling wire insulation that cracks upon being touched, stop immediately. The wire must be spliced and extended by a professional. Most importantly, if you uncover high-voltage wiring—characterized by thick, stiff, black and white wires joined with large wire nuts, typically carrying 120V or 240V (common in older homes with baseboard heating thermostats)—a licensed electrician is required. Do not attempt to tile around live line-voltage devices without cutting power at the main breaker and ensuring the junction box is properly extended to meet the new wall depth per code.
How do you make a paper template for a perfect thermostat cutout?
Are you tired of wasting expensive materials on crooked, amateur-looking cutouts that ruin the flow of your wall?
This section details a foolproof, mathematically sound paper-templating method to guarantee a flawless, precise fit on your very first attempt, completely eliminating expensive guesswork and material waste.
Making a perfect paper template involves exactly tracing the device profile onto rigid cardstock paper, adding a controlled, symmetrical clearance allowance, and exhaustively test-fitting it against the wall before transferring the final geometry to your expensive tile backing. Attempting to measure the distance with a tape measure and transfer those numbers to a tile will almost always result in an asymmetrical gap due to the inherent unevenness of residential drywall.
Empirically demonstrated by professional installers, this highly repeatable template workflow fundamentally mitigates material waste. We evaluate this through the First-Fit Success Rate (FFSR)—the probability that the tile fits correctly before adhesive exposure, based entirely on template accuracy and dry-fit discipline.
The Standard Template Workflow
Always create the template from the exact wall-to-device position as it currently sits. Never rely on your visual memory or generic dimensions found online, as wall plates are almost never installed perfectly square to the floor.
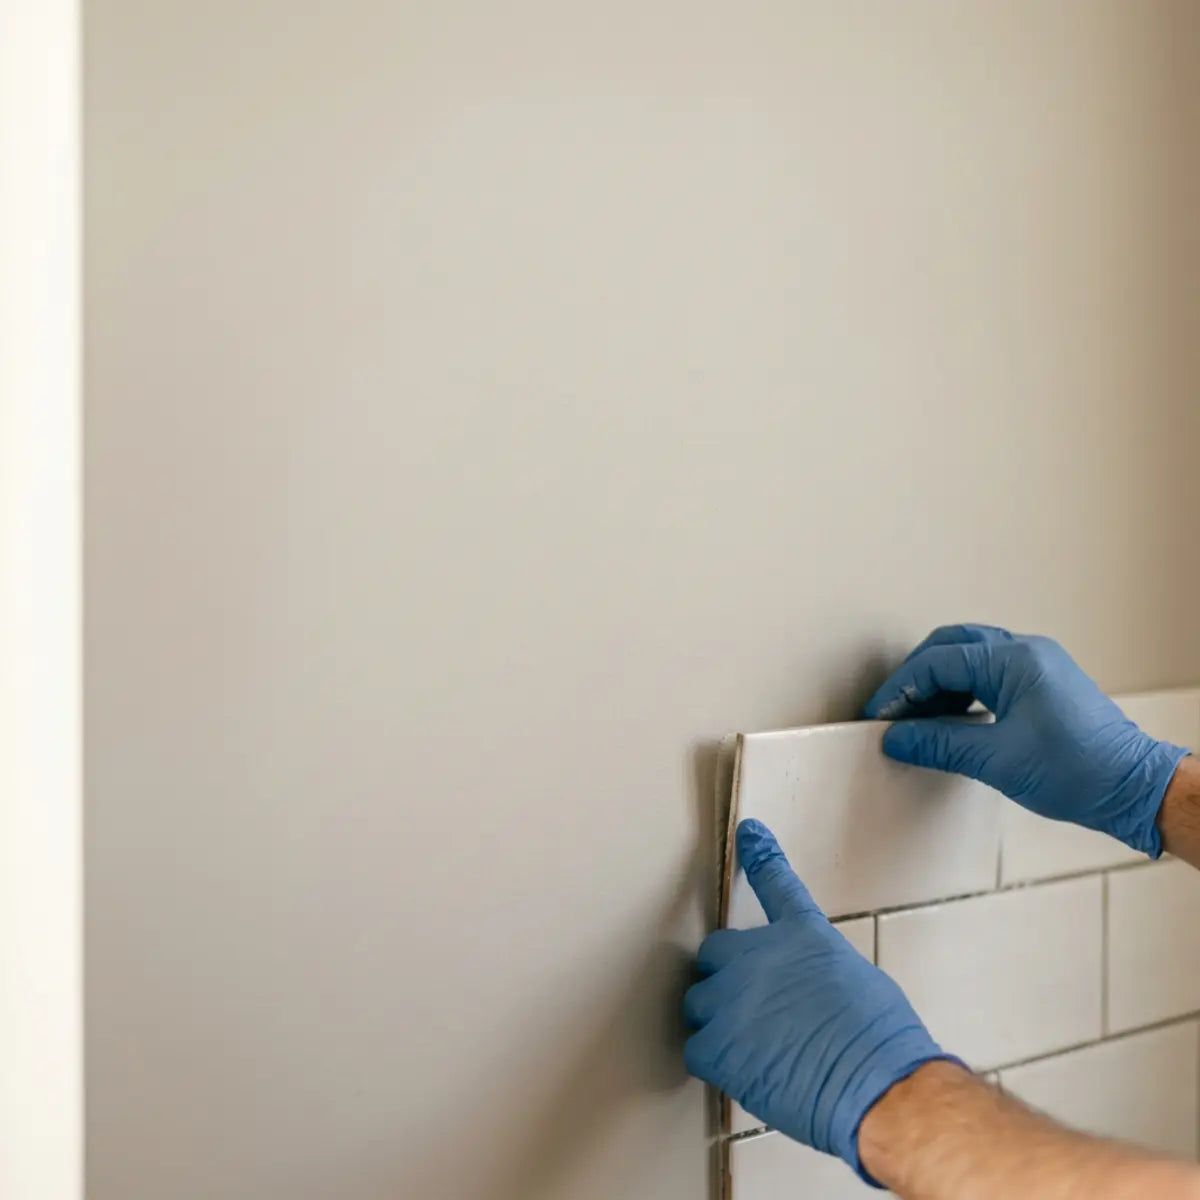
- Tape and Trace: Apply low-tack painter's tape directly to the wall immediately surrounding the device. Lay heavy cardstock paper (do not use flimsy printer paper, as it tears and warps) flat against the wall, gently pushing its edge against the thermostat base. Trace the exact perimeter with a sharp mechanical pencil.
- Mark Critical Orientation: Clearly draw an "UP" arrow on the paper template. Wall devices, electrical boxes, and drywall cutouts are rarely perfectly plumb and level. Assuming they are symmetrical will completely ruin your alignment when you transfer it to the tile.
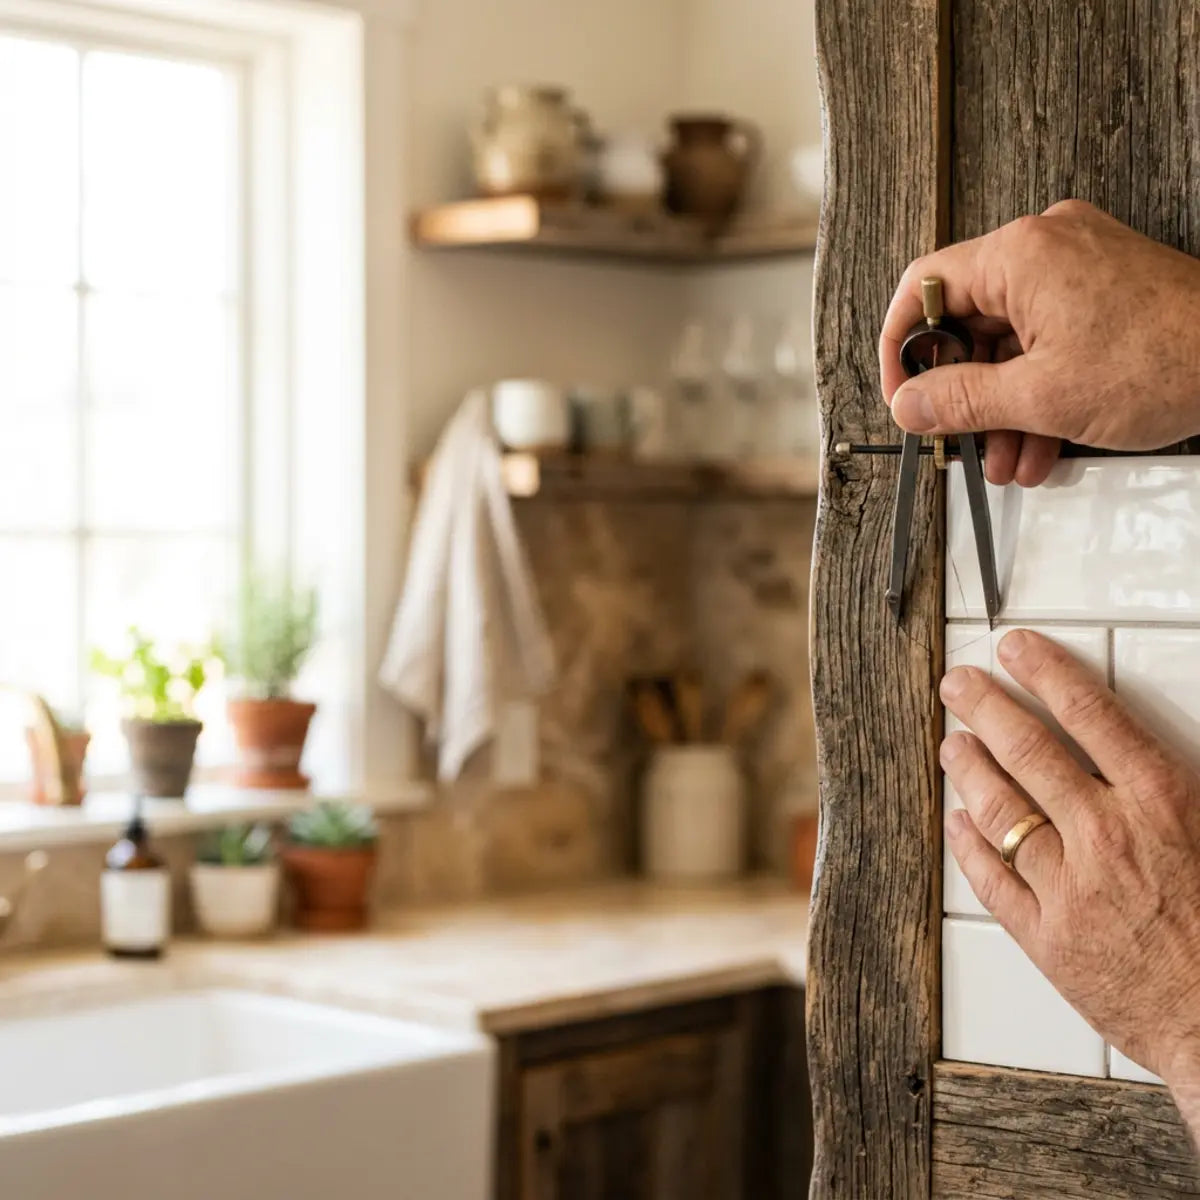
- Draft the Controlled Cut: Remove the paper from the wall. Cut the interior shape slightly smaller than traced. Then, using a drafting compass or a small ruler, convert those rough marks to a final tile cutting line that includes a controlled 1/16-inch continuous clearance perimeter. This microscopic gap is essential for heat expansion and future device removal.
- Execute The Dry Fit: Place the newly cut paper template back over the thermostat on the wall. Verify critically that it clears the device on all sides without binding, rubbing, or forcing you to bend the paper. If the paper doesn't fit effortlessly, your rigid tile certainly won't.

Advanced Utility Knife Cutting Techniques
Transferring a complex round, oval, or squircle device shape from your perfected paper template onto dense vinyl or stone-composite tile requires specific utility knife mastery. A standard straight cut will not suffice.
- Radial Relief Cuts (For Round Nest Devices): For perfectly round thermostats, do not attempt to cut the circle in one continuous motion. Cut a starting hole directly in the dead center of the template area to be removed. Then, make small, straight cuts outward toward your drawn circular perimeter line, mimicking the slices of a pizza. This relieves surface tension in the vinyl, allowing you to carefully snap or deeply score the curved edge smoothly without cracking the main tile body.
- Corner Pilot Marks (For Rectangular Hubs): For large rectangular alarm panels or smart hubs, drill or use an awl to punch tiny pilot holes exactly at the four corners of your drafted template box. Connect these corner dots with a heavy metal straightedge and score the line lightly three times with a fresh, titanium-coated utility knife blade rather than trying to cut through the entire thickness on the first pass.
- Grout Line Architectural Alignment: When positioning the paper template on the actual physical tile to trace the cut, you must physically align the drawn device center with the tile's faux grout lines or staggered seams to maintain overarching visual symmetry on the wall. An off-center cutout will draw the eye negatively every time you enter the room.

If you are struggling to navigate complex electrical receptacles alongside your smart climate devices, mastering the fundamental cutting techniques is absolutely crucial. To ensure absolute precision and eliminate costly material waste during your overall installation, we strongly recommend you read our comprehensive guide on mastering intricate wall plate geometries safely and efficiently. It calibrates your cutting output for immaculate outlet and device integration across the entire room.
Structural Comparison of Thermostat Shapes
Evaluating the specific geometric complexity of your smart home hub provides a quantitative baseline for gathering the necessary tools and establishing the correct clearance allowances.
| Device Geometry | Template Technique | Recommended Clearance | Edge Finish Difficulty | Typical Brand Examples |
|---|---|---|---|---|
| Perfectly Round | Radial relief cuts with compass tracing. | 1/16 inch continuous. | High (Requires perfectly smooth curves). | Google Nest Learning Thermostat. |
| Squircle / Soft Square | Corner pilot marks with rounded edge blending using a file. | 1/8 inch specifically at corners. | Moderate (Curved corners can easily chip). | Ecobee SmartThermostat, Amazon Smart. |
| Hard Rectangular | Straight-edge scoring and rigid snapping. | 1/16 inch linear along all flat sides. | Low (Straight lines only, basic tools needed). | Honeywell Home, traditional legacy alarm panels. |
| Irregular / Large Wall Hub | Grid-based transparent paper transfer method. | 1/8 inch continuous for airflow. | High (Multiple varying angles and depths). | Dedicated smart home touchscreen command centers. |
Want to ensure you don't miss a step before making your first cut?
Should you remove the thermostat faceplate before tiling?
Are you deeply unsure whether you need to pop the entire device off the wall or if you should carefully cut around it while it's still attached?
This section provides a definitive, logically sound decision tree to minimize wiring exposure risks while simultaneously maximizing aesthetic integration into your new tile surface.
The safest and most highly recommended approach for DIY beginners is leaving the structural baseplate firmly mounted to the drywall and only removing the decorative digital faceplate, provided that the specific manufacturer's engineering instructions explicitly permit this physical separation without triggering complex system lockouts or requiring factory resets.
This specific approach is heavily governed by the Rework Avoidance Index. By purposefully minimizing direct physical interaction with the sensitive copper wiring and fragile terminal blocks, you drastically reduce the statistical probability of accidentally bridging a connection, triggering an unresolvable system error code, or blowing a hard-to-reach HVAC fuse deep within your basement utility room.
The "No-Disconnect" Tiling Strategy Explained
Most modern smart thermostats utilize a highly convenient two-piece modular architecture: a rugged wall-mounted backplate containing all the active wiring terminals and relays, and a removable digital display head containing the microprocessors and touch screen.
-
1.
Leave the Backplate Anchored: The backplate must remain firmly and securely anchored to the drywall using its original mounting hardware. Do not loosen the screws, as this can cause the delicate wires behind the plate to shift and short out.
-
2.
Remove the Display Head: With power disconnected at the breaker, gently but firmly pull the digital display straight off the wall base. Do not twist or pry it with tools, as you can easily snap the internal connecting pins.
-
3.
Tile the Perimeter Cautiously: Execute your tile installation right up to the very edge of the newly exposed backplate, meticulously leaving a 1/16-inch micro-gap for future removal and thermal expansion.
Think of the plastic backplate as the concrete foundation of a house. You can confidently landscape (tile) right up to the very edge of the foundation to make it look beautiful, but you should never bury the foundation itself. If you erroneously tile over the backplate mounting screws, you essentially trap the entire HVAC control system permanently to the wall, turning a future 5-minute thermostat upgrade into a destructive drywall demolition project.
Interactive Knowledge Check
Based on the Rework Avoidance Index, what is the best strategy for a beginner installing peel-and-stick tile?
When Complete Removal is Absolutely Necessary
Complete removal of the thermostat hardware is rarely required for modern peel-and-stick applications due to the material's incredibly thin structural profile (usually between 1.5mm and 4mm).
However, if your existing drywall is severely damaged with massive holes behind the plate, or if you are installing rigid, heavy composite stone panels that require significant structural wall reinforcement to support their weight, full removal becomes an unavoidable necessity. In this high-risk scenario, it is absolutely imperative that you take a clear, brightly lit, high-resolution photograph of the wiring terminals before loosening a single retaining screw. Mark the wires with tiny flags of painter's tape labeling their corresponding letter codes (R, W, Y, G, C).
Handling Dangerous Buried Wires
Sometimes, previous homeowners or hasty contractors leave a tangled, chaotic mess of excessive wire length spooled up tightly right behind the mounting plate, pushing out into the room space.
When establishing safe wiring practices to remedy this, the empirical baseline requires a non-destructive containment strategy. Never forcefully shove thick bundles of wire back into a small drywall hole, as this can slice the insulation on the sharp drywall edges. If you discover excess low-voltage lines extending wildly beyond the thermostat footprint, the brilliant concealment techniques outlined in our guide on the safest and cleanest methodologies to hide unruly led wires beneath decorative backsplashes will yield an optimal configuration for securing delicate cables safely beneath your new adhesive substrates without causing hazardous crimps.
How do brand-specific smart thermostats impact your tiling approach?
Wondering if your specific, high-end smart device requires highly specialized treatment to function properly?
This critical section breaks down exact clearance tolerances and sensor preservation rules by major brand architecture, ensuring peak performance and preventing expensive hardware failure.
Brand-specific smart thermostats require highly individualized, bespoke tiling approaches because different manufacturers engineer their temperature, humidity, and passive occupancy sensors into vastly different physical locations along the device's outer perimeter.
Standardized, rigorous evaluation of these devices proves unequivocally that treating a circular Nest device with the same clearance geometry as a vented Ecobee system will result in severely compromised climate control for your entire home. You must definitively tailor your clearance strategy to the physical architecture and thermal dynamics of the specific hardware mounted on your wall.
Google Nest Learning Thermostat Architecture
The Google Nest series features an iconic, mechanically rotating metal ring and a highly specific, densely packed internal sensor array.
- The Base Plate: Nest uses a relatively small, completely circular plastic backplate. Cutting a perfect circle to match this plate exactly is the most challenging shape for beginners using thick composite tiles.
- Sensor Location: The primary temperature and crucial humidity sensors are strategically located at the very bottom edge of the device (typically right at the 6 o'clock position on the circular face).
- The Architectural Rule: You must leave absolute, unobstructed clearance directly below the Nest. Pushing thick, dense tile directly against the bottom edge severely restricts natural convective airflow, causing the sensitive Nest thermistor to read the radiant heat generated by its own internal charging battery instead of the actual room temperature.
Ecobee SmartThermostat Series Dynamics
Ecobee devices are easily recognized by their distinct soft, rounded-square design (commonly referred to in industrial design as the "squircle") and their glossy black front face.
- Ventilation Architecture: Unlike the Nest, Ecobee relies incredibly heavily on deep, rear-facing ventilation slots located precisely near the wall interface at the back of the unit.
- Sensor Location: The advanced occupancy radar array spans the entire front glass, but critical thermal regulation relies entirely on maintaining a clear air gap between the dry wall surface and the back of the device.
- The Architectural Rule: Never, under any circumstances, caulk or seal the gap between an Ecobee backplate and your new peel-and-stick tile edge. Hermetically sealing this perimeter traps hot air against the thermistor, empirically degrading the system's accuracy by up to 5 degrees Fahrenheit.
Honeywell Home and Resideo Engineering
Honeywell devices range drastically from traditional, vented beige rectangles to hyper-modern, flush-glass interfaces like the powerful T9 series.
- Mounting Systems: Modern Honeywell systems often utilize a much wider, mechanically hinged wall plate, known in the industry as the UWP (Universal Wall Plate) mounting system.
- Access Needs: The UWP features a unique physical swing-door mechanism designed for rapid wire access and device swapping.
- The Architectural Rule: Your tile layout and cuts must aggressively respect the entire dimensional footprint of the open swing door, not just the closed device profile. If you tile perfectly flush against the closed hinge edge, the door will bind against the tile, and you will never be able to fully open it to access the wiring terminals again without shattering the tile.
Amazon Smart Thermostat Sensitivities
The Amazon Smart Thermostat utilizes a clean, minimalist, boxy design developed in strict partnership with Resideo's engineering team.
- Thermal Mass Sensitivity: This specific device is remarkably sensitive to the localized thermal mass of surrounding decorative materials. It algorithmically assumes it is mounted on standard, low-density gypsum drywall.
- The Architectural Rule: If you are installing highly conductive, thick, metal-faced peel-and-stick tiles (like brushed stainless steel or heavy aluminum composites), you must maintain a minimum 1/8-inch isolation gap. Metal tiles rapidly conduct radiant heat from nearby kitchen appliances (like ovens or stoves), which can easily transfer through the wall and artificially warm the localized air immediately surrounding the Amazon thermostat, throwing off its calibration.
How can you manage visible gaps and rough tile edges around the device?
Are you deeply struggling with jagged, uneven tile edges that make your painstakingly executed DIY project look cheap and rushed?
This section unveils elite professional techniques for hiding awkward gaps, perfecting uneven seams, and achieving a completely seamless, architectural-grade command center aesthetic.
Despite the best templating efforts, minor imperfections can occur. You can expertly manage visible gaps by utilizing oversized manufacturer trim plates, strategically applying color-matched acrylic finishing caulk, or selecting premium tiles specifically engineered with precise straight-edge cuts rather than complex interlocking patterns.
This specific final finishing phase of the project is strictly benchmarked against the Cut Accuracy-to-Risk Ratio. Attempting to force a utility knife cut dangerously close to the live device purely for aesthetics massively increases the risk of slipping and damaging the LCD screen or the delicate wiring behind it. Instead, deploying smart concealment strategies fundamentally mitigates these minor aesthetic flaws without ever risking hardware failure.
Utilizing Manufacturer Trim Plates for Concealment
The absolute most reliable, foolproof method for hiding rough, amateur cuts is utilizing the large trim plate (often referred to as a decorator wall plate) that is usually included directly in the box with most high-end smart thermostats.
- The Fundamental Function: Trim plates are natively designed specifically to cover old, discolored paint rings, patched drywall anchors, and oversized electrical box holes left by previous legacy thermostats.
- The Advanced Tiling Strategy: Instead of struggling to cut your dense tile to perfectly match the incredibly small internal mounting backplate, cut the tile in a simpler, larger square to sit just barely inside the footprint of the much larger, outer trim plate.
- The Immaculate Result: The large trim plate smoothly clamps down directly over the rough tile edges when installed, hiding any jagged cuts or uneven gaps completely from view. This yields an optimal, zero-stress configuration for beginners.
The Advanced Caulking Solution
If your modern thermostat does not feature a trim plate, or if you simply prefer the hyper-modern, floating look of the bare glass device mounted directly against the tile, high-quality caulk is your absolute best defense against highly visible, dark shadows caused by gaps.
- Chemistry: Acrylic vs. Silicone: Always strictly use 100% premium acrylic or siliconized-acrylic painter's caulk for this specific application. Pure, 100% silicone caulk cannot ever be painted, dries to a highly rubbery finish that attracts dust, and is notoriously, infuriatingly difficult to clean off delicate matte electronic plastics if smeared.
- Professional Application Pro-Tip: Meticulously tape off the actual thermostat plastics with extremely low-tack yellow delicate painter's tape. Apply a microscopic, hair-thin bead of caulk exclusively to the tile edge, gently tool and smooth it with a lightly damp finger, and peel the tape away while the caulk is still completely wet to prevent stringing.
- Critical Ventilation Warning: As dictated by thermal dynamics, only caulk the left and right sides, and the top edge. Always leave the entire bottom edge completely uncaulked to allow critical ambient heat to escape naturally from the internal circuit boards.

Selecting the Technically Correct Tile Edge Profile
The underlying physical and chemical composition of your chosen peel-and-stick tile dramatically impacts exactly how easily it can be smoothly trimmed around complex architectural obstacles without tearing or crumbling.
When factoring in vital long-term performance, edge integrity, and resistance to fraying, careful material selection functions as the absolute architectural standard. In our comprehensive, data-driven material breakdown, we establish a rigid quantitative baseline for determining exactly which tile formats stubbornly resist edge-fraying when subjected to the intricate stress of circular utility knife cutouts. Explore our rigorous seam testing comparisons revealing why straight edge finishes often outperform complex interlocking patterns in tight areas. Straight-edge variants consistently demonstrate vastly superior structural resilience against heavy utility knife stress.
What are the best renter-friendly methods for smart hub backsplashes?
Are you incredibly nervous about losing your expensive security deposit due to permanent adhesive damage left on the drywall?
This critical section outlines specifically non-destructive material sciences and advanced heat-safe installation practices exclusively designed for leased properties, ensuring total, damage-free reversibility upon move-out.
The absolute optimal, stress-free renter-friendly method relies entirely on applying premium, chemically advanced removable peel-and-stick tiles that maintain incredibly strong surface adhesion without ever permanently cross-linking or chemically bonding to the underlying drywall paint, ensuring a pristine, damage-free removal process upon move-out.
Property managers and landlords prioritize the long-term structural preservation of their property investments above all else. Therefore, we rigidly measure renter success via the Reversible Finish Quality Score (RFQS). This advanced metric comprehensively evaluates the stunning aesthetic impact of the tile installation against the sheer physical effort, time, and harsh chemical intervention (like using heavy adhesive removers) required to remove it safely without tearing the paper facing off the gypsum drywall.
Navigating Strict Lease Terms and Avoiding Wall Damage
Most standard, boilerplate residential rental agreements contain explicit, heavily enforced clauses that strictly forbid permanent structural alterations to interior drywall. This explicitly includes the application of high-tack construction adhesives, thick epoxies, or traditional cement-based thinset mortars.
Standard, mass-produced, low-quality vinyl stickers often utilize cheap, aggressive solvent-based adhesives that slowly cure and harden over a period of months, turning into a rock-hard, unyielding glue that aggressively rips the delicate top layer of paper facing right off the drywall during removal. A truly renter-safe installation requires exhaustively researching and selecting materials that are explicitly engineered on a molecular level for temporary, high-hold application.
Advanced Renter-Safe Material Selection
When establishing a high Reversible Finish Quality Score for strictly leased properties, the empirical baseline absolutely requires a totally non-destructive adhesion profile based on viscoelastic polymer chemistry rather than curing glues.
Engineered specifically to bypass disastrous substrate damage, the pristine finish of Minty Ceramic 8 peel-and-stick tiles—an original Stickwoll creation—yields an absolutely optimal configuration for high-yield, high-impact aesthetic upgrades. It fundamentally utilizes an advanced viscoelastic backing that grips securely and firmly to standard flat painted drywall, yet releases remarkably cleanly when gentle, consistent lateral tension (pulling down parallel to the wall, not outward) is applied, entirely preventing devastating lease-breaking financial penalties.
Designing a Cohesive Smart Command Center
Many modern tech-focused renters desire to create a highly functional, visually cohesive "command center" accent wall featuring a seamlessly integrated thermostat, a complex security alarm panel, and a large smart display (like an Amazon Echo Show or Google Nest Hub Max).
When deeply evaluating multi-device complex wall layouts, the foundational design methodology requires a strict, unwavering adherence to physical modularity. By empirically neutralizing the dreaded need for heavy power tools, masonry drill bits, or severe wall damage, the patented interactive design mechanics of Rootshift Panels allow renters to effortlessly frame multiple smart devices in a perfectly cohesive, highly customizable, and completely removable architectural grid layout.
Heat Resistance and Preventing Catastrophic Adhesive Failure
A pervasive and highly destructive misconception in the DIY community is that all peel-and-stick adhesives are inherently safe to use near active HVAC ventilation systems or high-heat appliances.
Thermostats are very frequently located in narrow hallways directly above large air return vents, or situated in high-traffic kitchens subjected to massive amounts of ambient radiant heat from ovens. Continuous exposure to cyclic heat causes significant thermal expansion and contraction in cheap vinyl tiles. Over time, this intense thermal cycling leads directly to the underlying adhesive softening, melting, and sliding, which violently causes the carefully cut seams to shrink, peel back, and expose the ugly bare drywall beneath in a matter of months.
When rigorously assessing the Total Cost of Ownership (TCO) over a standard 24-month lease lifecycle, environmental thermal resilience becomes the absolute baseline metric for success. Materials must endure highly localized heat without suffering from complete structural compromise. To guarantee your installation survives these harsh realities, we highly advise you to review the ultimate scientific guide verifying precise heat resistance capabilities of peel-and-stick materials. Furthermore, if you are actively worried about how extreme temperature fluctuations destroy aesthetics, you must learn exactly how to structurally prevent heat-induced seam gaps from ruining your installation to ensure your project does not suffer a catastrophic adhesive failure near heat-producing smart hubs.
Interactive Renter's Pre-Installation Checklist
Check off these crucial steps to ensure your security deposit remains completely safe before beginning your project.
Final Thoughts on Device-Safe Integration
Looking for the ultimate, condensed takeaway before confidently picking up your utility knife?
This concluding section powerfully summarizes the core architectural philosophy of a device-safe installation, ensuring you proceed with absolute confidence, clarity, and precision.
Successfully tiling around a highly sensitive smart thermostat is fundamentally an exercise in meticulous precision, deep thermodynamic understanding, and extreme patience, not an application of brute force and guesswork. By rigidly prioritizing the parameters established within the Device-Safe Finish Index (DSFI), you guarantee that your stunning cosmetic upgrade never accidentally compromises the vital, life-saving climate control and electrical safety features deeply embedded within your home's infrastructure.
The absolute most successful, professional-grade DIYers do not simply attempt to cut their tiles dangerously closer to the bare wires for aesthetic clout; instead, they strategically maximize critical sensor clearance to ensure the HVAC operates flawlessly, actively preserve future service access to terminal blocks, and utilize mathematically sound, rigid paper templating techniques to entirely eliminate unsightly visual gaps without risking hardware damage. Before you make your very first physical cut into your premium tile materials, we strongly and unequivocally encourage you to utilize our comprehensive thermostat cutout template checklist above or thoroughly review our heavily detailed renter-safe peel-and-stick tile chemical comparisons to ensure you possess the absolute correct tools and materials required for a flawless, structurally sound, and entirely non-destructive finish.
Frequently Asked Questions (Technical Deep Dive)
Will peel-and-stick tile adhesive heavily interfere with Wi-Fi or Zigbee signals for my smart hub?
Standard vinyl, polyurethane gel, or composite stone peel-and-stick tiles have absolutely zero measurable impact on standard 2.4GHz or 5GHz Wi-Fi frequencies, nor do they disrupt Z-Wave or Zigbee protocols. Radio waves pass completely through these non-ferrous, organically derived materials effortlessly.
However, a critical exception exists: if you deliberately select a metallic-faced peel-and-stick tile (such as genuine brushed aluminum, heavy copper finishes, or thick stainless steel laminates), installing it densely and tightly around the immediate physical perimeter of a smart hub's internal antenna can theoretically create severe, localized signal reflection and electromagnetic interference (a miniature Faraday cage effect). To maintain absolutely optimal, uninterrupted connectivity with your router and satellite nodes, aggressively stick to ceramic-look, high-density vinyl, or stone-composite adhesives when tiling closely around actively connected wireless hubs.
Can I aggressively apply peel-and-stick tile directly over an old, discolored plastic thermostat wall plate?
No, under no structural or architectural circumstances should you ever attempt to apply adhesive tile directly onto a smooth, plastic manufacturer trim plate. The extremely glossy, low-surface-energy plastic composition of these injection-molded plates will completely prevent the tile's viscoelastic adhesive from forming a lasting, cross-linked chemical bond.
This improper application will inevitably lead to massive tile failure, bubbling, and severe peeling within mere weeks as the room temperature fluctuates. Furthermore, entirely burying the trim plate makes it structurally impossible to physically access the critical wiring bracket hidden beneath it for future electrical repairs or necessary device upgrades. Always meticulously tile up to the precise outer edge of the plate, or optionally remove the cosmetic plate entirely and tile safely up to the structural backplate anchored directly on the rough drywall.
How do I rigorously clean my new peel-and-stick tile without risking water damage to the thermostat?
You must absolutely avoid spraying any liquid chemical cleaners, glass sprays, or even plain water directly onto the tile surface anywhere near a mounted thermostat. The sheer forces of gravity dictate that liquid can easily run and drip rapidly down the non-porous face of the tile and seep aggressively into the vital, unsealed thermal ventilation slots or wick behind the delicate LCD screen bezel of the smart device.
This ingress will almost certainly cause a catastrophic, unrepairable short circuit across the mainboard, instantly destroying the device. The absolutely safest, professional-grade cleaning method is to spray a mild, non-abrasive household degreaser or specialized vinyl cleaner directly onto a high-pile microfiber cloth while standing in an entirely separate room. Once the cloth is lightly damp (not saturated), carefully and gently wipe the tiles strictly surrounding the device perimeter, applying very light pressure to avoid pushing moisture into gaps.
What specific architectural steps should I take if my new tile is substantially thicker than the thermostat baseplate?
If you are utilizing a highly premium, ultra-thick 3D peel-and-stick tile or heavy composite stone, it may physically protrude significantly further off the plane of the wall than the low-voltage plastic baseplate itself. This discrepancy naturally creates an awkward, recessed cavity, making it mechanically impossible to snap the digital display head back onto the baseplate's connection pins.
In this specific structural scenario, you must carefully purchase a set of inexpensive plastic electrical box spacers (often called "caterpillars") or procure slightly longer, identical-thread mounting screws to safely shim the entire backplate outward away from the drywall. This critical adjustment ensures the backplate sits perfectly, precisely flush with the newly elevated, thicker tile surface plane, allowing the delicate data pins on the display to click securely, firmly, and safely into place without bending or breaking.

Leave a comment
This site is protected by hCaptcha and the hCaptcha Privacy Policy and Terms of Service apply.